?手勢識別系列文章目錄
手勢識別是一種人機交互技術,通過識別人的手勢動作,從而實現對計算機、智能手機、智能電視等設備的操作和控制。
1.? opencv實現手部追蹤(定位手部關鍵點)
2.opencv實戰項目 實現手勢跟蹤并返回位置信息(封裝調用)
3.手勢識別-手勢音量控制(opencv)
4.opencv實戰項目 手勢識別-手勢控制鼠標
5.opencv實戰項目 手勢識別-手部距離測量
6.opencv實戰項目 手勢識別-實現尺寸縮放效果
未完待續
目錄
?手勢識別系列文章目錄
1.HandTraqckModule模塊
2、主模塊
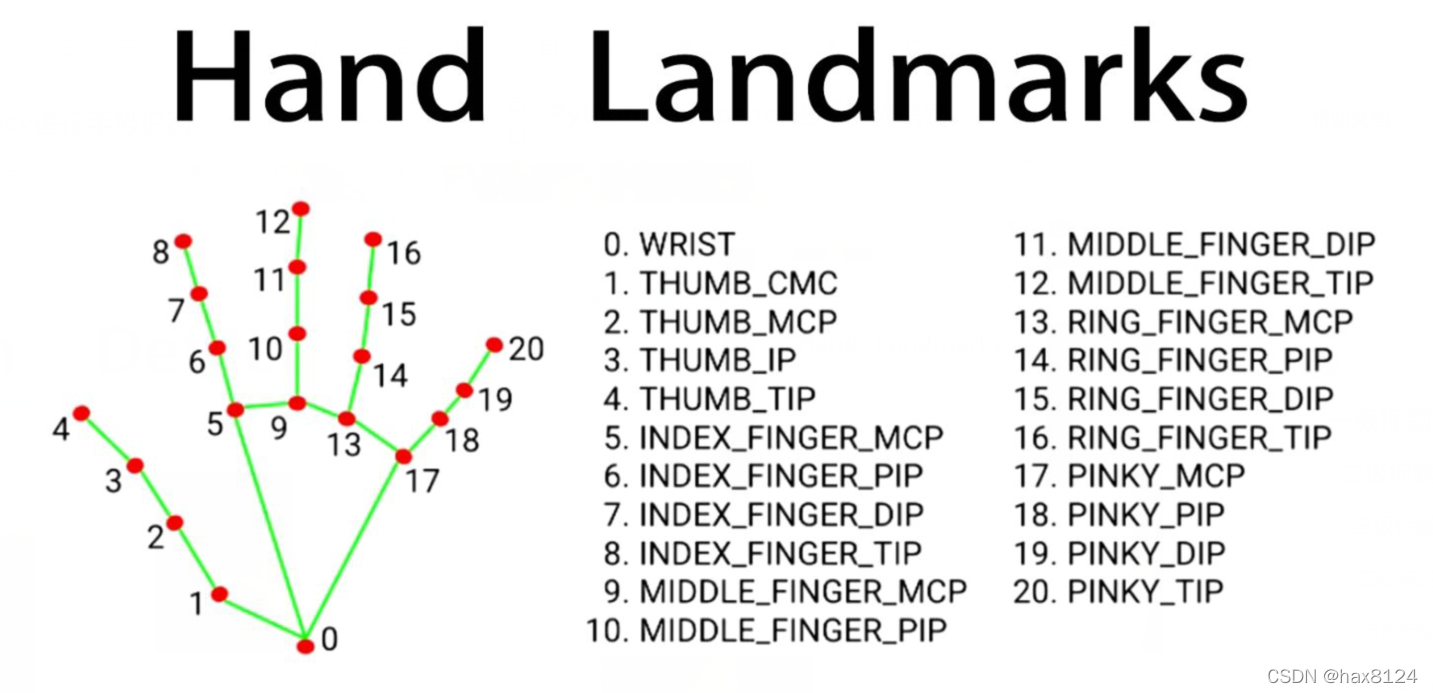
?本項目是使用了谷歌開源的框架mediapipe,里面有非常多的模型提供給我們使用,例如面部檢測,身體檢測,手部檢測等
代碼需要用到opencv? ?HandTraqckModule模塊? ?mediapipe模塊
1.HandTraqckModule模塊
如下:
定義 HandDetector 類,用于檢測手勢并提取相關信息:
class HandDetector:def __init__(self, mode=False, maxHands=2, detectionCon=0.5, minTrackCon=0.5):# 初始化函數,設置參數self.mode = modeself.maxHands = maxHandsself.detectionCon = detectionConself.minTrackCon = minTrackCon# 初始化 Mediapipe 模塊和相關對象self.mpHands = mp.solutions.handsself.hands = self.mpHands.Hands(static_image_mode=self.mode, max_num_hands=self.maxHands,min_detection_confidence=self.detectionCon, min_tracking_confidence=self.minTrackCon)self.mpDraw = mp.solutions.drawing_utilsself.tipIds = [4, 8, 12, 16, 20]self.fingers = []self.lmList = []
findHands 函數:在圖像中找到手部,并返回手部信息以及繪制的圖像。
def findHands(self, img, draw=True, flipType=True):# 找到手部,并繪制相關信息imgRGB = cv2.cvtColor(img, cv2.COLOR_BGR2RGB)self.results = self.hands.process(imgRGB)allHands = []# 處理每個檢測到的手if self.results.multi_hand_landmarks:for handType, handLms in zip(self.results.multi_handedness, self.results.multi_hand_landmarks):# 提取手部關鍵點和邊界框信息myHand = {}mylmList = []xList = []yList = []for id, lm in enumerate(handLms.landmark):px, py = int(lm.x * w), int(lm.y * h)mylmList.append([px, py])xList.append(px)yList.append(py)# 計算邊界框信息xmin, xmax = min(xList), max(xList)ymin, ymax = min(yList), max(yList)boxW, boxH = xmax - xmin, ymax - yminbbox = xmin, ymin, boxW, boxHcx, cy = bbox[0] + (bbox[2] // 2), bbox[1] + (bbox[3] // 2)myHand["lmList"] = mylmListmyHand["bbox"] = bboxmyHand["center"] = (cx, cy)# 根據手的方向進行翻轉if flipType:if handType.classification[0].label == "Right":myHand["type"] = "Left"else:myHand["type"] = "Right"else:myHand["type"] = handType.classification[0].labelallHands.append(myHand)# 繪制手部信息if draw:self.mpDraw.draw_landmarks(img, handLms, self.mpHands.HAND_CONNECTIONS)cv2.rectangle(img, (bbox[0] - 20, bbox[1] - 20), (bbox[0] + bbox[2] + 20, bbox[1] + bbox[3] + 20),(255, 0, 255), 2)cv2.putText(img, myHand["type"], (bbox[0] - 30, bbox[1] - 30), cv2.FONT_HERSHEY_PLAIN,2, (255, 0, 255), 2)if draw:return allHands, imgelse:return allHands
fingersUp 函數:檢測手指的狀態,返回一個列表表示手指是否抬起。
def fingersUp(self, myHand):# 檢測手指狀態,返回列表表示手指是否抬起myHandType = myHand["type"]myLmList = myHand["lmList"]if self.results.multi_hand_landmarks:fingers = []# 大拇指if myHandType == "Right":if myLmList[self.tipIds[0]][0] > myLmList[self.tipIds[0] - 1][0]:fingers.append(1)else:fingers.append(0)else:if myLmList[self.tipIds[0]][0] < myLmList[self.tipIds[0] - 1][0]:fingers.append(1)else:fingers.append(0)# 其他四指for id in range(1, 5):if myLmList[self.tipIds[id]][1] < myLmList[self.tipIds[id] - 2][1]:fingers.append(1)else:fingers.append(0)return fingers
findDistance 函數:計算兩點間的距離,可選是否在圖像上繪制。
def findDistance(self, p1, p2, img=None):# 計算兩點間的距離,可繪制在圖像上x1, y1 = p1x2, y2 = p2cx, cy = (x1 + x2) // 2, (y1 + y2) // 2length = math.hypot(x2 - x1, y2 - y1)info = (x1, y1, x2, y2, cx, cy)if img is not None:cv2.circle(img, (x1, y1), 15, (255, 0, 255), cv2.FILLED)cv2.circle(img, (x2, y2), 15, (255, 0, 255), cv2.FILLED)cv2.line(img, (x1, y1), (x2, y2), (255, 0, 255), 3)cv2.circle(img, (cx, cy), 15, (255, 0, 255), cv2.FILLED)return length, info, imgelse:return length, info
HandTraqckModule模塊整體代碼
"""
Hand Tracking Module
"""import cv2
import mediapipe as mp
import mathclass HandDetector:"""Finds Hands using the mediapipe library. Exports the landmarksin pixel format. Adds extra functionalities like finding howmany fingers are up or the distance between two fingers. Alsoprovides bounding box info of the hand found."""def __init__(self, mode=False, maxHands=2, detectionCon=0.5, minTrackCon=0.5):""":param mode: In static mode, detection is done on each image: slower:param maxHands: Maximum number of hands to detect:param detectionCon: Minimum Detection Confidence Threshold:param minTrackCon: Minimum Tracking Confidence Threshold"""self.mode = modeself.maxHands = maxHandsself.detectionCon = detectionConself.minTrackCon = minTrackConself.mpHands = mp.solutions.handsself.hands = self.mpHands.Hands(static_image_mode=self.mode, max_num_hands=self.maxHands,min_detection_confidence=self.detectionCon, min_tracking_confidence = self.minTrackCon)self.mpDraw = mp.solutions.drawing_utilsself.tipIds = [4, 8, 12, 16, 20]self.fingers = []self.lmList = []def findHands(self, img, draw=True, flipType=True):"""Finds hands in a BGR image.:param img: Image to find the hands in.:param draw: Flag to draw the output on the image.:return: Image with or without drawings"""imgRGB = cv2.cvtColor(img, cv2.COLOR_BGR2RGB)self.results = self.hands.process(imgRGB)allHands = []h, w, c = img.shapeif  self.results.multi_hand_landmarks:for handType,handLms in zip(self.results.multi_handedness,self.results.multi_hand_landmarks):myHand={}## lmListmylmList = []xList = []yList = []for id, lm in enumerate(handLms.landmark):px, py = int(lm.x * w), int(lm.y * h)mylmList.append([px, py])xList.append(px)yList.append(py)## bboxxmin, xmax = min(xList), max(xList)ymin, ymax = min(yList), max(yList)boxW, boxH = xmax - xmin, ymax - yminbbox = xmin, ymin, boxW, boxHcx, cy = bbox[0] + (bbox[2] // 2), \bbox[1] + (bbox[3] // 2)myHand["lmList"] = mylmListmyHand["bbox"] = bboxmyHand["center"] =  (cx, cy)if flipType:if handType.classification[0].label =="Right":myHand["type"] = "Left"else:myHand["type"] = "Right"else:myHand["type"] = handType.classification[0].labelallHands.append(myHand)## drawif draw:self.mpDraw.draw_landmarks(img, handLms,self.mpHands.HAND_CONNECTIONS)cv2.rectangle(img, (bbox[0] - 20, bbox[1] - 20),(bbox[0] + bbox[2] + 20, bbox[1] + bbox[3] + 20),(255, 0, 255), 2)cv2.putText(img,myHand["type"],(bbox[0] - 30, bbox[1] - 30),cv2.FONT_HERSHEY_PLAIN,2,(255, 0, 255),2)if draw:return allHands,imgelse:return allHandsdef findPosition(self, img, handNo=0, draw=True):"""Finds landmarks of a single hand and puts them in a listin pixel format. Also finds the bounding box around the hand.:param img: main image to find hand in:param handNo: hand id if more than one hand detected:param draw: Flag to draw the output on the image.:return: list of landmarks in pixel format; bounding box"""xList = []yList = []bbox = []bboxInfo = []self.lmList = []if self.results.multi_hand_landmarks:myHand = self.results.multi_hand_landmarks[handNo]for id, lm in enumerate(myHand.landmark):h, w, c = img.shapepx, py = int(lm.x * w), int(lm.y * h)xList.append(px)yList.append(py)self.lmList.append([px, py])if draw:cv2.circle(img, (px, py), 5, (255, 0, 255), cv2.FILLED)xmin, xmax = min(xList), max(xList)ymin, ymax = min(yList), max(yList)boxW, boxH = xmax - xmin, ymax - yminbbox = xmin, ymin, boxW, boxHcx, cy = bbox[0] + (bbox[2] // 2), \bbox[1] + (bbox[3] // 2)bboxInfo = {"id": id, "bbox": bbox, "center": (cx, cy)}if draw:cv2.rectangle(img, (bbox[0] - 20, bbox[1] - 20),(bbox[0] + bbox[2] + 20, bbox[1] + bbox[3] + 20),(0, 255, 0), 2)return self.lmList, bboxInfodef fingersUp(self,myHand):"""Finds how many fingers are open and returns in a list.Considers left and right hands separately:return: List of which fingers are up"""myHandType =myHand["type"]myLmList = myHand["lmList"]if self.results.multi_hand_landmarks:fingers = []# Thumbif myHandType == "Right":if myLmList[self.tipIds[0]][0] > myLmList[self.tipIds[0] - 1][0]:fingers.append(1)else:fingers.append(0)else:if myLmList[self.tipIds[0]][0] < myLmList[self.tipIds[0] - 1][0]:fingers.append(1)else:fingers.append(0)# 4 Fingersfor id in range(1, 5):if myLmList[self.tipIds[id]][1] < myLmList[self.tipIds[id] - 2][1]:fingers.append(1)else:fingers.append(0)return fingersdef findDistance(self,p1, p2, img=None):"""Find the distance between two landmarks based on theirindex numbers.:param p1: Point1:param p2: Point2:param img: Image to draw on.:param draw: Flag to draw the output on the image.:return: Distance between the pointsImage with output drawnLine information"""x1, y1 = p1x2, y2 = p2cx, cy = (x1 + x2) // 2, (y1 + y2) // 2length = math.hypot(x2 - x1, y2 - y1)info = (x1, y1, x2, y2, cx, cy)if img is not None:cv2.circle(img, (x1, y1), 15, (255, 0, 255), cv2.FILLED)cv2.circle(img, (x2, y2), 15, (255, 0, 255), cv2.FILLED)cv2.line(img, (x1, y1), (x2, y2), (255, 0, 255), 3)cv2.circle(img, (cx, cy), 15, (255, 0, 255), cv2.FILLED)return length,info, imgelse:return length, infodef main():cap = cv2.VideoCapture(0)detector = HandDetector(detectionCon=0.8, maxHands=2)while True:# Get image framesuccess, img = cap.read()# Find the hand and its landmarkshands, img = detector.findHands(img)  # with draw# hands = detector.findHands(img, draw=False)  # without drawif hands:# Hand 1hand1 = hands[0]lmList1 = hand1["lmList"]  # List of 21 Landmark pointsbbox1 = hand1["bbox"]  # Bounding box info x,y,w,hcenterPoint1 = hand1['center']  # center of the hand cx,cyhandType1 = hand1["type"]  # Handtype Left or Rightfingers1 = detector.fingersUp(hand1)if len(hands) == 2:# Hand 2hand2 = hands[1]lmList2 = hand2["lmList"]  # List of 21 Landmark pointsbbox2 = hand2["bbox"]  # Bounding box info x,y,w,hcenterPoint2 = hand2['center']  # center of the hand cx,cyhandType2 = hand2["type"]  # Hand Type "Left" or "Right"fingers2 = detector.fingersUp(hand2)# Find Distance between two Landmarks. Could be same hand or different handslength, info, img = detector.findDistance(lmList1[8], lmList2[8], img)  # with draw# length, info = detector.findDistance(lmList1[8], lmList2[8])  # with draw# Displaycv2.imshow("Image", img)cv2.waitKey(1)if __name__ == "__main__":main()
2、主模塊
原理:
-
當檢測到兩只手時,并且兩只手的拇指和食指都抬起時,通過計算拇指指尖之間的距離來獲取初始距離
startDist。 -
當兩只手的拇指和食指都抬起時,計算當前拇指指尖之間的距離,并根據距離變化來調整縮放因子
scale。這個變化可以通過當前距離減去初始距離得到。 -
根據計算得到的
scale值,調整圖像的尺寸,將另一張圖像按照scale進行縮放。
這樣,當你用兩只手的拇指和食指模擬捏取的動作時,可以實現圖像的放大和縮小效果。兩只手之間的距離越大,圖像縮小得越多;兩只手之間的距離越小,圖像放大得越多。
這個應用可以在許多場景中使用,比如在展示圖像、視頻播放或地圖應用中,通過手勢來實現圖像的交互式縮放效果。這個示例,展示了手勢識別在圖像處理和交互中的潛在應用。
導入所需的庫:
import cv2
from HandTrackingModule import *
配置攝像頭,創建手勢檢測器對象:
cap = cv2.VideoCapture(0)
cap.set(3, 1280)  # 設置攝像頭的寬度
cap.set(4, 720)   # 設置攝像頭的高度detector = HandDetector(detectionCon=0.8)  # 創建手勢檢測器對象,設置檢測置信度閾值
定義變量用于手勢縮放操作:
startDist = None  # 用于存儲初始距離
scale = 0  # 縮放值
cx, cy = 500, 500  # 縮放中心的坐標
進入主循環,讀取視頻幀并執行手勢識別和圖像操作:
while True:success, img = cap.read() # 讀取視頻幀hands, img = detector.findHands(img) # 手勢檢測# 讀取一張圖像用于操作img1 = cv2.imread("cvarduino.jpg")if len(hands) == 2:# 如果檢測到兩只手if detector.fingersUp(hands[0]) == [1, 1, 0, 0, 0] and \detector.fingersUp(hands[1]) == [1, 1, 0, 0, 0]:lmList1 = hands[0]["lmList"] # 第一只手的關鍵點列表lmList2 = hands[1]["lmList"] # 第二只手的關鍵點列表# 計算兩個手指尖之間的距離作為縮放參考if startDist is None:length, info, img = detector.findDistance(lmList1[8], lmList2[8], img)startDist = lengthlength, info, img = detector.findDistance(lmList1[8], lmList2[8], img)scale = int((length - startDist) // 2) # 計算縮放值cx, cy = info[4:] # 獲取縮放中心的坐標print(scale) # 打印縮放值else:startDist = Nonetry:h1, w1, _ = img1.shapenewH, newW = ((h1 + scale) // 2) * 2, ((w1 + scale) // 2) * 2img1 = cv2.resize(img1, (newW, newH))# 在指定位置繪制縮放后的圖像img[cy - newH // 2:cy + newH // 2, cx - newW // 2:cx + newW // 2] = img1except:passcv2.imshow("Image", img) # 顯示處理后的圖像cv2.waitKey(1) # 等待按鍵
主模塊
全部代碼:
import cv2
# from cvzone.HandTrackingModule import HandDetector
from HandTrackingModule import *
cap = cv2.VideoCapture(0)
cap.set(3, 1280)
cap.set(4, 720)detector = HandDetector(detectionCon=0.8)
startDist = None
scale = 0
cx, cy = 500,500
while True:success, img = cap.read()hands, img = detector.findHands(img)img1 = cv2.imread("cvarduino.jpg")if len(hands) == 2:# print('Zoom Gesture')# print(detector.fingersUp(hands[0]),detector.fingersUp(hands[1]))if detector.fingersUp(hands[0]) == [1, 1, 0, 0, 0] and \detector.fingersUp(hands[1]) == [1, 1, 0, 0, 0]:# print('zhenque ')lmList1 = hands[0]["lmList"]lmList2 = hands[1]["lmList"]# point 8 is the tip of the index fingerif startDist is None:length, info, img = detector.findDistance(lmList1[8], lmList2[8], img)# print(length)startDist = lengthlength, info, img = detector.findDistance(lmList1[8], lmList2[8], img)scale = int((length - startDist) // 2)cx, cy = info[4:]print(scale)else:startDist = Nonetry:h1, w1, _= img1.shapenewH, newW = ((h1+scale)//2)*2, ((w1+scale)//2)*2img1 = cv2.resize(img1, (newW,newH))img[cy-newH//2:cy+ newH//2, cx-newW//2:cx+ newW//2] = img1except:passcv2.imshow("Image", img)cv2.waitKey(1)
?
有遇到的問題歡迎評論區留言!


BM17 二分查找 BM21 旋轉數組的最小數字 BM23 二叉樹的前序遍歷)

-PK函數創建一條圓弧曲線)


