100 主子表代碼生成詳解
1?新建數據庫表結構(主子表)
-- ----------------------------
-- 客戶表
-- ----------------------------
drop table if exists sys_customer;
create table sys_customer (customer_id           bigint(20)      not null auto_increment    comment '客戶id',customer_name         varchar(30)     default ''                 comment '客戶姓名',phonenumber           varchar(11)     default ''                 comment '手機號碼',sex                   varchar(20)     default null               comment '客戶性別',birthday              datetime                                   comment '客戶生日',remark                varchar(500)    default null               comment '客戶描述',primary key (customer_id)
) engine=innodb auto_increment=1 comment = '客戶表';-- ----------------------------
-- 商品表
-- ----------------------------
drop table if exists sys_goods;
create table sys_goods (goods_id           bigint(20)      not null auto_increment    comment '商品id',-- 必須要有的關聯字段(外鍵)customer_id        bigint(20)      not null                   comment '客戶id',name               varchar(30)     default ''                 comment '商品名稱',weight             int(5)          default null               comment '商品重量',price              decimal(6,2)    default null               comment '商品價格',date               datetime                                   comment '商品時間',type               char(1)         default null               comment '商品種類',primary key (goods_id)
) engine=innodb auto_increment=1 comment = '商品表';2?代碼生成使用
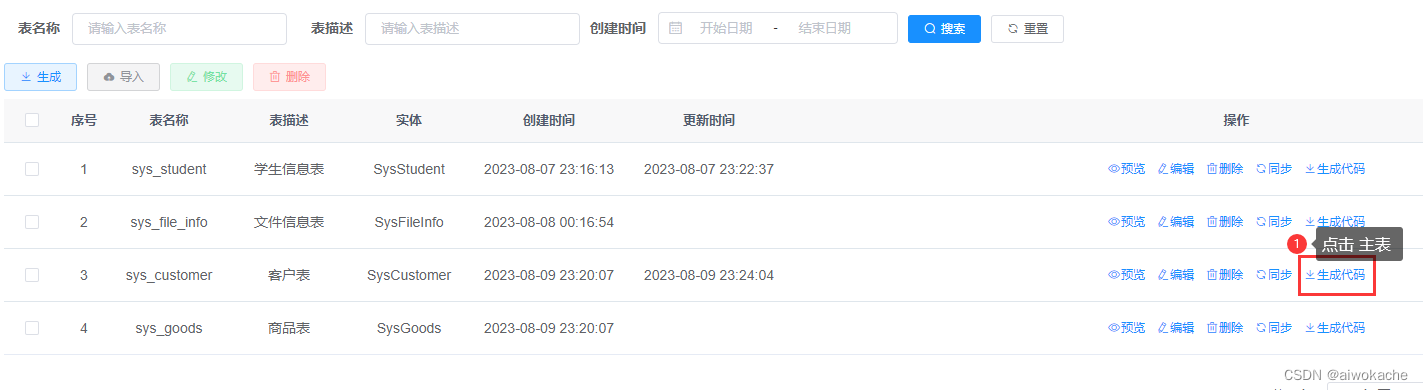
(1)登錄系統(系統工具 -> 代碼生成 -> 導入主表與子表)
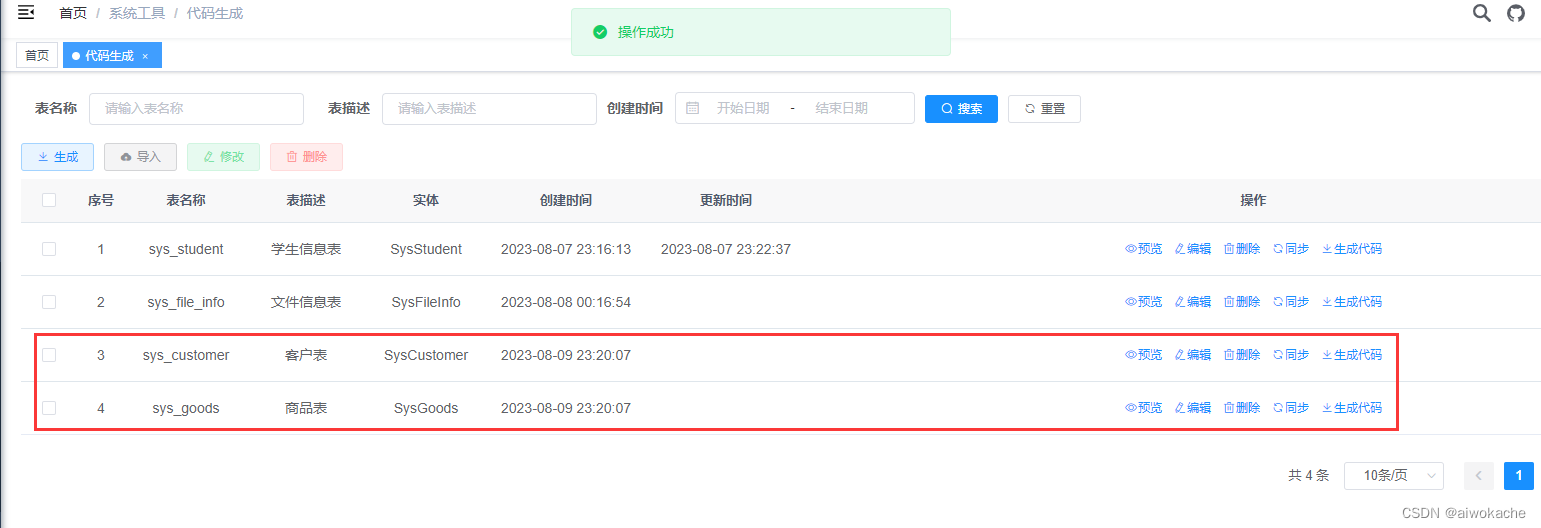
(2)代碼生成列表中找到需要表(可預覽、編輯、同步、刪除生成配置)

(3)點擊生成代碼會得到一個ruoyi.zip執行sql文件,按照包內目錄結構復制到自己的項目中即可
(4)執行customerMenu.sql生成菜單

-- 菜單 SQL
insert into sys_menu (menu_name, parent_id, order_num, path, component, is_frame, is_cache, menu_type, visible, status, perms, icon, create_by, create_time, update_by, update_time, remark)
values('客戶', '3', '1', 'customer', 'system/customer/index', 1, 0, 'C', '0', '0', 'system:customer:list', '#', 'admin', sysdate(), '', null, '客戶菜單');-- 按鈕父菜單ID
SELECT @parentId := LAST_INSERT_ID();-- 按鈕 SQL
insert into sys_menu (menu_name, parent_id, order_num, path, component, is_frame, is_cache, menu_type, visible, status, perms, icon, create_by, create_time, update_by, update_time, remark)
values('客戶查詢', @parentId, '1', '#', '', 1, 0, 'F', '0', '0', 'system:customer:query', '#', 'admin', sysdate(), '', null, '');insert into sys_menu (menu_name, parent_id, order_num, path, component, is_frame, is_cache, menu_type, visible, status, perms, icon, create_by, create_time, update_by, update_time, remark)
values('客戶新增', @parentId, '2', '#', '', 1, 0, 'F', '0', '0', 'system:customer:add', '#', 'admin', sysdate(), '', null, '');insert into sys_menu (menu_name, parent_id, order_num, path, component, is_frame, is_cache, menu_type, visible, status, perms, icon, create_by, create_time, update_by, update_time, remark)
values('客戶修改', @parentId, '3', '#', '', 1, 0, 'F', '0', '0', 'system:customer:edit', '#', 'admin', sysdate(), '', null, '');insert into sys_menu (menu_name, parent_id, order_num, path, component, is_frame, is_cache, menu_type, visible, status, perms, icon, create_by, create_time, update_by, update_time, remark)
values('客戶刪除', @parentId, '4', '#', '', 1, 0, 'F', '0', '0', 'system:customer:remove', '#', 'admin', sysdate(), '', null, '');insert into sys_menu (menu_name, parent_id, order_num, path, component, is_frame, is_cache, menu_type, visible, status, perms, icon, create_by, create_time, update_by, update_time, remark)
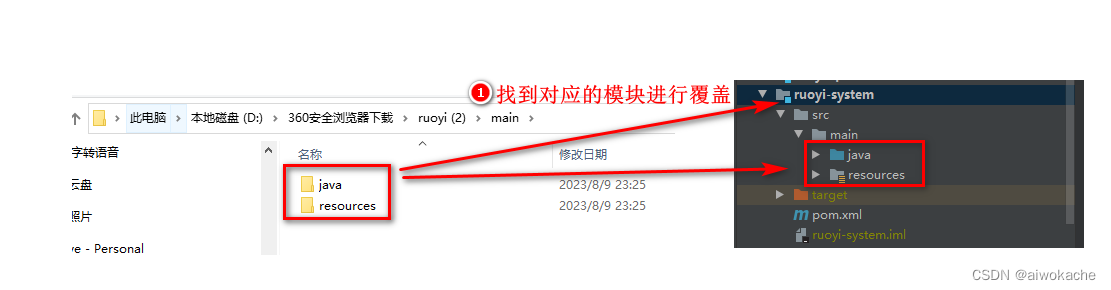
values('客戶導出', @parentId, '5', '#', '', 1, 0, 'F', '0', '0', 'system:customer:export', '#', 'admin', sysdate(), '', null, '');(5)覆蓋前端代碼:主要是里面的模板有不同

(6)覆蓋后端代碼:主要是里面的模板有不同
 ??
??
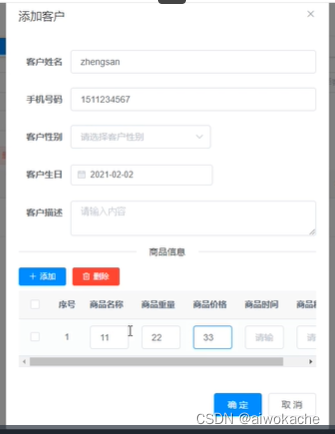
(7)測試
- F5刷新ruoyi-system
- 重啟前后端
- 測試成功
3 后臺(區別)詳解
(1)SysCustomer:客戶
/** * 關聯關系 商品信息 集合。* 后續:前端會把商品信息傳進來。* */private List<SysGoods> sysGoodsList;(2)SysGoods:商品。就跟單表一樣
(3)SysCustomerServiceImpl:大區別
package com.ruoyi.system.service.impl;import java.util.List;
import org.springframework.beans.factory.annotation.Autowired;
import org.springframework.stereotype.Service;
import java.util.ArrayList;
import com.ruoyi.common.utils.StringUtils;
import org.springframework.transaction.annotation.Transactional;
import com.ruoyi.system.domain.SysGoods;
import com.ruoyi.system.mapper.SysCustomerMapper;
import com.ruoyi.system.domain.SysCustomer;
import com.ruoyi.system.service.ISysCustomerService;/*** 客戶Service業務層處理* * @author ruoyi* @date 2023-08-09*/
@Service
public class SysCustomerServiceImpl implements ISysCustomerService
{@Autowiredprivate SysCustomerMapper sysCustomerMapper;/*** 查詢客戶* * 區別:XxxMapper.xml中會是一個關聯查詢*/@Overridepublic SysCustomer selectSysCustomerByCustomerId(Long customerId){return sysCustomerMapper.selectSysCustomerByCustomerId(customerId);}/*** 查詢客戶列表** 區別:XxxMapper.xml中會是一個關聯查詢*/@Overridepublic List<SysCustomer> selectSysCustomerList(SysCustomer sysCustomer){return sysCustomerMapper.selectSysCustomerList(sysCustomer);}/*** 新增客戶** 區別:新增對應的商品信息(列表)*/@Transactional@Overridepublic int insertSysCustomer(SysCustomer sysCustomer){int rows = sysCustomerMapper.insertSysCustomer(sysCustomer);insertSysGoods(sysCustomer);return rows;}/*** 修改客戶*/@Transactional@Overridepublic int updateSysCustomer(SysCustomer sysCustomer){/*** 刪除子表中的全部數據*/sysCustomerMapper.deleteSysGoodsByCustomerId(sysCustomer.getCustomerId());/*** 子表數據入庫*/insertSysGoods(sysCustomer);/*** 主表信息修改入庫*/return sysCustomerMapper.updateSysCustomer(sysCustomer);}/*** 批量刪除客戶*/@Transactional@Overridepublic int deleteSysCustomerByCustomerIds(Long[] customerIds){/*** 刪除子表數據*/sysCustomerMapper.deleteSysGoodsByCustomerIds(customerIds);/*** 刪除主表數據*/return sysCustomerMapper.deleteSysCustomerByCustomerIds(customerIds);}/*** 刪除客戶信息*/@Transactional@Overridepublic int deleteSysCustomerByCustomerId(Long customerId){/*** 刪除子表數據*/sysCustomerMapper.deleteSysGoodsByCustomerId(customerId);/*** 刪除主表數據*/return sysCustomerMapper.deleteSysCustomerByCustomerId(customerId);}/*** 新增商品信息* 即從客戶中獲取對應的商品信息列表,然后入庫*/public void insertSysGoods(SysCustomer sysCustomer){List<SysGoods> sysGoodsList = sysCustomer.getSysGoodsList();Long customerId = sysCustomer.getCustomerId();if (StringUtils.isNotNull(sysGoodsList)){List<SysGoods> list = new ArrayList<SysGoods>();for (SysGoods sysGoods : sysGoodsList){sysGoods.setCustomerId(customerId);list.add(sysGoods);}if (list.size() > 0){sysCustomerMapper.batchSysGoods(list);}}}
}
(4)SysCustomerMapper.xml:大區別
<?xml version="1.0" encoding="UTF-8" ?>
<!DOCTYPE mapper
PUBLIC "-//mybatis.org//DTD Mapper 3.0//EN"
"http://mybatis.org/dtd/mybatis-3-mapper.dtd">
<mapper namespace="com.ruoyi.system.mapper.SysCustomerMapper"><resultMap type="SysCustomer" id="SysCustomerResult"><result property="customerId"    column="customer_id"    /><result property="customerName"    column="customer_name"    /><result property="phonenumber"    column="phonenumber"    /><result property="sex"    column="sex"    /><result property="birthday"    column="birthday"    /><result property="remark"    column="remark"    /></resultMap><resultMap id="SysCustomerSysGoodsResult" type="SysCustomer" extends="SysCustomerResult"><collection property="sysGoodsList" notNullColumn="sub_goods_id" javaType="java.util.List" resultMap="SysGoodsResult" /></resultMap><resultMap type="SysGoods" id="SysGoodsResult"><result property="goodsId"    column="sub_goods_id"    /><result property="customerId"    column="sub_customer_id"    /><result property="name"    column="sub_name"    /><result property="weight"    column="sub_weight"    /><result property="price"    column="sub_price"    /><result property="date"    column="sub_date"    /><result property="type"    column="sub_type"    /></resultMap><sql id="selectSysCustomerVo">select customer_id, customer_name, phonenumber, sex, birthday, remark from sys_customer</sql><select id="selectSysCustomerList" parameterType="SysCustomer" resultMap="SysCustomerResult"><include refid="selectSysCustomerVo"/><where>  <if test="customerName != null  and customerName != ''"> and customer_name like concat('%', #{customerName}, '%')</if><if test="phonenumber != null  and phonenumber != ''"> and phonenumber = #{phonenumber}</if><if test="sex != null  and sex != ''"> and sex = #{sex}</if><if test="birthday != null "> and birthday = #{birthday}</if></where></select><!--區別:關聯查詢--><select id="selectSysCustomerByCustomerId" parameterType="Long" resultMap="SysCustomerSysGoodsResult">select a.customer_id, a.customer_name, a.phonenumber, a.sex, a.birthday, a.remark,b.goods_id as sub_goods_id, b.customer_id as sub_customer_id, b.name as sub_name, b.weight as sub_weight, b.price as sub_price, b.date as sub_date, b.type as sub_typefrom sys_customer aleft join sys_goods b on b.customer_id = a.customer_idwhere a.customer_id = #{customerId}</select><insert id="insertSysCustomer" parameterType="SysCustomer" useGeneratedKeys="true" keyProperty="customerId">insert into sys_customer<trim prefix="(" suffix=")" suffixOverrides=","><if test="customerName != null">customer_name,</if><if test="phonenumber != null">phonenumber,</if><if test="sex != null">sex,</if><if test="birthday != null">birthday,</if><if test="remark != null">remark,</if></trim><trim prefix="values (" suffix=")" suffixOverrides=","><if test="customerName != null">#{customerName},</if><if test="phonenumber != null">#{phonenumber},</if><if test="sex != null">#{sex},</if><if test="birthday != null">#{birthday},</if><if test="remark != null">#{remark},</if></trim></insert><update id="updateSysCustomer" parameterType="SysCustomer">update sys_customer<trim prefix="SET" suffixOverrides=","><if test="customerName != null">customer_name = #{customerName},</if><if test="phonenumber != null">phonenumber = #{phonenumber},</if><if test="sex != null">sex = #{sex},</if><if test="birthday != null">birthday = #{birthday},</if><if test="remark != null">remark = #{remark},</if></trim>where customer_id = #{customerId}</update><delete id="deleteSysCustomerByCustomerId" parameterType="Long">delete from sys_customer where customer_id = #{customerId}</delete><delete id="deleteSysCustomerByCustomerIds" parameterType="String">delete from sys_customer where customer_id in <foreach item="customerId" collection="array" open="(" separator="," close=")">#{customerId}</foreach></delete><delete id="deleteSysGoodsByCustomerIds" parameterType="String">delete from sys_goods where customer_id in <foreach item="customerId" collection="array" open="(" separator="," close=")">#{customerId}</foreach></delete><delete id="deleteSysGoodsByCustomerId" parameterType="Long">delete from sys_goods where customer_id = #{customerId}</delete><insert id="batchSysGoods">insert into sys_goods( goods_id, customer_id, name, weight, price, date, type) values<foreach item="item" index="index" collection="list" separator=",">( #{item.goodsId}, #{item.customerId}, #{item.name}, #{item.weight}, #{item.price}, #{item.date}, #{item.type})</foreach></insert>
</mapper>
4 前端(區別)詳解
(1)ruoyi-ui\src\views\system\customer\index.vue
<template><!--1、指定了商品信息(列表)2、選擇事件:@selection-change="handleSysGoodsSelectionChange"--><el-table :data="sysGoodsList" :row-class-name="rowSysGoodsIndex" @selection-change="handleSysGoodsSelectionChange" ref="sysGoods"><el-table-column type="selection" width="50" align="center" /><el-table-column label="序號" align="center" prop="index" width="50"/><el-table-column label="商品名稱" prop="name" width="150"><template slot-scope="scope"><el-input v-model="scope.row.name" placeholder="請輸入商品名稱" /></template></el-table-column><el-table-column label="商品重量" prop="weight" width="150"><template slot-scope="scope"><el-input v-model="scope.row.weight" placeholder="請輸入商品重量" /></template></el-table-column><el-table-column label="商品價格" prop="price" width="150"><template slot-scope="scope"><el-input v-model="scope.row.price" placeholder="請輸入商品價格" /></template></el-table-column><el-table-column label="商品時間" prop="date" width="240"><template slot-scope="scope"><el-date-picker clearable v-model="scope.row.date" type="date" value-format="yyyy-MM-dd" placeholder="請選擇商品時間" /></template></el-table-column><el-table-column label="商品種類" prop="type" width="150"><template slot-scope="scope"><el-select v-model="scope.row.type" placeholder="請選擇商品種類"><el-option label="請選擇字典生成" value="" /></el-select></template></el-table-column></el-table>
</template>
<script>
export default {name: "Customer",data() {// 商品表格數據,初始化為空sysGoodsList: [],},methods:{/** 修改按鈕操作 */handleUpdate(row) {this.reset();const customerId = row.customerId || this.idsgetCustomer(customerId).then(response => {this.form = response.data;/*** 從客戶中獲取商品集合(列表)*/this.sysGoodsList = response.data.sysGoodsList;this.open = true;this.title = "修改客戶";});},/** 提交按鈕 */submitForm() {this.$refs["form"].validate(valid => {if (valid) {/*** 提交時把商品賦值到對應的客戶中*/this.form.sysGoodsList = this.sysGoodsList;if (this.form.customerId != null) {updateCustomer(this.form).then(response => {this.$modal.msgSuccess("修改成功");this.open = false;this.getList();});} else {addCustomer(this.form).then(response => {this.$modal.msgSuccess("新增成功");this.open = false;this.getList();});}}});},/** 商品添加按鈕操作 */handleAddSysGoods() {let obj = {};obj.name = "";obj.weight = "";obj.price = "";obj.date = "";obj.type = "";this.sysGoodsList.push(obj);},}
}
</script>
101 【更】3.4.0版本更新介紹
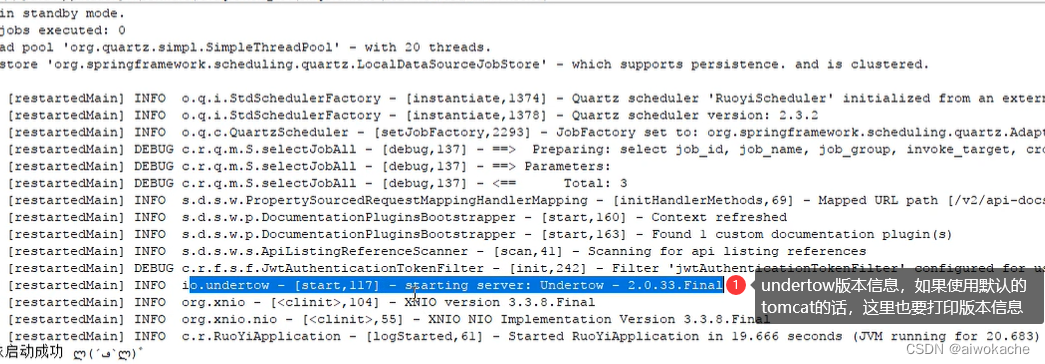
102 使用undertow容器來替代tomcat容器
1?undertow與tomcat的區別與聯系
- springboot默認使用tomcat做為http容器。
- undertow與tomcat是一樣的。
- undertow在處理高并發請求、對內存的優化要好于tomcat。
2 替換過程詳解
(1)ruoyi-framework\pom.xml模塊修改web容器依賴,使用undertow來替代tomcat容器
<!-- SpringBoot Web容器 --><dependency><groupId>org.springframework.boot</groupId><artifactId>spring-boot-starter-web</artifactId><exclusions><!-- 排除springboot默認使用的tomcat容器 --><exclusion><artifactId>spring-boot-starter-tomcat</artifactId><groupId>org.springframework.boot</groupId></exclusion></exclusions></dependency><!-- web 容器使用 undertow 替換 tomcat --><!-- undertow的版本默認跟隨springboot的版本--><dependency><groupId>org.springframework.boot</groupId><artifactId>spring-boot-starter-undertow</artifactId></dependency>(2)修改application.yml,使用undertow來替代tomcat容器
# 開發環境配置
server:# 服務器的HTTP端口,默認為80port: 80servlet:# 應用的訪問路徑context-path: /# undertow 配置(可以參考官網,設置更多的屬性)undertow:# HTTP post內容的最大大小。當值為-1時,默認值為大小是無限的max-http-post-size: -1# 以下的配置會影響buffer,這些buffer會用于服務器連接的IO操作,有點類似netty的池化內存管理# 每塊buffer的空間大小,越小的空間被利用越充分buffer-size: 512# 是否分配的直接內存direct-buffers: truethreads:# 設置IO線程數, 它主要執行非阻塞的任務,它們會負責多個連接, 默認設置每個CPU核心一個線程io: 8# 阻塞任務線程池, 當執行類似servlet請求阻塞操作, undertow會從這個線程池中取得線程,它的值設置取決于系統的負載worker: 256
(3)修改文件上傳工具類FileUploadUtils#getAbsoluteFile
? ? ? ? 使用undertow容器以后上傳文件可能會報錯,這是因為undertow和tomcat的底層實現是不一樣的,因此undertow是不需要去創建的:
private static final File getAbsoluteFile(String uploadDir, String fileName) throws IOException
{File desc = new File(uploadDir + File.separator + fileName);if (!desc.getParentFile().exists()){desc.getParentFile().mkdirs();}// undertow文件上傳,因底層實現不同,無需創建新文件// if (!desc.exists())// {//    desc.createNewFile();// }return desc;
}
(3)測試
- 重啟后端
- 簡單測試幾個功能:文件上傳
3 拓展:模擬高并發的場景
103 實現優雅關閉應用(集成springboot自帶的監控工具actuator)
1?為什么要優雅關閉呢?
? ? ? ?比如每一秒有上百筆的并發請求到訂單接口,如果直接停掉應用,那這上百筆訂單的線程沒執行完導致這些訂單就丟失了,這種情況是很嚴重的。所以一定要等到這些訂單線程全部執行完之后,再去停掉應用,才能防止一些正在執行或者在執行的過程中的線程被強制停掉。
2 詳細步驟
(1)ruoyi-admin/pom.xml中引入actuator依賴
<!-- 依賴springboot自帶的監控工具actuator --><dependency><groupId>org.springframework.boot</groupId><artifactId>spring-boot-starter-actuator</artifactId></dependency>(2)ruoyi-admin/application.yml配置文件中endpoint開啟shutdown
# 可監控:內存、線程、日志
management:endpoint:shutdown:# shutdown打開,即允許使用它去停止應用enabled: trueendpoints:web:exposure:# 優雅關閉# include其實我們可以配置成" * ",但不建議這么寫,因為很多東西都暴露出去對就項目來說是有風險的include: "shutdown"# 前綴路徑base-path: /monitor
(3)SecurityConfig#configure():因為在沒有登錄的情況下就停止了,所以需要配置白名單。
.antMatchers(HttpMethod.GET, "/", "/*.html", "/**/*.html", "/**/*.css", "/**/*.js", "/profile/**").permitAll()
/**
* 1、其中" /monitor/ "對應base-path: /monitor,shutdown對應include: "shutdown"
*/
.antMatchers("/monitor/shutdown").permitAll()
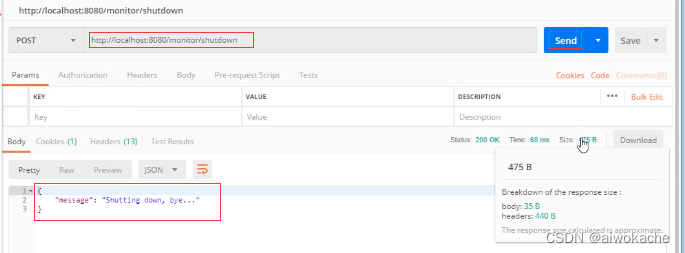
.antMatchers("/swagger-ui.html", "/swagger-resources/**", "/webjars/**", "/*/api-docs", "/druid/**").permitAll()(4)Post請求測試驗證優雅停機 curl -X POST http://localhost:80/monitor/shutdown
- 重啟后端
-
這個接口是自帶的,所以需要按照它的規則去請求。是POST請求,可以用postman工具發送post請求:
104 實現swagger文檔增強(集成knife4j)
1 為什么要增強?
- swagger界面風格、英文
- knife4j對比swagger相比有以下優勢,友好界面,離線文檔,接口排序,安全控制,在線調試,文檔清晰,后端注解增強,容易上手。
2 前端ui增強,詳細步驟
(1)ruoyi-admin\pom.xml模塊添加整合依賴(替換掉swagger的ui)
- 針對不分離版?
- 把swagger的ui刪除掉后:
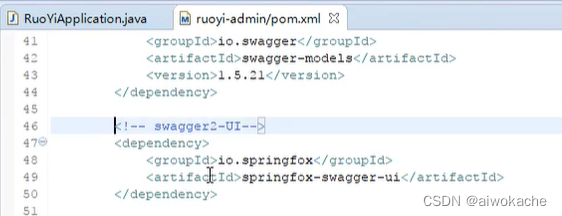
- 替換成knife4j的ui:
<!-- knife4j -->
<dependency><groupId>com.github.xiaoymin</groupId><artifactId>knife4j-spring-boot-starter</artifactId><version>3.0.3</version>
</dependency>
- 把swagger的ui刪除掉后:
- 針對分離版本
- 直接在ruoyi-admin\pom.xml加入knife4j的依賴即可
(2)修改首頁跳轉訪問地址
????????針對不分離版本:SwaggerController.java修改跳轉訪問地址" /doc.html "
// 默認swagger-ui.html前端ui訪問地址
public String index()
{return redirect("/swagger-ui.html");
}
// 修改成knife4j前端ui訪問地址doc.html
public String index()
{return redirect("/doc.html");
}
? ? ? ? 針對前后端分離版本:ruoyi-ui\src\views\tool\swagger\index.vue修改跳轉訪問地址為" /doc.html ":

(3)測試
-
重啟前后端
-
瀏覽器訪問:http://localhost:8080/doc.html#/home
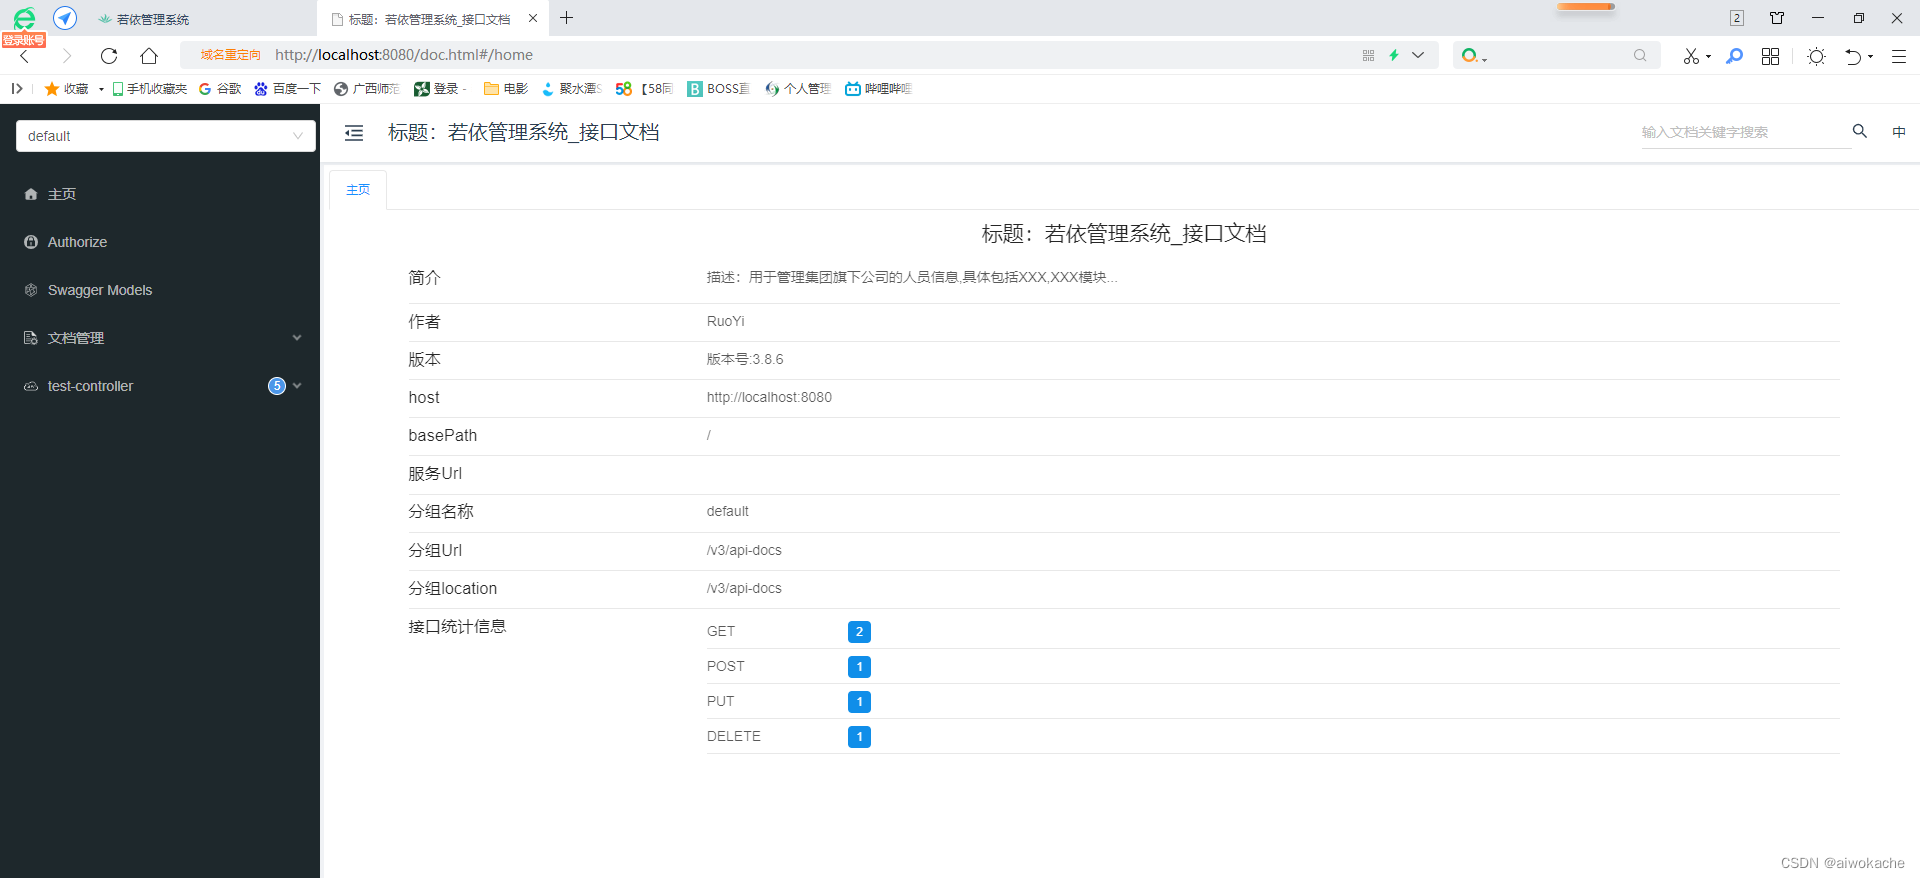
-
登錄系統,訪問菜單系統工具/系統接口,出現如下圖表示成功

(4)提示:引用knife4j-spring-boot-starter依賴,項目中的swagger依賴可以刪除。
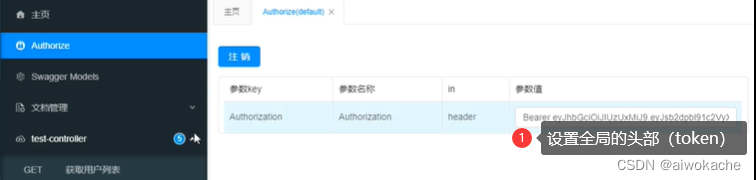
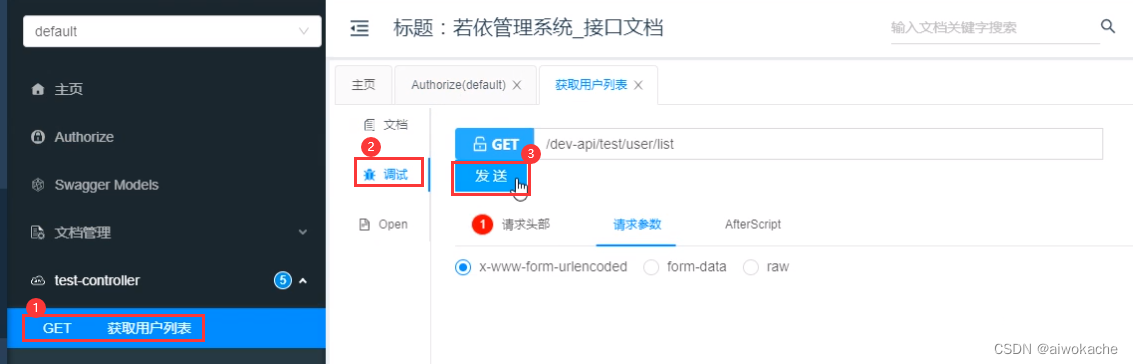
3 使用案例
4 拓展:后端注解增強
105 實現excel表格增強(集成easyexcel)?
1 excel表格實現1:自定義的@Excel、@Excels注解
2 excel表格實現2:easyExcel,使用簡單、功能多、性能好、阿里開源
(1)ruoyi-common\pom.xml模塊添加整合依賴
<!-- easyexcel -->
<dependency><groupId>com.alibaba</groupId><artifactId>easyexcel</artifactId><version>2.2.6</version>
</dependency>
(2)自定義的ExcelUtil.java中easyexcel新增導出導入方法
/*** 對excel表單默認第一個索引名轉換成list(EasyExcel)。** 這個兩個方法是作者自己加的,當然開發人員還可以加更多其它的方法。** 兼容我們以前的那種寫法:* (1)入參:流* (2)head(clazz):兼容實體類* (3)最后調用api*/public List<T> importEasyExcel(InputStream is) throws Exception{return EasyExcel.read(is).head(clazz).sheet().doReadSync();}/*** 對list數據源將其里面的數據導入到excel表單(EasyExcel)。** 這個兩個方法是作者自己加的,當然開發人員還可以加更多其它的方法。** 兼容我們以前的那種寫法:* (1)從List<T> list中讀取數據* (2)String sheetName:文件名* (3)把數據寫入該文件* (4)前端根據對應的地址下載該文件*/public void exportEasyExcel(HttpServletResponse response, List<T> list, String sheetName){try{EasyExcel.write(response.getOutputStream(), clazz).sheet(sheetName).doWrite(list);}catch (IOException e){log.error("導出EasyExcel異常{}", e.getMessage());}}(3)模擬測試,以操作日志為例,修改相關類。
(4)SysOperlogController.java改為exportEasyExcel
? ? ? ?導入和導出的方法加好之后,想在項目里面去使用easyExcel,其實以前你用怎么還是怎么用。那個默認的、自定義的、注解的導入導出方法,就現在直接改一下名字(使用帶有" Easy "字樣的方法)就行了。?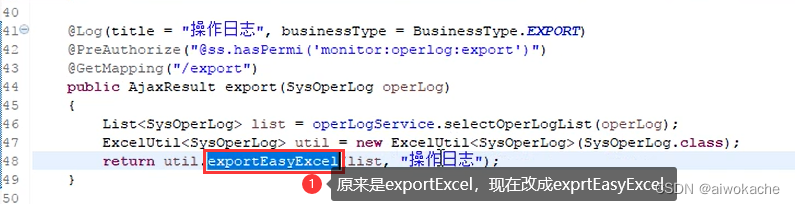
@Log(title = "操作日志", businessType = BusinessType.EXPORT)
@PreAuthorize("@ss.hasPermi('monitor:operlog:export')")
@PostMapping("/export")
public void export(HttpServletResponse response, SysOperLog operLog)
{List<SysOperLog> list = operLogService.selectOperLogList(operLog);ExcelUtil<SysOperLog> util = new ExcelUtil<SysOperLog>(SysOperLog.class);util.exportEasyExcel(response, list, "操作日志");
}
(5)SysOperLog.java修改為使用easyExcel的@ExcelProperty注解(不再使用自定義的注解)
package com.ruoyi.system.domain;/*** 操作日志記錄表 oper_log** @author ruoyi*/
@ExcelIgnoreUnannotated //只有加了@ExcelProperty注解的才導出
@ColumnWidth(16)        //寬度
@HeadRowHeight(14)      //高度
@HeadFontStyle(fontHeightInPoints = 11)//樣式
public class SysOperLog extends BaseEntity
{private static final long serialVersionUID = 1L;/** 日志主鍵 */@ExcelProperty(value = "操作序號")private Long operId;/** 操作模塊 */@ExcelProperty(value = "操作模塊")private String title;/** 業務類型(0其它 1新增 2修改 3刪除) */@ExcelProperty(value = "業務類型", converter = BusiTypeStringNumberConverter.class)private Integer businessType;/** 業務類型數組 */private Integer[] businessTypes;/** 請求方法 */@ExcelProperty(value = "請求方法")private String method;/** 請求方式 */@ExcelProperty(value = "請求方式")private String requestMethod;/** 操作類別(0其它 1后臺用戶 2手機端用戶) *//*** converter = OperTypeConverter.class:* (1)用于轉換。如狀態、性別、操作類型等等*/@ExcelProperty(value = "操作類別", converter = OperTypeConverter.class)private Integer operatorType;/** 操作人員 */@ExcelProperty(value = "操作人員")private String operName;/** 部門名稱 */@ExcelProperty(value = "部門名稱")private String deptName;/** 請求url */@ExcelProperty(value = "請求地址")private String operUrl;/** 操作地址 */@ExcelProperty(value = "操作地址")private String operIp;/** 操作地點 */@ExcelProperty(value = "操作地點")private String operLocation;/** 請求參數 */@ExcelProperty(value = "請求參數")private String operParam;/** 返回參數 */@ExcelProperty(value = "返回參數")private String jsonResult;/** 操作狀態(0正常 1異常) */@ExcelProperty(value = "狀態", converter = StatusConverter.class)private Integer status;/** 錯誤消息 */@ExcelProperty(value = "錯誤消息")private String errorMsg;/** 操作時間 *//*** @DateTimeFormat:easyExcel自帶的時間轉換注解。常用的,還有字符轉換注解。*/@DateTimeFormat("yyyy-MM-dd HH:mm:ss")@ExcelProperty(value = "操作時間")private Date operTime;// get / set()// toString()
}
(6)ruoyi-system\com\ruoyi\system\domain\read\BusiTypeStringNumberConverter.java:添加字符串翻譯內容
這個里邊我現在是直接寫死的,當然你們其實可以根據緩存里面的字典去查。?
package com.ruoyi.system.domain.read;import com.alibaba.excel.converters.Converter;
import com.alibaba.excel.enums.CellDataTypeEnum;
import com.alibaba.excel.metadata.CellData;
import com.alibaba.excel.metadata.GlobalConfiguration;
import com.alibaba.excel.metadata.property.ExcelContentProperty;/*** 業務類型字符串處理** Converter<Integer>中的整型、對應return Integer.class;,對應實體類中的屬性的數據類型*/
@SuppressWarnings("rawtypes")
public class BusiTypeStringNumberConverter implements Converter<Integer>
{@Overridepublic Class supportJavaTypeKey(){return Integer.class;}@Overridepublic CellDataTypeEnum supportExcelTypeKey(){return CellDataTypeEnum.STRING;}@Overridepublic Integer convertToJavaData(CellData cellData, ExcelContentProperty contentProperty,GlobalConfiguration globalConfiguration){Integer value = 0;String str = cellData.getStringValue();if ("新增".equals(str)){value = 1;}else if ("修改".equals(str)){value = 2;}else if ("刪除".equals(str)){value = 3;}else if ("授權".equals(str)){value = 4;}else if ("導出".equals(str)){value = 5;}else if ("導入".equals(str)){value = 6;}else if ("強退".equals(str)){value = 7;}else if ("生成代碼".equals(str)){value = 8;}else if ("清空數據".equals(str)){value = 9;}return value;}@Overridepublic CellData convertToExcelData(Integer value, ExcelContentProperty contentProperty,GlobalConfiguration globalConfiguration){String str = "其他";if (1 == value){str = "新增";}else if (2 == value){str = "修改";}else if (3 == value){str = "刪除";}else if (4 == value){str = "授權";}else if (5 == value){str = "導出";}else if (6 == value){str = "導入";}else if (7 == value){str = "強退";}else if (8 == value){str = "生成代碼";}else if (9 == value){str = "清空數據";}return new CellData(str);}
}
(7)ruoyi-system\com\ruoyi\system\domain\read\OperTypeConverter.java
package com.ruoyi.system.domain.read;import com.alibaba.excel.converters.Converter;
import com.alibaba.excel.enums.CellDataTypeEnum;
import com.alibaba.excel.metadata.CellData;
import com.alibaba.excel.metadata.GlobalConfiguration;
import com.alibaba.excel.metadata.property.ExcelContentProperty;/*** 操作類別字符串處理** @author ruoyi*/
@SuppressWarnings("rawtypes")
public class OperTypeConverter implements Converter<Integer>
{@Overridepublic Class supportJavaTypeKey(){return Integer.class;}@Overridepublic CellDataTypeEnum supportExcelTypeKey(){return CellDataTypeEnum.STRING;}@Overridepublic Integer convertToJavaData(CellData cellData, ExcelContentProperty contentProperty,GlobalConfiguration globalConfiguration){Integer value = 0;String str = cellData.getStringValue();if ("后臺用戶".equals(str)){value = 1;}else if ("手機端用戶".equals(str)){value = 2;}return value;}@Overridepublic CellData convertToExcelData(Integer value, ExcelContentProperty contentProperty,GlobalConfiguration globalConfiguration){String str = "其他";if (1 == value){str = "后臺用戶";}else if (2 == value){str = "手機端用戶";}return new CellData(str);}
}
(8)ruoyi-system\com\ruoyi\system\domain\read\StatusConverter.java
package com.ruoyi.system.domain.read;import com.alibaba.excel.converters.Converter;
import com.alibaba.excel.enums.CellDataTypeEnum;
import com.alibaba.excel.metadata.CellData;
import com.alibaba.excel.metadata.GlobalConfiguration;
import com.alibaba.excel.metadata.property.ExcelContentProperty;/*** 狀態字符串處理** @author ruoyi*/
@SuppressWarnings("rawtypes")
public class StatusConverter implements Converter<Integer>
{@Overridepublic Class supportJavaTypeKey(){return Integer.class;}@Overridepublic CellDataTypeEnum supportExcelTypeKey(){return CellDataTypeEnum.STRING;}@Overridepublic CellData convertToExcelData(Integer value, ExcelContentProperty contentProperty,GlobalConfiguration globalConfiguration){return new CellData(0 == value ? "正常" : "異常");}@Overridepublic Integer convertToJavaData(CellData cellData, ExcelContentProperty contentProperty,GlobalConfiguration globalConfiguration) throws Exception{return "正常".equals(cellData.getStringValue()) ? 0 : 1;}
}
(9)登錄系統,進入系統管理-日志管理-操作日志-執行導出功能
106 實現mybatis增強(集成mybatis-plus)
1 ruoyi-common\pom.xml模塊添加整合依賴
<!-- mybatis-plus 增強CRUD -->
<dependency><groupId>com.baomidou</groupId><artifactId>mybatis-plus-boot-starter</artifactId><version>3.4.1</version>
</dependency>
2?ruoyi-admin文件application.yml,修改mybatis配置為mybatis-plus?(其實就只改了名稱而已,配置參數一模一樣的)
# MyBatis Plus配置
mybatis-plus:# 搜索指定包別名typeAliasesPackage: com.ruoyi.**.domain# 配置mapper的掃描,找到所有的mapper.xml映射文件mapperLocations: classpath*:mapper/**/*Mapper.xml# 加載全局的配置文件configLocation: classpath:mybatis/mybatis-config.xml
3 ruoyi-framework\src\main\java\com\ruoyi\framework\config\MybatisPlusConfig.java:添加Mybatis Plus配置MybatisPlusConfig.java。 PS:原來的MyBatisConfig.java需要刪除掉
package com.ruoyi.framework.config;import com.baomidou.mybatisplus.annotation.DbType;
import com.baomidou.mybatisplus.extension.plugins.MybatisPlusInterceptor;
import com.baomidou.mybatisplus.extension.plugins.inner.BlockAttackInnerInterceptor;
import com.baomidou.mybatisplus.extension.plugins.inner.OptimisticLockerInnerInterceptor;
import com.baomidou.mybatisplus.extension.plugins.inner.PaginationInnerInterceptor;
import org.springframework.context.annotation.Bean;
import org.springframework.context.annotation.Configuration;
import org.springframework.transaction.annotation.EnableTransactionManagement;/*** Mybatis Plus 配置** @author ruoyi*/
@EnableTransactionManagement(proxyTargetClass = true)
@Configuration
public class MybatisPlusConfig
{@Beanpublic MybatisPlusInterceptor mybatisPlusInterceptor(){MybatisPlusInterceptor interceptor = new MybatisPlusInterceptor();// 分頁插件interceptor.addInnerInterceptor(paginationInnerInterceptor());// 樂觀鎖插件interceptor.addInnerInterceptor(optimisticLockerInnerInterceptor());// 阻斷插件interceptor.addInnerInterceptor(blockAttackInnerInterceptor());return interceptor;}/*** 分頁插件,自動識別數據庫類型 https://baomidou.com/guide/interceptor-pagination.html*/public PaginationInnerInterceptor paginationInnerInterceptor(){PaginationInnerInterceptor paginationInnerInterceptor = new PaginationInnerInterceptor();// 設置數據庫類型為mysqlpaginationInnerInterceptor.setDbType(DbType.MYSQL);// 設置最大單頁限制數量,默認 500 條,-1 不受限制paginationInnerInterceptor.setMaxLimit(-1L);return paginationInnerInterceptor;}/*** 樂觀鎖插件 https://baomidou.com/guide/interceptor-optimistic-locker.html*/public OptimisticLockerInnerInterceptor optimisticLockerInnerInterceptor(){return new OptimisticLockerInnerInterceptor();}/*** 如果是對全表的刪除或更新操作,就會終止該操作 https://baomidou.com/guide/interceptor-block-attack.html*/public BlockAttackInnerInterceptor blockAttackInnerInterceptor(){return new BlockAttackInnerInterceptor();}
}
4?添加測試表和菜單信息
drop table if exists sys_student;
create table sys_student (student_id           int(11)         auto_increment    comment '編號',student_name         varchar(30)     default ''        comment '學生名稱',student_age          int(3)          default null      comment '年齡',student_hobby        varchar(30)     default ''        comment '愛好(0代碼 1音樂 2電影)',student_sex          char(1)         default '0'       comment '性別(0男 1女 2未知)',student_status       char(1)         default '0'       comment '狀態(0正常 1停用)',student_birthday     datetime                          comment '生日',primary key (student_id)
) engine=innodb auto_increment=1 comment = '學生信息表';-- 菜單 sql
insert into sys_menu (menu_name, parent_id, order_num, url, menu_type, visible, perms, icon, create_by, create_time, update_by, update_time, remark)
values('學生信息', '3', '1', '/system/student', 'c', '0', 'system:student:view', '#', 'admin', sysdate(), '', null, '學生信息菜單');-- 按鈕父菜單id
select @parentid := last_insert_id();-- 按鈕 sql
insert into sys_menu (menu_name, parent_id, order_num, url, menu_type, visible, perms, icon, create_by, create_time, update_by, update_time, remark)
values('學生信息查詢', @parentid, '1',  '#',  'f', '0', 'system:student:list',         '#', 'admin', sysdate(), '', null, '');insert into sys_menu (menu_name, parent_id, order_num, url, menu_type, visible, perms, icon, create_by, create_time, update_by, update_time, remark)
values('學生信息新增', @parentid, '2',  '#',  'f', '0', 'system:student:add',          '#', 'admin', sysdate(), '', null, '');insert into sys_menu (menu_name, parent_id, order_num, url, menu_type, visible, perms, icon, create_by, create_time, update_by, update_time, remark)
values('學生信息修改', @parentid, '3',  '#',  'f', '0', 'system:student:edit',         '#', 'admin', sysdate(), '', null, '');insert into sys_menu (menu_name, parent_id, order_num, url, menu_type, visible, perms, icon, create_by, create_time, update_by, update_time, remark)
values('學生信息刪除', @parentid, '4',  '#',  'f', '0', 'system:student:remove',       '#', 'admin', sysdate(), '', null, '');insert into sys_menu (menu_name, parent_id, order_num, url, menu_type, visible, perms, icon, create_by, create_time, update_by, update_time, remark)
values('學生信息導出', @parentid, '5',  '#',  'f', '0', 'system:student:export',       '#', 'admin', sysdate(), '', null, '');
5?新增測試代碼驗證 新增 ruoyi-system\com\ruoyi\system\controller\SysStudentController.java
(1)刪除SysStudentMapper.xml?
(2) 空架構ruoyi-system\com\ruoyi\system\mapper\SysStudentMapper.java,因為繼承了BaseMap,所以包含了很多API,直接調用即可。
package com.ruoyi.system.mapper;
import com.baomidou.mybatisplus.core.mapper.BaseMapper;
import com.ruoyi.system.domain.SysStudent;/*** 學生信息Mapper接口** 空架構ruoyi-system\com\ruoyi\system\mapper\SysStudentMapper.java,因為繼承了BaseMap,所以包含了很多API,直接調用即可。* * 有比較復雜的查詢(關聯查詢、子查詢、多表查詢),可以加接口并使用mybatis,因為mybatis-plus兼容mybatis**/
public interface SysStudentMapper extends BaseMapper<SysStudent>
{}
(3)空架子(那就加一個方法吧)新增 ruoyi-system\com\ruoyi\system\service\ISysStudentService.java
package com.ruoyi.system.service;
import java.util.List;
import com.baomidou.mybatisplus.extension.service.IService;
import com.ruoyi.system.domain.SysStudent;/*** 學生信息Service接口** @author ruoyi*/
public interface ISysStudentService extends IService<SysStudent>
{/*** 查詢學生信息列表** @param sysStudent 學生信息* @return 學生信息集合*/public List<SysStudent> queryList(SysStudent sysStudent);
}
(4)?ruoyi-system\com\ruoyi\system\service\impl\SysStudentServiceImpl.java
package com.ruoyi.system.service.impl;import java.util.List;
import org.springframework.beans.factory.annotation.Autowired;
import org.springframework.stereotype.Service;
import com.ruoyi.system.mapper.SysStudentMapper;
import com.ruoyi.system.domain.SysStudent;
import com.ruoyi.system.service.ISysStudentService;import java.util.List;
import org.springframework.stereotype.Service;
import com.baomidou.mybatisplus.core.conditions.query.QueryWrapper;
import com.baomidou.mybatisplus.core.toolkit.Wrappers;
import com.baomidou.mybatisplus.extension.service.impl.ServiceImpl;
import com.ruoyi.common.utils.StringUtils;
import com.ruoyi.system.domain.SysStudent;
import com.ruoyi.system.mapper.SysStudentMapper;
import com.ruoyi.system.service.ISysStudentService;/*** 學生信息Service業務層處理** @author ruoyi*/
@Service
public class SysStudentServiceImpl extends ServiceImpl<SysStudentMapper, SysStudent> implements ISysStudentService
{@Overridepublic List<SysStudent> queryList(SysStudent sysStudent){// 注意:mybatis-plus lambda 模式不支持 eclipse 的編譯器// LambdaQueryWrapper<SysStudent> queryWrapper = Wrappers.lambdaQuery();// queryWrapper.eq(SysStudent::getStudentName, sysStudent.getStudentName());QueryWrapper<SysStudent> queryWrapper = Wrappers.query();if (StringUtils.isNotEmpty(sysStudent.getStudentName())){queryWrapper.eq("student_name", sysStudent.getStudentName());}if (StringUtils.isNotNull(sysStudent.getStudentAge())){queryWrapper.eq("student_age", sysStudent.getStudentAge());}if (StringUtils.isNotEmpty(sysStudent.getStudentHobby())){queryWrapper.eq("student_hobby", sysStudent.getStudentHobby());}return this.list(queryWrapper);}
}
(6)ruoyi-system\com\ruoyi\system\controller\SysStudentController.java?
import java.util.Arrays;
import java.util.List;
import org.springframework.beans.factory.annotation.Autowired;
import org.springframework.security.access.prepost.PreAuthorize;
import org.springframework.web.bind.annotation.DeleteMapping;
import org.springframework.web.bind.annotation.GetMapping;
import org.springframework.web.bind.annotation.PathVariable;
import org.springframework.web.bind.annotation.PostMapping;
import org.springframework.web.bind.annotation.PutMapping;
import org.springframework.web.bind.annotation.RequestBody;
import org.springframework.web.bind.annotation.RequestMapping;
import org.springframework.web.bind.annotation.RestController;
import com.ruoyi.common.annotation.Log;
import com.ruoyi.common.core.controller.BaseController;
import com.ruoyi.common.core.domain.AjaxResult;
import com.ruoyi.common.core.page.TableDataInfo;
import com.ruoyi.common.enums.BusinessType;
import com.ruoyi.common.utils.poi.ExcelUtil;
import com.ruoyi.system.domain.SysStudent;
import com.ruoyi.system.service.ISysStudentService;/*** 學生信息Controller* * @author ruoyi*/
@RestController
@RequestMapping("/system/student")
public class SysStudentController extends BaseController
{@Autowiredprivate ISysStudentService sysStudentService;/*** 查詢學生信息列表*/@PreAuthorize("@ss.hasPermi('system:student:list')")@GetMapping("/list")public TableDataInfo list(SysStudent sysStudent){startPage();List<SysStudent> list = sysStudentService.queryList(sysStudent);return getDataTable(list);}/*** 導出學生信息列表*/@PreAuthorize("@ss.hasPermi('system:student:export')")@Log(title = "學生信息", businessType = BusinessType.EXPORT)@GetMapping("/export")public AjaxResult export(SysStudent sysStudent){List<SysStudent> list = sysStudentService.queryList(sysStudent);ExcelUtil<SysStudent> util = new ExcelUtil<SysStudent>(SysStudent.class);return util.exportExcel(list, "student");}/*** 獲取學生信息詳細信息*/@PreAuthorize("@ss.hasPermi('system:student:query')")@GetMapping(value = "/{studentId}")public AjaxResult getInfo(@PathVariable("studentId") Long studentId){return AjaxResult.success(sysStudentService.getById(studentId));}/*** 新增學生信息*/@PreAuthorize("@ss.hasPermi('system:student:add')")@Log(title = "學生信息", businessType = BusinessType.INSERT)@PostMappingpublic AjaxResult add(@RequestBody SysStudent sysStudent){return toAjax(sysStudentService.save(sysStudent));}/*** 修改學生信息*/@PreAuthorize("@ss.hasPermi('system:student:edit')")@Log(title = "學生信息", businessType = BusinessType.UPDATE)@PutMappingpublic AjaxResult edit(@RequestBody SysStudent sysStudent){return toAjax(sysStudentService.updateById(sysStudent));}/*** 刪除學生信息*/@PreAuthorize("@ss.hasPermi('system:student:remove')")@Log(title = "學生信息", businessType = BusinessType.DELETE)@DeleteMapping("/{studentIds}")public AjaxResult remove(@PathVariable Long[] studentIds){return toAjax(sysStudentService.removeByIds(Arrays.asList(studentIds)));}
}
(7)也要改:實體類ruoyi-system\com\ruoyi\system\domain\SysStudent.java
package com.ruoyi.system.domain;import java.io.Serializable;// mybatis-plus 多加
import java.util.Date;
import org.apache.commons.lang3.builder.ToStringBuilder;
import org.apache.commons.lang3.builder.ToStringStyle;
import com.baomidou.mybatisplus.annotation.IdType;// mybatis-plus 多加
import com.baomidou.mybatisplus.annotation.TableField;// mybatis-plus 多加
import com.baomidou.mybatisplus.annotation.TableId;// mybatis-plus 多加
import com.baomidou.mybatisplus.annotation.TableName;// mybatis-plus 多加
import com.fasterxml.jackson.annotation.JsonFormat;
import com.ruoyi.common.annotation.Excel;/*** 學生信息對象 sys_student** @author ruoyi*/
@TableName(value = "sys_student")
public class SysStudent implements Serializable
{@TableField(exist = false)private static final long serialVersionUID = 1L;/** 編號 */@TableId(type = IdType.AUTO)private Long studentId;/** 學生名稱 */@Excel(name = "學生名稱")private String studentName;/** 年齡 */@Excel(name = "年齡")private Integer studentAge;/** 愛好(0代碼 1音樂 2電影) */@Excel(name = "愛好", readConverterExp = "0=代碼,1=音樂,2=電影")private String studentHobby;/** 性別(0男 1女 2未知) */@Excel(name = "性別", readConverterExp = "0=男,1=女,2=未知")private String studentSex;/** 狀態(0正常 1停用) */@Excel(name = "狀態", readConverterExp = "0=正常,1=停用")private String studentStatus;/** 生日 */@JsonFormat(pattern = "yyyy-MM-dd")@Excel(name = "生日", width = 30, dateFormat = "yyyy-MM-dd")private Date studentBirthday;public void setStudentId(Long studentId){this.studentId = studentId;}public Long getStudentId(){return studentId;}public void setStudentName(String studentName){this.studentName = studentName;}public String getStudentName(){return studentName;}public void setStudentAge(Integer studentAge){this.studentAge = studentAge;}public Integer getStudentAge(){return studentAge;}public void setStudentHobby(String studentHobby){this.studentHobby = studentHobby;}public String getStudentHobby(){return studentHobby;}public void setStudentSex(String studentSex){this.studentSex = studentSex;}public String getStudentSex(){return studentSex;}public void setStudentStatus(String studentStatus){this.studentStatus = studentStatus;}public String getStudentStatus(){return studentStatus;}public void setStudentBirthday(Date studentBirthday){this.studentBirthday = studentBirthday;}public Date getStudentBirthday(){return studentBirthday;}@Overridepublic String toString() {return new ToStringBuilder(this,ToStringStyle.MULTI_LINE_STYLE).append("studentId", getStudentId()).append("studentName", getStudentName()).append("studentAge", getStudentAge()).append("studentHobby", getStudentHobby()).append("studentSex", getStudentSex()).append("studentStatus", getStudentStatus()).append("studentBirthday", getStudentBirthday()).toString();}
}
6?登錄系統測試學生菜單增刪改查功能。
7 拓展:修改模板,使用代碼生成器生成mybatis-plus CURD代碼
107 實現離線IP地址定位(集成ip2region)?
01?需求
- 登錄日志會查詢并記錄,登錄地(網)址、登錄地點。
- 如果系統并發用戶大的話,就會頻繁地記錄登錄地(網)址、登錄地點,對網絡的消耗大。
- 離線IP地址定位庫主要用于內網或想減少對外訪問http帶來的資源消耗。
- 最終:實現通過本地離線IP庫去取歸屬地了,不需要再通過請求HTTP網絡(外網)的方式。
1 ruoyi-common/pom.xml引入依賴
<!-- 離線IP地址定位庫 -->
<dependency><groupId>org.lionsoul</groupId><artifactId>ip2region</artifactId><version>1.7.2</version>
</dependency>
2?ruoyi-common/uitl添加工具類RegionUtil.java
package com.ruoyi.common.utils;
import java.io.File;
import java.io.InputStream;
import java.lang.reflect.Method;
import org.apache.commons.io.FileUtils;
import org.lionsoul.ip2region.DataBlock;
import org.lionsoul.ip2region.DbConfig;
import org.lionsoul.ip2region.DbSearcher;
import org.lionsoul.ip2region.Util;
import org.slf4j.Logger;
import org.slf4j.LoggerFactory;
import org.springframework.core.io.ClassPathResource;/*** 根據ip離線查詢地址** @author ruoyi*/
public class RegionUtil
{private static final Logger log = LoggerFactory.getLogger(RegionUtil.class);// 臨時文件的地址private static final String JAVA_TEMP_DIR = "java.io.tmpdir";static DbConfig config = null;static DbSearcher searcher = null;/*** 初始化IP庫*/static{try{// 因為jar無法讀取文件,因此這里我們會,復制并創建臨時文件,放到target下面// 為什么會讀到target目錄下面去呢?因為我們打包生成的jar包,就是生成到了target目錄下,它們是一起的String dbPath = RegionUtil.class.getResource("/ip2region/ip2region.db").getPath();File file = new File(dbPath);if (!file.exists()){String tmpDir = System.getProperties().getProperty(JAVA_TEMP_DIR); // target目錄dbPath = tmpDir + "ip2region.db"; // 文件名字 自定義file = new File(dbPath);ClassPathResource cpr = new ClassPathResource("ip2region" + File.separator + "ip2region.db");InputStream resourceAsStream = cpr.getInputStream();if (resourceAsStream != null){FileUtils.copyInputStreamToFile(resourceAsStream, file);}}config = new DbConfig();searcher = new DbSearcher(config, dbPath);log.info("bean [{}]", config);log.info("bean [{}]", searcher);}catch (Exception e){log.error("init ip region error:{}", e);}}/*** 解析IP** @param ip* @return*/public static String getRegion(String ip){try{// dbif (searcher == null || StringUtils.isEmpty(ip)){log.error("DbSearcher is null");return StringUtils.EMPTY;}long startTime = System.currentTimeMillis();// 查詢算法int algorithm = DbSearcher.MEMORY_ALGORITYM;Method method = null;switch (algorithm){case DbSearcher.BTREE_ALGORITHM:method = searcher.getClass().getMethod("btreeSearch", String.class);break;case DbSearcher.BINARY_ALGORITHM:method = searcher.getClass().getMethod("binarySearch", String.class);break;case DbSearcher.MEMORY_ALGORITYM:method = searcher.getClass().getMethod("memorySearch", String.class);break;}DataBlock dataBlock = null;if (Util.isIpAddress(ip) == false){log.warn("warning: Invalid ip address");}dataBlock = (DataBlock) method.invoke(searcher, ip);String result = dataBlock.getRegion();long endTime = System.currentTimeMillis();log.debug("region use time[{}] result[{}]", endTime - startTime, result);return result;}catch (Exception e){log.error("error:{}", e);}return StringUtils.EMPTY;}}
3 修改AddressUtils.java
package com.ruoyi.common.utils.ip;import org.slf4j.Logger;
import org.slf4j.LoggerFactory;
import com.ruoyi.common.config.RuoYiConfig;
import com.ruoyi.common.utils.RegionUtil;
import com.ruoyi.common.utils.StringUtils;/*** 獲取地址類** @author ruoyi*/
public class AddressUtils
{private static final Logger log = LoggerFactory.getLogger(AddressUtils.class);// 未知地址public static final String UNKNOWN = "XX XX";public static String getRealAddressByIP(String ip){String address = UNKNOWN;// 內網不查詢if (IpUtils.internalIp(ip)){return "內網IP";}if (RuoYiConfig.isAddressEnabled()){try{String rspStr = RegionUtil.getRegion(ip);if (StringUtils.isEmpty(rspStr)){log.error("獲取地理位置異常 {}", ip);return UNKNOWN;}String[] obj = rspStr.split("\\|");String region = obj[2]; // 地區String city = obj[3];   // 城市return String.format("%s %s", region, city);}catch (Exception e){log.error("獲取地理位置異常 {}", e);}}return address;}
}
4 添加離線IP地址庫插件
????????下載前端插件相關包和代碼實現ruoyi/集成ip2region離線地址定位.zip
????????鏈接: https://pan.baidu.com/s/13JVC9jm-Dp9PfHdDDylLCQ 提取碼: y9jt
5 添加離線IP地址庫。即所有的請求都會從ip2region.db中獲取數據,就不用去請求外網地址的db,這樣就提升了響應速度:
????????在ruoyi-admin的src/main/resources下新建ip2region目錄,并復制文件ip2region.db到目錄下。如下圖所示: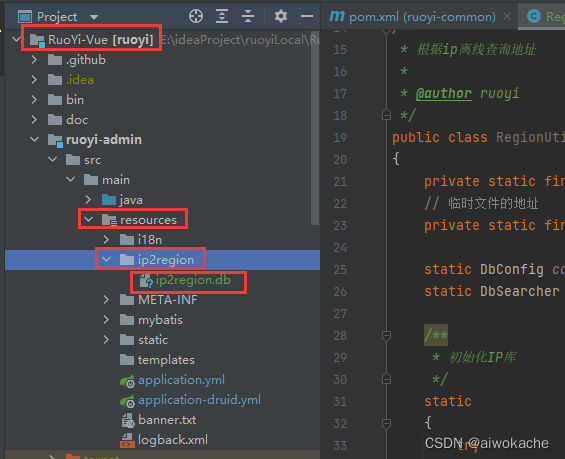
6 Test#main方法,簡單測試
修改AddressUtils.java,跳過內網不查,打開開關:
package com.ruoyi.common.utils.ip;import org.slf4j.Logger;
import org.slf4j.LoggerFactory;
import com.ruoyi.common.config.RuoYiConfig;
import com.ruoyi.common.utils.RegionUtil;
import com.ruoyi.common.utils.StringUtils;/*** 獲取地址類** @author ruoyi*/
public class AddressUtils
{private static final Logger log = LoggerFactory.getLogger(AddressUtils.class);// 未知地址public static final String UNKNOWN = "XX XX";public static String getRealAddressByIP(String ip){String address = UNKNOWN;// 內網不查詢/* TO DO main方法測試,跳過內網不查if (IpUtils.internalIp(ip)){return "內網IP";}*//* TO DO main方法測試,打開開關if (RuoYiConfig.isAddressEnabled()){*/try{String rspStr = RegionUtil.getRegion(ip);if (StringUtils.isEmpty(rspStr)){log.error("獲取地理位置異常 {}", ip);return UNKNOWN;}String[] obj = rspStr.split("\\|");String region = obj[2]; // 地區String city = obj[3];   // 城市return String.format("%s %s", region, city);}catch (Exception e){log.error("獲取地理位置異常 {}", e);}/* TO DO main方法測試,打開開關}*/return address;}
}


7 項目測試成功?
- 重啟后端
- 測試成功
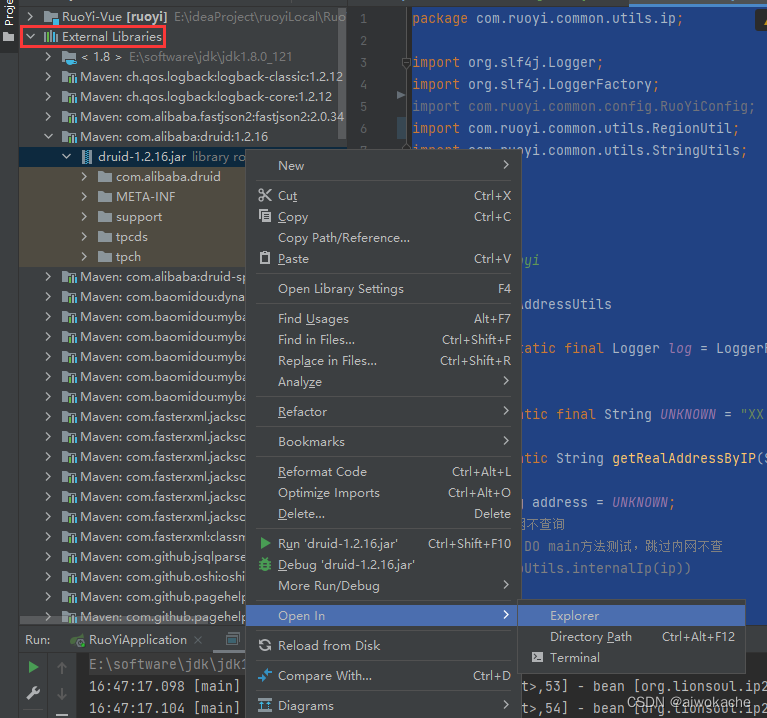
108 實現數據庫密碼加密(集成druid)
1?執行命令加密數據庫密碼?
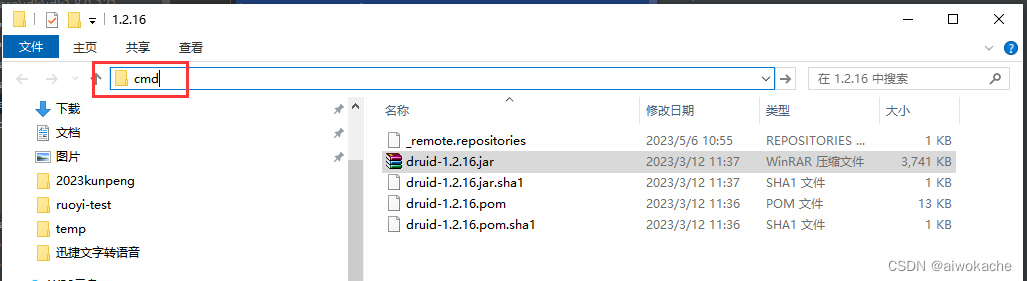
找到druid-xxx.jar:
 ?打開druid-xxx.jar所在目錄的cmd命令對話框:
 ?執行命令加密數據庫密碼:
java -cp druid-1.2.16.jar com.alibaba.druid.filter.config.ConfigTools password得到加密后的字符串:
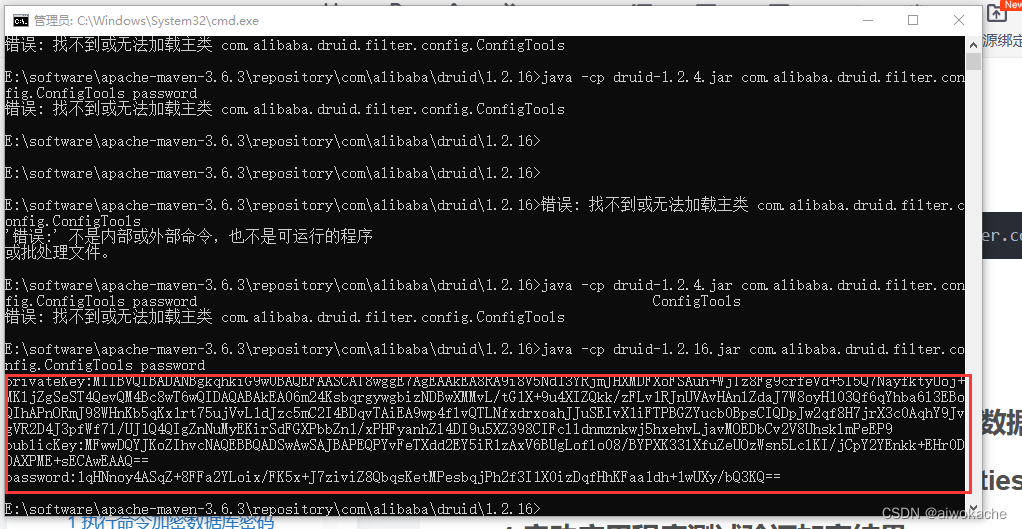
# 私鑰
privateKey:MIIBVQIBADANBgkqhkiG9w0BAQEFAASCAT8wggE7AgEAAkEA8RA9i8V5Nd13YRjmJHXMDFXoFSAuh+WjTz8Fg9crfeVd+5l5Q7NayfktyUoj+MKljZgSeST4QevQM4Bc8wT6wQIDAQABAkEA06m24KsbqrgywgbizNDBwXMMvL/tG1X+9u4XIZQkk/zFLv1RJnUVAvHAnlZdaJ7W8oyH103Qf6qYhba6l3EBoQIhAPnORmJ98WHnKb5qKx1rt75ujVvL1dJzc5mC2I4BDqvTAiEA9wp4flvQTLNfxdrxoahJJuSEIvX1iFTPBGZYucb0BpsCIQDpJw2qf8H7jrX3c0AqhY9JvgVR2D4J3pfWf7l/UJ1Q4QIgZnNuMyEKirSdFGXPbbZn1/xPHFyanhZl4DI9u5XZ398CIFclldnmznkwj5hxehvLjavMOEDbCv2V8UhsklmPeEP9# 公鑰
publicKey:MFwwDQYJKoZIhvcNAQEBBQADSwAwSAJBAPEQPYvFeTXdd2EY5iR1zAxV6BUgLoflo08/BYPXK33lXfuZeUOzWsn5LclKI/jCpY2YEnkk+EHr0DOAXPME+sECAwEAAQ==# 密碼
# 密碼用來替換掉application-druid.yml的數據密碼password:123456
password:1qHNnoy4ASqZ+8FFa2YLoix/FK5x+J7ziviZ8QbqsKetMPesbqjPh2f3I1X0izDqfHhKFaa1dh+1wUXy/bQ3KQ==
2 application-druid.yml:配置數據源,提示Druid數據源需要對數據庫密碼進行解密。
- 密碼替換
- 配置公鑰和私鑰
spring:datasource:type: com.alibaba.druid.pool.DruidDataSourcedriverClassName: com.mysql.cj.jdbc.Driverdruid:master:url: jdbc:mysql://localhost:3306/ry?useUnicode=true&characterEncoding=utf8&zeroDateTimeBehavior=convertToNull&useSSL=true&serverTimezone=GMT%2B8username: rootpassword: gkYlljNHKe0/4z7bbJxD7v/txWJIFbiGWwsIPo176Q7fG0UjcSizNxuRUI2ll27ZPQf2ekiHFptus2/Rc4cmvA==slave:enabled: falseurl: username: password: initialSize: 5minIdle: 10maxActive: 20maxWait: 60000connectTimeout: 30000socketTimeout: 60000timeBetweenEvictionRunsMillis: 60000minEvictableIdleTimeMillis: 300000maxEvictableIdleTimeMillis: 900000validationQuery: SELECT 1 FROM DUALtestWhileIdle: truetestOnBorrow: falsetestOnReturn: false# 第二步:配置連接屬性# 第三步:把最新的公鑰放到key=xxxconnectProperties: config.decrypt=true;config.decrypt.key=MFwwDQYJKoZIhvcNAQEBBQADSwAwSAJBALizFQBZnHsPpj31Z8yOrrRL4R1jtrOnuEdW1Vt2vSKR/qRMqXjVeirWf8PT7srD33T8VuXzdwZpyhWVACDL1oUCAwEAAQ==webStatFilter: enabled: truestatViewServlet:enabled: trueallow:url-pattern: /druid/*login-username: ruoyilogin-password: 123456filter:config:# 第一步:是否配置加密,設置為trueenabled: truestat:enabled: truelog-slow-sql: trueslow-sql-millis: 1000merge-sql: truewall:config:multi-statement-allow: true3?DruidProperties.java配置connectProperties屬性
// 添加:屬性(我們剛剛加)@Value("${spring.datasource.druid.connectProperties}")private String connectProperties;public DruidDataSource dataSource(DruidDataSource datasource){// 添加:為數據庫密碼提供加密功能 datasource.setConnectionProperties(connectProperties);}4 測試:啟動應用程序測試驗證加密結果?
? ? ? ? 啟動應用沒有報錯
5 提示:如若忘記密碼可以使用工具類解密(傳入生成的公鑰+密碼)
public static void main(String[] args) throws Exception
{String password = ConfigTools.decrypt("MFwwDQYJKoZIhvcNAQEBBQADSwAwSAJBALizFQBZnHsPpj31Z8yOrrRL4R1jtrOnuEdW1Vt2vSKR/qRMqXjVeirWf8PT7srD33T8VuXzdwZpyhWVACDL1oUCAwEAAQ==","gkYlljNHKe0/4z7bbJxD7v/txWJIFbiGWwsIPo176Q7fG0UjcSizNxuRUI2ll27ZPQf2ekiHFptus2/Rc4cmvA==");System.out.println("解密密碼:" + password);
}
109 實現滑塊驗證碼(集成aj-captcha)
1?ruoyi-framework\pom.xml添加依賴
<!-- 滑塊驗證碼 --><dependency><groupId>com.github.anji-plus</groupId><artifactId>captcha-spring-boot-starter</artifactId><version>1.2.7</version></dependency>2?修改application.yml,加入aj-captcha配置
# 滑塊驗證碼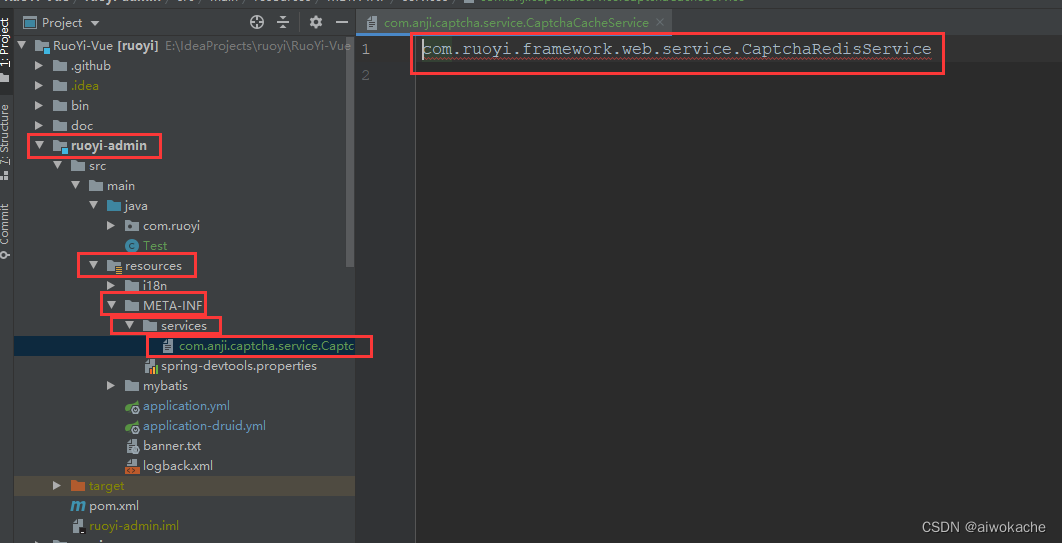
aj:captcha:# 緩存類型# 默認為本地緩存,如果有多臺機器的話可能會出現誤差# 自定義redis去實現cache-type: redis# blockPuzzle滑塊 clickWord文字點選 default默認兩者都實例化type: blockPuzzle# 右下角顯示字water-mark: ruoyi.vip# 校驗滑動拼圖允許誤差偏移量(默認5像素)slip-offset: 5# aes加密坐標開啟或者禁用(true|false)aes-status: true# 滑動干擾項(0/1/2)interference-options: 2同時在ruoyi-admin\src\main\resources\META-INF\services下創建com.anji.captcha.service.CaptchaCacheService文件同時設置文件內容為
com.ruoyi.framework.web.service.CaptchaRedisService
?為什么還要配置?com.anji.captcha.service.impl.CaptchaServiceFactory:
static {/*** 作用:加載CaptchaCacheService的實現類CaptchaRedisService** 為什么要新建呢?* aj-captcha是通過ServiceLoader.load(CaptchaCacheService.class)這種方式去加載的,這種方式是jdk的加載方式。* 而jdk包的加載方式,需要我們在META-INF.services去創建對應的類,才能加載到對應的XxxServie。* 創建什么XxxService呢?* 默認情況下,會使用本地的實現類:com.anji.captcha.service.impl.CaptchaCacheServiceMemImpl,把所有的數據都保存在本地(local)。* 而我們需要使用redis做為緩存,所以我們會去自定義一個Redis的Service實現類。* 如何創建redis緩存的實現類?* (1)創建一個類實現CaptchaCacheService* (2)配置:META-INF.services去創建對應的類* 提示:只有在使用自定義redis時才需要這個東西,如果不使用redis的話就不用管它了*/ServiceLoader<CaptchaCacheService> cacheServices = ServiceLoader.load(CaptchaCacheService.class);Iterator var1 = cacheServices.iterator();while(var1.hasNext()) {CaptchaCacheService item = (CaptchaCacheService)var1.next();cacheService.put(item.type(), item);}logger.info("supported-captchaCache-service:{}", cacheService.keySet().toString());ServiceLoader<CaptchaService> services = ServiceLoader.load(CaptchaService.class);Iterator var5 = services.iterator();while(var5.hasNext()) {CaptchaService item = (CaptchaService)var5.next();instances.put(item.captchaType(), item);}logger.info("supported-captchaTypes-service:{}", instances.keySet().toString());}配置效果:
3 在SecurityConfig中設置httpSecurity配置匿名訪問(白名單)
/*** "/captcha/get":獲取驗證碼的信息接口* "/captcha/check":檢查驗證碼的信息接口*/
.antMatchers("/login", "/captcha/get", "/captcha/check").permitAll()
/*** 以前的驗證碼配置,刪除掉*/
//.antMatchers("/login", "/register", "/captchaImage").permitAll()
4 修改相關類
(1)移除原先驗證碼使用的類
移除原先不需要的類:
ruoyi-admin\com\ruoyi\web\controller\common\CaptchaController.javaruoyi-framework\com\ruoyi\framework\config\CaptchaConfig.javaruoyi-framework\com\ruoyi\framework\config\KaptchaTextCreator.java
(2)修改ruoyi-admin\com\ruoyi\web\controller\system\SysLoginController.java
/*** 登錄方法* * @param loginBody 登錄信息* @return 結果*/
@PostMapping("/login")
public AjaxResult login(@RequestBody LoginBody loginBody)
{AjaxResult ajax = AjaxResult.success();// 生成令牌// 滑塊驗證碼:去掉UUIDString token = loginService.login(loginBody.getUsername(), loginBody.getPassword(), loginBody.getCode());ajax.put(Constants.TOKEN, token);return ajax;
}(3)修改ruoyi-framework\com\ruoyi\framework\web\service\SysLoginService.java
package com.ruoyi.framework.web.service;import javax.annotation.Resource;
import org.springframework.beans.factory.annotation.Autowired;
import org.springframework.context.annotation.Lazy;
import org.springframework.security.authentication.AuthenticationManager;
import org.springframework.security.authentication.BadCredentialsException;
import org.springframework.security.authentication.UsernamePasswordAuthenticationToken;
import org.springframework.security.core.Authentication;
import org.springframework.stereotype.Component;
import com.anji.captcha.model.common.ResponseModel;
import com.anji.captcha.model.vo.CaptchaVO;
import com.anji.captcha.service.CaptchaService;
import com.ruoyi.common.constant.Constants;
import com.ruoyi.common.core.domain.entity.SysUser;
import com.ruoyi.common.core.domain.model.LoginUser;
import com.ruoyi.common.exception.ServiceException;
import com.ruoyi.common.exception.user.CaptchaException;
import com.ruoyi.common.exception.user.UserPasswordNotMatchException;
import com.ruoyi.common.utils.DateUtils;
import com.ruoyi.common.utils.MessageUtils;
import com.ruoyi.common.utils.ServletUtils;
import com.ruoyi.common.utils.ip.IpUtils;
import com.ruoyi.framework.manager.AsyncManager;
import com.ruoyi.framework.manager.factory.AsyncFactory;
import com.ruoyi.framework.security.context.AuthenticationContextHolder;
import com.ruoyi.system.service.ISysUserService;/*** 登錄校驗方法* * @author ruoyi*/
@Component
public class SysLoginService
{@Autowiredprivate TokenService tokenService;@Resourceprivate AuthenticationManager authenticationManager;@Autowiredprivate ISysUserService userService;@Autowired@Lazyprivate CaptchaService captchaService;/*** 登錄驗證* 滑塊驗證碼:也不需要UUID了* @param username 用戶名* @param password 密碼* @param code 驗證碼* @return 結果*/public String login(String username, String password, String code){CaptchaVO captchaVO = new CaptchaVO();captchaVO.setCaptchaVerification(code);/* * 滑塊驗證碼:這里直接通過它提供的驗證方法去驗證*/ResponseModel response = captchaService.verification(captchaVO);if (!response.isSuccess()){AsyncManager.me().execute(AsyncFactory.recordLogininfor(username, Constants.LOGIN_FAIL, MessageUtils.message("user.jcaptcha.error")));throw new CaptchaException();}// 用戶驗證Authentication authentication = null;try{UsernamePasswordAuthenticationToken authenticationToken = new UsernamePasswordAuthenticationToken(username, password);AuthenticationContextHolder.setContext(authenticationToken);// 該方法會去調用UserDetailsServiceImpl.loadUserByUsernameauthentication = authenticationManager.authenticate(authenticationToken);}catch (Exception e){if (e instanceof BadCredentialsException){AsyncManager.me().execute(AsyncFactory.recordLogininfor(username, Constants.LOGIN_FAIL, MessageUtils.message("user.password.not.match")));throw new UserPasswordNotMatchException();}else{AsyncManager.me().execute(AsyncFactory.recordLogininfor(username, Constants.LOGIN_FAIL, e.getMessage()));throw new ServiceException(e.getMessage());}}finally{AuthenticationContextHolder.clearContext();}AsyncManager.me().execute(AsyncFactory.recordLogininfor(username, Constants.LOGIN_SUCCESS, MessageUtils.message("user.login.success")));LoginUser loginUser = (LoginUser) authentication.getPrincipal();recordLoginInfo(loginUser.getUserId());// 生成tokenreturn tokenService.createToken(loginUser);}/*** 記錄登錄信息** @param userId 用戶ID*/public void recordLoginInfo(Long userId){SysUser sysUser = new SysUser();sysUser.setUserId(userId);sysUser.setLoginIp(IpUtils.getIpAddr(ServletUtils.getRequest()));sysUser.setLoginDate(DateUtils.getNowDate());userService.updateUserProfile(sysUser);}
}(4)新增?ruoyi-framework\com\ruoyi\framework\web\service\CaptchaRedisService.java:自定義的redis緩存的實現類,所以的數據都緩存到redis中
package com.ruoyi.framework.web.service;import java.util.concurrent.TimeUnit;
import org.springframework.beans.factory.annotation.Autowired;
import org.springframework.data.redis.core.StringRedisTemplate;
import com.anji.captcha.service.CaptchaCacheService;/*** 自定義redis驗證碼緩存實現類* * @author ruoyi*/
public class CaptchaRedisService implements CaptchaCacheService
{@Autowiredprivate StringRedisTemplate stringRedisTemplate;@Overridepublic void set(String key, String value, long expiresInSeconds){stringRedisTemplate.opsForValue().set(key, value, expiresInSeconds, TimeUnit.SECONDS);}@Overridepublic boolean exists(String key){return stringRedisTemplate.hasKey(key);}@Overridepublic void delete(String key){stringRedisTemplate.delete(key);}@Overridepublic String get(String key){return stringRedisTemplate.opsForValue().get(key);}@Overridepublic Long increment(String key, long val){return stringRedisTemplate.opsForValue().increment(key, val);}@Overridepublic String type(){return "redis";}
}
5 前端集成:添加滑動驗證碼插件到ruoyi-ui
- 前端:
- 登錄頁面要改
- 登錄邏輯要改
下載前端插件相關包和代碼實現ruoyi-vue/集成滑動驗證碼.zip
鏈接: https://pan.baidu.com/s/13JVC9jm-Dp9PfHdDDylLCQ 提取碼: y9jt
6 測試
- 前端:npm install(安裝:"crypto-js": "4.1.1",) , npm run dev
- 后端:重啟
- 登錄成功
- 到redis中查看滑動驗證的信息
- 滑動驗證碼2分鐘過期
110 實現分庫分表(集成sharding-jdbc,當當網捐給apache的中間件)
?0 需求
- 當你們訂單的數據量很大的時候,就可以去用了。比如說,每天訂單量是上千萬。這時把全部的訂單都放到一張表肯定是不行的,一下就撐爆了。此時,就可以采用分庫分表存儲策略。
sharding-jdbc是由當當捐入給apache的一款分布式數據庫中間件,支持垂直分庫、垂直分表、水平分庫、水平分表、讀寫分離、分布式事務和高可用等相關功能。
1?ruoyi-framework\pom.xml模塊添加sharding-jdbc整合依賴?? ?
<!-- sharding-jdbc分庫分表 -->
<dependency><groupId>org.apache.shardingsphere</groupId><artifactId>sharding-jdbc-core</artifactId><version>4.1.1</version>
</dependency>
2?創建兩個測試數據庫
create database `ry-order1`;
create database `ry-order2`;
3?創建兩個測試訂單表(每個庫都兩張表)
-- ----------------------------
-- 訂單信息表sys_order_0
-- ----------------------------
drop table if exists sys_order_0;
create table sys_order_0
(order_id      bigint(20)      not null                   comment '訂單ID',user_id       bigint(64)      not null                   comment '用戶編號',status        char(1)         not null                   comment '狀態(0交易成功 1交易失敗)',order_no      varchar(64)     default null               comment '訂單流水',primary key (order_id)
) engine=innodb comment = '訂單信息表';-- ----------------------------
-- 訂單信息表sys_order_1
-- ----------------------------
drop table if exists sys_order_1;
create table sys_order_1
(order_id      bigint(20)      not null                   comment '訂單ID',user_id       bigint(64)      not null                   comment '用戶編號',status        char(1)         not null                   comment '狀態(0交易成功 1交易失敗)',order_no      varchar(64)     default null               comment '訂單流水',primary key (order_id)
) engine=innodb comment = '訂單信息表';
4?下載插件相關包和代碼實現覆蓋到工程中
提示
下載插件相關包和代碼實現
ruoyi/集成sharding-jdbc實現分庫分表.zip鏈接: https://pan.baidu.com/s/13JVC9jm-Dp9PfHdDDylLCQ 提取碼: y9jt
(1) 創建類ShardingDataSourceConfig配置sharding-jdbc信息
package com.ruoyi.framework.config;import java.sql.SQLException;
import java.util.HashMap;
import java.util.Map;
import java.util.Properties;
import javax.sql.DataSource;
import org.apache.shardingsphere.api.config.sharding.KeyGeneratorConfiguration;
import org.apache.shardingsphere.api.config.sharding.ShardingRuleConfiguration;
import org.apache.shardingsphere.api.config.sharding.TableRuleConfiguration;
import org.apache.shardingsphere.api.config.sharding.strategy.InlineShardingStrategyConfiguration;
import org.apache.shardingsphere.shardingjdbc.api.ShardingDataSourceFactory;
import org.springframework.beans.factory.annotation.Qualifier;
import org.springframework.boot.autoconfigure.condition.ConditionalOnProperty;
import org.springframework.boot.context.properties.ConfigurationProperties;
import org.springframework.context.annotation.Bean;
import org.springframework.context.annotation.Configuration;
import com.alibaba.druid.pool.DruidDataSource;
import com.alibaba.druid.spring.boot.autoconfigure.DruidDataSourceBuilder;
import com.ruoyi.framework.config.properties.DruidProperties;/*** sharding 配置信息* 這個的話是僅僅只是配置了分庫分表啊,其實它里邊還有很多東西可以配置,大家可以去看到它的一個文檔啊。* @author ruoyi*/
@Configuration
public class ShardingDataSourceConfig
{/*** 數據源1*/@Bean@ConfigurationProperties("spring.datasource.druid.order1")@ConditionalOnProperty(prefix = "spring.datasource.druid.order1", name = "enabled", havingValue = "true")public DataSource order1DataSource(DruidProperties druidProperties){/*** 加數據源1*/DruidDataSource dataSource = DruidDataSourceBuilder.create().build();return druidProperties.dataSource(dataSource);}/*** 數據源2*/@Bean@ConfigurationProperties("spring.datasource.druid.order2")@ConditionalOnProperty(prefix = "spring.datasource.druid.order2", name = "enabled", havingValue = "true")public DataSource order2DataSource(DruidProperties druidProperties){/*** 加數據源2*/DruidDataSource dataSource = DruidDataSourceBuilder.create().build();return druidProperties.dataSource(dataSource);}/*** 加了sharding-jdbc的數據源shardingDataSource*/@Bean(name = "shardingDataSource")public DataSource shardingDataSource(@Qualifier("order1DataSource") DataSource order1DataSource, @Qualifier("order2DataSource") DataSource order2DataSource) throws SQLException{Map<String, DataSource> dataSourceMap = new HashMap<>();/*** 初始兩個數據源*/dataSourceMap.put("order1", order1DataSource);dataSourceMap.put("order2", order2DataSource);// sys_order 表規則配置/*** sys_order:表前綴* "order$->{1..2}:現在只配置了兩個庫* sys_order_$->{0..1}:現在只配置了兩個表*/TableRuleConfiguration orderTableRuleConfig = new TableRuleConfiguration("sys_order", "order$->{1..2}.sys_order_$->{0..1}");// 配置分庫策略/*** user_id:分庫策略是通過user_id去分的* "order$->{user_id % 2 + 1}":分庫策略*/orderTableRuleConfig.setDatabaseShardingStrategyConfig(new InlineShardingStrategyConfiguration("user_id", "order$->{user_id % 2 + 1}"));// 配置分表策略/*** order_id:分表策略是通過order_id去分的* "sys_order_$->{order_id % 2}":分表策略*/orderTableRuleConfig.setTableShardingStrategyConfig(new InlineShardingStrategyConfiguration("order_id", "sys_order_$->{order_id % 2}"));// 分布式主鍵/*** 主鍵策略:使用Sharding-jdbc默認的主鍵策略*/orderTableRuleConfig.setKeyGeneratorConfig(new KeyGeneratorConfiguration("SNOWFLAKE", "order_id"));// 配置分片規則ShardingRuleConfiguration shardingRuleConfig = new ShardingRuleConfiguration();shardingRuleConfig.getTableRuleConfigs().add(orderTableRuleConfig);// 獲取數據源對象DataSource dataSource = ShardingDataSourceFactory.createDataSource(dataSourceMap, shardingRuleConfig, getProperties());return dataSource;}/*** 系統參數配置*/private Properties getProperties(){Properties shardingProperties = new Properties();shardingProperties.put("sql.show", true);return shardingProperties;}
}
(2)?配置文件application-druid.yml添加測試數據源
# 數據源配置
spring:datasource:type: com.alibaba.druid.pool.DruidDataSourcedriverClassName: com.mysql.cj.jdbc.Driverdruid:# 主庫數據源master:url: jdbc:mysql://localhost:3306/ry?useUnicode=true&characterEncoding=utf8&zeroDateTimeBehavior=convertToNull&useSSL=true&serverTimezone=GMT%2B8username: rootpassword: password# 訂單庫1order1:enabled: trueurl: jdbc:mysql://localhost:3306/ry-order1?useUnicode=true&characterEncoding=utf8&zeroDateTimeBehavior=convertToNull&useSSL=true&serverTimezone=GMT%2B8username: rootpassword: password# 訂單庫2order2:enabled: trueurl: jdbc:mysql://localhost:3306/ry-order2?useUnicode=true&characterEncoding=utf8&zeroDateTimeBehavior=convertToNull&useSSL=true&serverTimezone=GMT%2B8username: rootpassword: password...................
?(3)修改1:com.ruoyi.common.enums.DataSourceType.java:加入分庫分表的枚舉,后續進行切換動作
package com.ruoyi.common.enums;/*** 數據源* * @author ruoyi*/
public enum DataSourceType
{/*** 主庫*/MASTER,/*** 從庫*/SLAVE,/*** 分庫分表* 需要做切換的動作*/SHARDING
}
(4)修改2:com.ruoyi.framework.config.DruidConfig:加入sharding數據源
package com.ruoyi.framework.config;import java.io.IOException;
import java.util.HashMap;
import java.util.Map;
import javax.servlet.Filter;
import javax.servlet.FilterChain;
import javax.servlet.ServletException;
import javax.servlet.ServletRequest;
import javax.servlet.ServletResponse;
import javax.sql.DataSource;
import org.springframework.boot.autoconfigure.condition.ConditionalOnProperty;
import org.springframework.boot.context.properties.ConfigurationProperties;
import org.springframework.boot.web.servlet.FilterRegistrationBean;
import org.springframework.context.annotation.Bean;
import org.springframework.context.annotation.Configuration;
import org.springframework.context.annotation.Primary;
import com.alibaba.druid.pool.DruidDataSource;
import com.alibaba.druid.spring.boot.autoconfigure.DruidDataSourceBuilder;
import com.alibaba.druid.spring.boot.autoconfigure.properties.DruidStatProperties;
import com.alibaba.druid.util.Utils;
import com.ruoyi.common.enums.DataSourceType;
import com.ruoyi.common.utils.spring.SpringUtils;
import com.ruoyi.framework.config.properties.DruidProperties;
import com.ruoyi.framework.datasource.DynamicDataSource;/*** druid 配置多數據源* * @author ruoyi*/
@Configuration
public class DruidConfig
{@Bean@ConfigurationProperties("spring.datasource.druid.master")public DataSource masterDataSource(DruidProperties druidProperties){DruidDataSource dataSource = DruidDataSourceBuilder.create().build();return druidProperties.dataSource(dataSource);}@Bean@ConfigurationProperties("spring.datasource.druid.slave")@ConditionalOnProperty(prefix = "spring.datasource.druid.slave", name = "enabled", havingValue = "true")public DataSource slaveDataSource(DruidProperties druidProperties){DruidDataSource dataSource = DruidDataSourceBuilder.create().build();return druidProperties.dataSource(dataSource);}@Bean(name = "dynamicDataSource")@Primarypublic DynamicDataSource dataSource(DataSource masterDataSource){Map<Object, Object> targetDataSources = new HashMap<>();targetDataSources.put(DataSourceType.MASTER.name(), masterDataSource);setDataSource(targetDataSources, DataSourceType.SLAVE.name(), "slaveDataSource");/*** 其實就是這一句,加入sharding-jdbc的數據源。* 這個之前講數據源的時候也講到,就是說我們把所有的數據源加好之后需要在這里重新設一下,不然的話它就切換不到啊。*/setDataSource(targetDataSources, DataSourceType.SHARDING.name(), "shardingDataSource");return new DynamicDataSource(masterDataSource, targetDataSources);}/*** 設置數據源* * @param targetDataSources 備選數據源集合* @param sourceName 數據源名稱* @param beanName bean名稱*/public void setDataSource(Map<Object, Object> targetDataSources, String sourceName, String beanName){try{DataSource dataSource = SpringUtils.getBean(beanName);targetDataSources.put(sourceName, dataSource);}catch (Exception e){}}/*** 去除監控頁面底部的廣告*/@SuppressWarnings({ "rawtypes", "unchecked" })@Bean@ConditionalOnProperty(name = "spring.datasource.druid.statViewServlet.enabled", havingValue = "true")public FilterRegistrationBean removeDruidFilterRegistrationBean(DruidStatProperties properties){// 獲取web監控頁面的參數DruidStatProperties.StatViewServlet config = properties.getStatViewServlet();// 提取common.js的配置路徑String pattern = config.getUrlPattern() != null ? config.getUrlPattern() : "/druid/*";String commonJsPattern = pattern.replaceAll("\\*", "js/common.js");final String filePath = "support/http/resources/js/common.js";// 創建filter進行過濾Filter filter = new Filter(){@Overridepublic void init(javax.servlet.FilterConfig filterConfig) throws ServletException{}@Overridepublic void doFilter(ServletRequest request, ServletResponse response, FilterChain chain)throws IOException, ServletException{chain.doFilter(request, response);// 重置緩沖區,響應頭不會被重置response.resetBuffer();// 獲取common.jsString text = Utils.readFromResource(filePath);// 正則替換banner, 除去底部的廣告信息text = text.replaceAll("<a.*?banner\"></a><br/>", "");text = text.replaceAll("powered.*?shrek.wang</a>", "");response.getWriter().write(text);}@Overridepublic void destroy(){}};FilterRegistrationBean registrationBean = new FilterRegistrationBean();registrationBean.setFilter(filter);registrationBean.addUrlPatterns(commonJsPattern);return registrationBean;}
}
(5)創建1:測試類:com.ruoyi.web.controller.system.SysOrderController
package com.ruoyi.web.controller.system;import org.springframework.beans.factory.annotation.Autowired;
import org.springframework.web.bind.annotation.GetMapping;
import org.springframework.web.bind.annotation.PathVariable;
import org.springframework.web.bind.annotation.RequestMapping;
import org.springframework.web.bind.annotation.RestController;
import com.ruoyi.system.domain.SysOrder;
import com.ruoyi.system.service.ISysOrderService;
import com.ruoyi.common.core.controller.BaseController;
import com.ruoyi.common.core.domain.AjaxResult;
import com.ruoyi.common.utils.uuid.IdUtils;/*** 訂單 Controller* * @author ruoyi*/
@RestController
@RequestMapping("/order")
public class SysOrderController extends BaseController
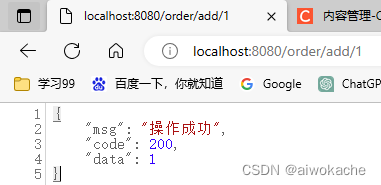
{@Autowiredprivate ISysOrderService sysOrderService;/*** 我們通過userId進行分庫*/@GetMapping("/add/{userId}")public AjaxResult add(@PathVariable("userId") Long userId){SysOrder sysOrder = new SysOrder();sysOrder.setUserId(userId);sysOrder.setStatus("0");sysOrder.setOrderNo(IdUtils.fastSimpleUUID());return AjaxResult.success(sysOrderService.insertSysOrder(sysOrder));}/*** 把兩個數據庫的兩張表都統一查詢出來*/@GetMapping("/list")public AjaxResult list(SysOrder sysOrder){return AjaxResult.success(sysOrderService.selectSysOrderList(sysOrder));}/*** 自動從對應庫中的對應表查詢單條*/@GetMapping("/query/{orderId}")public AjaxResult query(@PathVariable("orderId") Long orderId){return AjaxResult.success(sysOrderService.selectSysOrderById(orderId));}
}
?(6)創建2:實體類:com.ruoyi.system.domain.SysOrder
package com.ruoyi.system.domain;import com.ruoyi.common.core.domain.BaseEntity;/*** 訂單對象 tb_order* * @author ruoyi*/
public class SysOrder extends BaseEntity
{private static final long serialVersionUID = 1L;/** 訂單編號 */private Long orderId;/** 用戶編號 */private Long userId;/** 狀態 */private String status;/** 訂單編號 */private String orderNo;public void setOrderId(Long orderId){this.orderId = orderId;}public Long getOrderId(){return orderId;}public void setUserId(Long userId){this.userId = userId;}public Long getUserId(){return userId;}public void setStatus(String status){this.status = status;}public String getStatus(){return status;}public void setOrderNo(String orderNo){this.orderNo = orderNo;}public String getOrderNo(){return orderNo;}
}
(7)創建3:XxxMapper.java:?com.ruoyi.system.mapper.SysOrderMapper
package com.ruoyi.system.mapper;import java.util.List;
import com.ruoyi.system.domain.SysOrder;/*** 訂單Mapper接口* * @author ruoyi*/
public interface SysOrderMapper
{/*** 查詢訂單* * @param orderId 訂單編號* @return 訂單信息*/public SysOrder selectSysOrderById(Long orderId);/*** 查詢訂單列表* * @param sysOrder 訂單信息* @return 訂單列表*/public List<SysOrder> selectSysOrderList(SysOrder sysOrder);/*** 新增訂單* * @param sysOrder 訂單* @return 結果*/public int insertSysOrder(SysOrder sysOrder);
}
(8)創建4:IXxxService接口:com.ruoyi.system.service.ISysOrderService
package com.ruoyi.system.service;import java.util.List;
import com.ruoyi.system.domain.SysOrder;/*** 訂單Service接口* * @author ruoyi*/
public interface ISysOrderService
{/*** 查詢訂單* * @param orderId 訂單編號* @return 訂單信息*/public SysOrder selectSysOrderById(Long orderId);/*** 查詢訂單列表* * @param sysOrder 訂單信息* @return 訂單列表*/public List<SysOrder> selectSysOrderList(SysOrder sysOrder);/*** 新增訂單* * @param sysOrder 訂單* @return 結果*/public int insertSysOrder(SysOrder sysOrder);
}
?(9)創建5:XxxService實現類:
package com.ruoyi.system.service.impl;import java.util.List;
import org.springframework.beans.factory.annotation.Autowired;
import org.springframework.stereotype.Service;
import com.ruoyi.system.mapper.SysOrderMapper;
import com.ruoyi.system.domain.SysOrder;
import com.ruoyi.system.service.ISysOrderService;
import com.ruoyi.common.annotation.DataSource;
import com.ruoyi.common.enums.DataSourceType;/*** 訂單Service業務層處理* * @author ruoyi*/
@Service
public class SysOrderServiceImpl implements ISysOrderService
{@Autowiredprivate SysOrderMapper myShardingMapper;/*** 查詢訂單* * @param orderId 訂單編號* @return 訂單信息*/@Override@DataSource(DataSourceType.SHARDING)public SysOrder selectSysOrderById(Long orderId){return myShardingMapper.selectSysOrderById(orderId);}/*** 查詢訂單列表* * @param sysOrder 訂單信息* @return 訂單列表*/@Override@DataSource(DataSourceType.SHARDING)public List<SysOrder> selectSysOrderList(SysOrder sysOrder){return myShardingMapper.selectSysOrderList(sysOrder);}/*** 新增訂單* * @param sysOrder 訂單* @return 結果*/@Override@DataSource(DataSourceType.SHARDING)public int insertSysOrder(SysOrder sysOrder){return myShardingMapper.insertSysOrder(sysOrder);}
}
(10)創建10:XxxMapper.xml:ruoyi-system\src\main\resources\mapper\system\SysOrderMapper.xml
<?xml version="1.0" encoding="UTF-8" ?>
<!DOCTYPE mapper
PUBLIC "-//mybatis.org//DTD Mapper 3.0//EN"
"http://mybatis.org/dtd/mybatis-3-mapper.dtd">
<mapper namespace="com.ruoyi.system.mapper.SysOrderMapper"><resultMap type="SysOrder" id="SysOrderResult"><result property="orderId"    column="order_id"    /><result property="userId"     column="user_id"     /><result property="status"     column="status"      /><result property="orderNo"    column="order_no"    /></resultMap><sql id="selectSysOrderVo">select order_id, user_id, status, order_no from sys_order</sql><select id="selectSysOrderList" parameterType="SysOrder" resultMap="SysOrderResult"><include refid="selectSysOrderVo"/></select><select id="selectSysOrderById" parameterType="Long" resultMap="SysOrderResult"><include refid="selectSysOrderVo"/>where order_id = #{orderId}</select><insert id="insertSysOrder" parameterType="SysOrder">insert into sys_order<trim prefix="(" suffix=")" suffixOverrides=","><if test="orderId != null">order_id,</if><if test="userId != null">user_id,</if><if test="status != null">status,</if><if test="orderNo != null">order_no,</if></trim><trim prefix="values (" suffix=")" suffixOverrides=","><if test="orderId != null">#{orderId},</if><if test="userId != null">#{userId},</if><if test="status != null">#{status},</if><if test="orderNo != null">#{orderNo},</if></trim></insert></mapper>
5 測試驗證:crud
瀏覽器訪問http://localhost/order/add/1入庫到ry-order2
瀏覽器訪問http://localhost/order/add/2入庫到ry-order1
瀏覽器訪問http://localhost/order/list查詢到所有的數據
瀏覽器訪問http://localhost/order/query/896582425981747200查詢單條
同時根據訂單號order_id % 2入庫到sys_order_0或者sys_order_1

-
屏蔽:com.ruoyi.framework.config.SecurityConfig

- 重啟后端
- 測試成功


)


)


iptables開放指定端口開放指定端口)


面向對象技術)