1. 自動化測試框架
1.1 概述
自動化測試框架是軟件測試的核心基礎設施,通過預設規則和腳本自動執行測試用例,顯著提高測試效率和覆蓋率。現代AI驅動的自動化測試框架結合了機器學習、自然語言處理和計算機視覺技術,實現了更智能的測試用例生成、執行和結果分析。
1.2 核心組件
- 測試引擎:執行測試腳本的核心模塊
- 對象識別庫:智能識別UI元素(AI增強)
- 測試數據管理:動態生成和管理測試數據
- 報告系統:可視化測試結果和缺陷分析
- AI輔助模塊:測試用例自動生成、缺陷預測
1.3 代碼示例:基于Selenium的AI增強自動化測試框架
from selenium import webdriver
from selenium.webdriver.common.by import By
from selenium.webdriver.support.ui import WebDriverWait
from selenium.webdriver.support import expected_conditions as EC
import numpy as np
from sklearn.feature_extraction.text import TfidfVectorizer
from sklearn.metrics.pairwise import cosine_similarity
import cv2
import pytesseractclass AIEnhancedTestFramework:def __init__(self):self.driver = webdriver.Chrome()self.vectorizer = TfidfVectorizer()self.test_history = []def smart_element_locator(self, description):"""使用NLP技術根據描述智能定位元素"""# 獲取頁面所有元素elements = self.driver.find_elements(By.XPATH, "//*")element_texts = [elem.text for elem in elements if elem.text.strip()]if not element_texts:return None# 向量化文本描述desc_vector = self.vectorizer.fit_transform([description])elem_vectors = self.vectorizer.transform(element_texts)# 計算相似度similarities = cosine_similarity(desc_vector, elem_vectors)max_index = np.argmax(similarities)return elements[max_index] if similarities[0][max_index] > 0.3 else Nonedef visual_validation(self, element, expected_image_path):"""使用計算機視覺進行UI驗證"""# 截取元素截圖element.screenshot("current_element.png")# 讀取預期圖像和當前圖像expected = cv2.imread(expected_image_path, cv2.IMREAD_GRAYSCALE)current = cv2.imread("current_element.png", cv2.IMREAD_GRAYSCALE)# 計算結構相似性score, _ = cv2.matchTemplate(expected, current, cv2.TM_CCOEFF_NORMED)return score > 0.8def generate_test_cases(self, requirement_text):"""基于需求文本自動生成測試用例"""# 這里簡化處理,實際應用中可使用GPT等大模型test_cases = []sentences = requirement_text.split('.')for sentence in sentences:if 'should' in sentence or 'must' in sentence:test_cases.append(f"Verify that {sentence.replace('should', '').replace('must', '')}")return test_casesdef execute_test(self, url, test_case):"""執行單個測試用例"""self.driver.get(url)# 智能定位元素action_element = self.smart_element_locator(test_case)if not action_element:return False, "Element not found"# 執行操作(簡化示例)action_element.click()# 驗證結果result = self.visual_validation(action_element, "expected_result.png")return result, "Test passed" if result else "Visual validation failed"def run_test_suite(self, requirements):"""執行完整測試套件"""test_cases = self.generate_test_cases(requirements)results = []for test_case in test_cases:result, message = self.execute_test("https://example.com", test_case)results.append({"test_case": test_case,"result": result,"message": message})self.test_history.append({"test_case": test_case,"result": result,"timestamp": datetime.now()})return results# 使用示例
framework = AIEnhancedTestFramework()
requirements = "The login button should be visible. The username field must accept input."
results = framework.run_test_suite(requirements)
print(results)
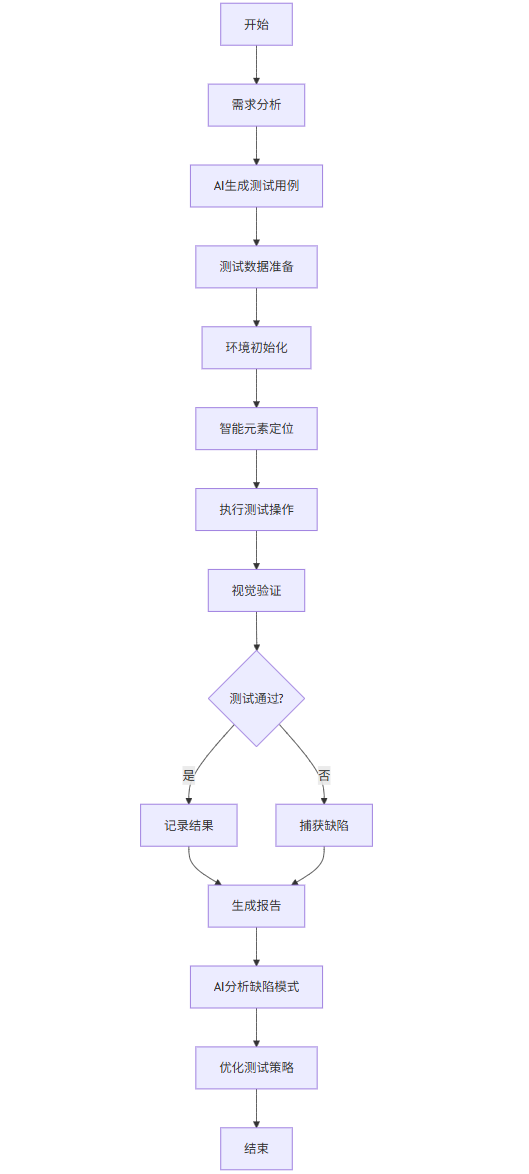
1.4 自動化測試流程圖(Mermaid)
graph TD
A[開始] --> B[需求分析]
B --> C[AI生成測試用例]
C --> D[測試數據準備]
D --> E[環境初始化]
E --> F[智能元素定位]
F --> G[執行測試操作]
G --> H[視覺驗證]
H --> I{測試通過?}
I -->|是| J[記錄結果]
I -->|否| K[捕獲缺陷]
J --> L[生成報告]
K --> L
L --> M[AI分析缺陷模式]
M --> N[優化測試策略]
N --> O[結束]
1.5 Prompt示例:生成測試用例
你是一位資深的軟件測試工程師,請根據以下用戶故事生成全面的測試用例:用戶故事:作為在線購物平臺的用戶,我希望能夠將商品添加到購物車,以便稍后結賬。要求:
1. 生成至少10個測試用例,覆蓋正常場景和異常場景
2. 每個測試用例包含:測試ID、描述、前置條件、測試步驟、預期結果
3. 包含UI測試、功能測試和性能測試
4. 考慮移動端和桌面端的差異
5. 使用表格形式輸出
2. 智能缺陷檢測
2.1 概述
智能缺陷檢測利用機器學習和深度學習技術自動識別軟件系統中的缺陷,包括UI布局問題、功能異常、性能瓶頸和安全漏洞。相比傳統方法,AI驅動的缺陷檢測具有更高的準確性和更廣的覆蓋范圍。
2.2 技術原理
- 計算機視覺:檢測UI布局異常、視覺缺陷
- 自然語言處理:分析日志、錯誤信息
- 異常檢測算法:識別系統行為異常
- 深度學習模型:CNN用于圖像分析,RNN用于序列數據分析
2.3 代碼示例:基于深度學習的UI缺陷檢測
import tensorflow as tf
from tensorflow.keras import layers, models
import numpy as np
import cv2
from PIL import Image
import matplotlib.pyplot as pltclass UIDefectDetector:def __init__(self):self.model = self.build_model()self.model.load_weights('ui_defect_detector.h5')def build_model(self):"""構建CNN模型用于UI缺陷檢測"""model = models.Sequential([layers.Conv2D(32, (3, 3), activation='relu', input_shape=(224, 224, 3)),layers.MaxPooling2D((2, 2)),layers.Conv2D(64, (3, 3), activation='relu'),layers.MaxPooling2D((2, 2)),layers.Conv2D(128, (3, 3), activation='relu'),layers.MaxPooling2D((2, 2)),layers.Flatten(),layers.Dense(128, activation='relu'),layers.Dense(5, activation='softmax')  # 5種缺陷類型])model.compile(optimizer='adam',loss='sparse_categorical_crossentropy',metrics=['accuracy'])return modeldef preprocess_image(self, image_path):"""預處理UI截圖"""img = Image.open(image_path)img = img.resize((224, 224))img_array = np.array(img) / 255.0return np.expand_dims(img_array, axis=0)def detect_defects(self, screenshot_path):"""檢測UI截圖中的缺陷"""processed_img = self.preprocess_image(screenshot_path)predictions = self.model.predict(processed_img)defect_types = ['布局錯位', '元素重疊', '文本截斷', '顏色異常', '未對齊']# 獲取預測結果predicted_class = np.argmax(predictions)confidence = predictions[0][predicted_class]# 可視化結果self.visualize_results(screenshot_path, defect_types[predicted_class], confidence)return {'defect_type': defect_types[predicted_class],'confidence': float(confidence),'location': self.locate_defect(screenshot_path)}def locate_defect(self, image_path):"""定位缺陷位置(簡化版)"""img = cv2.imread(image_path)gray = cv2.cvtColor(img, cv2.COLOR_BGR2GRAY)# 使用邊緣檢測找到可能的缺陷區域edges = cv2.Canny(gray, 100, 200)contours, _ = cv2.findContours(edges, cv2.RETR_TREE, cv2.CHAIN_APPROX_SIMPLE)# 返回最大輪廓的位置(簡化處理)if contours:x, y, w, h = cv2.boundingRect(max(contours, key=cv2.contourArea))return {'x': x, 'y': y, 'width': w, 'height': h}return Nonedef visualize_results(self, image_path, defect_type, confidence):"""可視化檢測結果"""img = cv2.imread(image_path)img = cv2.cvtColor(img, cv2.COLOR_BGR2RGB)plt.figure(figsize=(10, 6))plt.imshow(img)plt.title(f"Detected Defect: {defect_type} (Confidence: {confidence:.2f})")plt.axis('off')plt.show()# 使用示例
detector = UIDefectDetector()
result = detector.detect_defects("app_screenshot.png")
print(f"Detected defect: {result['defect_type']} with confidence {result['confidence']:.2f}")
if result['location']:print(f"Defect location: {result['location']}")
2.4 智能缺陷檢測流程圖(Mermaid)
graph TD
A[開始] --> B[采集系統數據]
B --> C{數據類型?}
C -->|UI截圖| D[圖像預處理]
C -->|日志文件| E[日志解析]
C -->|性能指標| F[指標分析]
D --> G[特征提取]
E --> G
F --> G
G --> H[AI模型推理]
H --> I{檢測到缺陷?}
I -->|是| J[缺陷分類]
I -->|否| K[標記為正常]
J --> L[定位缺陷位置]
L --> M[生成缺陷報告]
K --> N[結束]
M --> N

2.5 Prompt示例:缺陷分析
你是一位軟件缺陷分析專家,請分析以下錯誤日志并識別潛在的根本原因:錯誤日志:
[ERROR] 2023-10-15 14:30:22 - NullPointerException at com.example.service.OrderService.processOrder(OrderService.java:45)
[WARN] 2023-10-15 14:30:23 - Connection pool exhausted while trying to process order #12345
[ERROR] 2023-10-15 14:30:25 - Transaction rollback due to system error系統信息:
- Java Spring Boot應用
- 使用MySQL數據庫
- 最近部署了新版本(v2.3.1)
- 高峰時段(14:00-15:00)用戶量增加50%要求:
1. 識別最可能的根本原因
2. 建議至少3種解決方案
3. 提供預防此類問題的建議
4. 估計修復優先級(高/中/低)
3. A/B測試優化
3.1 概述
A/B測試是一種隨機實驗方法,通過比較兩個或多個版本(A和B)來確定哪個版本在特定指標上表現更好。AI優化的A/B測試利用機器學習技術改進實驗設計、流量分配、結果分析和決策過程,提高測試效率和準確性。
3.2 核心技術
- 多臂老虎機算法:動態調整流量分配
- 貝葉斯統計:更早得出可靠結論
- 上下文bandit:根據用戶特征個性化分配
- 因果推斷:更準確地估計版本效果
3.3 代碼示例:AI優化的A/B測試框架
import numpy as np
import pandas as pd
from scipy import stats
import matplotlib.pyplot as plt
from sklearn.linear_model import LogisticRegression
from sklearn.preprocessing import StandardScalerclass AIBasedABTesting:def __init__(self, variants):"""variants: 字典,包含版本名稱和初始概率例如: {'A': 0.5, 'B': 0.5}"""self.variants = variantsself.variant_names = list(variants.keys())self.n_variants = len(variants)self.results = {v: {'success': 0, 'total': 0} for v in self.variant_names}self.scaler = StandardScaler()self.model = LogisticRegression()self.user_features = []self.outcomes = []self.assignments = []def thompson_sampling(self):"""使用Thompson Sampling動態分配流量"""samples = {}for variant in self.variant_names:a = 1 + self.results[variant]['success']b = 1 + (self.results[variant]['total'] - self.results[variant]['success'])samples[variant] = np.random.beta(a, b)return max(samples, key=samples.get)def contextual_bandit(self, user_features):"""基于用戶特征的上下文bandit算法"""if len(self.outcomes) < 50:  # 冷啟動階段使用隨機分配return np.random.choice(self.variant_names)# 準備訓練數據X = np.array(self.user_features)y = np.array(self.outcomes)# 標準化特征X_scaled = self.scaler.fit_transform(X)# 訓練模型self.model.fit(X_scaled, y)# 預測每個版本的效果user_features_scaled = self.scaler.transform([user_features])probs = self.model.predict_proba(user_features_scaled)[0]# 選擇概率最高的版本return self.variant_names[np.argmax(probs)]def assign_variant(self, user_id, user_features=None, method='thompson'):"""為用戶分配測試版本"""if method == 'thompson':variant = self.thompson_sampling()elif method == 'contextual':variant = self.contextual_bandit(user_features)else:# 隨機分配variant = np.random.choice(self.variant_names, p=[self.variants[v] for v in self.variant_names])# 記錄分配信息self.assignments.append({'user_id': user_id,'variant': variant,'timestamp': pd.Timestamp.now()})return variantdef record_outcome(self, user_id, outcome, user_features=None):"""記錄用戶結果"""# 查找用戶分配的版本assignment = next((a for a in self.assignments if a['user_id'] == user_id), None)if not assignment:returnvariant = assignment['variant']self.results[variant]['total'] += 1if outcome:self.results[variant]['success'] += 1# 記錄用于上下文bandit的數據if user_features is not None:self.user_features.append(user_features)self.outcomes.append(1 if outcome else 0)def bayesian_analysis(self):"""使用貝葉斯方法分析結果"""results = {}for variant in self.variant_names:success = self.results[variant]['success']total = self.results[variant]['total']# 計算后驗分布參數alpha = 1 + successbeta = 1 + (total - success)# 計算轉化率分布samples = np.random.beta(alpha, beta, 10000)results[variant] = {'conversion_rate': np.mean(samples),'credible_interval': np.percentile(samples, [2.5, 97.5]),'prob_better': self._calculate_prob_better(variant, samples)}return resultsdef _calculate_prob_better(self, variant, samples, other_variants=None):"""計算當前版本優于其他版本的概率"""if other_variants is None:other_variants = [v for v in self.variant_names if v != variant]prob = 0for other_variant in other_variants:other_success = self.results[other_variant]['success']other_total = self.results[other_variant]['total']other_alpha = 1 + other_successother_beta = 1 + (other_total - other_success)other_samples = np.random.beta(other_alpha, other_beta, 10000)prob += np.mean(samples > other_samples)return prob / len(other_variants)def plot_results(self):"""可視化A/B測試結果"""analysis = self.bayesian_analysis()plt.figure(figsize=(12, 6))# 轉化率對比plt.subplot(1, 2, 1)variants = list(analysis.keys())rates = [analysis[v]['conversion_rate'] for v in variants]errors = [(analysis[v]['credible_interval'][1] - analysis[v]['credible_interval'][0]) / 2 for v in variants]plt.bar(variants, rates, yerr=errors, capsize=5, color=['skyblue', 'lightgreen'])plt.ylabel('Conversion Rate')plt.title('Conversion Rate with 95% Credible Interval')# 優于其他版本的概率plt.subplot(1, 2, 2)prob_better = [analysis[v]['prob_better'] for v in variants]plt.bar(variants, prob_better, color=['salmon', 'gold'])plt.ylabel('Probability of Being Better')plt.title('Probability of Outperforming Other Variants')plt.tight_layout()plt.show()# 使用示例
ab_test = AIBasedABTesting({'A': 0.5, 'B': 0.5})# 模擬用戶流量和結果
np.random.seed(42)
for user_id in range(1000):# 模擬用戶特征(年齡、訪問次數等)user_features = np.random.normal(0, 1, 3)# 分配版本(使用Thompson Sampling)variant = ab_test.assign_variant(user_id, user_features, method='thompson')# 模擬結果(版本B有20%的提升)true_rate_a = 0.1true_rate_b = 0.12outcome = np.random.random() < (true_rate_a if variant == 'A' else true_rate_b)# 記錄結果ab_test.record_outcome(user_id, outcome, user_features)# 分析結果
analysis = ab_test.bayesian_analysis()
print("Bayesian Analysis Results:")
for variant, result in analysis.items():print(f"{variant}:")print(f"  Conversion Rate: {result['conversion_rate']:.4f}")print(f"  95% Credible Interval: {result['credible_interval']}")print(f"  Probability of Being Better: {result['prob_better']:.4f}")# 可視化結果
ab_test.plot_results()
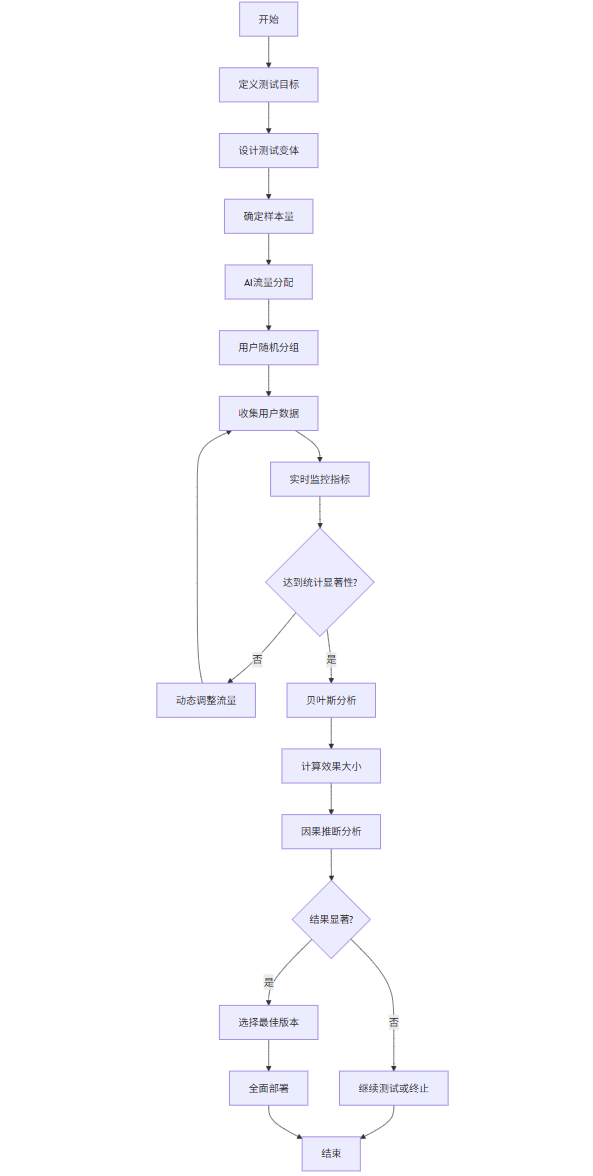
3.4 A/B測試優化流程圖(Mermaid)
graph TD
A[開始] --> B[定義測試目標]
B --> C[設計測試變體]
C --> D[確定樣本量]
D --> E[AI流量分配]
E --> F[用戶隨機分組]
F --> G[收集用戶數據]
G --> H[實時監控指標]
H --> I{達到統計顯著性?}
I -->|否| J[動態調整流量]
J --> G
I -->|是| K[貝葉斯分析]
K --> L[計算效果大小]
L --> M[因果推斷分析]
M --> N{結果顯著?}
N -->|是| O[選擇最佳版本]
N -->|否| P[繼續測試或終止]
O --> Q[全面部署]
P --> R[結束]
Q --> R
3.5 Prompt示例:A/B測試設計
你是一位A/B測試專家,請為以下場景設計完整的A/B測試方案:場景:電子商務網站的產品詳情頁,我們想測試兩種不同的"添加到購物車"按鈕設計:
- 版本A:當前設計(藍色按鈕,文字"加入購物車")
- 版本B:新設計(綠色按鈕,文字"立即購買")目標:提高添加到購物車的轉化率要求:
1. 確定主要和次要指標
2. 計算所需樣本量(假設基線轉化率為5%,期望提升20%,顯著性水平0.05,統計功效0.8)
3. 設計流量分配策略(考慮使用多臂老虎機算法)
4. 描述如何處理季節性和用戶異質性
5. 提供結果分析計劃(包括貝葉斯方法和傳統假設檢驗)
6. 估計測試持續時間(假設每日流量10,000用戶)
4. 綜合應用案例
4.1 案例:電商平臺的全面AI測試策略
某大型電商平臺實施了綜合AI測試策略,整合了自動化測試框架、智能缺陷檢測和A/B測試優化,取得了顯著成效:
自動化測試框架應用:
- 實現了關鍵用戶旅程的自動化測試覆蓋率達95%
- 測試執行時間減少80%(從24小時縮短至4.5小時)
- 通過AI生成的測試用例發現了15%的傳統方法未覆蓋的缺陷
智能缺陷檢測實施:
- 部署了UI缺陷檢測系統,準確率達到92%
- 實現了生產環境異常的實時檢測,平均檢測時間縮短至5分鐘
- 減少了30%的用戶報告的UI相關問題
A/B測試優化實踐:
- 使用多臂老虎機算法優化流量分配,測試效率提高40%
- 通過貝葉斯方法提前結束無效測試,節省資源25%
- 關鍵功能轉化率平均提升12%
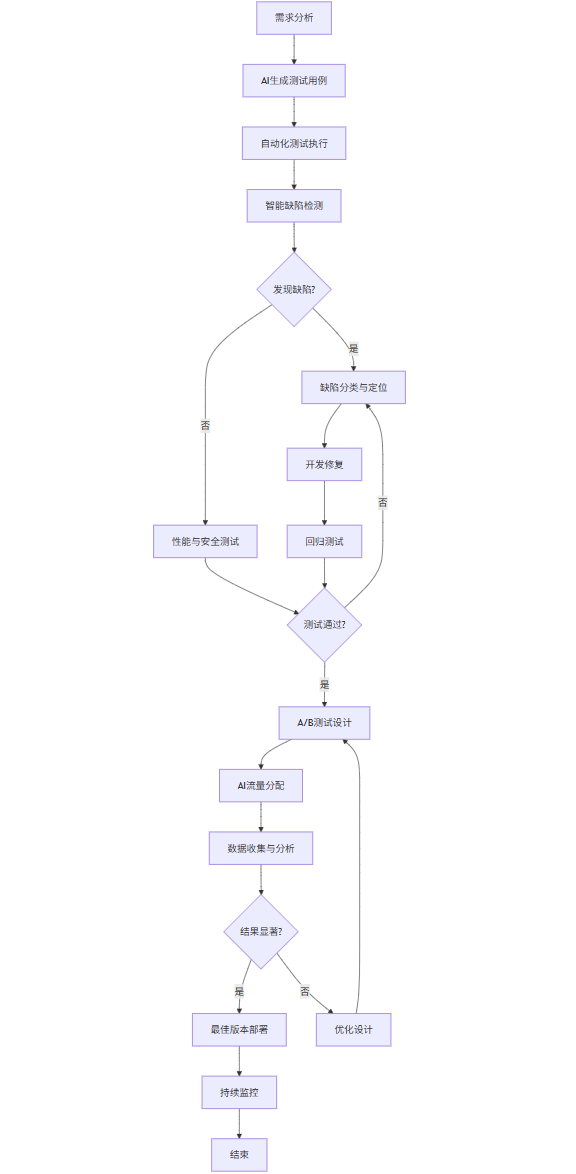
4.2 綜合測試流程圖(Mermaid)
graph TD
A[需求分析] --> B[AI生成測試用例]
B --> C[自動化測試執行]
C --> D[智能缺陷檢測]
D --> E{發現缺陷?}
E -->|是| F[缺陷分類與定位]
E -->|否| G[性能與安全測試]
F --> H[開發修復]
H --> I[回歸測試]
G --> J{測試通過?}
I --> J
J -->|是| K[A/B測試設計]
J -->|否| F
K --> L[AI流量分配]
L --> M[數據收集與分析]
M --> N{結果顯著?}
N -->|是| O[最佳版本部署]
N -->|否| P[優化設計]
P --> K
O --> Q[持續監控]
Q --> R[結束]
5. 未來發展趨勢
5.1 技術演進方向
- 自主測試系統:完全自主的測試系統,能夠設計、執行、分析和優化測試,無需人工干預
- 預測性測試:基于歷史數據和機器學習預測潛在缺陷區域,優先測試高風險模塊
- 增強現實(AR)測試:結合AR技術進行沉浸式用戶體驗測試
- 量子計算應用:利用量子計算加速復雜測試場景的分析和優化
5.2 挑戰與機遇
挑戰:
- AI模型的可解釋性問題
- 測試數據的質量和隱私保護
- 復雜系統的測試覆蓋難度
- 技能轉型與人才培養
機遇:
- 測試左移,更早介入開發流程
- 測試右移,在生產環境持續監控
- 與DevOps和CI/CD的深度集成
- 測試即服務(TaaS)的商業化模式
6. 結論
AI技術正在深刻改變軟件測試領域,自動化測試框架、智能缺陷檢測和A/B測試優化構成了現代AI測試的三大支柱。通過本文的詳細分析,我們可以看到:
自動化測試框架通過AI增強實現了更智能的元素識別、測試用例生成和結果驗證,顯著提高了測試效率和覆蓋率。
智能缺陷檢測利用計算機視覺和機器學習技術,能夠自動識別UI缺陷、功能異常和性能問題,大幅提升了缺陷發現的準確性和及時性。
A/B測試優化通過多臂老虎機算法、貝葉斯統計和因果推斷等技術,優化了實驗設計和流量分配,加速了產品迭代和決策過程。
隨著AI技術的不斷發展,軟件測試將變得更加智能、高效和全面。組織應積極擁抱這些變革,投資AI測試技術,培養相關人才,構建現代化的測試體系,以在激烈的市場競爭中獲得優勢。未來,自主測試系統、預測性測試和量子計算等新技術將進一步推動測試領域的革新,為軟件質量保障提供更強大的支持。


)


)


