?數字孿生項目實戰,WPF與Unity結合開發之路(一)
數字孿生項目實戰,WPF與Unity結合開發之路(一)
作 ? 者:水娃
嗨大家好,我是一名骨灰級的
WPF開發者,我叫水娃。這次主要是向大家講解一個
WPF與Unity相結合來實現WPF和3D的交互項目。此前一直做WPF開發,但是有時候要實現一些3D過程的時候,用WPF做就很麻煩。經過不斷探索,作者總結了一套合理的WPF與Unity通訊和嵌入方式,如果能用不同的技術相組合,用各自的技術做他擅長的方向,那既能達到產品需求又可以避免技術開發難點,是不是要比單用一門技術來實現要好很多呢?項目的起因是要做一個數字孿生項目,按照白皮書的解釋,數字孿生分為幾個階段:
1.虛實映射
2.實時同步
3.共生演進
4.閉環優先。
這里由于版權原因,我們只開源到第二部分實時同步階段,屬于集成前的測試程序,但是整體的集成方式和通訊過程已經全部實現了。項目主要實現對一個風機電廠中各種風機的監測和控制,由于風機的采集協議是用的
Modbus,所以采集這部分選擇WPF開發,SQLite存儲。但是要用3D來實現風機的表現,比如風速、轉向、掉線離線、不同風速對風機的影響,這部分如果用WPF來表現,那就很麻煩了,所以最終決定采用Unity來開發這部分。最后WPF里嵌入Unity來最終項目呈現。演示效果如下。我們分為三部分來開發:
1.WPF部分
2.Unity部分
3.集成部分
(一)、WPF 測試界面如下:

先簡單介紹一下
Modbus協議,Modbus是一個現場總線協議,應用在電子控制器上,可以實現控制器相互之間、PC到控制器的通訊。支持多種電氣接口(RS232、RS422、RS485、RJ45)和多種傳輸介質(雙絞線、網線)。主要有串口和網口方式,串口(電腦后面的串口孔,PC只有232串口的,所以需要買串口轉換器,才能用485協議)主要是用RS485協議,一主多從模式,傳輸格式有ModbusAscii和ModbusRTU;網口(電腦后面插網線的口)主要是
ModbusTCP和ModbusUDP,傳輸格式和串口ModbusRTU的相同。Modbus中數據存儲類型為bit(bool),byte(8位),word(16位),dword(32位). 這幾個類型的主要區別是存儲的長度不同,類似C#里的int和double。所謂的上位機一般都是用別人寫好的庫,連好硬件,然后根據地址表,從硬件中讀出來對應的數據,然后再解析出來。 因為C#的最小單位是byte,所以我們讀取完之后,一切都是byte[], 一定要寫好解析過程,不然就會出錯。Modbus這部分解決了,數據有了,下一步就是要從WPF發送給Unity,作者選擇了Socket協議,別的一些網絡協議也可以,但是Socket比較成熟,作者用的比較熟悉。最終封裝的類庫代碼如下
public?class?socketServer{public?class?StateObject{//?Client?socket.public?Socket?workSocket?=?null;//?Size?of?receive?buffer.public?const?int?BufferSize?=?1024;//?Receive?buffer.public?byte[]?buffer?=?new?byte[BufferSize];}public?class?ConnectionServer{public?static?ConnectionServer?Instance?=>?_instance;private?static?readonly?ConnectionServer?_instance?=?new?ConnectionServer();///?<summary>///?監聽線程///?</summary>public?Socket?listenSocket;///?<summary>///?tcp客戶端對象///?</summary>public?Socket?clientSocket?=?null;///?<summary>///?異步發送數據///?</summary>///?<returns></returns>public?int?Send(byte[]?byteMessage,?int?size){int?offset?=?0;try{return?SendBytes(byteMessage,?size,?ref?offset);}catch?(Exception?ex){Console.WriteLine($"發送出現異常{ex.Message.ToString()}");return?0;}}private?int?SendBytes(byte[]?byteMessage,?int?size,?ref?int?offset){if?(clientSocket?!=?null){while?(offset?<?size){int?n?=?clientSocket.Send(byteMessage,?offset,?size?-?offset,?SocketFlags.None);if?(n?>?0){offset?+=?n;}else{Console.WriteLine("發送數據失敗");break;}}return?offset;}return?0;}public?void?Start(string?ipServer,?int?portServer){IPEndPoint?ipEnd?=?new?IPEndPoint(IPAddress.Parse(ipServer),?portServer);//創建監聽listenSocket?=?new?Socket(ipEnd.AddressFamily,?SocketType.Stream,?ProtocolType.Tcp);//監聽該IPlistenSocket.Bind(ipEnd);//設置監聽隊列中最多可容納的等待接受的傳入連接數listenSocket.Listen(100);Console.WriteLine($"開始監聽:{ipServer}:{portServer}");//開始接受客戶端連接while?(true){clientSocket?=?listenSocket.Accept();var?ip?=?((IPEndPoint)clientSocket.RemoteEndPoint).Address;var?port?=?((IPEndPoint)clientSocket.RemoteEndPoint).Port;var?appkey?=?$"{ip}^{port}";if?(clientSocket.Connected){Console.WriteLine($"{appkey}連接到了服務端");try{//?開始異步接受數據SetupReceiveCallback();}catch?(Exception?ex){Console.WriteLine("Socket異步方式接收數據發生異常:{0}",?ex.StackTrace);}}else{Console.WriteLine("連接建立失敗");}}}///?<summary>///?開始用Socket異步方式接收數據。///?</summary>private?void?SetupReceiveCallback(){if?(clientSocket?!=?null){try{StateObject?state?=?new?StateObject();state.workSocket?=?clientSocket;clientSocket.BeginReceive(state.buffer,?0,?StateObject.BufferSize,?SocketFlags.None,new?AsyncCallback(OnReceive),?state);}catch?(Exception?ex){Console.WriteLine("Socket異步方式接收數據發生異常:{0}",?ex.StackTrace);}}else{Console.WriteLine("異步接收回報消息socket為null");}}///?<summary>///?異步接收回調///?</summary>///?<param?name="ar"></param>private?void?OnReceive(IAsyncResult?ar){try{if?(clientSocket?!=?null){StateObject?state?=?(StateObject)ar.AsyncState;Socket?client?=?state.workSocket;//?Read?data?from?the?remote?device.int?bytesRead?=?client.EndReceive(ar);if?(bytesRead?>?0){byte[]?result?=?new?byte[bytesRead];Buffer.BlockCopy(state.buffer,?0,?result,?0,?bytesRead);var?msg?=?Encoding.UTF8.GetString(result);Console.WriteLine("收到消息:"?+?msg);MsgCenter.Receive(msg);//?Send(result,?result.Length);SetupReceiveCallback();}else{Console.WriteLine("異步接受數據bytesRead為0");}}}catch?(Exception?ex){Console.WriteLine($"異步接受數據異常{ex.Message}");}}}}這個類沒有處理粘包情況,都是直接發直接收和解析,如果不是高頻通訊,比如毫秒級的通訊,其實粘包情況很少發生。
一般處理粘包都是一個消息分為
消息頭+消息體+消息尾巴,或者簡單一點直接消息頭+消息體的形式。消息頭里面一般會有序號和消息體的長度,方便接收端進行處理。由于項目通訊頻率不高,每臺風機是1s通訊一次,也就是1s WPF會把一個風機數據發送給Unity,一個程序中最多有10臺風機,所以1s最多發送10次。因為都是本機通訊,經過大量測試,沒有出現粘包的情況,所以測試通訊類只封裝了發送和接收,實際使用起碼要封裝斷線重連,心跳檢測才能真正使用。
(二)、 ?然后定義通訊格式,代碼如下:
public??class?MessageModel{///?<summary>///?id///?</summary>public?string?msid;///?<summary>///風機名字///?</summary>public?string?epname;///?<summary>///消息類型///?</summary>public?string?msg_type;///?<summary>///?狀態字服務器///?</summary>public?string?severztz;///?<summary>///?控制字服務器///?</summary>public?string?severkzz;///?<summary>///?偏航修正量,絕對值///?</summary>public?string?severphxzl;///?<summary>///?風速修正量,相對值///?</summary>public?string?severfxxzl;///?<summary>///?計數器///?</summary>public?string?severjzq;///?<summary>///??reserved///?</summary>public?string?severreserved;///?<summary>///??狀態字///?</summary>public?string?ztz;///?<summary>///??計數器///?</summary>public?string?jsq;///?<summary>///?風速///?</summary>public?string?fs;///?<summary>///?風向///?</summary>public?string?fx;///?<summary>///?機艙方位角///?</summary>public?string?jcfwj;///?<summary>///?雷達風速///?</summary>public?string?ldfs;///?<summary>///?雷達風向///?</summary>public?string?ldfx;///?<summary>///?雷達狀態字1///?</summary>public?string?ldztzone;///?<summary>///?雷達狀態字2///?</summary>public?string?ldztztwo;///?<summary>///雷達判斷數據是否有效///?</summary>public?string?ldsfyx;///?<summary>///雷達掃描層///?</summary>public?string?dyldsmc;///?<summary>///軸向風速///?</summary>public?string?zxfs;///?<summary>///水平風速///?</summary>public?string?spfs;///?<summary>///垂直風速///?</summary>public?string?czfs;///?<summary>///光束1///?</summary>public?string?vlos1;///?<summary>///光束2///?</summary>public?string?vlos2;///?<summary>///光束3///?</summary>public?string?vlos3;///?<summary>///光束4///?</summary>public?string?vlos4;///?<summary>///光束5///?</summary>public?string?vlos5;///?<summary>///光束6///?</summary>public?string?vlos6;///?<summary>///光束7///?</summary>public?string?vlos7;///?<summary>///光束8///?</summary>public?string?vlos8;///?<summary>///光束9///?</summary>public?string?vlos9;///?<summary>///光束10///?</summary>public?string?vlos10;///?<summary>///光束11///?</summary>public?string?vlos11;///?<summary>///光束12///?</summary>public?string?vlos12;///?<summary>///光束13///?</summary>public?string?vlos13;///?<summary>///光束14///?</summary>public?string?vlos14;///?<summary>///光束15///?</summary>public?string?vlos15;///?<summary>///光束16///?</summary>public?string?vlos16;///?<summary>///光束測量有效性///?</summary>public?string?gsclyxx;///?<summary>///reserved1///?</summary>public?string?reserved1;///?<summary>///reserved2///?</summary>public?string?reserved2;///?<summary>///reserved3///?</summary>public?string?reserved3;}其中的關鍵字段是
epname和msg_type,一個是風機名字,用來區分不同風機,一個是msg_type用來區分不同消息。其余字段都是用來控制風機的狀態。
(三)、 ?Unity部分:
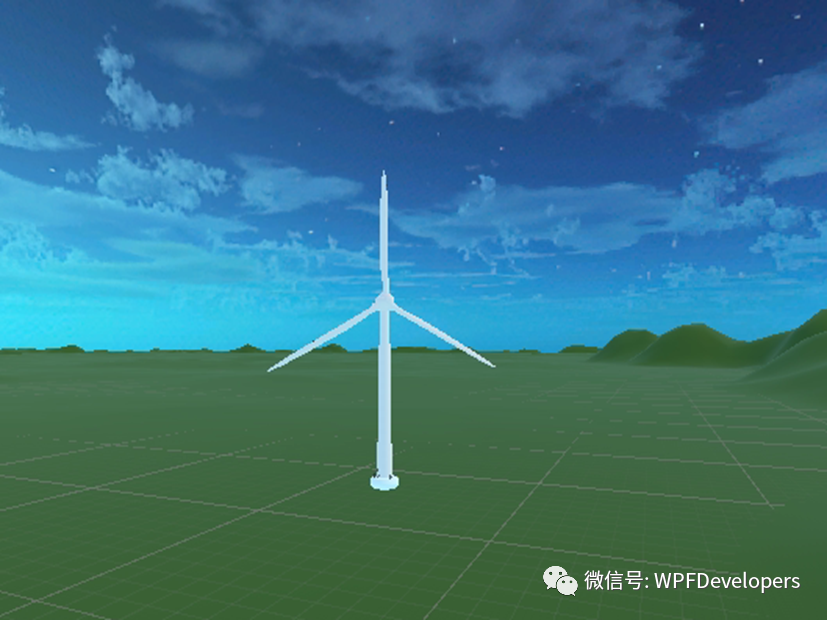
首先,我們需要建立地形,這個使用
Unity內置的Terrain,就和WPF內置的控件一樣,拖進去進去微調,然后拖進去風機模型,進行位置調整。調整完效果如下:
然后我們開始制作圖表,這個圖表的制作方式其實和
WPF寫界面是大同小異的。我們要實現的大屏界面如下:
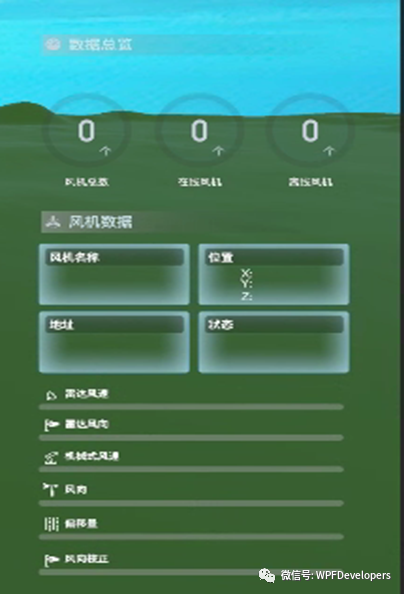
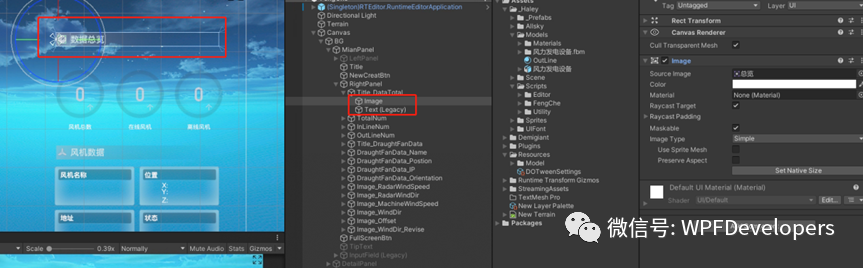
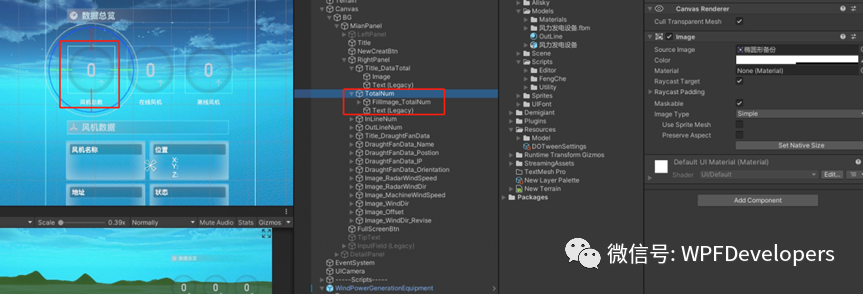
首先實現最上面的部分,先把
Unity設置為2D模式,然后增加一個Image控件和一個Text控件,Image控件選擇背景圖片,Text輸入文字。標題欄就形成了,如下
下面的風機總數那幾個圓形圖表的開發方式也類似,如下
下面的幾個圖表也是類似的開發方式,是不是發現很簡單?
甚至比
WPF的界面開發也要簡單,有時候高手和我們的差距,就是他們懂很多我們不懂的基礎知識,因為不懂,被高手一頓組合拳下來,老戳中我們的盲點,就覺得高手比較厲害,其實堅持學一學,我們也可以成為高手,雖然我現在也是個菜鳥。界面開發方式結束了,再來看看后臺代碼,同樣的我們也需要一個
Socket接收類,如下:
public?class?ConnectionClient{public?static?ConnectionClient?Instance?=>?_instance;private?static?readonly?ConnectionClient?_instance?=?new?ConnectionClient();private?string?ip?{?get;?set;?}private?int?port?{?get;?set;?}///?<summary>///?當前狀態///?</summary>public?ConnState?CurrState?{?get;?set;?}///?<summary>///?tcp客戶端對象///?</summary>private?Socket?socket?=?null;///?<summary>///?上一個隊列數據中剩余字節長度///?</summary>private?byte[]?lastBytes;public?bool?InitConnection(){//創建SOCKETsocket?=?new?Socket(AddressFamily.InterNetwork,?SocketType.Stream,?ProtocolType.Tcp);CurrState?=?ConnState.Connecting;socket.NoDelay?=?true;socket.ReceiveTimeout?=?10000;socket.SendTimeout?=?5000;return?true;}public?bool?ConnectServer(string?ipServer,?int?portServer){if?(socket.Connected){CurrState?=?ConnState.Connected;Console.WriteLine("已經有了連接");return?true;}try{Console.WriteLine("開始建立連接");this.ip?=?ipServer;this.port?=?portServer;IPEndPoint?ipEnd?=?new?IPEndPoint(IPAddress.Parse(ip),?port);socket.Connect(ipEnd);if?(socket.Connected){//接受數據SetupReceiveCallback();CurrState?=?ConnState.Connected;}else{CurrState?=?ConnState.Disconnected;Console.WriteLine("連接不上");}}catch?(Exception?ex){CurrState?=?ConnState.Disconnected;Console.WriteLine("連接socket異常"?+?ex.Message.ToString());return?false;}if?(CurrState?==?ConnState.Connected){return?true;}return?false;}public?void?Reconnection(){while?(true){if?(CurrState?==?ConnState.Disconnected){InitConnection();ConnectServer(ip,?port);}else?{?}Thread.Sleep(3000);}}///?<summary>///?開始用Socket異步方式接收數據。///?</summary>protected?void?SetupReceiveCallback(){if?(socket?!=?null){try{StateObject?state?=?new?StateObject();state.workSocket?=?socket;socket.BeginReceive(state.buffer,?0,?StateObject.BufferSize,?SocketFlags.None,new?AsyncCallback(OnReceive),?state);}catch?(Exception?ex){Console.WriteLine("Socket異步方式接收數據發生異常:{0}",?ex.Message.ToString());}}else{Console.WriteLine("異步接收回報消息socket為null");}}///?<summary>///?異步接收回調///?</summary>///?<param?name="ar"></param>private?void?OnReceive(IAsyncResult?ar){CurrState?=?ConnState.Connected;try{StateObject?state?=?(StateObject)ar.AsyncState;Socket?client?=?state.workSocket;int?bytesRead?=?socket.EndReceive(ar);if?(bytesRead?>?0){byte[]?result?=?new?byte[bytesRead];Buffer.BlockCopy(state.buffer,?0,?result,?0,?bytesRead);var?msg?=?Encoding.UTF8.GetString(result);var?model?=?Newtonsoft.Json.JsonConvert.DeserializeObject<MessageModel>(msg);//?Debug.Log(msg);ReceiveAction(model);SetupReceiveCallback();}else{CurrState?=?ConnState.Disconnected;}}catch?(Exception?ex){Console.WriteLine($"發生異常{ex.Message.ToString()}");}}///?<summary>///?異步發送數據///?</summary>///?<returns></returns>public?int?Send(byte[]?byteMessage,?int?size){int?offset?=?0;try{return?SendBytes(byteMessage,?size,?ref?offset);}catch?(Exception?ex){Console.WriteLine($"發送出現異常{ex.Message.ToString()}");return?0;}}private?int?SendBytes(byte[]?byteMessage,?int?size,?ref?int?offset){if?(socket?!=?null){while?(offset?<?size){int?n?=?socket.Send(byteMessage,?offset,?size?-?offset,?SocketFlags.None);if?(n?>?0){offset?+=?n;}else{Console.WriteLine("發送數據失敗");break;}}return?offset;}return?0;}}void?Start(){ConnectionClient.Instance.InitConnection();ConnectionClient.Instance.ConnectServer(GlobalInit.basicInfoDict["ServerIP"],?int.Parse(GlobalInit.basicInfoDict["Port"]));ReceiveAction?=?Receive;
}void?Receive(MessageModel?msg){lock?(lockObject){message.Add(msg);}}
與
WPF不同之處在于,Unity每個腳本都有一個Start和Update函數,所以更新界面的操作都要在這2個函數內執行。Start是初始化時候執行的,Update是更新每一幀畫面時候執行的(Unity的渲染原理是根據計算機不同,1s內固定更新多少幀圖像,然后圖像連起來就形成了實時畫面)。所以最終我們改變界面的代碼要寫到
Update內,他無法像WPF一樣可以自由切換UI線程。因此我們Socket收到的數據全部扔到了List<MessageModel> message里面,然后在Update里面判斷Message的信息,來對界面進行改變。如下:
void?Update(){lock?(lockObject){if?(message.Count?!=?0){for?(int?i?=?0;?i?<?message.Count;?i++){var?model?=?message[i];//Debug.Log(model.epname);switch?(model.msg_type){//sqlite?10,傳0?sql?server?11,傳1case?"10":GameManager.Instance.InitSql(0);message.Remove(model);break;case?"11":GameManager.Instance.InitSql(1);message.Remove(model);break;//100為實時數據?case?"100":GameManager.Instance.WeiLiu(model);RightPanel.Instance.SetInfo(model);RightPanel.Instance.SetFengJiState(model);message.Remove(model);break;//case?"200"://????GameManager.Instance.SetModelEffect(model.vlos1,?model.vlos2);//????break;}}message.Clear();}}}最終,
Unity的開發過程總結一下就是:1.導入風機模型,記錄一個初始位置,然后隱藏風機,點擊新建時候克隆這個風機,輸入屬性后存儲到
sqlite數據庫里面。2.寫好
socket接受類,收到wpf傳來的消息,在update函數里面進行邏輯判斷,從而更改界面顯示。
(四)、集成部分
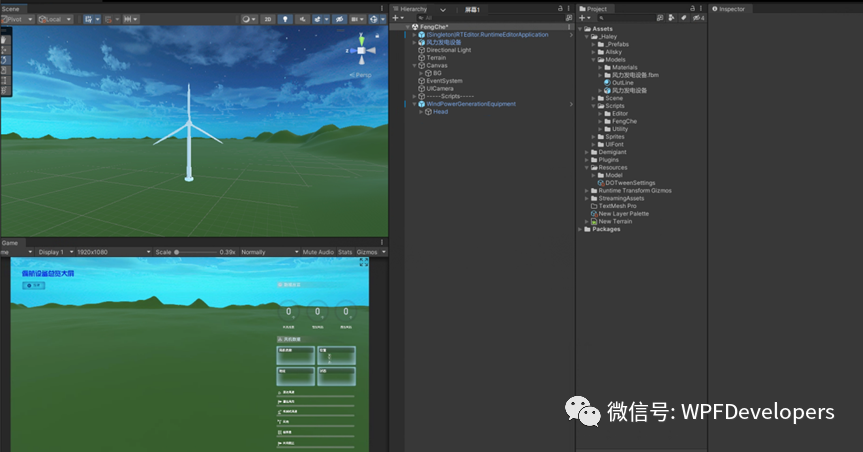
wpf和unity開發完成后,來到了最終的集成環節。這里我們不采用網上那種方式,作者自己經過幾天研究,總結了一個比較好的集成方式。
就是把
unity固定的放到wpf界面的一個區域內,在移動和放大縮小wpf界面的時候,不斷的對unity程序進行移動和放大縮小,這樣整體保持了一致。主要是用幾個
windows函數來操作:
[DllImport("user32.dll",?CharSet?=?CharSet.Auto)]static?extern?int?MoveWindow(IntPtr?hWnd,?int?x,?int?y,?int?nWidth,?int?nHeight,?bool?BRePaint);[DllImport("user32.dll",?CharSet?=?CharSet.Auto,?ExactSpelling?=?true)]public?static?extern?int?ShowWindow(IntPtr?hwnd,?int?nCmdShow);[DllImport("gdi32.dll")]private?static?extern?int?GetDeviceCaps(IntPtr?hDc,?int?nIndex);這里要注意,
wpf界面要選擇window,不能選擇page,因為page頁面沒有句柄,無法把Unity程序設置為wpf界面的子元素。代碼如下:
public?MainWindow(){//靜態指定Current?=?this;//窗口關閉方式,主窗口一旦關閉,就關閉Application.Current.ShutdownMode?=?ShutdownMode.OnMainWindowClose;//初始化窗口大小,到屏幕的80%this.Height?=?SystemParameters.PrimaryScreenHeight?*?0.8d;this.Width?=?SystemParameters.PrimaryScreenWidth?*?0.8d;//讀取配置文件option?=?new?ConfigurationBuilder().SetBasePath(Directory.GetCurrentDirectory()).AddJsonFile("AppSetting.json").Build().GetSection("config").Get<Option>();option.UnityDir?=?Environment.CurrentDirectory?+?"\\unity\\demo.exe";InitializeComponent();}private?void?Window_Loaded(object?sender,?RoutedEventArgs?e){//開始socket監聽Task.Run(()?=>?ConnectionServer.Instance.Start(option.Ip,?option.Port));//開啟渲染窗口,并設置父級RenderWindow.Current.OpenRenderWindow();//實際應該延時后建立socket后立馬發送選擇數據庫的信號//?Thread.Sleep(2000);//Button_Click_3(new?object(),?new?RoutedEventArgs());}//初始化,調整渲染窗口public?void?Init(){Window_SizeChanged(null,?null);}public?void?OpenRenderWindow(){//渲染程序路徑string?RenderExePath?=?MainWindow.option.UnityDir;//如果成功找到了渲染程序if?(!string.IsNullOrEmpty(RenderExePath)?&&System.IO.File.Exists(RenderExePath)){UnityEngine?=?Process.Start(RenderExePath);Thread.Sleep(3000);SetRenderWindow();}//沒找到渲染程序,就關閉else{MessageBox.Show("未找到渲染程序");//System.Windows.Application.Current.Shutdown();}}好了,這次的分享到這里結束,之后我會把開發過程詳細的寫出來,幫助大家手把手 的從
0到1搭建這個項目,最終這個項目也會集成到web里面。如果有不懂的可以隨時加作者溝通,互相提高。二維碼在下方。


)


![[轉載]unix環境高級編程備忘:理解保存的設置用戶ID,設置用戶ID位,有效用戶ID,實際用戶ID...](http://pic.xiahunao.cn/[轉載]unix環境高級編程備忘:理解保存的設置用戶ID,設置用戶ID位,有效用戶ID,實際用戶ID...)