
word中圖片超出頁邊距

Word documents open with one-inch margins by default. You can adjust the page margins by choosing one of Word’s predefined options, or you can specify the exact height and width of the margins yourself. Here’s how.
默認情況下,Word文檔以一英寸的頁邊距打開。 您可以通過選擇Word的預定義選項之一來調整頁邊距,也可以自己指定頁邊距的確切高度和寬度。 這是如何做。
在Word中更改頁邊距 (Change Page Margins in Word)
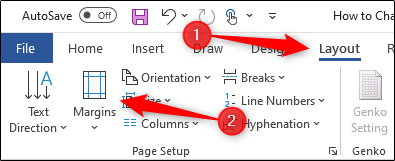
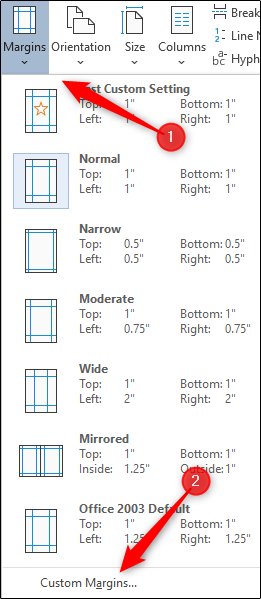
Open Word and head over to the “Layout” tab. Here, select “Margins” in the “Page Setup” group.
打開Word并轉到“布局”選項卡。 在這里,在“頁面設置”組中選擇“頁邊距”。
Once selected, a drop-down menu will appear. Here, you’ll find Word’s list of predefined margin settings.
選擇后,將出現一個下拉菜單。 在這里,您將找到Word的預定義頁邊距設置列表。
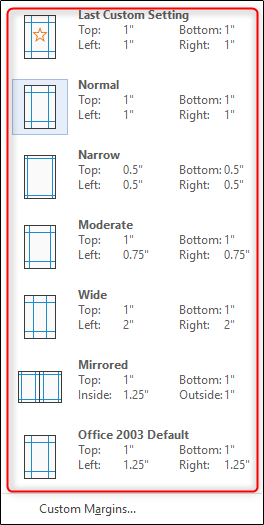
Go ahead and choose an option if you see one that matches what you’re needing. Once selected, the page margins will change based on those specifications.
如果您看到一個符合您需求的選項,請繼續選擇一個選項。 選擇后,頁邊距將根據這些規格而變化。
If you weren’t able to find an option that fits what you’re looking for, you can customize the page margins yourself down to the tenth of an inch by selecting “Custom Margins” at the bottom of the drop-down menu.
如果找不到適合您所需的選項,則可以通過選擇下拉菜單底部的“自定義頁邊距”,將頁面邊距自定義到十分之一英寸。

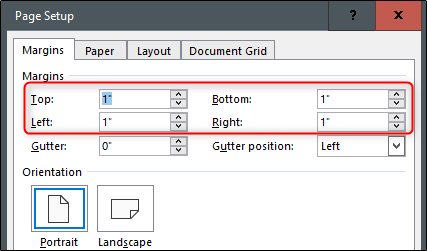
The “Page Setup” window will now appear, in which you’ll automatically be in the “Margins” tab. Under the “Margins” section, you can adjust the top, bottom, left, and right margins by clicking the up and down arrows next to each option. This increases or decreases the page margins by 0.1-inch increments.
現在將出現“頁面設置”窗口,您將在其中自動進入“頁邊距”標簽。 在“頁邊距”部分下,您可以通過單擊每個選項旁邊的向上和向下箭頭來調整頂部,底部,左側和右側的頁邊距。 這樣可以以0.1英寸的增量增加或減少頁邊距。
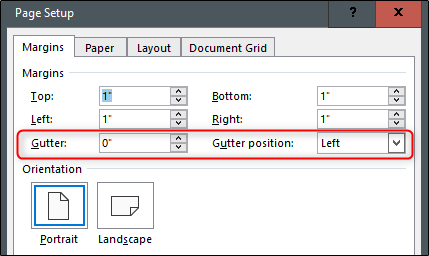
You can also adjust the gutter margin. The gutter margin is generally used in facing-pages layouts (known as “Mirrored” in Word) and refers to the area of the page that is rendered unusable or unviewable due to the binding process.
您還可以調整裝訂線邊距。 裝訂線邊距通常用于面對頁面的布局(在Word中稱為“鏡像”),是指由于綁定過程而導致無法使用或無法查看的頁面區域。
Setting the gutter margin works the same way as setting the page margin. Simply adjust the margin by selecting the up or down arrow next to the option.
設置裝訂線邊距與設置頁面頁邊距的工作方式相同。 只需選擇選項旁邊的向上或向下箭頭即可調整邊距。
Once you’re done, select “OK” to apply the changes.
完成后,選擇“確定”以應用更改。
將自定義保證金設置為默認值 (Set a Custom Margin as the Default)
If you’re finding yourself using the same custom margins over and over, instead of setting the margins each time you open Word, you can just set your custom margins as the default.
如果您發現自己一遍又一遍地使用相同的自定義邊距,而不必每次打開Word都設置邊距,則可以將自定義邊距設置為默認值。
To do so, select “Margins” in the “Page Setup” group of the “Layout” tab. In the drop-down menu that appears, select “Custom Margin.”
為此,請在“布局”選項卡的“頁面設置”組中選擇“頁邊距”。 在出現的下拉菜單中,選擇“自定義保證金”。
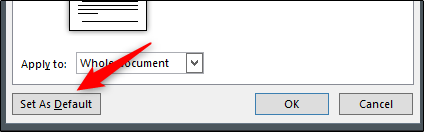
In the “Page Setup” window that appears, customize your margins and then select “Set As Default” in the bottom-left corner of the page.
在出現的“頁面設置”窗口中,自定義邊距,然后在頁面的左下角選擇“設置為默認值”。
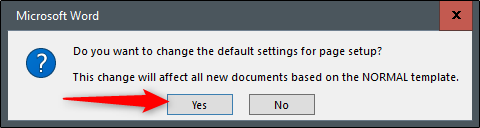
A dialog box will appear letting you know the changes will affect all new documents based on the NORMAL template. Select the “Yes” button.
將出現一個對話框,通知您更改將影響基于NORMAL模板的所有新文檔。 選擇“是”按鈕。
Now, next time you open Word, it will automatically open with the set custom margins.
現在,下次打開Word時,它將自動以設置的自定義邊距打開。
翻譯自: https://www.howtogeek.com/447480/how-to-change-page-margins-in-word/
word中圖片超出頁邊距
 —— AnalogClock)


)


