由于安裝Eclipse需要Java環境,還需要配置環境,非常復雜,建議安裝系統時,選擇上Eclipse開發工具
但是安裝的Eclipse中沒有CDT。首先給Eclipse安裝一個CDT。
1.安裝CDT
Eclipse菜單欄help----Install New Software.從Available Software Sites中選擇
http://download.eclipse.org/tools/cdt/releases/helios的網址,然后select all。
我將所有選項都選擇了。
一步步往下走,最后重啟Eclipse即可。
2.Linux下修改Eclipse的默認語言。
安裝CDT后,Eclipse的默認語言為漢語,實在不習慣啊。我打算將其修改為英文。修改方式如下:
1)通過whereis eclipse找到eclipse的位置。
$whereis eclipse
output:
/usr/bin/eclipse /etc/eclipse.ini /usr/lib/eclipse /usr/share/eclipse
2)打開eclipse.ini修改其中內容
$vim??/etc/eclipse.ini
output:
添加一句話
-Duser.language=en
保存退出
3)重新啟動Eclipse,成功變為英文界面。
3.編寫第一個C/C++Project
1)新建項目 File--New---C Project
選擇Executable-----Empty Project ----Linux GCC
假設我的項目名為HelloWorld
2)新建源文件
左側Project Explorer 中,選中HelloWorld點擊右鍵 New---Source File
切記:命名時要加上后綴.c,不然會提示錯誤。
3)輸入源代碼
#include main() { printf("Hello world!\n"); }
切記:1)一定要保存,否則會提示錯誤。
2)如果是新建C++Project,后綴名為.cpp
4.導入已經存在的項目
1)概述:
在安裝CDT后,出現的C/C++ Project為 C Project 、C++ Project、 Makefile C Project。但是很多教程中都包括的是Standard Make C++ Project。瞬間讓我失望。終于還是找到了最可愛的官方文檔。 http://help.eclipse.org/indigo/index.jsp?topic=%2Forg.eclipse.cdt.doc.user%2Fconcepts%2Fcdt_c_build_over.htm
步驟1:必須創建一個簡單的項目,該項目能夠反映已存在源代碼樹中的所有元素
1.選擇File > New > Project.
2.對于該項目,選擇C/C++和C project。由于后文中要導入Nginx(完全由C編寫),因此選擇C Project。
3.在Project Name中,輸入項目名
4.確保Use default location 沒有被選中。因為我們要指定源代碼所在的位置,而不是我們的工作區,因此,不能使用use default location.
5.在Location處,點擊Browse,選擇源代碼和Makefile所在的文件夾。假設源代碼和Makefile所在的文件夾為Nginx-1.2.3。
6.從Project types列表中,展開Makefile Project,選擇Empty Project。
7.確保選擇上Toolchains。Toolchains選擇Linux GCC。
8.點擊Next
9.(可選)全選,點擊Next即可。
10.點擊Finish,關閉對話框。
完成上述步驟后,在Project Explorer view中就可以看到新的項目。
5.導入Nginx所需要做的工作
對于Nginx的源代碼,在完成上述步驟以后,會發現在console中會提示以下錯誤,該如何解決呢?
make all
make:*** 沒有規則可以創建目標“all”。停止
或者
make: *** no rule to make target 'all'.
1)修改build選項。主要是修改Build的取值。
在我的Eclipse版本中,修改方法如下:
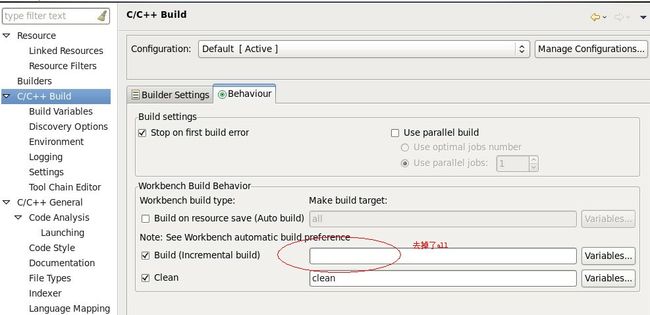
1.在Project Explorer中選中Nginx-1.2.3項目,點擊右鍵選中Project Properties。在右側找到C/C++ Build。
2.C/C++ Build ----Behavior 將Build改為空即可。如下圖所示
3.配置運行參數,打開Run Configuration對話框
1)在菜單欄Run---Run Configuration 中設置。C/C++ Application中選擇objs/nginx(如果沒有,先make一次)。Arguments添加
-c /home/hpnl/nginx_source/nginx-1.2.3/conf/nginx.conf指定運行時配置文件。注意:所添加的conf文件是在nginx源代碼目錄中的。
2)修改該conf的內容(完整文件)加粗字體為改動部分。
#user??nobody;
worker_processes??1;
daemon??off;
#daemon?must?be?set?as?off
#error_log??logs/error.log;
#error_log??logs/error.log??notice;
#error_log??logs/error.log??info;
events?{
worker_connections??1024;
}
http?{
include???????mime.types;
default_type??application/octet-stream;
#log_format??main??'$remote_addr?-?$remote_user?[$time_local]?"$request"?'
#??????????????????'$status?$body_bytes_sent?"$http_referer"?'
#??????????????????'"$http_user_agent"?"$http_x_forwarded_for"';
#access_log??logs/access.log??main;
sendfile????????on;
#tcp_nopush?????on;
#keepalive_timeout??0;
keepalive_timeout??65;
#gzip??on;
server?{
listen???????80;
server_name??localhost;
#charset?koi8-r;
#access_log??logs/host.access.log??main;
location?/?{
root???html;
index??index.html?index.htm;
}
location?/hello{
hello_world;
}
#error_page??404??????????????/404.html;
#?redirect?server?error?pages?to?the?static?page?/50x.html
#
error_page???500?502?503?504??/50x.html;
location?=?/50x.html?{
root???html;
}
#?proxy?the?PHP?scripts?to?Apache?listening?on?127.0.0.1:80
#
#location?~?\.php$?{
#????proxy_pass???http://127.0.0.1;
#}
#?pass?the?PHP?scripts?to?FastCGI?server?listening?on?127.0.0.1:9000
#
#location?~?\.php$?{
#????root???????????html;
#????fastcgi_pass???127.0.0.1:9000;
#????fastcgi_index??index.php;
#????fastcgi_param??SCRIPT_FILENAME??/scripts$fastcgi_script_name;
#????include????????fastcgi_params;
#}
#?deny?access?to?.htaccess?files,?if?Apache's?document?root
#?concurs?with?nginx's?one
#
#location?~?/\.ht?{
#????deny??all;
#}
}
#?another?virtual?host?using?mix?of?IP-,?name-,?and?port-based?configuration
#
#server?{
#????listen???????8000;
#????listen???????somename:8080;
#????server_name??somename??alias??another.alias;
#????location?/?{
#????????root???html;
#????????index??index.html?index.htm;
#????}
#}
#?HTTPS?server
#
#server?{
#????listen???????443;
#????server_name??localhost;
#????ssl??????????????????on;
#????ssl_certificate??????cert.pem;
#????ssl_certificate_key??cert.key;
#????ssl_session_timeout??5m;
#????ssl_protocols??SSLv2?SSLv3?TLSv1;
#????ssl_ciphers??HIGH:!aNULL:!MD5;
#????ssl_prefer_server_ciphers???on;
#????location?/?{
#????????root???html;
#????????index??index.html?index.htm;
#????}
#}
}
此時就可以正常運行Nginx和進行調試了


Thread類源碼分析)


下subversion 的安裝)
)


