This week I’ve been forging background illustrations for my website, epdillon.com (launching soon). I’ve been using Adobe Illustrator to do all the major casting, dabbling in Figma only to temper the colours. Fresh from the design furnace, my hands are a-crackle with renewed Adobe skill. Scintillating shapes and amazing anchor points are mine to command! I roar in the face of vectors! (cue insane theatrical laughter and the eruption of volcanoes). Before I completely run away with myself and forget what I’m on about, I present to you 8 tips to make your life with Adobe Illustrator a little bit gooier. You know, like a treacle sponge cake? A pleasantly warm treacly sponge served with a side of fresh fresh knowledge. Mmmm. You can’t smelt cake, it’d taste horrible.
本周,我一直在為自己的網站epdillon.com制作背景插圖(即將推出)。 我一直在使用Adobe Illustrator進行所有主要的投射,在Figma中涉獵只是為了調和顏色。 從設計熔爐剛接觸時,我的手就充滿了Adobe的新技能。 閃爍的形狀和驚人的錨點是我的命令! 我面對矢量怒吼! (提示瘋狂的戲劇笑聲和火山噴發)。 在我完全逃避自己并忘記正在發生的事情之前,我向您介紹了8條技巧,使您在Adobe Illustrator上的生活更加輕松。 你知道嗎,像一個糖蜜海綿蛋糕? 溫暖宜人的treacly海綿,配以新鮮的新鮮知識。 嗯 你不能冶煉蛋糕,它的味道太可怕了。
1 | 始終參考工作 (1| Always work from reference)
Conduct thorough research before picking up your pen. Create an image collection on Pinterest. Have a look through Designspiration, Dribble, and/or Behance for designs that inspire you. Look on Typewolf for font pairings that work well together. Use Adobe Color help pick and play with colour. Follow Instagram profiles like ocean.ui, ui_gradient, ui.insomniac, colours.cafe, coolors.co and save collections of design tips and colour palettes. Google image search artists and designers that you admire and save images of work which excites you. If your a visual or web designer, you can use this browser extension called Fontanello. You use it by right clicking on websites you admire so you can find out the details behind their font styling. I always check out this designer UIX Ninja for design inspiration. When illustrating I might use 3D model sites like Sketchfab or CGTrader for figure reference. Look at creative blogs for coverage of trends. Aaron Draplin’s design talks and videos are always great for inspiration!.
拿起筆之前,請進行徹底的研究。 在Pinterest上創建圖像集合。 看看Designspiration, 運球,和/或Behance的 為激發您靈感的設計。 看Typewolf 一起使用的字體配對。 使用Adobe Color幫助選擇并播放顏色。 關注Instagram個人資料,例如ocean.ui , ui_gradient , ui.insomniac , colours.cafe , coolors.co 并保存設計提示和調色板的集合。 您欽佩的Google圖片搜索藝術家和設計師,并保存令人興奮的作品圖片。 如果您是視覺或網頁設計師,則可以使用稱為Fontanello的瀏覽器擴展。 您可以通過右鍵單擊您喜歡的網站來使用它,以便了解其字體樣式背后的詳細信息。 我總是檢查這位設計師UIX Ninja 設計靈感。 在進行說明時,我可能會使用Sketchfab或CGTrader等3D模型站點作為參考。 查看創意博客 ,了解趨勢。 亞倫·德拉普林(Aaron Draplin)的 設計講座和視頻總是很容易獲得靈感!
Pablo Picasso is famously quoted as stating “good artists borrow, great artists steal” and that’s the same with design. By gathering styles you admire, imagery which inspires you and fonts that work, you give yourself a running start from which fresh ideas can flow. This is something which really should be going in the background of your practise all the time. I watch all kinds of YouTube videos covering wide ranges of topics from drawing to business. This series on how a design agency builds a brand from scratch is great food for thought. Concepts used to better ability in one creative area are often transferable, this video on bettering drawing practise is a good example. The core message behind it is learn to look at a range of images and deconstruct them, incorporate things you like into your own practise: that sites font; this adverts colour scheme; that apps illustration style; this videos animation style. Originality comes from how you combine elements together.
巴勃羅·畢加索(Pablo Picasso)曾被引述為“好藝術家借,大藝術家偷”的說法,而設計也是如此。 通過收集您欣賞的樣式,激發您靈感的圖像和有效的字體,您可以為自己提供一個不斷發展的起點,新的想法可以從中汲取靈感。 這確實應該一直作為練習的背景。 我觀看了各種YouTube視頻,涵蓋了從繪畫到商業的廣泛主題。 有關設計機構如何從頭開始建立品牌的系列文章令人深思。 該視頻通常用于在一個創意領域提高能力的概念可以轉讓。 改善繪圖實踐就是一個很好的例子。 它背后的核心信息是學習查看一系列圖像并對其進行解構,將您喜歡的東西結合到自己的實踐中:該網站的字體; 這會宣傳配色方案; 該應用的插畫風格; 此視頻的動畫樣式。 創意源于您將元素組合在一起的方式。
During this initial design phase make quick thumbnail sketches as ideas spark. Try to get as many quick sketches down as you can. By working in pencil you can iterate much faster than you can on a computer. There are a decent range of plug-ins available to help bring your pencil lines to life. As soon as you feel things are starting to move in the right direction and you have a range of solid ideas to develop further move everything onto the computer and start pushing pixels around. Here are some other basic tips and some help with how to approach texture. Here is a list of online tutorials to further improve your basic skills.
在此初始設計階段,請隨著想法的產生快速繪制縮略圖。 嘗試盡可能多地獲取快速草圖。 通過使用鉛筆工作,您可以比在計算機上更快地進行迭代。 有各種各樣的插件可幫助您使鉛筆線條栩栩如生。 一旦感覺到事情開始朝著正確的方向發展,您就會有了一系列扎實的想法,可以將所有東西進一步發展到計算機上,并開始推動像素移動。 這是其他一些基本技巧 還有一些方法上的幫助 質地 。 這是一系列在線教程 ,可進一步提高您的基本技能。
2 | 自定義您的工作區 (2| Customise your Workspace)
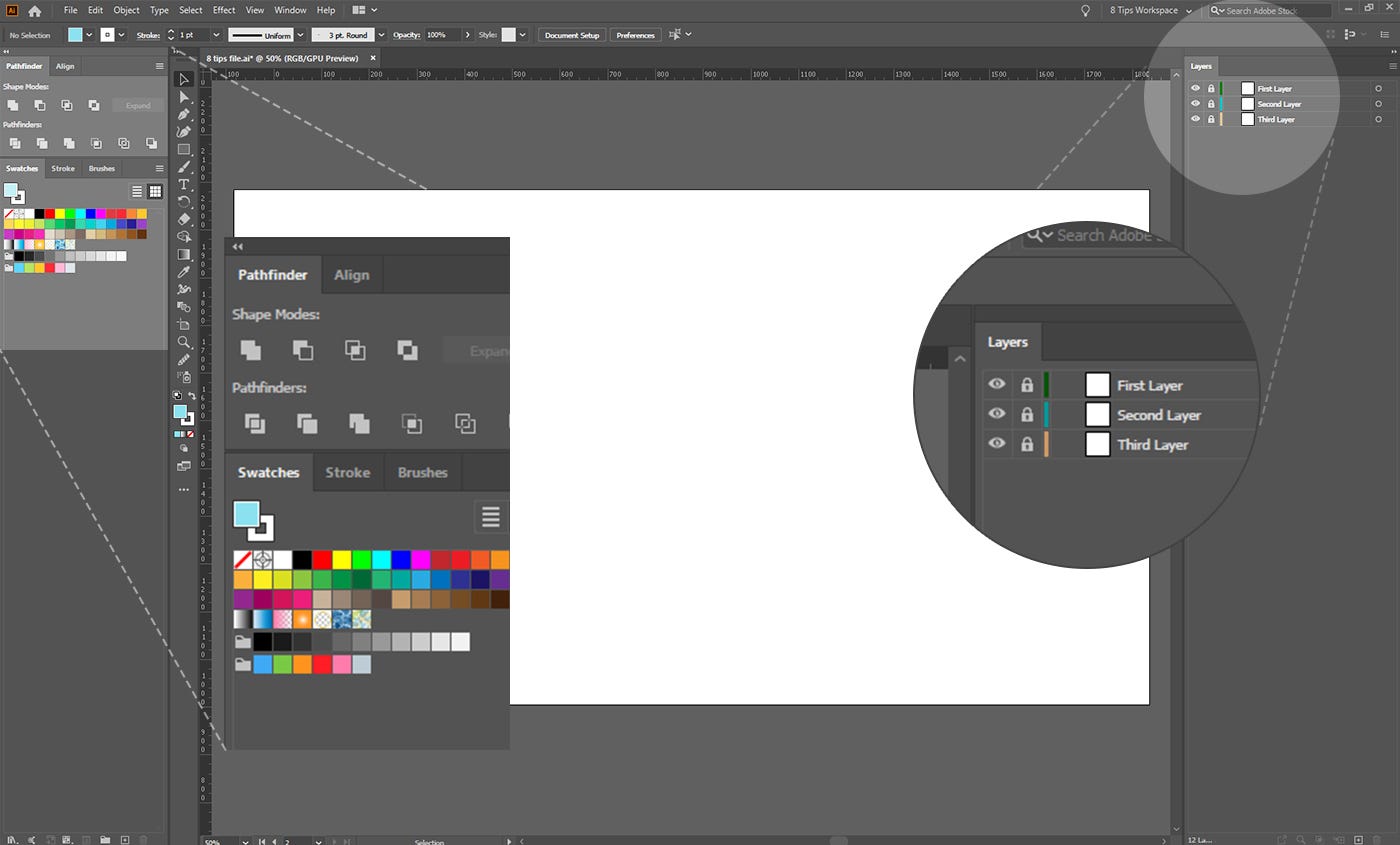
Each project requires a different set of tools. Making those tools more obvious and accessible improves your ability to get the job done without all that “where the f*** did I put pathfinder!” nonsense. If you’re not editing text you don’t need the Character and Paragraph Panels displayed, they’re just eating up space! Remove them! Select panels you want to use from the Window menu and arrange them on either side of your work area. Save your new workspace under a simple descriptive name for future access. It sounds like a lot of work but it really isn’t. Stop being lazy, you’re making your job harder! This video and this one do a good job of explaining what you can do.
每個項目需要一套不同的工具。 使這些工具更加明顯和易于使用可提高您完成工作的能力,而無需“僅在我將f ***放在探路器的位置!” 廢話。 如果您不編輯文本,則不需要顯示“字符面板”和“段落面板”,它們只是在占用空間! 刪除它們! 從“窗口”菜單中選擇要使用的面板,并將其排列在工作區的任一側。 用簡單的描述性名稱保存新的工作區,以供將來訪問。 聽起來需要做很多工作,但實際上并非如此。 別再懶了,您的工作變得更加艱難! 這個視頻 并且這很好地解釋了您可以做什么。
3 | 修改工具 (3| Modify your tools)
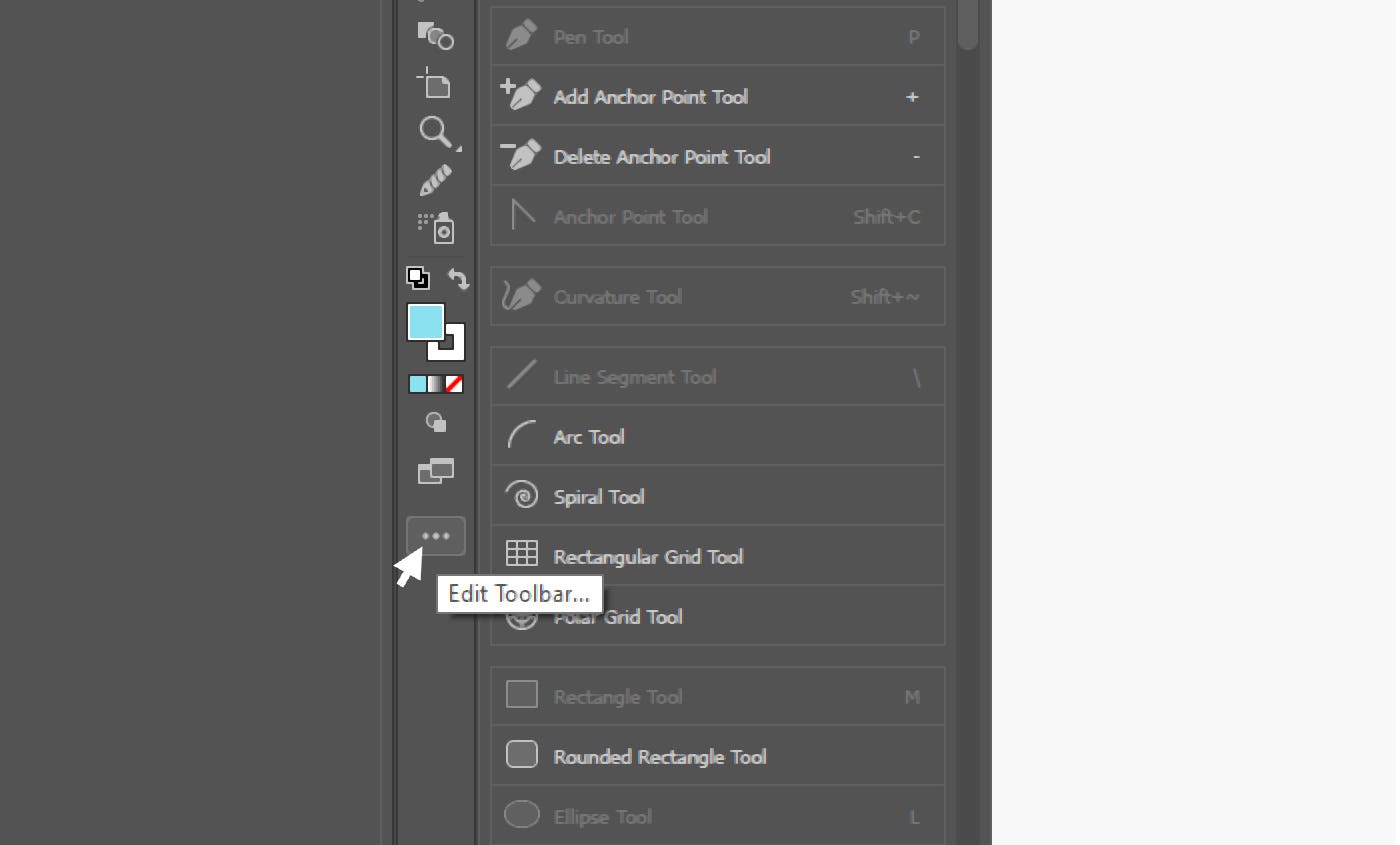
The current version of Illustrator CC allows you to enable and disable tools in the Tools Panel. You should have a look in there before you start your project and pull out anything that might be handy (it all works by drag and drop). Alternatively, get rid of tools which are irrelevant to your needs. If you do this before saving your workspace, your edited Tools Panel will be saved along with it for instant future access. Useful if you do lots of similar jobs. There are a great many tools available to supplement your workflow. Go down to the bottom of the Tools Panel and click on the icon with the three dots in a row (this is a menu icon referred to in UI as Meatballs — no joke). Clicking on the icon expands the Tools Panel out with a wider bar listing a whole heap of tools and their keyboard shortcuts. If you would like to make or amend keyboard shortcuts for tools you can go to Edit — Keyboard Shortcuts (or hit Alt+Shift+Ctrl [Option on Mac] +K). Check out this video about it.
當前版本的Illustrator CC允許您在“工具面板”中啟用和禁用工具。 在開始項目之前,應該先瀏覽一下那里,然后拉出可能有用的所有內容(通過拖放即可完成所有工作)。 或者,擺脫與您的需求無關的工具。 如果在保存工作區之前執行此操作,則將與之一起保存已編輯的“工具面板”,以供日后訪問。 如果您要做很??多類似的工作,則很有用。 有很多工具可以補充您的工作流程。 轉到“工具面板”的底部,然后單擊連續三個點的圖標(這是一個在UI中稱為Meatballs的菜單圖標-不開玩笑)。 單擊該圖標可展開“工具面板”,并帶有一個較寬的欄,列出了全部工具及其鍵盤快捷鍵。 如果您要制作或修改工具的鍵盤快捷鍵,可以轉到“編輯”“鍵盤快捷鍵”(或按Alt + Shift + Ctrl [Mac上為Option] + K)。 觀看有關此視頻 。
4 | 命名您的圖層和子圖層。 (4| Name your layers and sublayers.)
If you ever need to share your files with another designer, they will worship at your feet for taking the time to name each layer correctly. It separates the amateurs from the pros. The basics are covered here. Only you know what Layer 1 and Layer 11 contain, that is, until you forget. Don’t get cheeky with me and choose something like Bob or Susan — we are talking about short descriptive naming. It’s a bad habit and everyone falls victim to it. Correct layer naming will dramatically cut down time spent searching for assets. That’s right, you or someone else may need to open up that file again and retrieve something from it at a later date. Save your colleagues, and yourself, the stress of wading through a ton of layers. It makes my fingers twitch just thinking about it!
如果您需要與其他設計師共享文件,他們會花時間為每個圖層正確命名,這會讓您感到敬畏。 它將業余愛好者與職業選手分開。 這里介紹了基礎知識。 只有您知道第1層和第11層包含的內容,即直到您忘記。 不要厚顏無恥地選擇Bob或Susan之類的東西-我們在談論簡短的描述性命名。 這是一個壞習慣,每個人都成為它的受害者。 正確的圖層命名將大大減少搜索資產所花費的時間。 沒錯,您或其他人可能需要再次打開該文件,并在以后從其中檢索某些內容。 節省您的同事和您自己的繁瑣工作。 考慮到它使我的手指抽搐!

Mea culpa, in the past I have been particularly bad with this. Once I brought destruction on myself when I had to artwork some book covers containing around 50 unnamed layers, each filled with ungrouped unnamed sublayers, to produce 25-or-so uniquely different covers. Each with their own set of alterations. In times like these Illustrator will invariably decide to crash all of the time. I can still feel the hot spittle on the back of my neck as a former manager snarled “get it done by Friday!” over my shoulder, on no less than a Wednesday afternoon. I started to panic staring into that black abyss and emitted a silent scream. Dog owners for miles around awoke the next day to discover Fido had suddenly become as deaf as a doorpost. Some mornings I still wake up screaming about custom typography… Anyway, if you don’t want to wade through Hell just to make one little change, ending up burning with frustration and wanting to stick a gun in your mouth, name your layers. Every. Single. Time.
Mea culpa,過去我對此特別不滿意。 當我不得不破壞自己時,我不得不設計一些書封面,其中包含約50個未命名的圖層,每個圖層都填充有未分組的未命名子圖層,以制作25種左右獨特的封面。 每個都有自己的一套變更。 在這樣的情況下,Illustrator總是會始終崩潰。 一位前經理咆哮著說:“在周五之前完成!”我仍然感到脖子后側灼熱。 至少在星期三下午在我肩膀上 我開始慌張地凝視著那個黑色的深淵,發出一聲無聲的尖叫。 第二天,醒來幾英里的狗主人醒來,發現Fido突然變得像門柱一樣充耳不聞。 某個早晨,我仍然大喊著自定義字體...無論如何,如果您不想為了做些小改變而在地獄中徘徊,最后卻因沮喪而燃燒,并想在嘴里放一把槍,給圖層起個名字。 每一個 單。 時間。
5 | 灰度設計。 在Figma中選擇顏色。 (5| Design in grayscale. Pick your colours in Figma.)
Boom, ‘nuff said. Not really. I’m going to put it out there, and you may not agree with it, but this is how I stand on the matter. Illustrator sucks at refining colours. The program’s only redeeming features in this regard are the relatively new Recolour Artwork tool (which has all kinds of handy features) and the global colour swatch setting. The colour and swatch interfaces are generally unintuitive. Menus within menus within menus. I don’t think Adobe packages as a whole provide a particularly great experience for those wanting to navigate and fine tune colour properties. This is coming from a guy who has used Adobe software for around ten years — so I’m at least pretending to know a little bit about what I’m talking about.
oom,'納夫說。 并不是的。 我要把它放在那里,您可能不同意,但這就是我堅持的立場。 插畫家糟透了色彩。 該程序在這方面的唯一兌換功能是相對較新的Recolour Artwork工具(具有各種便捷功能)和全局色樣設置。 顏色和色板界面通常不直觀。 菜單內的菜單內的菜單。 我認為Adobe軟件包對于希望導航和微調顏色屬性的人來說,并不能提供特別出色的體驗。 這來自一個使用Adobe軟件已有十年之久的人-所以我至少假裝對我在說些什么有所了解。

A good solution to this colour problem has been a program I’ve discovered relatively recently — Figma. This is a fix only for digital products and not those requiring CMYK for print, for that you will have to go elsewhere. So, why Figma? Because Figma natively uses a H/S/L colour picker which responds to simple multiplication (*), division (/), addition (+) and subtraction (-) commands right there in the top-layer entry fields. (I covered this in my 3 tips for getting the basics right when doing visual design article, only in regard to type-size entry fields). Why is that important? Because it produces lighter, more vivid colour than the H/S/B colour picker built into Illustrator — and in which there is no H/S/L option. In Figma you can easily desaturate colours to check their values in grayscale to help you balance out the contrast your layout needs to work most effectively. In my experience I’ve noticed that the H/S/B colour picker in Illustrator contains more grey tones, and whilst using it you are far more likely to fall foul of muddy colours. It is a challenge to maintain colour saturation whilst changing the brightness without the colour appearing to shift into a tone. More importantly, you can’t quickly check your values in grayscale without fiddling about. Figma is a low-resource program, so we can use this to our advantage. We can have both Illustrator and Figma open at the same time on our desktops and easily dip in and out as we go about our work — refining swatches in Figma then copying the hex code over into Illustrator. Or, we can export the frame holding the swatches from Figma as a PNG, place it into Illustrator and colour pick from it.
解決這個顏色問題的一個好方法是我最近才發現一個程序-Figma。 此修復程序僅適用于數字產品,而不適用于需要CMYK進行打印的產品,因為您將不得不轉到其他地方。 那么,為什么選擇Figma? 因為Figma本身使用H / S / L顏色選擇器,所以它在頂層輸入字段中響應簡單的乘法(*),除法(/),加法(+)和減法(-)命令。 (我在進行視覺設計時獲得正確的基礎知識的3條技巧中對此進行了介紹 ,僅涉及類型大小的輸入字段)。 為什么這么重要? 因為它比Illustrator內置的H / S / B顏色選擇器產生更淺,更鮮艷的色彩,而且沒有H / S / L選項。 在Figma中,您可以輕松地使色彩飽和度降低,以灰度檢查其值,以幫助您平衡布局需要最有效地工作的對比度。 根據我的經驗,我注意到Illustrator中的H / S / B顏色選擇器包含更多的灰色調,并且在使用它時,您很可能會混入混濁的顏色。 在保持色彩飽和度的同時改變亮度而又不使顏色看起來變成色調是一個挑戰。 更重要的是,您不能不花心地快速檢查灰度值。 Figma是一種資源較少的程序,因此我們可以利用它來發揮自己的優勢。 我們可以同時在桌面上同時打開Illustrator和Figma,并在進行工作時輕松地將其浸入和浸出-在Figma中精制色板,然后將十六進制代碼復制到Illustrator中。 或者,我們可以將來自Figma的色板的框架導出為PNG,放置到Illustrator中并從中進行顏色選擇。
The H/S/B colour picker does come in handy when you are dealing with depth and balancing. For example, let’s say you are making a layered illustration of a landscape for your website. The layers in the background will require a slight desaturation and muting to generate a stronger separation from the midground. We want to emphasise the distance between fore- and midground by softening the hues as if there might be a slight veil of atmospheric mist in-between each of the layers. The foreground colour must be the richest in the illustration. Lowering the contrast towards the background helps make the layers easier on the eye and seats them more comfortably against white / off-white backgrounds, without giving an appearance of over-saturation — I describe colours like these as looking slightly acidic in hue.
在處理深度和平衡時,H / S / B顏色選擇器確實派上用場。 例如,假設您正在為網站制作分層的景觀圖。 背景中的各層將需要略微的飽和度和靜音,以產生與中層的更強分離。 我們希望通過柔化色調來強調前地面和中地面之間的距離,好像在每層之間都可能會出現一層薄霧。 前景色必須是插圖中最豐富的顏色。 降低與背景的對比度有助于使這些層在眼睛上更容易定位,并使其在白色/灰白色背景下更舒適地放置,而不會出現過飽和的外觀-我將這些顏色描述為看起來有些偏酸性。

So how are we to proceed? What I propose is that in Figma you make two sets of swatches: one full colour; one greyscale. Take them through to Illustrator. Use the grayscale swatch set whilst you’re illustrating and designing. Convert the swatches into their colour counterparts when you’re moving into finishing up. Now go through each layer from back to front slightly desaturating the colours with the H/S/B colour picker. We are talking slight nudges to round off some of the vividness. Not every layer will need this, but those colours sitting in the background on the lighter side of your palette will need the most attention. This is especially the case when those colours sit against whites / off-whites or strong dominant colours. You want those colours to appear as if they are receding into the background, not fighting it or sitting on top of it.
那么我們該如何進行呢? 我建議在Figma中制作兩套色板:一種是全色的;另一種是彩色的。 一灰度。 將它們帶到Illustrator。 在進行說明和設計時,請使用灰度色板集。 進行精加工時,將色板轉換為對應的顏色。 現在,使用H / S / B顏色選擇器從后到前遍歷每個圖層,使顏色略微飽和。 我們正在談論一些微妙的事情,以使某些生動性更加完美。 并非每個圖層都需要此顏色,但是位于調色板較亮一側的背景中的那些顏色將需要最多的關注。 當這些顏色與白色/灰白色或強烈的主色相對時,尤其如此。 您希望這些顏色看起來好像它們退回到背景中,而不是與之抗爭或坐在其頂部。
Phew! Here are a few final words about colour. When you’re making a colour palette and there is a gradation through tints / shades / tones from dark to light, use a little technique called hue-shifting. For each swatch below your dominant colour slightly nudge the hue entry field number up or down a few places (pick a direction for all the swatches and stick with it). In Figma you can take this further and use the multiplication (*), division (/), addition (+) and subtraction (-) commands directly in the entry fields in the H/S/L colour picker to create a consistent scale curve of hues providing you with a nice breadth of colour to work with.
! 這是關于顏色的最后幾句話。 制作調色板時,從深到淺的色調/陰影/色調會形成漸變,請使用一種稱為色相平移的小技巧。 對于低于主色的每個色板,將色相輸入字段編號向上或向下微移幾下(為所有色板選擇一個方向,并堅持使用)。 在Figma中,您可以更進一步,直接在H / S / L顏色選擇器的輸入字段中使用乘法(*),除法(/),加法(+)和減法(-)命令來創建一致的比例曲線色相為您提供了不錯的色彩范圍。

Recently, I created a nice palette typing /1.1 (divide by 1.1) after the hue and lightness values, then duplicating the resultant swatch and applying the same division again and so on consistently for each subsequent swatch. Play around with it. I think it produces better results than changing lightness values by increments of ten each time and bumping the hue manually. If you don’t like it and want to stick to nudging values in the entry fields with the arrow keys that’s your call.
最近,我創建了一個不錯的調色板,在色度和亮度值之后鍵入/1.1(除以1.1),然后復制生成的色板,并再次對每個后續色板應用相同的劃分,以此類推。 玩吧。 我認為它產生的效果比每次以10為增量并手動更改色調來更改亮度值要好。 如果您不喜歡它,并且想堅持使用箭頭鍵在輸入字段中微調數值,那就是您的電話。
So why hue-shift? It breathes life into your work. It provides a spectrum of warmer and cooler hues. When held against a set of swatches incrementally increasing or decreasing only in brightness, hue-shifted swatches feel dynamic and lush. I was introduced to designing in greyscale whilst taking this course.
那么,為什么要進行色移? 它為您的工作注入生命。 它提供了較暖和較冷的色調。 當緊貼一組樣本時,僅在亮度上逐漸增加或減少,色相偏移的樣本會感覺到動感和郁郁蔥蔥。 在學習的同時,我被介紹去進行灰度設計 這門課 。
6 | 制作畫筆。 (6| Make Artbrushes.)
Say you want to make repeating shapes like blades of grass. You don’t want to sit there endlessly making custom blades of grass, that’s insane, and more importantly, it will take forever to fill a wide area. Let’s face it, we as Designers are always running out of time. So here’s how to save some. In this example, making grass, we want to find a solution that will allow us to do as little as possible to enable the greatest amount of variation to fill the widest space. We can start off making a few basic grass shapes by editing ovals, using the Pathfinder Panel to cut shapes or drawing something custom with the brush / pen / or pencil tools. We only need two or three shapes. And by basic I mean an oval pointed at each end for one and then duplicated and cut it in half lengthways for two, done. Essentially, you’re creating a fill which can be applied to any number of paths simultaneously (or in quick succession) to produce that sweet grass you so so desire.
假設您要制作重復的形狀,例如草葉。 您不想無休止地坐在那里制作定制的草葉,這太瘋狂了,更重要的是,要花很長時間才能填滿大片區域。 面對現實吧,作為設計師,我們總是沒時間了。 所以這是保存方法。 在這個例子中 ,我們要尋找一種解決方案,該解決方案將使我們能夠做的盡可能少,以使最大的變化量能夠填充最寬的空間。 我們可以通過編輯橢圓來開始制作一些基本的草形狀,使用探路者面板剪切形狀或使用畫筆/鋼筆/鉛筆工具繪制自定義圖形。 我們只需要兩個或三個形狀。 基本而言,我的意思是在每個末端指向一個橢圓形,然后將其復制并縱向切成兩半,完成了。 本質上,您正在創建一個填充,該填充可以同時(或快速連續)應用于任何數量的路徑,以產生您如此想要的甜草。

However, all grass is not created equal. Some blades are tall, some blades are curvy and some blades are short, etc., etc. Variation of blade stems from the length and shaping of the paths you apply the Artbrush too, so the brush fill itself doesn’t need to be overly complicated. But I’m getting ahead of myself. Select each of the shapes you’ve just made individually and go to the Brushes Panel or if it’s not open, hit F5, click on the Hamburger icon (UI terminology makers seem to love using food names) in the top right and select New Brush. Select Artbrush from the list and hit OK, it will work fine with all the default settings so hit OK again to finish. If you wish to, you can play around with these settings later to produce different effects. Now, when you select a path you can select your new Artbrush from the Brushes Panel and it will automatically apply to the path. The colour of the fill will be the colour of the original object you made into an Artbrush.
但是,并非所有草都是平等的。 有些刀片很高,有些刀片是彎曲的,有些刀片很短,等等,等等。刀片的變化也源于您應用Artbrush的路徑的長度和形狀,因此筆刷填充本身并不需要過度復雜。 但是我要超越自己。 選擇您單獨制作的每種形狀,然后轉到“畫筆”面板,或者如果未打開,請按F5鍵,單擊右上角的“漢堡”圖標(UI術語制造商似乎喜歡使用食物名稱),然后選擇“新建畫筆” 。 從列表中選擇Artbrush,然后單擊OK,它將在所有默認設置下正常工作,因此再次單擊OK完成。 如果需要,您可以稍后使用這些設置來產生不同的效果。 現在,當您選擇路徑時,可以從“畫筆”面板中選擇新的Artbrush,它將自動應用于該路徑。 填充的顏色將是您制作成Artbrush的原始對象的顏色。
7 | 制作符號。 (7| Make symbols.)
Carrying on with this grass theme, lets say we’ve made a bunch of curved paths all in one place and have applied our new Artbrush options to them. Throw a selection around these paths and expand them with Object > Expand Appearance. Now merge them all together with the Shape Builder Tool or use the Unite Tool in the Pathfinder Panel. Right, now we have what looks like a clump of grass. Cool. Now open up the Symbols Panel (Window > Symbols) (or Shift+Ctrl [Option on Mac] +F11) select your new grass clump and click New Symbol in the Symbols Panel menu. Go into the Tools Panel and locate the Symbol Sprayer Tool. It may be hidden by the meatballs icon. You can double click the Symbol Sprayer Tool to change the intensity and density parameters amongst other things but for now simply have a go at spraying. You can now create a high number of grass shaped vectors that can cover a wide area with ease. Boom.
繼續講這個草皮主題,可以說我們已經在一個地方制作了許多彎曲的路徑,并對其應用了新的Artbrush選項。 圍繞這些路徑進行選擇,然后使用“對象”>“擴展外觀”對其進行擴展。 現在,將它們全部與Shape Builder工具合并在一起,或使用“路徑查找器”面板中的Unite工具。 對,現在我們看起來像一團草。 涼。 現在打開符號面板(“窗口”>“符號”)(或Shift + Ctrl [在Mac上為Option] + F11),選擇新的草叢,然后在“符號面板”菜單中單擊“新建符號”。 進入“工具面板”,找到“ Symbol Sprayer工具”。 可能被肉丸圖標隱藏。 您可以雙擊“ Symbol Sprayer工具”來更改強度和密度參數,但現在只需嘗試一下即可。 現在,您可以創建大量可以輕松覆蓋大范圍區域的草狀矢量。 繁榮。

This is a basic walkthrough of symbols and there is much you can do with them so just have a play with all the settings to see what you can make. One word of warning, the Symbol Sprayer Tool will spray symbols the same size as the original shape that was saved as a new symbol. If you want to have it spray smaller symbols to give a more detailed effect you will need to make sure your original shape is the size you want it to spray as before saving it as a symbol. Symbols can be used for many time saving things. I’ve seen people save artworks of differently dressed people as quick access symbols to try out logo designs and get an idea of how they might sit on clothing. At the bottom of the Symbol Menu in the Symbols Panel you can save your Symbol Library and export it, for future ease of use for yourself, or for sharing amongst your team. Symbols and Artbrushes are all about speeding up workflow, spend some time experimenting and think about how you can use them to your advantage.
這是符號的基本演練,您可以使用它們做很多事情,因此只需試一試所有設置,看看您能做什么。 一言以蔽之,Symbol Sprayer工具將噴涂與保存為新符號的原始形狀相同大小的符號。 如果要噴涂較小的符號以提供更詳細的效果,則需要先保存原始形狀,然后再將其保存為符號之前要噴涂的尺寸。 符號可用于節省很多時間。 我已經看到人們將穿著不同的人的藝術品保存為快速訪問符號,以試用徽標設計并了解他們如何坐在衣服上。 在“符號”面板中“符號菜單”的底部,您可以保存并導出符號庫,以便將來自己使用或與團隊共享。 Symbols和Artbrushes都是為了加快工作流程,花一些時間進行實驗,并思考如何利用它們來發揮自己的優勢。
Here is a good video on Symbols. Libraries can be shared between Adobe products and can help speed up your workflow, as in the case of designing UI elements in Illustrator and importing into XD to compose your product design.
這是關于Symbols的精彩視頻。 庫可以在Adobe產品之間共享,并且可以幫助加快工作流程,例如在Illustrator中設計UI元素并將其導入到XD中以構成產品設計的情況。
8 | 在您進行進度時保存工作的快速快照,然后將其通過電子郵件發送給自己 。 (8| Save quick snapshots of your work as you progress and email them to yourself.)
Take a break away from what you’ve been doing for fifteen minutes and do something else. Take yourself off for a walk or something. After your break, look at the snapshots you emailed yourself on your phone and/or other devices. Look at them on a PC if you design with a Mac. Look at them on a Mac if you design with a PC. Look at them on as many different sizes and types of screen as you can get your grubby little mitts on. Always be thinking multi-device. Are the values working? Are you struggling to make out particular details? Do the colours work? What is standing out to you most? By taking a break away from our work we help to disrupt our insular perspective on what’s going on. Viewing at different sizes forces you to look at the work . It’s all too easy to lose perspective and so lose sight of what needs changing when working on a project for long periods of time.
離開您十五分鐘的工作,然后做其他事情。 帶自己去散步或其他東西。 休息后,查看在手機和/或其他設備上通過電子郵件發送給自己的快照。 如果使用Mac設計,請在PC上查看它們。 如果使用PC進行設計,請在Mac上查看它們。 在盡可能多的不同尺寸和類型的屏幕上查看它們,即可穿上骯臟的小手套。 始終在考慮多設備 。 價值觀在起作用嗎? 您是否正在努力找出具體細節? 顏色有效嗎? 最讓您脫穎而出的是什么? 通過脫離我們的工作,我們有助于破壞我們對正在發生的事情的孤立看法。 以不同的尺寸查看會迫使您查看作品。 太容易失去遠見,而忽視了長時間從事項目時需要改變的地方。
For more Illustrator tutorials check out this extensive list put together by Sid Edwards.
有關更多Illustrator教程,請查看此詳盡列表 西德愛德華茲 ( Sid Edwards)放在一起。
After writing all that I’m tuckered out, so I guess I’ll leave this one here. Until next time folks!
在寫完我所有的東西之后,所以我想我把這個留在這里。 直到下一次鄉親們!
翻譯自: https://uxdesign.cc/8-tips-to-improve-your-work-in-adobe-illustrator-a8464fefe872
本文來自互聯網用戶投稿,該文觀點僅代表作者本人,不代表本站立場。本站僅提供信息存儲空間服務,不擁有所有權,不承擔相關法律責任。 如若轉載,請注明出處:http://www.pswp.cn/news/275879.shtml 繁體地址,請注明出處:http://hk.pswp.cn/news/275879.shtml 英文地址,請注明出處:http://en.pswp.cn/news/275879.shtml
如若內容造成侵權/違法違規/事實不符,請聯系多彩編程網進行投訴反饋email:809451989@qq.com,一經查實,立即刪除!相關文章

【轉】Vector與ArrayList區別

pyqt控件顯示重疊_Python編程:一個不錯的基于PyQt的Led控件顯示庫,建議收藏學習...

編寫高質量可維護的代碼:優雅命名

繼春晚不宕機后,百度云這次拿下攜程大單
列的大小(以字節為單位)是多少?)
mysql int 11 java_mysql中int(11)列的大小(以字節為單位)是多少?

powerpoint技巧_幾乎每個PowerPoint都爛雞蛋

認識mysql總結_從根上理解Mysql - 讀后個人總結1-搜云庫

白帽子技術分析會話劫持實戰講解

面試官問:你在項目中做過哪些安全防范措施?
)
TCP/IP協議族之應用層協議(FTP、TFTP)


logcat崩潰_使用logcat抓取Android崩潰日志

基于 Ubuntu 16.04 LTS 的 KDE neon 到達維護周期

真誠推薦7個能助你成長的前端大佬
:Silverlight的界面布局)
Silverlight學習筆記(3):Silverlight的界面布局

pov-inc_yourself勞自己-懶惰的設計師的POV和一些Figma

Geary 0.13.0 發布,GNOME 3 Email 客戶端應用

mysql表連接_mysql表連接

輕型本地服務器_一小時超輕型漂移機
