大家好,我是若川。最近組織了源碼共讀活動,感興趣的可以加我微信?ruochuan12?參與,已進行三個月了,大家一起交流學習,共同進步。
背景
相信很多同學在學習 webpack 的時候,對 loader 的概念應該有所了解,它用于模塊源碼的轉換,描述了 webpack 如何處理非 JavaScript 模塊,常見的有 css-loader、babel-loader、url-loader、vue-loader 等。
大部分 loader 已經滿足我們的日常開發需求,不過有些時候我們仍然需要自定義 loader。為了讓你了解如何開發一個 webpack loader,我決定從 ElementUI 組件庫的 md-loader 入手,帶你去了解其中的實現原理,以及在它的基礎上,如何做進一步的優化。
文檔的設計
對于一個組件的文檔,首先我們要考慮的是如何更好地展現組件的功能,其次要考慮的是如何更方便地做文檔維護。
想要編寫好一個組件的文檔,需要做好以下幾點:
1.功能描述
對組件功能、使用場景做詳細的描述。
2.demo 演示
直觀地讓用戶感受到組件的功能,并且能展示 demo 對應的代碼。
3.接口說明
寫清楚組件支持的屬性、方法、事件等。
那么,如何方便地維護文檔呢?
ElementUI 組件庫的文檔也是一個 Vue 項目,組件的文檔頁面是單獨的路由視圖,而文檔是用 markdown 文件來描述的,在文檔內部,不僅包含了對組件的功能以及接口的描述,還可以通過編寫 vue 組件的方式直接編寫組件的 demo,這種方式對于組件文檔的維護還是比較方便的。
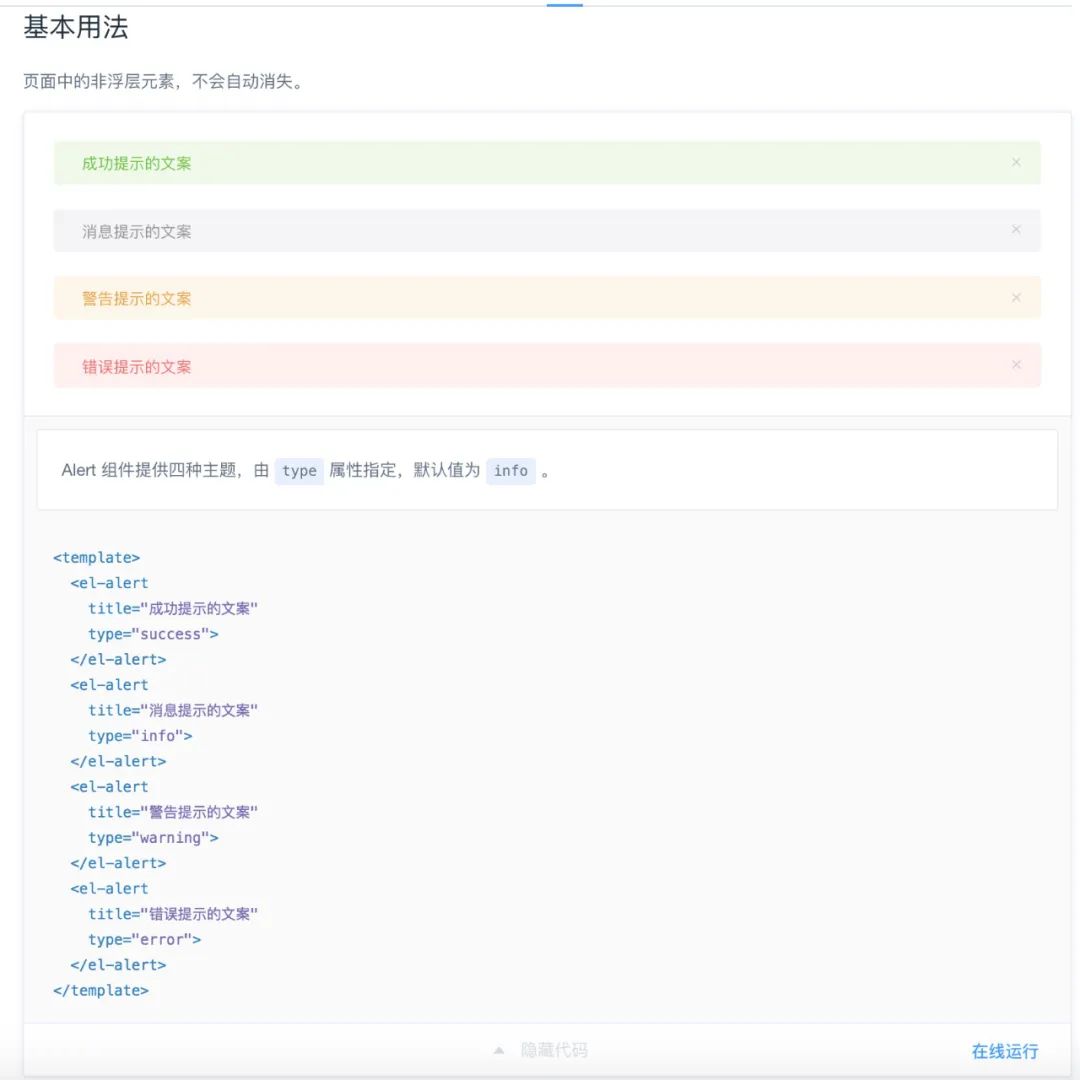
以 ElementUI 組件庫 Alter 組件為例:
##?Alert?警告用于頁面中展示重要的提示信息。###?基本用法頁面中的非浮層元素,不會自動消失。:::demo?Alert?組件提供四種主題,由`type`屬性指定,默認值為`info`。```html
<template><el-alerttitle="成功提示的文案"type="success"></el-alert><el-alerttitle="消息提示的文案"type="info"></el-alert><el-alerttitle="警告提示的文案"type="warning"></el-alert><el-alerttitle="錯誤提示的文案"type="error"></el-alert>
</template>
```
:::
最終它在頁面上的展示效果如下:

可以看到,組件的路由視圖對應的是一個 markdown 文件,而在我們通常的認知中,Vue 的路由視圖應該對應的是一個 Vue 組件。
在 ElementUI 內部,是通過 require.ensure 的方式去加載一個 .md 文件,它的返回值會作為路由視圖對應的異步組件。
const?LOAD_DOCS_MAP?=?{'zh-CN':?path?=>?{return?r?=>?require.ensure([],?()?=>r(require(`./docs/zh-CN${path}.md`)),'zh-CN');},//?...
}
因此內部就必須要把 markdown 文件轉換一個 Vue 組件,我們可以借助 webpack loader 來實現這一需求。
自定義 md-loader
首先,在 webpack 的配置規則中,需要指定 .md 文件應用的 loader:
{test:?/\.md$/,use:?[{loader:?'vue-loader',options:?{compilerOptions:?{preserveWhitespace:?false}}},{loader:?path.resolve(__dirname,?'./md-loader/index.js')}]
}
接下來,我們就來分析 md-loader 的源碼實現:
const?{stripScript,stripTemplate,genInlineComponentText
}?=?require('./util');
const?md?=?require('./config');module.exports?=?function(source)?{const?content?=?md.render(source);const?startTag?=?'<!--element-demo:';const?startTagLen?=?startTag.length;const?endTag?=?':element-demo-->';const?endTagLen?=?endTag.length;let?componenetsString?=?'';let?id?=?0;?//?demo?的?idlet?output?=?[];?//?輸出的內容let?start?=?0;?//?字符串開始位置let?commentStart?=?content.indexOf(startTag);let?commentEnd?=?content.indexOf(endTag,?commentStart?+?startTagLen);while?(commentStart?!==?-1?&&?commentEnd?!==?-1)?{output.push(content.slice(start,?commentStart));const?commentContent?=?content.slice(commentStart?+?startTagLen,?commentEnd);const?html?=?stripTemplate(commentContent);const?script?=?stripScript(commentContent);let?demoComponentContent?=?genInlineComponentText(html,?script);const?demoComponentName?=?`element-demo${id}`;output.push(`<template?slot="source"><${demoComponentName}?/></template>`);componenetsString?+=?`${JSON.stringify(demoComponentName)}:?${demoComponentContent},`;//?重新計算下一次的位置id++;start?=?commentEnd?+?endTagLen;commentStart?=?content.indexOf(startTag,?start);commentEnd?=?content.indexOf(endTag,?commentStart?+?startTagLen);}//?僅允許在?demo?不存在時,才可以在?Markdown?中寫?script?標簽let?pageScript?=?'';if?(componenetsString)?{pageScript?=?`<script>export?default?{name:?'component-doc',components:?{${componenetsString}}}</script>`;}?else?if?(content.indexOf('<script>')?===?0)?{start?=?content.indexOf('</script>')?+?'</script>'.length;pageScript?=?content.slice(0,?start);}output.push(content.slice(start));return?`<template><section?class="content?element-doc">${output.join('')}</section></template>${pageScript}`;
};
md-loader 要做的事情,就是把 markdown 語法的字符串,轉成 Vue 組件字符串。轉換的過程可以拆成三個步驟:markdown 渲染,demo 子組件的處理,構造完整的組件。接下來我們就來依次分析這三個步驟。
markdown 渲染
markdown 文件內容會渲染生成對應的 HTML,它是通過下面這段代碼完成的:
const?md?=?require('./config');
module.exports?=?function(source)?{const?content?=?md.render(source);
}
而 md 對象的來源如下:
const?Config?=?require('markdown-it-chain');
const?anchorPlugin?=?require('markdown-it-anchor');
const?slugify?=?require('transliteration').slugify;
const?containers?=?require('./containers');
const?overWriteFenceRule?=?require('./fence');const?config?=?new?Config();config.options.html(true).end().plugin('anchor').use(anchorPlugin,?[{level:?2,slugify:?slugify,permalink:?true,permalinkBefore:?true}]).end().plugin('containers').use(containers).end();const?md?=?config.toMd();
overWriteFenceRule(md);module.exports?=?md;
首先實例化了 config 對象,它依賴于 markdown-it-chain,通過 webpack chain 的鏈式 API,配置了 markdown-it 的插件。而 md 對象指向的就是 markdown-it 的實例。
markdown-it 的實例提供了很多 API,具體可以參考它的官網文檔。其中 md.render 就是把 markdown 字符串渲染生成 HTML。
不過我們注意到,組件文檔使用了一些非標準的 markdown 語法,比如:
:::demo
:::
它實際上是一個 markdown 的自定義容器,借助于 markdown-it-container 插件,就可以解析這個自定義容器:
const?mdContainer?=?require('markdown-it-container');module.exports?=?md?=>?{md.use(mdContainer,?'demo',?{validate(params)?{return?params.trim().match(/^demo\s*(.*)$/);},render(tokens,?idx)?{const?m?=?tokens[idx].info.trim().match(/^demo\s*(.*)$/);if?(tokens[idx].nesting?===?1)?{const?description?=?m?&&?m.length?>?1???m[1]?:?'';const?content?=?tokens[idx?+?1].type?===?'fence'???tokens[idx?+?1].content?:?'';return?`<demo-block>${description???`<div>${md.render(description)}</div>`?:?''}<!--element-demo:?${content}:element-demo-->`;}return?'</demo-block>';}});md.use(mdContainer,?'tip');md.use(mdContainer,?'warning');
};
可以看到,對于 demo 這個自定義容器,它會解析 demo 后面緊接著的描述字符串以及 code fence,并生成新的 HTML 字符串。
此外,code fence 也定義了新的渲染策略:
//?覆蓋默認的?fence?渲染策略
module.exports?=?md?=>?{const?defaultRender?=?md.renderer.rules.fence;md.renderer.rules.fence?=?(tokens,?idx,?options,?env,?self)?=>?{const?token?=?tokens[idx];//?判斷該?fence?是否在?:::demo?內const?prevToken?=?tokens[idx?-?1];const?isInDemoContainer?=?prevToken?&&?prevToken.nesting?===?1?&&?prevToken.info.trim().match(/^demo\s*(.*)$/);if?(token.info?===?'html'?&&?isInDemoContainer)?{return?`<template?slot="highlight"><pre?v-pre><code?class="html">${md.utils.escapeHtml(token.content)}</code></pre></template>`;}return?defaultRender(tokens,?idx,?options,?env,?self);};
};
對于在 demo 容器內且帶有 html 標記的 code fence,會做一層特殊處理。
對于我們前面的示例:
:::demo?Alert?組件提供四種主題,由`type`屬性指定,默認值為`info`。```html
<template><el-alerttitle="成功提示的文案"type="success"></el-alert><el-alerttitle="消息提示的文案"type="info"></el-alert><el-alerttitle="警告提示的文案"type="warning"></el-alert><el-alerttitle="錯誤提示的文案"type="error"></el-alert>
</template>
```
:::
經過解析后,生成的 HTML 大致如下:
<demo-block><div><p>Alert?組件提供四種主題,由<code>type</code>屬性指定,默認值為<code>info</code>。</p></div><!--element-demo:?<template><el-alerttitle="成功提示的文案"type="success"></el-alert><el-alerttitle="消息提示的文案"type="info"></el-alert><el-alerttitle="警告提示的文案"type="warning"></el-alert><el-alerttitle="錯誤提示的文案"type="error"></el-alert></template>:element-demo--><template?slot="highlight"><pre?v-pre><code?class="html"><template><el-alerttitle="成功提示的文案"type="success"></el-alert><el-alerttitle="消息提示的文案"type="info"></el-alert><el-alerttitle="警告提示的文案"type="warning"></el-alert><el-alerttitle="錯誤提示的文案"type="error"></el-alert></template></code></pre></template>
</demo-block>demo 子組件的處理
目前我們了解到,每一個 demo 容器對應一個示例,它會解析生成對應的 HTML,最終會通過 demo-block 組件渲染,這個組件是預先定義好的 Vue 組件:
<template><divclass="demo-block":class="[blockClass,?{?'hover':?hovering?}]"@mouseenter="hovering?=?true"@mouseleave="hovering?=?false"><div?class="source"><slot?name="source"></slot></div><div?class="meta"?ref="meta"><div?class="description"?v-if="$slots.default"><slot></slot></div><div?class="highlight"><slot?name="highlight"></slot></div></div><divclass="demo-block-control"ref="control":class="{?'is-fixed':?fixedControl?}"@click="isExpanded?=?!isExpanded"><transition?name="arrow-slide"><i?:class="[iconClass,?{?'hovering':?hovering?}]"></i></transition><transition?name="text-slide"><span?v-show="hovering">{{?controlText?}}</span></transition><el-tooltip?effect="dark"?:content="langConfig['tooltip-text']"?placement="right"><transition?name="text-slide"><el-buttonv-show="hovering?||?isExpanded"size="small"type="text"class="control-button"@click.stop="goCodepen">{{?langConfig['button-text']?}}</el-button></transition></el-tooltip></div></div>
</template>
demo-block 支持了多個插槽,其中默認插槽對應了組件的描述部分;highlight 插槽對應組件高亮的代碼部分;source 插槽對應 demo 實現的部分。
因此,目前我們生成的 HTML 字符串還不能夠直接被 demo-block 組件使用,需要進一步的處理:
module.exports?=?function(source)?{const?content?=?md.render(source);const?startTag?=?'<!--element-demo:';const?startTagLen?=?startTag.length;const?endTag?=?':element-demo-->';const?endTagLen?=?endTag.length;let?componenetsString?=?'';let?id?=?0;?//?demo?的?idlet?output?=?[];?//?輸出的內容let?start?=?0;?//?字符串開始位置let?commentStart?=?content.indexOf(startTag);let?commentEnd?=?content.indexOf(endTag,?commentStart?+?startTagLen);while?(commentStart?!==?-1?&&?commentEnd?!==?-1)?{output.push(content.slice(start,?commentStart));const?commentContent?=?content.slice(commentStart?+?startTagLen,?commentEnd);const?html?=?stripTemplate(commentContent);const?script?=?stripScript(commentContent);let?demoComponentContent?=?genInlineComponentText(html,?script);const?demoComponentName?=?`element-demo${id}`;output.push(`<template?slot="source"><${demoComponentName}?/></template>`);componenetsString?+=?`${JSON.stringify(demoComponentName)}:?${demoComponentContent},`;//?重新計算下一次的位置id++;start?=?commentEnd?+?endTagLen;commentStart?=?content.indexOf(startTag,?start);commentEnd?=?content.indexOf(endTag,?commentStart?+?startTagLen);}//?處理?script//?...output.push(content.slice(start))
};
其中 output 表示要輸出的模板內容,componenetsString 表示要輸出的腳本內容。這段代碼要做的事情就是填充 demo-block 組件內部的 source 插槽,并且插槽的內容是一個 demo 子組件。
由于前面生成的 HTML 中包含了 <!--element-demo: ?和 :element-demo--> 注釋字符串,因此就可以找到注釋字符串的位置,通過字符串截取的方式來獲取注釋內外的內容。
對于注釋內的內容,會提取其中的模板部分和 JS 部分,然后構造出一個內聯的組件字符串。
前面的示例經過處理,output 對應的內容如下:
[`<demo-block><div><p>Alert 組件提供四種主題,由<code>type</code>屬性指定,默認值為<code>info</code>。</p></div>`,`<template?slot="source"><element-demo0?/></template>`,?`<template?slot="highlight"><pre?v-pre><code?class="html"><template><el-alerttitle="成功提示的文案"type="success"></el-alert><el-alerttitle="消息提示的文案"type="info"></el-alert><el-alerttitle="警告提示的文案"type="warning"></el-alert><el-alerttitle="錯誤提示的文案"type="error"></el-alert></template></code></pre></template><demo-block>`
]處理后的 demo-block 就變成一個標準的 Vue 組件的應用了。
componenetsString 對應的內容如下:
`"element-demo0":?(function()?{var?render?=?function()?{var?_vm?=?thisvar?_h?=?_vm.$createElementvar?_c?=?_vm._self._c?||?_hreturn?_c("div",[[_c("el-alert",?{?attrs:?{?title:?"成功提示的文案",?type:?"success"?}?}),_vm._v("?"),_c("el-alert",?{?attrs:?{?title:?"消息提示的文案",?type:?"info"?}?}),_vm._v("?"),_c("el-alert",?{?attrs:?{?title:?"警告提示的文案",?type:?"warning"?}?}),_vm._v("?"),_c("el-alert",?{?attrs:?{?title:?"錯誤提示的文案",?type:?"error"?}?})]],2)??}??var?staticRenderFns?=?[]render._withStripped?=?trueconst?democomponentExport?=?{}return?{render,staticRenderFns,...democomponentExport}
})(),`
通過內聯的方式定義了 element-demo0 子組件的實現。
示例只是處理了單個 demo 子組件,如果有多個 demo 容器,就可以通過循環查找注釋字符串 element-demo:,處理所有的 demo-block。
構造完整的組件
module.exports?=?function(source)?{const?content?=?md.render(source);let?componenetsString?=?'';let?output?=?[];let?start?=?0;//?循環處理?demo?子組件//?...let?pageScript?=?'';if?(componenetsString)?{pageScript?=?`<script>export?default?{name:?'component-doc',components:?{${componenetsString}}}</script>`;}?else?if?(content.indexOf('<script>')?===?0)?{start?=?content.indexOf('</script>')?+?'</script>'.length;pageScript?=?content.slice(0,?start);}output.push(content.slice(start));return?`<template><section?class="content?element-doc">${output.join('')}</section></template>${pageScript}`;
};可以看到,output 負責組件的模板定義,pageScript 負責組件的腳本定義,最終會通過字符串拼接的方式,返回完整的組件定義。
對于最開始完整的示例而言,經過 md-loader 處理的結果如下:
<template><section?class="content?element-doc"><h2?id="alert-jing-gao"><a?class="header-anchor"?href="#alert-jing-gao"?aria-hidden="true">?</a>?Alert?警告</h2><p>用于頁面中展示重要的提示信息。</p><h3?id="ji-ben-yong-fa"><a?class="header-anchor"?href="#ji-ben-yong-fa"?aria-hidden="true">?</a>?基本用法</h3><p>頁面中的非浮層元素,不會自動消失。</p><demo-block><div><p>Alert?組件提供四種主題,由<code>type</code>屬性指定,默認值為<code>info</code>。</p></div><template?slot="source"><element-demo0/></template><template?slot="highlight"><pre?v-pre><code?class="html"><template><el-alerttitle="成功提示的文案"type="success"></el-alert><el-alerttitle="消息提示的文案"type="info"></el-alert><el-alerttitle="警告提示的文案"type="warning"></el-alert><el-alerttitle="錯誤提示的文案"type="error"></el-alert></template></code></pre></template></demo-block></section>
</template>
<script>export?default?{name:?'component-doc',components:?{"element-demo0":?(function()?{var?render?=?function()?{var?_vm?=?thisvar?_h?=?_vm.$createElementvar?_c?=?_vm._self._c?||?_hreturn?_c("div",[[_c("el-alert",?{?attrs:?{?title:?"成功提示的文案",?type:?"success"?}?}),_vm._v("?"),_c("el-alert",?{?attrs:?{?title:?"消息提示的文案",?type:?"info"?}?}),_vm._v("?"),_c("el-alert",?{?attrs:?{?title:?"警告提示的文案",?type:?"warning"?}?}),_vm._v("?"),_c("el-alert",?{?attrs:?{?title:?"錯誤提示的文案",?type:?"error"?}?})]],2)}var?staticRenderFns?=?[]render._withStripped?=?trueconst?democomponentExport?=?{}return?{render,staticRenderFns,...democomponentExport}})(),}}
</script>顯然,經過 md-loader 處理后原來 markdown 語法的字符串變成了一個 Vue 組件定義的字符串,就可以交給 vue-loader 繼續處理了。
文檔的優化
ElementUI 文檔的設計確實巧妙,由于我們研發的 ZoomUI 是 fork 自 ElementUI 的,很長一段時間,我們也沿用了 ElementUI 文檔的編寫方式。
但是隨著我們自研的組件越來越多,組件使用的場景也越來越豐富,我們對于文檔編寫和維護的需求也越來越多。
我發現在現有模式下寫文檔有幾個不爽的點:
1.在 .md 中寫 Vue 組件不方便,沒法格式化代碼,IDE 的智能提示不夠友好。
2.在 demo 中寫 style 是無效的,需要在外部的 css 文件另外定義樣式。
3.中英文文檔需要分別寫 demo,修改一處沒法自動同步到另一處。
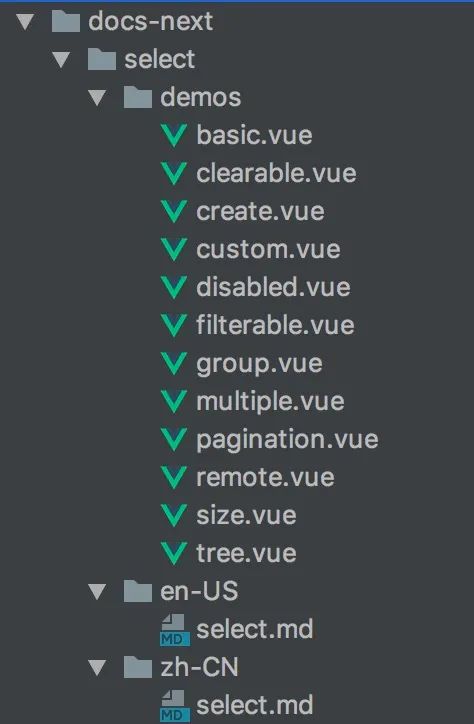
我認為理想中編寫一個組件的文檔的方式是這樣的:

##?Select?選擇器當選項過多時,使用下拉菜單展示并選擇內容。###?基礎用法適用廣泛的基礎單選。:::demo?`v-model`?的值為當前被選中的?`zm-option`?的?`value`?屬性值。```html
<basic/>
```
:::###?有禁用選項:::demo?在?`zm-option`?中,設定?`disabled`?值為?`true`,即可禁用該選項。
```html
<disabled/>
```
:::
所有組件的 demo 拆成一個個 Vue 組件,然后在 markdown 文檔中引入這些同名的組件。通過這種方式,前面提到的三個痛點就解決了。
那么,想達到這種效果,我們需要對 md-loader 做哪些修改呢?
來看一下修改后的 md-loader 的實現:
const?md?=?require('./config');module.exports?=?function(source)?{const?content?=?md.render(source,?{resourcePath:?this.resourcePath});const?startTag?=?'<!--element-demo:';const?startTagLen?=?startTag.length;const?endTag?=?':element-demo-->';const?endTagLen?=?endTag.length;const?tagReg?=?/\s*<([\w-_]+)\s*\/>\s*/;let?componenetsString?=?'';let?output?=?[];?//?輸出的內容let?start?=?0;?//?字符串開始位置let?commentStart?=?content.indexOf(startTag);let?commentEnd?=?content.indexOf(endTag,?commentStart?+?startTagLen);while?(commentStart?!==?-1?&&?commentEnd?!==?-1)?{output.push(content.slice(start,?commentStart));const?commentContent?=?content.slice(commentStart?+?startTagLen,?commentEnd);const?matches?=?commentContent.match(tagReg);if?(matches)?{const?demoComponentName?=?matches[1];output.push(`<template?slot="source"><${demoComponentName}?/></template>`);const?imports?=?`()=>import('../demos/${demoComponentName}.vue')`;componenetsString?+=?`${JSON.stringify(demoComponentName)}:?${imports},`;}start?=?commentEnd?+?endTagLen;commentStart?=?content.indexOf(startTag,?start);commentEnd?=?content.indexOf(endTag,?commentStart?+?startTagLen);}let?pageScript?=?'';if?(componenetsString)?{pageScript?=?`<script>export?default?{name:?'component-doc',components:?{${componenetsString}}}</script>`;}?else?if?(content.indexOf('<script>')?===?0)?{start?=?content.indexOf('</script>')?+?'</script>'.length;pageScript?=?content.slice(0,?start);}output.push(content.slice(start));return?`<template><section?class="content?element-doc">${output.join('')}</section></template>${pageScript}`;
};
思路很簡單,解析出每個 demo 容器中的組件名稱,通過動態 import 的方式加載組件,然后在 source 插槽中直接用這個組件。
這樣就把組件的 markdown 文檔和 demo 直接關聯起來。但這樣還不夠,我們還需要解決組件 demo 下面的代碼展示問題,需要對 code fence 渲染策略做一定的修改:
const?path?=?require('path');
const?fs?=?require('fs');const?tagReg?=?/\s*<([\w-_]+)\s*\/>\s*/;//?覆蓋默認的?fence?渲染策略
module.exports?=?md?=>?{const?defaultRender?=?md.renderer.rules.fence;md.renderer.rules.fence?=?(tokens,?idx,?options,?env,?self)?=>?{const?token?=?tokens[idx];//?判斷該?fence?是否在?:::demo?內const?prevToken?=?tokens[idx?-?1];const?isInDemoContainer?=?prevToken?&&?prevToken.nesting?===?1?&&?prevToken.info.trim().match(/^demo\s*(.*)$/);if?(token.info?===?'html'?&&?isInDemoContainer)?{const?matches?=?token.content.match(tagReg);if?(matches)?{const?componentName?=?matches[1];const?componentPath?=?path.resolve(env.resourcePath,?`../../demos/${componentName}.vue`);const?content?=?fs.readFileSync(componentPath,?'utf-8');return?`<template?slot="highlight"><pre?v-pre><code?class="html">${md.utils.escapeHtml(content)}</code></pre></template>`;}return?'';}return?defaultRender(tokens,?idx,?options,?env,?self);};
};
由于組件 demo 的代碼已經不在 markdown 文檔中維護了,因此只能從組件文件中讀取了。
但是我們如何知道應該從哪個路徑讀取對應的 demo 組件呢?
在 webpack loader 中,我們可以通過 this.resourcePath 獲取到當前處理文件的路徑,那么在執行 markdown 渲染的過程中就可以把路徑當做環境變量傳入:
const?content?=?md.render(source,?{resourcePath:?this.resourcePath
})
這樣在 markdown 處理器的內部我們就可以通過 env.resourcePath 拿到處理的 markdown 文件路徑,從而通過相對路徑計算出要讀取組件的路徑,然后讀取它們的內容:
const?componentPath?=?path.resolve(env.resourcePath,?`../../demos/${componentName}.vue`);
const?content?=?fs.readFileSync(componentPath,?'utf-8');
有了組件文檔的重構方案,接下來的工作就是依次重構組件的文檔。當然在這個階段,新老文檔編寫的方式都需要支持。
因此需要對 webpack 的配置做一些修改:
{test:?/examples(\/|\\)docs(\/|\\).*\.md$/,use:?[{loader:?'vue-loader',options:?{compilerOptions:?{preserveWhitespace:?false}}},{loader:?path.resolve(__dirname,?'./md-loader/index.js')}]
},?{test:?/(examples(\/|\\)docs-next(\/|\\).*|changelog\.[\w-_]+)\.md$/i,use:?[{loader:?'vue-loader',options:?{compilerOptions:?{preserveWhitespace:?false}}},{loader:?path.resolve(__dirname,?'./md-loader-next/index.js')}]
}
對于重構的文檔,使用新的 markdown loader。當然加載組件視圖的邏輯也需要做一定的修改,對于重構的文檔,指向新的文檔地址。
總結
ElementUI 通過 markdown 編寫組件文檔的思路還是非常棒的,主要利用了自定義 md-loader 對 markdown 文件內容做了一層處理,解析成 Vue 組件字符串,再交給 vue-loader 處理。
在寫這篇文章之前,我就在粉絲群里分享了重構文檔的方案。有同學告訴我,Element-plus 已經用 vitepress 重寫,看了一下文檔的組織方式,和我重構的方式非常類似,這就是傳說中的英雄所見略同嗎?
我在之前的文章中強調過,要善于發現工作中的痛點,并通過技術的方式解決,這是優秀的工程師重要的能力之一,希望這篇文章能夠帶給你這方面的一些思考。
參考資料
[1] markdown-it-chain:??https://github.com/ulivz/markdown-it-chain
[2] markdown-it:?https://markdown-it.github.io/markdown-it/
最近組建了一個江西人的前端交流群,如果你是江西人可以加我微信?ruochuan12?私信 江西?拉你進群。
推薦閱讀
1個月,200+人,一起讀了4周源碼
我歷時3年才寫了10余篇源碼文章,但收獲了100w+閱讀
老姚淺談:怎么學JavaScript?
我在阿里招前端,該怎么幫你(可進面試群)

·················?若川簡介?·················
你好,我是若川,畢業于江西高校。現在是一名前端開發“工程師”。寫有《學習源碼整體架構系列》10余篇,在知乎、掘金收獲超百萬閱讀。
從2014年起,每年都會寫一篇年度總結,已經寫了7篇,點擊查看年度總結。
同時,最近組織了源碼共讀活動,幫助1000+前端人學會看源碼。公眾號愿景:幫助5年內前端人走向前列。

識別上方二維碼加我微信、拉你進源碼共讀群
今日話題
略。歡迎分享、收藏、點贊、在看我的公眾號文章~


)


 一些知識點(續2))


