基于pt100溫度計仿真
重點 (Top highlight)
This article is the 2nd in a two part series — to the previous chapter in which I demonstrate how to establish an 8pt grid.
本文是該系列文章的第二部分 ,這是上一章 的第二部分 ,在上一章中,我演示了如何建立8pt網格 。
設計系統有什么用? (What are Design Systems for?)
If you and your team aren’t using a Design System (DS), please open the latest project in your favorite design software, and count the myriad of shades of your primary color and grays, the number of fonts you’ve used and the different sizes your primary button appears in.
如果您和您的團隊沒有使用設計系統(DS),請在您喜歡的設計軟件中打開最新的項目,并計算無數的原色和灰色陰影,已使用的字體數量以及您的主按鈕顯示的大小不同。
Go on, I can wait.
繼續,我可以等。
Most probably, you can shave off about %30 of the redundant styles and consolidate your design to be more consistent, lean and reusable.
最有可能的是,您可以省掉大約30%的冗余樣式,并將您的設計合并為更一致,更精簡和可重復使用的樣式。
When we create reusable styles and components, we essentially create a consistent visual language that we can rely upon when the product we’re working on inevitably scales.
當我們創建可重用的樣式和組件時,實質上是創建了一致的視覺語言,當我們正在開發的產品不可避免地擴展時,我們可以依靠它。
A design system is a collection of reusable components, guided by clear standards, that can be assembled together to build any number of applications.
設計系統是在明確的標準指導下的可重復使用組件的集合,這些組件可以組裝在一起以構建任何數量的應用程序。
— From the Design Systems Handbook, Design Better
—從《設計系統手冊》中可以更好地設計
You can read all about the value of Design Systems, in Invision’s excellent eBook — Design Systems Handbook. The first two chapters will help you understand better the need of a DS and who should be involved in the process (hint: not only designers).
您可以在Invision的出色電子書-Design Systems Handbook中閱讀有關Design Systems價值的所有信息。 前兩章將幫助您更好地了解DS的需求以及流程中應該涉及的人(提示:不僅是設計人員)。
設計我們的設計系統 (Designing our Design System)
In the previous article, we’ve established our basic unit — 8pt. We’ll use that unit in our smallest components as well as in our largest and more complex components. We also defined Typography, Iconography and Layout; so apart from Layout, I won’t be delving too deep on these two issues here. Here’s what we’ll be going going over:
在 上一篇文章中 ,我們建立了基本單元8pt。 我們將在最小的組件以及最大和更復雜的組件中使用該單元。 我們還定義了版式,圖標和布局。 因此,除了Layout之外,在這里我不會深入研究這兩個問題。 這是我們要進行的工作:
- Color 顏色
- Typography 版式
- Iconography 影像學
- Shadow 陰影
- Border Radius 邊界半徑
- Components 組件
- Grid & Layout 網格布局
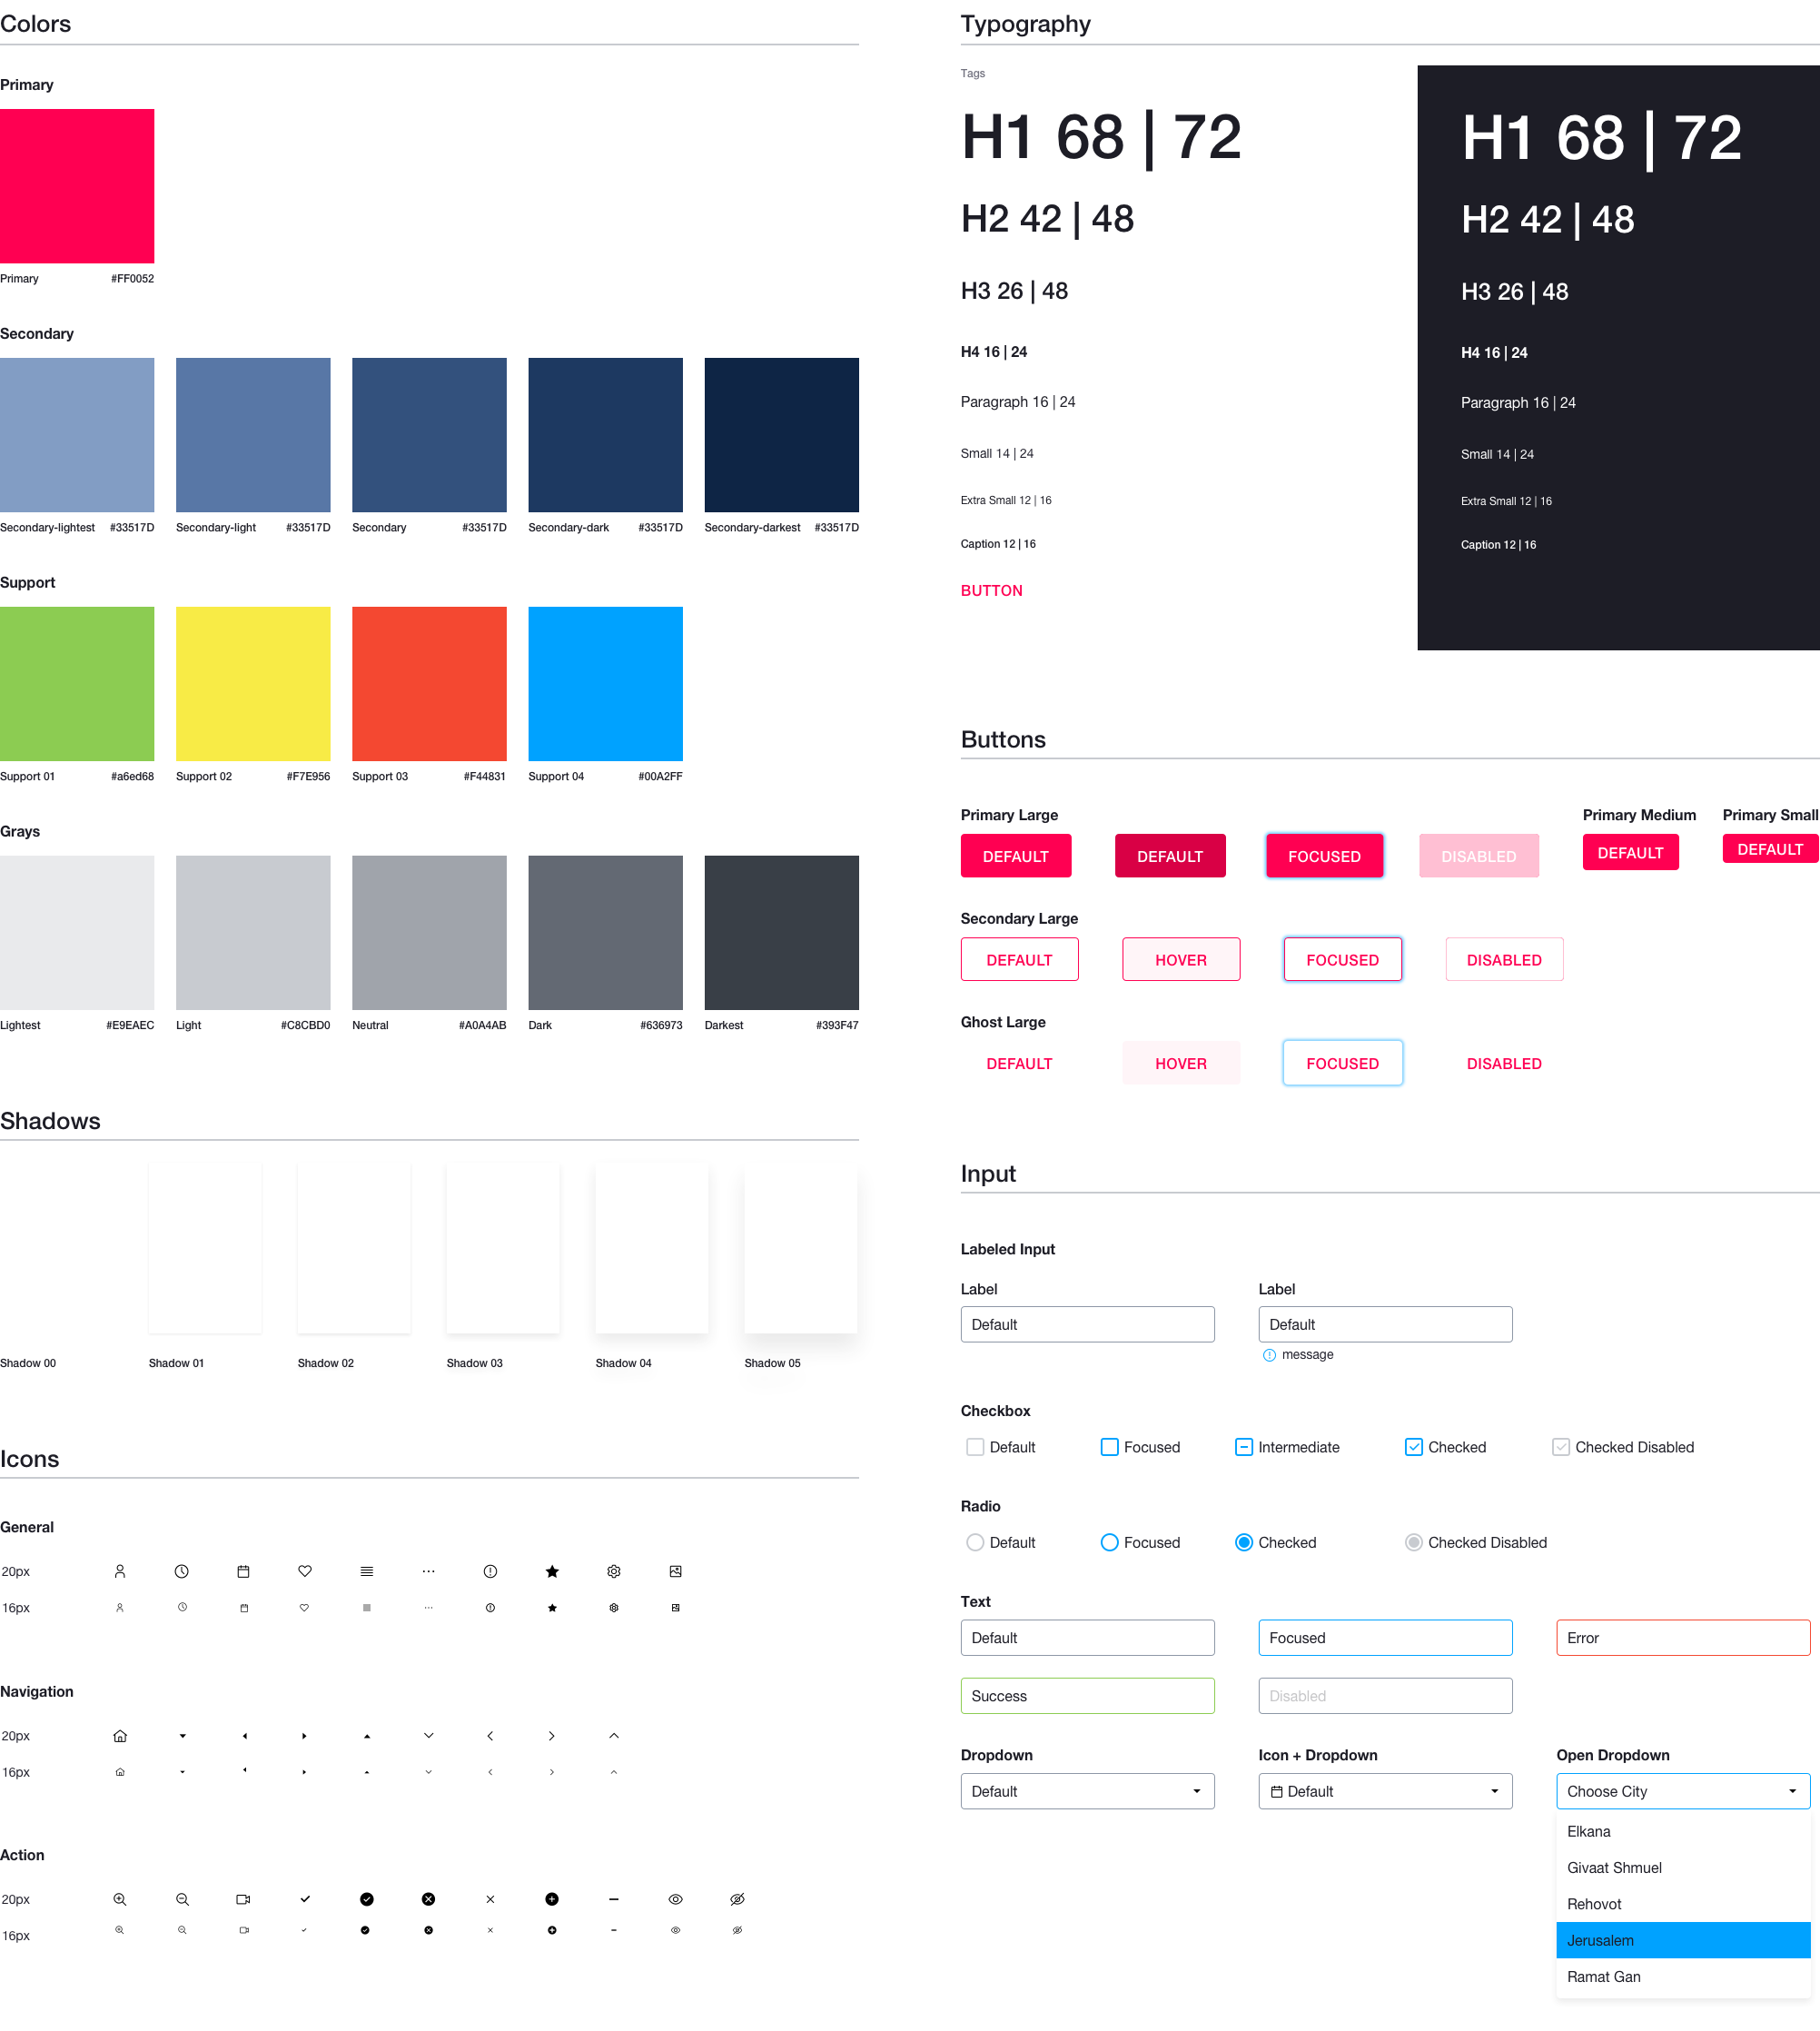
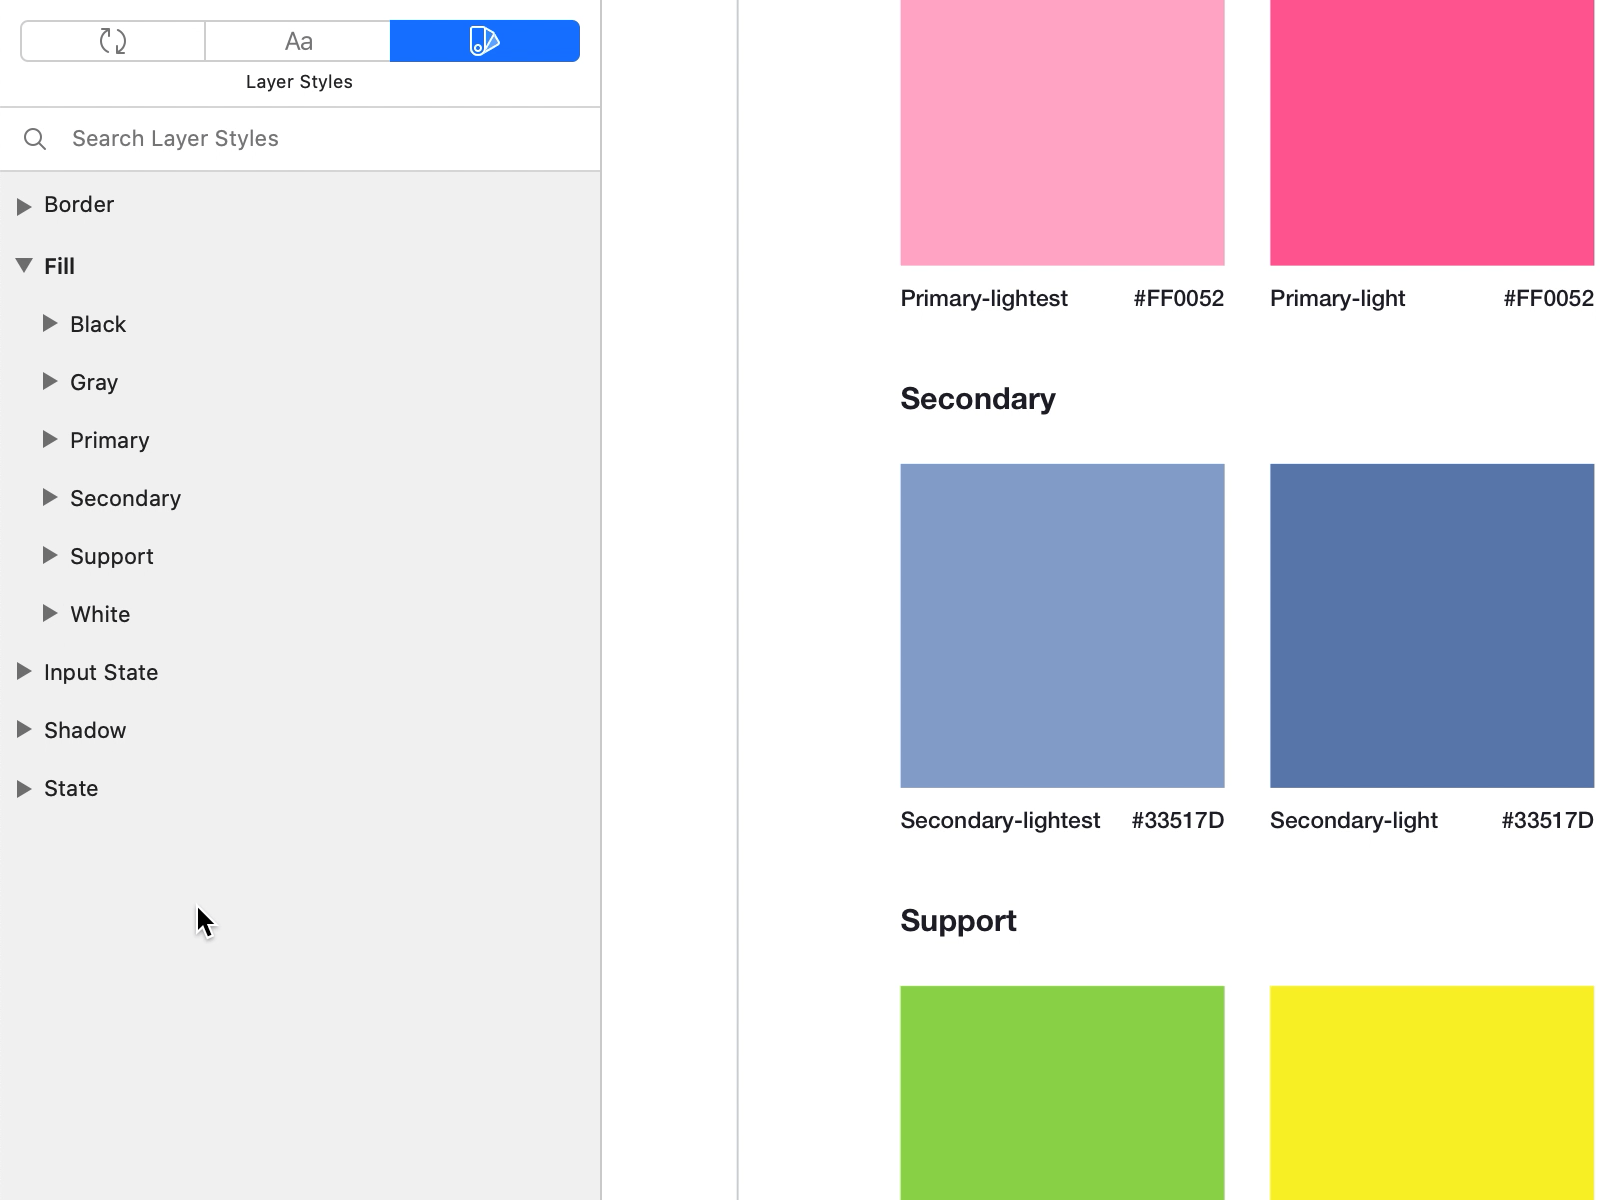
顏色 (Color)
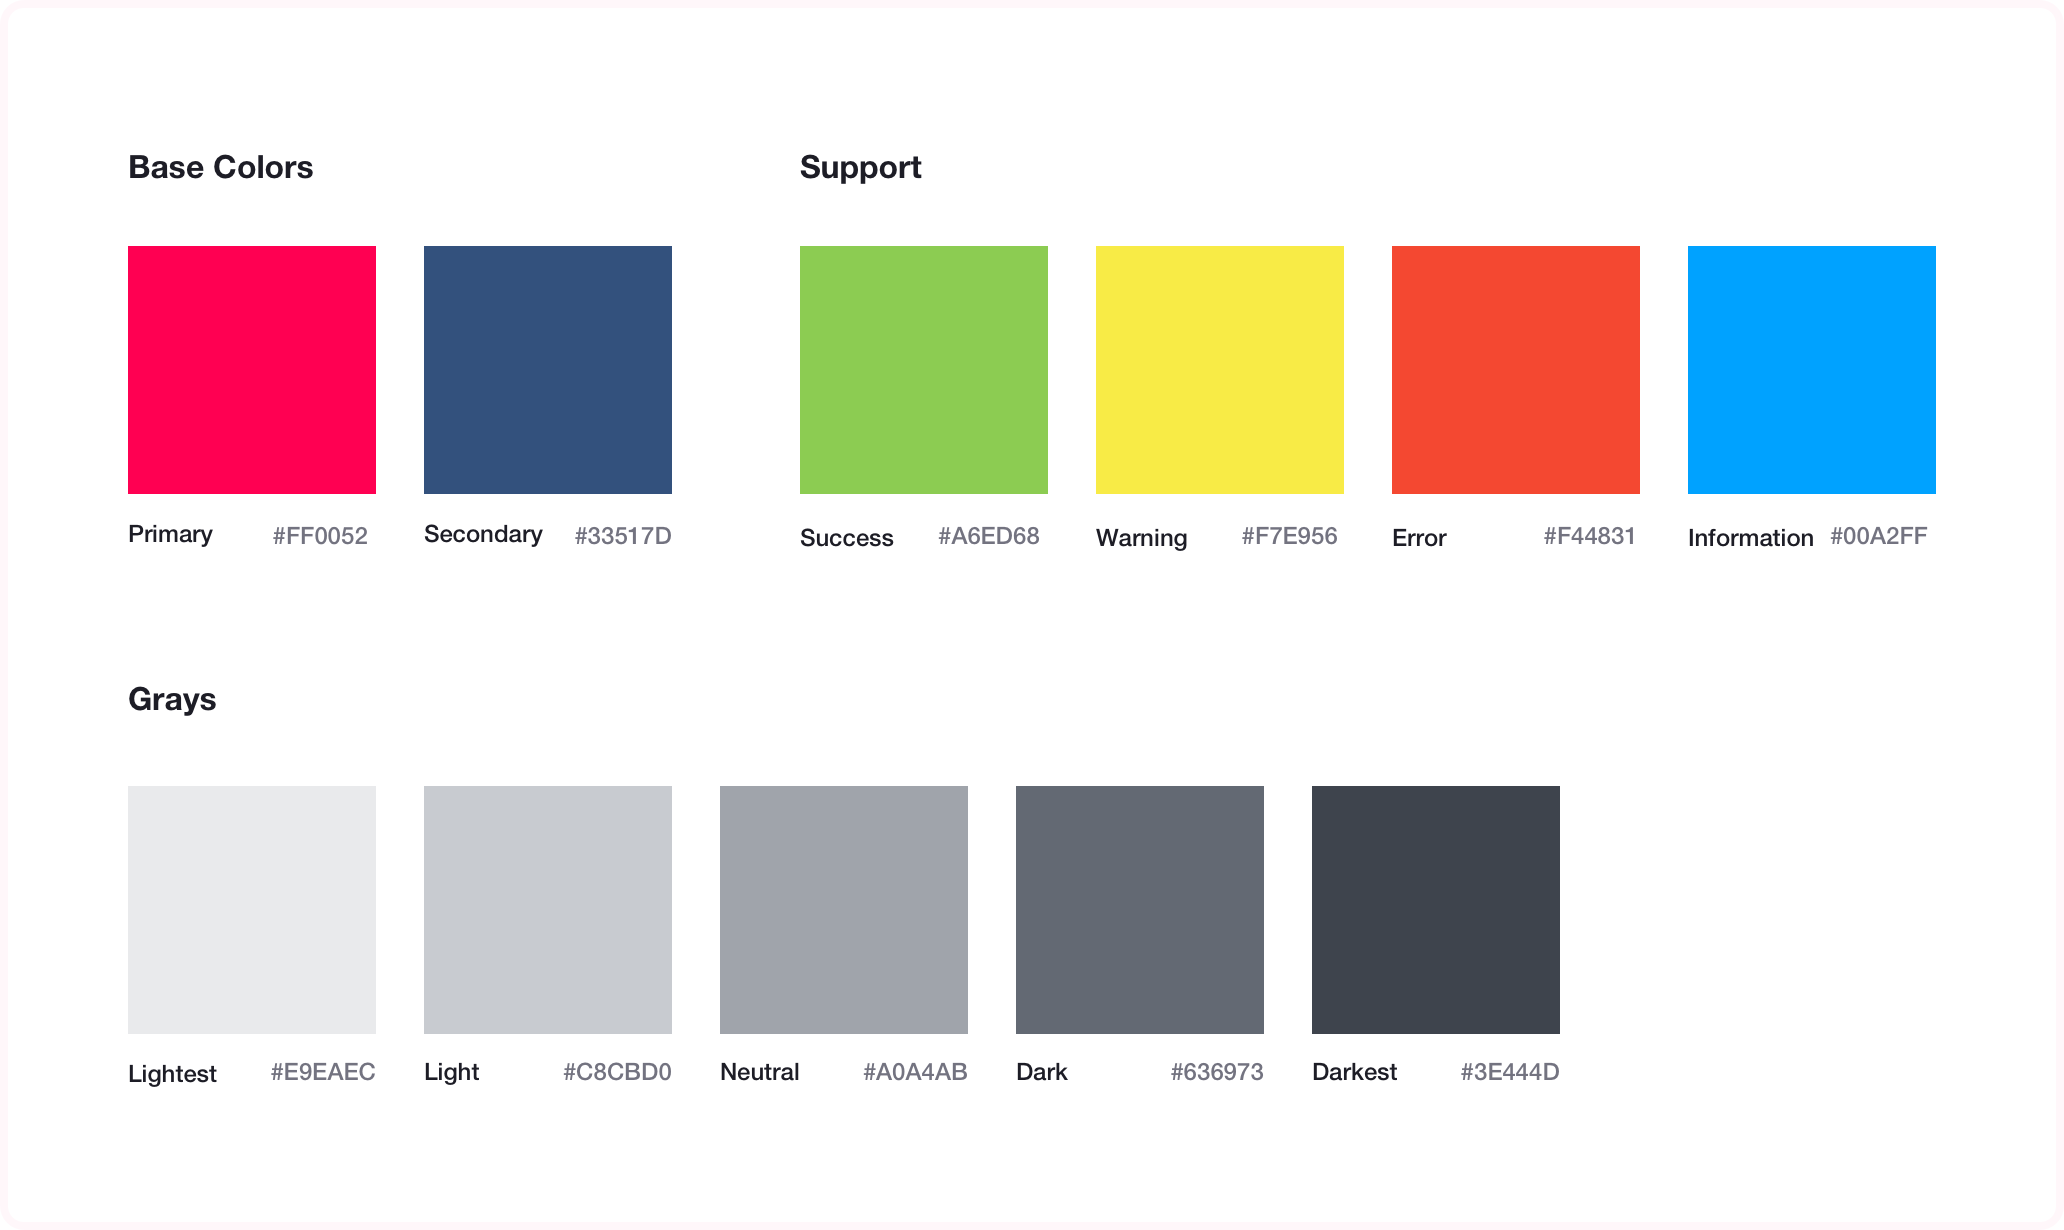
Colors are going to be our first building block. When designing digital products, we’re going to need the following colors as a minimum:
顏色將成為我們的第一個基石。 設計數字產品時,我們至少需要以下顏色:
Primary: Usually the brand color.
原色 :通常是品牌顏色。
Secondary (Optional): Should complement the primary and not compete for attention, it’s purpose is to signal elements with a secondary importance.
次要的 (可選的):應該補充主要的而不是爭奪注意力,其目的是表示具有次要重要性的元素。
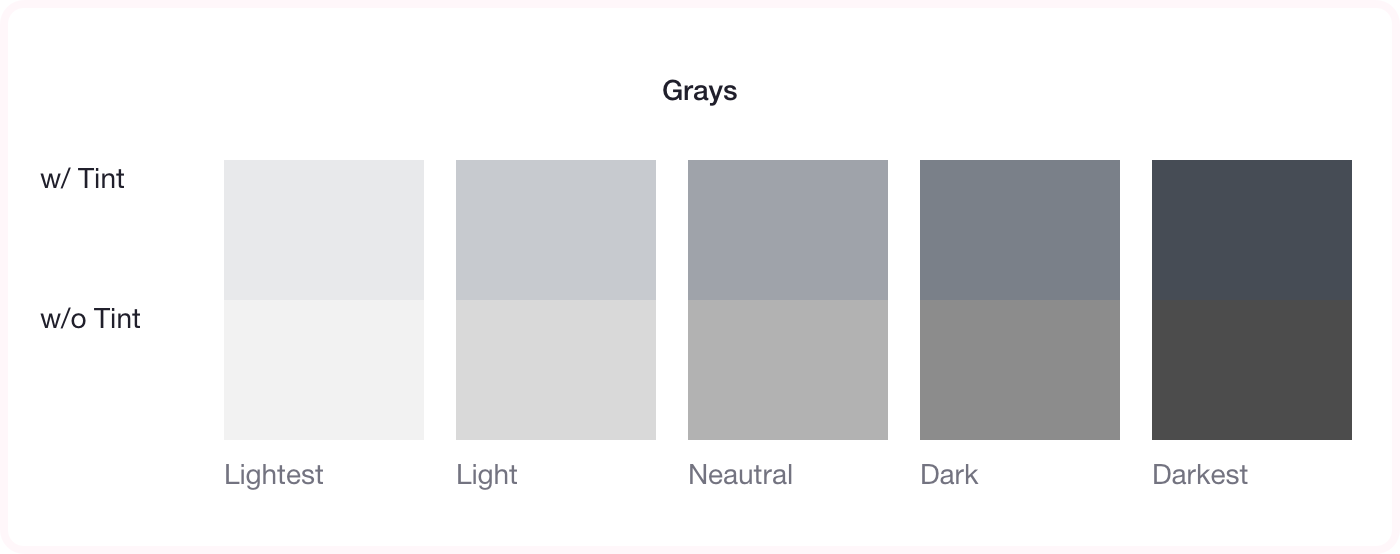
Grays: Approximately 4–5 shades.
灰色 :大約4–5個陰影。
Support: Success (Green), Warning (Yellow), Error (Red), and Information (Blue).
支持 :成功(綠色),警告(黃色),錯誤(紅色)和信息(藍色)。
創建調色板 (Creating the palette)
To create more shades of any color, simply use a a technique of manipulating Saturation (S) and Brightness (B):
要創建更多顏色的陰影,只需使用一種操作飽和度(S)和亮度(B)的技術即可:
Darker tones: add saturation and reduce blackness.
較暗的色調 :增加飽和度并減少黑度。
Lighter tones: reduce saturation and add blackness.
較淺的色調 :降低飽和度并增加黑色度。

Duolingo is a great example of using several shades of the same color:
Duolingo是使用相同顏色的多種陰影的一個很好的例子:

When creating the Grays palette, it’s crucial to assign a use for each one — otherwise you find yourself wondering what shade to use in which case. The Grays are:
創建Grays調色板時,至關重要的是為每個調色板分配用途-否則您會發現自己想知道在這種情況下應使用哪種陰影。 灰色是:
Lightest: used to distinct white elements on top of a gray background.
最輕 :用于區分灰色背景上的白色元素。
Light: should allow dark text over it to be accessibly read.
淺色 :應允許其上的深色文本易于閱讀。
Base: neutral gray.
基數 :中性灰色。
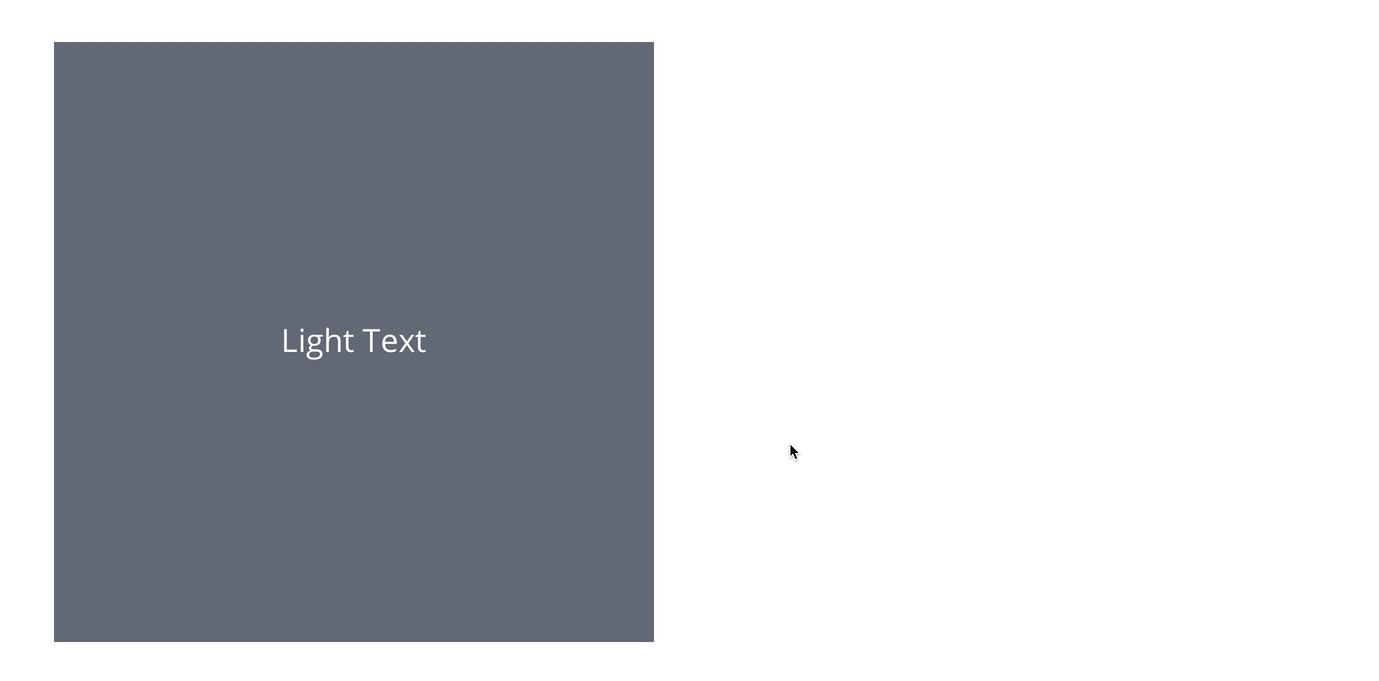
Dark: used to allow white text over to be accessibly read.
深色 :用于允許白色文本易于閱讀。
Darkest: used to signify secondary areas, like sidebars. Should allow white text over to be accessibly read.
最暗 :用于表示次要區域,例如側邊欄。 應該允許白色文本易于訪問。
Choosing the grays can be totally technical, or we can add some tint from our primary color to the mix.
選擇灰色可能完全是技術性的,或者我們可以在原色中添加一些色彩。
Until Sketch adds this feature natively, use the Stark plugin to check if your text styles adhere to the accessibility rules:
在Sketch本地添加此功能之前,請使用Stark插件檢查您的文本樣式是否符合輔助功能規則:
定義樣式 (Defining the styles)
Sketch allows us to name our styles and organize them into groups, saying goodbye to confusing randomly scattered color swatches.
Sketch允許我們命名樣式并將其分組,從而告別混淆隨機分散的色板。
Don’t forget to get creative, within accessibility and usability constraints of course. It’s easy to get totally technical here, but adding your twist will give the color palette more character.
當然,在可訪問性和可用性約束內,不要忘了發揮創造力。 在這里很容易獲得完全技術性的信息,但是增加扭曲感將使調色板更具特色。
版式 (Typography)
選擇字體 (Choose your fonts)
I’m going to assume your brand or client already have fonts they use. If the task of choosing the fonts has been given to you, give it the proper attention it deserves and read some articles on this topic.
我將假設您的品牌或客戶已經擁有他們使用的字體。 如果已經完成了選擇字體的任務,請給予應有的注意,并閱讀有關此主題的一些文章。
模塊化縮放 (Modular Scaling)
I’ve covered modular scaling in the previous article, however it’s worth it to go over it here as well.
我已經在上一篇文章中介紹了模塊化縮放,但是值得在這里進行介紹。
Modular scaling is basically a method that helps you create a consistent typography system fast. It removes the guesswork from choosing the next font size and line height. All that remains for you to do is choose a base font size (I usually opt for 16px or 18px), and a modular scale to go by:
模塊化縮放基本上是一種可幫助您快速創建一致的排版系統的方法。 它消除了選擇下一個字體大小和行高的猜測。 剩下要做的就是選擇基本字體大小(我通常選擇16px或18px),以及模塊化的縮放比例:
There’s one school of thought nor one solution for all the typographic needs out there. You’ll have to analyze and understand your project’s typographic needs either beforehand or as you go along.
對于所有的印刷需求,這里只有一種思想流派,也沒有一種解決方案。 您必須事先或在進行過程中分析并了解項目的印刷需求。
A few pointers on typographic systems:
有關印刷系統的一些提示:
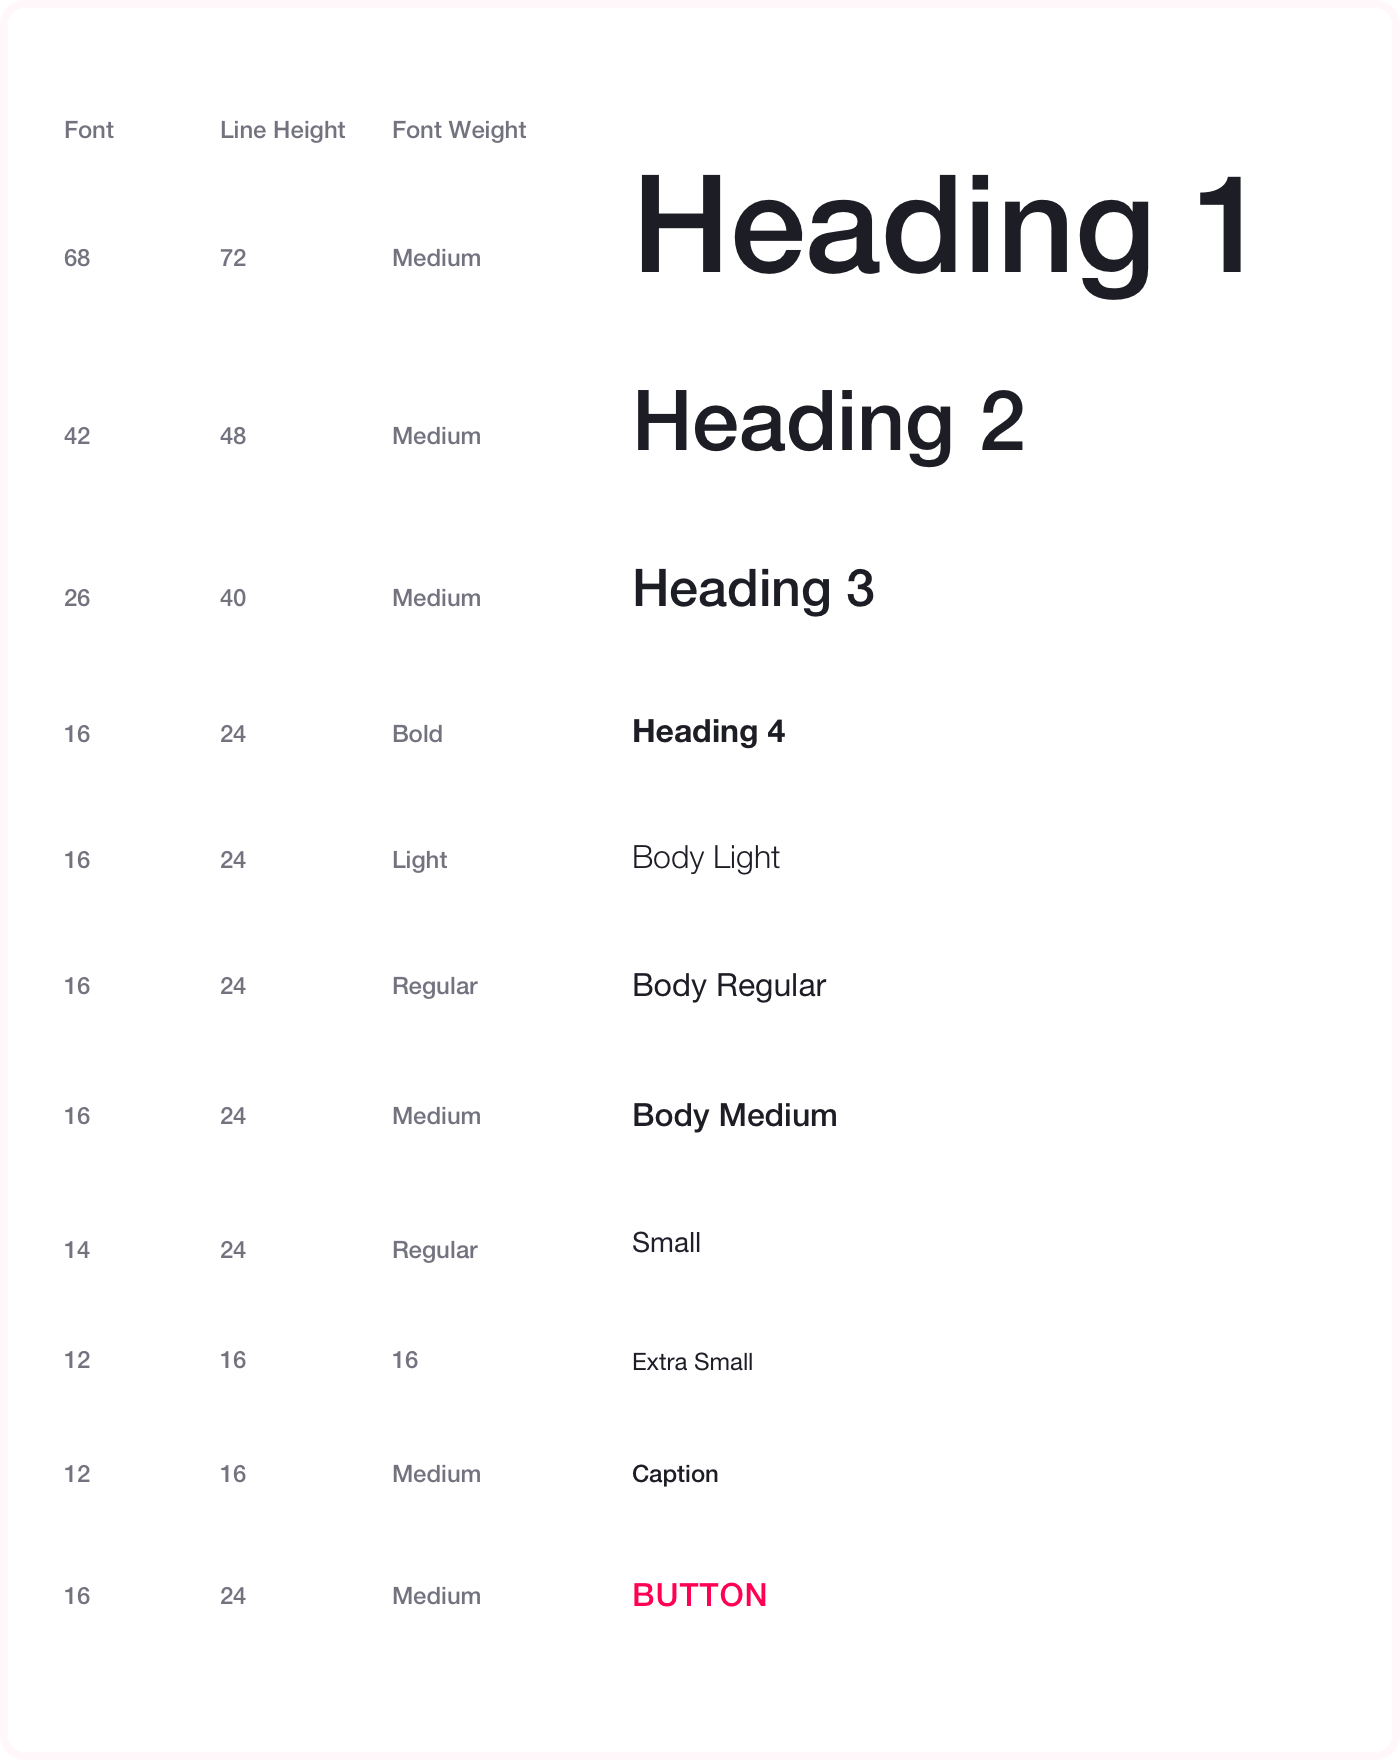
1–2 font families: Use 2 font families at the most, one for headings and another for body and small text. There’s rarely a need for a 3rd font family.
1-2個字體系列 :最多使用2個字體系列,一個用于標題,另一個用于正文和小文本。 很少需要第三字體家族。
2–3 font weights: Its easy to lose track and focus with robust font families like Helvetica or Inter, however more than 3 font weights are too much for the anyone to discern meaning from. If you feel like it, maybe go for the black font weight for your topmost heading.
2–3字體粗細 :它容易失去諸如Helvetica或Inter之類的強大字體系列的跟蹤和聚焦,但是任何人都無法識別其含義,而超過3種字體粗細就太過分了。 如果您愿意,可以將黑色字體粗細用作最頂部的標題。
4–12 typographic styles: Digital products tend to need less styles, usually 2–3 headings, body (2–3 weights), and a caption style, while blogs and robust websites tend to need several more headings and smaller font styles.
4–12印刷樣式 :數字產品通常需要較少的樣式,通常為2–3標題,正文(2–3權重)和標題樣式,而博客和健壯的網站往往需要更多的標題和較小的字體樣式。
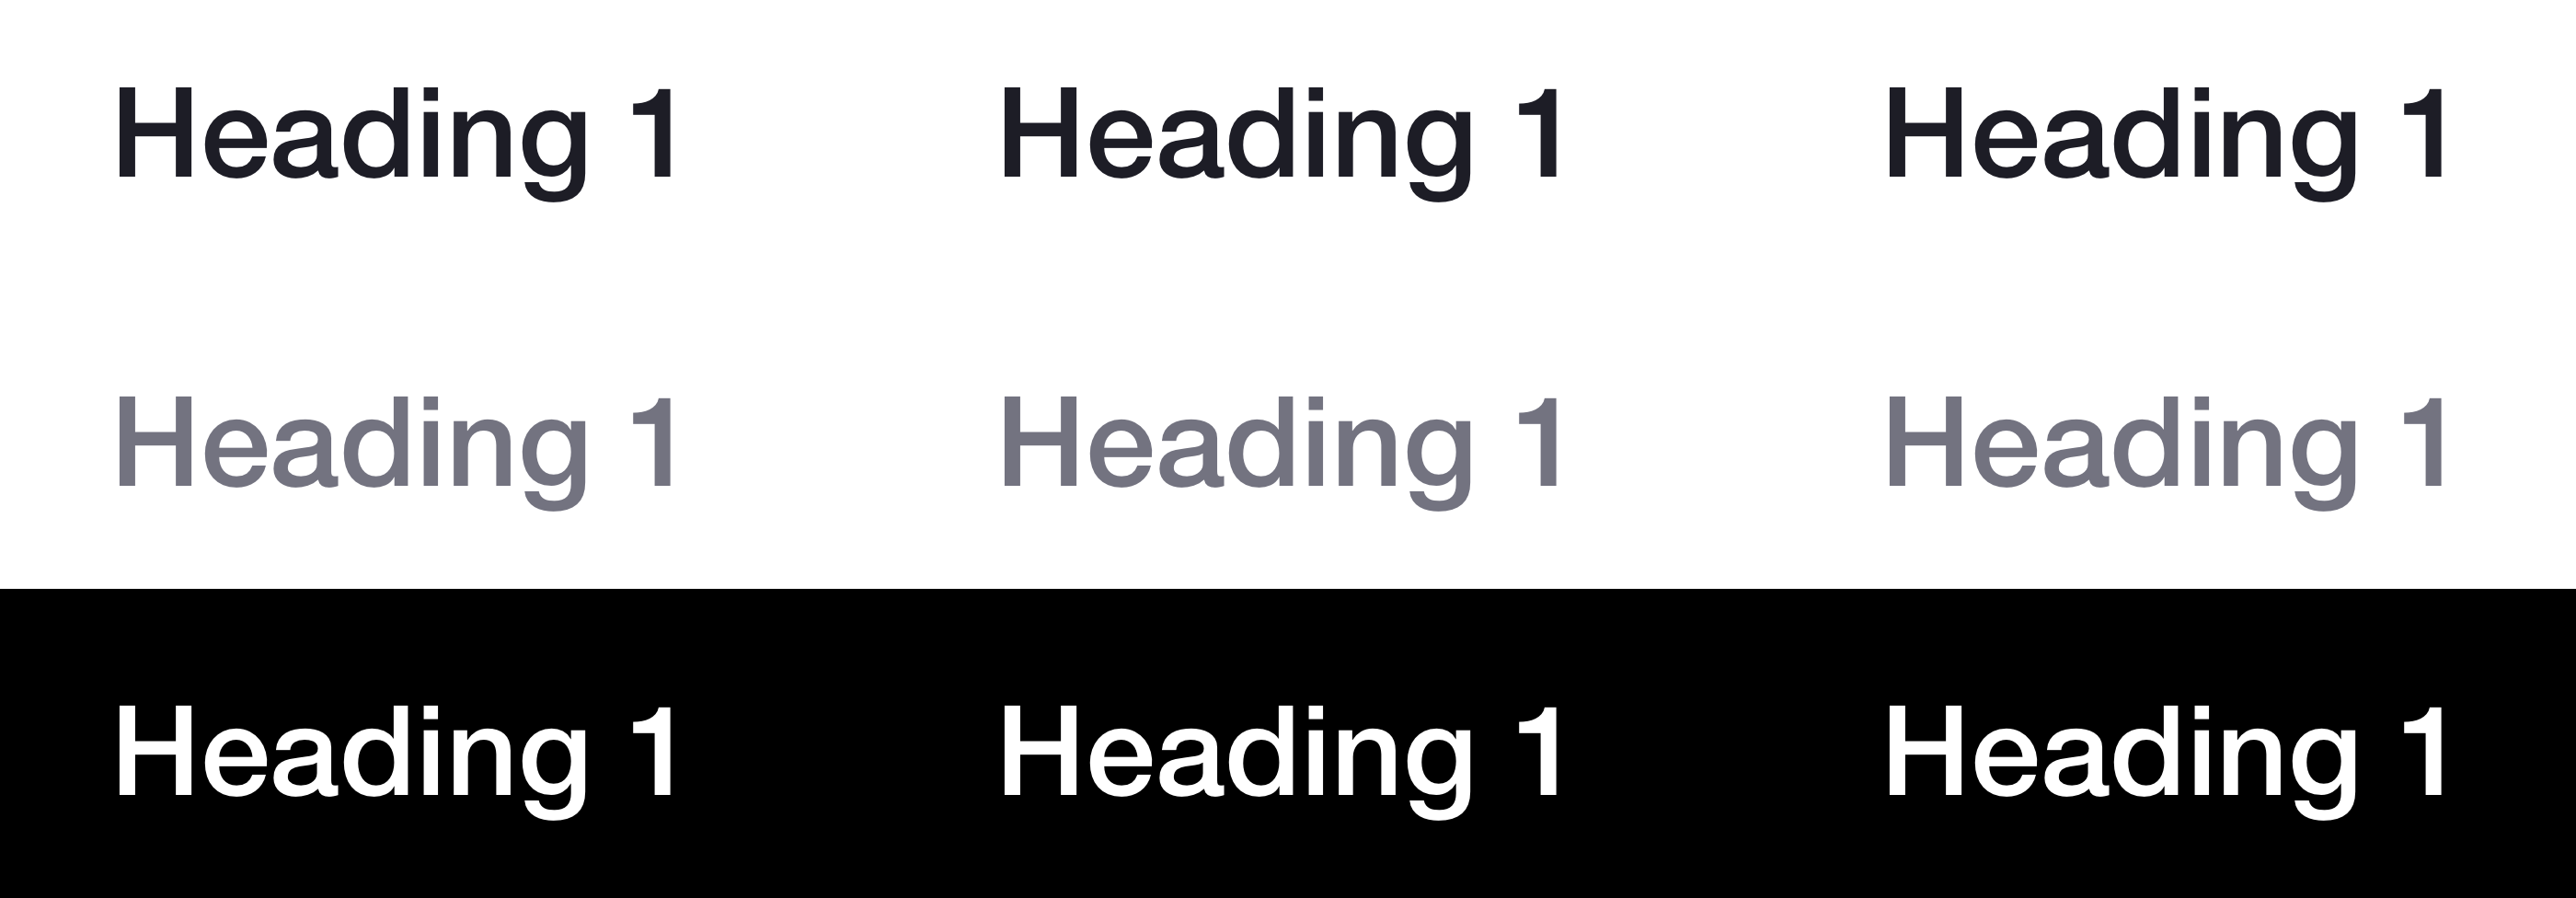
3 font colors: Prepare your typographic system beforehand for any occasion and create styles for Dark, Gray and Light at least.
3種字體顏色 :事先準備好任何情況下的印刷系統,并至少創建深色,灰色和淺色的樣式。
If your project is more branding than product related, I would urge you to be more creative than that. The main difference here is in the constraints. The content in a branding centered project, is controlled and curated and thus allows more creative freedom; while the content in a digital product, is user generated and needs to fit within tight constraints — which are up to you, the designer, to decide upon.
如果您的項目比產品相關的品牌更多,我敦促您更具創造力。 這里的主要區別在于約束。 以品牌為中心的項目中的內容受到控制和策劃,因此具有更大的創作自由; 而數字產品中的內容是用戶生成的,需要適應嚴格的限制-設計師(您)可以自行決定。
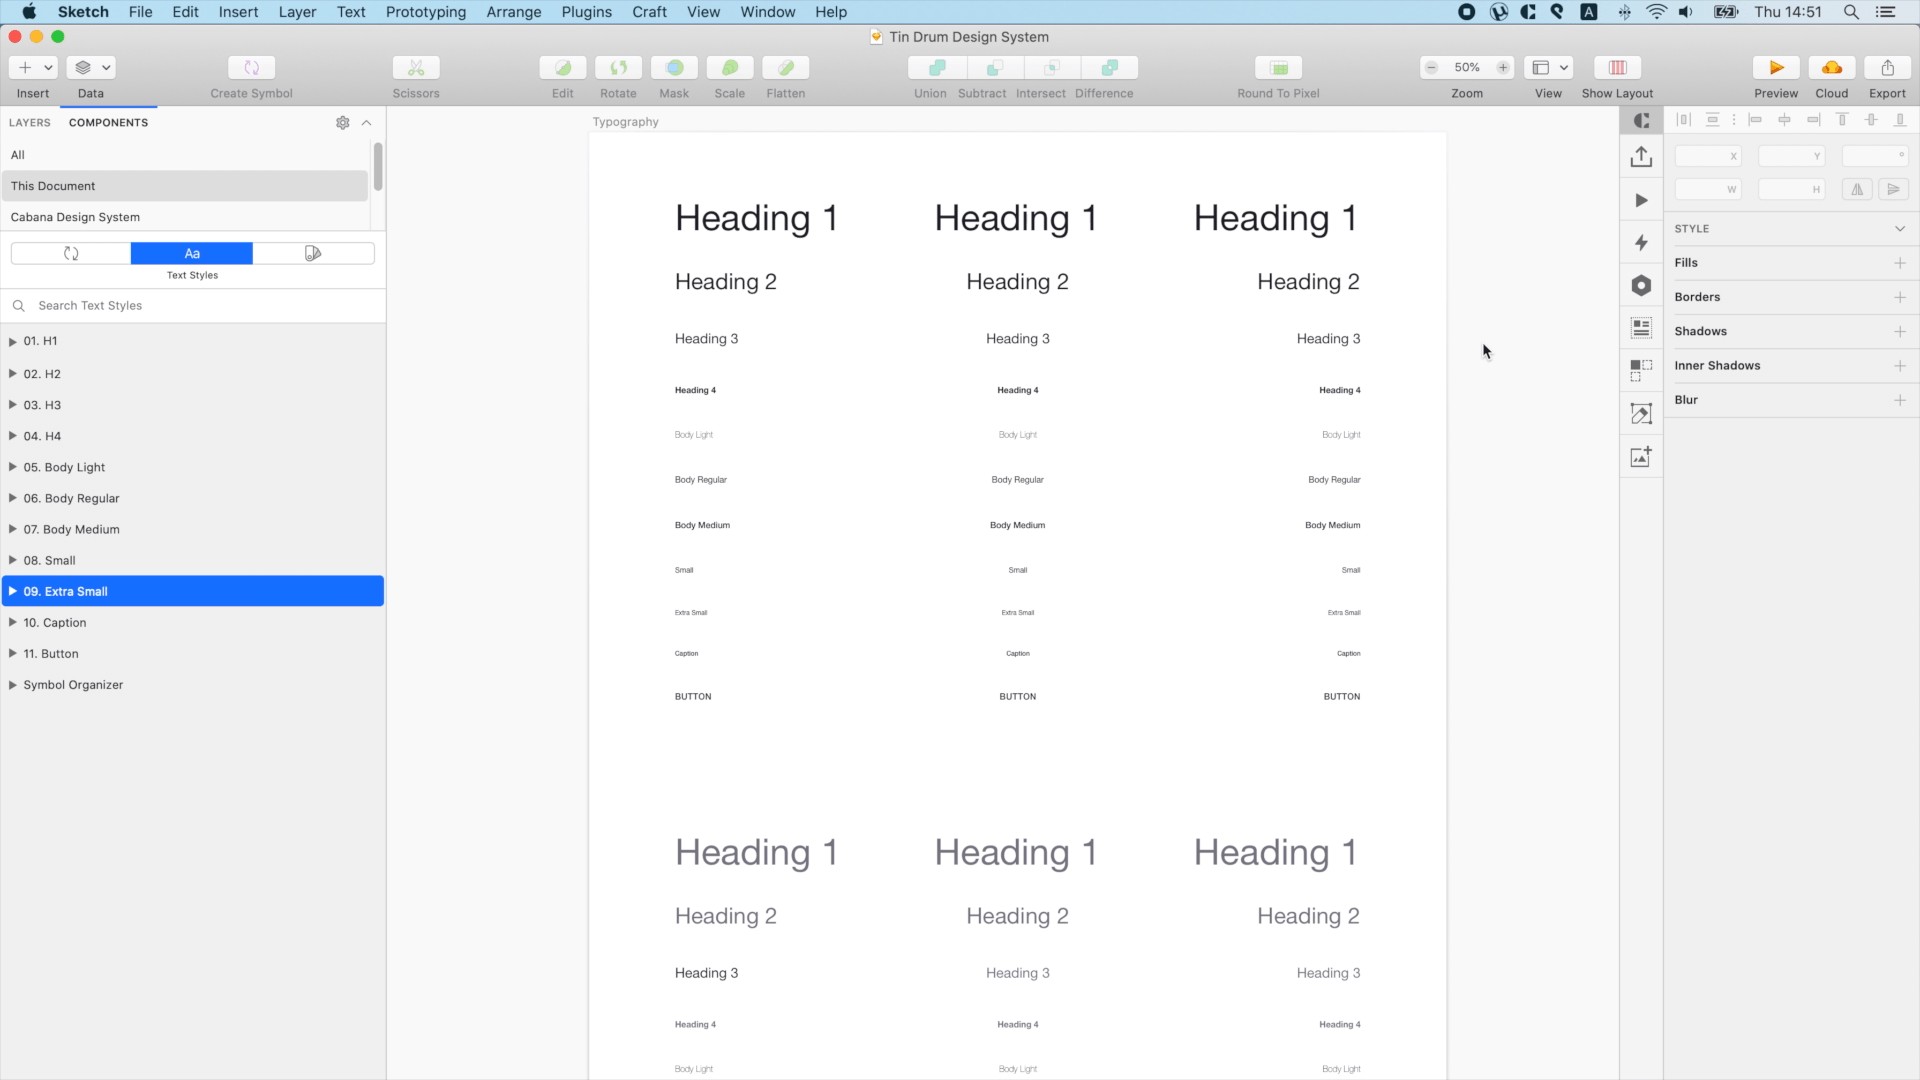
定義文字樣式 (Define text styles)
Sketch allows us to define text styles in an organized fashion, which helps us in turn to create a clear and concise typographic inventory.
Sketch允許我們以有組織的方式定義文本樣式,這有助于我們依次創建清晰簡潔的印刷清單。
I define my styles like this:
我定義我的樣式是這樣的:
{Style name} / {Alignment} / {Color}This way the result is a series of nested groups, all neatly organized and quickly exchangeable.
這樣,結果就是一系列嵌套的組,所有的組都整齊地組織并且可以快速交換。
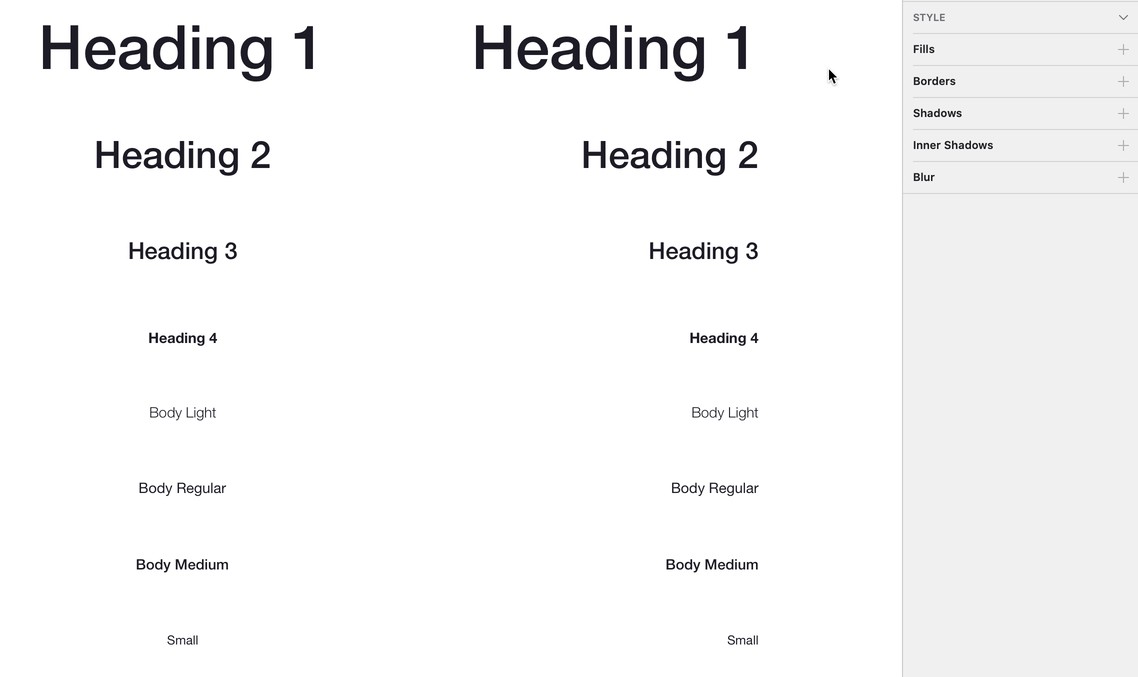
Only recently did Sketch allowed us to redefine multiple styles at once. This major improvement made managing our typographic system so much easier — all we need is a visual repository :
直到最近,Sketch才允許我們一次重新定義多種樣式。 這項重大改進使我們的印刷系統的管理變得非常容易-我們需要的是一個可視存儲庫:
影像學 (Iconography)
As mentioned above, icons designed on an 8pt based grid will scale perfectly:
如上所述,在基于8pt的網格上設計的圖標將完美縮放:
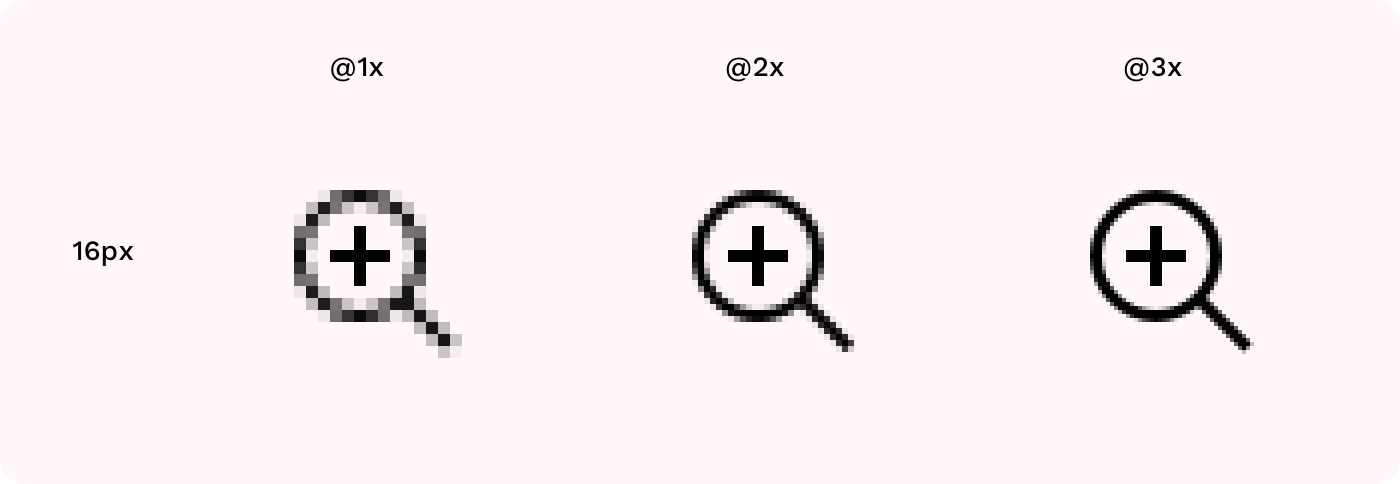
Exporting a 16×16 pixels icon for iOS will result in perfectly rendered icons in 16, 32 and 48 pixels.
為iOS導出16×16像素的圖標將得到16、32和48像素的完美呈現的圖標。
If you intend on using icons in a different size, I would recommend designing your icon on 16×16 pixels grid, and another version on a 20×20 pixels grid. This way you’re covered for any size: 16, 20, 24 (16×1.5), 32, 40 and so forth.
如果打算使用其他尺寸的圖標,建議您在16×16像素的網格上設計圖標,并在20×20像素的網格上設計另一個版本。 這樣,您就可以覆蓋任何大小:16、20、24(16×1.5),32、40等。
Undertow (Shadows)
Shadows are used to signify elevation — how much an element is off surface.
陰影用于表示高程-元素離表面有多少。
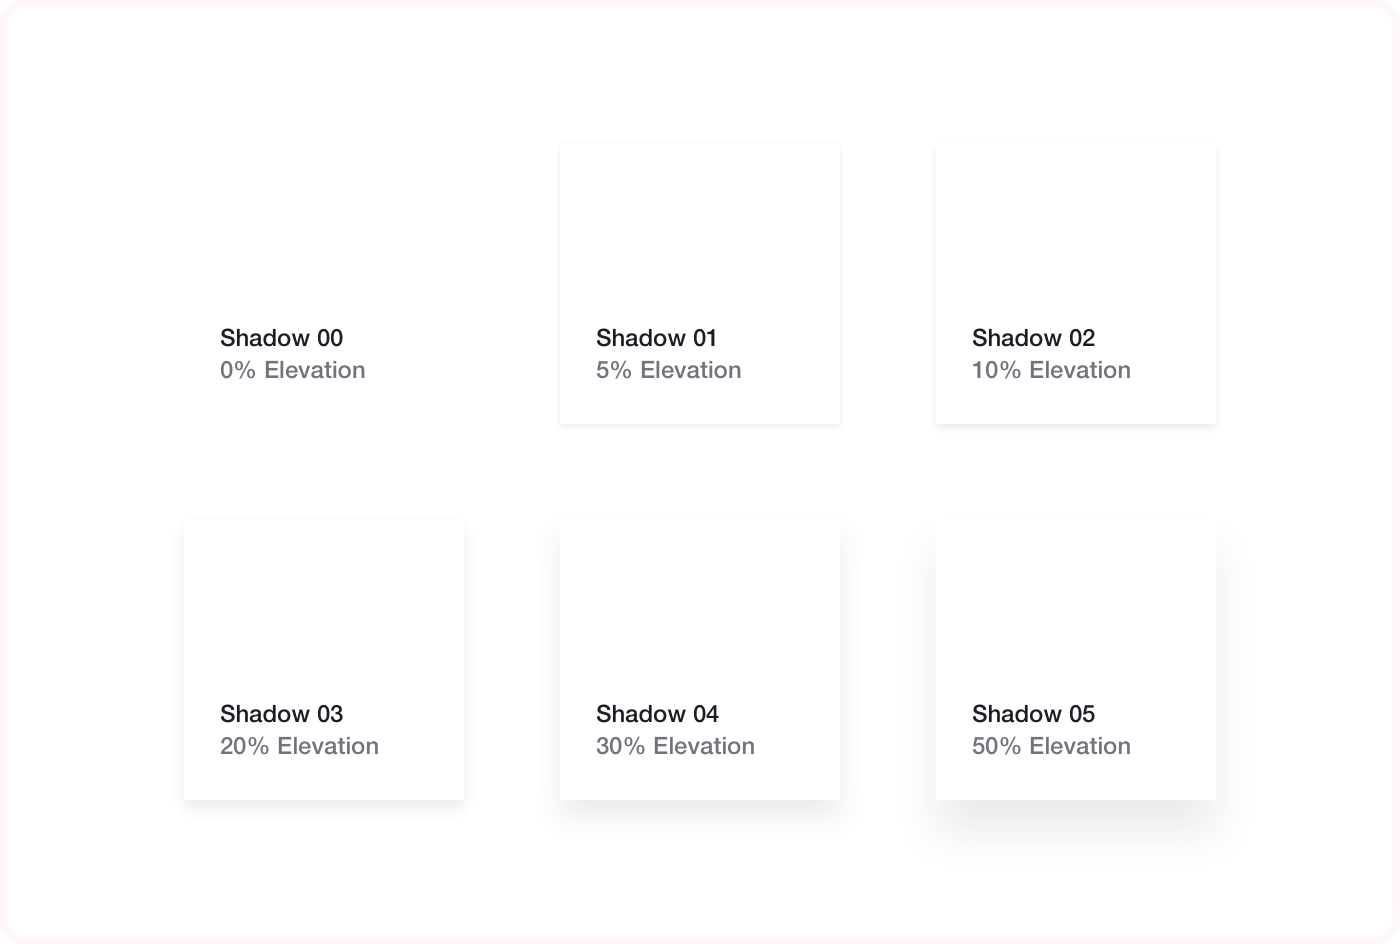
A few pointers on shadows:
關于陰影的一些提示:
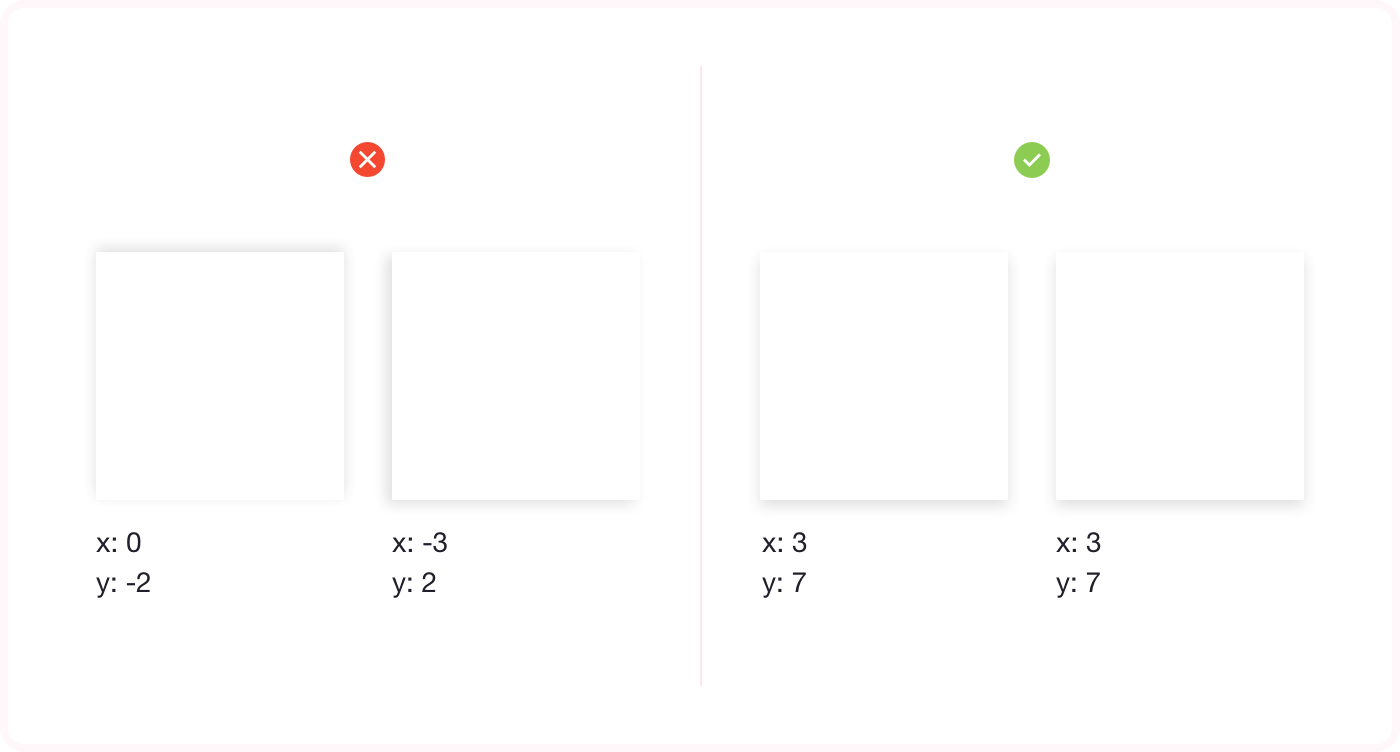
Use one light source: Imagine there is a single light source illuminating your interface, casting shadows from a single angle, resulting in one x value for all of your shadows horizontal position.
使用一個光源:想象有一個光源照亮您的界面,從單個角度投射陰影,因此所有陰影水平位置的值都是一個x。
More than one shadow: Multiple shadow styles can result in a more realistic and unique shadow.
一個以上的陰影:多種陰影樣式可以產生更真實和獨特的陰影。
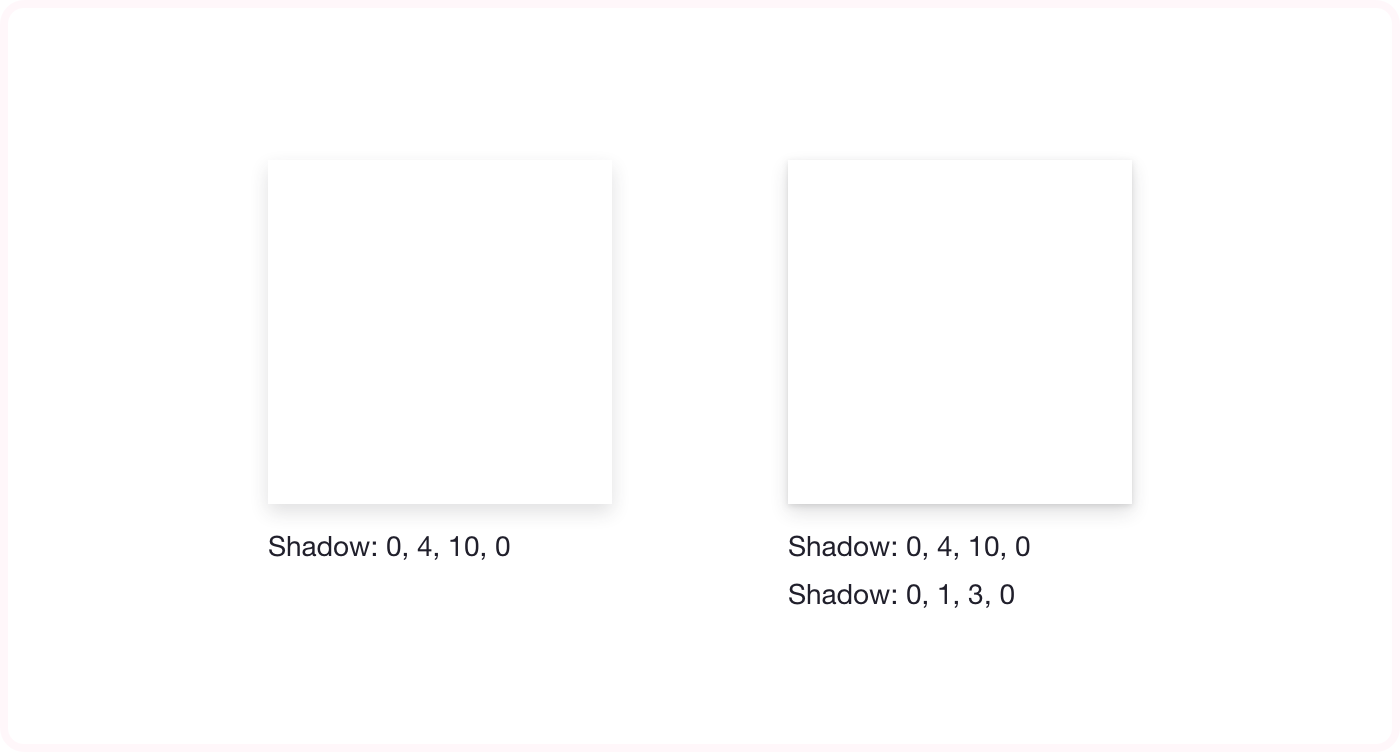
You can apply shadows to Groups: Avoid shadows overlaying one another, and apply you shadow to the group, instead of layers within. However, you can’t apply more than one shadow to a group.
您可以將陰影應用于組:避免陰影相互重疊,并將陰影應用于組,而不是內部的層。 但是,您不能對一個組應用多個陰影。
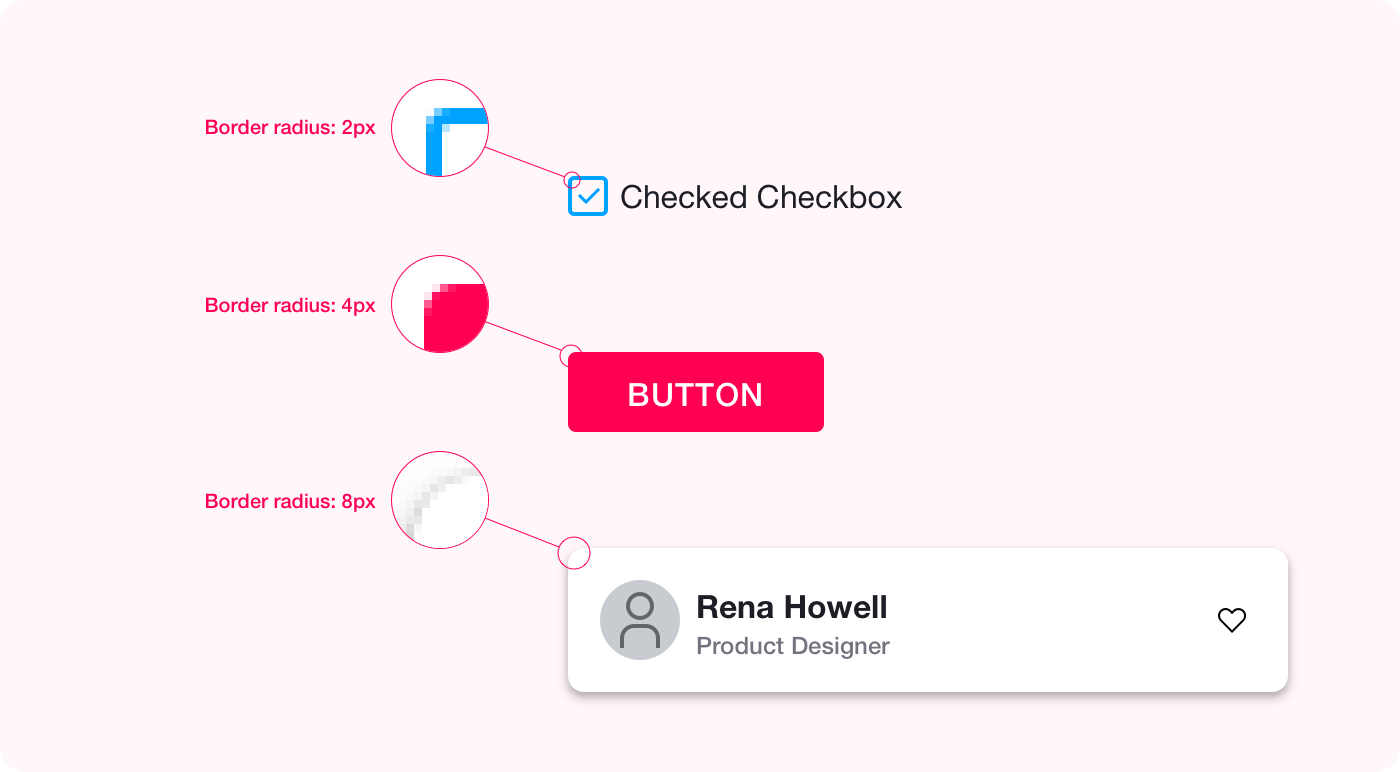
邊界半徑 (Border Radius)
Most likely you employ border radius in your design, alternating between different radii for different elements. However, I haven’t found the use in having more than 3 border radii settings (maybe 4, but that’s a stretch):
最有可能在設計中采用邊界半徑,在不同元素的不同半徑之間交替。 但是,我還沒有發現在超過3個邊界半徑設置(也許是4個,但這很麻煩)中的用途:
- 2px border radius for UI components such as checkboxes, tags and the like UI組件(例如復選框,標簽等)的邊框半徑為2px
- 4px border radius for buttons and the like 按鈕等的4px邊框半徑
- 8px border radius for cards, modals and the like 卡,模態等的8px邊框半徑
組件 (Components)
Components are all the reusable items you have lying around: buttons, inputs, labels, cards, video players and so forth. Our goal here is to have a readily available component for most occasions, but without ending up with an endless list of components.
組件是您可以使用的所有可重復使用的項目:按鈕,輸入,標簽,卡片,視頻播放器等。 我們的目標是在大多數情況下提供一個隨時可用的組件,但最終不會產生無窮無盡的組件列表。
I’ll take the basic button as an opportunity to explain the whole spiel.
我將把基本按鈕作為一個機會來解釋整個主題。
設計模塊化按鈕 (Designing a modular button)

The primary button is probably the most reused component in any DS. It’s function is to indicate the user that the function it suggests is the main function in this screen. It will usually be the safest action the user can take, and the one that we, the designers, want him to perform.
主按鈕可能是所有DS中最常用的組件。 它的功能是向用戶指示其建議的功能是此屏幕中的主要功能。 通常這將是用戶可以采取的最安全的操作,而我們(設計師)希望他執行此操作。
The primary button can arrive in set sizes:
主按鈕可以到達設置的大小:
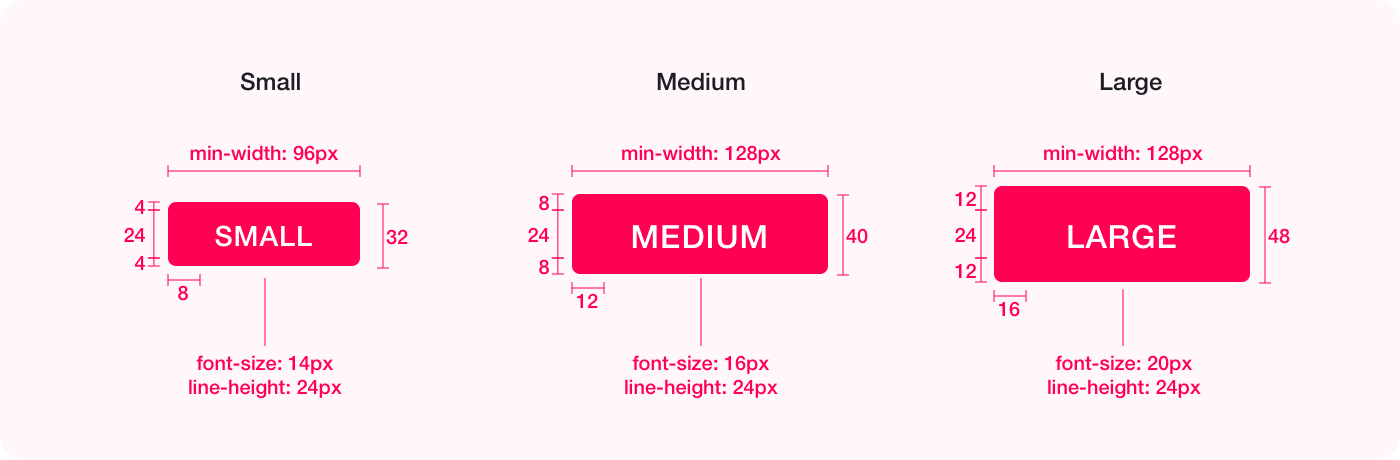
Should have a minimal size, while adapting to it’s content:
在適應其內容的同時,應具有最小的尺寸:
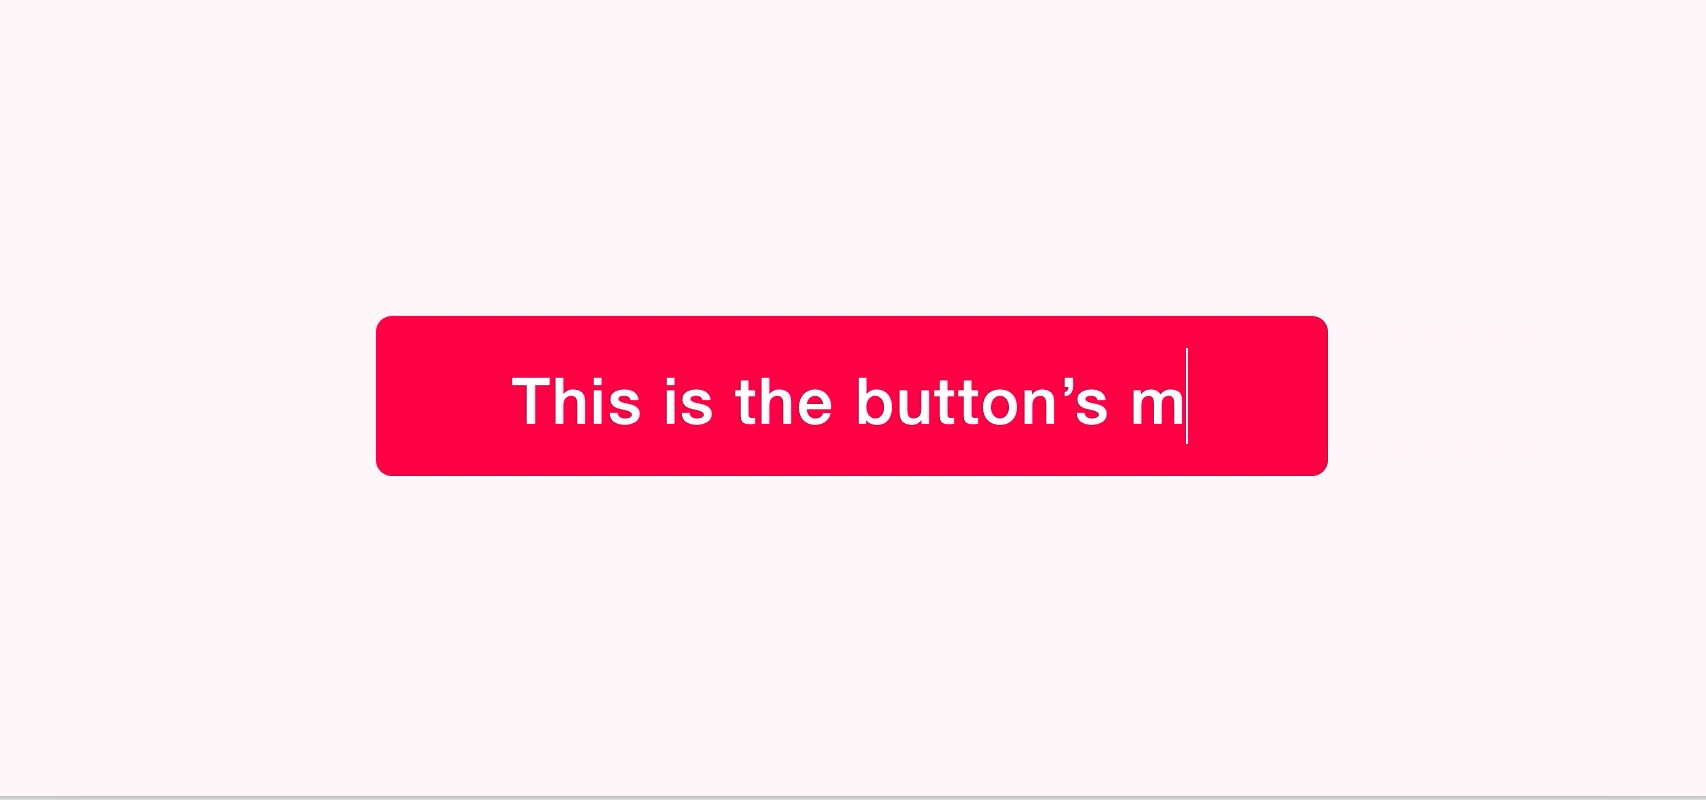
And have several states:
并有幾種狀態:
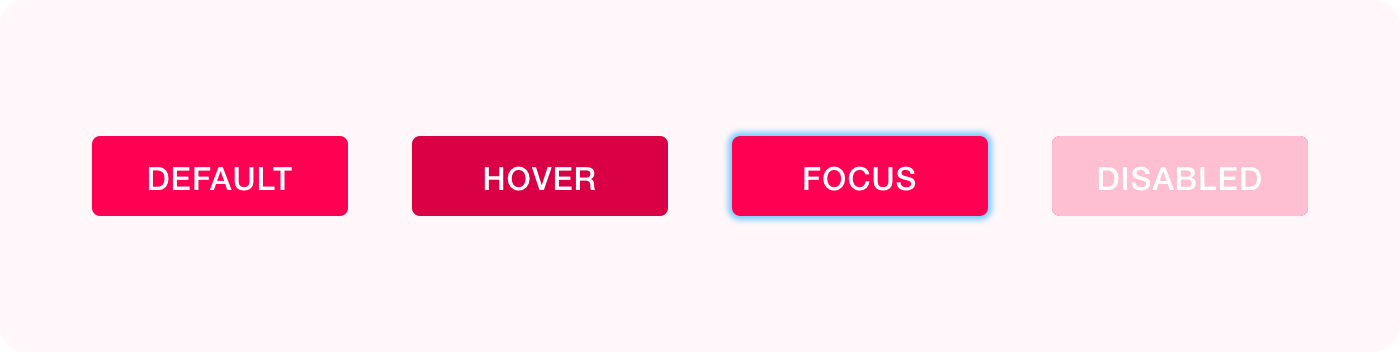
Voila! Our first building block is now efficient, reusable, flexible and up to standards!
瞧! 現在,我們的第一個構建塊是高效,可重復使用,靈活且符合標準!
And since we’re talking about building blocks..
由于我們正在談論積木。
模塊化積木 (Modular Building Blocks)
The most efficient method out there for organizing your DS that I’m familiar with is the Atomic Design method. The method was introduced to us all by Brad Frost — I urge you to read all about it here:
目前,最有效的組織DS的方法是Atomic Design方法。 布拉德·弗羅斯特(Brad Frost)向所有人介紹了該方法-我敦促您在此處閱讀有關此方法的所有信息:
In a nutshell, all of our components are organized to one of the following: Atoms, Molecules, Organisms, Templates and Pages.
簡而言之,我們所有的組件都按以下其中之一進行組織:原子,分子,生物,模板和頁面。
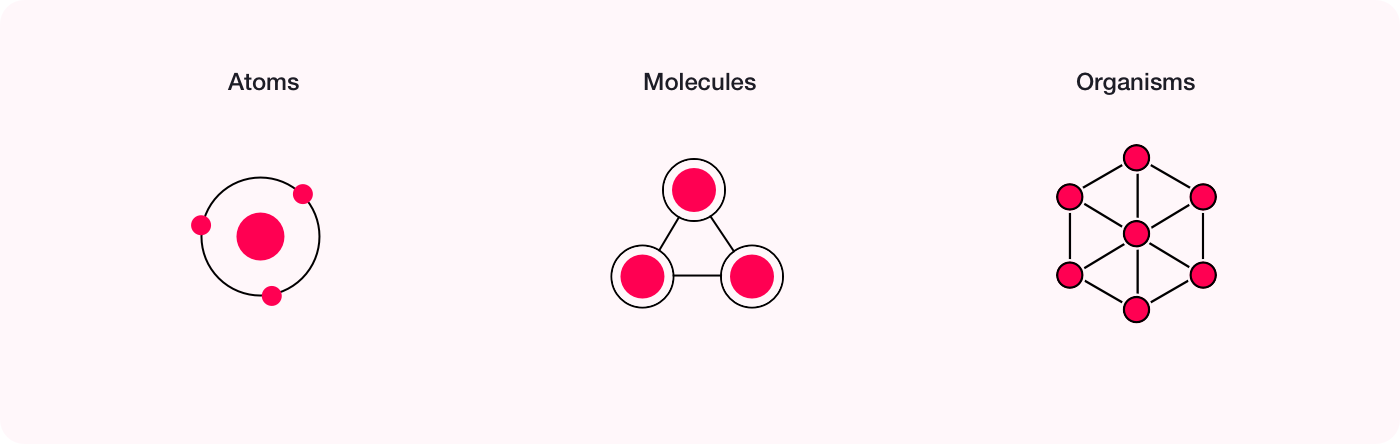
I myself haven’t found much use of Templates and Pages. If we’ll compare the Atomic design to Lego, then Atoms, Molecules and Organisms are the basic bricks, groups of different bricks and compositions of groups respectively.
我本人并沒有發現模板和頁面的大量使用。 如果我們將原子設計與樂高進行比較,則原子,分子和生物分別是基本的磚塊,不同磚塊的組和組的組成。
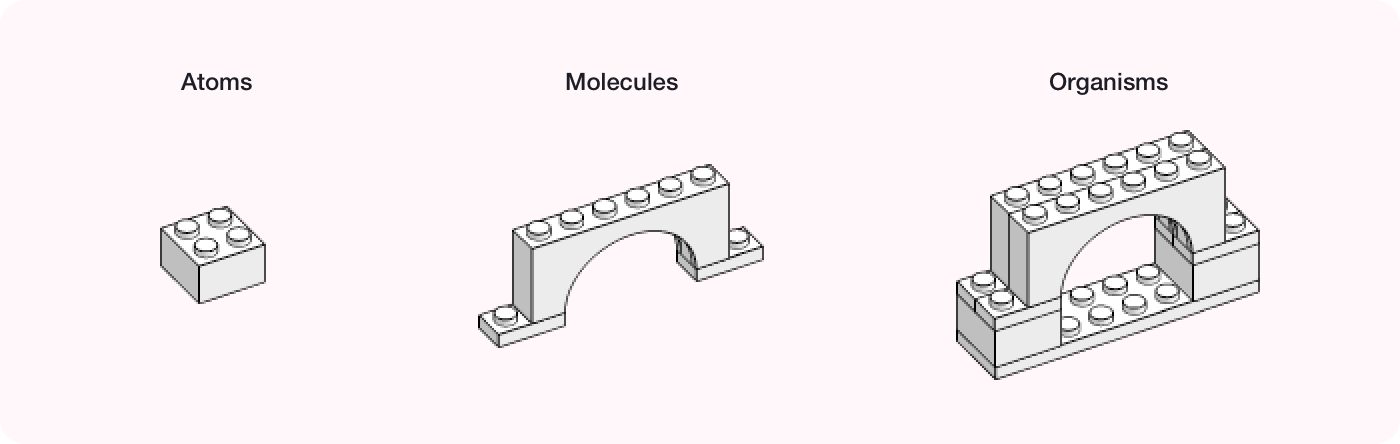
While Templates and Pages are more like the Millennium Falcon Lego set — fun and all but not very practical, and a nightmare to build.
盡管“模板和頁面”更像是“ 千年獵鷹”樂高套裝 ,但樂趣卻不盡如人意,而且是夢night。
If that sounds to you like Symbols and Nested Symbols, you’ve hit the nail on it’s head. The button we’ve just built is an Atom, if we’ll add this button to at the end of a card or in the websites navbar, it’s now a part of a Molecule:
如果您覺得這像符號和嵌套符號,那您就大功告成。 我們剛剛構建的按鈕是Atom,如果我們將其添加到卡片的末尾或網站導航欄中,則它現在是分子的一部分:

If we’ll keep this up, adhering to the 8pt Grid rules when designing each of our components, sooner than later we’ll have a whole DS based on the 8pt Grid.
如果我們堅持下去,在設計每個組件時都遵循8pt Grid規則,那么我們很快就會有一個基于8pt Grid的完整DS。
In the previous article, I went over layout (columns, rows and spacing), so if anything in the next sections won’t be quite clear, you’re more than welcome to pause here and read all about it.
在上一篇文章中 ,我介紹了布局(列,行和間距),因此,如果下一節中的內容不清楚,歡迎您在這里停下來閱讀所有內容。
網格布局 (Grid & Layout)
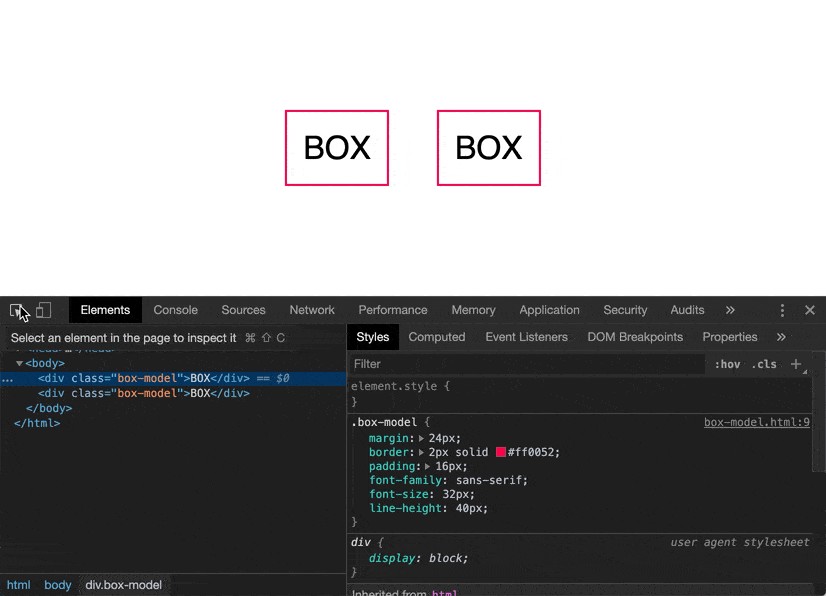
The jury is still out on whether designers should code. As a designer that codes, I can say that there is a shallow layer of coding that designers should be familiar with, one of which is the Box Model.
設計師是否應該編碼尚無定論。 作為編碼設計師,我可以說設計師應該熟悉一個淺層次的編碼,其中之一就是Box Model。
盒子模型 (The Box model)
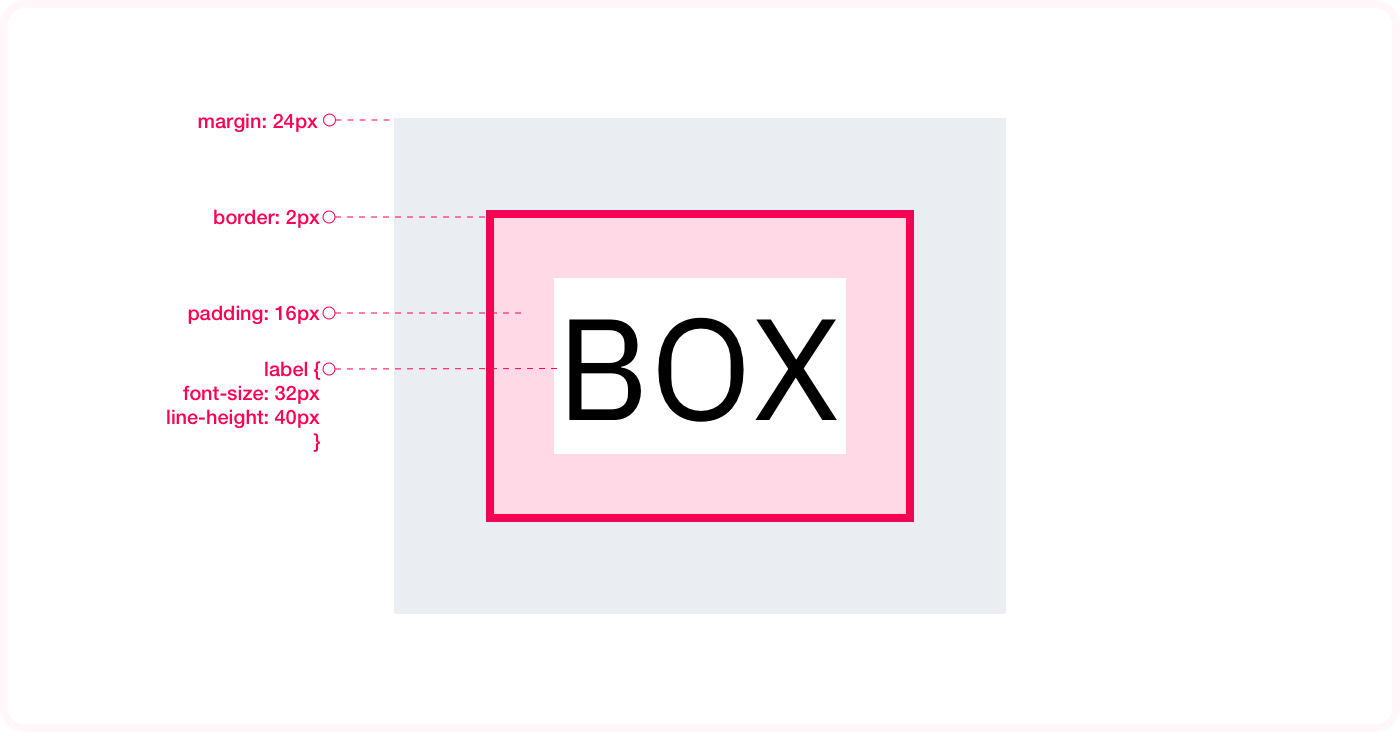
The box model is a box that envelopes every element on the screen — everything essentially lives in a rectangle. The box model consists of: margins, borders, padding, and the content itself.
盒子模型是一個包圍屏幕上每個元素的盒子-基本上所有內容都生活在一個矩形中。 盒子模型包括:邊距,邊框,填充和內容本身。
Increasing the padding will increase the box size, while increasing margins will increase the space around the box, pushing other elements away (element — any entity in the webpage, in this case the text ‘Box’).
增加填充將增加框的大小,而增加邊距則將增加框周圍的空間,從而將其他元素推開(元素-網頁中的任何實體,在這種情況下為文本“框”)。
Notice that padding and margins don’t have to be the same for all sides; in fact, they can be different for each side. Also, the box’s height is affected by the element’s line height, while it’s width is affected by the font size.
注意,邊距和邊距不必都相同; 實際上,它們的每一方都可以不同。 此外,框的高度受元素的線高影響,而框的寬度受字體大小影響。
This distinction is crucial for us designers to understand. An element’s size and position, it’s presence in the layout, is determined by several factors:
這種區別對我們的設計師來說至關重要。 元素的大小和位置( 在布局中是否存在 )取決于幾個因素:
Margins: the space an element keeps away from other elements.Padding: the space an element clears around the content.Content: the content inside the box
邊距 :元素與其他元素保持間隔的空間。 填充 :元素清除內容周圍的空間。 內容 :盒子內的內容
Frustratingly enough, there are two very confusing modes for rendering elements on the screen concerning the box model:
令人沮喪的是,有兩種非常令人困惑的模式,用于在屏幕上渲染與Box模型有關的元素:
/* The default and confusing settings */.red-box {
    width: 200px;
    height: 200px;
    padding: 40px;
    border: solid red 2px;
        /*default box sizing (bad for designers)*/
    box-sizing: content-box;
}/* The easy to understand settings */.blue-box {
    width: 200px;
    height: 200px;
    padding: 40px;
    border: solid blue 2px;    /*the box sizing (making sense for designers)*/
    box-sizing: border-box;
}
The two methods differ in calculating the elements size; the first method (default), takes the assigned height and width (200px), and adds on top of that padding (40px*4 sides), and border (2px*4 sides), resulting in a 288*288px box. Any change to padding and border width will alter the box’s final size.
兩種方法在計算元素大小方面有所不同; 第一種方法(默認方法),采用指定的高度和寬度(200像素),并在該填充(40像素* 4面)和邊框(2像素* 4面)的頂部添加,得到一個288 * 288像素的框。 填充和邊框寬度的任何更改都會改變盒子的最終尺寸。
The second mode includes padding and border in the final assigned size, resulting in a 200*200px box no matter what the padding and border values are— much neater and easier to understand.
第二種模式包括最終分配大小的填充和邊框,無論填充和邊框值是什么,都將產生200 * 200px的框-更加整潔和易于理解。
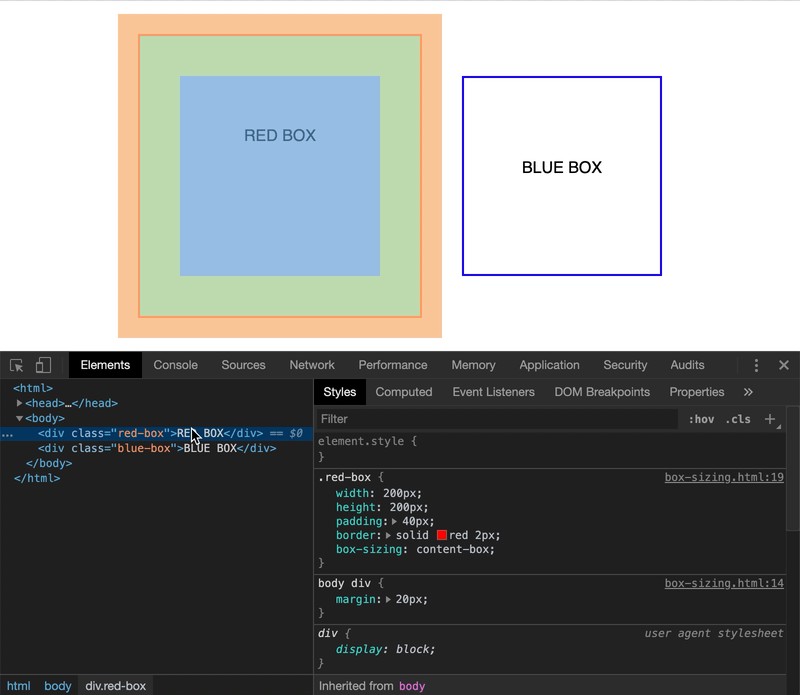
Of course, the element’s size and position can be affected by many other factors (such as width, height and explicit/implicit positioning and the like), but these are the basics for each element on the screen.
當然,元素的大小和位置可能會受到許多其他因素的影響(例如寬度,高度和顯式/隱式定位等),但這是屏幕上每個元素的基礎。
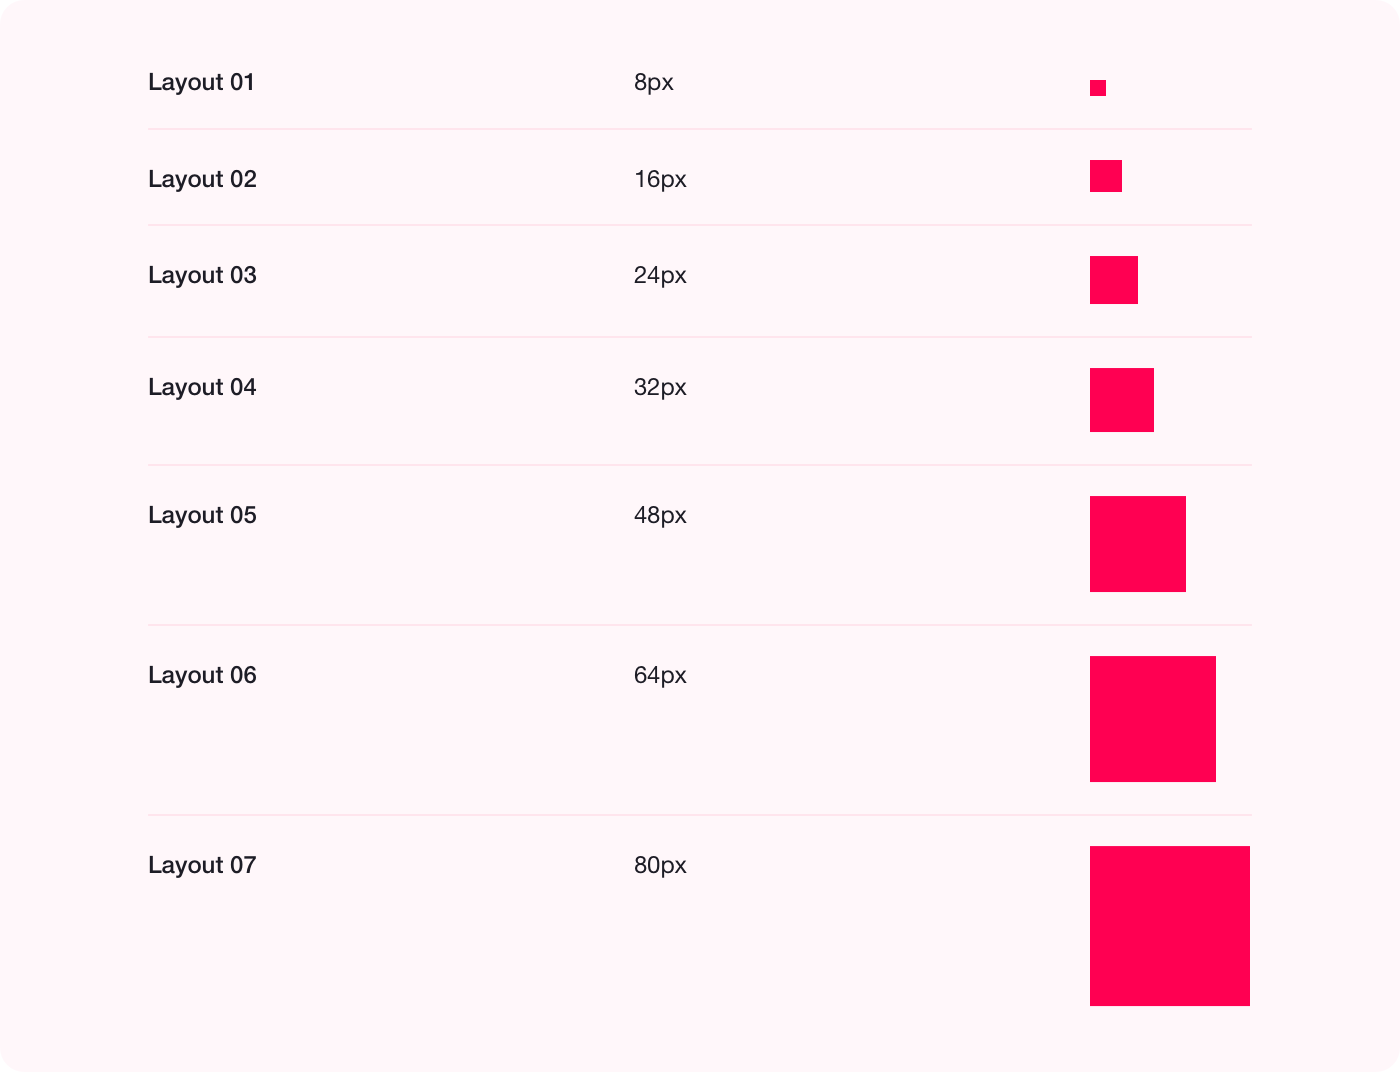
間距 (Spacing)
When deciding on the position of an element, we’re essentially deciding upon its’ spacing from another element. Repeat this decision hundreds of times without a system, and you have about a hundred different spacing definitions.
在確定一個元素的位置時,我們實質上是在確定它與另一個元素的間距 。 在沒有系統的情況下重復執行此決定數百次,您將獲得大約一百種不同的間距定義。
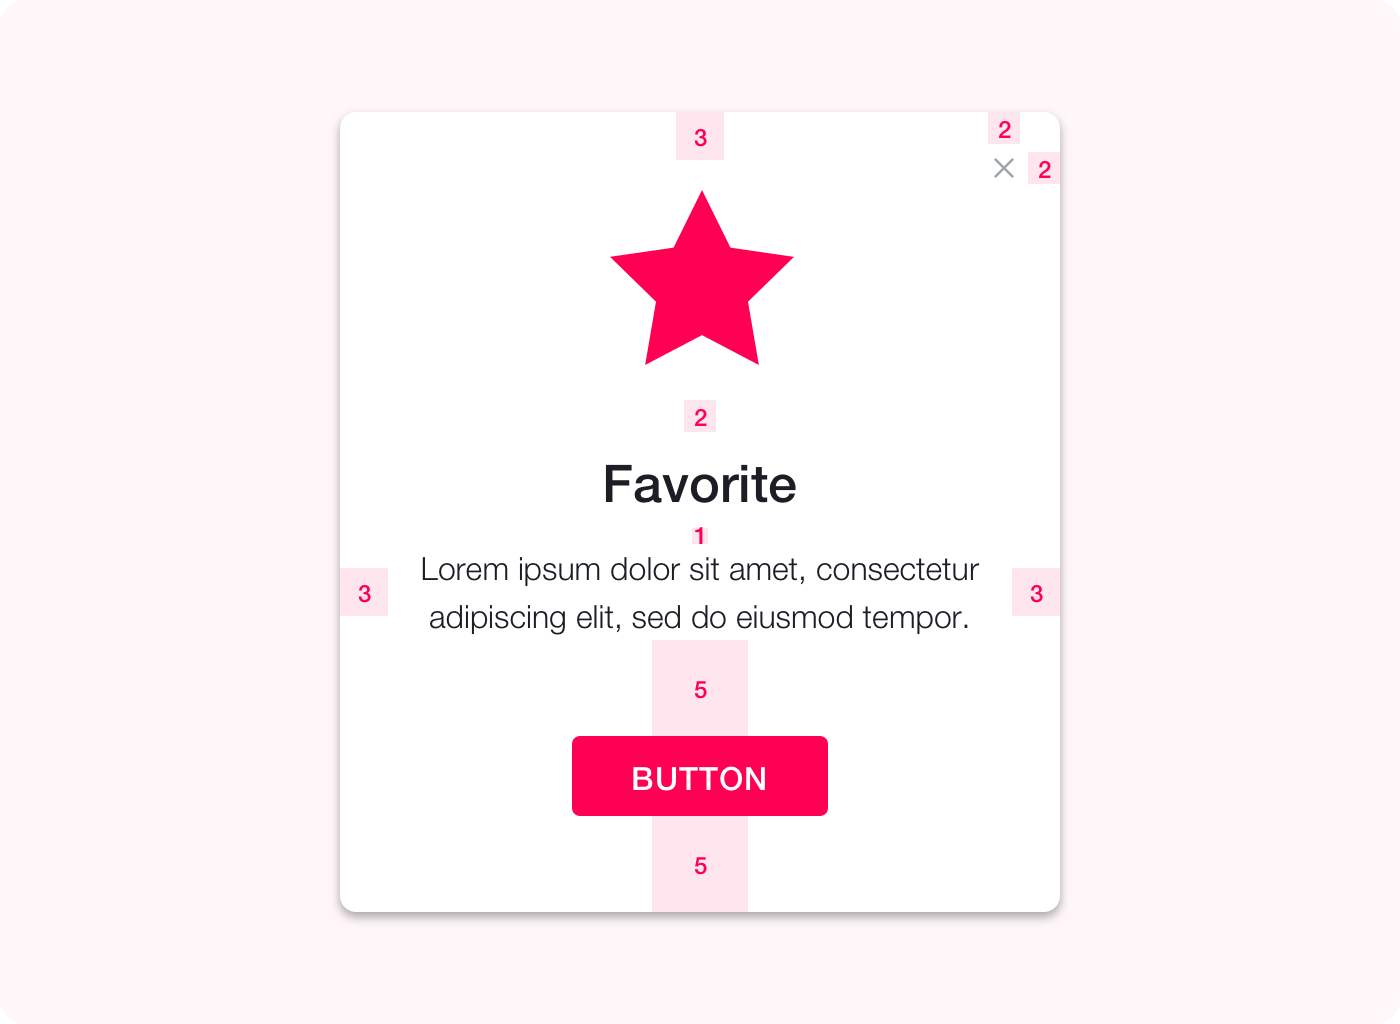
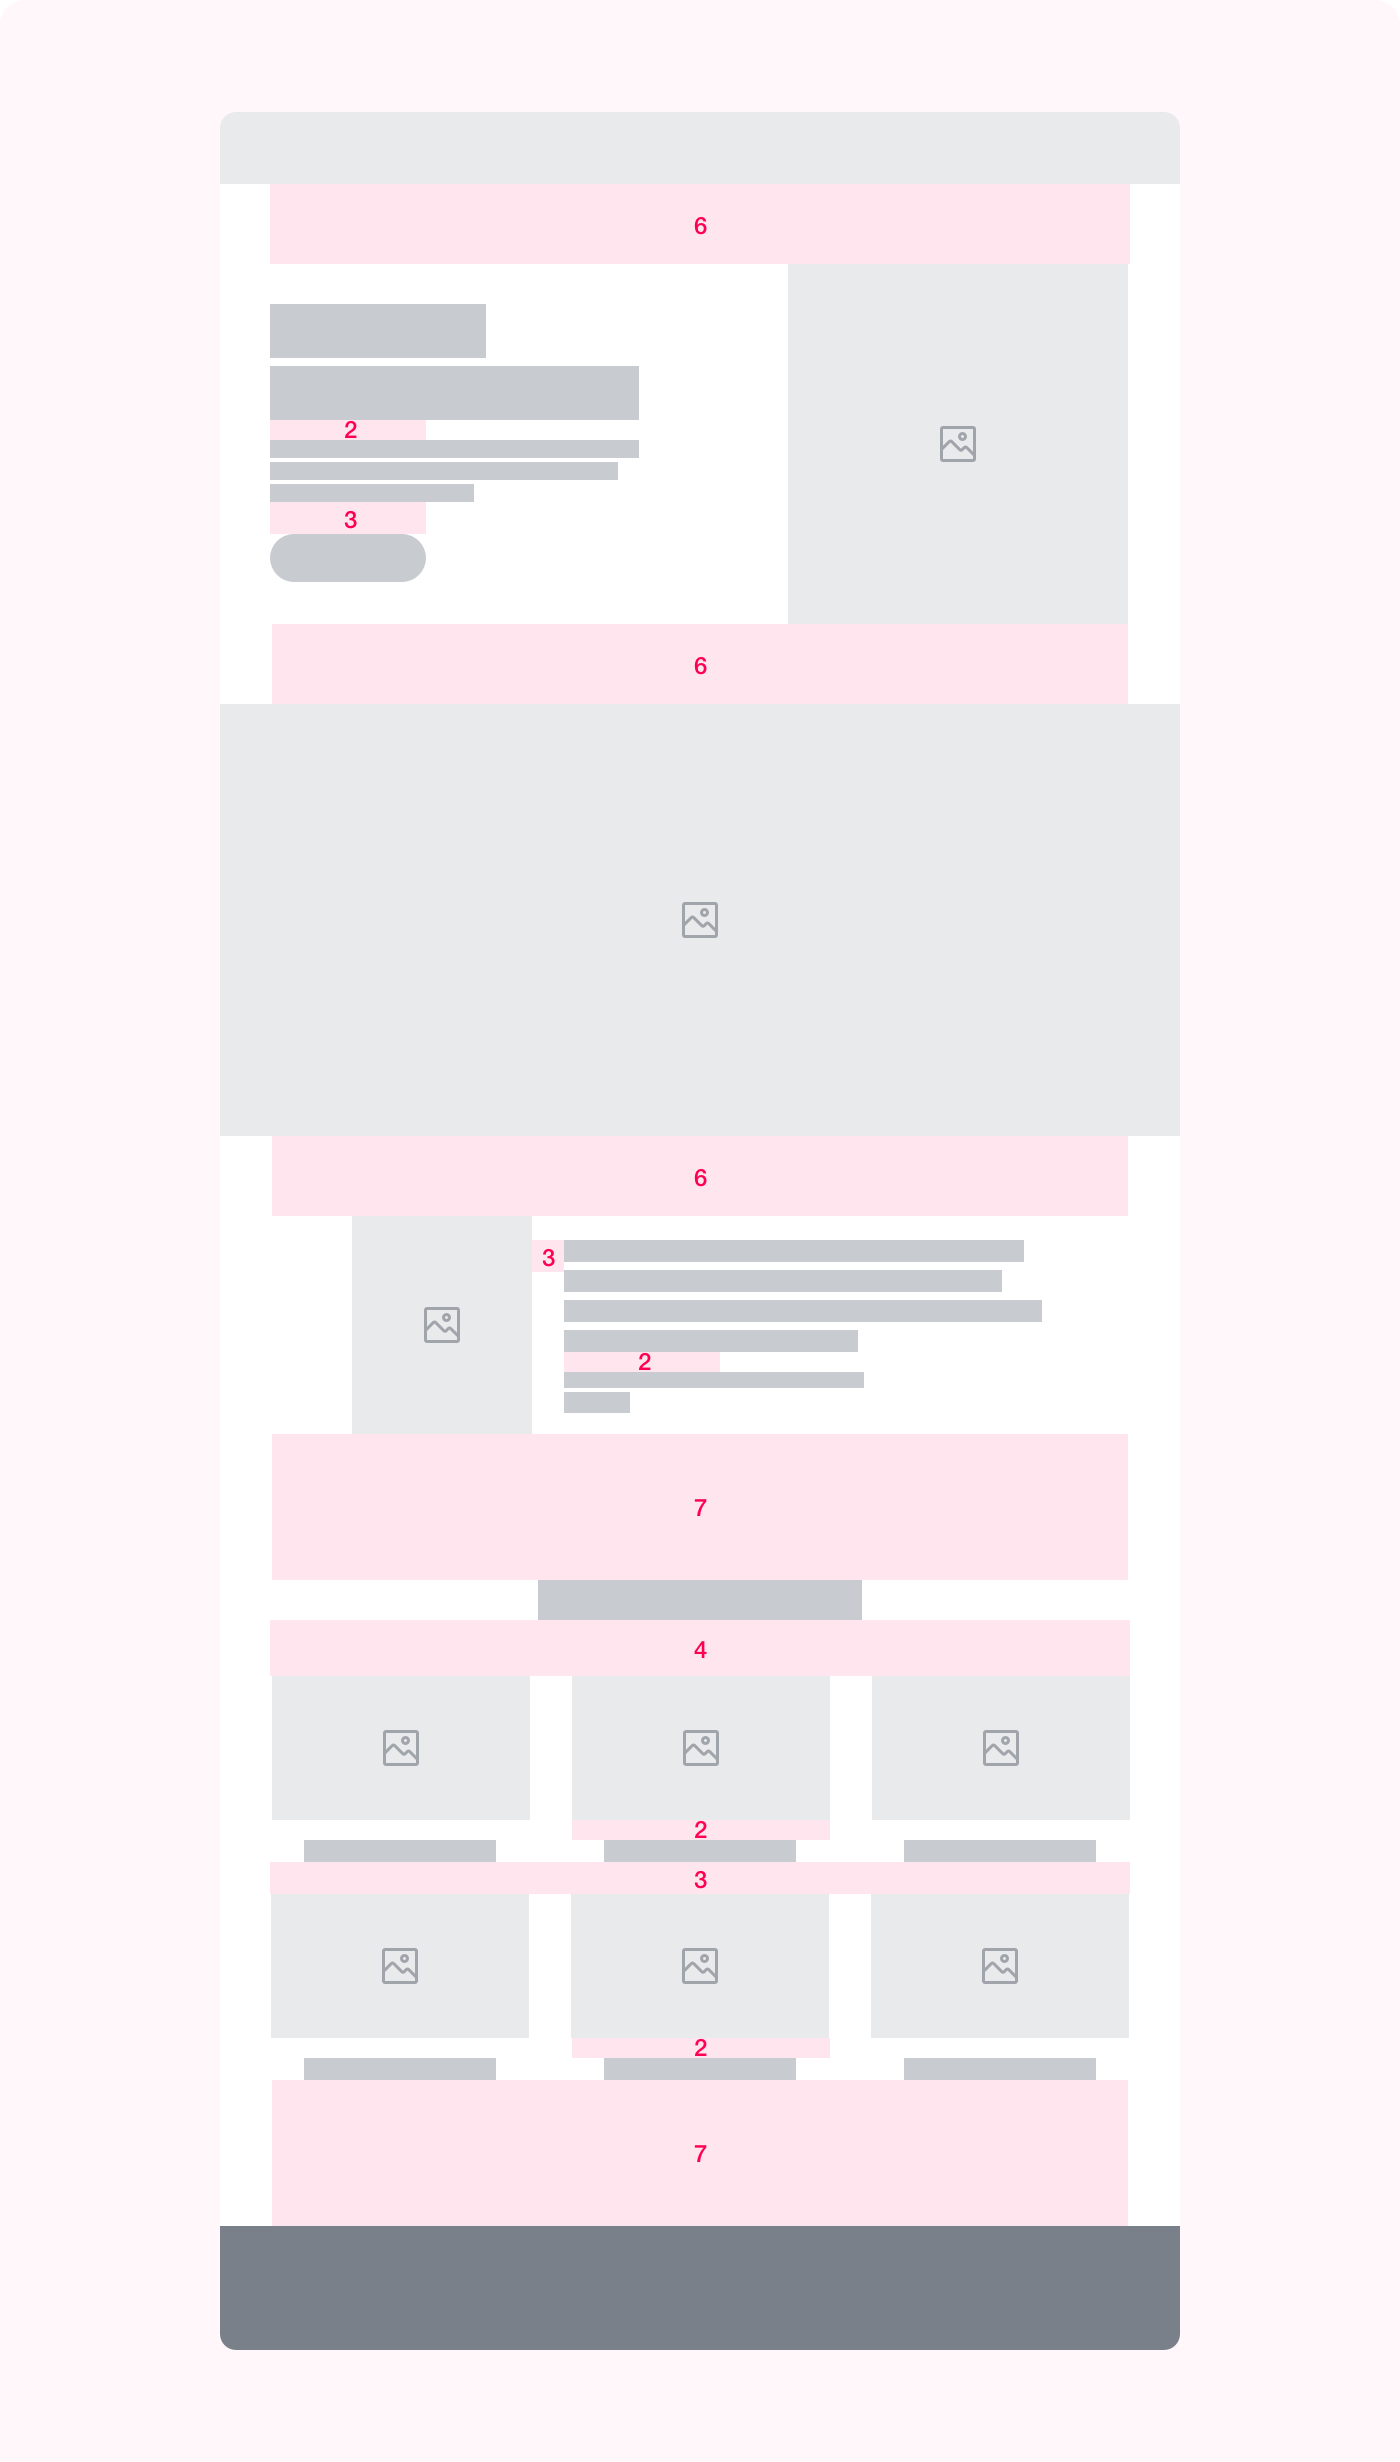
Taking in mind the fact that we have spacing within an element and outside an element, it may be to our advantage to have 2 spacing scales: Element spacing and Layout spacing.
考慮到我們在一個元素內和一個元素外都有間隔的事實,擁有兩個間隔比例可能對我們有利:元素間隔和布局間隔。
This is in fact a variation on IBM’s Carbon DS, so kudos IBM design team!
實際上,這是IBM Carbon DS的一個變體,因此請IBM設計團隊贊譽!
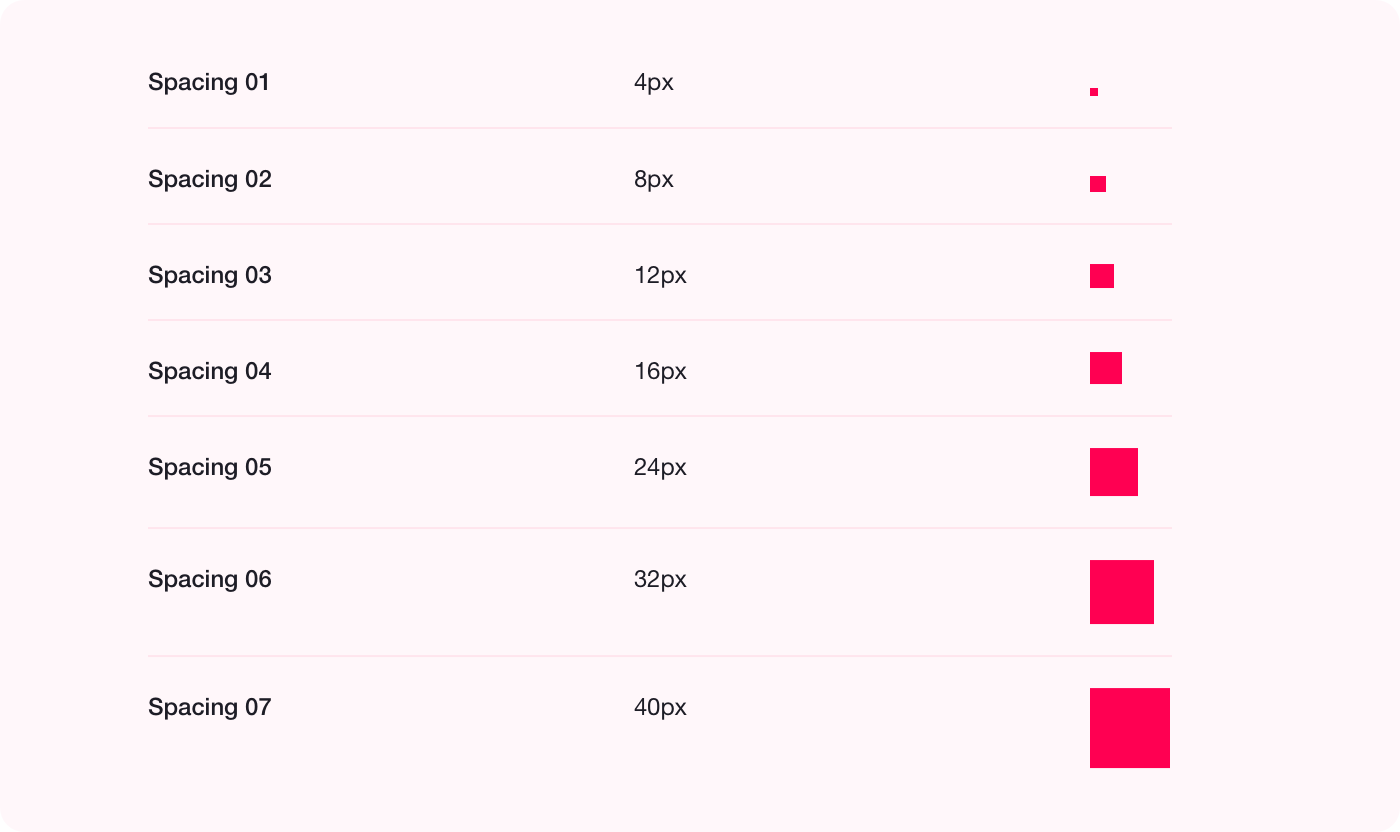
The layout scale is used to space elements from one another; within an encompassing element or between sections:
布局比例用于將元素彼此隔開。 在包含元素之內或在各節之間:
This is how it looks in action in an encompassing element:
這就是它在包含元素中的實際效果:
And this is how it looks in action in a webpage:
這就是它在網頁中的實際效果:
水平布局 (Horizontal Layout)
I covered this specific topic in detail in the previous article, check it out.
我在上一篇文章中詳細介紹了這個特定主題, 請查看 。
For horizontal layout, I use either a 12 column grid with a 24px gutter and 72px column, or a fluid 12 column grid with a 24px/32px gutter and varying column width (obviously).
對于水平布局,我使用帶有24px裝訂線和72px列的12列網格,或者使用帶有24px / 32px裝訂線和可變列寬的可變12列網格(顯然)。
Each product or website require a certain grid, simply use the 8pt unit in a way that makes sense.
每個產品或網站都需要一定的網格,只需以有意義的方式使用8pt單元即可。

最后的話 (Last words)
Design systems should live on and evolve, not freeze in time. Try and treat them as a living document, rather than words set in stone.
設計系統應該持續存在并不斷發展,而不是停滯不前。 嘗試將它們視為有生命的文件,而不是刻在石頭上的文字。
Keep in mind that the basic the component/style you’re about to change, the more complicated the consequences will be. Altering the button or body text style will affect the DS much more than altering the card layout. So experiment with the basic building blocks before venturing much further.
請記住,您將要更改的基本組件/樣式,后果將更加復雜。 更改按鈕或主體文本樣式對DS的影響遠比更改卡片的布局大。 因此,在進一步嘗試之前,請嘗試基本的構建塊。
Good luck and have fun!
祝好運并玩得開心點!
翻譯自: https://medium.com/swlh/design-system-based-on-the-8pt-grid-2473ca5f0ae1
基于pt100溫度計仿真
本文來自互聯網用戶投稿,該文觀點僅代表作者本人,不代表本站立場。本站僅提供信息存儲空間服務,不擁有所有權,不承擔相關法律責任。 如若轉載,請注明出處:http://www.pswp.cn/news/274217.shtml 繁體地址,請注明出處:http://hk.pswp.cn/news/274217.shtml 英文地址,請注明出處:http://en.pswp.cn/news/274217.shtml
如若內容造成侵權/違法違規/事實不符,請聯系多彩編程網進行投訴反饋email:809451989@qq.com,一經查實,立即刪除!相關文章
 glError (0x502))
GL ERROR - after deleteUnusedTextures() glError (0x502)

利用 k8s 建立軟件商店_為企業建立應用商店
![[轉]gcc生成動態庫靜態庫](http://pic.xiahunao.cn/[轉]gcc生成動態庫靜態庫)
[轉]gcc生成動態庫靜態庫

蘋果復興_類型復興的故事:來自Type West的經驗教訓

C#調用ATL COM

浪潮世科和浪潮軟件什么關系_社交圖形浪潮
)
PHP圖形圖像的典型應用 --常用圖像的應用(驗證碼)


寫saas創業的書_我在SaaS創業公司擔任UX設計師的第一個月中學到的三件事

ui項目答辯中學到了什么_我在UI設計9年中學到的12件事

linux下命令行的使用:使用sed命令操作文件

ux的重要性_UX中清晰的重要性

工欲善其事,必先利其器

可靠消息最終一致性設計_如何最終啟動您的設計產品組合
)
臺式機共享筆記本的無線網絡(只需要一根網線)

游戲用戶體驗指標_電子游戲如何超越游戲化的用戶體驗
算法)
JAVA編程心得-JAVA實現CRC-CCITT(XMODEM)算法

什么字體字母和數字大小一樣_字母和字體如何適應我們的屏幕

jenkins 通過批處理自動構建 非標準項目
