keynote使用手冊
Designing for AR is perhaps one of the most interesting applications of UX. As this incredible technology is being put to use for unique applications, UX Designers are tasked with creating user interfaces for an augmented experience, that does set guidelines at the moment. This requires a lot of design iterations and prototyping to get to a solution that works. But, how can you prototype for AR which exists in digital space only visible through the screens of our devices? Solutions like paper prototyping or digital prototypes do not assist designers in testing the interactions in a physical context where the application will be used. And physical context is a core essential for augmented reality.
為AR設計可能是UX最有趣的應用程序之一。 由于這項令人難以置信的技術已用于獨特的應用程序中,因此UX設計人員的任務是創建用戶界面以提供增強的體驗,此舉目前確實在制定準則。 這需要大量的設計迭代和原型設計才能獲得有效的解決方案。 但是,如何為僅存在于我們設備屏幕上的數字空間中的AR原型? 諸如紙張原型制作或數字原型之類的解決方案無法幫助設計人員在將使用該應用程序的物理環境中測試交互。 物理環境是增強現實的核心要素。
How can you prototype for AR which exists in digital space only visible through the screens of our devices?
您如何為僅存在于我們設備屏幕上的數字空間中的AR原型?
My two amazing colleagues (Lidong Liu and Liang Ce) and I recently faced this very problem, when we were designing an application where a person could “try-out” different hairstyles on themselves using AR. Now, in this article, I don’t want to talk about our findings or the design process (which you can read about here). Rather, let’s focus on how we created prototypes for the project in a way that we could test them. I believe this method will help a lot of AR UX Designers out there.
我和我兩位出色的同事( Lidong Liu和Liang Ce )最近遇到了這個問題,當時我們正在設計一個應用程序,使人們可以使用AR在自己身上“嘗試”不同的發型。 現在,在本文中,我不想談論我們的發現或設計過程(您可以在此處閱讀)。 而是讓我們專注于我們如何以測試原型的方式為項目創建原型。 我相信這種方法將幫助很多AR UX設計人員。
When the time arrived to create the user flow and UI for screens where the user can edit their hairstyle, we were stuck. We couldn’t find quick prototyping tools for design concepts that use augmented reality. Using low-fidelity wireframes did not provide enough physical context where we can hold it in a hand and actually look at our hair being digital edited. Tools like ARKit or ARCore would be time and resource-intensive for us to quickly test basic interactions and concept directions. We soon started using the front-facing camera and imagined interacting with the screen. We liked this idea and really wanted to try these interactions on top of the camera feed on the screen. That’s when we thought of an innovative way to create such prototypes.
當創建用戶流程和用戶界面的用戶界面的時間到了,用戶可以在其中編輯發型時,我們陷入了困境。 我們找不到使用增強現實技術的設計概念的快速原型制作工具。 使用低保真線框無法提供足夠的物理環境,我們無法將其握在手中并實際上看著被數字編輯的頭發。 諸如ARKit或ARCore之類的工具將使我們花費大量時間和資源來快速測試基本的交互作用和概念指導。 我們很快開始使用前置攝像頭,并想象了與屏幕的交互。 我們喜歡這個主意,非常想在屏幕上的攝像頭頂部嘗試這些交互。 那時我們想到了一種創新的方式來創建此類原型。
By simply using our smartphones and Keynote, we created an efficient and tactile prototyping method for AR applications. By recording ourselves through the camera, we can create prototypes that can provide a lot of insights. Here’s a 4 step process of how we used our creativity to create an A.R. prototype for our project.
通過簡單地使用智能手機和Keynote,我們為AR應用程序創建了一種高效的觸覺原型制作方法。 通過使用攝像機記錄自己,我們可以創建可以提供很多見解的原型。 這是一個四步過程,說明我們如何利用自己的創造力為項目創建AR原型。
1.錄制主題的視頻 (1. Recording videos of the subject)
I had long hair at that time and I could style my hair in a lot of ways. You can also use wigs or make up for this part. We took multiple videos of me, changing my hairstyle for each one of them.
那時我的頭發很長,可以用很多方法來修飾頭發。 您也可以使用假發或彌補這一部分。 我們為我拍攝了多個視頻,并為每個視頻改變了發型。
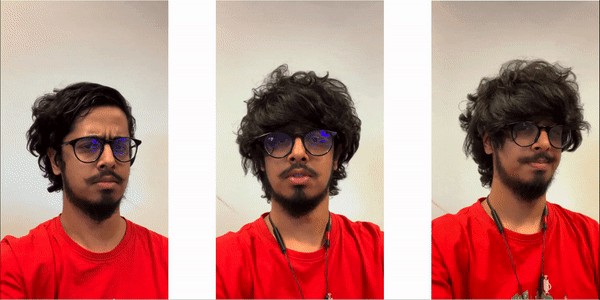
Note: Make a storyboard or a task list so that you can keep a check on the number of videos to create.
注意:制作情節提要或任務列表,以便您可以檢查要創建的視頻數量。
2.導出UI線框和組件 (2. Exporting UI wireframe and components)
After creating wireframes for our hairstyle editing concepts, we exported them as PNG images. It’s important to check which wireframe components are going to be on top of the camera feed. These components but have transparent areas in them through which the camera feed should be visible. In our case, we place a transparent area as shown in the image below.
為發型編輯概念創建線框后,我們將其導出為PNG圖像。 重要的是要檢查哪些線框組件將位于攝像機源上方。 這些組件但是在其中具有透明區域,通過這些區域應該可以看到攝像機饋送。 在本例中,我們將放置一個透明區域,如下圖所示。
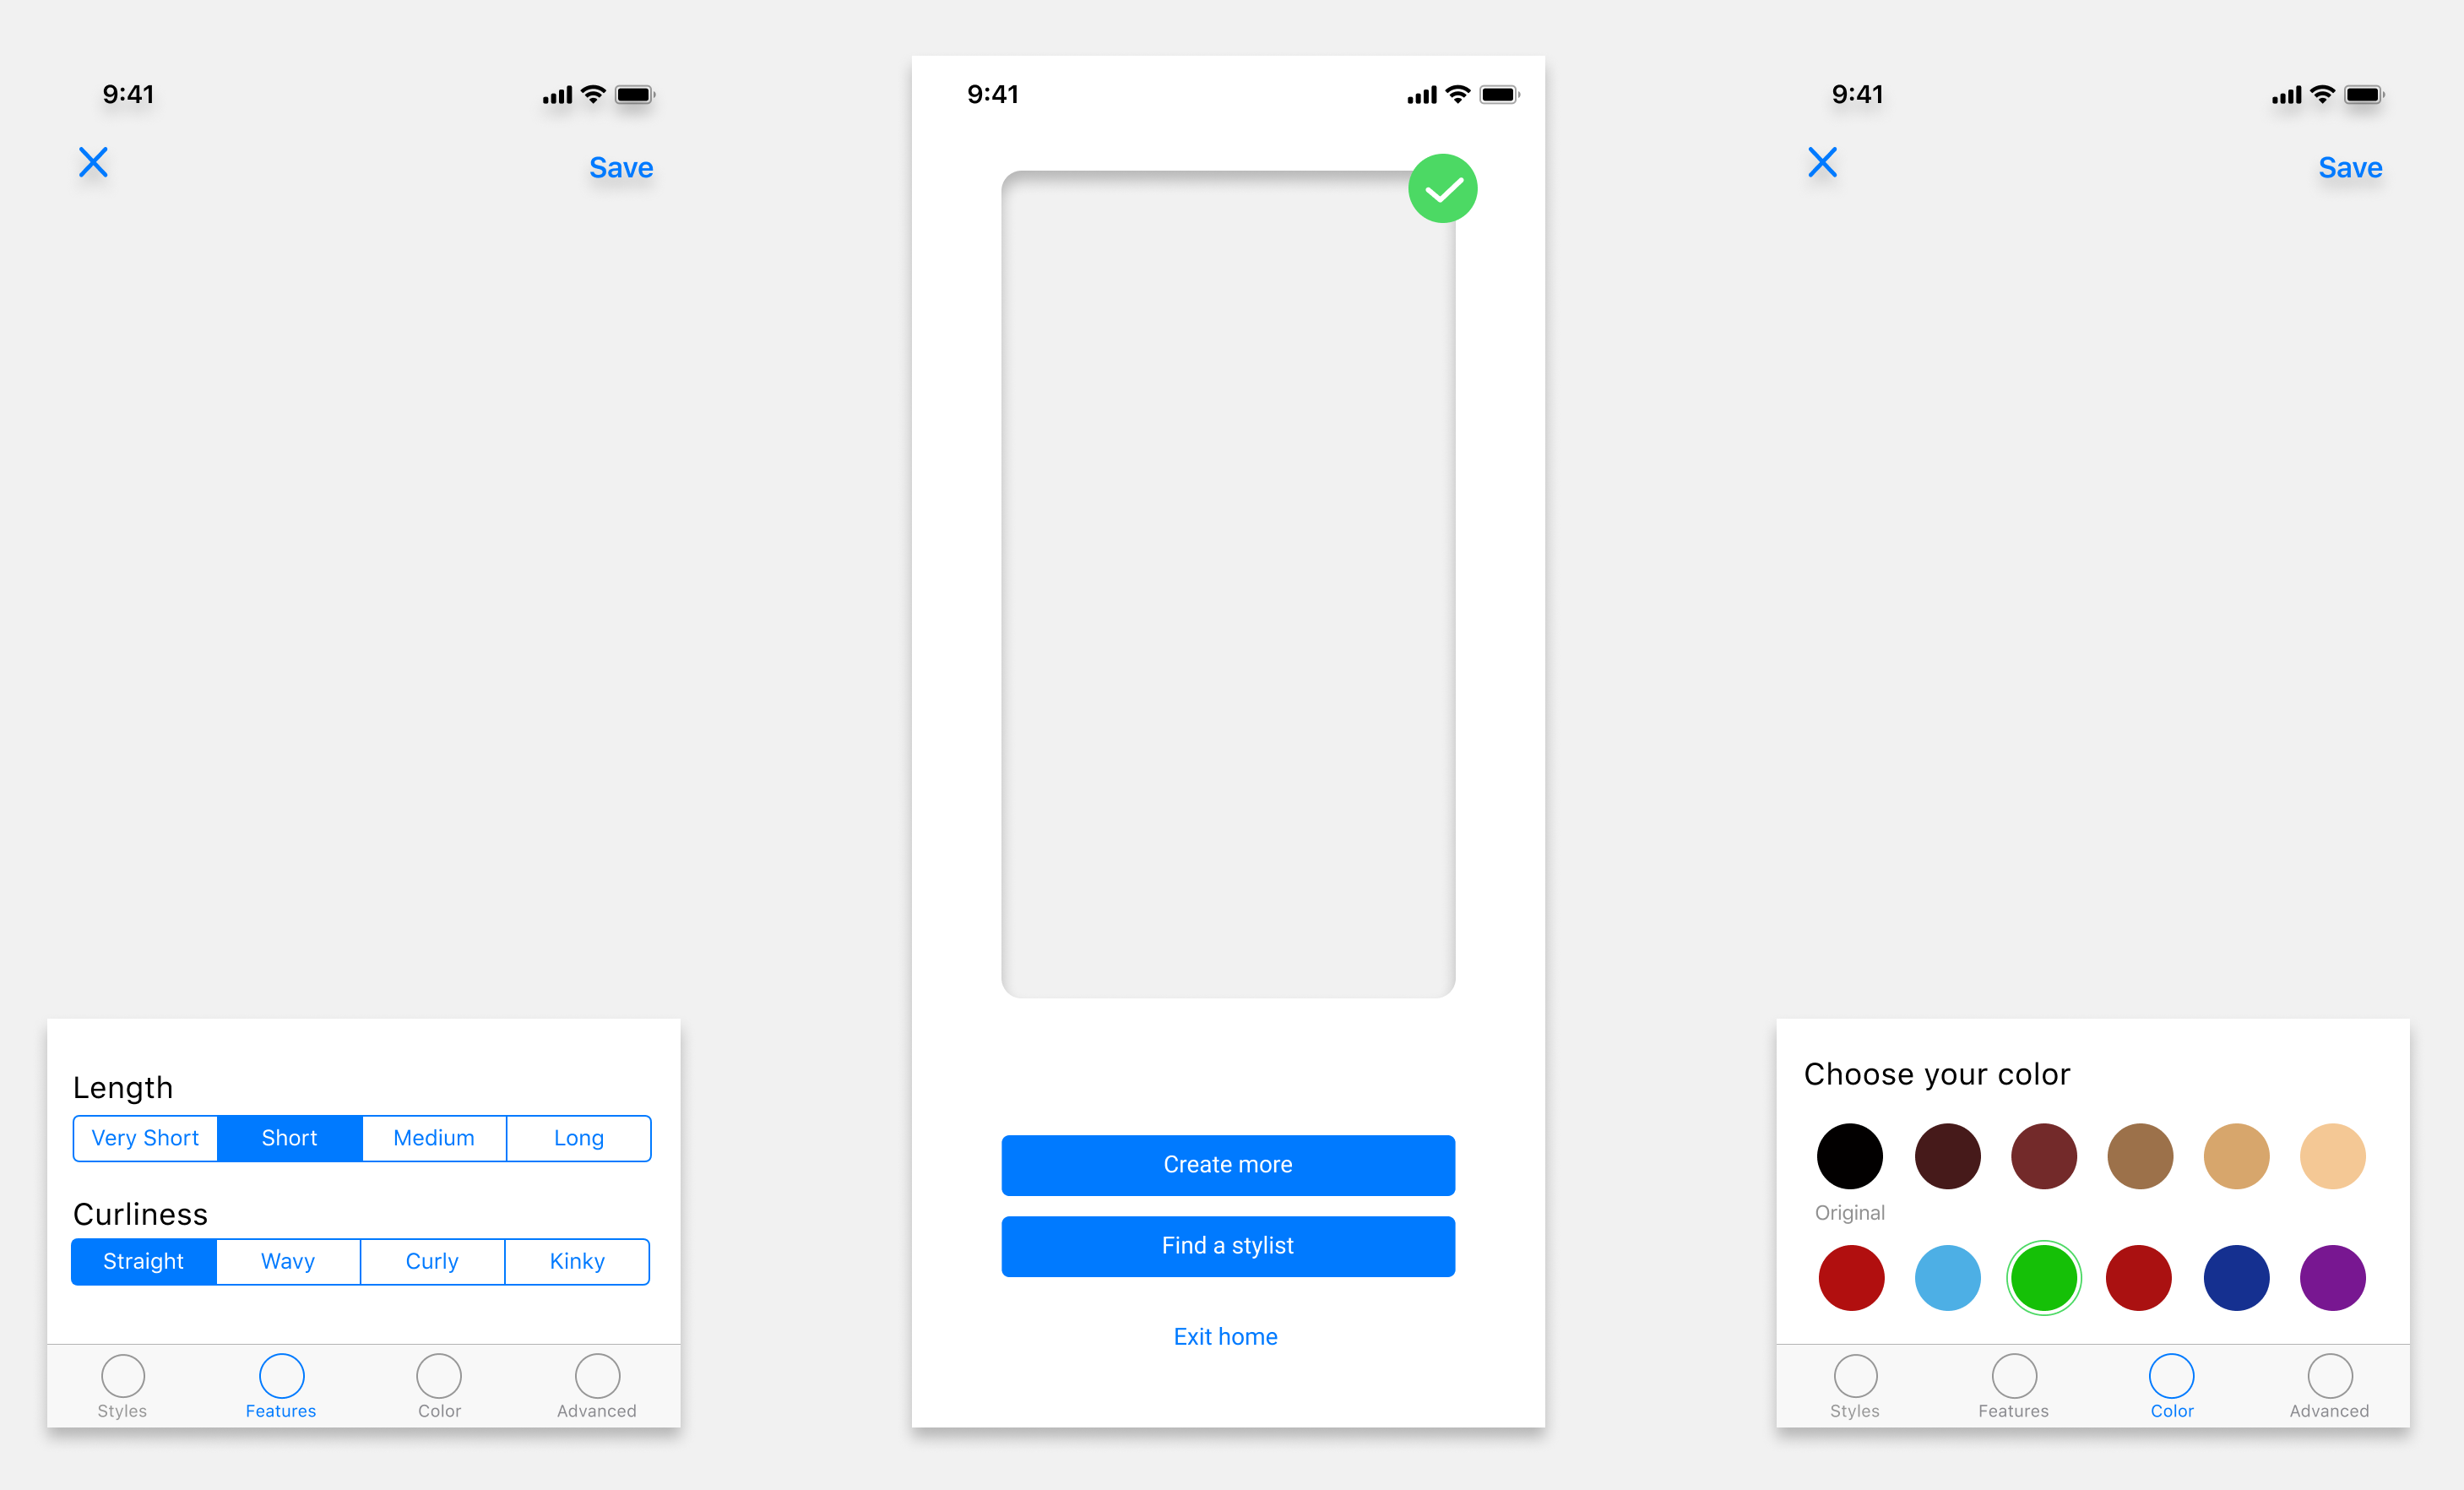
Note: Components and widgets that move on the wireframe will have to be exported separately.
注意:在線框上移動的零部件和小部件必須分別導出。
3.將視頻添加到UI (3. Adding video to the UI)
Now that we have the videos and the wireframes, it was time to put them together. But we did not use any design tools that would be a given at this point. Instead, we created the prototype in Keynote. Yes, Keynote, The presentation application on macOS! Create a new keynote on the app and change the size of the slide deck to fit your app wireframe. To do this, click on ‘Document’ in the top right of the screen and change the slide size. Now you can create a slide deck by adding all the wireframes in the required sequence. Also, here’s where you add the video as a background element and overlay the wireframe on the video.
現在我們有了視頻和線框,是時候將它們放在一起了。 但是,此時我們沒有使用任何特定的設計工具。 相反,我們在Keynote中創建了原型。 是的,主題演講,macOS上的演示應用程序! 在應用程序上創建一個新的主題演講,并更改幻燈片的大小以適合您的應用程序線框。 為此,請單擊屏幕右上方的“文檔”,然后更改幻燈片大小。 現在,您可以通過按所需順序添加所有線框來創建幻燈片。 另外,在這里您可以將視頻添加為背景元素,并將線框疊加在視頻上。

Tip: If you have transitions or animations in your wireframes, you will have to create them again in Keynote. These can be tricky to do but you can have a good prototype using this method in most cases without the animations.
提示:如果在線框中有轉場或動畫,則必須在Keynote中再次創建它們。 這些操作可能很棘手,但是在大多數情況下,如果沒有動畫,您可以使用此方法獲得一個好的原型。
4.在手機屏幕上測試 (4. Testing on mobile screens)
A lot of you might not know this, but MacOS’s Keynote can show a slide deck on an iPhone. If the slide size is set to that of the iPhone, the keynote takes up the whole of the device screen. And by tapping on the screen, it would take us to the next slide deck. So, to test our concepts, I acted like interacting with the screen and trying out new hairstyles on myself. This simple prototype allowed us to iterate on different design concepts. If you don’t have macOS to use KeyNote or an iPhone, you can use Google Slides to have a similar effect.
很多人可能不知道這一點,但是MacOS的Keynote可以在iPhone上顯示幻燈片。 如果幻燈片大小設置為iPhone的大小,則主題演講將占據整個設備屏幕。 通過點擊屏幕,它將帶我們進入下一個幻燈片。 因此,為了測試我們的概念,我的行為就像與屏幕進行交互并在自己身上嘗試新的發型一樣。 這個簡單的原型使我們可以迭代不同的設計概念。 如果您沒有macOS來使用KeyNote或iPhone,則可以使用Google幻燈片來達到類似的效果。
A sample video is shown below. You can also watch our complete prototype video: https://youtu.be/TM59NZ32uzw
示例視頻如下所示。 您也可以觀看我們完整的原型視頻: https : //youtu.be/TM59NZ32uzw
Tip: Using methods like bodystorming or role-playing is a good way to utilize the prototypes based on your designs.
提示:使用諸如頭腦風暴或角色扮演之類的方法是根據您的設計利用原型的好方法。
優點 (The pros)
EfficiencyThe process is very fast and ideal for prototypes. Every time we wanted to change something in the UI, we could make the changes in Figma, export the wireframes, put them in the slide deck and the prototype was ready.
效率該過程非常快速,非常適合原型。 每次我們想要在UI中進行某些更改時,我們都可以在Figma中進行更改,導出線框,將其放置在滑板中,然后原型就準備好了。
ContextualCompared to paper or digital prototypes, this type of prototyping is much closer to the implementation of an AR application. By roleplaying the video in real scenarios, details about the user interactions become obvious which might not be discovered before.
語境相對于紙或數字樣機,這種類型的原型更接近的AR應用程序的執行。 通過在真實場景中對視頻進行角色扮演,有關用戶交互的詳細信息將變得顯而易見,而以前可能不會發現。
缺點 (The cons)
ScalabilityUsing this method for a single flow is easier to do as you only need to record the videos once. But, once you start using this method for an application that has a lot of user flows that require A.R. prototype, the list of videos, slide decks to be prepared becomes long very quickly. At that point, you will end up working on video recording and editing more than the design itself. This is a problem we faced as our project progressed.
可伸縮性對單個流使用此方法比較容易,因為您只需要錄制一次視頻。 但是,一旦開始對需要大量用戶原型的應用程序使用這種方法,那么要準備的視頻和幻燈片的列表就會非常長。 到那時,您將比設計本身更多地從事視頻錄制和編輯工作。 這是我們在項目進行過程中面臨的問題。
User TestingThe application we created could not be user tested as it won’t make sense for a participant to look at my face while they are editing their hairstyle. Similarly, in prototypes where the participant's face has to be used in the app, it’s difficult to expand this method to people outside the team. I mean, yes we can record their videos and make the prototype but it defeats the purpose of a user test. Augmented Reality application for objects won’t be limited by this.
用戶測試我們創建的應用程序無法進行用戶測試,因為參與者在編輯發型時看著我的臉沒有意義。 同樣,在必須在應用程序中使用參與者面部表情的原型中,很難將此方法擴展到團隊外部的人員。 我的意思是,是的,我們可以錄制他們的視頻并制作原型,但這違反了用戶測試的目的。 對象的增強現實應用程序將不受此限制。
So, that’s a technique we developed for prototyping for A.R. What do you think? Let me know in the comments if you liked it or if it can be improved in some ways.
因此,這是我們為AR原型開發的一種技術,您認為呢? 在評論中讓我知道您是否喜歡它,或者可以通過某些方式對其進行改進。
翻譯自: https://uxdesign.cc/creating-prototypes-for-a-r-applications-26949ff02d4
keynote使用手冊
本文來自互聯網用戶投稿,該文觀點僅代表作者本人,不代表本站立場。本站僅提供信息存儲空間服務,不擁有所有權,不承擔相關法律責任。 如若轉載,請注明出處:http://www.pswp.cn/news/274179.shtml 繁體地址,請注明出處:http://hk.pswp.cn/news/274179.shtml 英文地址,請注明出處:http://en.pswp.cn/news/274179.shtml
如若內容造成侵權/違法違規/事實不符,請聯系多彩編程網進行投訴反饋email:809451989@qq.com,一經查實,立即刪除!相關文章

我會永遠永遠的愛你,直到你不愛我的那一天


遠程控制工具_不要讓您的工具控制您

模態和非模態代碼_我們如何使模態可用和可訪問?

如何查看數據文件或者Log文件是否增長過?

軟件項目開發 學校自行開發_自行開發游戲

jquery Fancybox使用教程

優衣庫不雅_Uniqlo主頁-用戶體驗案例研究

PHP生成縮略圖函數

shields 徽標_到處都有平面徽標

jquery錨點連接劃動滾動條,再也不用a標簽name 了

登錄,注冊,登錄,登錄..?


ux設計_UX設計101:

ASP.NET 文件上傳于下載

idea重要插件代碼顏色_顏色在您的網站上的重要性和品牌形象

【自己給自己題目做】之一:橢圓可點擊區域

軟件設計師中級 百度知道_設計師應該知道什么

看看清華的同學在四年的大學中干什么吧,非常值得學習
