RelativeLayout中子控件常用屬性:
子控件默認是從父控件的左上角開始排列的
- 相對于父控件
android:layout_alignParentTop="true" 和父控件的頂部對齊android:layout_alignParentBottom="true" 和父控件的底部對齊android:layout_alignParentRight="true" 和父控件的右端對齊android:layout_alignParentLeft="true" 和父控件的左端對齊
- 相對于給定的ID控件
android:layout_above="@id/cat1"        控件的底部置于給定ID的控件之上
android:layout_below="@id/cat1"        控件底部置于給定ID的控件之下·
android:layout_toRightOf="@id/cat1"    控件的左邊緣與給定ID的控件的右邊緣對齊
android:layout_toLeftOf="@id/cat1"     控件的右邊緣與給定ID的控件的左邊緣對齊
android:layout_alignBottom="@id/cat1"  與給定控件的底邊緣對齊
android:layout_alignLeft="@id/cat1"    與給定控件的左邊緣對齊
android:layout_alignTop="@id/cat1"     與給定控件的定邊緣對齊
android:layout_alignRight="@id/cat1"   與給定控件的右邊緣對齊
android:layout_alignBaseline="@id/cat1"控件的Baseline與給定ID控件的Baseline對齊,其實這個baseline相當于筆記本里寫文字時候的底下的那條線android:layout_alignRight 本元素的右邊緣和某元素的的右邊緣對齊
android:layout_toRightOf  在某元素的右邊
- 居中
android:layout_centerHorizontal="true" 水平居中android:layout_centerVertical="true" 垂直居中android:layout_centerInParent="true" 相對于父控件處在正中央
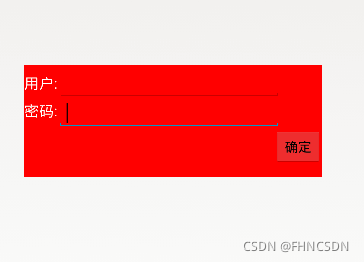
一個簡單的登錄界面:
<RelativeLayout xmlns:android="http://schemas.android.com/apk/res/android"xmlns:tools="http://schemas.android.com/tools"android:layout_width="match_parent"android:layout_height="match_parent"android:paddingBottom="@dimen/activity_vertical_margin"android:paddingLeft="@dimen/activity_horizontal_margin"android:paddingRight="@dimen/activity_horizontal_margin"android:paddingTop="@dimen/activity_vertical_margin"tools:context=".MainActivity" ><RelativeLayoutandroid:layout_height="150dp"android:layout_width="400dp"android:layout_centerInParent="true"android:background="#ff0000"><TextViewandroid:id="@+id/user"android:layout_width="wrap_content"android:layout_height="wrap_content"android:layout_marginTop="10dp"android:text="用戶:"android:textSize="20dp"android:textColor="#ffffff"/><EditTextandroid:id="@+id/userline"android:layout_marginTop="5dp"android:layout_width="300dp"android:layout_height="40dp"android:layout_toRightOf="@id/user"/><TextViewandroid:id="@+id/passwd"android:layout_marginTop="10dp"android:layout_below="@id/user"android:layout_width="wrap_content"android:layout_height="wrap_content"android:text="密碼:"android:textSize="20dp"android:textColor="#ffffff"/><EditTextandroid:id="@+id/passwdline"android:layout_width="300dp"android:layout_height="40dp"android:layout_below="@id/userline"android:layout_toRightOf="@id/passwd"/><Buttonandroid:layout_width="wrap_content"android:layout_height="wrap_content"android:text="確定"android:layout_alignParentRight="true"android:layout_below="@id/passwdline"/></RelativeLayout>
</RelativeLayout>
所的結果:
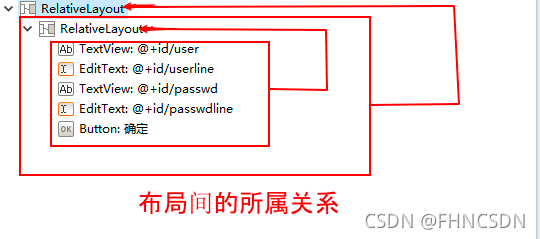
布局間的所屬關系:
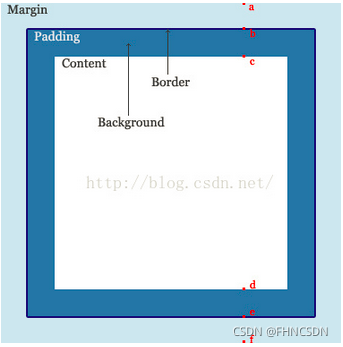
Margin和Padding:
盒模型(控件)主要定義四個區域:內容 (content)、邊框距(padding)即內邊距、邊界(border)和外邊距(margin)。 對于初學者,經常會搞不清楚margin,background-color,background- image,padding,content,border之間的層次、關系和相互影響。這里提供一張盒模型的平面示意圖,希望便于你的理解和記憶。Margin 是整體移動,帶著控件里面的內容(content),而padding 是移動控件里面的內容相對于控件Bprder的距離。
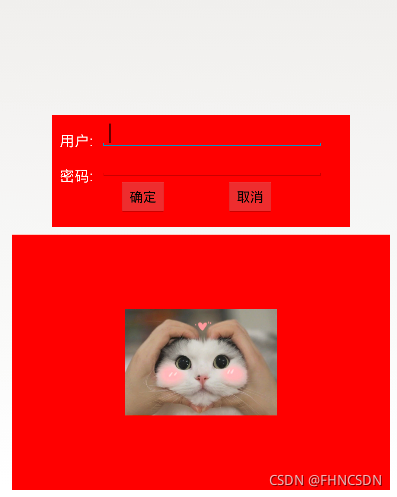
將上述界面進行美化:
<RelativeLayout xmlns:android="http://schemas.android.com/apk/res/android"xmlns:tools="http://schemas.android.com/tools"android:layout_width="match_parent"android:layout_height="match_parent"android:paddingBottom="@dimen/activity_vertical_margin"android:paddingLeft="@dimen/activity_horizontal_margin"android:paddingRight="@dimen/activity_horizontal_margin"android:paddingTop="@dimen/activity_vertical_margin"tools:context=".MainActivity" ><RelativeLayoutandroid:id="@+id/laout1"android:layout_height="150dp"android:layout_width="400dp"android:layout_centerInParent="true"android:background="#ff0000"><TextViewandroid:id="@+id/user"android:layout_width="wrap_content"android:layout_height="wrap_content"android:layout_marginTop="20dp"android:layout_marginLeft="10dp"android:layout_marginRight="10dp"android:text="用戶:"android:textSize="20dp"android:textColor="#ffffff"/><EditTextandroid:id="@+id/userline"android:layout_marginTop="5dp"android:layout_width="300dp"android:layout_height="40dp"android:layout_toRightOf="@id/user"/><TextViewandroid:id="@+id/passwd"android:layout_marginTop="20dp"android:layout_below="@id/user"android:layout_width="wrap_content"android:layout_height="wrap_content"android:layout_marginLeft="10dp"android:layout_marginRight="10dp"android:text="密碼:"android:textSize="20dp"android:textColor="#ffffff"/><EditTextandroid:id="@+id/passwdline"android:layout_width="300dp"android:layout_height="40dp"android:layout_below="@id/userline"android:layout_toRightOf="@id/passwd"/><Buttonandroid:id="@+id/btn1"android:layout_width="wrap_content"android:layout_height="wrap_content"android:layout_alignParentLeft="true"android:layout_marginLeft="90dp"android:text="確定"android:layout_below="@id/passwdline"/><Buttonandroid:layout_width="wrap_content"android:layout_height="wrap_content"android:text="取消"android:layout_toRightOf="@id/btn1"android:layout_below="@id/passwdline"android:layout_marginLeft="80dp"/></RelativeLayout><RelativeLayoutandroid:id="@+id/layout2"android:background="#ff0000"android:layout_width="match_parent"android:layout_height="match_parent"android:layout_below="@id/laout1"android:layout_marginTop="10dp"><ImageViewandroid:layout_width="wrap_content"android:layout_height="wrap_content"android:layout_margin="100dp"android:src="@drawable/picture2"/></RelativeLayout>
</RelativeLayout>
如下圖所示:
安卓按鍵快速美化:
- 在res/drawable目錄下新建按鈕樣式文件 btn_normal.xml(正常狀態) 和 btn_pressed.xml(按下狀態)。
btn_normal.xml文件:
<?xml version="1.0" encoding="utf-8"?>
<shapexmlns:android="http://schemas.android.com/apk/res/android"android:shape="rectangle"><!-- 圓角的半徑 --><corners android:radius="10dp"/><!-- 填充顏色 --><solid android:color="#3a8fea"/>
</shape>
btn_pressed.xml文件:
<?xml version="1.0" encoding="utf-8"?>
<shape xmlns:android="http://schemas.android.com/apk/res/android"android:shape="rectangle"><!-- 圓角的半徑 --><corners android:radius="10dp"/><!-- 填充顏色 --><solid android:color="#0662f5"/>
</shape>
- 在res/drawable目錄下新建樣式文件 btn_selector.xml 文件,定義按鈕的不同狀態樣式。
btn_selector.xml文件:
<?xml version="1.0" encoding="utf-8"?>
<selector xmlns:android="http://schemas.android.com/apk/res/android"><!-- 正常狀態 --><item android:drawable="@drawable/btn_normal" android:state_pressed="false"/><!-- 按下狀態 --><item android:drawable="@drawable/btn_pressed" android:state_pressed="true"/></selector>
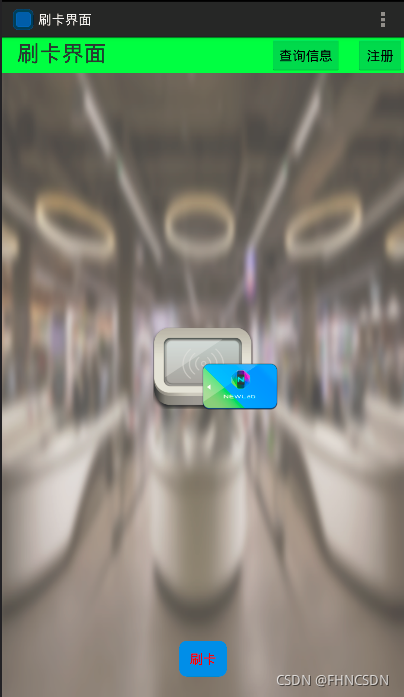
練習制作刷卡界面:
<RelativeLayout xmlns:android="http://schemas.android.com/apk/res/android"xmlns:tools="http://schemas.android.com/tools"android:layout_width="match_parent"android:layout_height="match_parent"android:background="@drawable/bg_shopping_menu"tools:context=".MainActivity" ><ImageView android:layout_height="wrap_content"android:layout_width="wrap_content"android:layout_centerInParent="true"android:src="@drawable/pic_rf"/><ImageViewandroid:layout_height="wrap_content"android:layout_width="wrap_content"android:layout_centerInParent="true"android:src="@drawable/card"android:paddingLeft="100dp"android:paddingTop="50dp"/><Buttonandroid:layout_height="wrap_content"android:layout_width="wrap_content"android:layout_centerHorizontal="true"android:layout_marginBottom="30dp"android:layout_alignParentBottom="true"android:text="刷卡"android:background="@drawable/btn_selector"android:textColor="#ff0000"/><RelativeLayoutandroid:layout_height="wrap_content"android:layout_width="match_parent"android:background="#00ff00"><TextViewandroid:layout_width="wrap_content"android:layout_height="wrap_content"android:textSize="30dp"android:text="刷卡界面"android:layout_marginLeft="20dp"/><Buttonandroid:id="@+id/butn1"android:layout_height="wrap_content"android:layout_width="wrap_content"android:text="注冊"android:layout_alignParentRight="true" /><Buttonandroid:layout_width="wrap_content"android:layout_height="wrap_content"android:text="查詢信息"android:layout_toLeftOf="@id/butn1"android:layout_marginRight="20dp"/></RelativeLayout></RelativeLayout>結果如下:
LinearLayout常用屬性(它的父控件還是RelativeLayout,所以RelativeLayout的屬性還可以拿來用):
orientation:布局中控件的排列方式,有vertical(豎直,默認)和horizontal(水平)兩種方式gravity:控制組件所包含的子元素的對齊方式,可多個組合,如left|buttom(這個是基礎控件相對于父控件來說的)layout_gravity:控制該組件在父容器中的對齊方式,(這個是布局控件相對于父控件來說的)layout_width:布局寬度,通常不直接寫數字的,用wrap_content(組件實際大小)和fill_parent或者match_marent(填滿父容器)layout_height:布局的高度,參數同上background:為組件設置一個背景圖片,或者直接用顏色覆蓋
Weight(權重):
該屬性用來等比例地劃分區域。
- 最簡單的用法:要等比例劃分,分誰,誰為0,Weight按比例即可
- 當我們設置寬度為0dp時,同時設置weight屬性為1,意思就是在寬度方向上所占比重為1。如果將height設置為0,同時設置weight屬性為2,意思就是在豎直方向所占比重為2。
divider分割線:
該屬性用于LinearLayout設置分割圖片,通過showDivider來設置分割線的所在位置,有四個可選值:none、middle、begining、end,當然還可以通過:
divider:為LinearLayout設置分割線的圖片showDivider:設置分割線所在位置,有四個通道:none、middle、begining、enddividerPadding:設置分割線的Padding
設置分割線(divider):
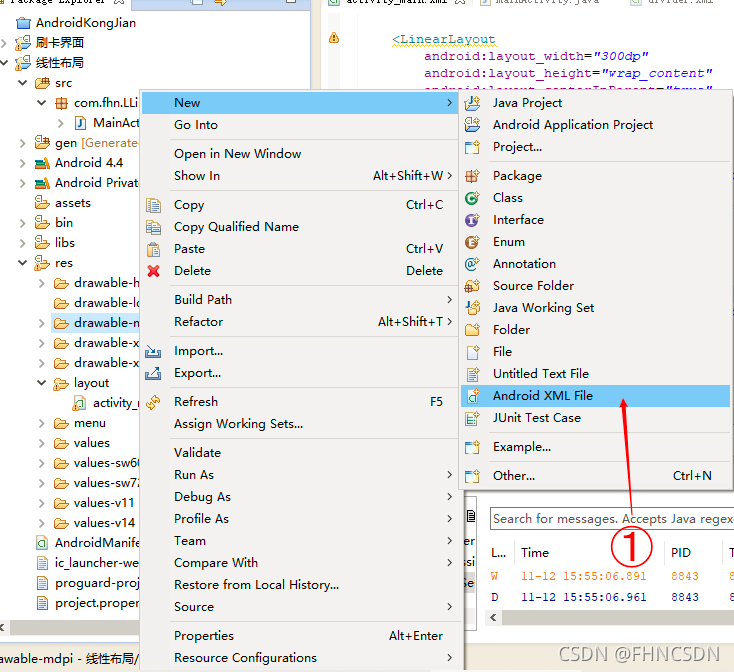
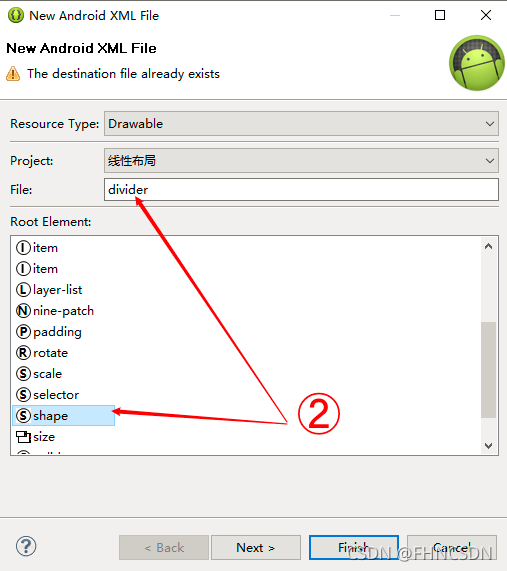
然后編輯該分割線的代碼:
<?xml version="1.0" encoding="utf-8"?>
<shape xmlns:android="http://schemas.android.com/apk/res/android" android:shape="line">      shape是分割線的形狀<sizeandroid:width="200dp"  分割線的寬android:height="2dp"   分割線的高/><strokeandroid:color="#000000"  這個是分割線的顏色/>
</shape>
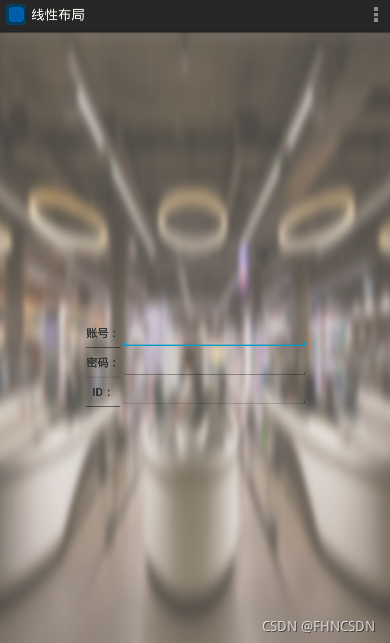
使用線性布局和相對布局寫一個丑陋的登錄界面:
<RelativeLayout xmlns:android="http://schemas.android.com/apk/res/android"xmlns:tools="http://schemas.android.com/tools"android:layout_width="match_parent"android:layout_height="match_parent"android:background="@drawable/bg_shopping_menu"tools:context=".MainActivity" ><LinearLayoutandroid:layout_width="300dp"android:layout_height="wrap_content"android:layout_centerInParent="true"android:orientation="horizontal" ><LinearLayoutandroid:layout_width="0dp"android:layout_height="match_parent"android:layout_weight="1"android:divider="@drawable/divider"android:showDividers="middle|end"android:dividerPadding="2dp"android:orientation="vertical" ><TextViewandroid:layout_width="match_parent"android:layout_height="0dp"android:layout_weight="1"android:gravity="center"android:textStyle="bold"android:textSize="15dp"android:text="賬號:" /><TextViewandroid:layout_width="match_parent"android:layout_height="0dp"android:layout_weight="1"android:gravity="center"android:textStyle="bold"android:textSize="15dp"android:text="密碼:" /><TextViewandroid:layout_width="match_parent"android:layout_height="0dp"android:layout_weight="1"android:gravity="center"android:textStyle="bold"android:textSize="15dp"android:text="ID:" /></LinearLayout><LinearLayoutandroid:layout_width="0dp"android:layout_height="match_parent"android:layout_weight="5"android:orientation="vertical" ><EditTextandroid:layout_width="match_parent"android:layout_height="0dp"android:layout_weight="1" /><EditTextandroid:layout_width="match_parent"android:layout_height="0dp"android:layout_weight="1" /><EditTextandroid:layout_width="match_parent"android:layout_height="0dp"android:layout_weight="1" /></LinearLayout></LinearLayout></RelativeLayout>
結果如下圖所示:


的生命周期)


、Handler類、安卓Socket傳數據、WebView)


