最近因之前的服務器上的caffe奔潰了,不得已重新安裝這一古老的深度學習框架,之前也嘗試了好幾次,每次都失敗,這次總算是成功了,因此及時地總結一下。
以下安裝的caffe主要是針對之前虹膜分割和鞏膜分割所需的caffe版本。之前已經出過一個安裝指南,部分內容與之重疊。
其實整個caffe安裝最困難的部分就是各個依賴軟件的安裝,因此我們只要把這部分安裝好了就可以了。
注意:安裝指南,請參考《深度學習:21天實戰caffe》的第5天那一章,只要按照上面所說的,將所有依賴文件安裝在一個目錄下,即可。最后安裝好的列表應該為: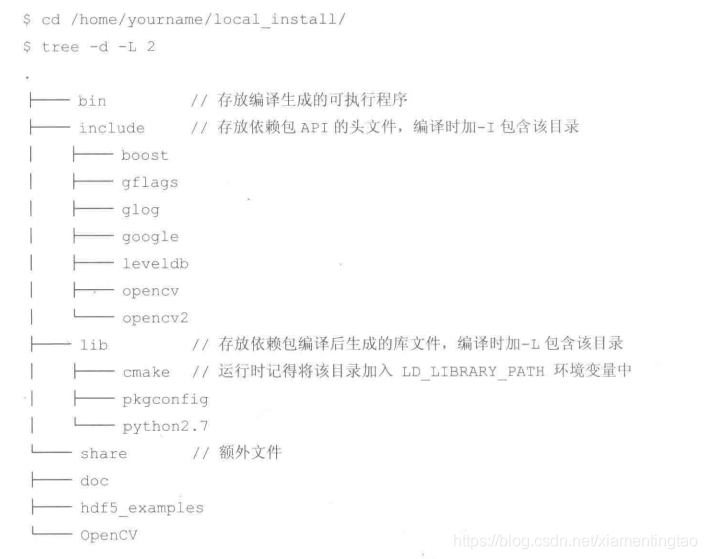
最后,修改caffe目錄下的Makefile.config,找到如下幾行:
# Whatever else you find you need goes here.
INCLUDE_DIRS :=/home/caiyong.wang/bin/caffe_local_install/include  $(PYTHON_INCLUDE)    /usr/local/include
LIBRARY_DIRS :=/home/caiyong.wang/bin/caffe_local_install/lib  $(PYTHON_LIB)   /usr/local/lib /usr/lib
完整的Makefile.config參考:
## Refer to http://caffe.berkeleyvision.org/installation.html
# Contributions simplifying and improving our build system are welcome!# cuDNN acceleration switch (uncomment to build with cuDNN).USE_CUDNN := 1# CPU-only switch (uncomment to build without GPU support).
# CPU_ONLY := 1# uncomment to disable IO dependencies and corresponding data layersUSE_OPENCV := 1
# USE_LEVELDB := 0
# USE_LMDB := 0# uncomment to allow MDB_NOLOCK when reading LMDB files (only if necessary)
#	You should not set this flag if you will be reading LMDBs with any
#	possibility of simultaneous read and write
# ALLOW_LMDB_NOLOCK := 1# Uncomment if you're using OpenCV 3OPENCV_VERSION := 2# To customize your choice of compiler, uncomment and set the following.
# N.B. the default for Linux is g++ and the default for OSX is clang++
# CUSTOM_CXX := g++# CUDA directory contains bin/ and lib/ directories that we need.
CUDA_DIR := /usr/local/cuda
# On Ubuntu 14.04, if cuda tools are installed via
# "sudo apt-get install nvidia-cuda-toolkit" then use this instead:
# CUDA_DIR := /usr# CUDA architecture setting: going with all of them.
# For CUDA < 6.0, comment the *_50 through *_61 lines for compatibility.
# For CUDA < 8.0, comment the *_60 and *_61 lines for compatibility.
CUDA_ARCH := -gencode arch=compute_20,code=sm_20 \-gencode arch=compute_20,code=sm_21 \-gencode arch=compute_30,code=sm_30 \-gencode arch=compute_35,code=sm_35 \-gencode arch=compute_50,code=sm_50 \-gencode arch=compute_52,code=sm_52 \-gencode arch=compute_60,code=sm_60 \-gencode arch=compute_61,code=sm_61 \-gencode arch=compute_61,code=compute_61# BLAS choice:
# atlas for ATLAS (default)
# mkl for MKL
# open for OpenBlas
BLAS := open
# Custom (MKL/ATLAS/OpenBLAS) include and lib directories.
# Leave commented to accept the defaults for your choice of BLAS
# (which should work)!
BLAS_INCLUDE := /opt/OpenBLAS/include
BLAS_LIB := /opt/OpenBLAS/lib# Homebrew puts openblas in a directory that is not on the standard search path
# BLAS_INCLUDE := $(shell brew --prefix openblas)/include
# BLAS_LIB := $(shell brew --prefix openblas)/lib# This is required only if you will compile the matlab interface.
# MATLAB directory should contain the mex binary in /bin.
# MATLAB_DIR :=  /usr/local/MATLAB/R2015a/
# MATLAB_DIR := /Applications/MATLAB_R2012b.app# NOTE: this is required only if you will compile the python interface.
# We need to be able to find Python.h and numpy/arrayobject.h.
# PYTHON_INCLUDE := /usr/include/python2.7 \
#		/usr/lib/python2.7/dist-packages/numpy/core/include
# Anaconda Python distribution is quite popular. Include path:
# Verify anaconda location, sometimes it's in root.ANACONDA_HOME := $(HOME)/anaconda2PYTHON_INCLUDE := $(ANACONDA_HOME)/include \$(ANACONDA_HOME)/include/python2.7 \$(ANACONDA_HOME)/lib/python2.7/site-packages/numpy/core/include# Uncomment to use Python 3 (default is Python 2)
# PYTHON_LIBRARIES := boost_python3 python3.5m
# PYTHON_INCLUDE := /usr/include/python3.5m \
#                 /usr/lib/python3.5/dist-packages/numpy/core/include# We need to be able to find libpythonX.X.so or .dylib.
# PYTHON_LIB := /usr/libPYTHON_LIB := $(ANACONDA_HOME)/lib# Homebrew installs numpy in a non standard path (keg only)
# PYTHON_INCLUDE += $(dir $(shell python -c 'import numpy.core; print(numpy.core.__file__)'))/include
# PYTHON_LIB += $(shell brew --prefix numpy)/lib# Uncomment to support layers written in Python (will link against Python libs)WITH_PYTHON_LAYER := 1# Whatever else you find you need goes here.
INCLUDE_DIRS :=/home/caiyong.wang/bin/caffe_local_install/include  $(PYTHON_INCLUDE)    /usr/local/include
LIBRARY_DIRS :=/home/caiyong.wang/bin/caffe_local_install/lib  $(PYTHON_LIB)   /usr/local/lib /usr/lib   # If Homebrew is installed at a non standard location (for example your home directory) and you use it for general dependencies
# INCLUDE_DIRS += $(shell brew --prefix)/include
# LIBRARY_DIRS += $(shell brew --prefix)/lib# NCCL acceleration switch (uncomment to build with NCCL)
# https://github.com/NVIDIA/nccl (last tested version: v1.2.3-1+cuda8.0)
# USE_NCCL := 1# Uncomment to use `pkg-config` to specify OpenCV library paths.
# (Usually not necessary -- OpenCV libraries are normally installed in one of the above $LIBRARY_DIRS.)
USE_PKG_CONFIG := 1# N.B. both build and distribute dirs are cleared on `make clean`
BUILD_DIR := build
DISTRIBUTE_DIR := distribute# Uncomment for debugging. Does not work on OSX due to https://github.com/BVLC/caffe/issues/171
# DEBUG := 1# The ID of the GPU that 'make runtest' will use to run unit tests.
TEST_GPUID := 0# enable pretty build (comment to see full commands)
Q ?= @LINKFLAGS := -Wl,-rpath,$(ANACONDA_HOME)/lib
下面是一些細節:
1. 首先必須安裝python2, 推薦直接安裝anaconda2, 例如:https://repo.anaconda.com/archive/Anaconda2-5.0.0.1-Linux-x86_64.sh?,并添加路徑到PATH環境變量。
2. opencv的安裝
對于opencv,需要安裝兩個版本,一個是python的,一個是系統的。
對于python,可以安裝?
pip install opencv-python==4.2.0.34直接安裝pip install opencv-python,可能出現 “ModuleNotFoundError: No module named 'skbuild'?#105”,因此推薦降級安裝。
參考:https://github.com/openvinotoolkit/dlstreamer_gst/issues/105
對于系統的安裝,方法為:
opencv一般安裝opencv 2.4.9, 首先下載opencv-2.4.9.zip源碼,并解壓:
unzip opencv-2.4.9.zip
cd opencv-2.4.9/
mkdir build;
cd build/
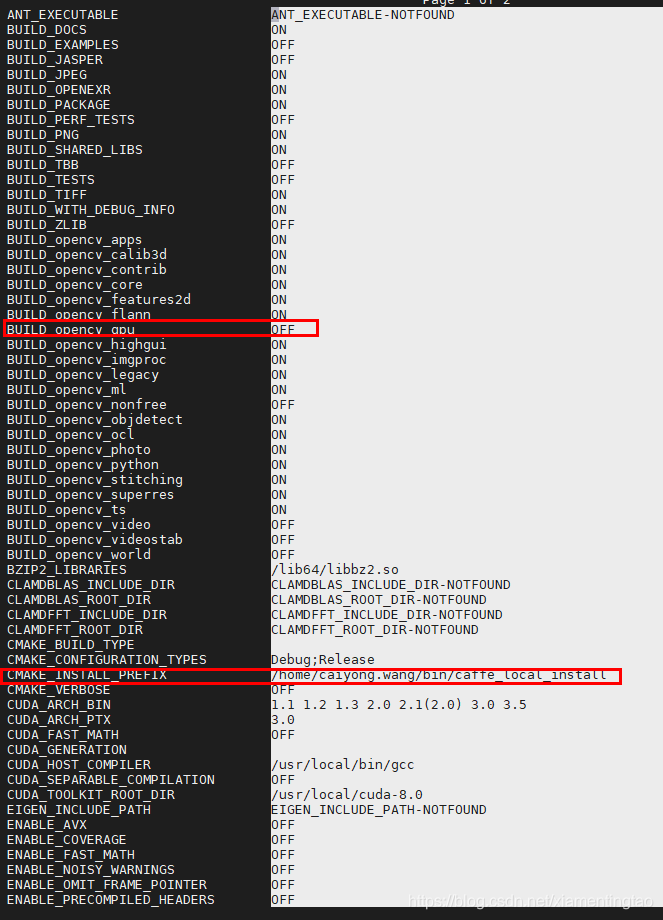
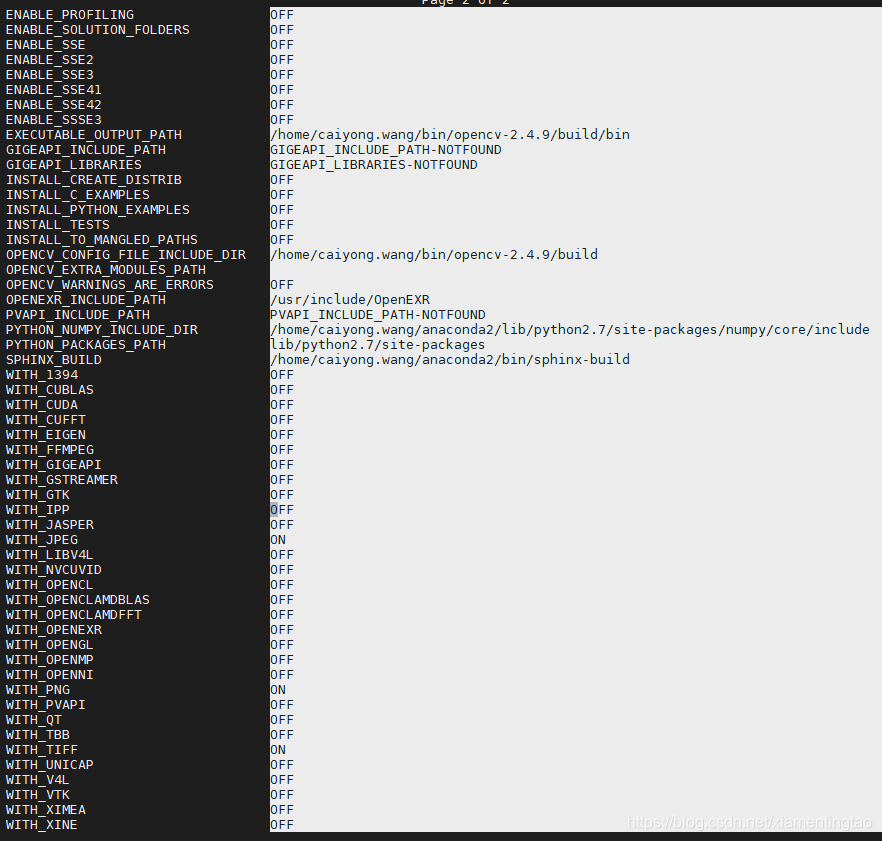
cmake ..
ccmake ..這里要用到cmake與ccmake,可以自己安裝,參考:?https://www.24kplus.com/linux/557.html
https://www.cnblogs.com/tosser/p/9905597.html
https://blog.csdn.net/sheqianweilong/article/details/102582668
注意編譯過程中需要加入:?
./bootstrap --prefix=/usr --datadir=share/cmake --docdir=doc/cmake --qt-gui && make // 參數--qt-gui是安裝cmake-gui,不想安裝可以省略?繼續回到opencv的安裝,注意在caffe中僅僅使用圖像讀取和縮放等在CPU上的簡單模塊,因此可以禁用大部分無關模塊以節省編譯時間。
然后進行編譯安裝,
make && make install至此安裝成功。安裝成功后,可以將opencv涉及到的bin,lib,pkgconfig填到~/.bashrc,
export PATH=/home/caiyong.wang/bin/caffe_local_install/bin:$PATH
export LD_LIBRARY_PATH=/home/caiyong.wang/bin/caffe_local_install/lib/:$LD_LIBRARY_PATHexport PKG_CONFIG_PATH=/home/caiyong.wang/bin/caffe_local_install/lib/pkgconfig/:$PKG_CONFIG_PATH
然后source ~/.bashrc刷新。
opencv安裝成功后,可以運行以下的程序進行測試,測試通過后,證明opencv安裝成功,可以順利安裝caffe.
先編輯一個main函數,命名為main.cpp:
#include <stdio.h>
#include <opencv2/opencv.hpp>
using namespace cv;
int main(void)
{  printf("%s\r\n", CV_VERSION);  printf("%u.%u.%u\r\n", CV_MAJOR_VERSION, CV_MINOR_VERSION, CV_SUBMINOR_VERSION);
}
然后執行:
?g++ -o main main.cpp `pkg-config opencv --cflags --libs`最后執行: ./main?
![]()
PS:對于pkgconfig的一些用法,如下:
[caiyong.wang@omnisky opencv_test]$ pkg-config --cflags opencv
-I/home/caiyong.wang/bin/caffe_local_install/include/opencv -I/home/caiyong.wang/bin/caffe_local_install/include
[caiyong.wang@omnisky opencv_test]$ pkg-config --libs opencv
/home/caiyong.wang/bin/caffe_local_install/lib/libopencv_calib3d.so /home/caiyong.wang/bin/caffe_local_install/lib/libopencv_core.so /home/caiyong.wang/bin/caffe_local_install/lib/libopencv_features2d.so /home/caiyong.wang/bin/caffe_local_install/lib/libopencv_flann.so /home/caiyong.wang/bin/caffe_local_install/lib/libopencv_highgui.so /home/caiyong.wang/bin/caffe_local_install/lib/libopencv_imgproc.so /home/caiyong.wang/bin/caffe_local_install/lib/libopencv_ml.so /home/caiyong.wang/bin/caffe_local_install/lib/libopencv_objdetect.so /home/caiyong.wang/bin/caffe_local_install/lib/libopencv_photo.so /home/caiyong.wang/bin/caffe_local_install/lib/libopencv_stitching.so /home/caiyong.wang/bin/caffe_local_install/lib/libopencv_ts.a -lrt -lpthread -lm -ldl
?
3.?protobuf的安裝
同上,也必須安裝兩個版本,一個是python,一個是系統。
python安裝:?直接pip install protobuf或者conda install protobuf。
系統安裝:參考:https://wangcaiyong.blog.csdn.net/article/details/78283336
參考:https://blog.csdn.net/dgyuanshaofeng/article/details/78151510
?


------parcel的起源)


![[Unity菜鳥] Time](http://pic.xiahunao.cn/[Unity菜鳥] Time)


![### C++總結-[類成員函數]](http://pic.xiahunao.cn/### C++總結-[類成員函數])


