繼上一次倒騰caffe安裝以后,因為博士畢業等原因,舊的服務器已經不能再使用,最近因論文等原因,不得不繼續來安裝一下我的caffe。這次運氣比較好,經歷了一晚上和一早上的痛苦之后,最終安裝成功了,而且由于使用極鏈AI云服務器或者AutoDL來安裝的,所以應該這次的可復現性更強,下面總結一些必要的地方,以幫助大家復現安裝我的caffe.?
首先需要選擇極鏈的云服務器。
?- nvidia cuda和gpu的選擇
這里我們使用的是極鏈-華北一區-GeForce RTX 2080 的gpu,cuda 10.1, python=2.7 ,禁用cudnn.


然后開始安裝后面的包。
如果是使用AutoDL的云服務器,則可以選擇:
?環境可以選擇Miniconda ?conda3、Python ?3.8 、 Cuda ?10.1,禁用cudnn.
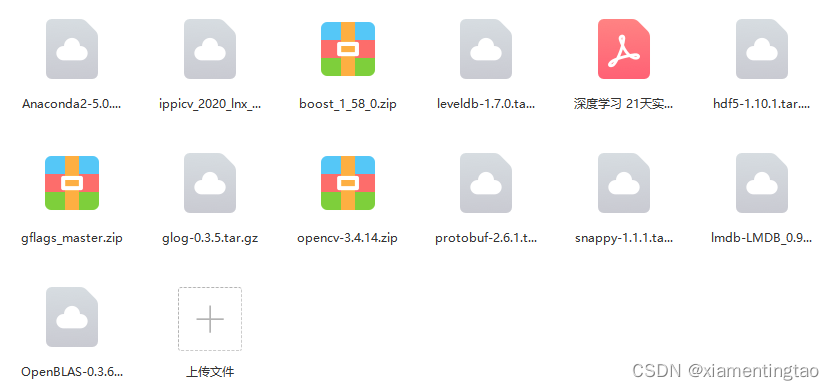
1. 首先仍然需要參考《深度學習:21天實戰caffe》的第5天那一章來進行安裝,最后的安裝列表為:
這里可以不管caffe和opencv,只要確保其他的文件如圖所示即可。
所有必備的caffe軟件【更新版】我們已經上傳到百度云盤,請大家需要的可以下載:
鏈接:https://pan.baidu.com/s/13P9PiTTnjOD6ZiiS4-dCBg?
提取碼:zlut
2. 在安裝各個包的過程中,一些包的安裝會有些困難,列舉如下:
?- Boost? (這里一定要強調把filesystem也要加上!)

?- glog?
初始時刻,我用glog-0.3.3.tar來安裝的,總是出錯,后來換成了glog-0.3.5.tar安裝,就對了。
- opencv
這里我們采用了opencv-3.4.14。 可以參考《復盤caffe安裝》來安裝opencv。
安裝過程中,可能會卡在IPPICV: Download: ippicv_2020_lnx_intel64_20191018_general.tgz,這時果斷停止編譯。從剛才的百度云盤中下載ippicv_2020_lnx_intel64_20191018_general.tgz,然后上傳到某一個位置,比如./opencv-3.4.14/3rdparty/ippicv/,
接著修改配置文件./opencv-3.4.14/3rdparty/ippicv/ippicv.cmake,
找到"https://raw.githubusercontent.com/opencv/opencv_3rdparty/${IPPICV_COMMIT}/ippicv/"
將其改為你保存ippicv_2020_lnx_intel64_20191018_general.tgz文件的路徑,
我的是./opencv-3.4.14/3rdparty/ippicv/,如下:

最后再來編譯。
unzip opencv-2.4.9.zip
cd opencv-2.4.9/
mkdir build;
cd build/
cmake ..  ## 初始時嘗試這個命令,如果遇到ippicv的問題,則離線下載并修改路徑后,執行下一條命令
cmake -D CMAKE_BUILD_TYPE=Release -D CMAKE_INSTALL_PREFIX=YOUR_INSTALL_PATH ..
make && make install
注意這里可以不用ccmake .. 也可以。
-------------------------------------------------------------------------------------------
opencv安裝需要花費較多時間。安裝完成以后,為了能后面使用opencv.pc,需要在root或者home下面的bashrc中增加如下命令,然后使用 source ~/.bashrc更新。
export PATH="/user-data/caffe_local_install/bin/:$PATH"
export PKG_CONFIG_PATH=/user-data/caffe_local_install/lib/pkgconfig/:$PKG_CONFIG_PATH
export LD_LIBRARY_PATH=/user-data/caffe_local_install/lib:$LD_LIBRARY_PATH
##(靜態庫搜索路徑) 程序編譯期間查找動態鏈接庫時指定查找共享庫的路徑
export LIBRARY_PATH=/user-data/caffe_local_install/lib:$LIBRARY_PATH ##c程序頭文件搜索路徑
export C_INCLUDE_PATH=/user-data/caffe_local_install/include:$C_INCLUDE_PATH
##c++程序頭文件搜索路徑
export CPLUS_INCLUDE_PATH=/user-data/caffe_local_install/include:$CPLUS_INCLUDE_PATH
這樣以后,就可以查看是否安裝成功
pkg-config --modversion opencv 顯示opencv版本。?
-? python依賴包的安裝
我們需要提前創造一個python2.7的虛擬環境caffe.?
由于極鏈已經預裝了anaconda,所以可以直接創造虛擬環境,否則應該先按照anaconda, 再創建虛擬環境。 可參考:安裝依賴庫常用命令 - 極鏈AI云支持中心
conda create -n your_env_name python=X.X(2.7、3.6等)我的為:
conda create -n caffe python=2.7
接著開始按照如下的python包
pip install opencv-python==4.2.0.32
pip install opencv-python==4.1.1.26  #二選一
pip install protobuf==2.6.1
pip install scikit-image==0.14.2
3. 配置Makefile.config文件,
cp Makefile.config.example Makefile.config
## Refer to http://caffe.berkeleyvision.org/installation.html
# Contributions simplifying and improving our build system are welcome!# cuDNN acceleration switch (uncomment to build with cuDNN).USE_CUDNN := 0# CPU-only switch (uncomment to build without GPU support).
# CPU_ONLY := 1# uncomment to disable IO dependencies and corresponding data layers
# USE_OPENCV := 0
# USE_LEVELDB := 0
# USE_LMDB := 0# uncomment to allow MDB_NOLOCK when reading LMDB files (only if necessary)
#	You should not set this flag if you will be reading LMDBs with any
#	possibility of simultaneous read and write
# ALLOW_LMDB_NOLOCK := 1# Uncomment if you're using OpenCV 3OPENCV_VERSION := 3# To customize your choice of compiler, uncomment and set the following.
# N.B. the default for Linux is g++ and the default for OSX is clang++
# CUSTOM_CXX := g++# CUDA directory contains bin/ and lib/ directories that we need.
CUDA_DIR := /usr/local/cuda
# On Ubuntu 14.04, if cuda tools are installed via
# "sudo apt-get install nvidia-cuda-toolkit" then use this instead:
# CUDA_DIR := /usr# CUDA architecture setting: going with all of them.
# For CUDA < 6.0, comment the *_50 through *_61 lines for compatibility.
# For CUDA < 8.0, comment the *_60 and *_61 lines for compatibility.
CUDA_ARCH :=-gencode arch=compute_30,code=sm_30 \-gencode arch=compute_35,code=sm_35 \-gencode arch=compute_50,code=sm_50 \-gencode arch=compute_52,code=sm_52 \-gencode arch=compute_60,code=sm_60 \-gencode arch=compute_61,code=sm_61 \-gencode arch=compute_61,code=compute_61# BLAS choice:
# atlas for ATLAS (default)
# mkl for MKL
# open for OpenBlas
BLAS := open
# Custom (MKL/ATLAS/OpenBLAS) include and lib directories.
# Leave commented to accept the defaults for your choice of BLAS
# (which should work)!
BLAS_INCLUDE := /user-data/caffe_local_install/include
BLAS_LIB := /user-data/caffe_local_install/lib# Homebrew puts openblas in a directory that is not on the standard search path
# BLAS_INCLUDE := $(shell brew --prefix openblas)/include
# BLAS_LIB := $(shell brew --prefix openblas)/lib# This is required only if you will compile the matlab interface.
# MATLAB directory should contain the mex binary in /bin.
# MATLAB_DIR :=  /data1/caiyong.wang/bin/matlab/
# MATLAB_DIR := /Applications/MATLAB_R2012b.app# NOTE: this is required only if you will compile the python interface.
# We need to be able to find Python.h and numpy/arrayobject.h.
# PYTHON_INCLUDE := /usr/include/python2.7 \
#		/usr/lib/python2.7/dist-packages/numpy/core/include
# Anaconda Python distribution is quite popular. Include path:
# Verify anaconda location, sometimes it's in root.ANACONDA_HOME := /opt/conda/envs/caffePYTHON_INCLUDE := $(ANACONDA_HOME)/include \$(ANACONDA_HOME)/include/python2.7 \$(ANACONDA_HOME)/lib/python2.7/site-packages/numpy/core/include# Uncomment to use Python 3 (default is Python 2)
# PYTHON_LIBRARIES := boost_python3 python3.5m
# PYTHON_INCLUDE := /usr/include/python3.5m \
#                 /usr/lib/python3.5/dist-packages/numpy/core/include# We need to be able to find libpythonX.X.so or .dylib.
# PYTHON_LIB := /usr/libPYTHON_LIB := $(ANACONDA_HOME)/lib# Homebrew installs numpy in a non standard path (keg only)
# PYTHON_INCLUDE += $(dir $(shell python -c 'import numpy.core; print(numpy.core.__file__)'))/include
# PYTHON_LIB += $(shell brew --prefix numpy)/lib# Uncomment to support layers written in Python (will link against Python libs)WITH_PYTHON_LAYER := 1# Whatever else you find you need goes here.
INCLUDE_DIRS := /user-data/caffe_local_install/include  $(PYTHON_INCLUDE) /usr/local/include /usr/include
LIBRARY_DIRS := /user-data/caffe_local_install/lib  $(PYTHON_LIB) /usr/local/lib /usr/lib  /usr/lib64/ # If Homebrew is installed at a non standard location (for example your home directory) and you use it for general dependencies
# INCLUDE_DIRS += $(shell brew --prefix)/include
# LIBRARY_DIRS += $(shell brew --prefix)/lib# NCCL acceleration switch (uncomment to build with NCCL)
# https://github.com/NVIDIA/nccl (last tested version: v1.2.3-1+cuda8.0)
# USE_NCCL := 1# Uncomment to use `pkg-config` to specify OpenCV library paths.
# (Usually not necessary -- OpenCV libraries are normally installed in one of the above $LIBRARY_DIRS.)
USE_PKG_CONFIG := 1# N.B. both build and distribute dirs are cleared on `make clean`
BUILD_DIR := build
DISTRIBUTE_DIR := distribute# Uncomment for debugging. Does not work on OSX due to https://github.com/BVLC/caffe/issues/171
# DEBUG := 1# The ID of the GPU that 'make runtest' will use to run unit tests.
TEST_GPUID := 0# enable pretty build (comment to see full commands)
Q ?= @
編譯caffe
# Adjust Makefile.config (for example, if using Anaconda Python, or if cuDNN is desired)
make all -j8
make pycaffe
編譯到最后的結果:

4. 編輯root或者home下面的bashrc,?
export PYTHONPATH=/user-data/software/caffe_tifs/python/:$PYTHONPATH確保編譯成功的caffe被添加到python的路徑中,最終新增的命令匯總為:
export PATH="/user-data/caffe_local_install/bin/:$PATH"
export PKG_CONFIG_PATH=/user-data/caffe_local_install/lib/pkgconfig/:$PKG_CONFIG_PATH
export PYTHONPATH=/user-data/software/caffe_tifs/python/:$PYTHONPATH
export LD_LIBRARY_PATH=/user-data/caffe_local_install/lib:$LD_LIBRARY_PATH
##(靜態庫搜索路徑) 程序編譯期間查找動態鏈接庫時指定查找共享庫的路徑
export LIBRARY_PATH=/user-data/caffe_local_install/lib:$LIBRARY_PATH ##c程序頭文件搜索路徑
export C_INCLUDE_PATH=/user-data/caffe_local_install/include:$C_INCLUDE_PATH
##c++程序頭文件搜索路徑
export CPLUS_INCLUDE_PATH=/user-data/caffe_local_install/include:$CPLUS_INCLUDE_PATH
使用 source ~/.bashrc更新。
5. 驗證caffe是否安裝成功
?至此安裝成功。
6. 保存鏡像
安裝好的caffe環境可以保存成鏡像,以便在租用不同的gpu時快速創建caffe。


 返回 true)


![通過擴展改善ASP.NET MVC的驗證機制[實現篇]](http://pic.xiahunao.cn/通過擴展改善ASP.NET MVC的驗證機制[實現篇])


介紹和入門)


![[Hadoop] - 自定義Mapreduce InputFormatOutputFormat](http://pic.xiahunao.cn/[Hadoop] - 自定義Mapreduce InputFormatOutputFormat)

