Vue+ElementUI實現學生管理
代碼: qiushiju/java2313_vue_elementui_crud (gitee.com)
一、思考
-
考慮需求(登錄,查詢全部,基本增刪改查,分頁,搜索,批量)

- 設計數據庫
- 搭建項目
- 后端項目(day39_springboot_curd)已經完成
- 前端項目(暫無)ps:前端寫的接口數據 需要和后端一致
二、搭建前端項目
2.1 使用vue-cli創建項目,選擇router,vuex
2.2 安裝所需axios,elementui
# 安裝依賴
npm install --save axios vue-axios
npm i element-ui -S
// 在main.js中配置axios,element
import ElementUI from 'element-ui';
import 'element-ui/lib/theme-chalk/index.css';
Vue.use(ElementUI);// axios
import axios from "axios";
axios.defaults.baseURL = 'http://localhost:8888'// 添加Axios響應攔截器
axios.interceptors.response.use(function (response) {//console.log('響應攔截',response)return response.data;
}, function (error) {console.log(error)
});
2.3 自帶About,HomeView,HelloWorld組件刪除
三、登錄頁
考慮: 項目默認訪問首頁是登錄頁.怎么實現?
解決: 在路由表中定義/路徑匹配Login.vue
App.vue中只保留一個路由 出口<router-view/>
const routes = [{path: '/',component: View1Login}
]
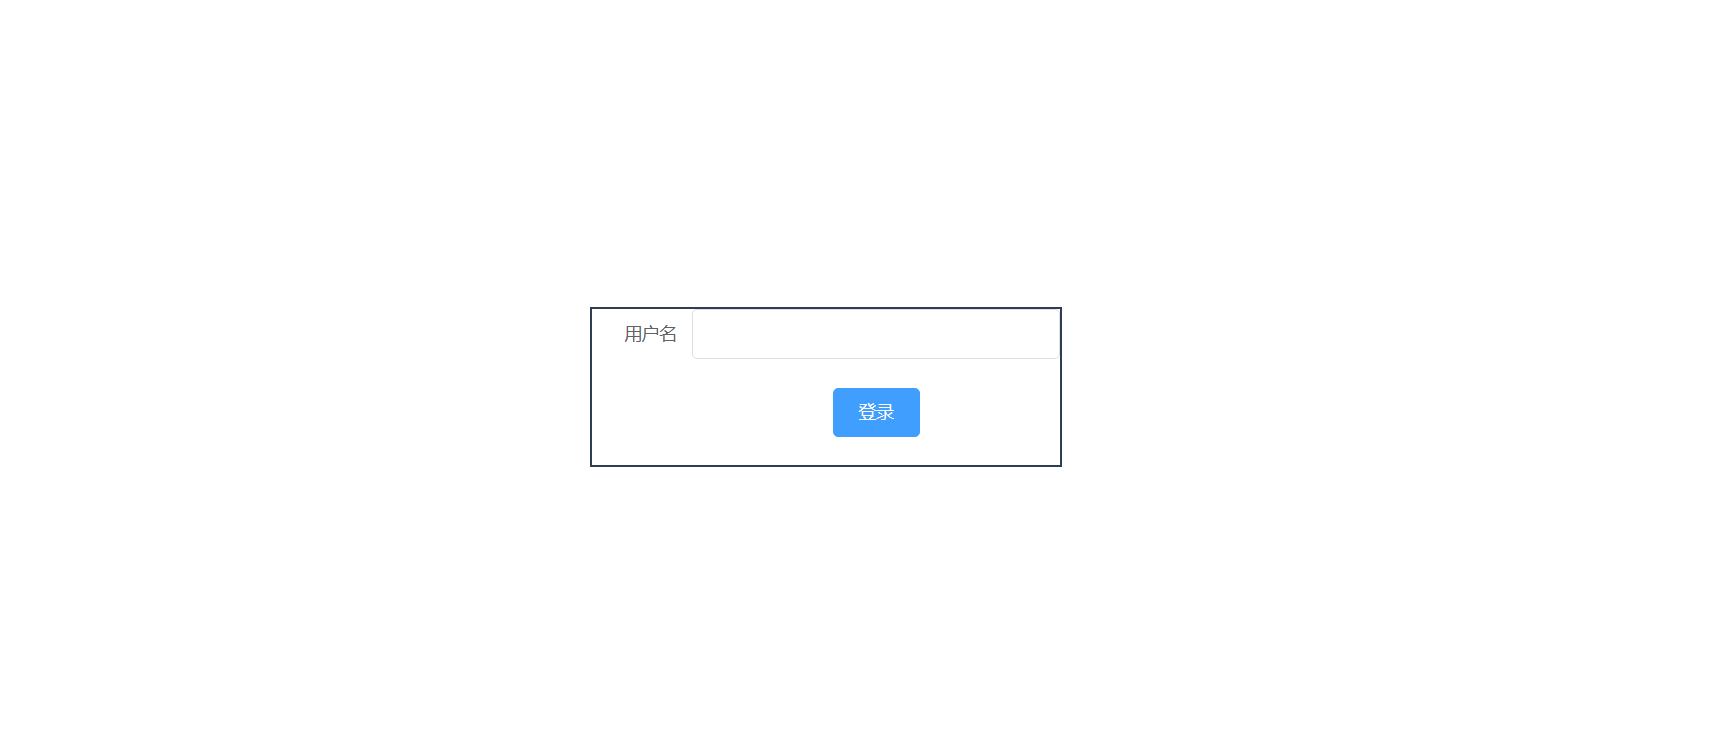
登錄頁View1Login.vue
<template>
<div><el-row class="c1"><el-col class="c1" :span="6" :offset="9"><div class="c2"><el-form ref="form" :model="stu" label-width="80px"><el-form-item label="用戶名"><el-input v-model="stu.sname"></el-input></el-form-item><el-form-item><el-button type="primary" @click="onSubmit">登錄</el-button></el-form-item></el-form></div></el-col></el-row>
</div>
</template><script>
import axios from "axios";
export default {name: "View1Login",data(){return  {stu:{sname:""}}},methods:{onSubmit(){// axios.post('/stu/login',{},{//   params:{//     username:this.stu.sname//   }// })// console.log(this.stu.sname)axios.post('/stu/login',{sname:this.stu.sname}).then(ret => {if (ret.code==20000){this.$message({message:"登錄成功",type:"success",duration:700})// TODO 跳轉頁面}else{this.$message({message:"登錄失敗",type:"error",duration:700})}})}}
}
</script><style scoped>
.c1 {margin-top: 150px;
}
.c2{border: 2px #2c3e50 solid;
}
</style>
擴展: 輸入框輸入完,提示該人是否注冊
登錄成功后,跳轉主頁
onSubmit(){axios.post('/stu/login',{sname:this.stu.sname}).then(ret => {if (ret.code==20000){this.$message({message:"登錄成功",type:"success",duration:700})// 登陸成功 ,要跳轉主頁this.$router.push('/admin')}else{this.$message({message:"登錄失敗",type:"error",duration:700})}})}
四、主頁
思考:
- 登錄成功后,App.vue頁面切換成主頁
- 主頁面需要容器布局,在右側main主頁內容這里還能 再切換其后頁面
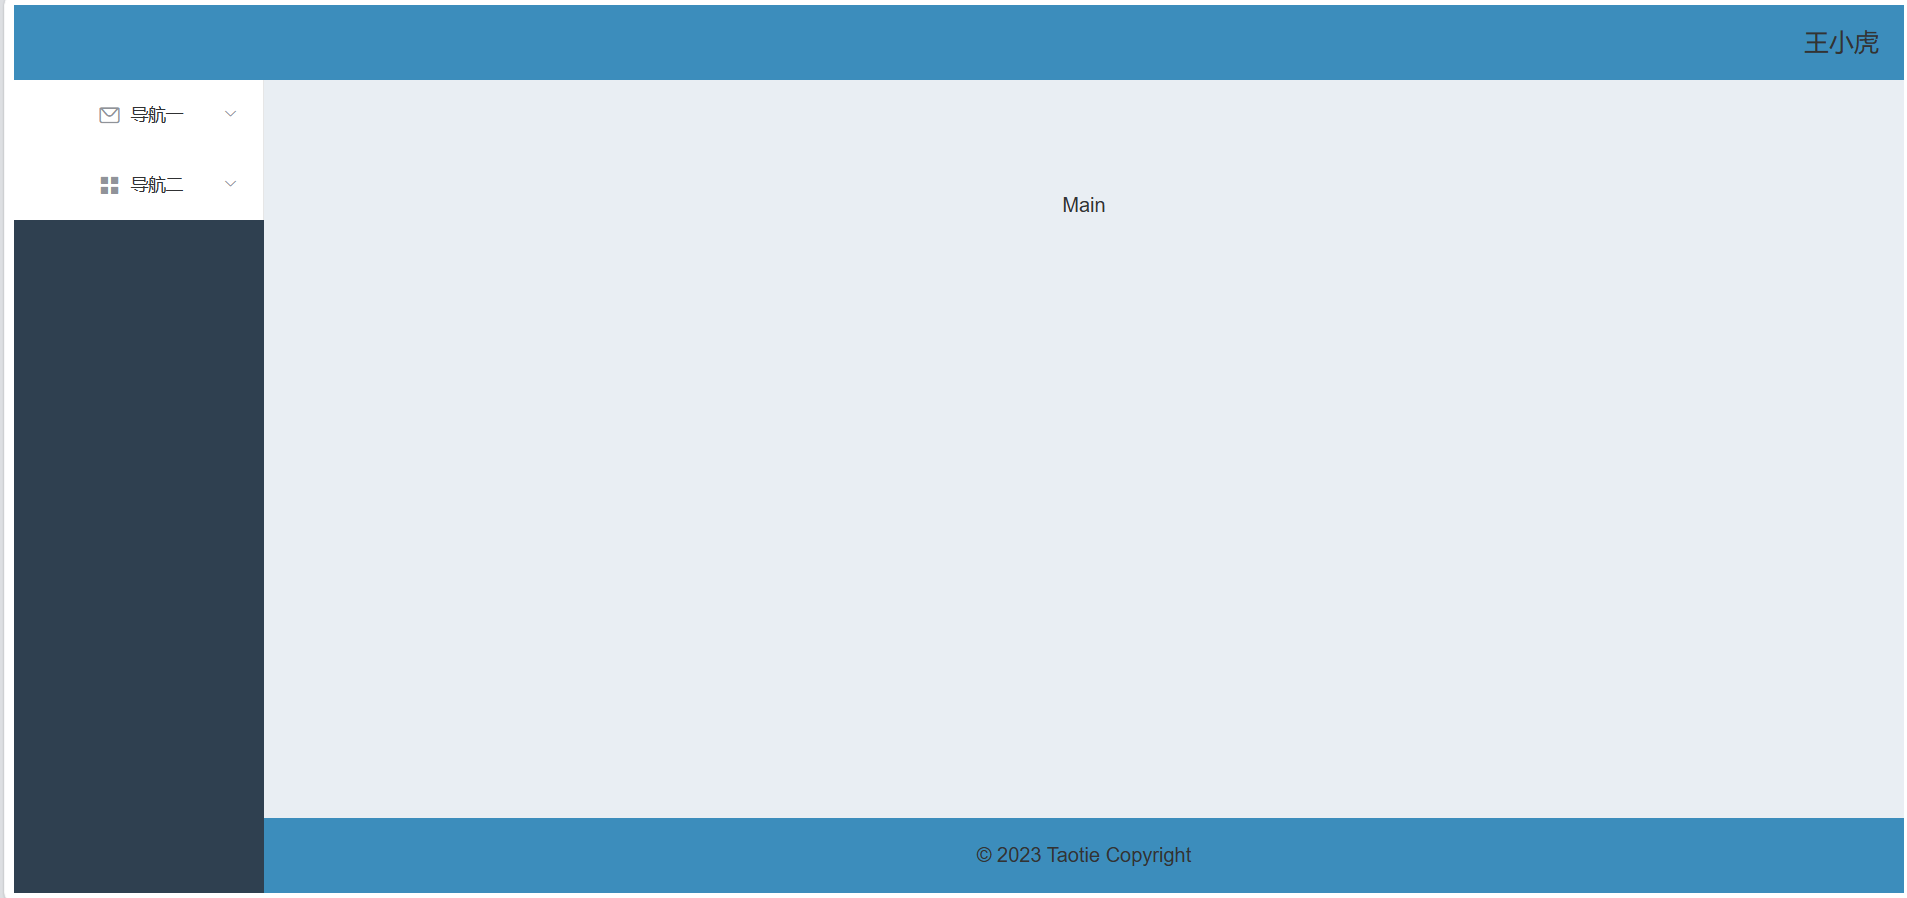
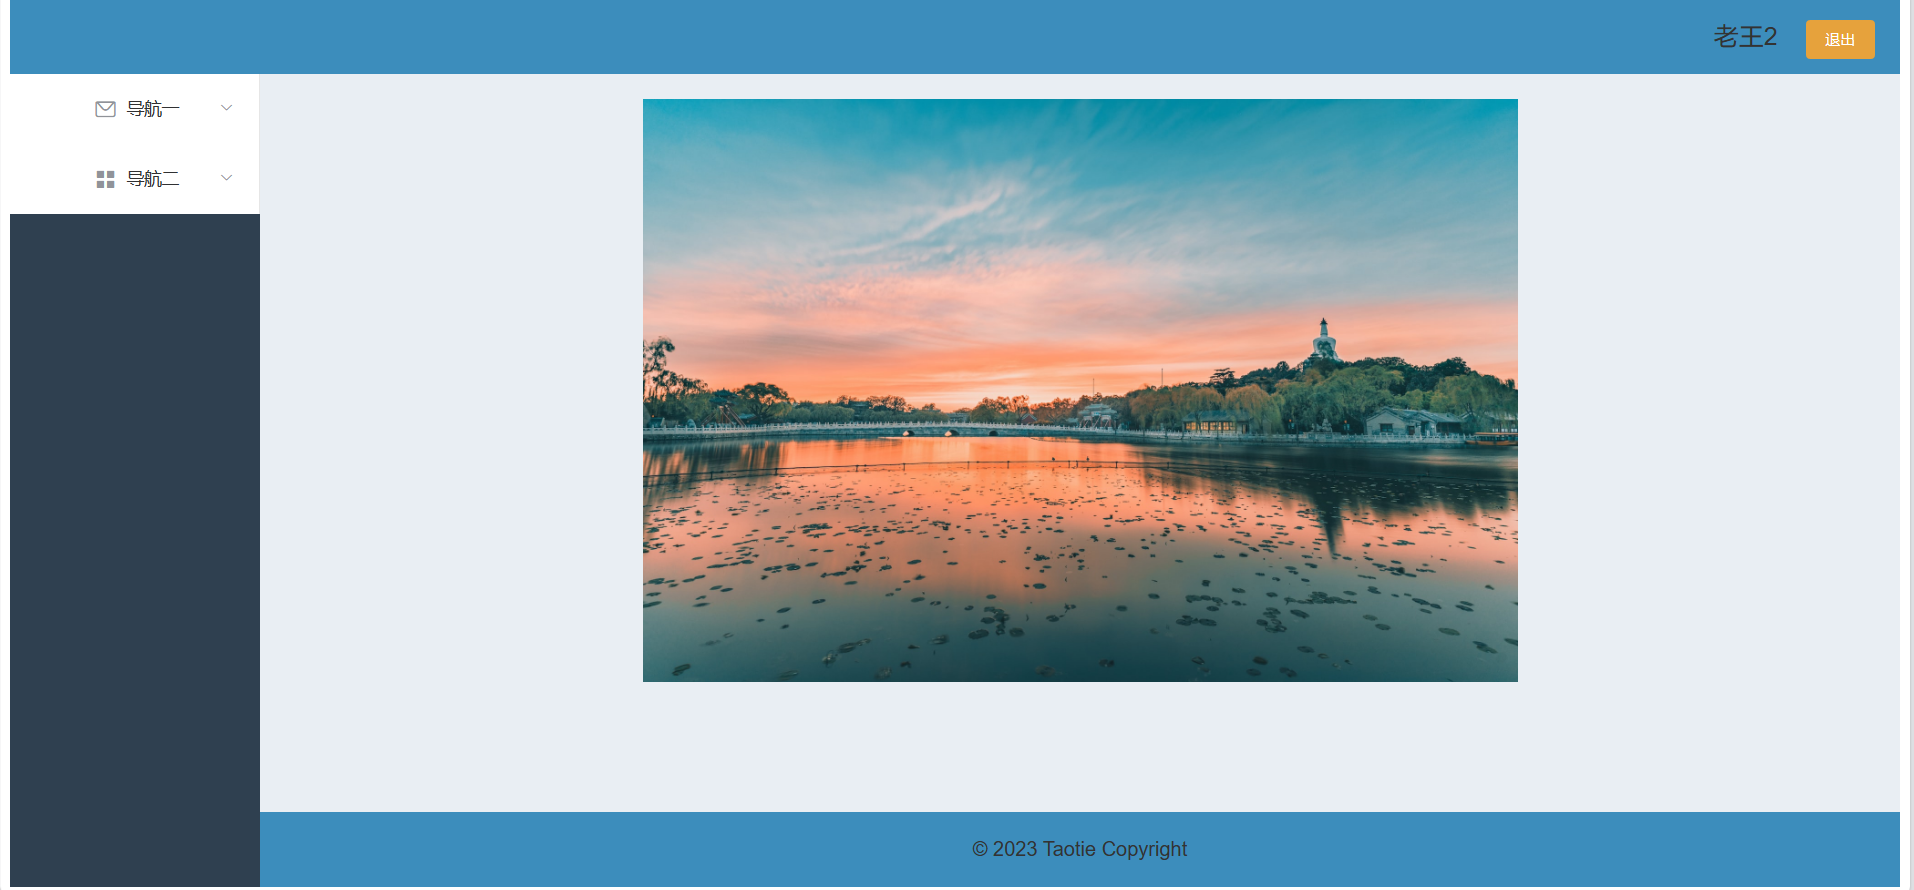
首先,創建View2Admin.vue主頁,布局效果
<template>
<div><el-container><el-header style="text-align: right; font-size: 20px"><span>王小虎</span></el-header><el-container><el-aside width="200px"><el-menu><el-submenu index="1"><template slot="title"><i class="el-icon-message"></i>導航一</template><el-menu-item index="1-1">選項1</el-menu-item><el-menu-item index="1-2">選項2</el-menu-item></el-submenu><el-submenu index="2"><template slot="title"><i class="el-icon-menu"></i>導航二</template><el-menu-item index="2-1">選項1</el-menu-item><el-menu-item index="2-2">選項2</el-menu-item></el-submenu></el-menu></el-aside><el-container><el-main>Main</el-main><el-footer>? 2023 Taotie Copyright</el-footer></el-container></el-container></el-container>
</div>
</template><script>
export default {name: "View2Admin"
}
</script><style scoped>
.el-header, .el-footer {background-color: #3c8dbc;color: #333;text-align: center;line-height: 60px;
}.el-aside {background-color: #2f4050;color: white;text-align: center;line-height: 200px;height: 650px;
}.el-main {background-color: #E9EEF3;color: #333;text-align: center;line-height: 160px;
}body > .el-container {margin-bottom: 40px;
}.el-container:nth-child(5) .el-aside,
.el-container:nth-child(6) .el-aside {line-height: 260px;
}.el-container:nth-child(7) .el-aside {line-height: 320px;
}
</style>
五、用戶名
- 現在vuex中設置用戶名變量
- 登錄時存入state
- 主頁中取出
// vuex
export default new Vuex.Store({state: {username:"" // 設置變量名},mutations: {setUsername(state,v){  // 提供一個改變用戶名的方式state.username = v;}}
})
// 登錄時存入state
axios.post('/stu/login',{sname:this.stu.sname}).then(ret => {if (ret.code==20000){this.$message({message:"登錄成功",type:"success",duration:700})// 存儲用戶名this.$store.commit('setUsername',ret.data.sname)// 登陸成功 ,要跳轉主頁this.$router.push('/admin')}else{this.$message({message:"登錄失敗",type:"error",duration:700})}})
// 主頁中取出
<script>
import {mapState}  from 'vuex'
export default {name: "View2Admin",// computed:{//   username(){//     return this.$store.state.username//   }// }computed:mapState(['username'])
}
</script>
六、退出按鈕
<el-header style="text-align: right; font-size: 20px"><span>{{username}}</span> <span><el-button @click="logout" type="warning" size="small">退出</el-button></span></el-header>
methods:{logout(){this.$router.push("/")}}
七、歡迎頁
登錄成功,跳轉主頁,主頁先不展示數據,而是展示歡迎頁
創建歡迎頁,引入圖片
<template>
<div><img width="700px" src="../assets/bgm.jpg" alt="背景圖">
</div>
</template><script>
export default {name: "View3Welcome"
}
</script><style scoped></style>
Admin.vue中設置路由出口
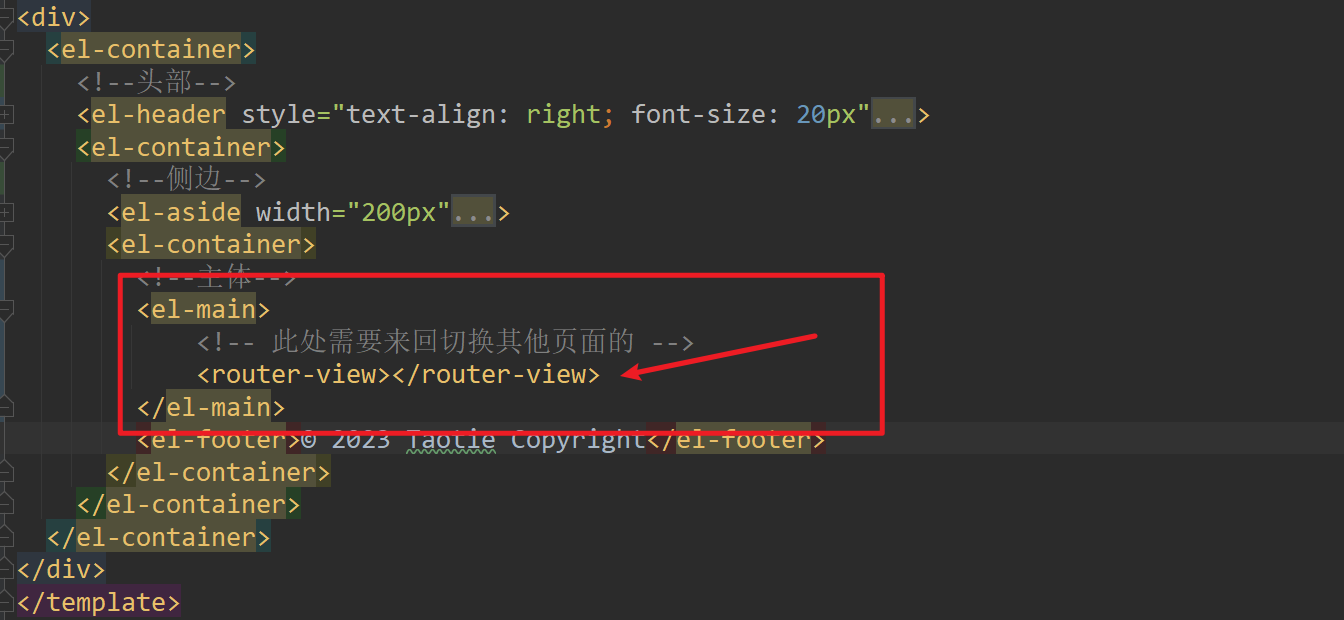
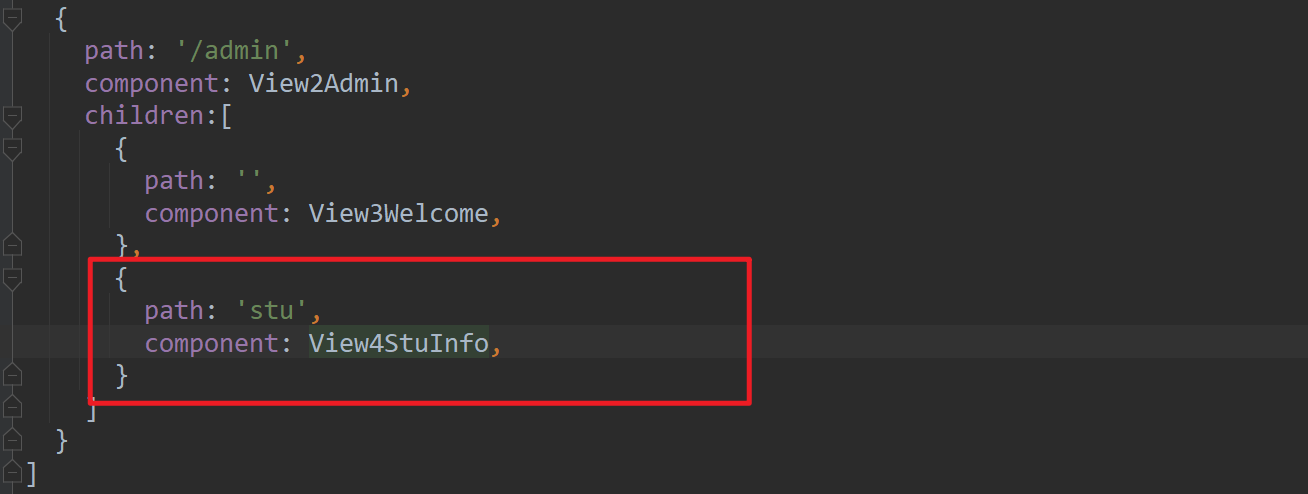
router/index.js路由表給admin設置子路由,目的是訪問主頁時,默認跳轉至歡迎頁
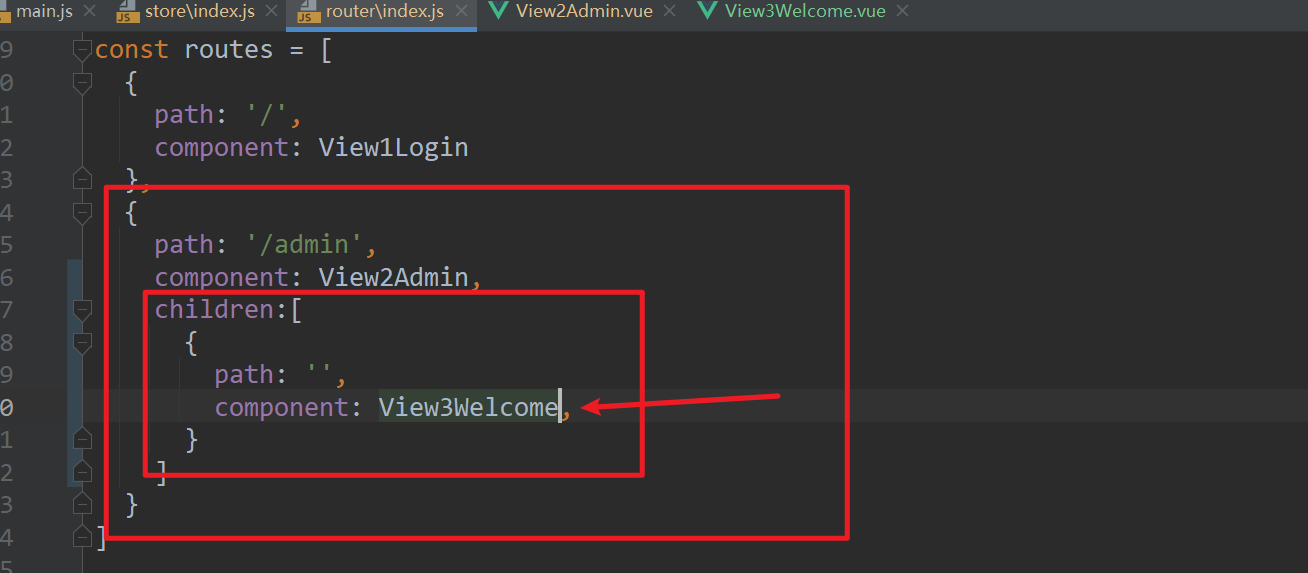
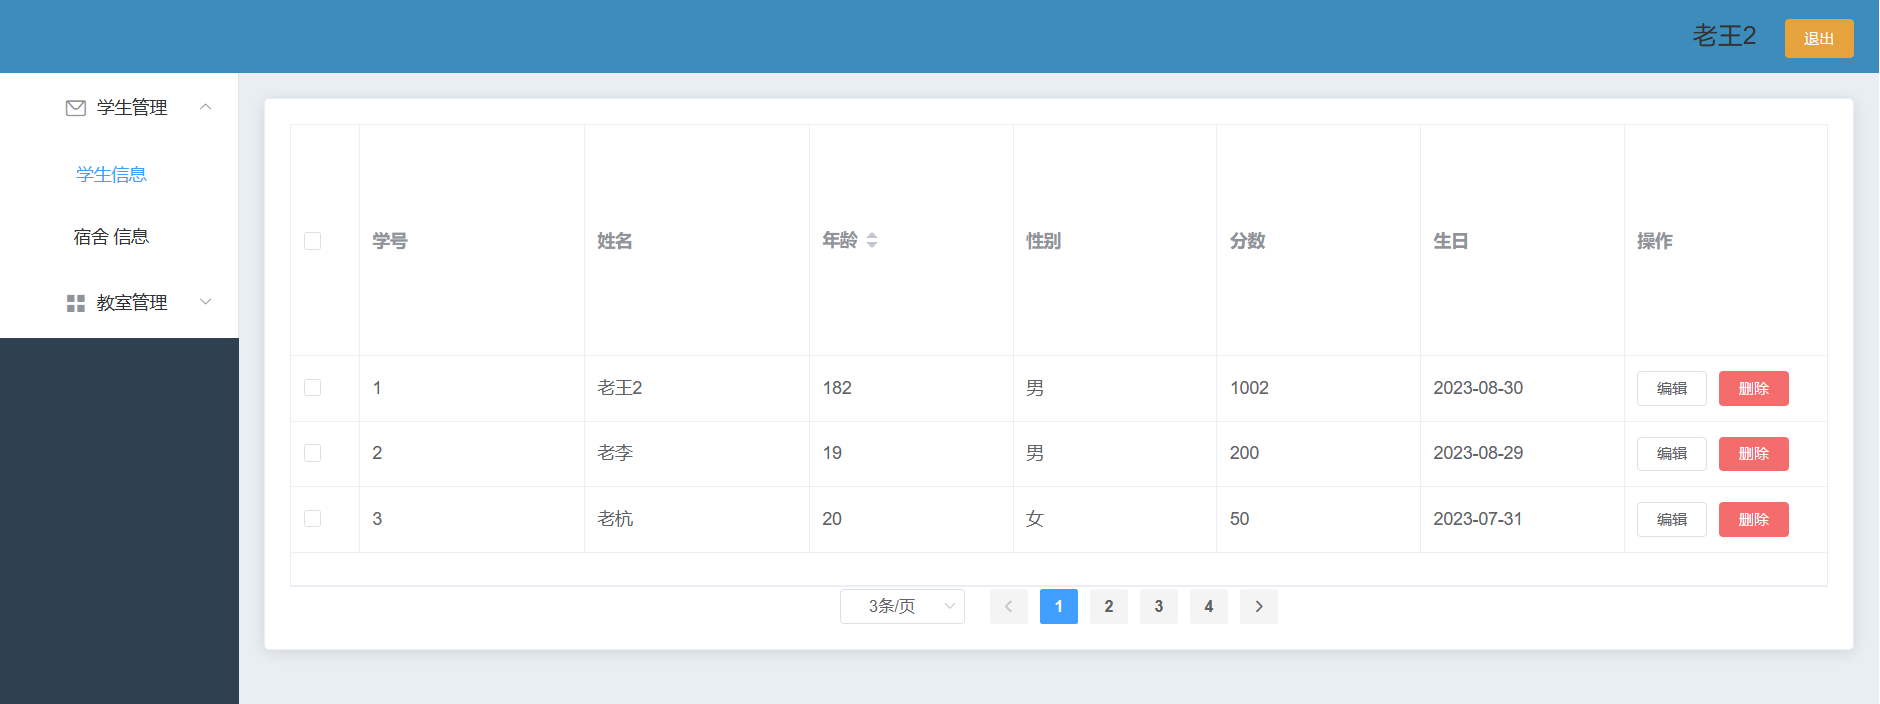
八、學生列表
思路: 點擊左邊菜單,路由到Admin的內部(即,子路由),分頁展現所有學生信息
// 創建學生信息頁,寫table組件展示數據,在生命周期函數發請求查數據,給data中變量賦值
<template>
<div>
<!--  卡片-->
<el-card :body-style="{ padding: '20px',height:'400px' }"><!-- TODO: 表頭行高度需要修改!!:header-row-style設置無效!! --><el-table:data="stuList"style="width: 100%"border:header-row-style="{ height: '5px' }"><el-table-columntype="selection"width="55"></el-table-column><!-- label是列名,prop是對象的屬性  --><el-table-columnlabel="學號"prop="id"width="180"></el-table-column><el-table-columnprop="sname"label="姓名"width="180"></el-table-column><el-table-columnprop="age"label="年齡"sortable></el-table-column><el-table-columnprop="sex"label="性別"></el-table-column><el-table-columnprop="score"label="分數"></el-table-column><el-table-columnprop="birthday"label="生日"></el-table-column></el-table>
</el-card>
</div>
</template><script>
import axios from "axios";
export default {name: "View4StuInfo",data(){return {stuList:[]}},// 定義生命周期函數,頁面加載完即展現數據created() {axios.get('/stu/list',{params:{pageNum:1  // 默認訪問第一頁}}).then(ret => {if (ret.code == 20000){// ret.data是后端返回的PageInfoconsole.log(ret.data)this.stuList= ret.data.list;} else {this.$message.error('后臺請求錯誤')}})}
}
</script><style scoped></style>
// 主頁面,左側菜單,點擊路由跳轉至學生頁
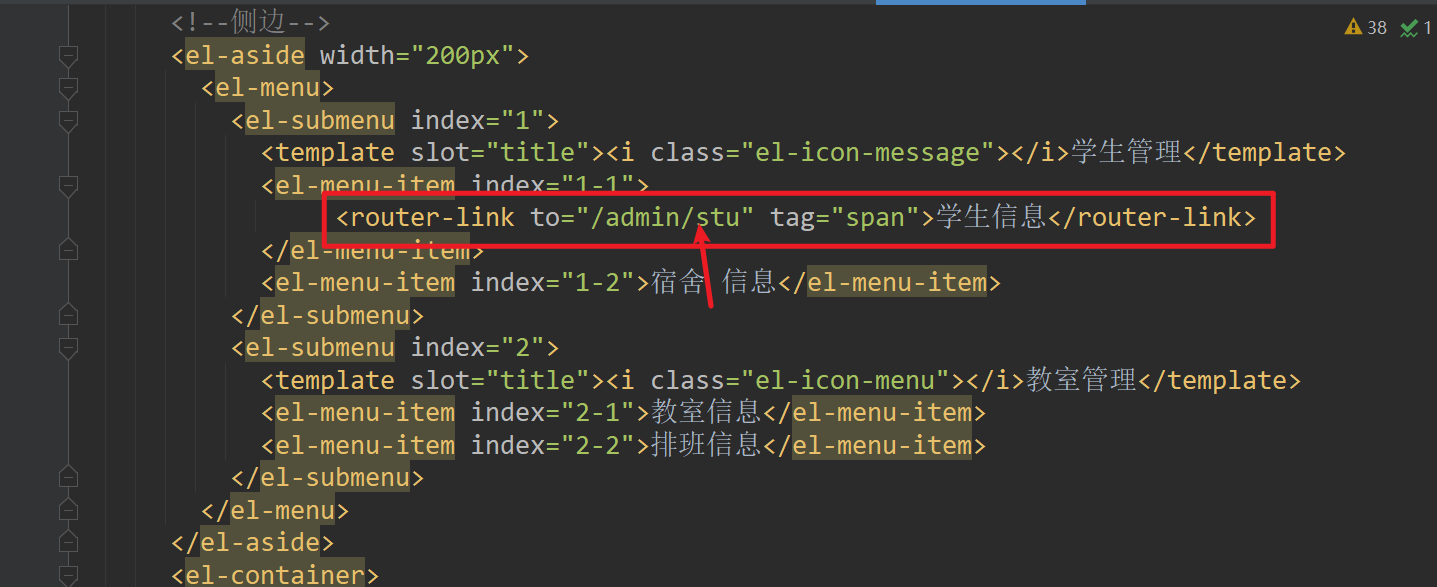
// 經過路由表映射,到admin的子路由中
九、分頁查詢
1)設置分頁組件
2) 設置對應的 函數
<template>
<div>
<!--  卡片-->
<el-card :body-style="{ padding: '20px',height:'400px' }"><!-- TODO: 表頭行高度需要修改!!:header-row-style設置無效!! --><el-table:data="stuList"style="width: 100%"border:header-row-style="{ height: '5px' }"height="370px"><el-table-columntype="selection"width="55"></el-table-column><!-- label是列名,prop是對象的屬性  --><el-table-columnlabel="學號"prop="id"width="180"></el-table-column><el-table-columnprop="sname"label="姓名"width="180"></el-table-column><el-table-columnprop="age"label="年齡"sortable></el-table-column><el-table-columnprop="sex"label="性別"></el-table-column><el-table-columnprop="score"label="分數"></el-table-column><el-table-columnprop="birthday"label="生日"></el-table-column><el-table-column label="操作"><template slot-scope="scope"><el-buttonsize="mini">編輯</el-button><el-buttonsize="mini"type="danger">刪除</el-button></template></el-table-column></el-table><div><!--@size-change="handleSizeChange"      頁面大小改變會觸發函數@current-change="handleCurrentChange"當前頁改變 觸發函數:current-page.sync="currentPage":page-sizes="[3, 6, 9]"   演示每頁大小列表:page-size="pageSize"     綁定頁面大小,下方data中定義變量layout="sizes,prev, pager, next"  外觀顯示效果:total="total">   總條數,下方data中定義變量--><el-paginationbackground@size-change="handleSizeChange"@current-change="handleCurrentChange":current-page.sync="currentPage":page-sizes="[3, 6, 9]":page-size="pageSize"layout="sizes,prev, pager, next":total="total"></el-pagination></div>
</el-card>
</div>
</template><script>
import axios from "axios";
export default {name: "View4StuInfo",data(){return {stuList:[],currentPage: 1,pageSize: 3,total: 0,}},methods:{// 抽取查詢數據的方法,可以復用getData(){axios.get('/stu/list',{params:{pageNum:this.currentPage,  // 默認訪問第一頁pageSize: this.pageSize}}).then(ret => {if (ret.code == 20000){// ret.data是后端返回的PageInfoconsole.log(ret.data)this.stuList= ret.data.list;this.total=ret.data.total;} else {this.$message.error('后臺請求錯誤')}})},// 頁面大小變化時,改變pageSizehandleSizeChange(val) {this.pageSize = val;this.getData();},// 當前頁變化,即跳轉頁面時handleCurrentChange(val) {this.currentPage = val;// 重新查詢當前頁數據this.getData();},},// 定義生命周期函數,頁面加載完即展現數據created() {this.getData();}
}
</script><style scoped></style>
十、添加
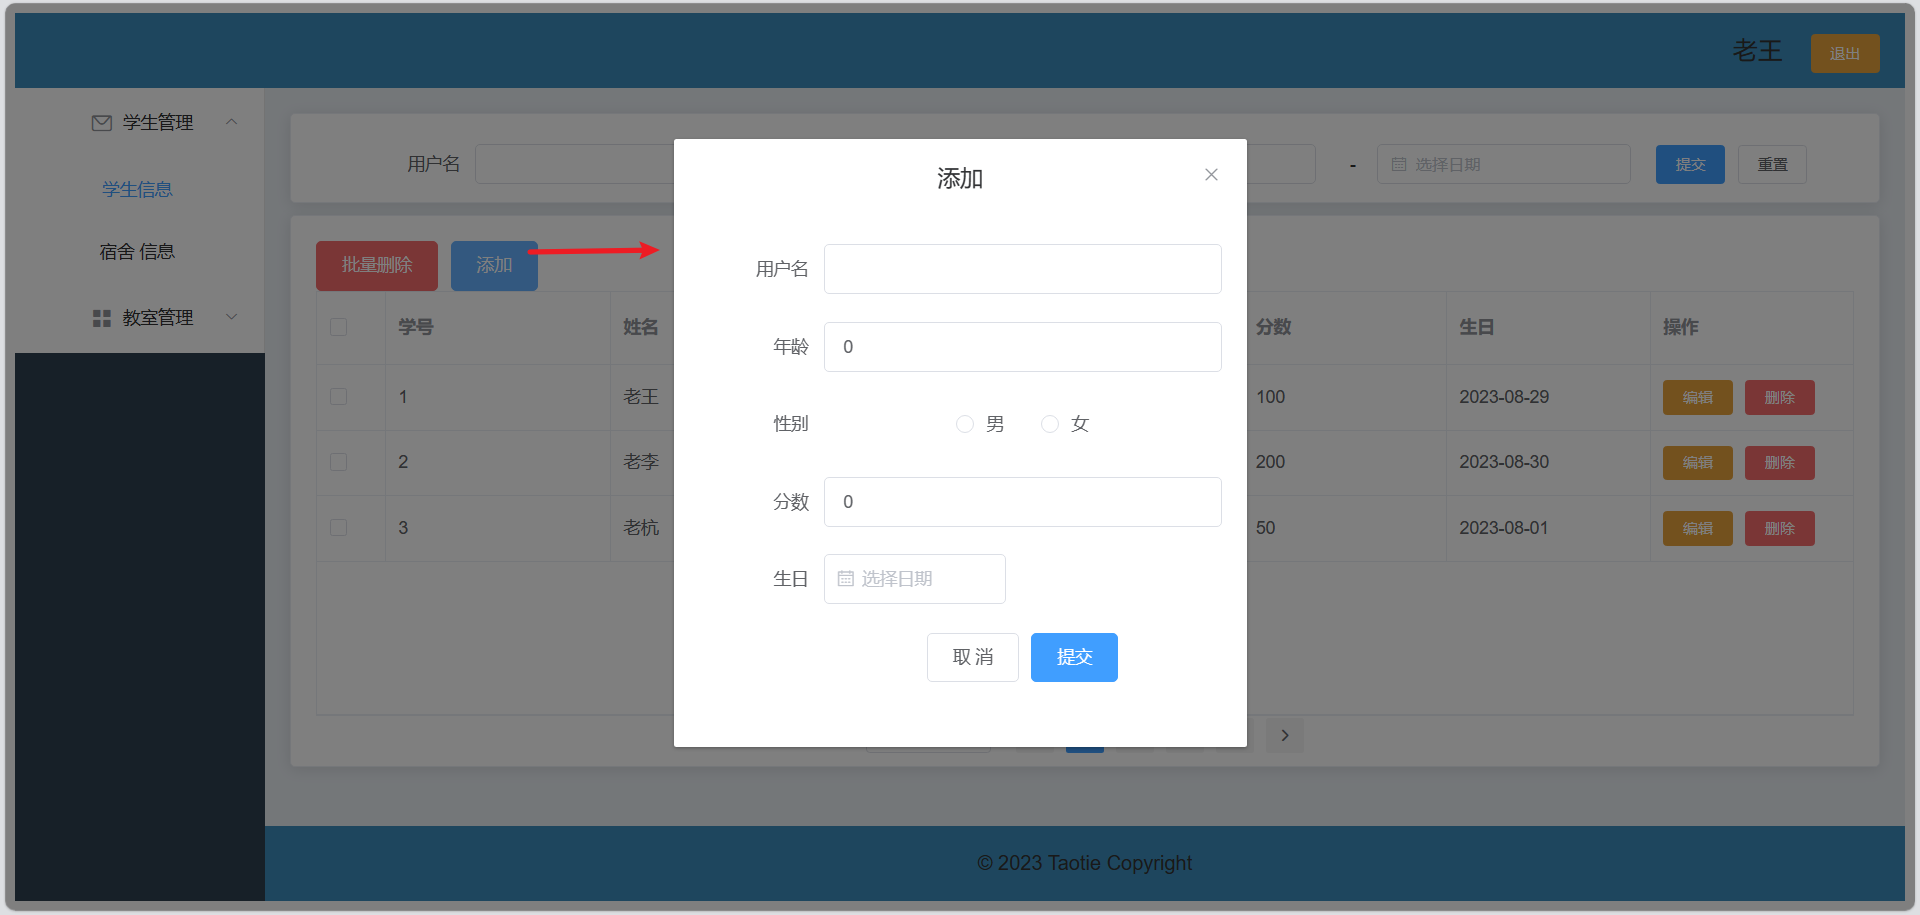
需求:
1)表格上方設置添加按鈕
2)彈出彈出層對話框
3)其中設置表單
4)點擊保存,插入數據庫
5)對話框隱藏,查詢最新數據
在StuInfo.vue中添加對話框和對應的js
<template>
<div>
<!--  卡片-->
<el-card :body-style="{ padding: '20px',height:'400px' }"><div style="text-align: left"><el-button type="danger">批量刪除</el-button><!-- 顯示/隱藏對話框,通過變量 --><el-button type="primary" @click="addDialogVisible = true">添加</el-button></div><!-- 添加對話框,默認是隱藏 --><el-dialogtitle="添加":visible.sync="addDialogVisible"width="30%":before-close="handleClose"><el-form :model="stu" status-icon :rules="rules" ref="stu" label-width="100px" class="demo-stu"><el-form-item label="用戶名" prop="sname"><el-input type="text" v-model="stu.sname" autocomplete="off"></el-input></el-form-item><el-form-item label="年齡" prop="age"><!-- TODO: .number是修飾符,輸入的直接就是數字 --><el-input type="text" v-model.number="stu.age" autocomplete="off"></el-input></el-form-item><el-form-item label="性別" prop="sex"><!--todo: 單選框獲得的值是什么?是label的值? 結論!是label值--><el-radio-group v-model="stu.sex"><el-radio label="男"></el-radio><el-radio label="女"></el-radio></el-radio-group></el-form-item><el-form-item label="分數" prop="score"><el-input type="text" v-model="stu.score" autocomplete="off"></el-input></el-form-item><el-form-item label="生日" prop="birthday"><el-col :span="11"><el-date-picker type="date" placeholder="選擇日期" v-model="stu.birthday" value-format="yyyy-MM-dd" style="width: 100%;"></el-date-picker></el-col></el-form-item><el-form-item><el-button @click="addDialogVisible = false">取 消</el-button><el-button type="primary" @click="submitForm('stu')">提交</el-button></el-form-item></el-form></el-dialog><!-- 表格渲染數據: 省略 --><!-- 分頁: 省略 --></div>
</el-card>
</div>
</template><script>
import axios from "axios";
export default {name: "View4StuInfo",data(){// 自定義校驗年齡var checkAge = (rule, value, callback) => {if (!value) {return callback(new Error('年齡不能為空'));}if (!Number.isInteger(value)) {callback(new Error('請輸入數字值'));} else {if (value < 18) {callback(new Error('必須年滿18歲'));} else {// 校驗通過放行!!callback();}}};return {stuList:[],currentPage: 1,pageSize: 3,total: 0,addDialogVisible: false,stu:{sname:"",age:0,sex:"",score:0.0,birthday:""},rules: {age: [{ validator: checkAge, trigger: 'blur' }]}}},methods: {// 抽取查詢數據的方法,可以復用getData() {axios.get('/stu/list', {params: {pageNum: this.currentPage,  // 默認訪問第一頁pageSize: this.pageSize}}).then(ret => {if (ret.code == 20000) {// ret.data是后端返回的PageInfoconsole.log(ret.data)this.stuList = ret.data.list;this.total = ret.data.total;} else {this.$message.error('后臺請求錯誤')}})},// 頁面大小變化時,改變pageSizehandleSizeChange(val) {this.pageSize = val;this.getData();},// 當前頁變化,即跳轉頁面時handleCurrentChange(val) {this.currentPage = val;// 重新查詢當前頁數據this.getData();},handleClose(done) {this.$confirm('確認關閉?').then(_ => {done();}).catch(_ => {});},// 提交表單,并隱藏對話框submitForm(formName) {this.$refs[formName].validate((valid) => {if (valid) {console.log("提交表單--->  ",this.stu)// TODO 添加成功! 但是市區不對!//  已解決! 給el-date-picker設置value-format="yyyy-MM-dd"即可axios.post('/stu/add',this.stu).then(ret =>{console.log(ret)})} else {console.log('error submit!!');return false;}});// 重置當前頁為第一頁,this.currentPage = 1;// 查詢最新數據,從第一頁查this.getData();// 隱藏對話框this.addDialogVisible = false;// 對話框清空this.$refs.stu.resetFields()},},// 定義生命周期函數,頁面加載完即展現數據created() {this.getData();}
}
</script><style scoped></style>
問題1: 時區,時間差一天 // 已解決! 給el-date-picker設置value-format="yyyy-MM-dd"即可
問題2:添加表格沒有清空
// 解決方案:對話框清空,注意此處stu是el-form上面定義的ref的值
this.$refs.stu.resetFields()
十一、更新
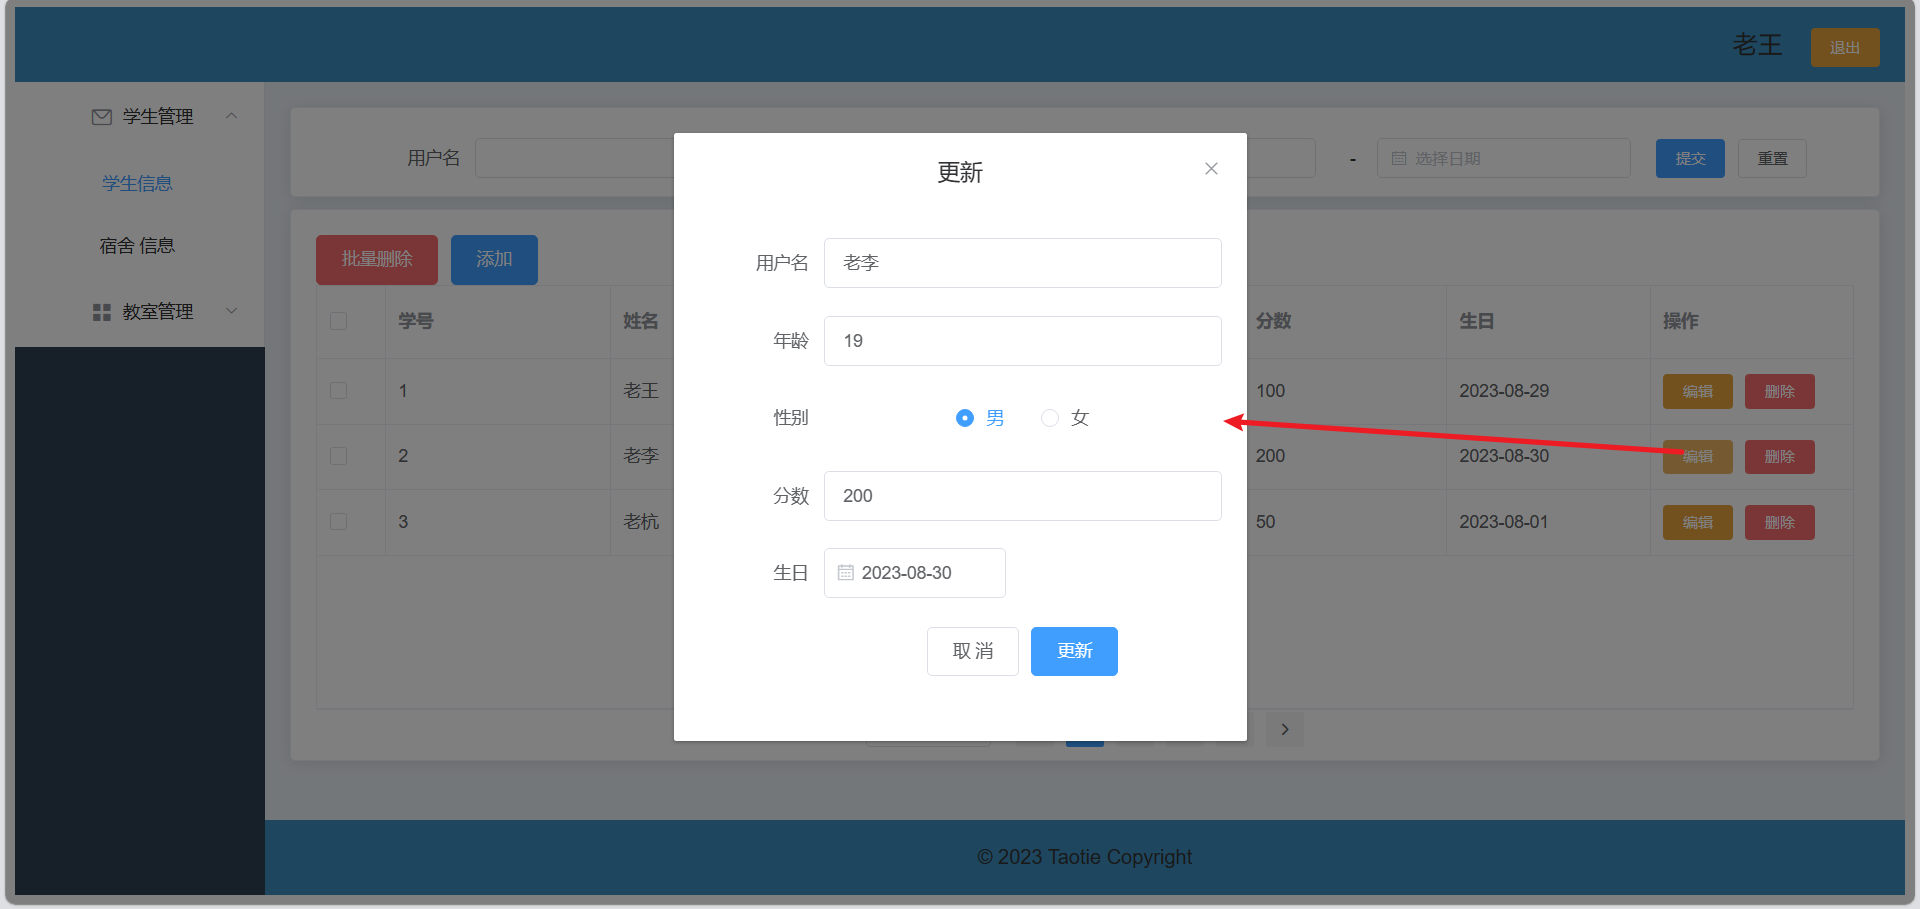
思路:
1)點擊更新按鈕,彈出對話框
2)對話框回顯數據 ps: elementui-table組件,按鈕事件中自帶屬性scope,觸發按鈕獲得當前行內數據
3)點擊保存
4)對話框隱藏,重新查詢
StuInfo.vue
<template>
<div>
<!--  卡片-->
<el-card :body-style="{ padding: '20px',height:'400px' }"><div style="text-align: left"><el-button type="danger">批量刪除</el-button><!-- 顯示/隱藏對話框,通過變量 --><el-button type="primary" @click="addDialogVisible = true">添加</el-button></div><!-- 添加對話框,默認是隱藏 --><!--更新對話框,默認是隱藏 --><el-dialogtitle="更新":visible.sync="editDialogVisible"width="30%"><el-form :model="stu" status-icon :rules="rules" ref="editStuRef" label-width="100px" class="demo-stu"><el-form-item label="用戶名" prop="sname"><el-input type="text" v-model="stu.sname" autocomplete="off"></el-input></el-form-item><el-form-item label="年齡" prop="age"><el-input type="text" v-model.number="stu.age" autocomplete="off"></el-input></el-form-item><el-form-item label="性別" prop="sex"><el-radio-group v-model="stu.sex"><el-radio label="男"></el-radio><el-radio label="女"></el-radio></el-radio-group></el-form-item><el-form-item label="分數" prop="score"><el-input type="text" v-model="stu.score" autocomplete="off"></el-input></el-form-item><el-form-item label="生日" prop="birthday"><el-col :span="11"><el-date-picker type="date" placeholder="選擇日期" v-model="stu.birthday" value-format="yyyy-MM-dd" style="width: 100%;"></el-date-picker></el-col></el-form-item><el-form-item><el-button @click="editDialogVisible = false">取 消</el-button><el-button type="primary" @click="editForm('editStuRef')">更新</el-button></el-form-item></el-form></el-dialog><!-- 表格渲染數據 --><el-table:data="stuList"style="width: 100%"borderheight="340px"><el-table-columntype="selection"width="55"></el-table-column><!-- label是列名,prop是對象的屬性  --><el-table-columnlabel="學號"prop="id"width="180"></el-table-column><el-table-columnprop="sname"label="姓名"width="180"></el-table-column><el-table-columnprop="age"label="年齡"sortable></el-table-column><el-table-columnprop="sex"label="性別"></el-table-column><el-table-columnprop="score"label="分數"></el-table-column><el-table-columnprop="birthday"label="生日"></el-table-column><el-table-column label="操作"><template slot-scope="scope"><el-buttontype="warning"size="mini"@click="handleEdit(scope.$index, scope.row)">編輯</el-button><el-buttonsize="mini"type="danger">刪除</el-button></template></el-table-column></el-table><!-- 分頁 --></div>
</template><script>
import axios from "axios";
export default {name: "View4StuInfo",data(){// 自定義校驗年齡var checkAge = (rule, value, callback) => {if (!value) {return callback(new Error('年齡不能為空'));}if (!Number.isInteger(value)) {callback(new Error('請輸入數字值'));} else {if (value < 18) {callback(new Error('必須年滿18歲'));} else {// 校驗通過放行!!callback();}}};// 數據return {stuList:[],currentPage: 1,pageSize: 3,total: 0,addDialogVisible: false,editDialogVisible:false,stu:{sname:"",age:0,sex:"",score:0.0,birthday:""},rules: {age: [{ validator: checkAge, trigger: 'blur' }]}}},// 函數methods: {// 抽取查詢數據的方法,可以復用// 頁面大小變化時,改變pageSize// 當前頁變化,即跳轉頁面時// 提交添加表單,并隱藏對話框// 處理更新回顯handleEdit(index, row) {this.editDialogVisible = true;this.stu = row},// 提交更新表單,并隱藏對話框editForm(formName) {this.$refs[formName].validate((valid) => {if (valid) {console.log("提交更新表單--->  ",this.stu)axios.put('/stu/edit',this.stu).then(ret =>{if (ret.code == 20000) {// 重置當前頁為第一頁,this.currentPage = 1;// 查詢最新數據,從第一頁查this.getData();}})} else {console.log('error submit!!');return false;}});// 隱藏對話框this.editDialogVisible = false;// 對話框清空this.$refs.editStuRef.resetFields()},},// 定義生命周期函數,頁面加載完即展現數據
}
</script>
問題1: 后端查詢日期到前端顯示少一天!
解決: @JsonFormat(pattern = “yyyy-MM-dd”,timezone = “GMT+8”)
參考解決springboot框架返回前端的日期值少一天_springboot 后端傳給前端的時間不是24小時-CSDN博客
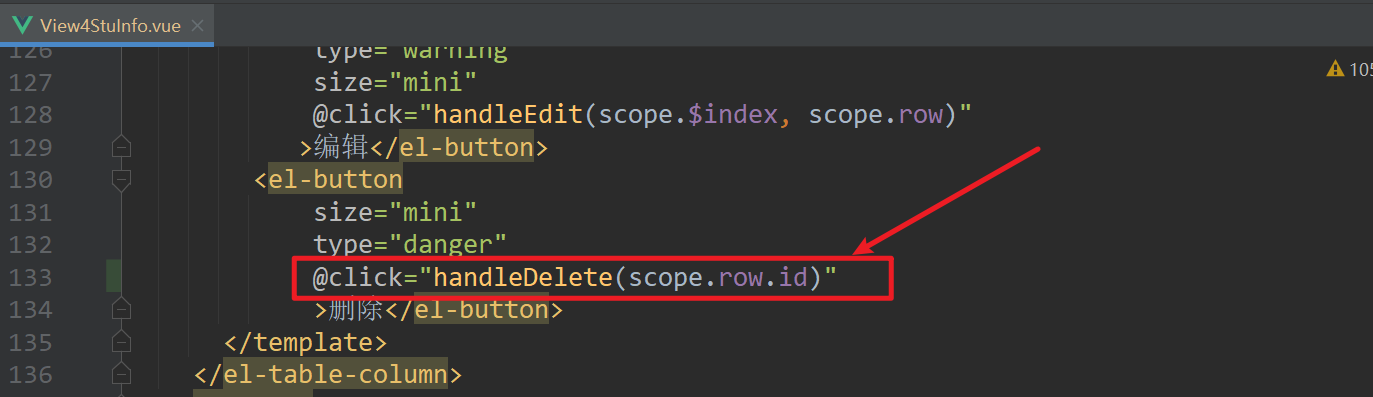
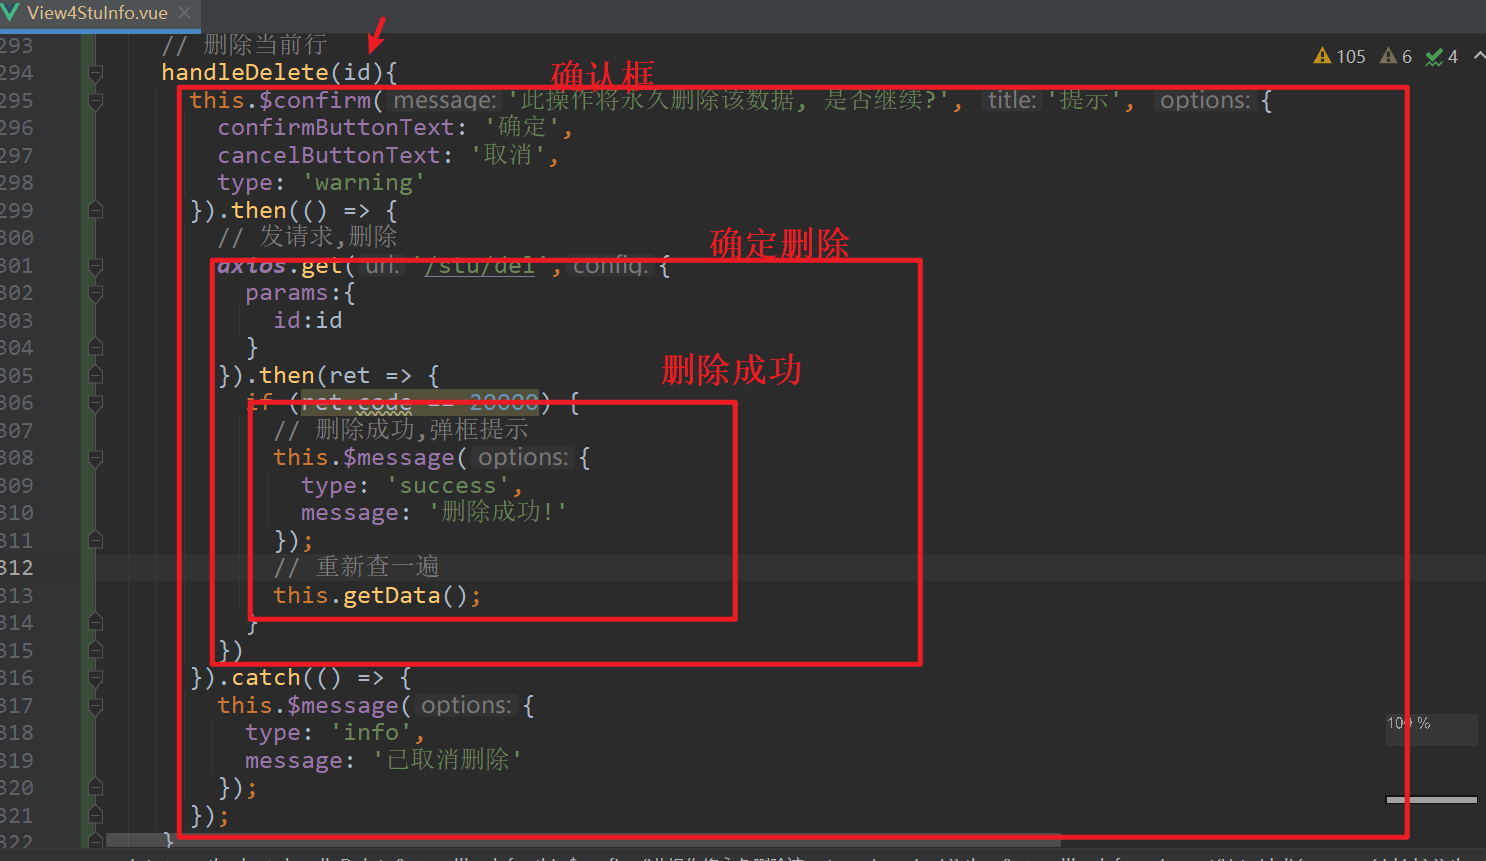
十二、刪除

思路:
1)刪除按鈕
2)彈出確認框,確定刪除,取消
3)確定刪除,發請求攜帶id
4)刪除完重新查詢數據
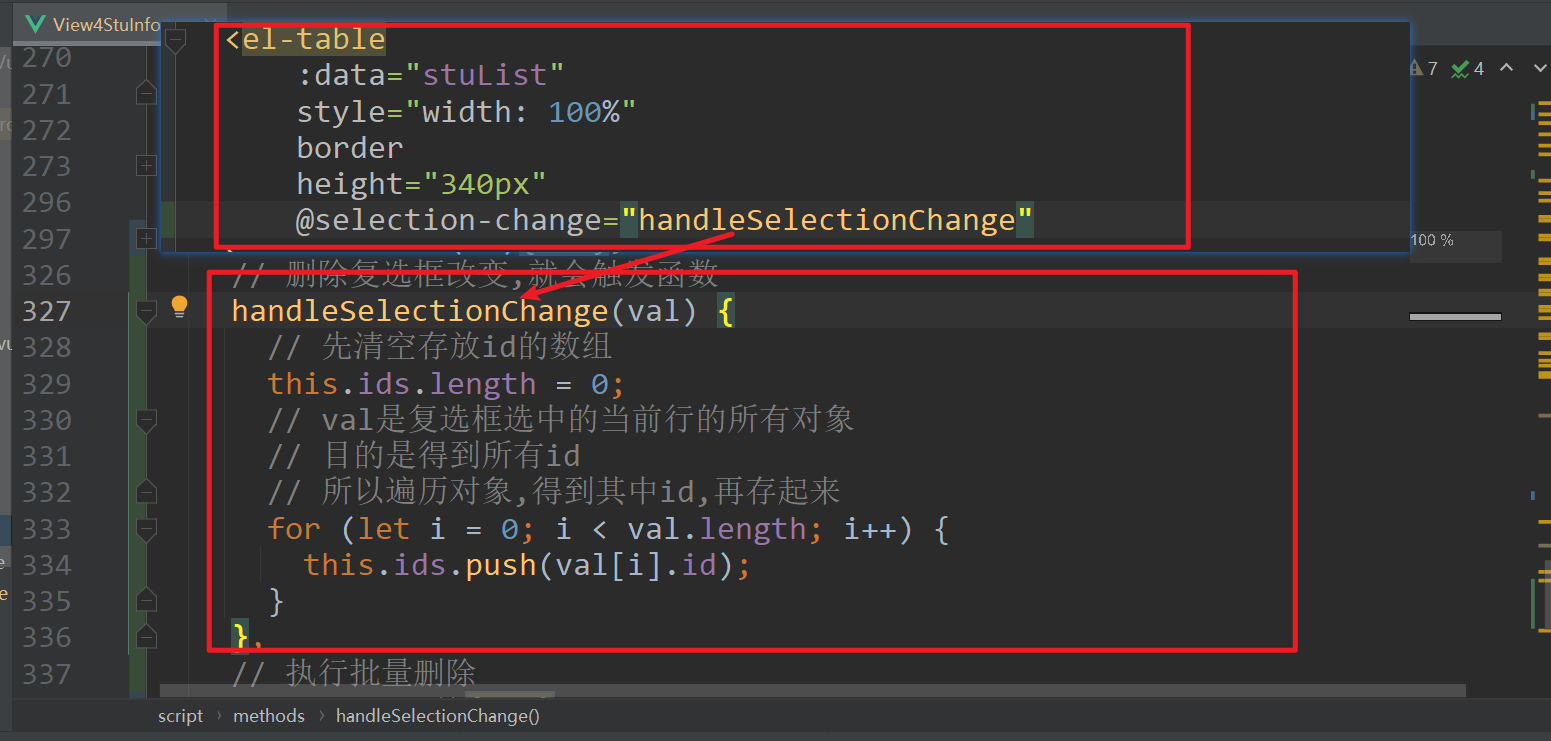
十三、批量刪除
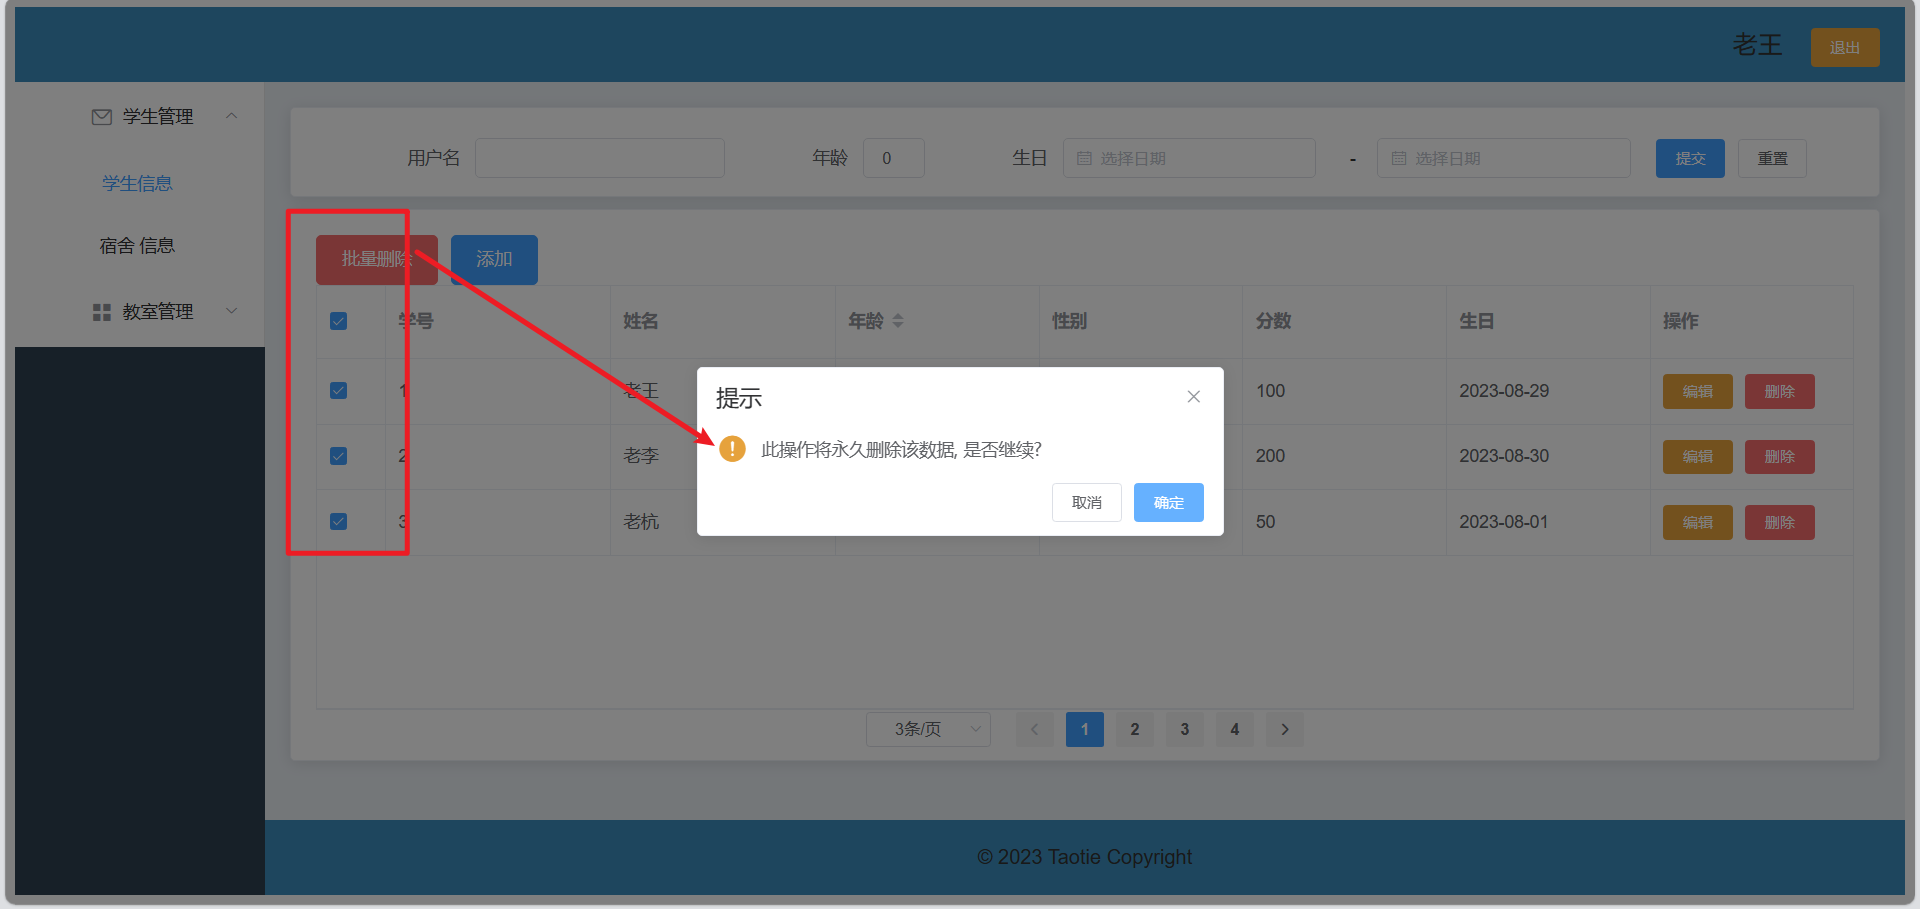
1)設置復選框改變,獲得選中行數據
2)點擊批量刪除按鈕,發請求
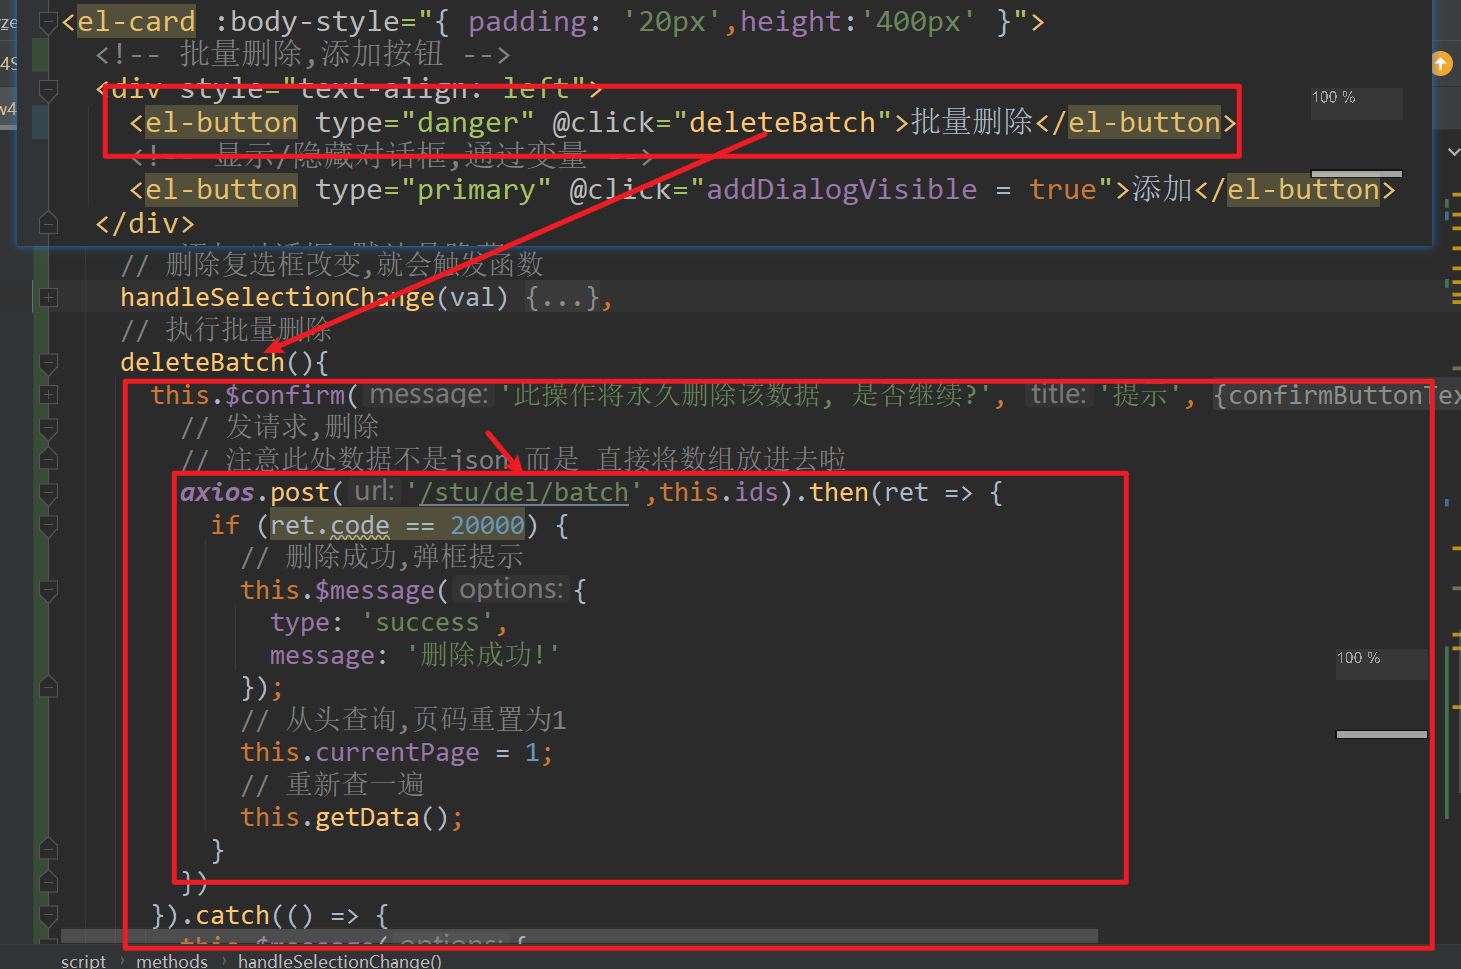
3)后端接收id數組

十四、模糊搜索

需求: 提供根據名字模糊搜索,年齡等值搜索,時間區間搜
思路:
1)設置卡片,卡片中設置 搜索表單
2)點擊搜索,發請求搜索 -->用的還是查詢全部,只不過多帶了一些搜索關鍵詞
3)搜索后數據還在表格 中展現
  <div style="margin-bottom: 10px">
<!--  搜索框卡片--><el-card :body-style="{ padding: '20px',height:'30px'}"><el-form :inline="true" :model="searchModel" status-icon ref="searchModelRef" label-width="100px" class="demo-stu"><el-form-item label="用戶名"prop="sname"><el-input style="width: 200px" size="small" type="text" v-model="searchModel.sname" autocomplete="off"></el-input></el-form-item><el-form-item label="年齡" prop="age"><el-input style="width: 50px" size="small" type="text" v-model.number="searchModel.age" autocomplete="off"></el-input></el-form-item><el-form-item label="生日"><el-col :span="11"><el-form-item prop="birthday1"><el-date-picker size="small" type="date" placeholder="選擇日期" v-model="searchModel.birthday1" value-format="yyyy-MM-dd" style="width: 100%;"></el-date-picker></el-form-item></el-col><el-col class="line" :span="2">-</el-col><el-col :span="11"><el-form-item prop="birthday2"><el-date-picker size="small" type="date" placeholder="選擇日期" v-model="searchModel.birthday2" value-format="yyyy-MM-dd" style="width: 100%;"></el-date-picker></el-form-item></el-col></el-form-item><el-form-item><el-button size="small" type="primary" @click="searchSubmit">提交</el-button><el-button size="small" @click="resetSearch('searchModelRef')">重置 </el-button></el-form-item></el-form></el-card></div>
<script>
import axios from "axios";
export default {name: "View4StuInfo",data(){return{// 搜索關鍵詞searchModel:{sname:"",age:0,birthday1:"",birthday2:"",pageSize:3,pageNum:1}}},methods:{//代碼見圖}
}
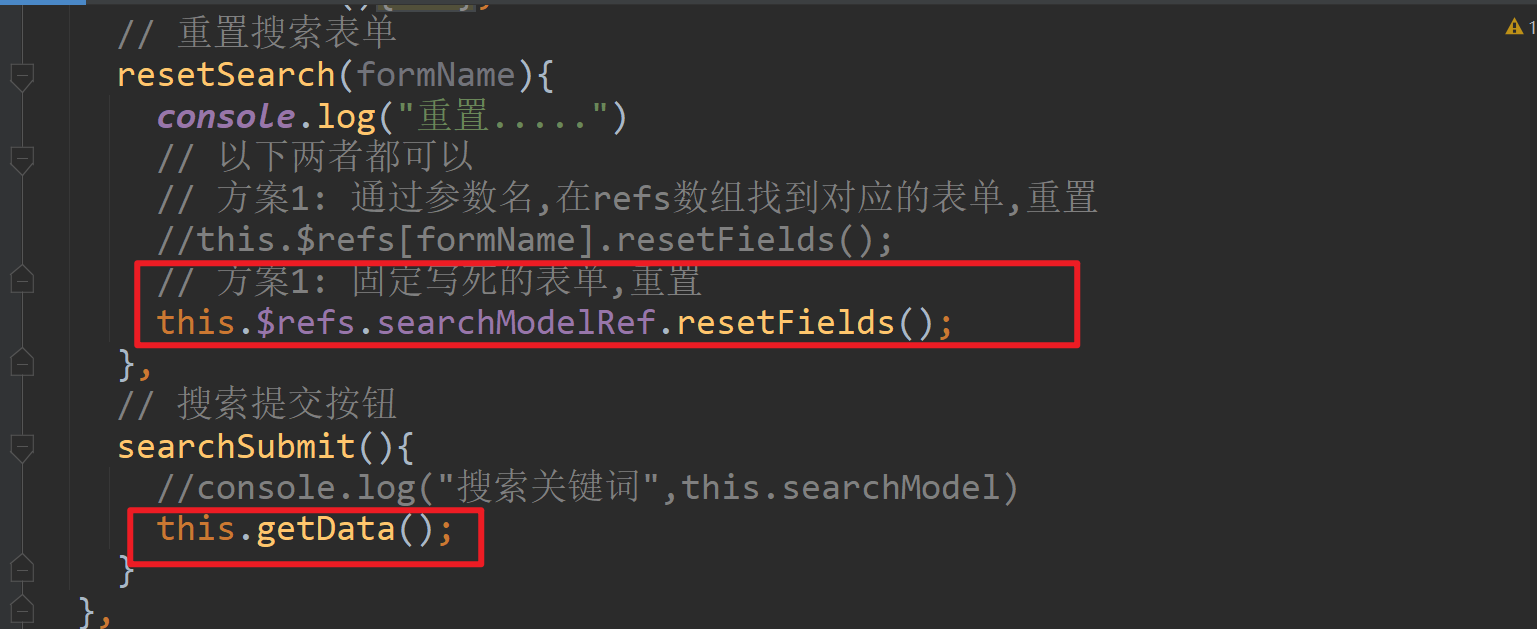
改動 了getData()函數,從原來只有分頁查詢,改成了帶上模糊關鍵詞查詢
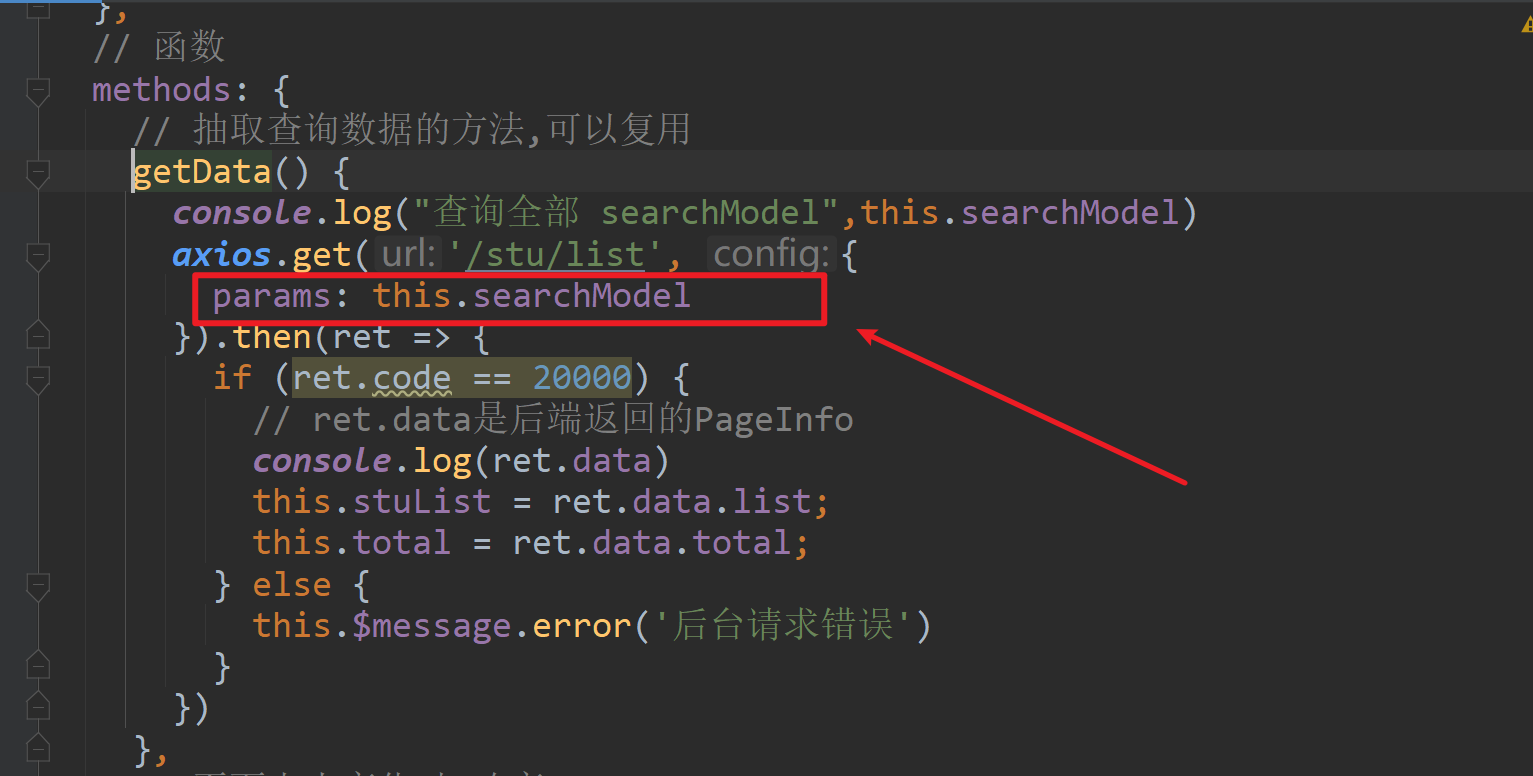
后端查詢全部的接口,變成接收map,map中就包含搜索關鍵詞和分頁數據
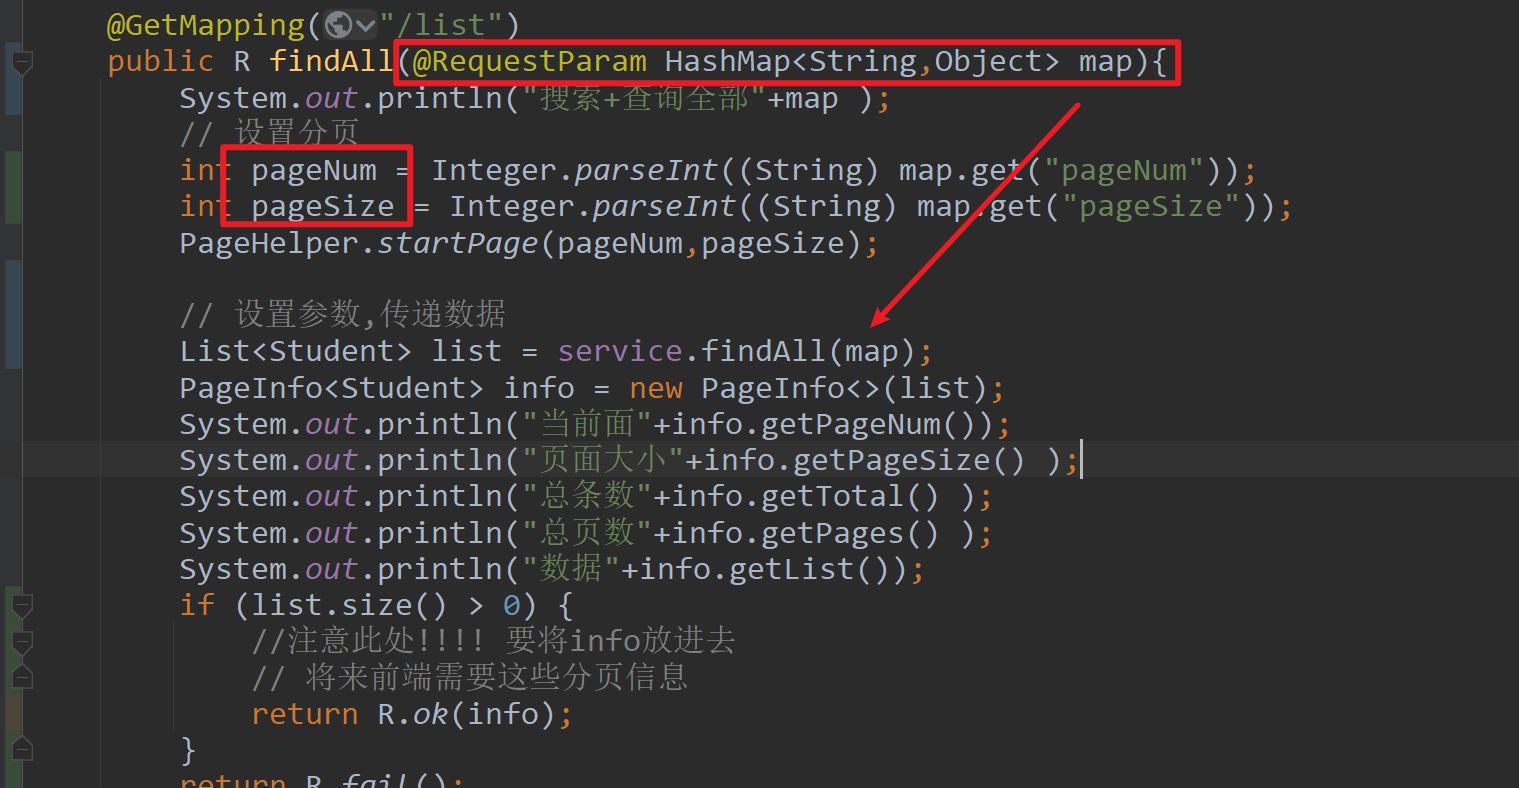
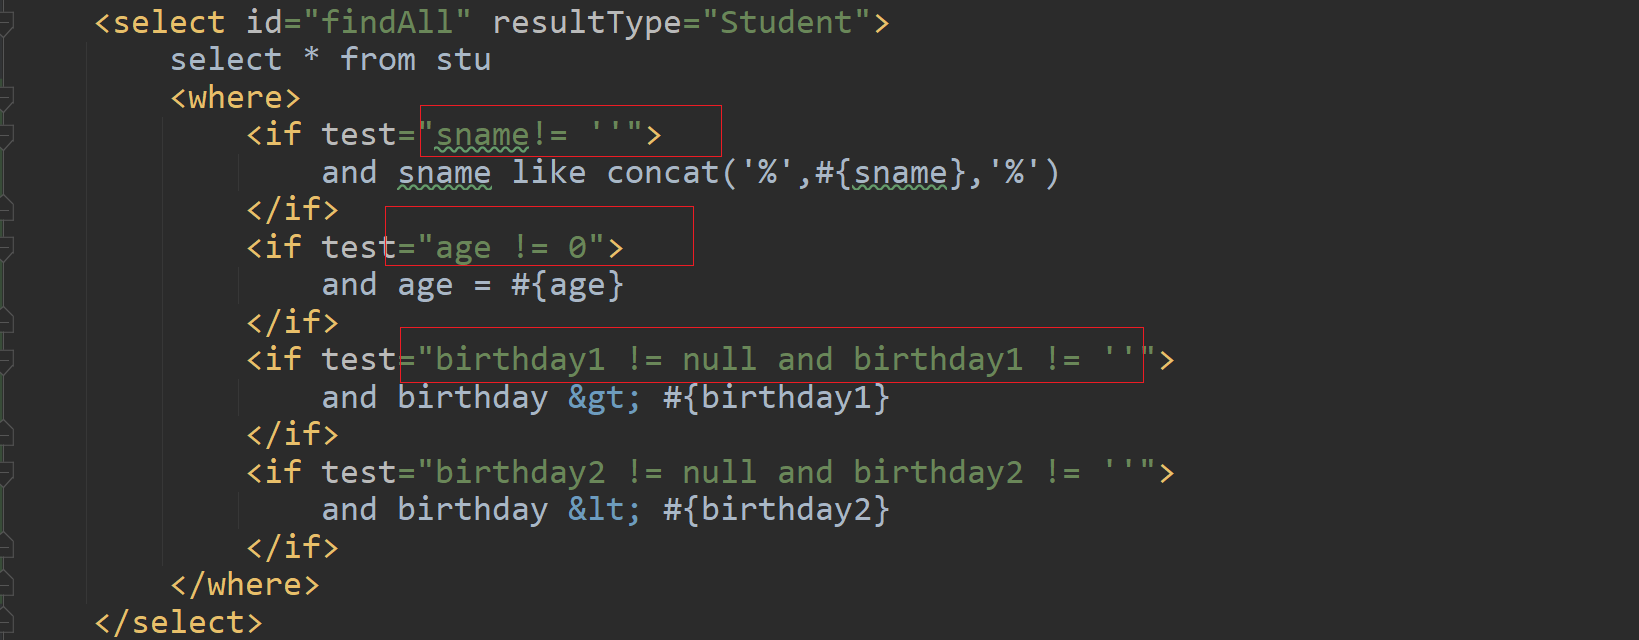
mapper做動態sql查詢
總結
- 前后端對接注意事項
// 前端發 get,用params
axios.get('/login',{params:{username:this.username,password:this.password,}
}).then(ret =>{})// 后端Controller,方法正常寫兩個變量名接收
@GetMapping("/login")
public R login(String username,String password){}
// 前端發 post
axios.post('/login',{username:this.username,password:this.password,
}).then(ret =>{})// 后端Controller,方法正常寫兩個變量名接收接不到!!!
// 方法參數列表需要用對象,且加@RequestBody
@PostMapping("/login")
public R login(@RequestBody User user){}
-
看日志,從日志中 你自己寫過的相關的單詞,變量,屬性,方法等等
-
axios有響應攔截,確定項目是否配置攔截!! 如果配置了攔截,我們已經在攔截中取出了響應的數據,即axios成功回調函數then中的ret就是獲得的R
-
前后端對接
增前端發post,攜帶數據是json后端@PostMapping,參數列表用json對應的java實體類,配上@RequestBody
刪一個前端發get,攜帶參數可以 用{param:{id:1}}后端@GetMapping,參數列表用一個基本類型int id接收
刪多個(批量)方案一:前端發get,攜帶參數可以拼接后端@GetMapping,參數列表用List,配合@RequestParam方案一:前端發post,攜帶參數,直接將數組放在data處后端@PostMapping,參數列表用List,配合@RequestBody
改前端發post/put,攜帶數據是json后端@PostMapping,參數列表用json對應的java實體類,配上@RequestBody
查(空參)
查(簡單參數)前端發post,攜帶json參數后端方法參數列表用對象接收,@RequestBody------前端發get,攜帶{params:{username:'zs',password:'123'}}后端方法參數列表,直接設置(String username,String password)
查(復雜參數)前端發get,攜帶params參數后端方法參數列表用Map接收,配合@RequestParam
基本上,前端只要使用post發送json,后端就得使用@RequestBody+對象
前端使用get發送,普通參數,后端 正常接收 ,默認List,Map類型參數需要@RequestParam
ord){}
```js
// 前端發 post
axios.post('/login',{username:this.username,password:this.password,
}).then(ret =>{})// 后端Controller,方法正常寫兩個變量名接收接不到!!!
// 方法參數列表需要用對象,且加@RequestBody
@PostMapping("/login")
public R login(@RequestBody User user){}
-
看日志,從日志中 你自己寫過的相關的單詞,變量,屬性,方法等等
-
axios有響應攔截,確定項目是否配置攔截!! 如果配置了攔截,我們已經在攔截中取出了響應的數據,即axios成功回調函數then中的ret就是獲得的R
-
前后端對接
增前端發post,攜帶數據是json后端@PostMapping,參數列表用json對應的java實體類,配上@RequestBody
刪一個前端發get,攜帶參數可以 用{param:{id:1}}后端@GetMapping,參數列表用一個基本類型int id接收
刪多個(批量)方案一:前端發get,攜帶參數可以拼接后端@GetMapping,參數列表用List,配合@RequestParam方案一:前端發post,攜帶參數,直接將數組放在data處后端@PostMapping,參數列表用List,配合@RequestBody
改前端發post/put,攜帶數據是json后端@PostMapping,參數列表用json對應的java實體類,配上@RequestBody
查(空參)
查(簡單參數)前端發post,攜帶json參數后端方法參數列表用對象接收,@RequestBody------前端發get,攜帶{params:{username:'zs',password:'123'}}后端方法參數列表,直接設置(String username,String password)
查(復雜參數)前端發get,攜帶params參數后端方法參數列表用Map接收,配合@RequestParam
基本上,前端只要使用post發送json,后端就得使用@RequestBody+對象
前端使用get發送,普通參數,后端 正常接收 ,默認List,Map類型參數需要@RequestParam
)


)


二十一 人臉識別)

)

)

)

![[隴劍杯 2021]日志分析](http://pic.xiahunao.cn/[隴劍杯 2021]日志分析)