pytorch:YOLOV1的pytorch實現
注:本篇僅為學習記錄、學習筆記,請謹慎參考,如果有錯誤請評論指出。
參考:
動手學習深度學習pytorch版——從零開始實現YOLOv1
目標檢測模型YOLO-V1損失函數詳解
3.1 YOLO系列理論合集(YOLOv1~v3)代碼倉庫:https://gitee.com/wtryb/yolov1-pytorch-implement
模型權重:鏈接:https://pan.baidu.com/s/1ZSl-VwkjaRUPuD9CkA6sdg?pwd=blhj
提取碼:blhj
YoloV1的預測過程

上圖是作者在原論文Introduction部分對YoloV1檢測器系統的大致介紹。對比R-CNN系列,YoloV1的結構相對來說簡單很多。Yolo的主要思想就是將識別問題看作是一個回歸問題。因為全連接層的存在YoloV1只能接受(448x448)尺寸(分辨率)的圖片,因此需要將輸入的圖片進行resize然后輸入到網絡中,通過網絡進行預測后的結果進行非極大值抑制得到最終結果。
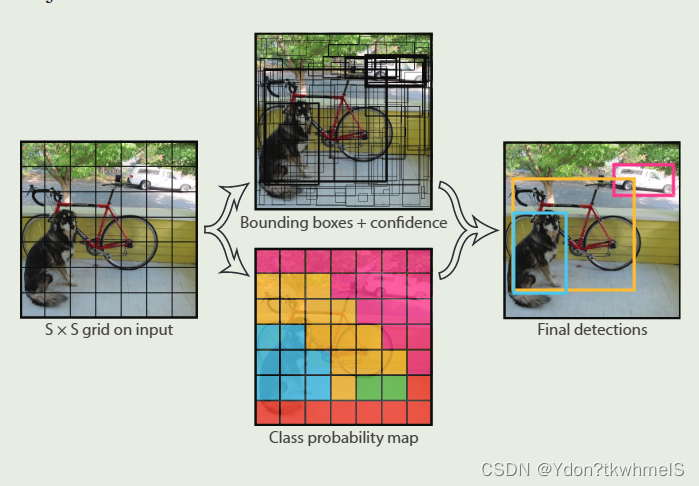
上圖是作者在原論文中Introduction部分對網絡預測過程解釋的原圖。雖然這張圖有兩個分支,但是是從一個網絡中得到兩個分支上的結果。網格會將輸入圖片分成(SxS)個小方格(grid cell),然后在每個小方格上預測邊界框和類別概率,最后得到最后的預測結果。YoloV1這種將輸入分為小網格的操作和錨框有些相似。
1、網絡將輸入分成SxS個小網格,S是超參數可以設置不同的值,原論文設置為7,也就是將輸入圖像分成了7x7個(64x64)的小網格。
2、如果某個對象(Objectness)的中心坐標落在了哪一個網格內,那個網格就負責預測這個物體。網格會預測B個邊界框和C個類別概率,邊界框數和類別數是超參數,可以設置網格預測多少個邊界框原論文是2個以及有多少個類別就有多少個類別概率。而每個邊界框會有5個參數:x,y,w,h,c,因此網絡最終輸出就是(batch, (B*5+C), S,S)。下面說明邊界框預測參數的含義。
x , y x,y x,y:邊界框的中心相對于網格左上角的坐標偏移。
w , h w,h w,h:邊界框相對于整個圖像的大小。
c c c:邊界框的置信度。
這五個參數的取值范圍都是[0,1]。其他四個參數都好理解,主要是C邊界框置信度(confidence score)這個參數怎么理解。下面兩個問題我認為是關鍵。
如何理解邊界框置信度這個參數?
原論文中說明,邊界框置信度(confidence score)就是網絡認為網格中存在物體的置信度以及網絡對于預測的邊界框的準確率。也就是說這個值越高越好,越高越認為這個網格預測到了對象(objectness)而且很準確。
如何計算置信度?
論文中將C定義為了 P r ( O b j e c t ) ? I O U p r e d t r u t h Pr\left( Object \right) *IOU_{pred}^{truth} Pr(Object)?IOUpredtruth?。解釋下這兩個值的意思:
P r ( O b j e c t ) = { 1 有對象存在 0 無對象存在 Pr\left( Object \right) =\begin{cases} 1& \text{有對象存在}\\ 0& \text{無對象存在}\\ \end{cases} Pr(Object)={10?有對象存在無對象存在?
I O U p r e d t r u c h : G T 真實邊界框與預測邊界框的 I O U 值。 IOU_{pred}^{truch}:GT真實邊界框與預測邊界框的IOU值。 IOUpredtruch?:GT真實邊界框與預測邊界框的IOU值。
那么兩個值乘起來也就意味著,如果這個網格有對象存在,置信度就等于GT真實邊界框與預測邊界框的IOU值,如果沒有對象存在就等于0。YoloV1對于采樣區域策略以及正負樣本區分做的很粗糙,因此訓練時C的取值無非就是0和1,GT邊界框中心落在哪個網格哪個網格的置信度就取1此外取0。推理預測時,哪個網格的置信度越接近于1,對象中心在那個網格的概率以及邊界框預測準確率越高。
總而言之,置信度的取值衡量了,網格對于對象預測的質量,值越高越質量越好。
YoloV1的網絡設計
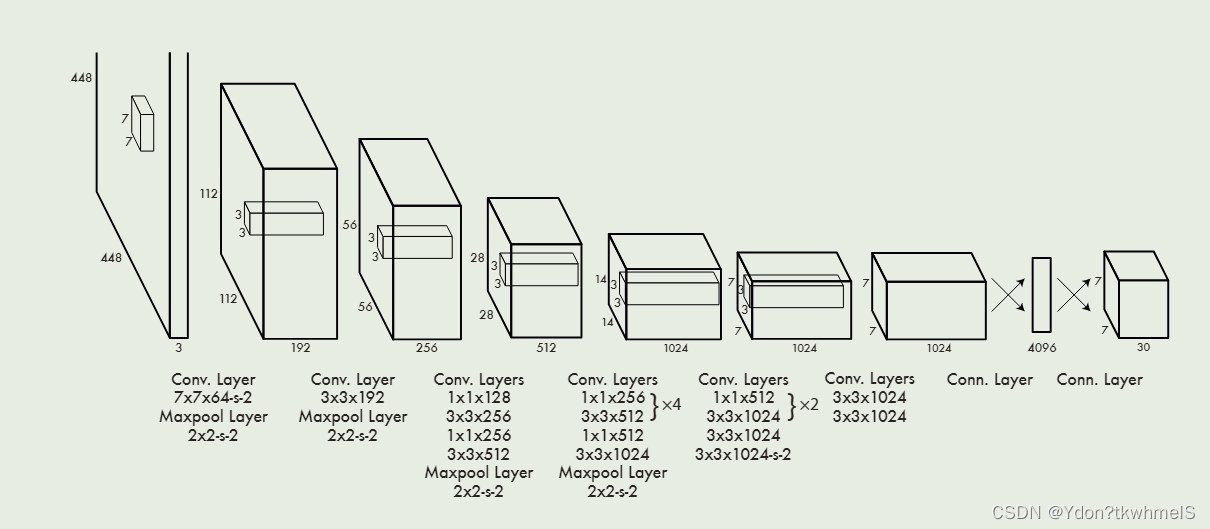
作者收到GoogleNet的啟發,設計了Darknet,其結構如上圖所示。隨著Yolo系列的迭代,主干網絡也在迭代。
YoloV1的損失函數設計
作者在論文中提到使用了平方誤差和損失(sum-squared error)因為它易于優化,但是對于最終最大平均精度(maximizing average precision)的目標來說不是很合適,因為它沒有區分開定位損失和類別損失,因此作者做了一些修改。下面來進行說明。
1、對正負樣本的損失設置權重。在訓練時,負樣本的數量大大壓過正樣本,正負樣本也就是存在和不存在對象的小網格,這會使得網絡難以訓練以及造成網絡訓練時的不穩定。
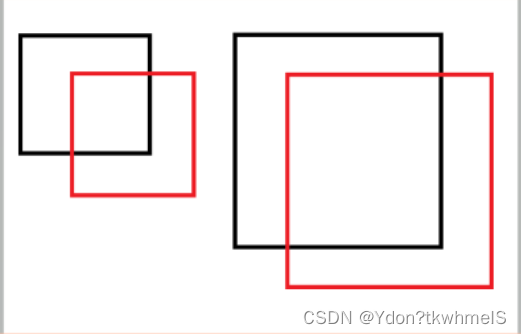
2、使用寬高的平方根計算損失。平方誤差和損失將大邊界框和小邊界框的誤差認為是同等程度的誤差,而實際情況是相同的偏移誤差對于小邊界框影響更大。如下圖,黑框是GT邊界框,紅框是預測邊界框,小紅框和大紅框相對各自的GT邊界框的坐標偏移是相同的,從視覺上來看相同的偏移對于小框影響更大。
3、采用于GT邊界框最大IOU的邊界框作為預測器。Yolo每個網格生成多個框,但是只采用于GT邊界框IOU最大的邊界框作為預測器,這種操作使得邊界框有了分化,使得邊界框在預測特定大小、寬高比、類別時更加準確。
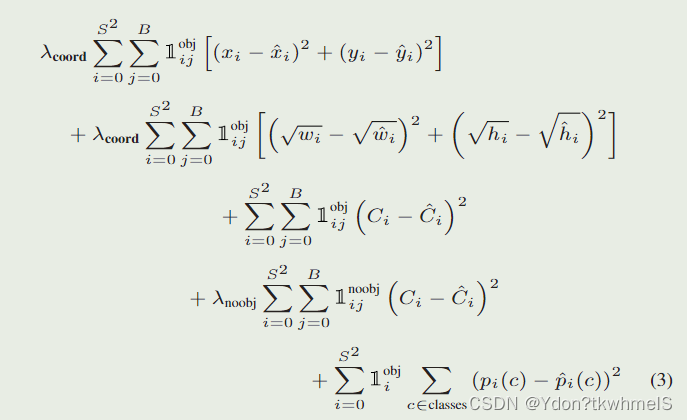
論文給出的損失函數如圖。解釋幾個參數:
λ c o o r d :取 5 ,正樣本的權重 \lambda _{coord}:取5,正樣本的權重 λcoord?:取5,正樣本的權重
λ n o o b j :取 0.5 ,負樣本的權重 \lambda _{noobj}:取0.5,負樣本的權重 λnoobj?:取0.5,負樣本的權重
1 i j o b j :第 i 個網格的第 j 個邊界框作為預測器時取 1 ,其余取 0 1_{ij}^{obj}:第i個網格的第j個邊界框作為預測器時取1,其余取0 1ijobj?:第i個網格的第j個邊界框作為預測器時取1,其余取0
1 i j n o o b j :第 i 個網格的第 j 個邊界框不作為預測器時取1,其余取 0 1_{ij}^{noobj}\text{:第}i\text{個網格的第}j\text{個邊界框不作為預測器時取1,其余取}0 1ijnoobj?:第i個網格的第j個邊界框不作為預測器時取1,其余取0
S :網格的數量 S\text{:網格的數量} S:網格的數量
B :每個網格預測邊界框的數量 B\text{:每個網格預測邊界框的數量} B:每個網格預測邊界框的數量
總體理解下YoloV1的損失函數:
正樣本參與位置損失、置信度損失和類別損失的計算,負樣本只計算置信度損失,同時為了減弱負樣本數量過多的問題給正負樣本的損失計算加上了權重。
YoloV1的優缺點
優點:
1、非常快
2、結構簡單
缺點:
1、定位誤差大
2、區域采樣機制設計粗糙
YoloV1的Pytorch實現
1、構建數據集。
使用Pascal VOC2007數據集,這里不再多介紹。YoloV1的輸入尺寸固定是(448x448)因此讀入圖片后需要進行resize,直接resize即可,不需要做其他操作。
VOC2007對于每張圖片都有標注文件,讀取標注文件中的邊界框和類別,按照YoloV1的輸出進行編碼。
def yolo_encoder(boxes, labels, yolo_config):# print("進入編碼器")target = torch.zeros(size= (30, yolo_config["num_grid"], yolo_config["num_grid"]), dtype= torch.float)# print("標簽的形狀: ", target.shape)cell_size = yolo_config["input_size"] / yolo_config["num_grid"]# print("網格大小:", cell_size)# print(f"一共處理{len(boxes)}個邊界框 Boxes:{boxes}")for index, box in enumerate(boxes):# print(f"正在處理第{index+1}個邊界框:", box)x_c, y_c, w, h = point_to_center(box)# print("歸一化前 x_c, y_c", x_c, y_c)# print("歸一化前 w, h", w, h)x_i = math.ceil(x_c // cell_size)y_i = math.ceil(y_c // cell_size)delta_x = float((x_c - x_i * cell_size) / cell_size)delta_y = float((y_c - y_i * cell_size) / cell_size)w = float(w / yolo_config["input_size"])h = float(h / yolo_config["input_size"])# print("物體中心所在網格:", (x_i, y_i))# print("得到邊界框偏移:", (delta_x, delta_y))# print("歸一化后邊界框寬高:", w, h)# print(x_i, y_i)# 前兩個值是中心坐標對網格左上角坐標的偏移,歸一化到0-1target[0, x_i, y_i] = delta_xtarget[1, x_i, y_i] = delta_y# print("delta_x, delta_y", delta_x, delta_y)target[2, x_i, y_i] = wtarget[3, x_i, y_i] = h# print("w, h", w, h)# 每個網格預測兩個邊界框,每個邊界框的最后一個參數是confidence score因為數據集里是真實框因此為1# 預測到了物體而且就是就是真實框,置信度就是1target[4, x_i, y_i] = 1target[5, x_i, y_i] = delta_xtarget[6, x_i, y_i] = delta_ytarget[7, x_i, y_i] = wtarget[8, x_i, y_i] = htarget[9, x_i, y_i] = 1# 把邊界框對應的類在編碼中的位置置為1,代表概率是1target[labels[index]+10, x_i, y_i] = 1# print(labels[index])# print("編碼結果:", target[:, x_i, y_i])return target
class YoloV1Dataset(Dataset):def __init__(self, path):self.path = path# 從數據集中獲取樣本# 這個過程耗時很短self.obj_dict_list = pascal_VOC.xml_parse_dict(path)def __getitem__(self, index):# 按照索引獲取對應的圖片名稱self.image_name = self.obj_dict_list[index]["image_name"]# print(self.image_name)# 讀取圖像img = cv2.imread(os.path.join(self.path, "JPEGImages",self.image_name))# 轉換色彩通道img = cv2.cvtColor(img, cv2.COLOR_BGR2RGB)# 按照索引獲取邊界和對應標號boxes_and_label_list = self.obj_dict_list[index]["boxes"]# print("boxes_and_label_list", boxes_and_label_list)# print(boxes_and_label_list)# 放縮圖片同時放縮邊界框img, self.boxes = scale_img_with_box(img, [i[0:4] for i in boxes_and_label_list])# print("scale_img_with_box new boxes", self.boxes)self.labels = [i[4] for i in boxes_and_label_list]# self.boxes = [point_to_center(i) for i in self.boxes]# print("point_to_center self.boxes", self.boxes)# print(f"一共有{len(self.boxes)}個邊界框")# 通過編碼器,編碼網絡的標簽target = yolo_encoder(self.boxes, self.labels, yolo_config)# print(target.shape)# 轉換為張量img = transforms.ToTensor()(img)return img, targetdef __len__(self):# 圖片的個數return len(self.obj_dict_list)2、構建YoloV1網絡
使用Resnet34代替Darknet主干網絡。
from torch import nn
from torchvision.models import resnet34, resnet18
import torchfrom torchsummary import summaryfrom yoloconfig import yolo_configclass yoloV1Resnet(nn.Module):def __init__(self):super(yoloV1Resnet, self).__init__()# 使用預訓練#resnet = resnet18(pretrained= True)resnet = resnet34(pretrained=True)# print(resnet)# 記錄卷積輸出的通道數resnet_out_channels = resnet.fc.in_features# 構造網絡,去掉resnet34的全連接層self.feature_extractor = nn.Sequential(*list(resnet.children())[:-2])# 以下是YOLOv1的最后四個卷積層self.Conv_layers = nn.Sequential(nn.Conv2d(resnet_out_channels, 1024, 3, padding=1),nn.BatchNorm2d(1024),  # 為了加快訓練,這里增加了BN層,原論文里YOLOv1是沒有的nn.LeakyReLU(),nn.Conv2d(1024, 1024, 3, stride=2, padding=1),nn.BatchNorm2d(1024),nn.LeakyReLU(),nn.Conv2d(1024, 1024, 3, padding=1),nn.BatchNorm2d(1024),nn.LeakyReLU(),nn.Conv2d(1024, 1024, 3, padding=1),nn.BatchNorm2d(1024),nn.LeakyReLU(),)# 以下是YOLOv1的最后2個全連接層self.Conn_layers = nn.Sequential(nn.Linear(7 * 7 * 1024, 4096),nn.LeakyReLU(),nn.Linear(4096, 7 * 7 * 30),nn.Sigmoid()  # 增加sigmoid函數是為了將輸出全部映射到(0,1)之間,因為如果出現負數或太大的數,后續計算loss會很麻煩)def forward(self, input):input = self.feature_extractor(input)input = self.Conv_layers(input)input = input.view(input.size()[0], -1)input = self.Conn_layers(input)return input.reshape(-1, (5 * yolo_config["num_boxes"] + yolo_config["num_class"]), 7, 7)  # 記住最后要reshape一下輸出數據if __name__ == "__main__":if __name__ == '__main__':x = torch.randn((1, 3, 448, 448))net = yoloV1Resnet()print(net)y = net(x)print(y.size())
3、訓練網絡
from torch.utils.data import DataLoader
import torch
from MyLib.nnTools.Trainer import Trainerfrom network import yolo
from dataprocess import dataset
from network import yololossdef train_model():# PATH = r"E:\Postgraduate_Learning\Python_Learning\DataSets\pascal voc2012\VOCtrainval_11-May-2012\VOCdevkit\VOC2012"PATH = r"E:\Postgraduate_Learning\Python_Learning\DataSets\pascal_voc2007\VOCdevkit\VOC2007"# 定義yolo網絡yolo_net = yolo.yoloV1Resnet()yolo_net.load_state_dict(torch.load("models/_keyboardInterrupt_.pth"))# 凍結卷積層的參數for layer in yolo_net.children():layer.requires_grad = Falsebreak# 定義數據集yolo_train_dataset = dataset.YoloV1Dataset(PATH)# 定義數據加載器0yolo_train_iter = DataLoader(dataset= yolo_train_dataset, shuffle= True, batch_size= 4)optimer = torch.optim.SGD(yolo_net.parameters(), lr=1e-3, weight_decay= 0.0005)StepLR = torch.optim.lr_scheduler.StepLR(optimer, step_size=7, gamma=0.65)loss = yololoss.yoloV1Loss()trainer = Trainer()trainer.config_trainer(net= yolo_net, dataloader= yolo_train_iter,optimer= optimer, loss= loss, lr_scheduler= StepLR)trainer.config_task(num_epoch= 60)trainer.start_task(True, "./models")if __name__ == "__main__":train_model()
4、推理預測
YoloV1的網絡輸出還需要進行一步解碼才能獲取邊界框和類別。
def yolo_decoder(pred, class_name_list, yolo_config, confidence_thr= 0.0002, class_thr= 0.5):boxes = []cell_size = yolo_config["input_size"] / yolo_config["num_grid"]# 循環遍歷每個批次for batch in range(pred.shape[0]):# 循環遍歷x軸for x in range(yolo_config["num_grid"]):# 循環遍歷y軸for y in range(yolo_config["num_grid"]):# 得到類別class_name = class_name_list[torch.argmax(pred[batch, 10:, x, y])]print("class predict", torch.max(pred[batch, 10:, x, y]).item())confidence_box1 = pred[batch, 4, x, y]# * torch.max(pred[batch, 10:, x, y])confidence_box2 = pred[batch, 9, x, y]# * torch.max(pred[batch, 10:, x, y])print(f"confidence_box1: {confidence_box1.item()}", f"confidence_box2: {confidence_box2.item()}")# 如果沒有物體,跳過if confidence_box1 < confidence_thr or confidence_box2 < confidence_thr:continueif torch.max(pred[batch, 10:, x, y]).item() < class_thr:# print("不符合閾值的box1", pred[batch, 0:5, x, y], "不符合閾值的box1", pred[batch, 6:11, x, y])continue# print(f"有物體存在的網格",x,y)# 判斷confidence scores哪個大哪個就是預測器if confidence_box1 >= confidence_box2:box = pred[batch, 0:5, x, y]# print(box)# print(f"解碼前結果 box: ", box)box[0] = (box[0] * cell_size + x * cell_size).item()box[1] = (box[1] * cell_size + y * cell_size).item()box[2] = (box[2] * yolo_config["input_size"]).item()box[3] = (box[3] * yolo_config["input_size"]).item()# 轉換坐標box_xy = center_to_point(box[0:4])# print(f"解碼結果 box: ", box)# print(f"解碼結果 class_name: ", class_name)boxes.append((*(box_xy), confidence_box1.item(), class_name))if confidence_box1 < confidence_box2:box = pred[batch, 6:11, x, y]# print(box)# print(f"解碼前結果 box: ", box)box[0] = (box[0] * cell_size + x * cell_size).item()box[1] = (box[1] * cell_size + y * cell_size).item()box[2] = (box[2] * yolo_config["input_size"]).item()box[3] = (box[3] * yolo_config["input_size"]).item()# 轉換坐標box_xy = center_to_point(box[0:4])# print(f"解碼結果 box: ", box)# print(f"解碼結果 class_name: ", class_name)boxes.append((*(box_xy), confidence_box2.item(), class_name))# print(box)return boxes
import cv2
import torchimport yoloconfig
from network import yolo
from network.encoder import calculate_iou, yolo_decoder
from torch.utils.data import DataLoader
from torchvision.transforms import transforms
import numpy as npfrom MyLib.imgProcess.draw import cv2_draw_one_boxCOLOR = [(255,0,0),(255,125,0),(255,255,0),(255,0,125),(255,0,250),(255,125,125),(255,125,250),(125,125,0),(0,255,125),(255,0,0),(0,0,255),(125,0,255),(0,125,255),(0,255,255),(125,125,255),(0,255,0),(125,255,125),(255,255,255),(100,100,100),(0,0,0),]  # 用來標識20個類別的bbox顏色,可自行設定
CLASS = ['aeroplane', 'bicycle', 'bird', 'boat', 'bottle', 'bus', 'car', 'cat', 'chair', 'cow', 'diningtable', 'dog','horse', 'motorbike', 'person', 'pottedplant', 'sheep', 'sofa', 'train', 'tvmonitor']def calculate_iou_1(box1, box2):# 計算兩個邊界框的交集面積x_left = max(box1[0], box2[0])y_top = max(box1[1], box2[1])x_right = min(box1[2], box2[2])y_bottom = min(box1[3], box2[3])if x_right < x_left or y_bottom < y_top:return 0.0intersection_area = (x_right - x_left) * (y_bottom - y_top)box1_area = (box1[2] - box1[0]) * (box1[3] - box1[1])box2_area = (box2[2] - box2[0]) * (box2[3] - box2[1])iou = intersection_area / float(box1_area + box2_area - intersection_area)return ioudef nms(boxes, threshold):"""非極大值抑制算法(NMS):param boxes: 包含每個邊界框的左上角和右下角坐標、置信度和類別的列表:param threshold: 重疊面積閾值:return: 保留的邊界框列表"""if len(boxes) == 0:return []# 分別提取邊界框的坐標、置信度和類別信息x1 = np.array([box[0] for box in boxes])y1 = np.array([box[1] for box in boxes])x2 = np.array([box[2] for box in boxes])y2 = np.array([box[3] for box in boxes])scores = np.array([box[4] for box in boxes])areas = (x2 - x1 + 1) * (y2 - y1 + 1)# 根據邊界框置信度降序排列order = scores.argsort()[::-1]keep = []while len(order) > 0:i = order[0]  # 取出當前置信度最高的邊界框keep.append(i)xx1 = np.maximum(x1[i], x1[order[1:]])yy1 = np.maximum(y1[i], y1[order[1:]])xx2 = np.minimum(x2[i], x2[order[1:]])yy2 = np.minimum(y2[i], y2[order[1:]])w = np.maximum(0.0, xx2 - xx1 + 1)h = np.maximum(0.0, yy2 - yy1 + 1)intersection = w * hiou = intersection / (areas[i] + areas[order[1:]] - intersection)inds = np.where(iou <= threshold)[0]order = order[inds + 1]return [boxes[i] for i in keep]if __name__ == '__main__':model = yolo.yoloV1Resnet()# 2023.11.11 定位不準可能是單元格內邊界框的置信度誤差比較大,導致定位時,定位在了錯誤的網格#            訓練時loss會震蕩# 11.12 模型訓練loss仍然下不來,可能是數據集太少的原因# 11.13 改小batch繼續訓練,之前嘗試更換主體網絡為resnet18不行,減小學習率不行model.load_state_dict(torch.load("models/_keyboardInterrupt_.pth")) # 加載訓練好的模型model.eval()model.cuda()img = cv2.imread("./img/000229.jpg")img = cv2.resize(img, (448, 448))inputs = cv2.cvtColor(img, cv2.COLOR_BGR2RGB)inputs = transforms.ToTensor()(inputs)inputs = inputs.to(torch.device("cuda:0"))inputs = torch.unsqueeze(inputs, dim=0)pred = model(inputs)  # pred的尺寸是(1,30,7,7)pred = pred.detach().cpu()# pred = pred.squeeze(dim=0)  # 壓縮為(30,7,7)# pred = pred.permute((1, 2, 0))  # 轉換為(7,7,30)print(pred[0, 4, :, :])print(pred[0, 9, :, :])boxes = yolo_decoder(pred, CLASS, yolo_config=yoloconfig.yolo_config, confidence_thr=0.1)print("boxes", boxes)box_boxes = []for i in boxes:if i[3] - i[1] <= 10:continueelse:box_boxes.append(i)# print("nms前", box_boxes)new_boxes = nms(box_boxes, 0.3)# print("nms后", new_boxes)for i in new_boxes:# print(i)cv2_draw_one_box(img, i, (255, 0, 255))cv2.imshow("aa", img)cv2.waitKey(0)

)


)


五種最新算法(SWO、COA、LSO、GRO、LO)求解無人機路徑規劃MATLAB)
——系統懸浮窗( 可在其他應用上顯示,可實時更新內容))

五種最新算法(SWO、COA、LSO、GRO、LO)求解無人機路徑規劃MATLAB)


