1.研究背景與意義
項目參考AAAI Association for the Advancement of Artificial Intelligence
研究背景與意義
隨著科技的不斷發展,圖像超分辨率技術在計算機視覺領域中變得越來越重要。圖像超分辨率是指通過使用計算機算法將低分辨率圖像轉換為高分辨率圖像的過程。這項技術在許多領域都有廣泛的應用,包括醫學圖像處理、監控攝像頭、衛星圖像處理等。
在過去的幾十年里,圖像超分辨率技術已經取得了顯著的進展。早期的方法主要基于插值和濾波技術,但這些方法無法捕捉到圖像中的細節和紋理。隨著深度學習的興起,基于深度學習的圖像超分辨率方法開始受到關注。其中,基于卷積神經網絡(CNN)的方法取得了很大的成功。
然而,傳統的CNN方法在處理大尺寸圖像時存在一些問題。首先,它們需要大量的計算資源和存儲空間,限制了它們在實際應用中的可行性。其次,它們往往無法處理大尺寸圖像中的細節和紋理,導致生成的高分辨率圖像質量不佳。因此,尋找一種高效且準確的圖像超分辨率方法是非常重要的。
近年來,Swin Transformer作為一種新興的注意力機制模型,已經在自然語言處理和計算機視覺領域取得了顯著的成果。Swin Transformer采用了一種分層的注意力機制,能夠在處理大尺寸圖像時保持較高的效率和準確性。因此,將Swin Transformer應用于圖像超分辨率任務是非常有前景的研究方向。
基于Swin Transformer的圖像超分辨率系統具有以下幾個重要的意義:
首先,基于Swin Transformer的圖像超分辨率系統可以提供更高質量的高分辨率圖像。Swin Transformer的注意力機制能夠更好地捕捉到圖像中的細節和紋理,從而生成更加真實和清晰的圖像。這對于許多應用領域,如醫學圖像處理和衛星圖像處理,具有重要的意義。
其次,基于Swin Transformer的圖像超分辨率系統可以提高計算效率。傳統的CNN方法在處理大尺寸圖像時需要大量的計算資源和存儲空間,限制了它們在實際應用中的可行性。而Swin Transformer采用了一種分層的注意力機制,能夠在處理大尺寸圖像時保持較高的效率和準確性,從而降低了計算成本。
最后,基于Swin Transformer的圖像超分辨率系統可以為其他相關領域的研究提供借鑒和參考。Swin Transformer作為一種新興的注意力機制模型,已經在自然語言處理和計算機視覺領域取得了顯著的成果。將其應用于圖像超分辨率任務可以為其他領域的研究提供新的思路和方法。
綜上所述,基于Swin Transformer的圖像超分辨率系統具有重要的研究背景和意義。它可以提供更高質量的高分辨率圖像,提高計算效率,并為其他相關領域的研究提供借鑒和參考。隨著深度學習和注意力機制的不斷發展,相信基于Swin Transformer的圖像超分辨率系統將在未來取得更加廣泛的應用和研究進展。
2.圖片演示


3.視頻演示
基于Swin_Transformer的圖像超分辨率系統_嗶哩嗶哩_bilibili
4.圖像超分辨重建原理
為了對圖像超分辨率重建原理有更深入的理解,本小節將對高分辨率圖像到低分辨率的退化過程進行詳細介紹。受硬件設備的限制、環境因素的干擾和傳輸條件的限制,人們采集所得的實際圖像的分辨率往往很難達到預期,而這些低分辨率圖像通常由高分辨率圖像經過多種退化過程所產生,包括光線干擾、運動模糊、噪聲、壓縮等退化因素。由于圖像超分辨率重建是一個典型的逆向問題,其核心概念是建立對應的退化模型來學習從高分辨率圖像到低分辨率圖像的退化關系,進一步恢復低分辨率圖像的紋理細節,因此,建立合適的退化模型是解決超分辨率重建問題的關鍵。

通過對上述圖像退化模型的分析,可知通常的圖像退化過程可以描述為高分辨率圖像歷經一系列的退化因素的影響,產生模糊甚至失真的低分辨率圖像。假設x為原始高分辨率圖像,J為退化后的低分辨率圖像,則圖像退化模型可以表示為:

其中,H()表示整個退化過程,D()表示下采樣操作,B()表示模糊操作,L()表示光線干擾,n表示隨機噪聲,一般為高斯噪聲或泊松噪聲。圖像超分辨率重建的本質就是從歲反向求解x的過程,如式所示:

即構造相應的圖像恢復函數H-(-),對低分辨率圖像y進行逆向推算,去除由于軟硬件技術、環境因素和人為因素所帶來的模糊、下采樣和噪聲等影響,盡可能恢復出原始高分辨率圖像x。
5.核心代碼講解
5.1 main_test_swin2sr.py
class Swin2SR:def __init__(self, args):self.args = argsself.device = torch.device('cuda' if torch.cuda.is_available() else 'cpu')self.model = self.define_model()self.model.eval()self.model = self.model.to(self.device)self.test_results = OrderedDict()self.test_results['psnr'] = []self.test_results['ssim'] = []self.test_results['psnr_y'] = []self.test_results['ssim_y'] = []self.test_results['psnrb'] = []self.test_results['psnrb_y'] = []self.psnr, self.ssim, self.psnr_y, self.ssim_y, self.psnrb, self.psnrb_y = 0, 0, 0, 0, 0, 0def define_model(self):# 001 classical image srif self.args.task == 'classical_sr':model = net(upscale=self.args.scale, in_chans=3, img_size=self.args.training_patch_size, window_size=8,num_classes=3, embed_dim=96, depths=[2, 2, 6, 2], num_heads=[3, 6, 12, 24],mlp_ratio=4, upsampler='pixelshuffle', upsampler_params={'scale': self.args.scale})# 002 lightweight image srelif self.args.task == 'lightweight_sr':model = net(upscale=self.args.scale, in_chans=3, img_size=self.args.training_patch_size, window_size=8,num_classes=3, embed_dim=48, depths=[2, 2, 6, 2], num_heads=[3, 6, 12, 24],mlp_ratio=4, upsampler='pixelshuffle', upsampler_params={'scale': self.args.scale})# 003 real image srelif self.args.task == 'real_sr':if self.args.large_model:model = net(upscale=self.args.scale, in_chans=3, img_size=self.args.training_patch_size, window_size=8,num_classes=3, embed_dim=96, depths=[2, 2, 18, 2], num_heads=[3, 6, 12, 24],mlp_ratio=4, upsampler='pixelshuffle', upsampler_params={'scale': self.args.scale})else:model = net(upscale=self.args.scale, in_chans=3, img_size=self.args.training_patch_size, window_size=8,num_classes=3, embed_dim=48, depths=[2, 2, 18, 2], num_heads=[3, 6, 12, 24],mlp_ratio=4, upsampler='pixelshuffle', upsampler_params={'scale': self.args.scale})# 004 grayscale denoisingelif self.args.task == 'gray_dn':model = net(upscale=1, in_chans=1, img_size=self.args.training_patch_size, window_size=8,num_classes=1, embed_dim=48, depths=[2, 2, 6, 2], num_heads=[3, 6, 12, 24],mlp_ratio=4, upsampler='pixelshuffle', upsampler_params={'scale': 1})# 005 color denoisingelif self.args.task == 'color_dn':model = net(upscale=1, in_chans=3, img_size=self.args.training_patch_size, window_size=8,num_classes=3, embed_dim=48, depths=[2, 2, 6, 2], num_heads=[3, 6, 12, 24],mlp_ratio=4, upsampler='pixelshuffle', upsampler_params={'scale': 1})# 006 jpeg compression artifact reductionelif self.args.task == 'jpeg_car':model = net(upscale=1, in_chans=3, img_size=self.args.training_patch_size, window_size=8,num_classes=3, embed_dim=48, depths=[2, 2, 6, 2], num_heads=[3, 6, 12, 24],mlp_ratio=4, upsampler='pixelshuffle', upsampler_params={'scale': 1})# 007 color jpeg compression artifact reductionelif self.args.task == 'color_jpeg_car':model = net(upscale=1, in_chans=3, img_size=self.args.training_patch_size, window_size=8,num_classes=3, embed_dim=48, depths=[2, 2, 6, 2], num_heads=[3, 6, 12, 24],mlp_ratio=4, upsampler='pixelshuffle', upsampler_params={'scale': 1})else:raise NotImplementedError(f'Task [{self.args.task}] is not implemented.')return modeldef setup(self):folder, save_dir, border, window_size = self.args.folder_lq, './outputs/', 0, self.args.training_patch_sizereturn folder, save_dir, border, window_sizedef get_image_pair(self, path):imgname = os.path.splitext(os.path.basename(path))[0]img_lq = cv2.imread(path, cv2.IMREAD_UNCHANGED)img_gt = Noneif self.args.folder_gt is not None:img_gt = cv2.imread(os.path.join(self.args.folder_gt, f'{imgname}.png'), cv2.IMREAD_UNCHANGED)return imgname, img_lq, img_gtdef test(self, img_lq, model, args, window_size):_, _, h_old, w_old = img_lq.size()h_pad = (h_old // window_size + 1) * window_size - h_oldw_pad = (w_old // window_size + 1) * window_size - w_oldimg_lq = torch.cat([img_lq, torch.flip(img_lq, [2])], 2)[:, :, :h_old + h_pad, :]img_lq = torch.cat([img_lq, torch.flip(img_lq, [3])], 3)[:, :, :, :w_old + w_pad]output = model(img_lq)if args.task == 'compressed_sr':output = output[0][..., :h_old * args.scale, :w_old * args.scale]else:output = output[..., :h_old * args.scale, :w_old * args.scale]return outputdef evaluate(self, output, img_gt, border):output = output.data.squeeze().float().cpu().clamp_(0, 1).numpy()if output.ndim == 3:output = np.transpose(output[[2, 1, 0], :, :], (1, 2, 0)) # CHW-RGB to HCW-BGRoutput = (output * 255.0).round().astype(np.uint8) # float32 to uint8cv2.imwrite(f'{save_dir}/{imgname}_Swin2SR.png', output)if img_gt is not None:img_gt = (img_gt * 255.0).round().astype(np.uint8) # float32 to uint8img_gt = img_gt[:h_old * args.scale, :w_old * args.scale, ...] # crop gtimg_gt = np.squeeze(img_gt)psnr = util.calculate_psnr(output, img_gt, crop_border=border)ssim = util.calculate_ssim(output, img_gt, crop_border=border)self.test_results['psnr'].append(psnr)self.test_results['ssim'].append(ssim)if img_gt.ndim == 3: # RGB imagepsnr_y = util.calculate_psnr(output, img_gt, crop_border=border, test_y_channel=True)ssim_y = util.calculate_ssim(output, img_gt, crop_border=border, test_y_channel=True)self.test_results['psnr_y'].append(psnr_y)self.test_results['ssim_y'].append(ssim_y)if args.task in ['jpeg_car', 'color_jpeg_car']:psnrb = util.calculate_psnrb(output, img_gt, crop_border=border, test_y_channel=False)self.test_results['psnrb'].append(psnrb)if args.task in ['color_jpeg_car']:psnrb_y = util.calculate_psnrb(output, img_gt, crop_border=border, test_y_channel=True)self.test_results['psnrb_y'].append(psnrb_y)print('Testing {:d} {:20s} - PSNR: {:.2f} dB; SSIM: {:.4f}; PSNRB: {:.2f} dB;'該程序文件是一個用于圖像超分辨率重建的測試程序。程序首先通過命令行參數解析器解析輸入參數,包括任務類型、尺度因子、噪聲水平、JPEG壓縮因子等。然后加載模型并設置設備。接下來,程序設置文件夾和路徑,并創建一個用于保存結果的文件夾。然后,程序遍歷輸入文件夾中的所有圖像,讀取圖像并進行預處理。然后,程序使用模型對圖像進行推理,并將結果保存為圖像文件。最后,程序計算并打印出PSNR和SSIM等評估指標的平均值。
該程序文件依賴于其他模塊和函數,包括argparse、cv2、glob、numpy、collections、os、torch、requests等。其中,models.network_swin2sr模塊定義了Swin2SR模型,utils模塊包含了計算PSNR和SSIM的函數。
總體而言,該程序文件實現了圖像超分辨率重建的測試功能,包括加載模型、預處理圖像、進行推理、保存結果和計算評估指標等步驟。
5.2 predict.py
class Predictor(BasePredictor):def setup(self):"""Load the model into memory to make running multiple predictions efficient"""print("Loading pipeline...")self.device = "cuda:0"args = argparse.Namespace()args.scale = 4args.large_model = Falsetasks = ["classical_sr", "compressed_sr", "real_sr"]paths = ["weights/Swin2SR_ClassicalSR_X4_64.pth","weights/Swin2SR_CompressedSR_X4_48.pth","weights/Swin2SR_RealworldSR_X4_64_BSRGAN_PSNR.pth",]sizes = [64, 48, 128]self.models = {}for task, path, size in zip(tasks, paths, sizes):args.training_patch_size = sizeargs.task, args.model_path = task, pathself.models[task] = define_model(args)self.models[task].eval()self.models[task] = self.models[task].to(self.device)def predict(self,image: Path = Input(description="Input image"),task: str = Input(description="Choose a task",choices=["classical_sr", "real_sr", "compressed_sr"],default="real_sr",),) -> Path:"""Run a single prediction on the model"""model = self.models[task]window_size = 8scale = 4img_lq = cv2.imread(str(image), cv2.IMREAD_COLOR).astype(np.float32) / 255.0img_lq = np.transpose(img_lq if img_lq.shape[2] == 1 else img_lq[:, :, [2, 1, 0]], (2, 0, 1)) # HCW-BGR to CHW-RGBimg_lq = (torch.from_numpy(img_lq).float().unsqueeze(0).to(self.device)) # CHW-RGB to NCHW-RGB# inferencewith torch.no_grad():# pad input image to be a multiple of window_size_, _, h_old, w_old = img_lq.size()h_pad = (h_old // window_size + 1) * window_size - h_oldw_pad = (w_old // window_size + 1) * window_size - w_oldimg_lq = torch.cat([img_lq, torch.flip(img_lq, [2])], 2)[:, :, : h_old + h_pad, :]img_lq = torch.cat([img_lq, torch.flip(img_lq, [3])], 3)[:, :, :, : w_old + w_pad]output = model(img_lq)if task == "compressed_sr":output = output[0][..., : h_old * scale, : w_old * scale]else:output = output[..., : h_old * scale, : w_old * scale]# save imageoutput = output.data.squeeze().float().cpu().clamp_(0, 1).numpy()if output.ndim == 3:output = np.transpose(output[[2, 1, 0], :, :], (1, 2, 0)) # CHW-RGB to HCW-BGRoutput = (output * 255.0).round().astype(np.uint8) # float32 to uint8output_path = "/tmp/out.png"cv2.imwrite(output_path, output)return Path(output_path)
這個程序文件是一個用于圖像超分辨率預測的預測器。它使用了Swin2SR模型來進行預測。文件中定義了一個名為Predictor的類,繼承自BasePredictor類。在setup方法中,加載了模型并將其放入內存中以提高多次預測的效率。在predict方法中,通過傳入一個輸入圖像和一個任務類型,可以運行單個預測。預測過程中,首先將輸入圖像進行預處理,然后使用模型進行推理,最后將輸出圖像保存到指定路徑并返回。
5.3 ui.py
class Swin2SR:def __init__(self, args):self.args = argsself.device = torch.device('cuda' if torch.cuda.is_available() else 'cpu')self.model = self.define_model()self.model.eval()self.model = self.model.to(self.device)def define_model(self):if self.args.task == 'classical_sr':model = net(upscale=self.args.scale, in_chans=3, img_size=self.args.training_patch_size, window_size=8,img_range=1., depths=[6, 6, 6, 6, 6, 6], embed_dim=180, num_heads=[6, 6, 6, 6, 6, 6],mlp_ratio=2, upsampler='pixelshuffle', resi_connection='1conv')param_key_g = 'params'elif self.args.task in ['lightweight_sr']:model = net(upscale=self.args.scale, in_chans=3, img_size=64, window_size=8,img_range=1., depths=[6, 6, 6, 6], embed_dim=60, num_heads=[6, 6, 6, 6],mlp_ratio=2, upsampler='pixelshuffledirect', resi_connection='1conv')param_key_g = 'params'elif self.args.task == 'compressed_sr':model = net(upscale=self.args.scale, in_chans=3, img_size=self.args.training_patch_size, window_size=8,img_range=1., depths=[6, 6, 6, 6, 6, 6], embed_dim=180, num_heads=[6, 6, 6, 6, 6, 6],mlp_ratio=2, upsampler='pixelshuffle_aux', resi_connection='1conv')param_key_g = 'params'elif self.args.task == 'real_sr':if not self.args.large_model:model = net(upscale=self.args.scale, in_chans=3, img_size=64, window_size=8,img_range=1., depths=[6, 6, 6, 6, 6, 6], embed_dim=180, num_heads=[6, 6, 6, 6, 6, 6],mlp_ratio=2, upsampler='nearest+conv', resi_connection='1conv')else:model = net(upscale=self.args.scale, in_chans=3, img_size=64, window_size=8,img_range=1., depths=[6, 6, 6, 6, 6, 6, 6, 6, 6], embed_dim=240,num_heads=[8, 8, 8, 8, 8, 8, 8, 8, 8],mlp_ratio=2, upsampler='nearest+conv', resi_connection='3conv')param_key_g = 'params_ema'elif self.args.task == 'jpeg_car':model = net(upscale=1, in_chans=1, img_size=126, window_size=7,img_range=255., depths=[6, 6, 6, 6, 6, 6], embed_dim=180, num_heads=[6, 6, 6, 6, 6, 6],mlp_ratio=2, upsampler='', resi_connection='1conv')param_key_g = 'params'elif self.args.task == 'color_jpeg_car':model = net(upscale=1, in_chans=3, img_size=126, window_size=7,img_range=255., depths=[6, 6, 6, 6, 6, 6], embed_dim=180, num_heads=[6, 6, 6, 6, 6, 6],mlp_ratio=2, upsampler='', resi_connection='1conv')param_key_g = 'params'pretrained_model = torch.load(self.args.model_path)model.load_state_dict(pretrained_model[param_key_g] if param_key_g in pretrained_model.keys() else pretrained_model,strict=True)return modeldef setup(self):if self.args.task in ['classical_sr', 'lightweight_sr', 'compressed_sr']:save_dir = f'results/swin2sr_{self.args.task}_x{self.args.scale}'if self.args.save_img_only:folder = self.args.folder_lqelse:folder = self.args.folder_gtborder = self.args.scalewindow_size = 8ui.py是一個用于圖像超分辨率的PyQt5界面程序。它導入了PyQt5和其他一些必要的庫,并定義了一些函數來加載模型、設置參數、獲取圖像對和進行測試。主要的函數是main()函數,它接受一個圖像路徑作為輸入,并根據指定的參數加載模型并對圖像進行超分辨率處理。處理結果將保存在指定的文件夾中。
5.4 models\network_swin2sr.py
class SwinTransformerBlock(nn.Module):r""" Swin Transformer Block.Args:dim (int): Number of input channels.input_resolution (tuple[int]): Input resulotion.num_heads (int): Number of attention heads.window_size (int): Window size.shift_size (int): Shift size for SW-MSA.mlp_ratio (float): Ratio of mlp hidden dim to embedding dim.qkv_bias (bool, optional): If True, add a learnable bias to query, key, value. Default: Truedrop (float, optional): Dropout rate. Default: 0.0attn_drop (float, optional): Attention dropout rate. Default: 0.0drop_path (float, optional): Stochastic depth rate. Default: 0.0act_layer (nn.Module, optional): Activation layer. Default: nn.GELUnorm_layer (nn.Module, optional): Normalization layer. Default: nn.LayerNormpretrained_window_size (int): Window size in pre-training."""def __init__(self, dim, input_resolution, num_heads, window_size=7, shift_size=0,mlp_ratio=4., qkv_bias=True, drop=0., attn_drop=0., drop_path=0.,act_layer=nn.GELU, norm_layer=nn.LayerNorm, pretrained_window_size=0):super().__init__()self.dim = dimself.input_resolution = input_resolutionself.num_heads = num_headsself.window_size = window_sizeself.shift_size = shift_sizeself.mlp_ratio = mlp_ratioif min(self.input_resolution) <= self.window_size:# if window size is larger than input resolution, we don't partition windowsself.shift_size = 0self.window_size = min(self.input_resolution)assert 0 <= self.shift_size < self.window_size, "shift_size must in 0-window_size"self.norm1 = norm_layer(dim)self.attn = WindowAttention(dim, window_size=to_2tuple(self.window_size), num_heads=num_heads,qkv_bias=qkv_bias, attn_drop=attn_drop, proj_drop=drop,pretrained_window_size=to_2tuple(pretrained_window_size))self.drop_path = DropPath(drop_path) if drop_path > 0. else nn.Identity()self.norm2 = norm_layer(dim)mlp_hidden_dim = int(dim * mlp_ratio)self.mlp = Mlp(in_features=dim, hidden_features=mlp_hidden_dim, act_layer=act_layer, drop=drop)if self.shift_size > 0:attn_mask = self.calculate_mask(self.input_resolution)else:attn_mask = Noneself.register_buffer("attn_mask", attn_mask)def calculate_mask(self, x_size):# calculate attention mask for SW-MSAH, W = x_sizeimg_mask = torch.zeros((1, H, W, 1)) # 1 H W 1h_slices = (slice(0, -self.window_size),slice(-self.window_size, -self.shift_size),slice(-self.shift_size, None))w_slices = (slice(0, -self.window_size),slice(-self.window_size, -self.shift_size),slice(-self.shift_size, None))cnt = 0for h in h_slices:for w in w_slices:img_mask[:, h, w, :] = cntcnt += 1mask_windows = window_partition(img_mask, self.window_size) # nW, window_size, window_size, 1mask_windows = mask_windows.view(-1, self.window_size * self.window_size)attn_mask = mask_windows.unsqueeze(1) - mask_windows.unsqueeze(2)attn_mask = attn_mask.masked_fill(attn_mask != 0, float(-100.0)).masked_fill(attn_mask == 0, float(0.0))return attn_maskdef forward(self, x):"""Args:x: input features with shape of (B, N, C)."""B, N, C = x.shapeshortcut = xx = self.norm1(x)x = x.view(B, N, C)if self.shift_size > 0:shifted_x = torch.roll(x, shifts=(-self.shift_size, -self.shift_size), dims=(1, 2))else:shifted_x = xx = self.attn(x, mask=self.attn_mask)x = shortcut + self.drop_path(x)x = x + self.drop_path(self.mlp(self.norm2(x)))return x
這是一個實現Swin Transformer模型的Python程序文件。Swin Transformer是一種用于壓縮圖像超分辨率和恢復的模型,具體細節可以參考論文https://arxiv.org/abs/2209.11345。
程序文件中定義了一些輔助函數和模塊,包括Mlp、window_partition、window_reverse、WindowAttention和SwinTransformerBlock。
Mlp是一個多層感知機模塊,用于對輸入進行線性變換和激活函數處理。
window_partition和window_reverse函數用于將輸入圖像劃分為窗口,并將窗口恢復為原始圖像。
WindowAttention是一個基于窗口的多頭自注意力模塊,支持相對位置偏置。
SwinTransformerBlock是Swin Transformer的一個基本模塊,包括窗口注意力和多層感知機。
整個程序文件實現了Swin Transformer模型的核心組件,可以用于圖像超分辨率和恢復任務。
5.5 utils\plots.py
class ImageLoader:def __init__(self, debug=False, norm=True, resize=None):self.debug = debugself.norm = normself.resize = resizedef load_img(self, filename):img = cv2.imread(filename)img = cv2.cvtColor(img, cv2.COLOR_BGR2RGB)if self.norm: img = img / 255.img = img.astype(np.float32)if self.debug:print (img.shape, img.dtype, img.min(), img.max())if self.resize:img = cv2.resize(img, (self.resize[0], self.resize[1]))return imgdef plot_all(self, images, axis='off', figsize=(16, 8)):fig = plt.figure(figsize=figsize, dpi=80)nplots = len(images)for i in range(nplots):plt.subplot(1,nplots,i+1)plt.axis(axis)plt.imshow(images[i])plt.show()
這個程序文件是一個用于繪制圖像的工具文件,文件名為utils\plots.py。該文件包含了兩個函數load_img和plot_all。
load_img函數用于加載圖像文件。它接受一個文件名作為參數,并可選擇是否進行調試、歸一化和調整大小。函數首先使用OpenCV庫的imread函數讀取圖像文件,然后將圖像從BGR顏色空間轉換為RGB顏色空間。如果選擇進行歸一化,則將圖像的像素值除以255,并將其轉換為32位浮點數類型。如果選擇進行調試,則會打印圖像的形狀、數據類型、最小值和最大值。如果選擇調整大小,則會使用OpenCV庫的resize函數將圖像調整為指定的大小。最后,函數返回加載和處理后的圖像。
plot_all函數用于繪制多個圖像。它接受一個圖像列表作為參數,并可選擇繪制軸的樣式和圖像的大小。函數首先創建一個matplotlib的Figure對象,并設置其大小和分辨率。然后,根據圖像列表的長度,在Figure對象中創建相應數量的子圖。對于每個子圖,設置軸的樣式,并使用imshow函數顯示對應的圖像。最后,調用show函數顯示繪制的圖像。
這個程序文件提供了方便的函數來加載和繪制圖像,可以在圖像處理和分析的過程中使用。
5.6 utils\util_calculate_psnr_ssim.py
import cv2
import torch
import numpy as npclass ImageMetrics:def __init__(self, input_order='HWC'):self.input_order = input_orderdef calculate_psnr(self, img1, img2, crop_border, test_y_channel=False):assert img1.shape == img2.shape, (f'Image shapes are differnet: {img1.shape}, {img2.shape}.')if self.input_order not in ['HWC', 'CHW']:raise ValueError(f'Wrong input_order {self.input_order}. Supported input_orders are ' '"HWC" and "CHW"')img1 = self.reorder_image(img1)img2 = self.reorder_image(img2)img1 = img1.astype(np.float64)img2 = img2.astype(np.float64)if crop_border != 0:img1 = img1[crop_border:-crop_border, crop_border:-crop_border, ...]img2 = img2[crop_border:-crop_border, crop_border:-crop_border, ...]if test_y_channel:img1 = self.to_y_channel(img1)img2 = self.to_y_channel(img2)mse = np.mean((img1 - img2) ** 2)if mse == 0:return float('inf')return 20. * np.log10(255. / np.sqrt(mse))......
該程序文件是一個用于計算圖像質量評估指標的工具文件。主要包含以下幾個函數:
-
calculate_psnr(img1, img2, crop_border, input_order=‘HWC’, test_y_channel=False):計算圖像的峰值信噪比(PSNR)指標。
-
_ssim(img1, img2):計算圖像的結構相似性(SSIM)指標。
-
calculate_ssim(img1, img2, crop_border, input_order=‘HWC’, test_y_channel=False):計算圖像的結構相似性(SSIM)指標。
-
_blocking_effect_factor(im):計算圖像的塊效應因子。
-
calculate_psnrb(img1, img2, crop_border, input_order=‘HWC’, test_y_channel=False):計算圖像的PSNR-B指標。
-
reorder_image(img, input_order=‘HWC’):重新排列圖像的通道順序。
-
to_y_channel(img):將圖像轉換為Y通道。
-
bgr2ycbcr(img, y_only=False):將BGR圖像轉換為YCbCr圖像。
這些函數可以用于評估圖像處理算法的
6.系統整體結構
整體功能和構架概述:
該圖像超分辨率系統的整體功能是實現圖像的超分辨率重建。它使用了基于Swin Transformer的模型進行圖像超分辨率處理。系統包含了多個程序文件,每個文件負責不同的功能模塊。主要的程序文件包括:
-
main_test_swin2sr.py:用于圖像超分辨率重建的測試程序。負責加載模型、預處理圖像、進行推理、保存結果和計算評估指標等步驟。
-
predict.py:圖像超分辨率預測的預測器。使用Swin2SR模型進行預測,定義了Predictor類,負責加載模型并進行預測。
-
ui.py:圖像超分辨率的PyQt5界面程序。通過界面輸入圖像路徑和參數,調用predict.py中的函數進行超分辨率處理。
-
models\network_swin2sr.py:實現Swin Transformer模型的核心組件。定義了多個輔助函數和模塊,包括Mlp、WindowAttention和SwinTransformerBlock等。
-
utils\plots.py:用于繪制圖像的工具文件。包含load_img和plot_all函數,用于加載和繪制圖像。
-
utils\util_calculate_psnr_ssim.py:用于計算圖像質量評估指標的工具文件。包含多個函數,用于計算PSNR、SSIM和其他指標。
-
utils_init_.py:空文件,用于標識utils文件夾為Python模塊。
下表整理了每個文件的功能:
| 文件路徑 | 功能 |
|---|---|
| E:\視覺項目\shop\基于Swin_Transformer的圖像超分辨率系統\code\main_test_swin2sr.py | 圖像超分辨率重建的測試程序,包括加載模型、預處理圖像、進行推理、保存結果和計算評估指標等步驟 |
| E:\視覺項目\shop\基于Swin_Transformer的圖像超分辨率系統\code\predict.py | 圖像超分辨率預測的預測器,定義了Predictor類,負責加載模型并進行預測 |
| E:\視覺項目\shop\基于Swin_Transformer的圖像超分辨率系統\code\ui.py | 圖像超分辨率的PyQt5界面程序,通過界面輸入圖像路徑和參數,調用predict.py中的函數進行超分辨率處理 |
| E:\視覺項目\shop\基于Swin_Transformer的圖像超分辨率系統\code\models\network_swin2sr.py | 實現Swin Transformer模型的核心組件,包括輔助函數和模塊,如Mlp、WindowAttention和SwinTransformerBlock |
| E:\視覺項目\shop\基于Swin_Transformer的圖像超分辨率系統\code\utils\plots.py | 用于繪制圖像的工具文件,包含load_img和plot_all函數,用于加載和繪制圖像 |
| E:\視覺項目\shop\基于Swin_Transformer的圖像超分辨率系統\code\utils\util_calculate_psnr_ssim.py | 用于計算圖像質量評估指標的工具文件,包含多個函數,用于計算PSNR、SSIM和其他指標 |
| E:\視覺項目\shop\基于Swin_Transformer的圖像超分辨率系統\code\utils_init_.py | 空文件,用于標識utils文件夾為Python模塊 |
7.Swin_Transformer用于超分辨率重建
參考該博客提出的RefSR工作,主要觀點是將Transformer作為一個attention,這樣可以更好地將參考圖像(Ref)的紋理信息轉移到高質圖像(HR)中。做法還是比較有意思的,如下圖所示,將上采樣的LR圖像、依次向下/上采樣的Ref圖像、原始Ref圖像中提取的紋理特征分別作為Q、K、V。紋理Transformer包含了4個結構:1)DNN實現的可學習的紋理提取器(learnable texture extractor)2)相關性嵌入模塊( relevance embedding)3)用于紋理轉換的硬注意力模塊(hard-attention)4)用于紋理合成的軟注意力模塊(soft-attention)。此外整個紋理Transformer模塊可以跨尺度的方式進一步堆疊,這使得能夠從不同尺度(例如,從1x倍到4x倍放大率)恢復紋理。

網絡的整體架構
如下圖所示,將多個紋理Transformer(即上圖)堆疊、上采下采融合來實現超分。
其中RBS為多個殘差Block,CSFI為跨尺度特征集成模塊(ross-scale feature integration )
紋理Transformer

即圖,介紹一下他的四個組件。
1)DNN實現的可學習的紋理提取器。就是將圖像送入DNN,然后DNN可以訓練
2)相關性嵌入模塊。使用歸一化內積計算Q、K之間的相關性。獲得矩陣r i , j r_{i,j}r
3)硬注意力。通過h i = a r g m a x ( r i , j ) h_{i}=argmax(r_{i,j})h
4)軟注意力。獲得軟注意力圖s i = a r g m a x ( r i , j ) s_{i}=argmax(r_{i,j})s
再分析一下這個公式,當S大的時候,說明當前塊和T的相關性大,所以用更多的T的特征,如果S小,則使用更少的參考幀特征。

損失函數
L1 loss + GAN loss + Percepture Loss
網絡結構
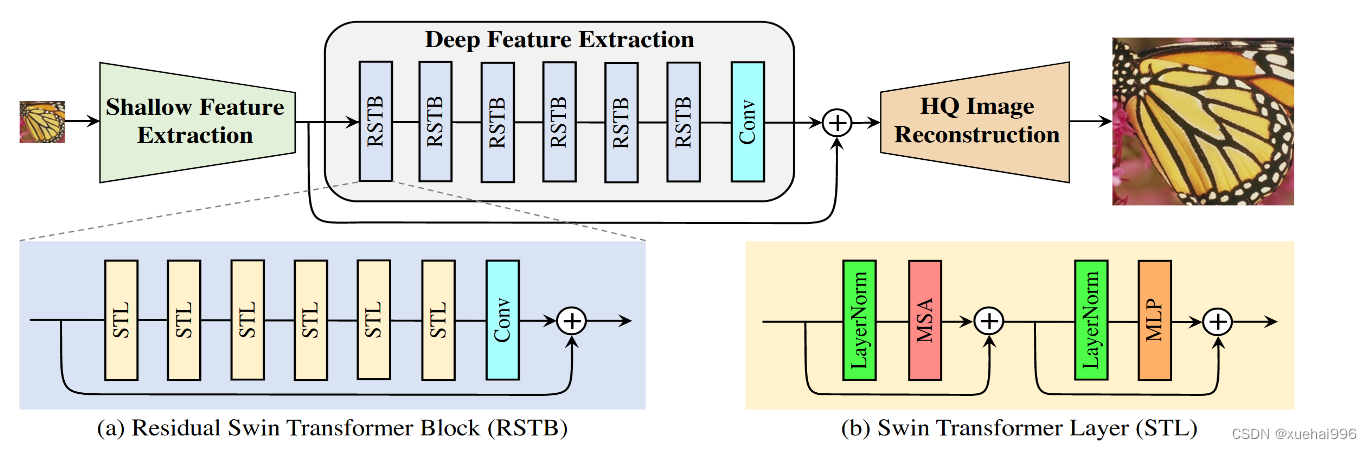
1)Shallow Feature Extraction 為一層3x3卷積。
2)HQ Image Reconstruction在SR任務中采用sub-pixel Conv,就是unpixelShuffle。denoise和JPEG去偽影用一層卷積。
3)對STL,就是Transformer的Encoder結構。將輸入劃分為M ? M M*MM?M個塊X,然后每個X映射為QKV,通過多頭attention后將輸出concat。MLP通過兩層FC實現。作者還進行了劃窗來避免圖像塊之間的信息不融合問題。步長為M / 2 M/2M/2
EMHA
主要是在獲得QKV之后,將QKV特征分為s組,每組分別進行attention獲得輸出O,然后將輸出Concat,這樣可以將大矩陣相乘拆分為多個小矩陣相乘。這也是Transformer常見的減少參數操作。

HFM
此外該博客的作者還用了一個High-frequencyFiltering Module (HFM)提取高頻信息,結構如下,僅供參考。

Microsoft Bing Turing ISR(T-ISR)
Introducing Turing Image Super Resolution: AI powered image enhancements for Microsoft Edge and Bing Maps
這篇不算論文,是微軟介紹自家用于Microsoft Edge和Bing Maps上ISR的技術博客。但是效果非常Amazing啊,但缺點是有些地方沒有仔細介紹。
設計原則
1)人類視覺為基準(Human eyes as the north star)
廣泛使用的指標如PSNR,SSIM并不總是和人眼視覺的直觀感受匹配的,同時也需要GT圖。我們構建了一個并行評估工具匹配人眼判斷,并將這個工具作為north star metric來引導模型訓練。(可是作者沒介紹這個工具是啥55555)
2)噪聲建模(Noise modeling)
開始作者也是將HR圖像降質然后構建HR-LR圖相對訓練。但這樣有些case效果好,但是對真實的LR圖像不魯棒。因此隨機對輸入圖像用blurring, compression 和 gaussian noise進行破壞可以恢復細節。
3)Perceptual and GAN loss
僅pixel loss不夠,要引入感知和GAN loss,并用權重結合。
4)Transformers for vision
CNN和Transformer各有優缺點,因此未利用他們各自優點,將網絡分為Enhance和Zoom,前者使用Transformer,后者使用CNN。(其實這段也沒詳細介紹各自優缺點是什么。整體四準則很對我胃口啊,果然英雄所見略同hhhh)
DeepEnhance – Cleaning and Enhancing Images
在處理高度壓縮和從遠程衛星拍攝的航拍照片等very noise圖像時,Transformer清理噪聲做的很好。如人臉的噪聲和處理包含很多紋理的森林的特征就很不同。這是因為大數據集和Transformer卓越的遠程記憶能力。我們先使用了一個稀疏Transformer,將其放大以支持非常大的序列長度來“Enhance”圖像,產生干凈的,crisper和更具吸引力,尺寸相同的圖像。有些場景不需要放大圖像,那到這里就可以停止了。
8.系統整合
下圖完整源碼&環境部署視頻教程&自定義UI界面

參考博客《基于Swin_Transformer的圖像超分辨率系統》
9.參考文獻
[1]盤展鴻,朱鑒,遲小羽,等.基于特征融合和注意力機制的圖像超分辨率模型[J].計算機應用研究.2022,39(3).DOI:10.19734/j.issn.1001-3695.2021.07.0288 .
[2]鄧焱文.基于深度學習的超分辨率重建在人臉識別中的應用[D].2019.
[3]Yu-Qi Liu,Xin Du,Hui-Liang Shen,等.Estimating Generalized Gaussian Blur Kernels for Out-of-Focus Image Deblurring[J].IEEE Transactions on Circuits & Systems for Video Technology.2020,31(3).829-843.DOI:10.1109/TCSVT.2020.2990623 .
[4]Shengxiang Zhang,Gaobo Liang,Shuwan Pan,等.A Fast Medical Image Super Resolution Method Based on Deep Learning Network[J].IEEE Access.2018.712319-12327.DOI:10.1109/ACCESS.2018.2871626 .
[5]Huihui Song,Qingshan Liu,Guojie Wang,等.Spatiotemporal Satellite Image Fusion Using Deep Convolutional Neural Networks[J].IEEE journal of selected topics in applied earth observations & remote sensing.2018,11(3).821-829.DOI:10.1109/JSTARS.2018.2797894 .
[6]Park, S.,Serpedin, E.,Qaraqe, K..Gaussian Assumption: The Least Favorable but the Most Useful [Lecture Notes][J].IEEE Signal Processing Magazine.2013,30(3).183-186.
[7]Mittal, A.,Soundararajan, R.,Bovik, A.C..Making a “Completely Blind” Image Quality Analyzer[J].Signal Processing Letters, IEEE.2013,20(3).209-212.DOI:10.1109/LSP.2012.2227726 .
[8]Ogawa, T.,Haseyama, M..Missing Intensity Interpolation Using a Kernel PCA-Based POCS Algorithm and its Applications[J].IEEE Transactions on Image Processing.2011,20(2).
[9]Yang, J.Wright, J.Huang, T.Ma, Y..Image Super-Resolution Via Sparse Representation[J].IEEE Transactions on Image Processing.2010,19(11).2861-2873.
[10]Bovik A.C.,Zhou Wang,Simoncelli E.P.,等.Image quality assessment: from error visibility to structural similarity[J].IEEE Transactions on Image Processing.2004,13(4).


malloc,calloc,realloc函數的介紹使用及柔性數組的介紹)

)


———HTTPS:保護網絡通信安全的關鍵)