文章目錄
- 前言
- 設計思路
- SDK實現步驟
- 1. 創建SDK Maven項目(sdk目錄)
- 2. 實現配置類
- 3. 實現認證邏輯
- 4. 實現攔截器
- 5. 實現自動配置
- 6. 創建spring.factories文件
- 使用方集成步驟
- 1. 引入SDK依賴
- 2. 配置Application屬性
- 3. 創建測試接口
- 4. 測試接口訪問
- SDK擴展功能
- 總結
前言
Spring Boot作為當前最流行的Java開發框架之一,其Starter機制為開發者提供了極大的便利,使得集成各種功能變得更加簡單。為了幫助開發者快速實現基于AppID和AppSecret的應用認證功能,我們設計并實現了這個認證SDK。該SDK遵循Spring Boot Starter的最佳實踐,可以無縫集成到Spring Boot應用中,提供開箱即用的Basic認證功能。

設計思路
創建一個Spring Boot Starter風格的SDK,它會:
1.自動配置認證所需的組件
2.提供簡單的配置方式管理多個AppID/AppSecret
3.通過攔截器自動保護指定接口
4.提供統一的錯誤響應處理
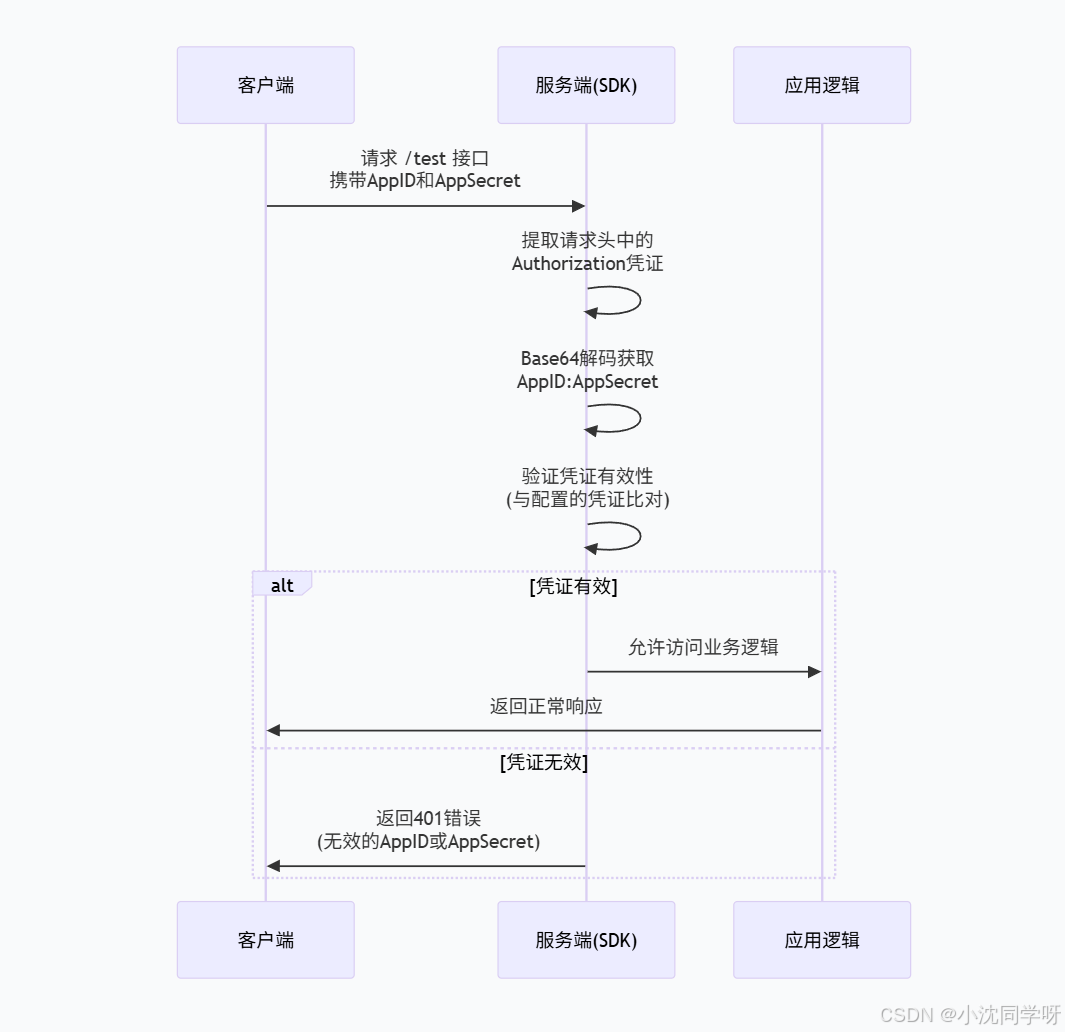
下面是整個認證流程的示意圖:
SDK實現步驟
1. 創建SDK Maven項目(sdk目錄)
創建sdk/pom.xml文件:
<?xml version="1.0" encoding="UTF-8"?>
<project xmlns="http://maven.apache.org/POM/4.0.0" xmlns:xsi="http://www.w3.org/2001/XMLSchema-instance"xsi:schemaLocation="http://maven.apache.org/POM/4.0.0 https://maven.apache.org/xsd/maven-4.0.0.xsd"><modelVersion>4.0.0</modelVersion><groupId>com.example</groupId><artifactId>java-basic-sdk</artifactId><version>0.0.1-SNAPSHOT</version><packaging>jar</packaging><name>java-basic-sdk</name><description>java-basic-sdk</description><properties><java.version>1.8</java.version><project.build.sourceEncoding>UTF-8</project.build.sourceEncoding><project.reporting.outputEncoding>UTF-8</project.reporting.outputEncoding><spring-boot.version>2.6.13</spring-boot.version></properties><dependencies><dependency><groupId>org.springframework.boot</groupId><artifactId>spring-boot-starter-web</artifactId></dependency><dependency><groupId>org.springframework.boot</groupId><artifactId>spring-boot-starter-test</artifactId><scope>test</scope></dependency></dependencies><dependencyManagement><dependencies><dependency><groupId>org.springframework.boot</groupId><artifactId>spring-boot-dependencies</artifactId><version>${spring-boot.version}</version><type>pom</type><scope>import</scope></dependency></dependencies></dependencyManagement><build><plugins><plugin><groupId>org.apache.maven.plugins</groupId><artifactId>maven-compiler-plugin</artifactId><configuration><source>${java.version}</source><target>${java.version}</target></configuration></plugin></plugins></build>
</project>
2. 實現配置類
創建配置屬性類AppAuthProperties.java:
/*** AppAuthProperties* @author senfel* @version 1.0* @date 2025/9/12 16:17*/
@ConfigurationProperties(prefix = "app.auth")
public class AppAuthProperties {/*** 是否啟用App認證*/private boolean enabled = true;/*** 需要認證的路徑模式(默認保護/test接口)*/private String[] includePatterns = new String[]{"/test/**"};/*** 排除的路徑模式*/private String[] excludePatterns = new String[]{};/*** 存儲有效的AppID和AppSecret鍵值對*/private Map<String, String> clients = new HashMap<>();public boolean isEnabled() {return enabled;}public void setEnabled(boolean enabled) {this.enabled = enabled;}public String[] getIncludePatterns() {return includePatterns;}public void setIncludePatterns(String[] includePatterns) {this.includePatterns = includePatterns;}public String[] getExcludePatterns() {return excludePatterns;}public void setExcludePatterns(String[] excludePatterns) {this.excludePatterns = excludePatterns;}public Map<String, String> getClients() {return clients;}public void setClients(Map<String, String> clients) {this.clients = clients;}
}
3. 實現認證邏輯
創建認證服務類AppAuthService.java:
/*** AppAuthService* @author senfel* @version 1.0* @date 2025/9/12 16:19*/
public class AppAuthService {private final AppAuthProperties properties;public AppAuthService(AppAuthProperties properties) {this.properties = properties;}/*** 驗證AppID和AppSecret是否有效*/public boolean validateCredentials(String appId, String appSecret) {if (!StringUtils.hasText(appId) || !StringUtils.hasText(appSecret)) {return false;}// 檢查配置中是否存在該AppID且AppSecret匹配return properties.getClients().containsKey(appId) &&properties.getClients().get(appId).equals(appSecret);}/*** 從HTTP Basic認證頭中提取憑證*/public String[] extractCredentials(String authorizationHeader) {if (!StringUtils.hasText(authorizationHeader) ||!authorizationHeader.startsWith("Basic ")) {return null;}try {String base64Credentials = authorizationHeader.substring(6);String credentials = new String(Base64.getDecoder().decode(base64Credentials));return credentials.split(":", 2);} catch (Exception e) {return null;}}
}
4. 實現攔截器
創建認證攔截器AppAuthInterceptor.java:
/*** AppAuthInterceptor* @author senfel* @version 1.0* @date 2025/9/12 16:20*/
public class AppAuthInterceptor implements HandlerInterceptor {private final AppAuthService appAuthService;public AppAuthInterceptor(AppAuthService appAuthService) {this.appAuthService = appAuthService;}@Overridepublic boolean preHandle(HttpServletRequest request, HttpServletResponse response,Object handler) throws Exception {// 從請求頭中獲取Authorization信息String authorizationHeader = request.getHeader("Authorization");// 提取AppID和AppSecretString[] credentials = appAuthService.extractCredentials(authorizationHeader);if (credentials == null || credentials.length != 2) {sendErrorResponse(response, "缺少有效的Authorization請求頭,請使用Basic認證格式");return false;}String appId = credentials[0];String appSecret = credentials[1];// 驗證憑證if (!appAuthService.validateCredentials(appId, appSecret)) {sendErrorResponse(response, "無效的AppID或AppSecret");return false;}return true;}private void sendErrorResponse(HttpServletResponse response, String message)throws Exception {response.setStatus(HttpServletResponse.SC_UNAUTHORIZED);response.setContentType("application/json;charset=UTF-8");response.getWriter().write("{\"code\": 401, \"message\": \"" + message + "\"}");}
}
5. 實現自動配置
創建自動配置類AppAuthAutoConfiguration.java:
/*** AppAuthAutoConfiguration* @author senfel* @version 1.0* @date 2025/9/12 16:22*/
@Configuration
@ConditionalOnWebApplication
@EnableConfigurationProperties(AppAuthProperties.class)
@ConditionalOnProperty(prefix = "app.auth", name = "enabled", havingValue = "true", matchIfMissing = true)
public class AppAuthAutoConfiguration implements WebMvcConfigurer {private final AppAuthProperties properties;public AppAuthAutoConfiguration(AppAuthProperties properties) {this.properties = properties;}@Beanpublic AppAuthService appAuthService() {return new AppAuthService(properties);}@Beanpublic AppAuthInterceptor appAuthInterceptor(AppAuthService appAuthService) {return new AppAuthInterceptor(appAuthService);}@Overridepublic void addInterceptors(InterceptorRegistry registry) {registry.addInterceptor(appAuthInterceptor(appAuthService())).addPathPatterns(properties.getIncludePatterns()).excludePathPatterns(properties.getExcludePatterns());}
}
6. 創建spring.factories文件
創建sdk/src/main/resources/META-INF/spring.factories文件:
org.springframework.boot.autoconfigure.EnableAutoConfiguration=\
com.example.javabasicsdk.config.AppAuthAutoConfiguration
使用方集成步驟
1. 引入SDK依賴
在使用方的項目中添加SDK依賴:
<!--java-basic-sdk-->
<dependency><groupId>com.example</groupId><artifactId>java-basic-sdk</artifactId><version>0.0.1-SNAPSHOT</version>
</dependency>
2. 配置Application屬性
在使用方的application.yml中配置允許訪問的AppID和AppSecret:
# App認證配置
app:auth:enabled: trueinclude-patterns:- /test/**# 配置允許訪問的AppID和AppSecretclients:appid1: "appsecret1"
3. 創建測試接口
創建測試ControllerTestBasicController.java:
/*** TestController* @author senfel* @version 1.0* @date 2025/9/12 16:33*/
@RestController
@RequestMapping("/test")
public class TestBasicController {@GetMappingpublic String test() {return "認證成功,可以訪問此接口";}@GetMapping("/sub")public String testSub() {return "認證成功,可以訪問子接口";}
}
4. 測試接口訪問
不帶basic請求頭,會提示認證失敗:

帶錯誤的appId/appSecret,會提示驗證失敗:

正確的認證信息可以訪問:

SDK擴展功能
如果想進一步增強SDK的功能,可以考慮:
1.添加日志記錄:記錄認證成功和失敗的請求
2.限流功能:為每個AppID添加請求頻率限制
3.動態配置:支持從數據庫或配置中心動態加載AppID/AppSecret
4.管理接口:提供管理接口用于動態添加/刪除AppID和AppSecret
5.多種認證方式:除了Basic認證,支持自定義請求頭等方式
總結
通過以上實現,創建一個Spring Boot Starter風格的AppID/AppSecret認證SDK,使用方只需:
1.引入SDK依賴
2.在application.yml中配置允許訪問的AppID和AppSecret
3.創建需要保護的接口(如/test)
SDK會自動攔截配置的接口路徑,驗證請求中的AppID和AppSecret,只有憑證有效的請求才能訪問受保護的接口。這種設計提供了開箱即用的體驗,同時保持了足夠的靈活性,可以通過配置調整保護的范圍和允許的憑證。


)


)


)