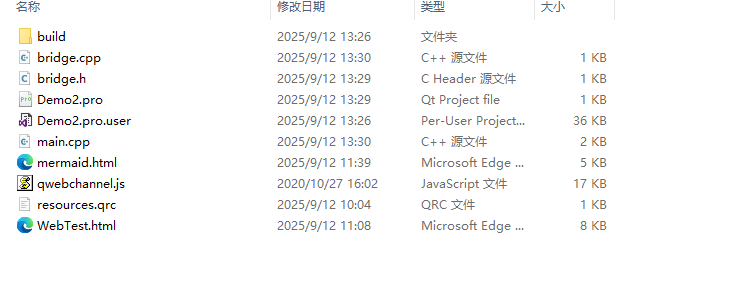
第1章 本地目錄結構

1.1 自己寫的兩個網頁(html)
- mermaid.html? ? ? ? (自己寫的網頁界面)
- WebTest.html? ? ? ? ? (自己寫的網頁界面)
- qwebchannel.js? ? ? ?(Qt下載安裝之后,會在安裝目錄下有這個文件,需要將安裝目錄下的改文件拷貝到自己項目目錄下)
1.2 創建一個資源文件(xxxx.qrc)
在此我創建的文件為:resources.qrc。文件名自己隨便,但是后綴要為【.qrc】
文件內容:
<RCC>
<qresource prefix="/">
<file>mermaid.html</file>
</qresource>
<qresource prefix="/">
<file>WebTest.html</file>
</qresource>
<qresource prefix="/qt">
<file>qwebchannel.js</file>
</qresource>
</RCC>
文件中的內容是將資源文件,管理起來。引入自己的html文件和JS腳本。
前綴可以自己定:【<qresource prefix="/">】或者【<qresource prefix="/qt">】。定好前綴之后,以后在Qt代碼中就要按照這個前綴來拼接出資源文件的位置。
1.3 將資源文件引入到Qt項目
在Qt的項目配置文件目錄【xxx.pro】,我的是【Demo2.pro】中引入資源文件
RESOURCES += \
resources.qrc
第2章 資源源碼
2.1?mermaid.html?
<!DOCTYPE html>
<html lang="en">
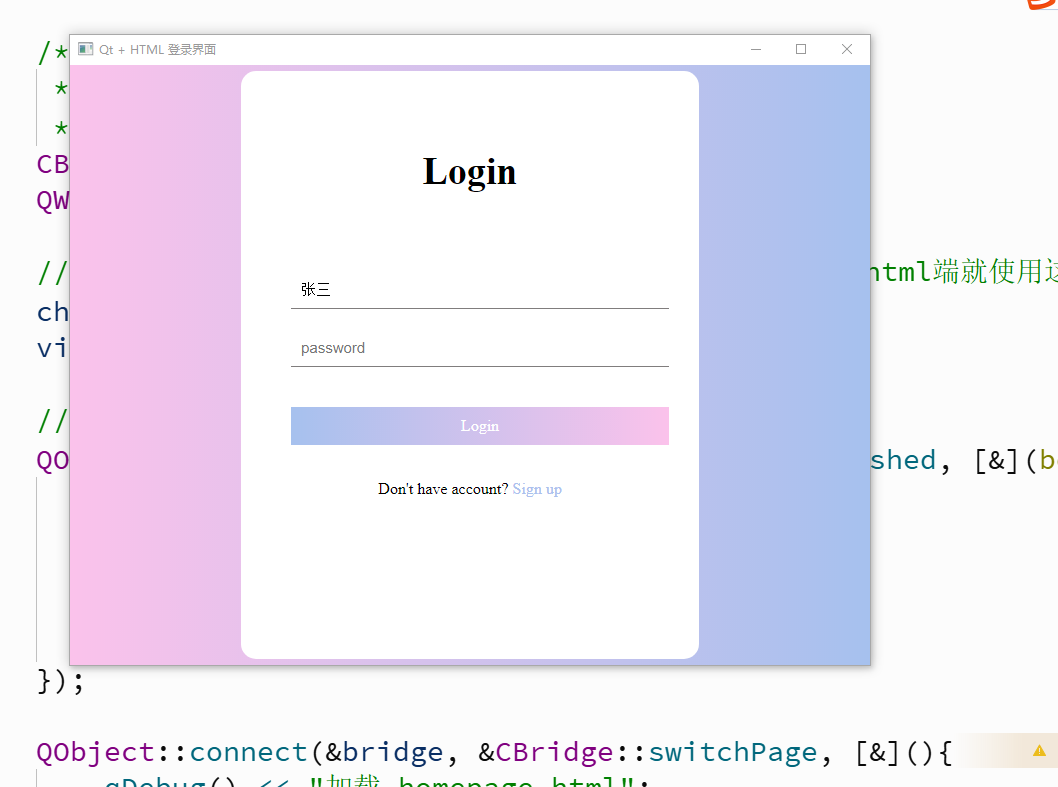
<head><meta charset="UTF-8"><meta name="viewport" content="width=device-width, initial-scale=1.0"><title>Login Page</title><!-- 添加:引入 qwebchannel.js --><!-- 引入 Qt WebChannel 支持 --><script src="qrc:///qt/qwebchannel.js"></script><script>window.onload = function() {if (typeof qt === 'undefined') {console.error('Qt WebChannel transport not available!');return;}new QWebChannel(qt.webChannelTransport, function(channel) {// 獲取C++端暴露的對象“bridge33”var bridge = channel.objects.bridge33;console.log('bridge =', bridge);// 檢查C++端是否有這個信號函數 “sendUsername”if (!bridge.sendUsername) {console.error('sendUsername 信號不存在!檢查 C++ 信號聲明和 moc');return;}console.log('emit sendUsername() exist');bridge.sendUsername.connect(function(username) {console.log('Received username: ', username);console.log('username.length: ', username.length);console.log('username.charCodeAt(0): ', username.charCodeAt(0));var input = document.querySelector("input[name='username']");if (input) {input.value = username;console.log('full success');} else {console.error('輸入框未找到');}});// html界面被正確渲染,發送信號給C++bridge.onWebChannelReady22();// 登錄按鈕document.querySelector(".btn").onclick = function() {var username = document.querySelector("input[name='username']").value;var password = document.querySelector("input[name='password']").value;if (bridge.receiveLoginInfo) {bridge.receiveLoginInfo(username, password);//console.log('已發送登錄信息:', username, password);} else {console.error('bridge.receiveLoginInfo 不存在');}};// 注冊鏈接點擊document.querySelector("#register-link").onclick = function(event) {event.preventDefault();//console.log('用戶點擊了【Sign up】');bridge.onRegisterClicked();};});};</script><style>* { margin: 0; padding: 0; }html { height: 100%; }body { height: 100%; }.container {height: 100%;background-image: linear-gradient(to right, #fbc2eb, #a6c1ee);}.login-wrapper {background-color: #fff;width: 358px;height: 588px;border-radius: 15px;padding: 0 50px;position: relative;left: 50%;top: 50%;transform: translate(-50%, -50%);}.header {font-size: 38px;font-weight: bold;text-align: center;line-height: 200px;}.input-item {display: block;width: 100%;margin-bottom: 20px;border: 0;padding: 10px;border-bottom: 1px solid rgb(128, 125, 125);font-size: 15px;outline: none;}.input-item:placeholder {text-transform: uppercase;}.btn {text-align: center;padding: 10px;width: 100%;margin-top: 40px;background-image: linear-gradient(to right, #a6c1ee, #fbc2eb);color: #fff;cursor: pointer; /* 增加光標提示 */}.msg {text-align: center;line-height: 88px;}a {text-decoration-line: none;color: #abc1ee;}</style>
</head>
<body><div class="container"><div class="login-wrapper"><div class="header">Login</div><div class="form-wrapper"><input type="text" name="username" placeholder="username" class="input-item"><input type="password" name="password" placeholder="password" class="input-item"><div class="btn">Login</div></div><div class="msg">Don't have account?<a href="#" id="register-link">Sign up</a></div></div></div>
</body>
</html>
2.2?WebTest.html
<!DOCTYPE html>
<html lang="en">
<!-- https://codepen.io/danielkvist/pen/LYNVyPL -->
<head><meta charset="UTF-8"><meta name="viewport" content="width=device-width, initial-scale=1.0"><title>Document</title><style>:root {/* COLORS */--white: #e9e9e9;--gray: #333;--blue: #0367a6;--lightblue: #008997;/* RADII */--button-radius: 0.7rem;/* SIZES */--max-width: 758px;--max-height: 420px;font-size: 16px;font-family: -apple-system, BlinkMacSystemFont, "Segoe UI", Roboto, Oxygen,Ubuntu, Cantarell, "Open Sans", "Helvetica Neue", sans-serif;}body {align-items: center;background-color: var(--white);background: url("https://res.cloudinary.com/dbhnlktrv/image/upload/v1599997626/background_oeuhe7.jpg");/* 決定背景圖像的位置是在視口內固定,或者隨著包含它的區塊滾動。 *//* https://developer.mozilla.org/zh-CN/docs/Web/CSS/background-attachment */background-attachment: fixed;background-position: center;background-repeat: no-repeat;background-size: cover;display: grid;height: 100vh;place-items: center;}.form__title {font-weight: 300;margin: 0;margin-bottom: 1.25rem;}.link {color: var(--gray);font-size: 0.9rem;margin: 1.5rem 0;text-decoration: none;}.container {background-color: var(--white);border-radius: var(--button-radius);box-shadow: 0 0.9rem 1.7rem rgba(0, 0, 0, 0.25),0 0.7rem 0.7rem rgba(0, 0, 0, 0.22);height: var(--max-height);max-width: var(--max-width);overflow: hidden;position: relative;width: 100%;}.container__form {height: 100%;position: absolute;top: 0;transition: all 0.6s ease-in-out;}.container--signin {left: 0;width: 50%;z-index: 2;}.container.right-panel-active .container--signin {transform: translateX(100%);}.container--signup {left: 0;opacity: 0;width: 50%;z-index: 1;}.container.right-panel-active .container--signup {animation: show 0.6s;opacity: 1;transform: translateX(100%);z-index: 5;}.container__overlay {height: 100%;left: 50%;overflow: hidden;position: absolute;top: 0;transition: transform 0.6s ease-in-out;width: 50%;z-index: 100;}.container.right-panel-active .container__overlay {transform: translateX(-100%);}.overlay {background-color: var(--lightblue);background: url("https://cdn.pixabay.com/photo/2018/08/14/13/23/ocean-3605547_1280.jpg");background-attachment: fixed;background-position: center;background-repeat: no-repeat;background-size: cover;height: 100%;left: -100%;position: relative;transform: translateX(0);transition: transform 0.6s ease-in-out;width: 200%;}.container.right-panel-active .overlay {transform: translateX(50%);}.overlay__panel {align-items: center;display: flex;flex-direction: column;height: 100%;justify-content: center;position: absolute;text-align: center;top: 0;transform: translateX(0);transition: transform 0.6s ease-in-out;width: 50%;}.overlay--left {transform: translateX(-20%);}.container.right-panel-active .overlay--left {transform: translateX(0);}.overlay--right {right: 0;transform: translateX(0);}.container.right-panel-active .overlay--right {transform: translateX(20%);}.btn {background-color: var(--blue);background-image: linear-gradient(90deg, var(--blue) 0%, var(--lightblue) 74%);border-radius: 20px;border: 1px solid var(--blue);color: var(--white);cursor: pointer;font-size: 0.8rem;font-weight: bold;letter-spacing: 0.1rem;padding: 0.9rem 4rem;text-transform: uppercase;transition: transform 80ms ease-in;}.form>.btn {margin-top: 1.5rem;}.btn:active {transform: scale(0.95);}.btn:focus {outline: none;}.form {background-color: var(--white);display: flex;align-items: center;justify-content: center;flex-direction: column;padding: 0 3rem;height: 100%;text-align: center;}.input {background-color: #fff;border: none;padding: 0.9rem 0.9rem;margin: 0.5rem 0;width: 100%;}@keyframes show {0%,49.99% {opacity: 0;z-index: 1;}50%,100% {opacity: 1;z-index: 5;}}</style>
</head><body><div class="container right-panel-active"><!-- Sign Up --><div class="container__form container--signup"><form action="#" class="form" id="form1"><h2 class="form__title">Sign Up</h2><input type="text" placeholder="User" class="input" /><input type="email" placeholder="Email" class="input" /><input type="password" placeholder="Password" class="input" /><button class="btn">Sign Up</button></form></div><!-- Sign In --><div class="container__form container--signin"><form action="#" class="form" id="form2"><h2 class="form__title">Sign In</h2><input type="email" placeholder="Email" class="input" /><input type="password" placeholder="Password" class="input" /><a href="#" class="link">Forgot your password?</a><button class="btn">Sign In</button></form></div><!-- Overlay --><div class="container__overlay"><div class="overlay"><div class="overlay__panel overlay--left"><button class="btn" id="signIn">Sign In</button></div><div class="overlay__panel overlay--right"><button class="btn" id="signUp">Sign Up</button></div></div></div></div><script>const signInBtn = document.getElementById("signIn");const signUpBtn = document.getElementById("signUp");const fistForm = document.getElementById("form1");const secondForm = document.getElementById("form2");const container = document.querySelector(".container");signInBtn.addEventListener("click", () => {container.classList.remove("right-panel-active");});signUpBtn.addEventListener("click", () => {container.classList.add("right-panel-active");});fistForm.addEventListener("submit", (e) => e.preventDefault());secondForm.addEventListener("submit", (e) => e.preventDefault());</script>
</body></html>
2.3?bridge文件
頭文件
#ifndef CBridge_H
#define CBridge_H#include <QObject>class CBridge : public QObject
{Q_OBJECTpublic:explicit CBridge(QObject *parent = nullptr);signals:/*** C++端向HTML端傳遞數據* html端可以通過別名獲取到該信號*/void sendUsername(const QString &username);void switchPage();public slots:// 新增:接收用戶名和密碼的槽函數void receiveLoginInfo44(const QString &username, const QString &password);// JS 調用這個表示準備好了void onWebChannelReady22();void onRegisterClicked();};#endif // CBridge_H
源文件
#include "bridge.h"
#include <QTimer>
#include <QDebug>CBridge::CBridge(QObject *parent): QObject(parent)
{}// 實現接收用戶名和密碼的槽函數
void CBridge::receiveLoginInfo44(const QString &username, const QString &password) {qDebug() << "User name: " << username;qDebug() << "PassWord" << password;
}void CBridge::onWebChannelReady22()
{qDebug() << "JS 已準備就緒,現在發送用戶名";emit sendUsername("張三"); // 現在發,100% 安全qDebug() << "發送用戶名";
}void CBridge::onRegisterClicked()
{qDebug() << "Sign up";emit switchPage();
}
2.4 main.cpp
#include <QApplication>
#include <QWebEngineView>
#include <QWebChannel>
#include <QUrl>
#include <QDir>
#include "bridge.h"int main(int argc, char *argv[]) {QApplication app(argc, argv);QWebEngineView view;view.resize(800, 600);view.setWindowTitle("Qt + HTML 登錄界面");/** 通訊橋*/CBridge bridge;QWebChannel channel;// 給CBridge實例對象起一個別名“bridge33”,暴露給html。html端就使用這個別名channel.registerObject("bridge33", &bridge);view.page()->setWebChannel(&channel);// 在加載完成后再顯示窗口QObject::connect(&view, &QWebEngineView::loadFinished, [&](bool ok) {if (ok) {view.show();    // 顯示Html} else {qWarning() << "Failed to load page!";}});QObject::connect(&bridge, &CBridge::switchPage, [&](){qDebug() << "加載 homepage.html";// 通過資源配置文件加載資源文件view.load(QUrl("qrc:///WebTest.html"));});// 通過寫絕對路徑加載資源文件QString filePath = "F:/MyTest/test20250911/Demo2/mermaid.html";QUrl fileUrl = QUrl::fromLocalFile(filePath);view.load(fileUrl);  // 開始加載return app.exec();
}
第3章 總結
編譯器一定要選擇MSVC。本人使用的是【MSVC2019-64】
酷炫界面的可以使用這種方式。其他使用Qt.。使用這種方式交叉開發。
可以使用一個html界面使用一個QWebEngineView對象。每個對象放置在
QStackedWidget *stackedWidget = new QStackedWidget(&mainWindow);// 頁面1: 登錄頁 (mermaid.html)QWebEngineView *loginView = new QWebEngineView();loginView->load(QUrl::fromLocalFile("F:/MyTest/test20250911/Demo2/mermaid.html"));// 頁面2: 主頁 (WebTest.html)QWebEngineView *homeView = new QWebEngineView();homeView->load(QUrl("qrc:///WebTest.html")); // 使用 qrc 資源// 添加到 stacked widgetstackedWidget->addWidget(loginView); // index 0stackedWidget->addWidget(homeView); // index 1
 與本地化 (l10n) 完整指南)


)


)

)


)