一、項目技術棧
登錄頁面暫時涉及到的技術棧如下:
前端 Vue2?+ Element UI + Axios,后端 Spring Boot 2 + MyBatis + MySQL + Redis + EasyCaptcha + JWT? +?Maven
后端使用IntelliJ IDEA 2024.3.5 前端使用 HBuilder X 和 微信開發者工具
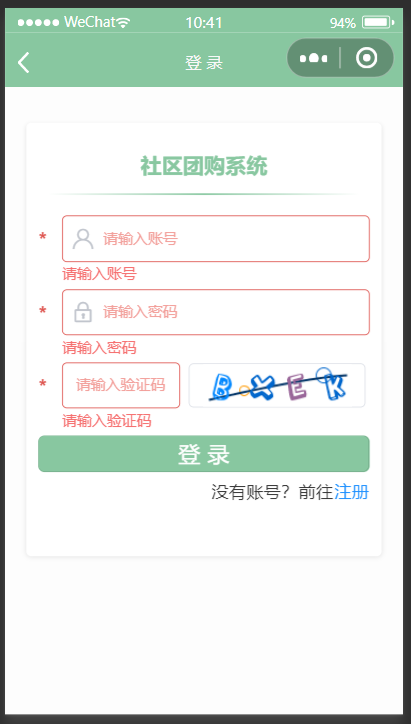
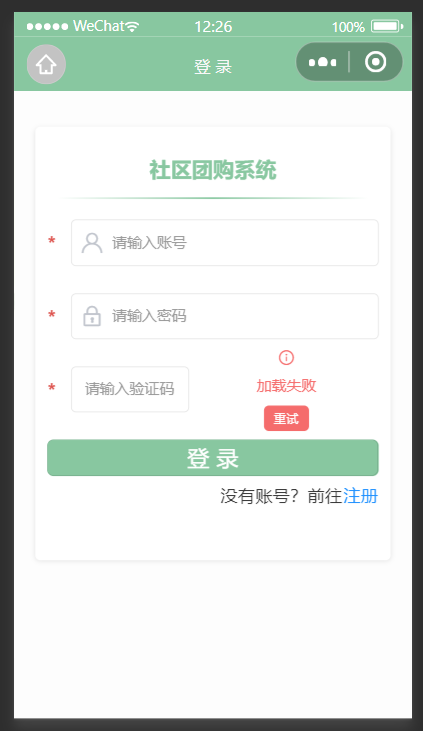
二、實現功能及效果圖
過期管理
- 驗證碼有效期為 5 分鐘(300 秒)。
- 剩余 1 分鐘時標記為 “即將過期”(橙色邊框提示),過期后顯示 “已過期” 標簽并提示用戶刷新。
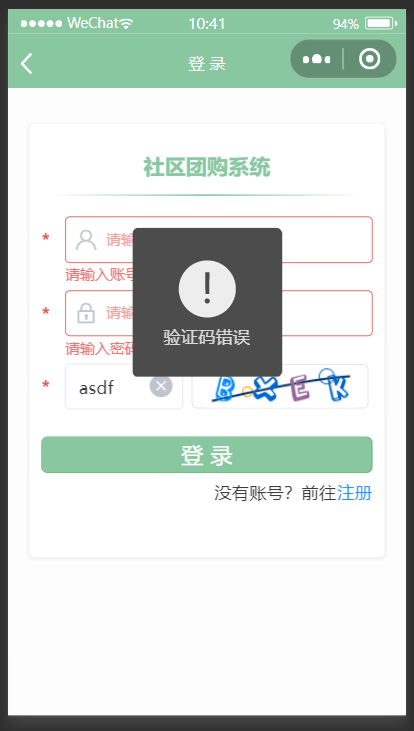
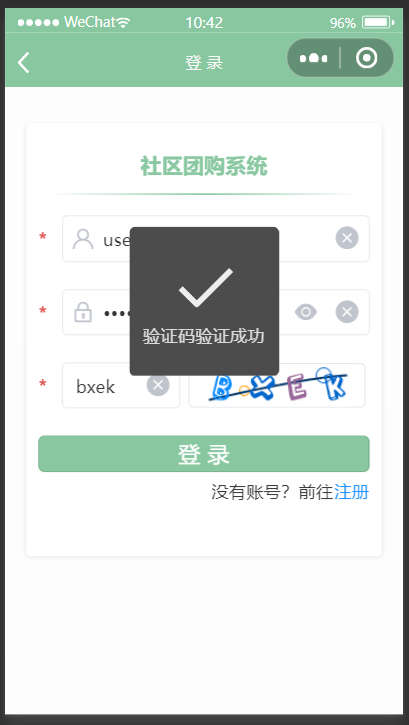
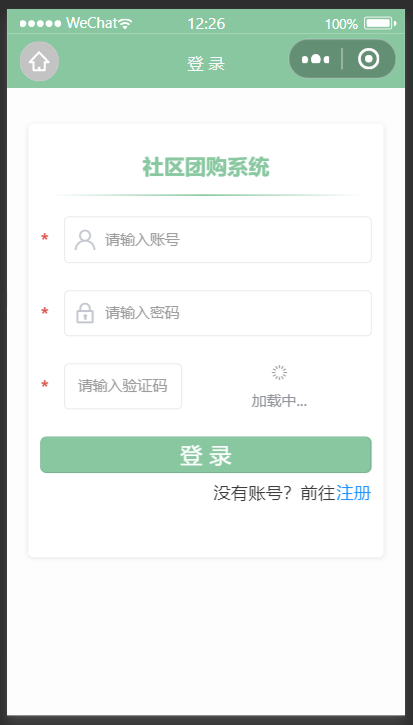
交互功能
- 點擊驗證碼可直接刷新(重新生成新驗證碼)。
- 加載失敗時顯示錯誤狀態。
- 支持圖片加載成功 / 失敗的狀態反饋。
- 用戶輸入驗證碼后系統會返回校驗成功/失敗提示

三、驗證碼的實現步驟
? ? ? ? 本項目后端通過EasyCaptcha——第三方驗證碼生成庫(com.wf.captcha),來生成圖片驗證碼,再通過Redis來存儲驗證碼(鍵值對形式),實現過期管理和分布式共享。
????????前端將驗證碼功能封裝成了 RedisCaptcha 組件達到多個頁面復用的目的。后端生成驗證碼圖片后通過 Base64 編碼轉為字符串返回給前端,前端用 <image> 標簽渲染出來。
- 生成驗證碼:前端請求生成接口 → 后端生成驗證碼圖片和唯一 key → 存儲驗證碼到 Redis(設置 5 分鐘過期) → 返回 key 和 Base64 圖片給前端
- 顯示驗證碼:前端渲染 Base64 圖片,啟動倒計時監控過期狀態
- 驗證驗證碼:用戶輸入驗證碼后,前端請求驗證接口 → 后端通過 key 從 Redis 取存儲的驗證碼 → 比對用戶輸入 → 驗證成功后刪除 Redis 中的驗證碼(防止重復使用)
- 刷新驗證碼:用戶主動刷新或過期時,前端請求刷新接口 → 后端刪除舊驗證碼并生成新驗證碼
為了方便大家之后將驗證碼組件復用,下面簡單講一下前端實現部分,后續會給出前后端全部代碼
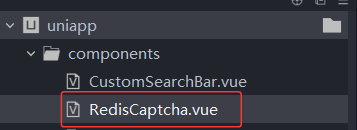
1. 首先在components目錄下新建一個RedisCaptcha.vue文件
里面主要功能是生成、展示和驗證驗證碼
RedisCaptcha.vue
<template><view class="redis-captcha" @click="refreshCaptcha"><view v-if="captchaImage" class="captcha-container"><!-- 使用UniApp兼容的圖片標簽,設置明確的尺寸 --><image :src="captchaImage" mode="aspectFit"class="captcha-image":class="{ 'expiring': isExpiring, 'expired': isExpired }"@error="onImageError"@load="onImageLoad"style="width: 140px; height: 36px;"/><view v-if="isExpired" class="expired-text">已過期</view></view><view v-else-if="loading" class="loading"><uni-icons type="spinner-cycle" size="16" color="#909399"></uni-icons><text>加載中...</text></view><view v-else class="error-state"><uni-icons type="info" size="16" color="#f56c6c"></uni-icons><text>加載失敗</text><view class="retry-btn" @click.stop="generateCaptcha">重試</view></view><!-- 調試信息(開發環境顯示) -->
<!--    <view v-if="showDebug" class="debug-info"><text>圖片長度: {{captchaImage ? captchaImage.length : 0}}</text><text>Key: {{captchaKey}}</text><text>圖片尺寸: 140x50</text><text>容器尺寸: 140x60</text></view> --></view>
</template><script>
export default {name: 'RedisCaptcha',props: {type: {type: String,default: 'LOGIN' // 驗證碼類型,默認為登錄場景}},data() {return {captchaImage: '', // 存儲驗證碼圖片的Base64字符串captchaKey: '', // 驗證碼唯一標識,用于后端驗證remainingSeconds: 300, // 驗證碼有效期(5分鐘=300秒)countdownTimer: null, // 倒計時定時器isExpired: false, // 驗證碼是否已過期isExpiring: false, // 驗證碼是否即將過期(剩余時間≤60秒)loading: false, // 是否正在加載驗證碼error: false, // 是否加載失敗showDebug: false, // 調試模式開關imageLoadSuccess: false // 圖片是否加載成功}},/*** 組件掛載時執行的生命周期函數* 1. 開發環境下顯示調試信息* 2. 自動生成驗證碼*/mounted() {// 開發環境顯示調試信息(僅微信小程序環境)// #ifdef MP-WEIXIN// this.showDebug = true;// #endifthis.generateCaptcha()},/*** 組件銷毀前執行的生命周期函數* 清除倒計時定時器,避免內存泄漏*/beforeDestroy() {this.clearTimer()},methods: {/*** 生成新的驗證碼* 1. 重置狀態(加載中、清除錯誤、清除定時器)* 2. 調用后端接口獲取驗證碼圖片和key* 3. 處理Base64圖片格式并顯示* 4. 啟動倒計時* 5. 向父組件傳遞驗證碼key*/async generateCaptcha() {try {// 重置狀態:進入加載中、清除錯誤標記、清除圖片加載狀態this.loading = truethis.error = falsethis.imageLoadSuccess = falsethis.clearTimer() // 清除可能存在的舊定時器this.isExpired = falsethis.isExpiring = falseconsole.log('開始生成驗證碼,類型:', this.type)// 調用后端接口生成驗證碼,傳遞驗證碼類型參數const response = await this.$request.post('/captcha/generate', null, {params: { type: this.type }})console.log('驗證碼生成響應:', response)// 接口調用成功(狀態碼200)if (response.code === '200') {// 處理Base64圖片數據let imageData = response.data.image// 確保圖片數據是完整的Base64格式if (imageData) {// 如果已經是完整的data:image格式(包含協議頭),直接使用if (imageData.startsWith('data:image/')) {this.captchaImage = imageData} else {// 否則添加Base64圖片協議頭(適配后端只返回純Base64字符串的情況)this.captchaImage = 'data:image/png;base64,' + imageData}} else {throw new Error('驗證碼圖片數據為空')}// 保存驗證碼唯一標識,用于后續驗證this.captchaKey = response.data.key// 重置倒計時時間this.remainingSeconds = 300// 啟動倒計時this.startCountdown()console.log('驗證碼生成成功:', {key: this.captchaKey,imageLength: imageData ? imageData.length : 0,imagePreview: imageData ? imageData.substring(0, 100) + '...' : 'null',finalImageData: this.captchaImage.substring(0, 100) + '...'})// 向父組件傳遞驗證碼key(用于表單提交時關聯)this.$emit('update:key', this.captchaKey)// 檢查圖片數據有效性(簡單校驗:長度是否合理)if (this.captchaImage && this.captchaImage.length > 100) {console.log('驗證碼圖片數據有效,長度:', this.captchaImage.length)} else {console.error('驗證碼圖片數據異常:', this.captchaImage)throw new Error('驗證碼圖片數據格式異常')}} else {// 接口返回非成功狀態this.error = truethrow new Error(response.msg || '驗證碼生成失敗')}} catch (error) {// 捕獲異常并處理console.error('生成驗證碼失敗:', error)this.error = truethis.captchaImage = '' // 清空無效圖片// 顯示錯誤提示uni.showToast({icon: 'error',title: error.message || '驗證碼生成失敗,請重試'})} finally {// 無論成功失敗,結束加載狀態this.loading = false}},/*** 圖片加載成功時觸發的回調函數* 更新圖片加載狀態,清除錯誤標記*/onImageLoad() {console.log('驗證碼圖片加載成功')this.imageLoadSuccess = truethis.error = false},/*** 圖片加載失敗時觸發的回調函數* 更新圖片加載狀態,標記錯誤,顯示提示* @param {Object} e - 錯誤事件對象*/onImageError(e) {console.error('驗證碼圖片加載失敗:', e)this.imageLoadSuccess = falsethis.error = true// 顯示加載失敗提示uni.showToast({icon: 'error',title: '驗證碼圖片加載失敗'})},/*** 刷新驗證碼* 直接調用生成驗證碼方法,實現刷新功能*/refreshCaptcha() {console.log('刷新驗證碼')this.generateCaptcha()},/*** 啟動驗證碼倒計時* 1. 每秒更新剩余時間* 2. 剩余1分鐘時標記為"即將過期"* 3. 時間到期時標記為"已過期",并通知父組件*/startCountdown() {// 啟動定時器,每秒執行一次this.countdownTimer = setInterval(() => {this.remainingSeconds--// 剩余1分鐘(60秒)時,標記為即將過期if (this.remainingSeconds <= 60 && this.remainingSeconds > 0) {this.isExpiring = true}// 時間到期(剩余時間≤0)if (this.remainingSeconds <= 0) {this.isExpired = true // 標記為已過期this.isExpiring = false // 清除即將過期標記this.clearTimer() // 清除定時器this.$emit('expired') // 向父組件發送過期事件// 顯示過期提示uni.showToast({icon: 'none',title: '驗證碼已過期,請重新獲取'})}}, 1000)},/*** 清除倒計時定時器* 避免組件銷毀后定時器仍在運行導致內存泄漏*/clearTimer() {if (this.countdownTimer) {clearInterval(this.countdownTimer)this.countdownTimer = null}},/*** 驗證用戶輸入的驗證碼(供父組件調用)* @param {String} inputCode - 用戶輸入的驗證碼* @returns {Boolean} 驗證結果(true=成功,false=失敗)*/async validateCaptcha(inputCode) {// 前置校驗:驗證碼key不存在或已過期,直接返回失敗if (!this.captchaKey || this.isExpired) {console.error('驗證碼驗證失敗:key不存在或已過期', { captchaKey: this.captchaKey, isExpired: this.isExpired })return false}try {console.log('開始驗證驗證碼:', { key: this.captchaKey, code: inputCode, type: this.type,inputLength: inputCode ? inputCode.length : 0})// 校驗用戶輸入是否為空if (!inputCode || inputCode.trim() === '') {console.error('驗證碼輸入為空')return false}// 調用后端接口驗證驗證碼const response = await this.$request.post('/captcha/validate', null, {params: {key: this.captchaKey, // 驗證碼唯一標識code: inputCode.trim(),  // 用戶輸入的驗證碼(去除首尾空格)type: this.type || 'LOGIN'  // 驗證碼類型(確保有默認值)}})console.log('驗證碼驗證響應:', response)// 驗證成功if (response.code === '200') {console.log('驗證碼驗證成功')return true} else {// 驗證失敗(如輸入錯誤)console.error('驗證碼驗證失敗,響應:', response)// 顯示后端返回的錯誤信息if (response.msg) {uni.showToast({icon: 'error',title: response.msg})}return false}} catch (error) {// 驗證過程中發生異常(如網絡錯誤)console.error('驗證碼驗證異常:', error)let errorMsg = '驗證碼驗證失敗'if (error.message) {errorMsg += ': ' + error.message}// 顯示異常提示uni.showToast({icon: 'error',title: errorMsg})return false}},/*** 獲取當前驗證碼的唯一標識key* @returns {String} 驗證碼key*/getCaptchaKey() {return this.captchaKey},/*** 檢查當前驗證碼是否已過期* @returns {Boolean} 是否過期*/isCaptchaExpired() {return this.isExpired}}
}
</script><style scoped>
/* 驗證碼容器主樣式- cursor: pointer: 鼠標懸停時顯示手型指針,提示可點擊- user-select: none: 禁止文本選中,提升交互體驗- position: relative: 為子元素提供相對定位參考- 自適應寬度與彈性布局,確保內容居中顯示- min-height: 36px: 保證容器最小高度,避免內容閃爍- align-self: flex-start: 與輸入框保持同一水平對齊
*/
.redis-captcha {cursor: pointer;user-select: none;position: relative;width: 100%; /* 讓容器填滿父組件空間,可選,根據需求調整 */height: 100%;display: flex;align-items: center;justify-content: center;min-height: 36px;
}
/* 驗證碼圖片容器樣式- 相對定位用于過期文本的絕對定位- 垂直居中布局確保圖片和狀態文本對齊
*/
.captcha-container {position: relative;text-align: center;height: 36px;display: flex;align-items: center;justify-content: center;flex-direction: column;
}/* 驗證碼圖片基礎樣式- !important 強制覆蓋可能的外部樣式- 固定尺寸確保在各平臺顯示一致- 邊框和圓角美化樣式- 過渡動畫提升交互體驗- 圖片渲染優化屬性確保小程序中顯示清晰
*/
.captcha-image {width: 140px !important;height: 50px !important;border: 1px solid #dcdfe6;border-radius: 4px;transition: all 0.3s ease;image-rendering: -webkit-optimize-contrast;image-rendering: crisp-edges;
}/* 驗證碼即將過期狀態樣式- 橙色邊框提示用戶及時操作- 輕微陰影增強視覺層次感
*/
.captcha-image.expiring {border-color: #e6a23c;
/*  box-shadow: 0 2px 8px rgba(230, 162, 60, 0.2); */
}/* 驗證碼已過期狀態樣式- 紅色邊框明確提示過期狀態- 降低透明度表示不可用狀態
*/
.captcha-image.expired {border-color: #f56c6c;opacity: 0.6;
}/* 過期提示文本樣式- 絕對定位覆蓋在圖片中央- 半透明紅色背景增強可見性- 小號粗體文本突出提示信息
*/
.expired-text {position: absolute;top: 50%;left: 50%;transform: translate(-50%, -50%);background: rgba(245, 108, 108, 0.9);color: white;padding: 4px 8px;border-radius: 4px;font-size: 12px;font-weight: bold;
}/* 刷新提示樣式(通常配合:hover使用)- 鼠標懸停時顯示提示信息- 透明度過渡實現平滑顯示效果
*/
.redis-captcha:hover .refresh-hint {opacity: 1;
}/* 加載狀態樣式- 垂直居中布局保持容器高度一致- 灰色文本表示加載中狀態- 小號字體節省空間
*/
.loading {display: flex;flex-direction: column;align-items: center;justify-content: center;color: #909399;font-size: 12px;height: 36px; /* 與驗證碼容器高度一致 */
}/* 加載狀態文本間距調整 */
.loading text {margin-top: 5px;
}/* 錯誤狀態樣式- 紅色文本明確提示錯誤狀態- 垂直居中布局保持容器一致性- 小號字體節省空間
*/
.error-state {display: flex;flex-direction: column;align-items: center;justify-content: center;color: #f56c6c;font-size: 12px;text-align: center;height: 36px; /* 與驗證碼容器高度一致 */
}/* 錯誤狀態文本間距調整 */
.error-state text {margin-top: 5px;
}/* 重試按鈕樣式- 紅色背景突出可交互性- 小號字體適配錯誤狀態區域- 圓角設計提升視覺友好度
*/
.retry-btn {margin-top: 8px;padding: 4px 8px;background: #f56c6c;color: white;border-radius: 4px;cursor: pointer;font-size: 10px;
}/* 調試信息樣式- 絕對定位在右上角不影響主內容- 深色半透明背景確保文本可讀性- 小號字體顯示詳細調試信息- 自動換行避免內容溢出
*/
/* .debug-info {position: absolute;top: 10px;right: 10px;background-color: rgba(0, 0, 0, 0.7);color: white;padding: 8px 12px;border-radius: 6px;font-size: 10px;z-index: 10;display: flex;flex-direction: column;gap: 4px;max-width: 200px;word-break: break-all;
} *//* 調試信息文本行高調整 */
.debug-info text {line-height: 1.2;
}
</style>
?2. 前面這個ValidCode.vue文件是子組件,接下來我們要去login.vue父組件中去引入它
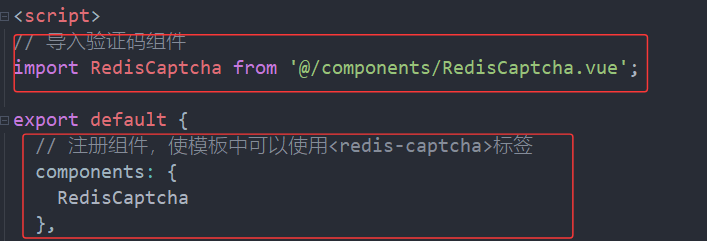
3. 接下來就是將組件放在我們 HTML 模版上
注: Vue 的組件命名規范中,在單文件組件(.vue)中定義組件時,可使用 PascalCase(大駝峰,如 RedisCaptcha) 命名,但在模板中引用時,需使用 kebab-case(短橫線分隔,如 redis-captcha)。這是為了符合 HTML 的命名習慣(HTML 標簽通常用短橫線分隔,如 <input-type>),同時避免大小寫導致的匹配問題。
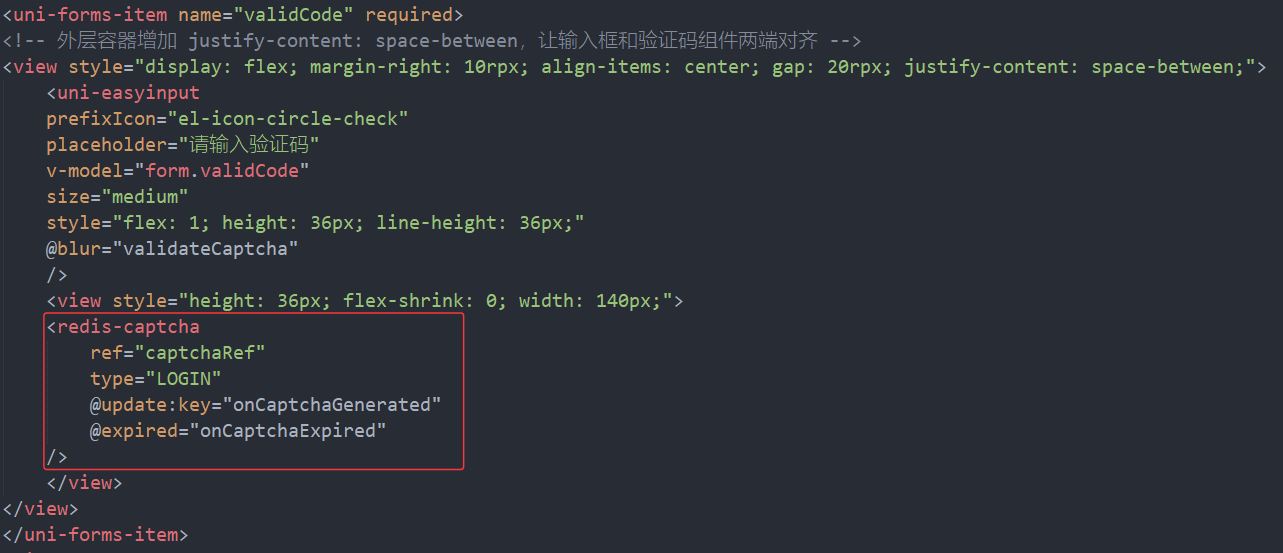
屬性解析
ref="captchaRef"
????????給組件設置引用標識,父組件可通過 this.$refs.captchaRef 直接訪問子組件的方法和數據。
例如:調用子組件的驗證碼驗證方法 this.$refs.captchaRef.validateCaptcha(inputCode)。
type="LOGIN"
????????向子組件傳遞 type 屬性,指定驗證碼類型為 “登錄場景”(與子組件 props 定義的 type 對應)。
作用:后端可根據不同類型(如登錄、注冊)生成不同規則的驗證碼,或做差異化的驗證邏輯。
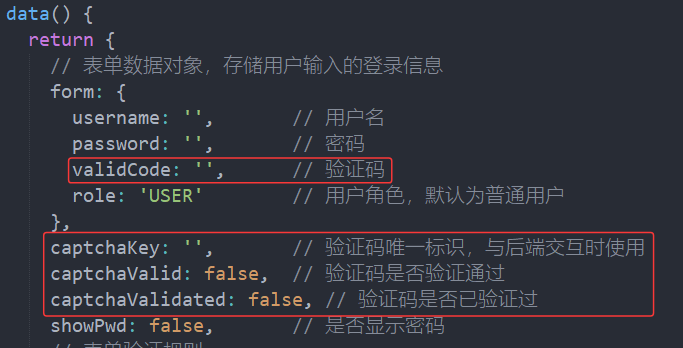
4. data里面需要添加下面四個變量
5. 在表單驗證規則中針對驗證碼(validCode) 字段做驗證配置
在表單規則 rules 中,插入下面內容,實現當用戶未輸入驗證碼時,顯示'請輸入驗證碼'的錯誤提示信息。
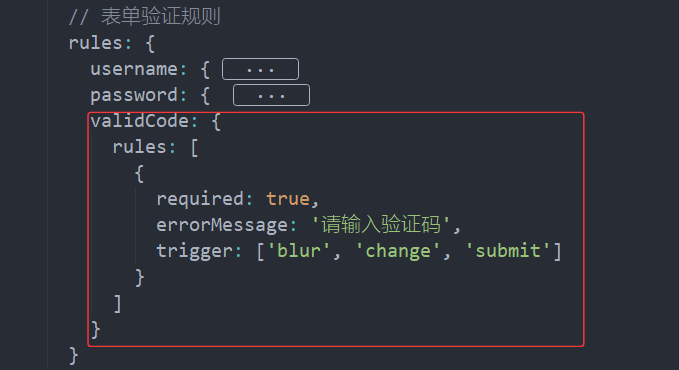
trigger: ['blur', 'change', 'submit'] 用來指定觸發驗證的時機:
blur:驗證碼輸入框失去焦點時驗證(如用戶輸入后點擊其他地方)。
change:驗證碼輸入內容變化時驗證(實時監測輸入)。
submit:表單提交時驗證(防止用戶未輸入就提交)。
6. 添加validateCaptcha 方法驗證用戶輸入的驗證碼
當驗證碼輸入框失去焦點時,觸發 validateCaptcha 方法。
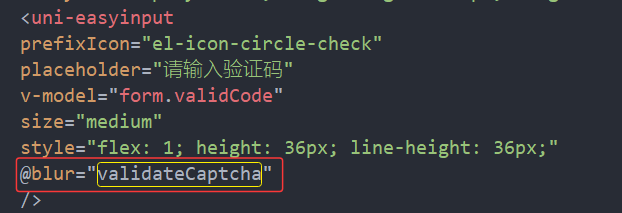
在methods里面添加validateCaptcha 方法
/*** 驗證用戶輸入的驗證碼* 調用驗證碼組件的驗證方法,更新驗證狀態并給出反饋*/async validateCaptcha() {console.log('開始驗證驗證碼,表單數據:', {validCode: this.form.validCode,captchaKey: this.captchaKey,captchaValid: this.captchaValid})// 前置校驗:如果驗證碼輸入為空或缺少驗證碼key,直接返回if (!this.form.validCode || !this.captchaKey) {console.error('驗證碼驗證失敗:缺少必要參數', {validCode: this.form.validCode,captchaKey: this.captchaKey})return}try {console.log('調用驗證碼組件驗證方法')// 調用子組件的驗證方法,傳入用戶輸入的驗證碼const isValid = await this.$refs.captchaRef.validateCaptcha(this.form.validCode)console.log('驗證碼驗證結果:', isValid)this.captchaValid = isValid // 更新驗證結果this.captchaValidated = true // 標記已驗證// 根據驗證結果顯示相應提示if (isValid) {uni.showToast({icon: 'success',title: '驗證碼驗證成功'})} else {uni.showToast({icon: 'error',title: '驗證碼錯誤'})}} catch (error) {console.error('驗證碼驗證異常:', error)this.captchaValid = false // 異常時標記為驗證失敗uni.showToast({icon: 'error',title: '驗證碼輸入有誤'})}},7. 添加驗證碼生成完成時和驗證碼過期時的回調函數
驗證碼生成完成時
當 <redis-captcha> 組件內部成功生成驗證碼(調用后端接口并獲取到 captchaKey 和圖片后),會主動通過 this.$emit('update:key', key) 觸發update:key自定義事件。
子組件位置: 在generateCaptcha方法里

父組件在模板中通過 @update:key="onCaptchaGenerated" 監聽該事件,當子組件觸發事件時,父組件的 onCaptchaGenerated 方法會被自動調用,并接收子組件傳遞的 captchaKey
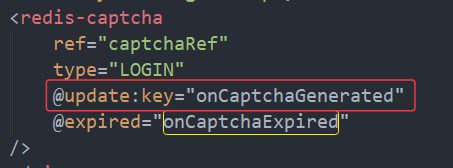
驗證碼過期時
當 <redis-captcha> 組件內部的驗證碼倒計時結束(剩余時間為 0,?5 分鐘有效期滿),會主動通過 this.$emit('expired') 觸發 expired 自定義事件。
子組件位置:在 startCountdown 方法里(倒計時定時器檢測到剩余時間≤0 時)
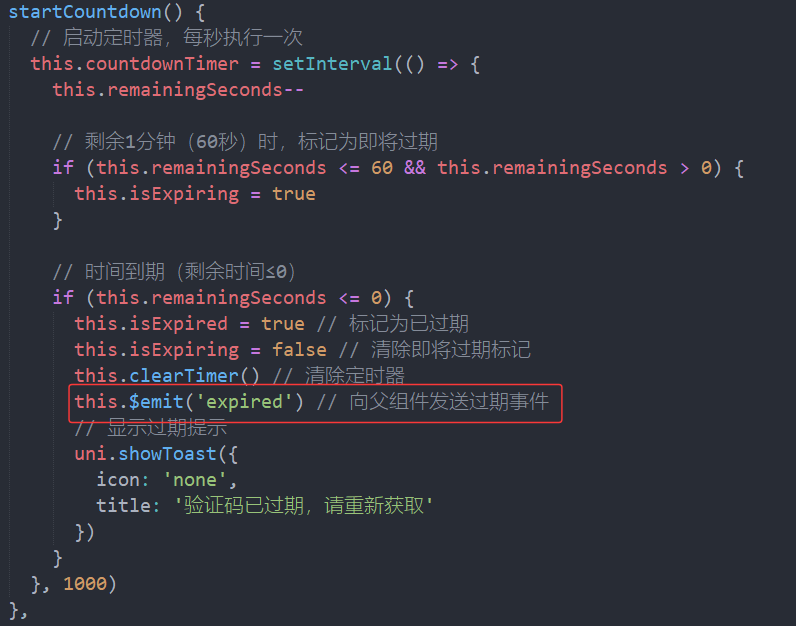
父組件在模板中通過 @expired="onCaptchaExpired" 監聽該事件,當子組件觸發事件時,父組件的 onCaptchaExpired 方法會被自動調用,執行驗證碼過期后的處理邏輯(如重置狀態、提示用戶)
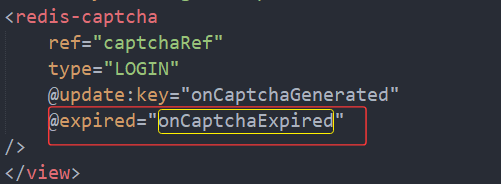
注: 自定義事件名稱是可以修改的,只要保證使用的時候子組件觸發的 $emit 的事件名和父組件 @事件名 監聽的名稱是完全一致的即可。
login.vue父組件的methods中應該添加的驗證碼生成完成時和驗證碼過期時的兩個回調函數
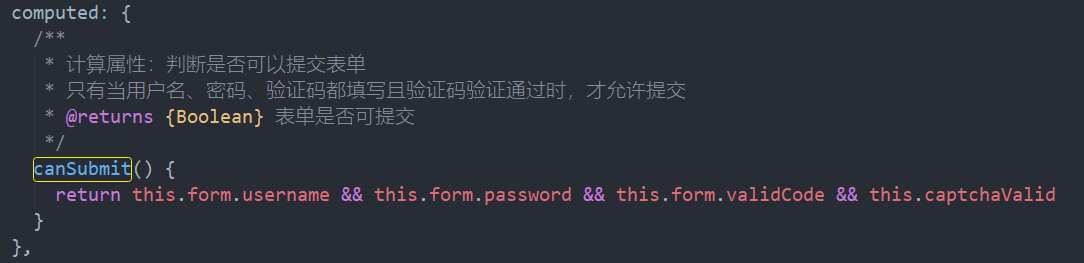
/*** 驗證碼生成完成時的回調函數* 接收驗證碼組件傳遞的唯一標識key,并重置驗證碼相關狀態* @param {String} key - 驗證碼唯一標識*/onCaptchaGenerated(key) {this.captchaKey = key // 保存驗證碼keythis.captchaValid = false // 重置驗證狀態this.captchaValidated = false // 重置已驗證標記this.form.validCode = '' // 清空輸入框},/*** 驗證碼過期時的回調函數* 重置驗證碼相關狀態,并提示用戶重新獲取*/onCaptchaExpired() {this.captchaValid = false // 標記驗證未通過this.captchaValidated = false // 重置已驗證標記this.form.validCode = '' // 清空輸入框// 顯示過期提示uni.showToast({icon: 'none',title: '驗證碼已過期,請重新獲取'})},8. 給登錄按鈕添加:disabled="!canSubmit" 動態屬性綁定,根據條件控制按鈕是否可點擊(如果是注冊頁面就在注冊按鈕那添加)

添加canSubmit計算屬性,實現當用戶名、密碼、驗證碼都填寫,且驗證碼驗證通過時,返回 true,否則返回 false。
9.修改登錄邏輯
添加校驗驗證碼邏輯
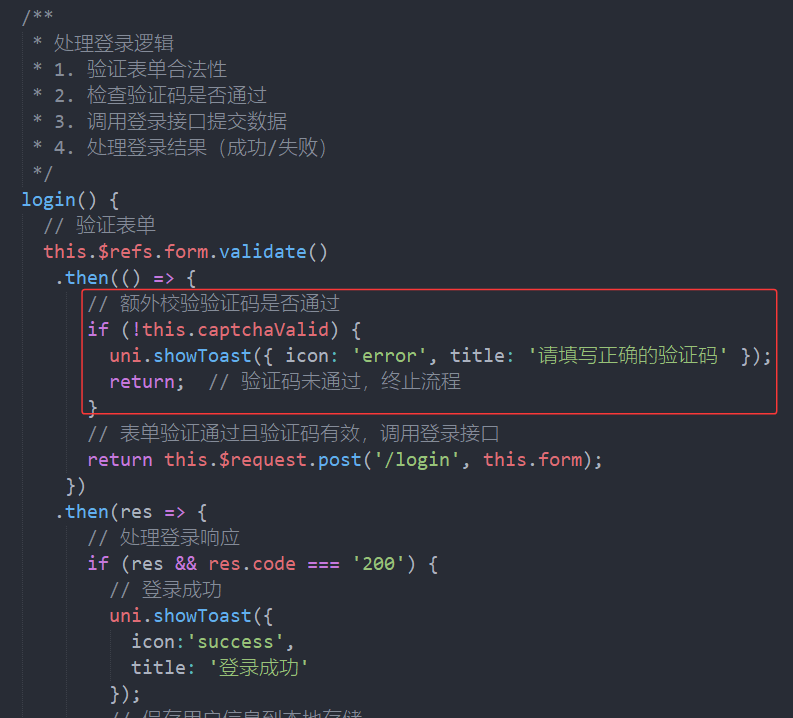
到這我們就實現了驗證碼組件的引入了
四、完整代碼
下面是本項目的登錄部分完整代碼,大家可以做適量的增刪工作
1.前端
Login.vue
<template><view style="padding: 40rpx"><view style="padding: 25rpx; margin: 30rpx 0; background-color: #fff; box-shadow: 0 2rpx 10rpx rgba(0,0,0,.1); border-radius: 10rpx;"><view style="margin: 30rpx 20rpx; font-size:40rpx; font-weight:600; color: #88c7a0;  text-align: center;">社區團購系統</view><view style="height: 2rpx; margin: 20rpx 20rpx; margin-bottom: 40rpx; background: linear-gradient(to right, white, #88c7a0 50%, white);"></view><uni-forms ref="form" :modelValue="form" :rules="rules" validateTrigger='blur'><uni-forms-item name="username" required><uni-easyinput prefixIcon="person" type="text" v-model="form.username" placeholder="請輸入賬號" /></uni-forms-item><uni-forms-item name="password" required><uni-easyinput prefixIcon="locked" type="password" v-model="form.password" placeholder="請輸入密碼" :showPassword="showPwd" @click:icon="togglePwd" icon="eye" /></uni-forms-item><uni-forms-item name="validCode" required><!-- 外層容器增加 justify-content: space-between,讓輸入框和驗證碼組件兩端對齊 --><view style="display: flex; margin-right: 10rpx; align-items: center; gap: 20rpx; justify-content: space-between;"> <uni-easyinput prefixIcon="el-icon-circle-check" placeholder="請輸入驗證碼" v-model="form.validCode" size="medium" style="flex: 1; height: 36px; line-height: 36px;" @blur="validateCaptcha"/><view style="height: 36px; flex-shrink: 0; width: 140px;"> <redis-captcha ref="captchaRef"type="LOGIN"@update:key="onCaptchaGenerated"@expired="onCaptchaExpired"/> </view></view></uni-forms-item></uni-forms><button style="background-color: #88c7a0; border-color: #88c7a0; color: #fff; height: 70rpx; line-height: 70rpx; margin-top: 30rpx;" @click="login":disabled="!canSubmit">登 錄</button><uni-forms-item><view style="text-align: right; margin-top: 15rpx; color: #333">沒有賬號?前往 <navigator style="display: inline-block; color: dodgerblue; margin-left: 4rpx;" url="/pages/register/register">注冊</navigator></view></uni-forms-item></view></view>
</template><script>
// 導入驗證碼組件
import RedisCaptcha from '@/components/RedisCaptcha.vue';export default {// 注冊組件,使模板中可以使用<redis-captcha>標簽components: { RedisCaptcha },data() {return {// 表單數據對象,存儲用戶輸入的登錄信息form: {username: '',       // 用戶名password: '',       // 密碼validCode: '',      // 驗證碼role: 'USER'        // 用戶角色,默認為普通用戶},captchaKey: '',       // 驗證碼唯一標識,與后端交互時使用captchaValid: false,  // 驗證碼是否驗證通過captchaValidated: false, // 驗證碼是否已驗證過  // captchaValid 和 captchaValidated 用于區分 “未驗證” 和 “驗證失敗” 兩種狀態showPwd: false,       // 是否顯示密碼// 表單驗證規則rules: {username: {rules: [{required: true,errorMessage: '請輸入賬號',},{minLength: 3,maxLength: 20,errorMessage: '賬號長度在 {minLength} 到 {maxLength} 個字符',}],},password: { rules: [{required: true,errorMessage: '請輸入密碼',},{minLength: 6,errorMessage: '密碼長度不能少于6位',}]},validCode: {rules: [{ required: true,errorMessage: '請輸入驗證碼',trigger: ['blur', 'change', 'submit'] }]}}}},computed: {/*** 計算屬性:判斷是否可以提交表單* 只有當用戶名、密碼、驗證碼都填寫且驗證碼驗證通過時,才允許提交* @returns {Boolean} 表單是否可提交*/canSubmit() {return this.form.username && this.form.password && this.form.validCode && this.captchaValid}},methods: {/*** 驗證碼生成完成時的回調函數* 接收驗證碼組件傳遞的唯一標識key,并重置驗證碼相關狀態* @param {String} key - 驗證碼唯一標識*/onCaptchaGenerated(key) {this.captchaKey = key         // 保存驗證碼keythis.captchaValid = false     // 重置驗證狀態this.captchaValidated = false // 重置已驗證標記this.form.validCode = ''      // 清空輸入框},/*** 驗證碼過期時的回調函數* 重置驗證碼相關狀態,并提示用戶重新獲取*/onCaptchaExpired() {this.captchaValid = false     // 標記驗證未通過this.captchaValidated = false // 重置已驗證標記this.form.validCode = ''      // 清空輸入框// 顯示過期提示uni.showToast({icon: 'none',title: '驗證碼已過期,請重新獲取'})},/*** 驗證用戶輸入的驗證碼* 調用驗證碼組件的驗證方法,更新驗證狀態并給出反饋*/async validateCaptcha() {console.log('開始驗證驗證碼,表單數據:', {validCode: this.form.validCode,captchaKey: this.captchaKey,captchaValid: this.captchaValid})// 前置校驗:如果驗證碼輸入為空或缺少驗證碼key,直接返回if (!this.form.validCode || !this.captchaKey) {console.error('驗證碼驗證失敗:缺少必要參數', {validCode: this.form.validCode,captchaKey: this.captchaKey})return}try {console.log('調用驗證碼組件驗證方法')// 調用子組件的驗證方法,傳入用戶輸入的驗證碼const isValid = await this.$refs.captchaRef.validateCaptcha(this.form.validCode)console.log('驗證碼驗證結果:', isValid)this.captchaValid = isValid         // 更新驗證結果this.captchaValidated = true        // 標記已驗證// 根據驗證結果顯示相應提示if (isValid) {uni.showToast({icon: 'success',title: '驗證碼驗證成功'})} else {uni.showToast({icon: 'error',title: '驗證碼錯誤'})}} catch (error) {console.error('驗證碼驗證異常:', error)this.captchaValid = false  // 異常時標記為驗證失敗uni.showToast({icon: 'error',title: '驗證碼輸入有誤'})}},/*** 處理登錄邏輯* 1. 驗證表單合法性* 2. 檢查驗證碼是否通過* 3. 調用登錄接口提交數據* 4. 處理登錄結果(成功/失敗)*/login() {// 驗證表單this.$refs.form.validate().then(() => {// 額外校驗驗證碼是否通過if (!this.captchaValid) {uni.showToast({ icon: 'error', title: '請填寫正確的驗證碼' });return;  // 驗證碼未通過,終止流程}// 表單驗證通過且驗證碼有效,調用登錄接口return this.$request.post('/login', this.form);}).then(res => {// 處理登錄響應if (res && res.code === '200') {// 登錄成功uni.showToast({icon:'success',title: '登錄成功'});// 保存用戶信息到本地存儲uni.setStorageSync('xm-user', res.data);// 延遲1秒后跳轉到首頁(避免彈窗被遮擋)setTimeout(() => {// 使用switchTab跳轉到tabBar頁面uni.switchTab({url: '/pages/index/index'});}, 1000);} else {// 登錄失敗(后端返回錯誤)uni.showToast({icon: 'error',title: res.msg || '登錄失敗'});}}).catch(err => {// 捕獲異常(表單驗證失敗或網絡錯誤)if (err instanceof Error) { // 表單驗證失敗console.log('表單錯誤信息:', err);uni.showToast({ icon: 'error', title: '輸入有誤,請檢查' });} else {// 網絡請求異常console.error('登錄請求失敗:', err);uni.showToast({ icon: 'error', title: '網絡異常,請重試' });}});},/*** 切換密碼顯示/隱藏狀態* 點擊密碼框的眼睛圖標時觸發*/togglePwd() {this.showPwd =!this.showPwd;  // 取反當前狀態}}
}
</script><style></style>
其他配置:?
package.json 配置文件
里面描述了項目的基本信息、依賴關系、腳本命令等
{"name": "manager-uniapp","version": "1.0.0","description": "xx系統小程序端","main": "main.js","scripts": {"dev:app": "uni build --platform app","dev:app-android": "uni build --platform app-android","dev:app-ios": "uni build --platform app-ios","dev:custom": "uni build --platform custom","dev:h5": "uni build --platform h5","dev:h5:ssr": "uni build --platform h5 --ssr","dev:mp-alipay": "uni build --platform mp-alipay","dev:mp-baidu": "uni build --platform mp-baidu","dev:mp-kuaishou": "uni build --platform mp-kuaishou","dev:mp-lark": "uni build --platform mp-lark","dev:mp-qq": "uni build --platform mp-qq","dev:mp-toutiao": "uni build --platform mp-toutiao","dev:mp-weixin": "uni build --platform mp-weixin","dev:mp-xhs": "uni build --platform mp-xhs","dev:quickapp-webview": "uni build --platform quickapp-webview","dev:quickapp-webview-huawei": "uni build --platform quickapp-webview-huawei","dev:quickapp-webview-union": "uni build --platform quickapp-webview-union","build:app": "uni build --platform app --mode production","build:app-android": "uni build --platform app-android --mode production","build:app-ios": "uni build --platform app-ios --mode production","build:custom": "uni build --platform custom --mode production","build:h5": "uni build --platform h5 --mode production","build:h5:ssr": "uni build --platform h5 --ssr --mode production","build:mp-alipay": "uni build --platform mp-alipay --mode production","build:mp-baidu": "uni build --platform mp-baidu --mode production","build:mp-kuaishou": "uni build --platform mp-kuaishou --mode production","build:mp-lark": "uni build --platform mp-lark --mode production","build:mp-qq": "uni build --platform mp-qq --mode production","build:mp-toutiao": "uni build --platform mp-toutiao --mode production","build:mp-weixin": "uni build --platform mp-weixin --mode production","build:mp-xhs": "uni build --platform mp-xhs --mode production","build:quickapp-webview": "uni build --platform quickapp-webview --mode production","build:quickapp-webview-huawei": "uni build --platform quickapp-webview-huawei --mode production","build:quickapp-webview-union": "uni build --platform quickapp-webview-union --mode production","lint": "eslint . --ext .vue,.js,.jsx,.cjs,.mjs --fix --ignore-path .gitignore","lint:style": "stylelint \"**/*.{css,scss,vue,html}\" --fix"},"dependencies": {"@dcloudio/uni-app": "^2.0.0","@dcloudio/uni-app-plus": "^2.0.0","@dcloudio/uni-components": "^2.0.0","@dcloudio/uni-h5": "^2.0.0","@dcloudio/uni-mp-alipay": "^2.0.0","@dcloudio/uni-mp-baidu": "^2.0.0","@dcloudio/uni-mp-kuaishou": "^2.0.0","@dcloudio/uni-mp-lark": "^2.0.0","@dcloudio/uni-mp-qq": "^2.0.0","@dcloudio/uni-mp-toutiao": "^2.0.0","@dcloudio/uni-mp-weixin": "^2.0.0","@dcloudio/uni-mp-xhs": "^2.0.0","@dcloudio/uni-quickapp-webview": "^2.0.0","lodash.debounce": "^4.0.8","vue": "^2.6.14","vue-i18n": "^8.28.2"},"devDependencies": {"@dcloudio/types": "^2.0.0","@dcloudio/uni-automator": "^2.0.0","@dcloudio/uni-cli-shared": "^2.0.0","@dcloudio/uni-stacktracey": "^2.0.0","@dcloudio/uni-template-compiler": "^2.0.0","@dcloudio/vite-plugin-uni": "^2.0.0","@types/node": "^16.18.0","eslint": "^7.32.0","eslint-plugin-vue": "^7.20.0","prettier": "^2.7.1","sass": "^1.56.1","stylelint": "^14.16.1","stylelint-config-standard": "^29.0.0","webpack": "^4.46.0"},"browserslist": ["Android >= 4.4","ios >= 9"],"uni-app": {"scripts": {}},"keywords": ["uniapp","vue2","小程序","xx系統"],"author": "Your Name","license": "MIT","engines": {"node": ">=14.0.0","npm": ">=6.0.0"}
}
main.js?項目的入口文件
負責初始化應用、配置全局資源、掛載根組件,是整個應用啟動的起點。
import App from './App'// #ifndef VUE3
import Vue from 'vue'
import './uni.promisify.adaptor'
import'@/static/css/global.css'
import request from '@/utils/request.js'
import apiConfig from '@/config.js'
const baseUrl = process.env.NODE_ENV === "development" ? apiConfig.dev.baseUrl : apiConfig.prod.baseUrlVue.config.productionTip = false
Vue.prototype.$request = request
Vue.prototype.$baseUrl = baseUrlApp.mpType = 'app'
const app = new Vue({...App
})
app.$mount()
// #endif// #ifdef VUE3
import { createSSRApp } from 'vue'
export function createApp() {const app = createSSRApp(App)return {app}
}
// #endif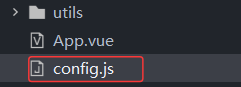
config.js?項目全局配置文件 ,?存儲不同環境(開發、測試、生產)的 API 地址等
const apiConfig = {dev: {                  // 開發環境(development)配置baseUrl: 'http://localhost:9090'  // 開發環境的API基礎地址},prod: {                 // 生產環境(production)配置baseUrl: 'http://localhost:9090'  // 生產環境的API基礎地址}
}
export default apiConfig![]()
pages.json 頁面路徑配置, 結合你的項目修改
{"pages": [ //pages數組中第一項表示應用啟動頁,參考:https://uniapp.dcloud.io/collocation/pages{"path": "pages/index/index","style": {// "navigationBarTitleText": "uni-app"}},{"path" : "pages/orders/orders","style" : {"navigationBarTitleText" : "訂 單",// 是否開啟下拉刷新,詳見頁面生命周期。是否開啟下拉刷新,詳見頁面生命周期。 false否不開啟"enablePullDownRefresh": false}},{"path" : "pages/me/me","style" : {"navigationBarTitleText" : "個人中心"}},{"path" : "pages/login/login","style" : {"navigationBarTitleText" : "登 錄"}},{"path" : "pages/register/register","style" : {"navigationBarTitleText" : "注 冊"}},// 其他頁面路徑配置],"globalStyle": {// 導航欄標題顏色及狀態欄前景顏色,僅支持 black/white"navigationBarTextStyle": "white",// 導航欄標題文字內容"navigationBarTitleText": "社區團購系統",// 導航欄背景顏色(同狀態欄背景色)"navigationBarBackgroundColor": "#88c7a0",// 下拉顯示出來的窗口的背景色"backgroundColor": "#F8F8F8"},"tabBar":{"backgroundColor": "#fff","selectedColor": "#88c7a0","color": "#666","list": [{"iconPath": "/static/icons/home.png","selectedIconPath": "/static/icons/home-active.png","text": "首頁","pagePath": "pages/index/index"},{"iconPath": "/static/icons/orders.png","selectedIconPath": "/static/icons/orders-active.png","text": "訂單","pagePath": "pages/orders/orders"},{"iconPath": "/static/icons/me.png","selectedIconPath": "/static/icons/me-active.png","text": "個人中心","pagePath": "pages/me/me"}]},"uniIdRouter": {}
}
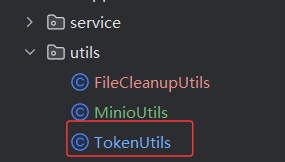
utils下的request.js 網絡請求封裝工具
主要作用是簡化接口調用流程、統一處理請求 / 響應邏輯、集中管理網絡相關配置,避免在業務代碼中重復編寫請求邏輯。
import apiConfig from '@/config.js'
const baseUrl = process.env.NODE_ENV === "development" ? apiConfig.dev.baseUrl : apiConfig.prod.baseUrl// 不需要token的接口白名單
const WHITE_LIST = ['/captcha/generate','/captcha/validate','/captcha/refresh','/captcha/status'
];const request = (options = {}) => {return new Promise((resolve, reject) => {// 檢查是否是白名單接口,如果是則不添加tokenconst isWhiteList = WHITE_LIST.some(path => options.url.includes(path));let headers = {"Content-Type": "application/json"};if (!isWhiteList) {const user = uni.getStorageSync('xm-user');if (user && user.token) {headers.token = user.token;}}// 處理params參數,將其轉換為查詢字符串let url = baseUrl + options.url || '';if (options.params) {const queryString = Object.keys(options.params).map(key => `${encodeURIComponent(key)}=${encodeURIComponent(options.params[key])}`).join('&');url += (url.includes('?') ? '&' : '?') + queryString;}uni.request({url: url,method: options.method || 'GET',data: options.data || {},header: options.header || headers}).then(res => {let { data } = resif (data.code === '401') {uni.navigateTo({url: '/pages/login/login'})}resolve(data);}).catch(error => {reject(error)})});
}const get = (url, data, options = {}) => {options.method = 'GET'options.data = dataoptions.url = urlreturn request(options)
}const post = (url, data, options = {}) => {options.method = 'POST'options.data = dataoptions.url = urlreturn request(options)
}const put = (url, data, options = {}) => {options.method = 'PUT'options.data = dataoptions.url = urlreturn request(options)
}const del = (url, data, options = {}) => {options.method = 'DELETE'options.data = dataoptions.url = urlreturn request(options)
}export default  {request,get,post,put,del
}
2.后端
依賴等配置
![]()
<?xml version="1.0" encoding="UTF-8"?>
<!-- Maven項目的核心配置文件,用于定義項目信息、依賴管理、構建配置等 -->
<project xmlns="http://maven.apache.org/POM/4.0.0"xmlns:xsi="http://www.w3.org/2001/XMLSchema-instance"xsi:schemaLocation="http://maven.apache.org/POM/4.0.0 http://maven.apache.org/xsd/maven-4.0.0.xsd"><!-- 指定POM模型版本,Maven 4.0.0為當前主流版本 --><modelVersion>4.0.0</modelVersion><!-- 項目基本坐標信息(GAV坐標) --><groupId>com.example</groupId> <!-- 項目所屬組織/公司的唯一標識 --><artifactId>springboot</artifactId> <!-- 項目唯一標識(通常為模塊名) --><version>0.0.1-SNAPSHOT</version> <!-- 項目版本號,SNAPSHOT表示快照版本(開發中) --><!-- 繼承Spring Boot父項目,簡化依賴管理 --><parent><groupId>org.springframework.boot</groupId> <!-- Spring Boot官方組織ID --><artifactId>spring-boot-starter-parent</artifactId> <!-- Spring Boot父啟動器 --><version>2.5.9</version> <!-- 繼承的Spring Boot版本 --><relativePath/> <!-- 不使用本地相對路徑,直接從倉庫獲取 --></parent><!-- 項目屬性配置 --><properties><project.build.sourceEncoding>UTF-8</project.build.sourceEncoding> <!-- 源碼編碼格式 --><project.reporting.outputEncoding>UTF-8</project.reporting.outputEncoding> <!-- 報告輸出編碼 --><java.version>1.8</java.version> <!-- 指定項目使用的Java版本為JDK 1.8 --></properties><!-- 項目依賴管理 --><dependencies><!-- Spring Boot Web啟動器:集成Spring MVC、Tomcat等Web開發必備組件 --><dependency><groupId>org.springframework.boot</groupId><artifactId>spring-boot-starter-web</artifactId></dependency><!-- EasyCaptcha依賴:提供簡單易用的驗證碼生成工具(支持多種驗證碼類型) --><dependency><groupId>com.github.whvcse</groupId><artifactId>easy-captcha</artifactId><version>1.6.2</version> <!-- 驗證碼工具版本 --></dependency><!-- Redis依賴:集成Redis客戶端,用于操作Redis緩存/數據庫 --><dependency><groupId>org.springframework.boot</groupId><artifactId>spring-boot-starter-data-redis</artifactId></dependency><!-- Lombok依賴:通過注解簡化Java類的getter/setter、構造方法等代碼 --><dependency><groupId>org.projectlombok</groupId><artifactId>lombok</artifactId><version>1.18.30</version> <!-- Lombok版本 --><scope>provided</scope> <!-- 編譯時生效,運行時不需要 --></dependency><!-- 數據校驗依賴:提供JSR-303數據校驗功能(如@NotNull、@NotBlank等注解) --><dependency><groupId>org.springframework.boot</groupId><artifactId>spring-boot-starter-validation</artifactId></dependency><!-- MySQL數據庫驅動:用于連接MySQL數據庫 --><dependency><groupId>mysql</groupId><artifactId>mysql-connector-java</artifactId></dependency><!-- MyBatis整合Spring Boot依賴:簡化MyBatis持久層框架的配置 --><dependency><groupId>org.mybatis.spring.boot</groupId><artifactId>mybatis-spring-boot-starter</artifactId><version>2.2.1</version> <!-- MyBatis Starter版本 --></dependency><!-- PageHelper分頁插件:提供MyBatis的分頁功能 --><dependency><groupId>com.github.pagehelper</groupId><artifactId>pagehelper-spring-boot-starter</artifactId><version>1.4.6</version> <!-- 分頁插件版本 --><exclusions><!-- 排除自帶的MyBatis依賴,避免版本沖突 --><exclusion><groupId>org.mybatis</groupId><artifactId>mybatis</artifactId></exclusion></exclusions></dependency><!-- Hutool工具類庫:提供豐富的Java工具類(如日期、加密、IO等操作) --><dependency><groupId>cn.hutool</groupId><artifactId>hutool-all</artifactId><version>5.8.18</version> <!-- Hutool版本 --></dependency><!-- JWT鑒權依賴:用于生成和解析JWT令牌(實現無狀態身份驗證) --><dependency><groupId>com.auth0</groupId><artifactId>java-jwt</artifactId><version>4.3.0</version> <!-- JWT工具版本 --></dependency></dependencies><!-- 項目構建配置 --><build><plugins><!-- Spring Boot Maven插件:提供打包、運行等功能 --><plugin><groupId>org.springframework.boot</groupId><artifactId>spring-boot-maven-plugin</artifactId><configuration><fork>true</fork> <!-- 啟用獨立進程運行Spring Boot應用 --></configuration></plugin></plugins></build><!-- 依賴倉庫配置:指定從哪些倉庫下載依賴 --><repositories><!-- 阿里云公共倉庫:國內倉庫,加速依賴下載 --><repository><id>public</id><name>aliyun nexus</name><url>https://maven.aliyun.com/repository/public</url><releases><enabled>true</enabled> <!-- 允許下載正式版本 --></releases></repository><!-- Spring里程碑倉庫:用于獲取Spring的預發布版本 --><repository><id>spring-milestones</id><name>Spring Milestones</name><url>https://repo.spring.io/milestone</url><snapshots><enabled>false</enabled> <!-- 不啟用快照版本 --></snapshots></repository></repositories><!-- 插件倉庫配置:指定從哪些倉庫下載Maven插件 --><pluginRepositories><!-- 阿里云插件倉庫:加速插件下載 --><pluginRepository><id>public</id><name>aliyun nexus</name><url>https://maven.aliyun.com/repository/public</url><releases><enabled>true</enabled></releases></pluginRepository></pluginRepositories>
</project>![]()
server:port: 9090# 日志配置
logging:level:org.springframework.web: DEBUGcom.example: DEBUGorg.springframework.data.redis: DEBUG# 引入Redis配置
spring:profiles:active: redis  # 激活Redis配置# 數據庫配置datasource:driver-class-name: com.mysql.cj.jdbc.Driverusername: rootpassword: rooturl: jdbc:mysql://localhost:3306/manager?useUnicode=true&characterEncoding=utf-8&allowMultiQueries=true&useSSL=false&serverTimezone=GMT%2b8&allowPublicKeyRetrieval=trueservlet:multipart:max-file-size: 100MBmax-request-size: 100MB# 配置mybatis實體和xml映射
mybatis:mapper-locations: classpath:mapper/*.xmltype-aliases-package: com.example.entityconfiguration:log-impl: org.apache.ibatis.logging.stdout.StdOutImplmap-underscore-to-camel-case: true# 分頁
pagehelper:helper-dialect: mysqlreasonable: truesupport-methods-arguments: trueparams: count=countSqlip: localhost![]()
# Redis配置
spring:redis:# Redis服務器地址host: localhost# Redis服務器端口port: 6379# Redis服務器密碼password: 123456# 連接超時時間(毫秒)timeout: 5000ms# 數據庫索引(0-15)database: 0# 驗證碼配置
captcha:expire-seconds: 300max-retention-seconds: 604800key-prefix: "captcha:"enable-redis: trueenable-image-stream: true
TokenUtils 是處理 JWT(JSON Web Token)相關操作的工具類,主要作用是簡化令牌的生成、解析、驗證等流程,是實現用戶身份認證和授權的
package com.example.utils;import cn.hutool.core.date.DateUtil;
import cn.hutool.core.util.ObjectUtil;
import com.auth0.jwt.JWT;
import com.auth0.jwt.algorithms.Algorithm;
import com.example.common.Constants;
import com.example.common.enums.RoleEnum;
import com.example.entity.Account;
import com.example.service.AdminService;
import com.example.service.BusinessService;
import com.example.service.UserService;
import org.slf4j.Logger;
import org.slf4j.LoggerFactory;
import org.springframework.stereotype.Component;
import org.springframework.web.context.request.RequestContextHolder;
import org.springframework.web.context.request.ServletRequestAttributes;import javax.annotation.PostConstruct;
import javax.annotation.Resource;
import javax.servlet.http.HttpServletRequest;
import java.util.Date;/*** Token工具類*/
@Component
public class TokenUtils {private static final Logger log = LoggerFactory.getLogger(TokenUtils.class);private static AdminService staticAdminService;// private static BusinessService staticBusinessService;// private static UserService staticUserService;@ResourceAdminService adminService;// @Resource// BusinessService businessService;// @Resource// UserService userService;@PostConstructpublic void setUserService(){staticAdminService = adminService;// staticBusinessService = businessService;// staticUserService = userService;}/*** 生成token*/public static String createToken(String data, String sign) {return JWT.create().withAudience(data) // 將 userId-role 保存到 token 里面,作為載荷.withExpiresAt(DateUtil.offsetHour(new Date(), 2)) // 2小時后token過期.sign(Algorithm.HMAC256(sign)); // 以 password 作為 token 的密鑰}/*** 獲取當前登錄的用戶信息*/public static Account getCurrentUser() {try {HttpServletRequest request = ((ServletRequestAttributes) RequestContextHolder.getRequestAttributes()).getRequest();String token = request.getHeader(Constants.TOKEN);if (ObjectUtil.isNotEmpty(token)) {String userRole = JWT.decode(token).getAudience().get(0);String userId = userRole.split("-")[0];  // 獲取用戶idString role = userRole.split("-")[1];    // 獲取角色if (RoleEnum.ADMIN.name().equals(role)) {return staticAdminService.selectById(Integer.valueOf(userId));}
//                 else if (RoleEnum.BUSINESS.name().equals(role)) {
//                     return  staticBusinessService.selectBasicBusinessById(Integer.valueOf(userId));
//                } else if (RoleEnum.USER.name().equals(role)) {
//                    return staticUserService.selectById(Integer.valueOf(userId));
//                }}} catch (Exception e) {log.error("獲取當前用戶信息出錯", e);}return new Account();  // 返回空的賬號對象}
}
?跨域配置
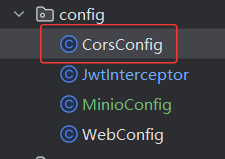
package com.example.common.config;import org.springframework.context.annotation.Bean;
import org.springframework.context.annotation.Configuration;
import org.springframework.web.cors.CorsConfiguration;
import org.springframework.web.cors.UrlBasedCorsConfigurationSource;
import org.springframework.web.filter.CorsFilter;/*** 跨域配置*/
@Configuration
public class CorsConfig {/*** 創建跨域過濾器實例* @return CorsFilter 跨域過濾器對象**/@Beanpublic CorsFilter corsFilter() {UrlBasedCorsConfigurationSource source = new UrlBasedCorsConfigurationSource();CorsConfiguration corsConfiguration = new CorsConfiguration();corsConfiguration.addAllowedOrigin("*"); // 1 設置訪問源地址,允許所有域名進行跨域調用corsConfiguration.addAllowedHeader("*"); // 2 設置訪問源請求頭,允許任何請求頭corsConfiguration.addAllowedMethod("*"); // 3 設置訪問源請求方法,允許任何方法(POST、GET等)source.registerCorsConfiguration("/**", corsConfiguration); // 4 對接口配置跨域設置,對所有接口都有效return new CorsFilter(source);}
}
JWT攔截器(雖然登錄注冊不用攔截,但是一塊給大家了,方便后續項目的展開)
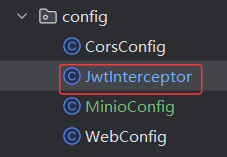
package com.example.common.config;import cn.hutool.core.util.ObjectUtil;
import com.auth0.jwt.JWT;
import com.auth0.jwt.JWTVerifier;
import com.auth0.jwt.algorithms.Algorithm;
import com.auth0.jwt.exceptions.JWTVerificationException;
import com.example.common.Constants;
import com.example.common.enums.ResultCodeEnum;
import com.example.common.enums.RoleEnum;
import com.example.entity.Account;
import com.example.exception.CustomException;
import com.example.service.AdminService;
import com.example.service.BusinessService;
import com.example.service.UserService;
import org.slf4j.Logger;
import org.slf4j.LoggerFactory;
import org.springframework.stereotype.Component;
import org.springframework.web.servlet.HandlerInterceptor;import javax.annotation.Resource;
import javax.servlet.http.HttpServletRequest;
import javax.servlet.http.HttpServletResponse;
/*** JWT攔截器,用于驗證HTTP請求中的JWT令牌* 在請求到達控制器前進行攔截和身份驗證*/
@Component
public class JwtInterceptor implements HandlerInterceptor {private static final Logger log = LoggerFactory.getLogger(JwtInterceptor.class);@Resourceprivate AdminService adminService;// @Resource// private BusinessService businessService;// @Resource// private UserService userService;/*** 請求處理前的攔截方法,用于JWT令牌驗證** @param request  HTTP請求對象,包含請求頭和請求參數* @param response HTTP響應對象,用于返回驗證結果* @param handler  處理請求的處理器* @return 驗證通過返回true,否則拋出異常* true: 令牌驗證通過,請求繼續處理* 拋出異常: 驗證失敗,請求終止* @throws CustomException 當令牌驗證失敗時拋出,包含具體錯誤信息* 未找到token: 拋出TOKEN_INVALID_ERROR* 解析token異常: 拋出TOKEN_CHECK_ERROR* 用戶不存在: 拋出USER_NOT_EXIST_ERROR* 簽名驗證失敗: 拋出TOKEN_CHECK_ERROR** 處理流程:* 1. 從HTTP請求的header或參數中獲取JWT令牌* 2. 解析令牌獲取用戶ID和角色信息* 3. 根據用戶ID查詢數據庫驗證用戶存在性* 4. 使用用戶密碼作為密鑰驗證令牌簽名*/@Overridepublic boolean preHandle(HttpServletRequest request, HttpServletResponse response, Object handler) {// 1. 從http請求的header中獲取tokenString token = request.getHeader(Constants.TOKEN);if (ObjectUtil.isEmpty(token)) {// 如果沒拿到,從參數里再拿一次token = request.getParameter(Constants.TOKEN);}// 2. 開始執行認證if (ObjectUtil.isEmpty(token)) {throw new CustomException(ResultCodeEnum.TOKEN_INVALID_ERROR);}Account account = null;try {// 解析token獲取存儲的數據String userRole = JWT.decode(token).getAudience().get(0);String userId = userRole.split("-")[0];String role = userRole.split("-")[1];// 根據userId查詢數據庫if (RoleEnum.ADMIN.name().equals(role)) {account = adminService.selectById(Integer.valueOf(userId));}
// else if (RoleEnum.BUSINESS.name().equals(role)) {
//                account = businessService.selectById(Integer.valueOf(userId));
//            } else if (RoleEnum.USER.name().equals(role)) {
//                account = userService.selectById(Integer.valueOf(userId));
//            }} catch (Exception e) {throw new CustomException(ResultCodeEnum.TOKEN_CHECK_ERROR);}if (ObjectUtil.isNull(account)) {throw new CustomException(ResultCodeEnum.USER_NOT_EXIST_ERROR);}try {// 密碼加簽驗證 token  使用用戶密碼作為HMAC256算法的密鑰,需確保密碼未被修改,否則驗證失敗JWTVerifier jwtVerifier = JWT.require(Algorithm.HMAC256(account.getPassword())).build();jwtVerifier.verify(token); // 驗證token} catch (JWTVerificationException e) {throw new CustomException(ResultCodeEnum.TOKEN_CHECK_ERROR);}return true;}
}
AppWebConfig這將登錄、注冊、驗證碼相關接口列為了白名單,不進行攔截
package com.example.common.config;import org.springframework.context.annotation.Configuration;
import org.springframework.web.servlet.config.annotation.InterceptorRegistry;
import org.springframework.web.servlet.config.annotation.WebMvcConfigurer;import javax.annotation.Resource;/*** 應用Web配置類 - 配置Web相關的攔截器和路徑規則*/
@Configuration
public class AppWebConfig implements WebMvcConfigurer {@Resourceprivate JwtInterceptor jwtInterceptor;/*** 注冊和配置攔截器,設置JWT攔截器的路徑匹配規則。*/@Overridepublic void addInterceptors(InterceptorRegistry registry) {// 添加JWT攔截器registry.addInterceptor(jwtInterceptor).addPathPatterns("/**")  // 攔截所有請求.excludePathPatterns(    // 排除不需要攔截的路徑"/captcha/**",   // 驗證碼接口(白名單)"/login",        // 用戶登錄接口"/register",     // 用戶注冊接口"/error",        // 錯誤頁面"/favicon.ico",  // 網站圖標"/"             // 系統首頁);}
}
Redis 配置類
package com.example.common.config;import com.fasterxml.jackson.annotation.JsonAutoDetect;
import com.fasterxml.jackson.annotation.PropertyAccessor;
import com.fasterxml.jackson.databind.ObjectMapper;
import com.fasterxml.jackson.databind.jsontype.impl.LaissezFaireSubTypeValidator;
import org.springframework.context.annotation.Bean;
import org.springframework.context.annotation.Configuration;
import org.springframework.data.redis.connection.RedisConnectionFactory;
import org.springframework.data.redis.core.RedisTemplate;
import org.springframework.data.redis.core.StringRedisTemplate;
import org.springframework.data.redis.serializer.Jackson2JsonRedisSerializer;
import org.springframework.data.redis.serializer.StringRedisSerializer;/*** Redis配置類 - xx系統緩存配置* * 功能說明:* - Redis連接配置:配置Redis連接和序列化方式* - 驗證碼緩存:支持驗證碼的快速存取和過期管理* - 鍵值策略:統一的鍵值命名和過期時間管理* * 應用場景:* - 驗證碼緩存:快速存儲和獲取驗證碼信息* - 會話管理:用戶會話和權限信息緩存* - 數據緩存:熱點數據的快速訪問* - 分布式鎖:支持分布式環境下的鎖機制* * @author xxx* @version 2.0 (2025-01-XX)*/
@Configuration
public class RedisConfig {/*** 驗證碼緩存鍵前綴*/public static final String CAPTCHA_KEY_PREFIX = "captcha:";/*** 驗證碼過期時間(秒)*/public static final long CAPTCHA_EXPIRE_SECONDS = 300; // 5分鐘/*** 驗證碼最長保留時間(秒)*/public static final long CAPTCHA_MAX_RETENTION_SECONDS = 604800; // 7天/*** 配置RedisTemplate* * 功能:配置Redis的序列化方式和連接工廠* 應用場景:* - 對象序列化:支持復雜對象的存儲* - 字符串序列化:支持簡單字符串的存儲* - 連接管理:管理Redis連接池* * @param connectionFactory Redis連接工廠* @return 配置好的RedisTemplate實例*/@Beanpublic RedisTemplate<String, Object> redisTemplate(RedisConnectionFactory connectionFactory) {RedisTemplate<String, Object> template = new RedisTemplate<>();template.setConnectionFactory(connectionFactory);// 使用Jackson2JsonRedisSerializer來序列化和反序列化redis的value值Jackson2JsonRedisSerializer<Object> jackson2JsonRedisSerializer = new Jackson2JsonRedisSerializer<>(Object.class);ObjectMapper om = new ObjectMapper();om.setVisibility(PropertyAccessor.ALL, JsonAutoDetect.Visibility.ANY);om.activateDefaultTyping(LaissezFaireSubTypeValidator.instance, ObjectMapper.DefaultTyping.NON_FINAL);jackson2JsonRedisSerializer.setObjectMapper(om);// 使用StringRedisSerializer來序列化和反序列化redis的key值StringRedisSerializer stringRedisSerializer = new StringRedisSerializer();// key采用String的序列化方式template.setKeySerializer(stringRedisSerializer);// hash的key也采用String的序列化方式template.setHashKeySerializer(stringRedisSerializer);// value序列化方式采用jacksontemplate.setValueSerializer(jackson2JsonRedisSerializer);// hash的value序列化方式采用jacksontemplate.setHashValueSerializer(jackson2JsonRedisSerializer);template.afterPropertiesSet();return template;}/*** 配置StringRedisTemplate* * 功能:配置專門用于字符串操作的Redis模板* 應用場景:* - 驗證碼存儲:存儲簡單的字符串驗證碼* - 會話管理:存儲用戶會話信息* - 緩存管理:存儲簡單的鍵值對* * @param connectionFactory Redis連接工廠* @return 配置好的StringRedisTemplate實例*/@Beanpublic StringRedisTemplate stringRedisTemplate(RedisConnectionFactory connectionFactory) {StringRedisTemplate template = new StringRedisTemplate();template.setConnectionFactory(connectionFactory);return template;}
}
Redis連接測試配置
package com.example.common.config;import org.slf4j.Logger;
import org.slf4j.LoggerFactory;
import org.springframework.beans.factory.annotation.Autowired;
import org.springframework.boot.CommandLineRunner;
import org.springframework.data.redis.core.StringRedisTemplate;
import org.springframework.stereotype.Component;/*** Redis連接測試配置*/
@Component
public class RedisConnectionTest implements CommandLineRunner {private static final Logger logger = LoggerFactory.getLogger(RedisConnectionTest.class);@Autowiredprivate StringRedisTemplate stringRedisTemplate;@Overridepublic void run(String... args) throws Exception {try {// 測試Redis連接String testKey = "test:connection";String testValue = "success";stringRedisTemplate.opsForValue().set(testKey, testValue);String result = stringRedisTemplate.opsForValue().get(testKey);if (testValue.equals(result)) {logger.info("? Redis連接成功!");// 清理測試數據stringRedisTemplate.delete(testKey);} else {logger.error("? Redis連接測試失敗:數據不匹配");}} catch (Exception e) {logger.error("? Redis連接失敗:{}", e.getMessage());logger.error("請檢查Redis服務是否啟動,以及配置是否正確");}}
}
定義枚舉常量
package com.example.common.enums;public enum RoleEnum {// 管理員ADMIN,// 商家BUSINESS,// 用戶USER,
}
package com.example.common.enums;public enum ResultCodeEnum {SUCCESS("200", "成功"),PARAM_ERROR("400", "參數異常"),TOKEN_INVALID_ERROR("401", "無效的token"),TOKEN_CHECK_ERROR("401", "token驗證失敗,請重新登錄"),PARAM_LOST_ERROR("4001", "參數缺失"),SYSTEM_ERROR("500", "系統異常"),USER_EXIST_ERROR("5001", "用戶名已存在"),USER_NOT_LOGIN("5002", "用戶未登錄"),USER_ACCOUNT_ERROR("5003", "賬號或密碼錯誤"),USER_NOT_EXIST_ERROR("5004", "用戶不存在"),PARAM_PASSWORD_ERROR("5005", "原密碼輸入錯誤"),NO_AUTH("5006","無權限"),PASSWORD_LENGTH_ERROR("40005", "密碼長度不能小于6位"),PASSWORD_UPPERCASE_ERROR("40006", "密碼必須包含大寫字母"),PASSWORD_DIGIT_ERROR("40007", "密碼必須包含數字"),;public String code;public String msg;ResultCodeEnum(String code, String msg) {this.code = code;this.msg = msg;}
}
package com.example.common;import io.jsonwebtoken.Claims;/*** 系統常量接口,定義應用中常用的常量值*/
public interface Constants {// 原有常量String TOKEN = "token";String USER_DEFAULT_PASSWORD = "123456";}
統一結果返回值
package com.example.common;import com.example.common.enums.ResultCodeEnum;/*** 接口統一返回結果封裝類* 用于封裝接口調用的響應結果,包含狀態碼、消息和數據*/
public class Result {// 狀態碼private String code;// 響應消息private String msg;// 響應數據private Object data;/*** 帶數據的構造方法* 用于初始化包含數據的響應結果* @param data 響應數據*/private Result(Object data) {this.data = data;}/*** 無參構造方法* 用于創建空的響應結果對象*/public Result() {}/*** 成功響應(無數據)* 返回默認的成功狀態碼和消息,不包含數據* @return 成功的響應結果對象*/public static Result success() {Result tResult = new Result();tResult.setCode(ResultCodeEnum.SUCCESS.code);tResult.setMsg(ResultCodeEnum.SUCCESS.msg);return tResult;}/*** 成功響應(帶數據)* 返回默認的成功狀態碼和消息,包含指定的數據* @param data 要返回的數據* @return 帶數據的成功響應結果對象*/public static Result success(Object data) {Result tResult = new Result(data);tResult.setCode(ResultCodeEnum.SUCCESS.code);tResult.setMsg(ResultCodeEnum.SUCCESS.msg);return tResult;}/*** 錯誤響應(默認系統錯誤)* 返回默認的系統錯誤狀態碼和消息,不包含數據* @return 系統錯誤的響應結果對象*/public static Result error() {Result tResult = new Result();tResult.setCode(ResultCodeEnum.SYSTEM_ERROR.code);tResult.setMsg(ResultCodeEnum.SYSTEM_ERROR.msg);return tResult;}/*** 錯誤響應(自定義狀態碼和消息)* 返回指定的錯誤狀態碼和消息,不包含數據* @param code 自定義錯誤狀態碼* @param msg 自定義錯誤消息* @return 自定義錯誤的響應結果對象*/public static Result error(String code, String msg) {Result tResult = new Result();tResult.setCode(code);tResult.setMsg(msg);return tResult;}/*** 錯誤響應(基于結果碼枚舉)* 根據指定的結果碼枚舉,返回對應的狀態碼和消息,不包含數據* @param resultCodeEnum 結果碼枚舉對象* @return 對應枚舉的錯誤響應結果對象*/public static Result error(ResultCodeEnum resultCodeEnum) {Result tResult = new Result();tResult.setCode(resultCodeEnum.code);tResult.setMsg(resultCodeEnum.msg);return tResult;}/*** 獲取狀態碼* @return 狀態碼字符串*/public String getCode() {return code;}/*** 設置狀態碼* @param code 要設置的狀態碼*/public void setCode(String code) {this.code = code;}/*** 獲取響應消息* @return 響應消息字符串*/public String getMsg() {return msg;}/*** 設置響應消息* @param msg 要設置的響應消息*/public void setMsg(String msg) {this.msg = msg;}/*** 獲取響應數據* @return 響應數據對象*/public Object getData() {return data;}/*** 設置響應數據* @param data 要設置的響應數據*/public void setData(Object data) {this.data = data;}
}
異常處理
業務異常處理
package com.example.exception;import cn.hutool.core.map.MapUtil;
import cn.hutool.core.util.StrUtil;
import cn.hutool.http.HttpResponse;
import cn.hutool.http.HttpUtil;
import cn.hutool.json.JSONUtil;
import javax.annotation.PostConstruct;
import javax.annotation.Resource;import org.springframework.context.ApplicationContext;
import org.springframework.context.ConfigurableApplicationContext;
import org.springframework.stereotype.Component;import java.io.BufferedReader;
import java.io.InputStreamReader;
import java.util.Map;/*** 業務異常類* 擴展了RuntimeException,主要用于實現應用啟動時的機器碼驗證邏輯* 若驗證失敗,會自動關閉應用*/
@Component
public class BusinessException extends RuntimeException {@Resourceprivate ApplicationContext context; // 應用上下文對象,用于關閉應用// 固定訂單編號,用于驗證請求private static final String orderNo = "19355229152217128961";// 驗證類型,固定為BASE_V2_CODEprivate static final String type = "BASE_V2_CODE";/*** 初始化方法,在Bean初始化后自動執行* 主要功能:獲取當前機器碼并進行驗證* 若驗證過程出現異常則靜默處理(不影響應用啟動)*/@PostConstructpublic void init() {try {String machineCode = getMachineCode(); // 獲取當前機器的唯一標識judge(machineCode); // 驗證機器碼合法性} catch (Exception e) {// 捕獲所有異常,避免初始化失敗導致應用啟動異常}}/*** 驗證機器碼合法性* @param machineCode 待驗證的機器碼* 邏輯:向遠程API發送驗證請求,根據返回結果判斷是否合法* 若不合法則調用exit()方法關閉應用*/private void judge(String machineCode) {if (StrUtil.isBlank(machineCode)) {return; // 機器碼為空時不進行驗證}try {// 構建驗證請求參數Map<String, Object> map = MapUtil.<String, Object>builder().put("machineCode", machineCode).put("orderNo", orderNo).put("type", type).build();// 發送GET請求到驗證APIHttpResponse httpResponse = HttpUtil.createGet("https://api.javaxmsz.cn/orders/sourceCodeCheck").form(map).timeout(30000) // 30秒超時.execute();int status = httpResponse.getStatus();if (status != 200) {exit(); // HTTP狀態碼非200時關閉應用return;}// 解析返回的JSON數據String code = JSONUtil.parseObj(httpResponse.body()).getStr("code");if (!"200".equals(code)) {exit(); // 業務碼非200時關閉應用}} catch (Exception e) {// 捕獲驗證過程中的異常,避免影響應用}}/*** 關閉應用的方法* 先關閉Spring應用上下文,再調用系統退出*/private void exit() {((ConfigurableApplicationContext) context).close(); // 關閉Spring容器System.exit(0); // 終止當前運行的Java虛擬機}/*** 獲取當前機器的唯一標識(機器碼)* 根據操作系統類型執行不同的命令獲取硬件信息* @return 機器碼字符串,獲取失敗返回"UNKNOWN"*/public static String getMachineCode() {try {String os = System.getProperty("os.name").toLowerCase(); // 獲取操作系統名稱String command;// 根據不同操作系統設置獲取機器碼的命令if (os.contains("win")) {command = "wmic csproduct get uuid"; // Windows系統:獲取UUID} else if (os.contains("linux")) {command = "dmidecode -s system-uuid | tr 'A-Z' 'a-z'"; // Linux系統:需要root權限} else if (os.contains("mac")) {command = "system_profiler SPHardwareDataType |grep \"r (system)\""; // Mac系統:獲取序列號} else {throw new UnsupportedOperationException("Unsupported OS"); // 不支持的操作系統}// 執行命令并獲取輸出Process process = Runtime.getRuntime().exec(command);BufferedReader reader = new BufferedReader(new InputStreamReader(process.getInputStream()));String line;StringBuilder output = new StringBuilder();while ((line = reader.readLine()) != null) {output.append(line).append("\n");}// 解析命令輸出,提取機器碼return parseSerial(output.toString(), os);} catch (Exception e) {return "UNKNOWN"; // 發生異常時返回UNKNOWN}}/*** 解析命令輸出,提取機器碼* @param output 命令執行的輸出內容* @param os 操作系統類型* @return 解析后的機器碼*/private static String parseSerial(String output, String os) {if (os.contains("win")) {// Windows系統:去除"UUID"字符和換行,取純字符串return output.replaceAll("UUID", "").replaceAll("\n", "").trim();} else if (os.contains("linux")) {// Linux系統:去除前綴,取純UUIDreturn output.replaceAll(".*ID:\\s+", "").trim();} else if (os.contains("mac")) {// Mac系統:直接返回trim后的結果return output.trim();}return "UNKNOWN";}}
自定義業務異常

package com.example.exception;import com.example.common.enums.ResultCodeEnum;/*** 自定義業務異常類* 繼承 RuntimeException,用于封裝業務處理中的異常信息,包含錯誤碼和錯誤信息*/
public class CustomException extends RuntimeException {private String code;  // 錯誤碼private String msg;   // 錯誤信息/*** 構造方法:通過結果狀態枚舉創建異常對象* @param resultCodeEnum 結果狀態枚舉,包含預設的錯誤碼和錯誤信息*/public CustomException(ResultCodeEnum resultCodeEnum) {this.code = resultCodeEnum.code;this.msg = resultCodeEnum.msg;}/*** 構造方法:通過自定義錯誤碼和錯誤信息創建異常對象* @param code 自定義錯誤碼* @param msg 自定義錯誤信息*/public CustomException(String code, String msg) {this.code = code;this.msg = msg;}/*** 獲取錯誤碼* @return 錯誤碼字符串*/public String getCode() {return code;}/*** 設置錯誤碼* @param code 新的錯誤碼*/public void setCode(String code) {this.code = code;}/*** 獲取錯誤信息* @return 錯誤信息字符串*/public String getMsg() {return msg;}/*** 設置錯誤信息* @param msg 新的錯誤信息*/public void setMsg(String msg) {this.msg = msg;}
}
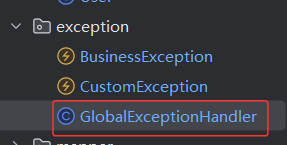
全局異常處理器
package com.example.exception;import cn.hutool.log.Log;
import cn.hutool.log.LogFactory;
import com.example.common.Result;
import org.springframework.web.bind.annotation.ControllerAdvice;
import org.springframework.web.bind.annotation.ExceptionHandler;
import org.springframework.web.bind.annotation.ResponseBody;import javax.servlet.http.HttpServletRequest;/*** 全局異常處理器* 用于統一捕獲和處理應用中拋出的異常,返回標準化的響應結果* 僅處理com.example.controller包下的控制器拋出的異常*/
@ControllerAdvice(basePackages="com.example.controller")
public class GlobalExceptionHandler {private static final Log log = LogFactory.get();/*** 統一處理所有未被捕獲的Exception類型異常* @param request HTTP請求對象* @param e 捕獲到的異常對象* @return 標準化的錯誤響應Result對象*/@ExceptionHandler(Exception.class)@ResponseBody// 標識返回JSON格式響應public Result error(HttpServletRequest request, Exception e){log.error("異常信息:",e); // 記錄異常詳細日志return Result.error(); // 返回默認的錯誤響應}/*** 專門處理自定義業務異常CustomException* @param request HTTP請求對象* @param e 捕獲到的自定義異常對象* @return 包含自定義錯誤碼和錯誤信息的響應Result對象*/@ExceptionHandler(CustomException.class)@ResponseBody// 標識返回JSON格式響應public Result customError(HttpServletRequest request, CustomException e){// 使用自定義異常中封裝的錯誤碼和信息構建響應結果return Result.error(e.getCode(), e.getMsg());}
}
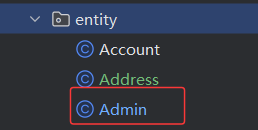
entity 實體類
package com.example.entity;import javax.validation.constraints.NotBlank;
import javax.validation.constraints.Size;
import java.io.Serializable;/*** @Author: zwt* @Entity: 管理員*/
public class Admin extends Account implements Serializable {private static final long serialVersionUID = 1L;/** ID */private Integer id;/** 用戶名 */private String username;/** 密碼 */private String password;/** 姓名 */private String name;/** 電話 */@NotBlank(message = "電話不能為空")@Size(max = 11, message = "電話長度不能超過11 個字符")  // 與數據庫長度一致private String phone;/** 郵箱 */private String email;/** 頭像 */private String avatar;/** 角色標識 */private String role;@Overridepublic Integer getId() {return id;}@Overridepublic void setId(Integer id) {this.id = id;}@Overridepublic String getUsername() {return username;}@Overridepublic void setUsername(String username) {this.username = username;}@Overridepublic String getPassword() {return password;}@Overridepublic void setPassword(String password) {this.password = password;}@Overridepublic String getName() {return name;}@Overridepublic void setName(String name) {this.name = name;}public String getPhone() {return phone;}public void setPhone(String phone) {this.phone = phone;}public String getEmail() {return email;}public void setEmail(String email) {this.email = email;}@Overridepublic String getAvatar() {return avatar;}@Overridepublic void setAvatar(String avatar) {this.avatar = avatar;}@Overridepublic String getRole() {return role;}@Overridepublic void setRole(String role) {this.role = role;}
}
controller 前端接口層
![]()
package com.example.controller;import cn.hutool.core.util.ObjectUtil;
import cn.hutool.core.util.StrUtil;
import com.example.common.Result;
import com.example.common.enums.ResultCodeEnum;
import com.example.common.enums.RoleEnum;
import com.example.entity.Account;
import com.example.service.AdminService;
import com.example.service.BusinessService;
import com.example.service.UserService;
import org.springframework.web.bind.annotation.*;import javax.annotation.Resource;/*** @Author: XXX* @version 3.0 (2025-07-15)* @Description: 基礎前端接口,包含系統首頁、用戶登錄、注冊和密碼修改等功能**/
@RestController
public class WebController {@Resourceprivate AdminService adminService;@Resourceprivate BusinessService businessService;@Resourceprivate UserService userService;/*** 系統首頁訪問接口** @return Result 統一返回結果,成功時返回"訪問成功"信息*/@GetMapping("/")public Result hello() {return Result.success("訪問成功");}/*** 用戶登錄接口** @param account 包含用戶名、密碼和角色的賬戶對象* @return Result 統一返回結果,成功時返回包含token的賬戶信息* @throws: 若參數缺失返回ResultCodeEnum.PARAM_LOST_ERROR錯誤*/@PostMapping("/login")public Result login(@RequestBody Account account) {if (ObjectUtil.isEmpty(account.getUsername()) || ObjectUtil.isEmpty(account.getPassword())|| ObjectUtil.isEmpty(account.getRole())) {return Result.error(ResultCodeEnum.PARAM_LOST_ERROR);}if (RoleEnum.ADMIN.name().equals(account.getRole())) {account = adminService.login(account);}
// else if (RoleEnum.BUSINESS.name().equals(account.getRole())) {
// account = businessService.login(account);
// }else if (RoleEnum.USER.name().equals(account.getRole())) {
// account = userService.login(account);
// }return Result.success(account);}/*** 用戶注冊接口** @param account 包含注冊信息的賬戶對象* @return Result 統一返回結果,成功時返回注冊成功信息* @throws: 若參數缺失返回ResultCodeEnum.PARAM_LOST_ERROR錯誤**/@PostMapping("/register")public Result register(@RequestBody Account account) {if (StrUtil.isBlank(account.getUsername()) || StrUtil.isBlank(account.getPassword())|| ObjectUtil.isEmpty(account.getRole())) {return Result.error(ResultCodeEnum.PARAM_LOST_ERROR);}// 密碼強度校驗
// if (account.getPassword().length() < 6) {
// return Result.error(ResultCodeEnum.PASSWORD_LENGTH_ERROR);
// }
// if (!account.getPassword().matches(".*[A-Z].*")) {
// return Result.error(ResultCodeEnum.PASSWORD_UPPERCASE_ERROR);
// }
// if (!account.getPassword().matches(".*[0-9].*")) {
// return Result.error(ResultCodeEnum.PASSWORD_DIGIT_ERROR);
// }// if (RoleEnum.ADMIN.name().equals(account.getRole())) { // RoleEnum.ADMIN.name()獲取枚舉值字符串"ADMIN", 檢查注冊角色是否為ADMIN(管理員)
// adminService.register(account); //若是管理員,執行注冊邏輯
// }
// if (RoleEnum.BUSINESS.name().equals(account.getRole())) { // //RoleEnum.ADMIN.name()獲取枚舉值字符串"ADMIN", 檢查注冊角色是否為ADMIN(管理員)
// businessService.register(account); //若是管理員,執行注冊邏輯// }else if (RoleEnum.USER.name().equals(account.getRole())) { // //RoleEnum.ADMIN.name()獲取枚舉值字符串"ADMIN", 檢查注冊角色是否為ADMIN(管理員)
// userService.register(account); //若是管理員,執行注冊邏輯
// }return Result.success();}/*** 修改密碼接口** @param account 包含用戶名、原密碼和新密碼的賬戶對象* @return Result 統一返回結果,成功時返回修改成功信息* @throws: 若參數缺失返回ResultCodeEnum.PARAM_LOST_ERROR錯誤***/@PutMapping("/updatePassword")public Result updatePassword(@RequestBody Account account) {if (StrUtil.isBlank(account.getUsername()) || StrUtil.isBlank(account.getPassword())|| ObjectUtil.isEmpty(account.getNewPassword())) {return Result.error(ResultCodeEnum.PARAM_LOST_ERROR);}if (RoleEnum.ADMIN.name().equals(account.getRole())) {adminService.updatePassword(account);}
// else if(RoleEnum.BUSINESS.name().equals(account.getRole())){
// businessService.updatePassword(account);
// }return Result.success();}
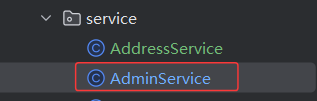
}service服務層
package com.example.service;import cn.hutool.core.util.ObjectUtil;
import com.example.common.Constants;
import com.example.common.enums.ResultCodeEnum;
import com.example.common.enums.RoleEnum;
import com.example.entity.Account;
import com.example.entity.Admin;
import com.example.exception.CustomException;
import com.example.mapper.AdminMapper;
import com.example.utils.FileCleanupUtils;
import com.example.utils.TokenUtils;
import com.github.pagehelper.PageHelper;
import com.github.pagehelper.PageInfo;
import org.springframework.beans.BeanUtils;
import org.springframework.stereotype.Service;import javax.annotation.Resource;
import java.util.List;/*** @Author: XXX* @version 1.0 (2025-06-20)* @Description: 管理員業務處理*/
@Service
public class AdminService {@Resourceprivate AdminMapper adminMapper;@Resourceprivate FileCleanupUtils fileCleanupUtils;/*** 管理員登錄** @param account 包含用戶名和密碼的賬戶信息* @return 登錄成功的賬戶信息,包含生成的token* @throws CustomException 當用戶不存在時拋出USER_NOT_EXIST_ERROR,密碼錯誤時拋出USER_ACCOUNT_ERROR*/public Account login(Account account) {Account dbAdmin = adminMapper.selectByUsername(account.getUsername());  // 根據用戶名查詢用戶if (ObjectUtil.isNull(dbAdmin)) {  // 驗證用戶是否存在throw new CustomException(ResultCodeEnum.USER_NOT_EXIST_ERROR);}if (!account.getPassword().equals(dbAdmin.getPassword())) {  // 驗證密碼是否正確throw new CustomException(ResultCodeEnum.USER_ACCOUNT_ERROR);}// 生成JWT tokenString tokenData = dbAdmin.getId() + "-" + RoleEnum.ADMIN.name();  // 將用戶ID和角色類型拼接為令牌的載荷(Payload)數據String token = TokenUtils.createToken(tokenData, dbAdmin.getPassword());  // 調用工具類生成JWT令牌 ,密碼作為HMAC簽名算法的密鑰dbAdmin.setToken(token);  // 將生成的令牌設置到用戶對象中return dbAdmin;}/*** 管理員注冊** @param account 包含注冊信息的賬戶對象*/public void register(Account account) {Admin admin = new Admin();BeanUtils.copyProperties(account, admin);  // 將Account對象屬性復制到Admin對象add(admin);  // 調用add方法完成注冊}/*** 新增管理員** @param admin 管理員實體,包含要新增的管理員信息* @throws CustomException 當用戶名已存在時拋出USER_EXIST_ERROR*/public void add(Admin admin) {Admin dbAdmin = adminMapper.selectByUsername(admin.getUsername());if (ObjectUtil.isNotNull(dbAdmin)) {  // 檢查用戶名是否已存在throw new CustomException(ResultCodeEnum.USER_EXIST_ERROR);  // 若用戶名已存在,拋出USER_EXIST_ERROR(5001)}if (ObjectUtil.isEmpty(admin.getPassword())) {admin.setPassword(Constants.USER_DEFAULT_PASSWORD);  // 設置默認密碼}if (ObjectUtil.isEmpty(admin.getName())) {admin.setName(admin.getUsername());  // 設置默認名稱}admin.setRole(RoleEnum.ADMIN.name());  // 設置管理員角色adminMapper.insert(admin);  // 插入新管理員記錄}}
Mapper 數據訪問層
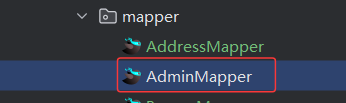
package com.example.mapper;import com.example.entity.Admin;
import org.apache.ibatis.annotations.Select;import java.util.List;/*** @Author: XXX* @version 1.0 (2025-06-20)* @Description: 管理員相關數據接口*/
public interface AdminMapper {/*** 插入新管理員記錄** @param admin 管理員實體對象,包含要插入的管理員信息* @return 插入操作影響的記錄數*/int insert(Admin admin);/*** 根據用戶名查詢管理員** @param username 要查詢的用戶名* @return 匹配的管理員實體對象,若不存在則返回null*/@Select("select * from admin where username = #{username}")Admin selectByUsername(String username);
}
<?xml version="1.0" encoding="UTF-8"?>
<!DOCTYPE mapperPUBLIC "-//mybatis.org//DTD Mapper 3.0//EN""http://mybatis.org/dtd/mybatis-3-mapper.dtd">
<mapper namespace="com.example.mapper.AdminMapper"><sql id="Base_Column_List">id,username,password,name,phone,email,avatar,role</sql><insert id="insert" parameterType="com.example.entity.Admin" useGeneratedKeys="true">insert into admin<trim prefix="(" suffix=")" suffixOverrides=","><if test="id != null">id,</if><if test="username != null">username,</if><if test="password != null">password,</if><if test="name != null">name,</if><if test="phone != null">phone,</if><if test="email != null">email,</if><if test="avatar != null">avatar,</if><if test="role != null">role,</if></trim><trim prefix="values (" suffix=")" suffixOverrides=","><if test="id != null">#{id},</if><if test="username != null">#{username},</if><if test="password != null">#{password},</if><if test="name != null">#{name},</if><if test="phone != null">#{phone},</if><if test="email != null">#{email},</if><if test="avatar != null">#{avatar},</if><if test="role != null">#{role},</if></trim></insert></mapper>
package com.example.controller;import com.example.common.Result;
import com.example.common.enums.ResultCodeEnum;
import com.example.service.RedisCaptchaService;
import org.springframework.beans.factory.annotation.Autowired;
import org.springframework.web.bind.annotation.*;import javax.servlet.http.HttpServletRequest;
import java.util.Map;/*** 驗證碼控制器 - 社區團購系統驗證碼管理API接口* * 功能說明:* - 驗證碼生成:提供圖片驗證碼生成接口* - 驗證碼驗證:驗證用戶輸入的驗證碼* - 驗證碼刷新:支持用戶主動刷新驗證碼* * 應用場景:* - 用戶登錄頁面:生成和驗證登錄驗證碼* - 用戶注冊頁面:生成和驗證注冊驗證碼* - 敏感操作:重要操作前的驗證碼確認* - 表單提交:防止惡意表單提交和機器人攻擊* * 接口特性:* - 跨域支持:支持前端跨域請求* - 類型區分:支持不同類型的驗證碼(登錄、注冊等)* - 過期管理:驗證碼5分鐘自動過期* - 安全防護:驗證成功后立即刪除驗證碼,防止重復使用* * @author zwt* @version 1.0 (2025-01-XX)*/
@CrossOrigin
@RestController
@RequestMapping("/captcha")
public class CaptchaController {@Autowiredprivate RedisCaptchaService captchaService;/*** 生成驗證碼接口* * 功能:生成指定類型的圖片驗證碼* 應用場景:* - 用戶登錄頁面加載時生成驗證碼* - 用戶點擊刷新驗證碼時重新生成* - 表單頁面初始化時生成驗證碼* * 返回數據:* - key: 驗證碼唯一標識符,用于后續驗證* - image: Base64編碼的驗證碼圖片數據* - expireTime: 驗證碼過期時間戳* * @param type 驗證碼類型(LOGIN-登錄、REGISTER-注冊、FORM-表單等)* @return 包含驗證碼key和圖片數據的響應*/@PostMapping("/generate")public Result generateCaptcha(@RequestParam(defaultValue = "LOGIN") String type,HttpServletRequest request) {try {Map<String, String> captchaData = captchaService.generateCaptcha(type, request);return Result.success(captchaData);} catch (Exception e) {e.printStackTrace();return Result.error(ResultCodeEnum.CAPTCHA_GENERATE_ERROR);}}/*** 驗證驗證碼接口* * 功能:驗證用戶輸入的驗證碼是否正確* 應用場景:* - 用戶登錄時驗證驗證碼* - 表單提交時驗證驗證碼* - 敏感操作前的驗證碼確認* * 驗證規則:* - 驗證碼必須存在且未過期* - 驗證碼類型必須匹配* - 驗證成功后立即刪除驗證碼,防止重復使用* * @param key 驗證碼key* @param code 用戶輸入的驗證碼* @param type 驗證碼類型* @return 驗證成功返回成功信息,失敗返回錯誤信息*/@PostMapping("/validate")public Result validateCaptcha(@RequestParam String key,@RequestParam String code,@RequestParam(defaultValue = "LOGIN") String type,HttpServletRequest request) {try {if (key == null || code == null || code.trim().isEmpty()) {return Result.error(ResultCodeEnum.PARAM_ERROR);}boolean isValid = captchaService.validateCaptcha(key, code.trim(), type, request);if (isValid) {return Result.success("驗證碼驗證成功");} else {return Result.error(ResultCodeEnum.CAPTCHA_VALIDATE_ERROR);}} catch (Exception e) {e.printStackTrace();return Result.error(ResultCodeEnum.CAPTCHA_VALIDATE_ERROR);}}/*** 刷新驗證碼接口* * 功能:刪除舊驗證碼并生成新的驗證碼* 應用場景:* - 用戶看不清驗證碼時主動刷新* - 驗證碼過期后重新生成* - 系統維護時清理舊驗證碼* * @param key 舊驗證碼key* @param type 驗證碼類型* @return 新的驗證碼數據*/@PostMapping("/refresh")public Result refreshCaptcha(@RequestParam String key,@RequestParam(defaultValue = "LOGIN") String type,HttpServletRequest request) {try {if (key == null) {return Result.error(ResultCodeEnum.PARAM_ERROR);}// 刪除舊驗證碼captchaService.removeCaptcha(key);// 生成新驗證碼Map<String, String> captchaData = captchaService.generateCaptcha(type, request);return Result.success(captchaData);} catch (Exception e) {e.printStackTrace();return Result.error(ResultCodeEnum.CAPTCHA_GENERATE_ERROR);}}/*** 檢查驗證碼狀態接口* * 功能:檢查驗證碼是否存在且未過期* 應用場景:* - 前端檢查驗證碼狀態* - 調試和監控驗證碼系統* * @param key 驗證碼key* @return 驗證碼存在返回true,不存在返回false*/@GetMapping("/status")public Result checkCaptchaStatus(@RequestParam String key) {try {if (key == null) {return Result.error(ResultCodeEnum.PARAM_ERROR);}boolean exists = captchaService.existsCaptcha(key);return Result.success(exists);} catch (Exception e) {e.printStackTrace();return Result.error(ResultCodeEnum.CAPTCHA_VALIDATE_ERROR);}}
} 
package com.example.controller;import com.example.common.Result;
import com.example.common.enums.ResultCodeEnum;
import com.example.service.RedisCaptchaService;
import org.springframework.beans.factory.annotation.Autowired;
import org.springframework.web.bind.annotation.*;import javax.servlet.http.HttpServletRequest;
import java.util.Map;/*** 驗證碼控制器 - XX系統驗證碼管理API接口* * 功能說明:* - 驗證碼生成:提供圖片驗證碼生成接口* - 驗證碼驗證:驗證用戶輸入的驗證碼* - 驗證碼刷新:支持用戶主動刷新驗證碼* * 應用場景:* - 用戶登錄頁面:生成和驗證登錄驗證碼* - 用戶注冊頁面:生成和驗證注冊驗證碼* - 敏感操作:重要操作前的驗證碼確認* - 表單提交:防止惡意表單提交和機器人攻擊* * 接口特性:* - 跨域支持:支持前端跨域請求* - 類型區分:支持不同類型的驗證碼(登錄、注冊等)* - 過期管理:驗證碼5分鐘自動過期* - 安全防護:驗證成功后立即刪除驗證碼,防止重復使用* * @author XXX* @version 1.0 (2025-XX-XX)*/
@CrossOrigin
@RestController
@RequestMapping("/captcha")
public class CaptchaController {@Autowiredprivate RedisCaptchaService captchaService;/*** 生成驗證碼接口* * 功能:生成指定類型的圖片驗證碼* 應用場景:* - 用戶登錄頁面加載時生成驗證碼* - 用戶點擊刷新驗證碼時重新生成* - 表單頁面初始化時生成驗證碼* * 返回數據:* - key: 驗證碼唯一標識符,用于后續驗證* - image: Base64編碼的驗證碼圖片數據* - expireTime: 驗證碼過期時間戳* * @param type 驗證碼類型(LOGIN-登錄、REGISTER-注冊、FORM-表單等)* @return 包含驗證碼key和圖片數據的響應*/@PostMapping("/generate")public Result generateCaptcha(@RequestParam(defaultValue = "LOGIN") String type,HttpServletRequest request) {try {Map<String, String> captchaData = captchaService.generateCaptcha(type, request);return Result.success(captchaData);} catch (Exception e) {e.printStackTrace();return Result.error(ResultCodeEnum.CAPTCHA_GENERATE_ERROR);}}/*** 驗證驗證碼接口* * 功能:驗證用戶輸入的驗證碼是否正確* 應用場景:* - 用戶登錄時驗證驗證碼* - 表單提交時驗證驗證碼* - 敏感操作前的驗證碼確認* * 驗證規則:* - 驗證碼必須存在且未過期* - 驗證碼類型必須匹配* - 驗證成功后立即刪除驗證碼,防止重復使用* * @param key 驗證碼key* @param code 用戶輸入的驗證碼* @param type 驗證碼類型* @return 驗證成功返回成功信息,失敗返回錯誤信息*/@PostMapping("/validate")public Result validateCaptcha(@RequestParam String key,@RequestParam String code,@RequestParam(defaultValue = "LOGIN") String type,HttpServletRequest request) {try {if (key == null || code == null || code.trim().isEmpty()) {return Result.error(ResultCodeEnum.PARAM_ERROR);}boolean isValid = captchaService.validateCaptcha(key, code.trim(), type, request);if (isValid) {return Result.success("驗證碼驗證成功");} else {return Result.error(ResultCodeEnum.CAPTCHA_VALIDATE_ERROR);}} catch (Exception e) {e.printStackTrace();return Result.error(ResultCodeEnum.CAPTCHA_VALIDATE_ERROR);}}/*** 刷新驗證碼接口* * 功能:刪除舊驗證碼并生成新的驗證碼* 應用場景:* - 用戶看不清驗證碼時主動刷新* - 驗證碼過期后重新生成* - 系統維護時清理舊驗證碼* * @param key 舊驗證碼key* @param type 驗證碼類型* @return 新的驗證碼數據*/@PostMapping("/refresh")public Result refreshCaptcha(@RequestParam String key,@RequestParam(defaultValue = "LOGIN") String type,HttpServletRequest request) {try {if (key == null) {return Result.error(ResultCodeEnum.PARAM_ERROR);}// 刪除舊驗證碼captchaService.removeCaptcha(key);// 生成新驗證碼Map<String, String> captchaData = captchaService.generateCaptcha(type, request);return Result.success(captchaData);} catch (Exception e) {e.printStackTrace();return Result.error(ResultCodeEnum.CAPTCHA_GENERATE_ERROR);}}/*** 檢查驗證碼狀態接口* * 功能:檢查驗證碼是否存在且未過期* 應用場景:* - 前端檢查驗證碼狀態* - 調試和監控驗證碼系統* * @param key 驗證碼key* @return 驗證碼存在返回true,不存在返回false*/@GetMapping("/status")public Result checkCaptchaStatus(@RequestParam String key) {try {if (key == null) {return Result.error(ResultCodeEnum.PARAM_ERROR);}boolean exists = captchaService.existsCaptcha(key);return Result.success(exists);} catch (Exception e) {e.printStackTrace();return Result.error(ResultCodeEnum.CAPTCHA_VALIDATE_ERROR);}}
}
到這登錄頁面的驗證碼功能就已經實現了,快去試試吧
每天進步一點點,加油 ! ! !?


)


)


未完)


與節流(Throttle))