目錄
- 前言
- props 父傳子
- 原理說明
- 使用場景
- 代碼示例
- 父組件 PropsTest.vue
- 子組件 Child.vue
- 自定義事件 $emit 子傳父
- 原理說明
- 使用場景
- 代碼示例
- 父組件 EventTest.vue
- 子組件 Event2.vue
- Event Bus 兄弟/跨層通信
- 原理說明
- 使用場景
- 代碼示例
- 事件總線 bus/index.ts
- 兄弟組件通信示例
- Child2.vue(發送事件的組件,發布者)
- Child1.vue(接收事件的組件,訂閱者)
- EventBusTest.vue(測試入口,父組件)
- v-model 父子雙向綁定
- 原理說明
- 使用場景
- 代碼示例
- 父組件 ModelTest.vue
- 子組件 Child.vue
- \$attrs / $listeners 屬性和事件透傳
- 原理說明
- 使用場景
- 代碼示例
- 父組件 AttrsListenersTest.vue
- 子組件 HintButton.vue
- ref / parent / children 獲取組件實例
- 原理說明
- 使用場景
- 代碼示例
- 父組件 RefChildrenParentTest.vue
- 子組件 Son.vue
- 子組件 Daughter.vue
- provide / inject 跨級通信
- 原理說明
- 使用場景
- 代碼示例
- 祖先組件 ProvideInjectTest.vue
- 子組件 Child.vue
- 孫子組件 GrandChild.vue
- Pinia 全局狀態管理
- 原理說明
- 使用場景
- 代碼示例
- 1. 安裝 Pinia
- 2. 創建并注冊 Pinia
- 3. 定義 Store(全局計數器,js 版)
- 4. 父組件下兩個子組件共享 store
- 父組件 index.vue
- 子組件 Child.vue(子組件A)
- 子組件 Child1.vue(子組件B)
- Slot 插槽內容分發
- 原理說明
- 使用場景
- 代碼示例
- 1. SlotTest.vue(父組件)
- 2. Test.vue(子組件,包含默認插槽和具名插槽)
- 3. Test1.vue(子組件,僅包含默認插槽)
前言
組件通信是 Vue 開發中的核心知識點,也是初學者理解組件化思想的關鍵環節。在 Vue 應用中,組件并非孤立存在,它們之間需要通過數據傳遞、事件通知等方式協同工作,實現復雜的業務邏輯。
我系統整理了 Vue 中常用的組件通信方式,包括 props 父傳子、自定義事件子傳父、Event Bus 兄弟通信、v-model 雙向綁定、$attrs 透傳、ref 獲取組件實例、provide/inject 跨級通信、Pinia 全局狀態管理 和 Slot 插槽內容分發 共 9 種方案。
props 父傳子
原理說明
props 是 Vue 組件間最基礎、最常用的通信方式,核心遵循單向數據流原則。具體來說,父組件可以通過在子組件標簽上定義屬性(props)的方式傳遞數據;子組件則需要通過 defineProps 函數明確聲明接收這些數據。這里的單向數據流非常關鍵:子組件只能讀取 props 中的數據,絕對不能直接修改,如果子組件需要更新數據,必須通過通知父組件,由父組件修改數據源后重新傳遞。這種機制保證了數據流向的清晰可追蹤,避免了組件間數據混亂。
使用場景
適用于所有父組件向子組件傳遞數據的場景,例如:
- 父組件將用戶基本信息(姓名、年齡)傳遞給個人資料子組件展示;
- 父組件將配置參數(如是否顯示邊框、主題顏色)傳遞給子組件控制樣式;
- 父組件將列表數據傳遞給子組件進行渲染展示。
代碼示例
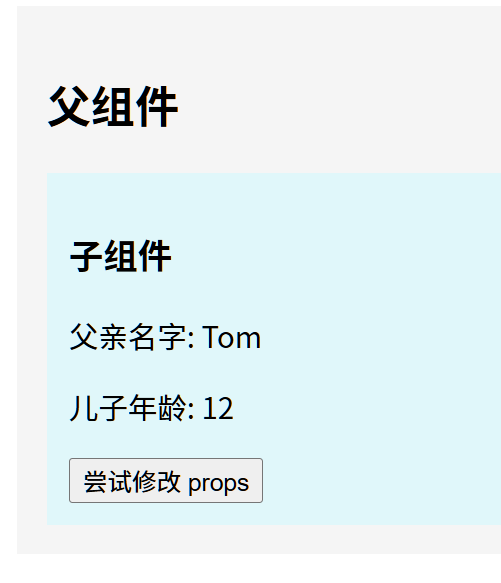
父組件 PropsTest.vue
<template><div class="container"><h2>父組件</h2><!-- 通過 fatherName(靜態字符串)和 sonAge(響應式數據)兩個 props 向子組件傳遞數據 --><Son fatherName="Tom" :sonAge="age" /></div>
</template><script setup>
// 導入子組件
import Son from "./Child.vue";
// 導入 Vue 的 ref 函數創建響應式數據
import { ref } from "vue";
// 定義響應式變量 age,初始值為 12
const age = ref(12);
</script><style scoped>
.container {padding: 16px;background: #f5f5f5;
}
</style>
父組件通過兩種方式傳遞 props:
fatherName="Tom":靜態字符串傳遞,無需v-bind(:是縮寫);:sonAge="age":響應式數據傳遞,必須用v-bind綁定,父組件數據更新時子組件會自動同步。
子組件 Child.vue
<template><div class="child"><h3>子組件</h3><!-- 直接使用接收的 props 數據渲染 --><p>父親名字: {{ fatherName }}</p><p>兒子年齡: {{ sonAge }}</p><!-- 嘗試修改 props 的按鈕 --><button @click="tryModify">嘗試修改 props</button></div>
</template><script setup>
// 通過 defineProps 聲明接收的 props 名稱,參數是數組形式的 props 列表
const props = defineProps(['fatherName', 'sonAge']);
// 解構 props 中的數據,方便在模板和腳本中使用
const { fatherName, sonAge } = props;// 嘗試修改 props 的函數(實際無效)
const tryModify = () => {// 彈出提示:props 是只讀的,直接修改會報錯alert('props 是只讀的,不能直接修改');
};
</script><style scoped>
.child {padding: 12px;background: #e0f7fa;
}
</style>
子組件核心邏輯說明:
- 通過
defineProps(['fatherName', 'sonAge'])明確聲明需要接收的 props,確保數據來源清晰; - 解構 props 后可直接在模板中用
{{ fatherName }}渲染,或在腳本中使用; tryModify函數驗證了 props 的只讀性,直接修改(如sonAge = 13)會觸發 Vue 警告。
自定義事件 $emit 子傳父
原理說明
當子組件需要向父組件傳遞數據或通知父組件執行操作時,可通過自定義事件實現。核心流程是:
- 子組件通過
defineEmits提前聲明要觸發的自定義事件名稱,明確事件類型; - 子組件在特定時機(如按鈕點擊、數據變化)通過
emit方法觸發聲明的事件,并可攜帶數據; - 父組件在使用子組件時,通過
@事件名監聽子組件觸發的事件,并在事件處理函數中接收子組件傳遞的數據。
這種方式實現了子組件到父組件的反向通信,是 Vue 中“子傳父”的標準方案。
使用場景
適用于子組件有用戶交互或內部狀態變化需要通知父組件的場景,例如:
- 子組件的表單提交按鈕被點擊,需要將表單數據傳遞給父組件保存;
- 子組件的刪除按鈕被點擊,需要通知父組件刪除對應數據;
- 子組件的下拉菜單選擇項變化,需要將選中值傳遞給父組件。
代碼示例
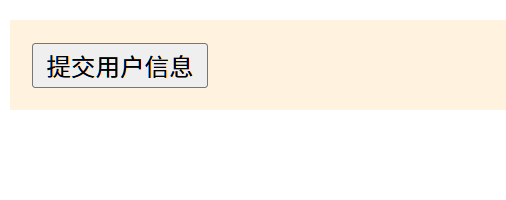
父組件 EventTest.vue
<template><div><!-- 監聽子組件 UserForm 的自定義事件 submitUser,綁定處理函數 handleUserSubmit --><UserForm @submitUser="handleUserSubmit" /></div>
</template><script setup>
// 導入子組件
import UserForm from './Event2.vue';// 定義事件處理函數,參數 user 接收子組件傳遞的數據
const handleUserSubmit = (user) => {console.log('收到子組件提交的用戶:', user); // 控制臺輸出子組件傳遞的用戶信息
};
</script>
父組件核心邏輯:通過 @submitUser="handleUserSubmit" 監聽子組件的 submitUser 事件,當子組件觸發該事件時,handleUserSubmit 函數會被調用,參數即為子組件傳遞的數據。
子組件 Event2.vue
<template><div class="form"><!-- 點擊按鈕觸發 submit 函數 --><button @click="submit">提交用戶信息</button></div>
</template><script setup>
// 通過 defineEmits 聲明要觸發的自定義事件,參數是數組形式的事件列表
const emit = defineEmits(['submitUser']);// 按鈕點擊的處理函數
const submit = () => {// 子組件內部準備需要傳遞給父組件的數據const user = { name: 'Alice', age: 20 };// 觸發自定義事件 submitUser,并傳遞 user 數據emit('submitUser', user);
};
</script><style scoped>
.form {padding: 12px;background: #fff3e0;
}
</style>
子組件核心邏輯:
defineEmits(['submitUser'])聲明要觸發的事件submitUser,確保事件來源可追溯;submit函數在按鈕點擊時執行,內部創建用戶數據user;- 通過
emit('submitUser', user)觸發事件并傳遞數據,父組件的監聽函數會接收該數據。

Event Bus 兄弟/跨層通信
原理說明
Event Bus(事件總線)是一種基于發布-訂閱模式的跨組件通信方案,核心是創建一個全局的事件中心(通常是一個能觸發和監聽事件的對象)。具體流程:
- 所有組件都可以訪問這個全局事件中心;
- 需要發送數據的組件(發布者)通過事件中心的
emit方法發布事件,并攜帶數據; - 需要接收數據的組件(訂閱者)通過事件中心的
on方法訂閱對應事件,并在事件回調中處理數據; - 組件銷毀時需通過
off方法取消訂閱,避免內存泄漏(示例中簡化未展示)。
在 Vue3 中,官方推薦使用 mitt 庫實現事件總線(Vue2 中常用 Vue.prototype.$bus = new Vue(),但 Vue3 不再支持)。
使用場景
適用于無直接父子關系的組件間通信,例如:
- 兄弟組件之間的通信(如頁面左側導航和右側內容區的交互);
- 跨多層級的組件通信(如孫子組件和祖父組件的通信,且中間層級無需關心數據);
- 非嵌套關系的任意組件間數據傳遞。
代碼示例
事件總線 bus/index.ts
// 導入 mitt 庫(需先通過 npm install mitt 安裝)
import mitt from 'mitt';
// 創建 mitt 實例作為全局事件中心
const bus = mitt();
// 導出事件中心,供所有組件使用
export default bus;
這是事件總線的核心文件,創建了一個全局可訪問的事件中心 bus,所有組件通過導入該 bus 實現通信。
兄弟組件通信示例
Child2.vue(發送事件的組件,發布者)
<script setup>
// 導入全局事件中心 bus
import bus from '../../bus';// 定義發送數據的函數
const sendStudent = () => {// 通過 bus.emit 發布事件 updateStudent,并攜帶學生數據bus.emit('updateStudent', { name: 'Tom', grade: 3 });
};
</script>
<template><div class="child"><!-- 點擊按鈕觸發 sendStudent 函數,發布事件 --><button @click="sendStudent">發送學生信息</button></div>
</template>
<style scoped>
.child { padding: 12px; background: #e3f2fd; }
</style>
Child2 是數據的發送方:通過 bus.emit('事件名', 數據) 發布事件,其他組件可訂閱該事件接收數據。
Child1.vue(接收事件的組件,訂閱者)
<script setup>
// 導入全局事件中心 bus
import bus from '../../bus';
// 導入 Vue 的 onMounted 生命周期鉤子,確保組件掛載后再訂閱事件
import { onMounted } from 'vue';// 組件掛載后執行
onMounted(() => {// 通過 bus.on 訂閱 updateStudent 事件,回調函數接收發布者傳遞的數據bus.on('updateStudent', (student) => {console.log('收到學生信息:', student); // 控制臺輸出接收的數據});
});
</script>
<template><div class="child"><p>等待接收學生信息...</p></div>
</template>
<style scoped>
.child { padding: 12px; background: #fffde7; }
</style>
Child1 是數據的接收方:在 onMounted 生命周期中通過 bus.on('事件名', 回調函數) 訂閱事件,當事件被發布時,回調函數會被觸發并接收數據。
EventBusTest.vue(測試入口,父組件)
<template><div class="container"><!-- 引入兩個子組件,形成兄弟關系 --><Child1 /><Child2 /></div>
</template>
<script setup>
// 導入兩個子組件
import Child1 from './Child1.vue';
import Child2 from './Child2.vue';
</script>
<style scoped>
.container { display: flex; gap: 16px; } /* 橫向排列兩個子組件 */
</style>
該組件作為父組件,同時引入 Child1 和 Child2,使兩者成為兄弟組件。點擊 Child2 的按鈕,Child1 會通過事件總線收到數據,實現兄弟組件通信。


v-model 父子雙向綁定
原理說明
v-model 是 Vue 提供的父子組件雙向數據綁定語法糖,本質是對“父傳子 props + 子傳父事件”的簡化封裝。核心流程:
- 父組件使用
v-model="數據"綁定數據,等價于:modelValue="數據" @update:modelValue="數據 = $event"; - 子組件通過
defineProps接收modelValue(默認名稱,可自定義),作為展示的數據源; - 子組件數據變化時,通過
emit('update:modelValue', 新數據)觸發事件,父組件會自動更新綁定的數據; - 最終實現父子組件數據的實時同步,一方變化另一方自動更新。
使用場景
適用于需要父子組件數據實時同步的場景,例如:
- 自定義輸入框組件(輸入內容實時同步到父組件);
- 開關組件(開關狀態在父子組件同步);
- 滑塊組件(滑動值實時反饋給父組件)。
代碼示例
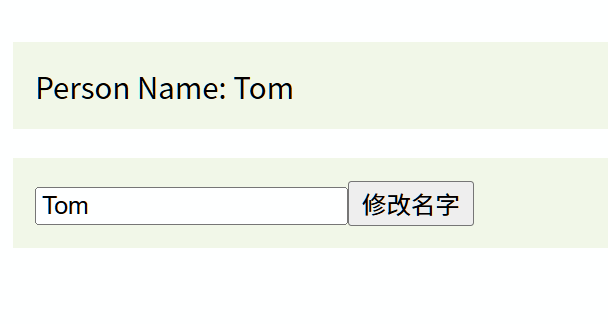
父組件 ModelTest.vue
<template><div><!-- v-model 綁定 personName,實現父子雙向綁定 --><PersonInput v-model="personName" /></div>
</template>
<script setup>
// 導入子組件
import PersonInput from './Child.vue';
// 導入 ref 創建響應式數據
import { ref } from 'vue';
// 定義響應式變量 personName,初始值為 'Tom'
const personName = ref('Tom');
</script>
父組件核心:v-model="personName" 等價于:
<PersonInput :modelValue="personName" @update:modelValue="personName = $event" />
無需手動寫 props 和事件監聽,簡化了雙向綁定的寫法。
子組件 Child.vue
<template><div class="input-box"><!-- 輸入框的值綁定到 modelValue(父組件通過 v-model 傳遞) --><input :value="modelValue" @input="onInput" /><!-- 按鈕點擊觸發 updateName 函數 --><button @click="updateName">修改名字</button></div>
</template>
<script setup>
// 接收父組件通過 v-model 傳遞的 modelValue
const props = defineProps(['modelValue']);
// 聲明要觸發的 update:modelValue 事件
const emit = defineEmits(['update:modelValue']);// 輸入框輸入事件處理函數
const onInput = (e) => {// 觸發 update:modelValue 事件,傳遞輸入框的最新值(e.target.value)emit('update:modelValue', e.target.value);
};
// 按鈕點擊修改名字的函數
const updateName = () => {// 主動觸發事件,傳遞新值 'Jerry'emit('update:modelValue', 'Jerry');
};
</script>
<style scoped>
.input-box { padding: 12px; background: #f1f8e9; }
</style>
子組件核心邏輯:
- 通過
defineProps(['modelValue'])接收父組件傳遞的初始值; - 輸入框
:value="modelValue"綁定展示值,輸入時觸發onInput函數,通過emit傳遞新值更新父組件; updateName函數主動觸發事件修改值,體現雙向綁定的靈活性:無論是用戶輸入還是代碼觸發,都能同步到父組件。
$attrs / $listeners 屬性和事件透傳
原理說明
在組件嵌套層級較深時,父組件傳遞的屬性和事件可能需要逐層傳遞到底層組件,$attrs 和屬性透傳機制可簡化這一過程:
$attrs是一個對象,包含父組件傳遞給子組件、但未被子組件通過defineProps聲明接收的所有屬性和事件(class 和 style 除外,它們會自動合并);- 子組件可通過
v-bind="$attrs"將$attrs中的所有屬性和事件透傳到內部的子組件(通常是原生 HTML 元素或基礎組件); - 這種方式避免了中間組件手動聲明大量 props 和事件,減少冗余代碼。
Vue3 中 $listeners 已被合并到 $attrs 中,無需單獨處理。
使用場景
適用于組件封裝層級較深,需要透傳屬性和事件的場景,例如:
- UI 組件庫封裝(如封裝 Button 組件時,透傳原生 button 的所有屬性和事件);
- 多層嵌套組件中,上層組件傳遞的屬性需要直接作用于最底層組件。
代碼示例
父組件 AttrsListenersTest.vue
<template><div><!-- 向 ActionButton 傳遞 type、label、@action 等屬性和事件 --><ActionButton type="primary" label="保存" @action="handleAction" /></div>
</template>
<script setup>
// 導入子組件
import ActionButton from './HintButton.vue';
// 定義 action 事件的處理函數
const handleAction = () => {alert('執行操作!'); // 點擊按鈕時觸發
};
</script>
父組件向 ActionButton 傳遞了:
- 屬性
type="primary"(原生 button 的 type 屬性); - 屬性
label="保存"(自定義屬性,用于按鈕文本); - 事件
@action="handleAction"(自定義事件,按鈕點擊時觸發)。
子組件 HintButton.vue
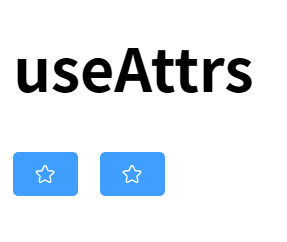
<template><!-- 通過 v-bind="$attrs" 將 $attrs 中的屬性和事件透傳給 button 元素 --><button v-bind="$attrs">{{ label }}</button>
</template>
<script setup>
// 導入 useAttrs 函數獲取 $attrs 對象
import { useAttrs } from 'vue';
// 通過 defineProps 接收 label 屬性(需要單獨處理的屬性)
const props = defineProps(['label']);
// 獲取 $attrs 對象(包含未被 props 接收的屬性和事件)
const $attrs = useAttrs();
</script>
子組件核心邏輯:
- 通過
defineProps(['label'])聲明接收label屬性,用于在模板中展示按鈕文本{{ label }}; - 未被
defineProps接收的type="primary"和@action事件會自動進入$attrs; - 通過
v-bind="$attrs"將$attrs中的屬性和事件透傳給原生 button 元素,最終:- button 會擁有
type="primary"屬性; - button 的點擊事件會觸發父組件的
handleAction函數(因為@action事件被透傳)。
- button 會擁有
這種方式下,中間組件(HintButton)無需聲明 type 和 @action,直接透傳到底層 button 元素,減少代碼冗余。
ref / parent / children 獲取組件實例
原理說明
在某些場景下,父組件需要直接訪問子組件的屬性或調用子組件的方法,或子組件需要訪問父組件的實例,可通過以下方式實現:
- ref 獲取子組件實例:父組件在子組件標簽上添加
ref="變量名",通過變量名.value獲取子組件實例;子組件需通過defineExpose顯式暴露需要被訪問的屬性和方法(默認情況下,setup 中的內容是私有的)。 - **parent獲取父組件實例??:子組件中通過‘parent 獲取父組件實例**:子組件中通過 `parent獲取父組件實例??:子組件中通過‘parent` 可直接獲取父組件的實例,進而訪問父組件的屬性和方法(需注意層級關系,避免過度依賴導致耦合)。
這種方式直接操作組件實例,靈活性高,但會增加組件間的耦合度,需謹慎使用。
使用場景
適用于父組件需要直接控制子組件行為的場景,例如:
- 父組件需要調用子組件的初始化方法或重置方法;
- 子組件需要獲取父組件的樣式或狀態(如示例中獲取父組件的 class)。
代碼示例
父組件 RefChildrenParentTest.vue
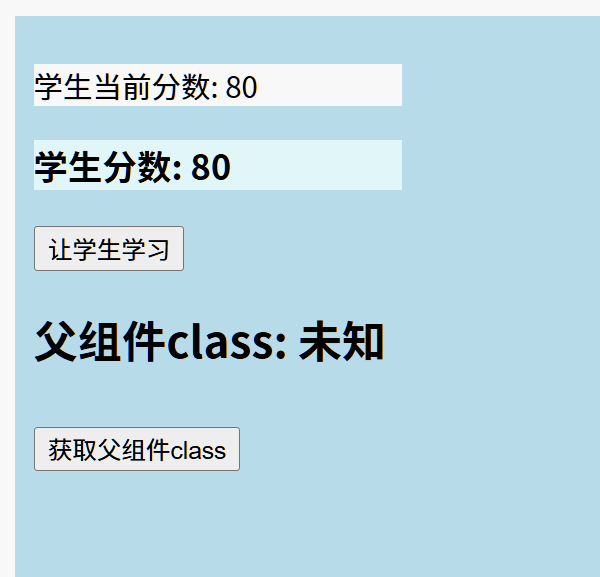
<template><div class="container"><p>學生當前分數: {{ studentRef?.score }}</p> <!-- 通過 ref 訪問子組件的 score 屬性 --><!-- 通過 ref="studentRef" 綁定 Son 組件實例 --><Son ref="studentRef" /><!-- 點擊按鈕調用子組件的 study 方法 --><button @click="callStudy">讓學生學習</button><!-- 通過 ref="daughterRef" 綁定 Daughter 組件實例 --><Daughter ref="daughterRef" /></div>
</template>
<script setup>
// 導入子組件
import Son from './Son.vue';
import Daughter from './Daughter.vue';
// 導入 ref 創建用于綁定組件實例的變量
import { ref } from 'vue';
// 創建 ref 變量存儲 Son 組件實例
const studentRef = ref();
// 創建 ref 變量存儲 Daughter 組件實例(示例中未使用,僅展示綁定方式)
const daughterRef = ref();
// 定義調用子組件方法的函數
const callStudy = () => {// 通過 studentRef.value 獲取子組件實例,調用其暴露的 study 方法studentRef.value.study();
};
</script><style scoped>
p{ width: 200px;height: auto;background: #f0f0f0;
}
.container{width: 100vw;height:400px;padding: 10px;background: #b9dcea; /* 父組件的 class 樣式 */
}
</style>
父組件核心邏輯:
- 通過
ref="studentRef"綁定 Son 組件,studentRef.value即為 Son 組件的實例; studentRef?.score訪問子組件暴露的score屬性(?.是可選鏈,避免未掛載時報錯);callStudy函數通過studentRef.value.study()調用子組件暴露的study方法。
子組件 Son.vue
<template><div class="student"><h3>學生分數: {{ score }}</h3> <!-- 展示 score 屬性 --></div>
</template><script setup>
// 導入 ref 創建響應式分數
import { ref } from 'vue';
// 定義分數屬性(初始值 80)
const score = ref(80);
// 定義學習方法(調用時分數增加 5)
const study = () => {score.value += 5;console.log('學生正在學習,分數提升!');
};
// 通過 defineExpose 顯式暴露 score 屬性和 study 方法,供父組件訪問
defineExpose({ score, study });
</script><style scoped>
.student {width: 200px;height: auto;background: #e0f7fa;
}
</style>
Son 組件核心:通過 defineExpose({ score, study }) 將 score 和 study 暴露給父組件,父組件才能通過 ref 訪問,否則無法訪問 setup 中的私有變量和方法。
子組件 Daughter.vue
<template><div><h2>父組件class: {{ parentClass }}</h2> <!-- 展示父組件的 class --><!-- 點擊按鈕調用 getParentClass 函數,傳遞 $parent 獲取父組件實例 --><button @click="getParentClass($parent)">獲取父組件class</button></div>
</template><script setup>
// 導入 ref 存儲父組件的 class
import { ref } from 'vue';
// 定義變量存儲父組件的 class
const parentClass = ref('未知');
// 定義獲取父組件 class 的函數
const getParentClass = ($parent) => {// 通過 $parent 獲取父組件實例,$el 是組件的根 DOM 元素,className 是其 class 屬性parentClass.value = $parent.$el.className;
};
</script><style scoped>
button {margin:10px 0 10px 0;
}
</style>
Daughter 組件核心:通過 $parent 獲取父組件實例,$parent.$el 訪問父組件的根 DOM 元素,進而獲取其 class 屬性,展示了子組件訪問父組件實例的方式。
provide / inject 跨級通信
原理說明
provide/inject 是 Vue 提供的跨多層級組件通信方案,專門解決父子組件嵌套層級較深時,數據逐層傳遞(props 鉆取)的問題:
- 祖先組件通過
provide方法提供數據(可以是響應式數據或普通值),指定一個注入名和對應的值; - 任意后代組件(無論層級多深)通過
inject方法注入數據,使用注入名獲取祖先組件提供的值; - 若提供的是響應式數據(如
ref或reactive對象),后代組件修改數據會影響所有使用該數據的組件,實現跨層級數據同步。
使用場景
適用于跨多層級組件共享數據的場景,例如:
- 全局配置(如主題顏色、語言設置)在所有組件中共享;
- 權限信息在多層級組件中使用;
- 框架級別的數據傳遞(如組件庫中的上下文配置)。
代碼示例
祖先組件 ProvideInjectTest.vue
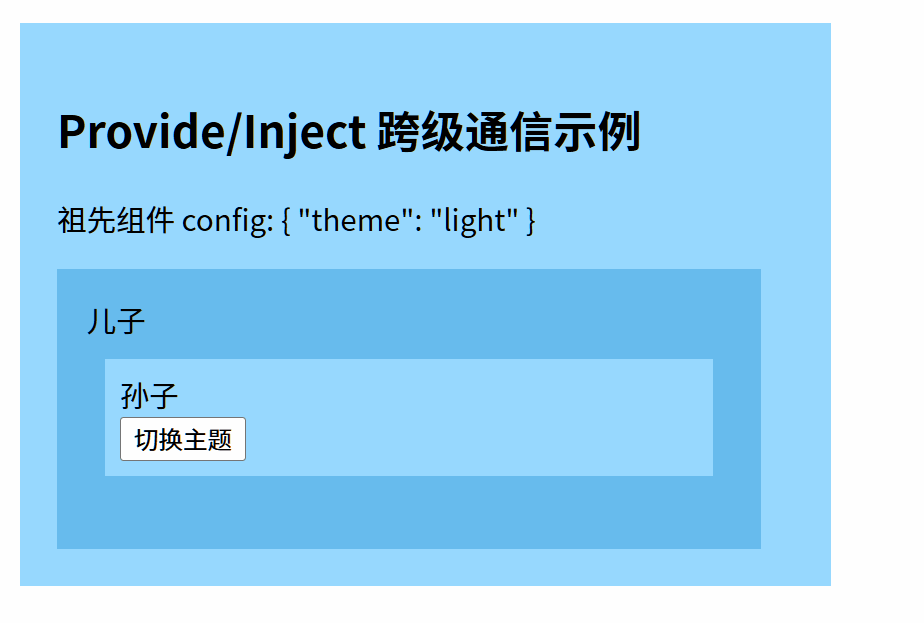
<template><div class="container"><h2>Provide/Inject 跨級通信示例</h2><p>祖先組件 config: {{ config }}</p> <!-- 展示提供的 config 數據 --><Child /> <!-- 引入子組件,形成層級:祖先 -> 子 -> 孫子 --></div>
</template><script setup>
// 導入 ref 創建響應式數據,導入 provide 方法提供數據
import { ref, provide } from 'vue';
// 導入子組件
import Child from './Child.vue';
// 定義響應式 config 數據,初始主題為 light
const config = ref({ theme: 'light' });
// 通過 provide 提供數據,注入名為 'appConfig',值為 config
provide('appConfig', config);
</script><style scoped>
.container {width: 400px;min-height: 180px;background: #98d9ff; /* 初始主題顏色(light 模式) */padding: 20px;
}
</style>
祖先組件核心:通過 provide('appConfig', config) 提供數據,'appConfig' 是注入名(后代組件需用相同名稱注入),config 是響應式數據,后代組件可獲取并修改。
子組件 Child.vue
<template><div class="child"><div>兒子</div><GrandChild /> <!-- 引入孫子組件,形成更深層級 --></div>
</template><script setup>
// 導入孫子組件
import GrandChild from './GrandChild.vue';
</script><style scoped>
.child {width: 350px;min-height: 120px;background: #67bced;padding: 16px;
}
</style>
該組件是中間層級,僅作為嵌套容器,無需處理 provide/inject 數據,體現了 provide/inject 跳過中間層級的優勢。
孫子組件 GrandChild.vue
<template><div class="grandchild"><div>孫子</div><!-- 點擊按鈕切換主題 --><button @click="updateTheme">切換主題</button></div>
</template><script setup>
// 導入 inject 方法注入數據
import { inject } from 'vue';
// 通過 inject 注入祖先組件提供的 appConfig 數據,設置默認值防止未提供時為 undefined
const config = inject('appConfig', { value: { theme: 'light' } });
// 定義切換主題的函數
const updateTheme = () => {// 檢查 config 是響應式數據(ref 對象),通過 .value 訪問if (config && config.value) {// 切換主題(light <-> dark)config.value.theme = config.value.theme === 'light' ? 'dark' : 'light';// 根據主題修改祖先組件的背景色document.querySelector('.container').style.backgroundColor = config.value.theme === 'light' ? '#98d9ff' : '#135074';}
};
</script>
<style scoped>
.grandchild {margin:10px;padding: 8px;background: #98d9ff;
}
</style>
孫子組件核心:
- 通過
inject('appConfig', 默認值)獲取祖先組件提供的config數據,注入名必須與provide時一致; config是響應式ref對象,通過config.value訪問和修改其屬性;updateTheme函數修改config.value.theme,由于是響應式數據,所有使用該數據的組件(包括祖先組件)都會感知變化,實現跨層級數據同步。
Pinia 全局狀態管理
原理說明
Pinia 是 Vue3 官方推薦的全局狀態管理庫,替代了 Vue2 中的 Vuex,核心優勢是支持響應式、模塊化和 TypeScript 類型推導。其工作原理:
- 通過
defineStore定義一個store(倉庫),包含state(存儲數據)、actions(修改數據的方法)等; store中的state是響應式的,任意組件獲取state后,數據變化會觸發組件重新渲染;- 組件通過導入
store并調用其state和actions,實現跨組件數據共享和修改; - 整個應用的狀態集中管理,避免了組件間通信的繁瑣,適合全局數據共享。
使用場景
適用于全局數據需要在多個組件間共享和同步的場景,例如:
- 用戶登錄狀態(用戶名、權限)在所有組件中使用;
- 購物車數據在商品列表、購物車頁面、結算頁面同步;
- 全局計數器、通知消息等需要跨組件訪問的數據。
代碼示例
1. 安裝 Pinia
npm install pinia
首先通過 npm 安裝 Pinia 庫,確保項目中可使用其 API。
2. 創建并注冊 Pinia
// src/store/index.js
import { createPinia } from 'pinia';
// 創建 Pinia 實例
const pinia = createPinia();
// 導出實例供 app 使用
export default pinia;// main.ts
import { createApp } from 'vue';
import App from './App.vue';
// 導入 Pinia 實例
import pinia from './store';
// 創建 Vue 應用
const app = createApp(App);
// 應用 Pinia 插件
app.use(pinia);
// 掛載應用
app.mount('#app');
創建 Pinia 實例并通過 app.use(pinia) 注冊到 Vue 應用,使整個應用都能使用 Pinia 的功能。
3. 定義 Store(全局計數器,js 版)
// src/store/modules/info.js
import { defineStore } from 'pinia';// 通過 defineStore 定義 store,第一個參數是唯一 id(需全局唯一),第二個參數是配置對象
export const useInfoStore = defineStore('info', {// state 是函數,返回初始狀態對象state: () => ({count: 0 // 全局計數器,初始值 0}),// actions 是對象,包含修改 state 的方法(可異步)actions: {// 增加計數器的方法increment() {this.count++; // this 指向 store 實例,直接修改 state},// 減少計數器的方法decrement() {this.count--;}}
});
定義了一個名為 info 的 store,包含 count 狀態和修改它的 increment、decrement 方法,所有組件都可訪問該 store。
4. 父組件下兩個子組件共享 store
父組件 index.vue
<template><div class="container"><h2>Pinia 父子組件共享狀態示例</h2><!-- 引入兩個子組件,它們將共享同一個 store --><Child /><Child1 /></div>
</template>
<script setup>
// 導入子組件
import Child from './Child.vue';
import Child1 from './Child1.vue';
</script>
父組件僅作為容器,引入兩個子組件,兩個子組件將通過 Pinia 共享全局狀態。
子組件 Child.vue(子組件A)
<template><div class="child"><h3>子組件A</h3><p>全局計數: {{ infoStore.count }}</p> <!-- 展示 store 中的 count --><!-- 點擊按鈕調用 store 的 increment 方法 --><button @click="infoStore.increment">增加</button></div>
</template>
<script setup>
// 導入定義的 store
import { useInfoStore } from '@/store/modules/info.js';
// 獲取 store 實例
const infoStore = useInfoStore();
</script>
子組件A核心:通過 useInfoStore() 獲取 store 實例,直接訪問 infoStore.count 展示數據,點擊按鈕調用 increment 方法增加計數。
子組件 Child1.vue(子組件B)
<template><div class="child"><h3>子組件B</h3><p>全局計數: {{ infoStore.count }}</p> <!-- 展示同一個 store 的 count --><!-- 點擊按鈕調用 store 的 decrement 方法 --><button @click="infoStore.decrement">減少</button></div>
</template>
<script setup>
// 導入定義的 store
import { useInfoStore } from '@/store/modules/info.js';
// 獲取 store 實例(與子組件A的實例相同)
const infoStore = useInfoStore();
</script>
子組件B核心:同樣通過 useInfoStore() 獲取同一個 store 實例,展示的 count 與子組件A完全同步,點擊按鈕調用 decrement 方法減少計數。
這樣,父組件下的兩個子組件都能共享和操作同一個全局狀態 count,實現響應式同步。無論哪個組件修改 count,另一個組件都會實時更新,體現了 Pinia 全局狀態管理的優勢。

Slot 插槽內容分發
原理說明
Slot(插槽)是 Vue 提供的組件內容分發機制,允許父組件向子組件的指定位置插入自定義內容,使子組件更靈活可定制。核心概念:
- 默認插槽:子組件中用
<slot></slot>定義一個默認插入位置,父組件在子組件標簽內的內容會默認插入到該位置; - 具名插槽:子組件中用
<slot name="插槽名"></slot>定義多個有名稱的插槽,父組件通過<template #插槽名>指定內容插入到對應插槽; - 插槽內容由父組件提供,子組件負責定義插槽位置和樣式,實現內容與結構的分離。
使用場景
適用于組件需要支持自定義內容的場景,例如:
- 組件庫開發(如卡片組件的頭部、內容、底部可自定義);
- 布局組件(如側邊欄、主內容區的內容由父組件指定);
- 表單組件(如輸入框前綴、后綴內容自定義)。
代碼示例
1. SlotTest.vue(父組件)
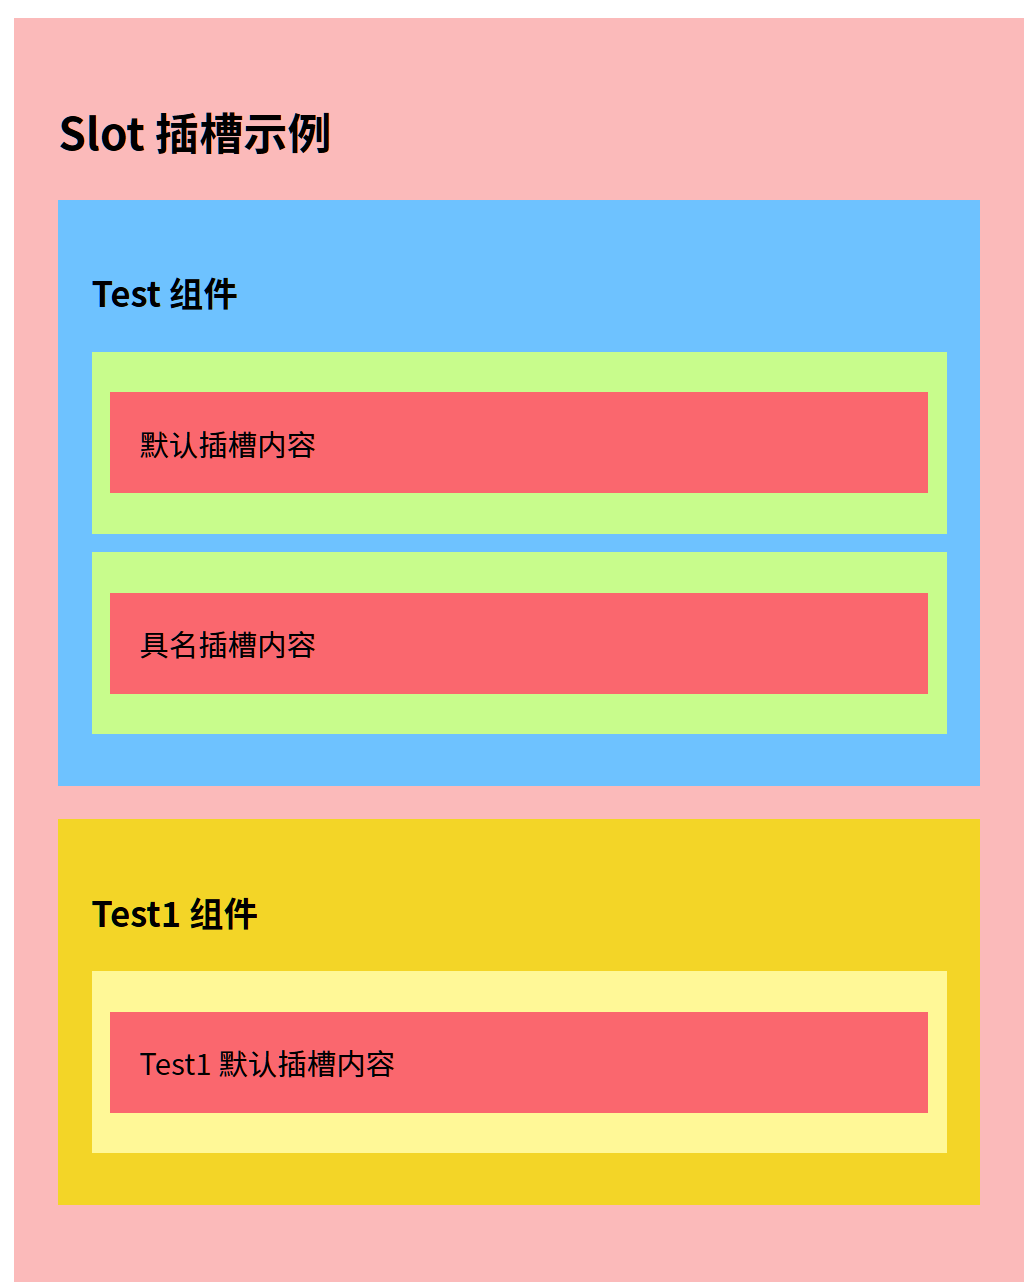
<template><div class="slot-container"><h2>Slot 插槽示例</h2><!-- 使用 Test 組件,提供插槽內容 --><Test><!-- 默認插槽內容:通過 <template #default> 指定插入到 Test 組件的默認插槽 --><template #default><div class="slot-block">默認插槽內容</div></template><!-- 具名插槽內容:通過 <template #named> 指定插入到 Test 組件的 named 插槽 --><template #named><div class="slot-block">具名插槽內容</div></template></Test><!-- 使用 Test1 組件,提供默認插槽內容 --><Test1><template #default><div class="slot-block">Test1 默認插槽內容</div></template></Test1></div>
</template>
<script setup>
// 導入子組件
import Test from './Test.vue';
import Test1 from './Test1.vue';
</script>
<style scoped>
.slot-container {width: 500px;min-height: 200px;background: #fbbaba;padding: 24px;
}
.slot-block {background: #fa676e;margin: 12px 0;padding: 16px;font-size: 16px;
}
</style>
父組件核心:通過 <template #插槽名> 為子組件的不同插槽提供內容,#default 可省略,直接在子組件標簽內寫內容即默認插槽。
2. Test.vue(子組件,包含默認插槽和具名插槽)
<template><div class="test-block"><h3>Test 組件</h3><!-- 默認插槽區域:父組件的 #default 內容插入到這里 --><div class="slot-area"><slot></slot></div><!-- 具名插槽 named 區域:父組件的 #named 內容插入到這里 --><div class="slot-area"><slot name="named"></slot></div></div>
</template>
<style scoped>
.test-block {background: #6ec2ff;padding: 18px;margin-bottom: 18px;
}
.slot-area {margin: 10px 0;padding: 10px;background: #c8fc8c; /* 插槽區域背景色,區分內容來源 */
}
</style>
Test 組件核心:定義了兩個插槽:
<slot></slot>:默認插槽,接收父組件的#default內容;<slot name="named"></slot>:具名插槽,接收父組件的#named內容;- 插槽所在的
.slot-area定義了樣式,使插入的內容有統一的展示風格。
3. Test1.vue(子組件,僅包含默認插槽)
<template><div class="test1-block"><h3>Test1 組件</h3><!-- 默認插槽區域:父組件的內容插入到這里 --><div class="slot-area"><slot></slot></div></div>
</template>
<style scoped>
.test1-block {background: #f3d527;padding: 18px;margin-bottom: 18px;
}
.slot-area {margin: 10px 0;padding: 10px;background: #fff897; /* 插槽區域背景色 */
}
</style>
Test1 組件僅定義了默認插槽,父組件在其標簽內的內容會默認插入到 <slot></slot> 位置,展示了默認插槽的基本用法。
通過以上示例,父組件可根據需求為子組件提供自定義內容,子組件通過插槽定義內容位置和樣式,實現了組件的高復用性和靈活性。

RotSpecial)


機器學習小白入門YOLOv:YOLOv8-cls epochs與數據量的關系)


)


