文章目錄
- 接入FFmpeg
- 1.下載FFmpeg 源碼
- 2.編譯FFmpeg.so庫
- 異常處理
- 3.自定義FFmpeg交互so庫創建
- 4.配置CMakeLists.txt
- 5.CMakeLists.txt 環境配置
- 6.Native與Java層調用
- 解碼器準備
接入FFmpeg
1.下載FFmpeg 源碼
FFmpeg官網地址
2.編譯FFmpeg.so庫
- 移動 FFmpeg 源碼文件夾至 Android Studio 的 cpp 包下(也可以不移)
- 在 FFmpeg 文件夾內創建用來編譯 .so 庫 的 sh腳本
編譯腳本是基于以下 Android 各較新版本:
| 庫 | 版本 |
|---|---|
| Android SDK | 35 |
| NDK | 26 |
| CMake | 3.6 |
| JDK | 11 |
| Gradle | 8.11.0 |
| Android Gradle Plugin | 8.6.0 |
#!/usr/bin/env bash
# 聲明腳本解釋器為 bash# -------------------- 配置路徑 --------------------
# ??修改成自己的NDK版本和路徑
NDK=/Users/xxx/Library/Android/sdk/ndk/26.1.10909125
# Android NDK 路徑HOST_TAG=darwin-x86_64
# 主機系統標識,macOS 64位TOOLCHAIN=$NDK/toolchains/llvm/prebuilt/$HOST_TAG
# LLVM 交叉編譯工具鏈路徑SYSROOT=$TOOLCHAIN/sysroot
# sysroot 路徑,NDK 中包含標準庫等文件的根目錄API=21
# Android API 級別FFMPEG_SRC=$(pwd)
# 當前工作目錄,即 ffmpeg 源碼根目錄OUTPUT_ROOT=$FFMPEG_SRC/android-build
# 編譯輸出目錄ARCHS=("armeabi-v7a" "arm64-v8a" "x86_64")
# 需要編譯的架構列表# -------------------- 函數:編譯單個架構 --------------------
build_one() {ARCH=$1# 接收參數,架構名稱echo "==================== 編譯架構: $ARCH ===================="# 打印當前編譯的架構,方便查看進度case $ARCH inarmeabi-v7a)TARGET=armv7a-linux-androideabi# armeabi-v7a 架構對應的目標三元組;;arm64-v8a)TARGET=aarch64-linux-android# arm64-v8a 架構對應的目標三元組;;x86_64)TARGET=x86_64-linux-android# x86_64 架構對應的目標三元組;;*)echo "? 未知架構: $ARCH"exit 1# 如果傳入架構不在已知列表,退出腳本;;esacCC="$TOOLCHAIN/bin/clang --target=${TARGET}${API} --sysroot=$SYSROOT"# 定義 C 編譯器,帶上目標三元組和 API 版本,指定 sysrootCXX="$TOOLCHAIN/bin/clang++ --target=${TARGET}${API} --sysroot=$SYSROOT"# 定義 C++ 編譯器,參數同上PREFIX=$OUTPUT_ROOT/$ARCH# 該架構編譯后文件的安裝目錄mkdir -p $PREFIX# 創建安裝目錄,若不存在則新建cd $FFMPEG_SRC# 進入 ffmpeg 源碼目錄,準備開始編譯make clean# 清理之前的編譯結果,避免干擾./configure \--prefix=$PREFIX \--target-os=android \--arch=$ARCH \--enable-cross-compile \--cc="$CC" \--cxx="$CXX" \--sysroot=$SYSROOT \--enable-shared \--disable-static \--disable-doc \--disable-programs \--disable-symver \--disable-debug \--disable-asm \--extra-cflags="-Os -fPIC" \--extra-ldflags=""# 調用 ffmpeg 的 configure 腳本,配置編譯選項:# --prefix:安裝路徑# --target-os=android:目標操作系統為 Android# --arch:目標架構# --enable-cross-compile:啟用交叉編譯# --cc 和 --cxx:指定 C 和 C++ 編譯器# --sysroot:指定 sysroot 路徑# --enable-shared:生成動態庫(so)# --disable-static:不生成靜態庫# --disable-doc:不生成文檔# --disable-programs:不編譯 ffmpeg 命令行工具# --disable-symver:關閉符號版本控制# --disable-debug:關閉調試# --disable-asm:禁用匯編優化(可根據需求開啟)# --extra-cflags:額外的編譯參數,此處優化大小且使用 PIC# --extra-ldflags:額外的鏈接參數,當前為空if [ $? -ne 0 ]; thenecho "? 配置失敗: $ARCH"exit 1fi# 如果 configure 出錯,則打印失敗信息并退出make -j$(sysctl -n hw.ncpu)# 多線程編譯,線程數為當前 CPU 核數make install# 安裝編譯結果到指定目錄
}# -------------------- 循環編譯所有架構 --------------------
for ARCH in "${ARCHS[@]}"; dobuild_one $ARCH# 按順序調用函數,編譯每個架構
doneecho "==================== 全部架構編譯完成 ===================="
# 全部架構編譯結束,打印提示- 編譯成功后在路徑下可以看到生成的 .so 庫和 .h 頭文件
cpp/ffmpeg-7.1.1/android-build/arm64-v8a/lib .so庫位置
cpp/ffmpeg-7.1.1/android-build/arm64-v8a/include .h 頭文件
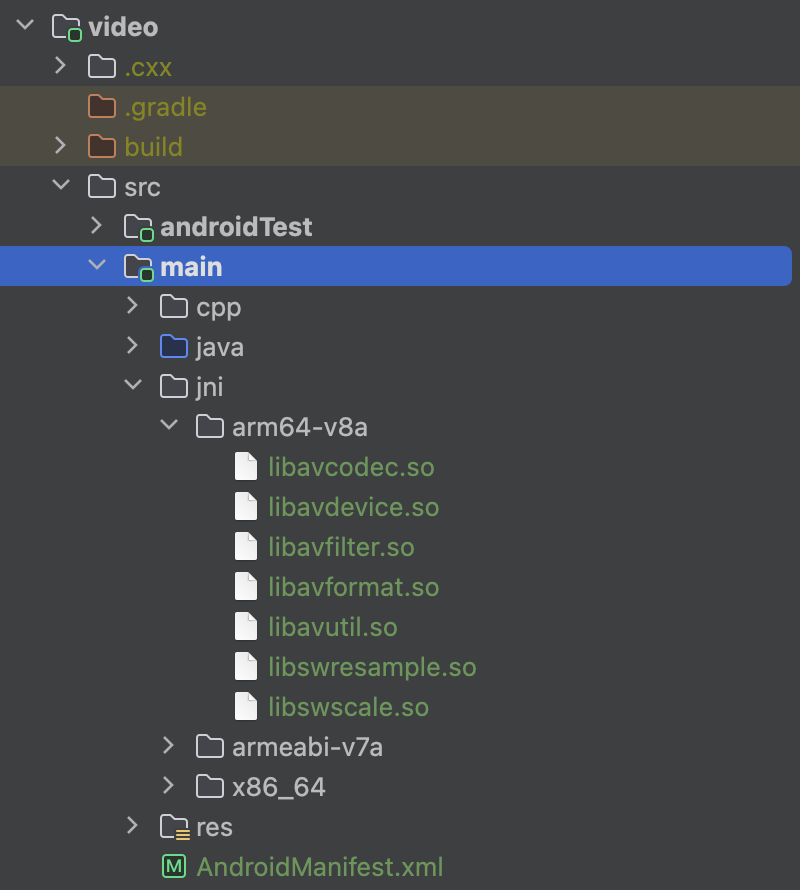
一共輸出7個 .so庫:
| so庫 | 功能 |
|---|---|
| libavcodec.so | 編解碼器核心庫 |
| libavformat.so | 負責封裝/解封裝(容器格式,如 mp4、mkv) |
| libavutil.so | 工具庫(數學、字節序、日志等) |
| libswscale.so | 視頻像素格式轉換(YUV ? RGB 等) |
| libswresample.so | 音頻重采樣、通道布局轉換 |
| libavfilter.so | 濾鏡處理(裁剪、特效等) |
| libavdevice.so | 設備輸入輸出(通常可以不用) |
編譯.so庫完成。
異常處理
- 報錯:nasm/yasm not found or too old. Use --disable-x86asm for a crippled build.
-
安裝 nasm
brew install nasm
-
- 報錯:C compiler test failed.
- 在系統NDK路徑確認 clang 編譯路徑的有效性
$NDK/toolchains/llvm/prebuilt/darwin-arm64/bin/clang
- 在系統NDK路徑確認 clang 編譯路徑的有效性
3.自定義FFmpeg交互so庫創建
-
創建一個Java類,自定義調用 native 層的方法
package com.example.video;public class FFmpegLoader {//自定義方法,返回FFmpeg的版本,判斷接入成功public native String getFFmpegVersion();static {//自定義so庫名System.loadLibrary("native-lib-myFFmpeg");} } -
通過命令行在當前路徑中生成 .h 文件,再放入cpp文件夾中
javac -h ./jni FFmpegLoader.java.h文件內容:
/* DO NOT EDIT THIS FILE - it is machine generated */
#include <jni.h>
/* Header for class com_example_video_FFmpegLoader */#ifndef _Included_com_example_video_FFmpegLoader
#define _Included_com_example_video_FFmpegLoader
#ifdef __cplusplus
extern "C" {
#endif
/** Class:     com_example_video_FFmpegLoader* Method:    getFFmpegVersion* Signature: ()V*/
JNIEXPORT void JNICALL 	Java_com_example_video_FFmpegLoader_getFFmpegVersion(JNIEnv *, jobject);#ifdef __cplusplus
}
#endif
#endif
移入路徑:cpp/com_example_video_FFmpegLoader.h
-
在同一cpp路徑下,創建 cpp 文件,會有 #include <libavcodec/avcodec.h> 等文件報紅,是因為沒有配置CMakeLists.txt 鏈接,可以先不管,或者先注釋掉 FFmpge 庫的引用,編譯完之后再調用。
/* DO NOT EDIT THIS FILE - it is machine generated */
#include <jni.h>
/* Header for class com_example_video_FFmpegLoader */
#include <string>
extern "C" {
#include <libavcodec/avcodec.h>
#include <libavformat/avformat.h>
#include <libavutil/avutil.h>
}#ifndef _Included_com_example_video_FFmpegLoader
#define _Included_com_example_video_FFmpegLoader
#ifdef __cplusplus
extern "C" {
#endif
/** Class:     com_example_video_FFmpegLoader* Method:    getFFmpegVersion* Signature: ()V*/
JNIEXPORT jstring JNICALL 	Java_com_example_video_FFmpegLoader_getFFmpegVersion(JNIEnv *env, jobject){const char *version = av_version_info();return env->NewStringUTF(version);
}#ifdef __cplusplus
}
#endif
#endif
4.配置CMakeLists.txt
-
外部so庫調用 :將編譯成功的 so 庫(路徑:cpp/ffmpeg-7.1.1/android-build/arm64-v8a/lib),集中存放到 jni 文件夾下(/src/main/jni)。并且根據 不同架構分別存放,用于之后在CMakeList.txt 中可以動態鏈接到這些so庫。
根據 jni 文件夾相對 CMakeLists.txt 文件的位置,找到各 so 庫,通過外部引入。# 引入 FFmpeg 的 so 庫 # 1.編解碼器核心庫 add_library(avcodec SHARED IMPORTED) set_target_properties(avcodec PROPERTIES IMPORTED_LOCATION${CMAKE_SOURCE_DIR}/../jni/${ANDROID_ABI}/libavcodec.so) -
添加頭文件目錄:讓自定義 cpp 文件,可以通過頭文件鏈接到其他 so 庫
# 添加頭文件目錄include_directories(${CMAKE_SOURCE_DIR}/include) -
將自定義 cpp 文件(native-lib-myFFmpeg 庫)與FFmpeg 庫 鏈接到一起,使得我的 native 方法可以調用到 FFmpage 的內容。
完整代碼:
cmake_minimum_required(VERSION 3.6)
project(ffmpeg_test)# 添加頭文件目錄
include_directories(${CMAKE_SOURCE_DIR}/include)# 引入 FFmpeg 的 so 庫
# 1.編解碼器核心庫
add_library(avcodec SHARED IMPORTED)
set_target_properties(avcodec PROPERTIES IMPORTED_LOCATION${CMAKE_SOURCE_DIR}/../jni/${ANDROID_ABI}/libavcodec.so)#2.負責封裝/解封裝(容器格式,如 mp4、mkv)
add_library(avformat SHARED IMPORTED)
set_target_properties(avformat PROPERTIES IMPORTED_LOCATION${CMAKE_SOURCE_DIR}/../jni/${ANDROID_ABI}/libavformat.so)#3.工具庫(數學、字節序、日志等)
add_library(avutil SHARED IMPORTED)
set_target_properties(avutil PROPERTIES IMPORTED_LOCATION${CMAKE_SOURCE_DIR}/../jni/${ANDROID_ABI}/libavutil.so)#4.視頻像素格式轉換(YUV ? RGB 等)
add_library(swscale SHARED IMPORTED)
set_target_properties(swscale PROPERTIES IMPORTED_LOCATION${CMAKE_SOURCE_DIR}/../jni/${ANDROID_ABI}/libswscale.so)#5.音頻重采樣、通道布局轉換
add_library(swresample SHARED IMPORTED)
set_target_properties(swresample PROPERTIES IMPORTED_LOCATION${CMAKE_SOURCE_DIR}/../jni/${ANDROID_ABI}/libswresample.so)#6.濾鏡處理(裁剪、特效等)
add_library(avfilter SHARED IMPORTED)
set_target_properties(avfilter PROPERTIES IMPORTED_LOCATION${CMAKE_SOURCE_DIR}/../jni/${ANDROID_ABI}/libavfilter.so)# 添加你的本地庫
add_library(native-lib-myFFmpeg SHARED native-lib-myFFmpeg.cpp)# 鏈接 FFmpeg 庫
target_link_libraries(native-lib-myFFmpegavcodecavformatavutilswscaleswresampleavfilterandroid${log-lib}
)
5.CMakeLists.txt 環境配置
配置如下三點:
- CMakeLists.txt 路徑
- ndk 編譯架構
- C++編譯語言
android {defaultConfig {🧠 externalNativeBuild{cmake{cppFlags("")}}🧠 ndk{abiFilters += listOf("armeabi-v7a","x86_64","arm64-v8a")}}🧠  externalNativeBuild{cmake {path = file("src/main/cpp/CMakeLists.txt")}}
}
build 項目,生成自定義的 native-lib-myFFmpeg.so 文件,路徑:
build/intermediates/cxx/Debug/48u475k3/obj/armeabi-v7a/libnative-lib-myFFmpeg.so
6.Native與Java層調用
TextView tv = findViewById(R.id.video_text);FFmpegLoader fFmpegLoader = new FFmpegLoader();tv.setText(fFmpegLoader.getFFmpegVersion());
顯示FFmpeg的版本,完成FFmpeg 接入。
解碼器準備
native-lib-myFFmpeg.h
/* DO NOT EDIT THIS FILE - it is machine generated */
#include <jni.h>
/* Header for class com_example_video_FFmpegLoader */#ifndef _Included_com_example_video_FFmpegLoader
#define _Included_com_example_video_FFmpegLoader
#ifdef __cplusplus
extern "C" {
#endif
/** Class:     com_example_video_FFmpegLoader* Method:    getFFmpegVersion* Signature: ()V*/
JNIEXPORT void JNICALL Java_com_example_video_SimplePlayer_getFFmpegVersion(JNIEnv *, jobject);#ifdef __cplusplus
}
#endif
#endif
native-lib-myFFmpeg.cpp
/* DO NOT EDIT THIS FILE - it is machine generated */
#include <jni.h>
/* Header for class com_example_video_FFmpegLoader */
#include <string>
#include "NativeSimplePlayer.h"
#include "JNICallbackHelper.h"extern "C" {
#include <libavcodec/avcodec.h>
#include <libavformat/avformat.h>
#include <libavutil/avutil.h>
}#ifndef _Included_com_example_video_FFmpegLoader
#define _Included_com_example_video_FFmpegLoader
#ifdef __cplusplus
extern "C" {
#endif
/** Class:     com_example_video_FFmpegLoader* Method:    getFFmpegVersion* Signature: ()V*/
JNIEXPORT jstring JNICALL Java_com_example_video_SimplePlayer_getFFmpegVersion(JNIEnv *env, jobject){const char *version = av_version_info();return env->NewStringUTF(version);
}#ifdef __cplusplus
}
#endif
#endif//虛擬機可以跨線程
JavaVM  *vm = 0;
jint JNI_OnLoad(JavaVM *vm,void *args){::vm = vm;return JNI_VERSION_1_6;
}extern "C"
JNIEXPORT void JNICALL
Java_com_example_video_SimplePlayer_prepareNative(JNIEnv *env, jobject job, jstring data_source) {const char* data_source_ = env->GetStringUTFChars(data_source,0);//可能是主線程,也可能是子線程auto *helper = new JNICallbackHelper(vm,env,job);auto *player = new NativeSimplePlayer(data_source_,helper);player->prepare();env->ReleaseStringUTFChars(data_source,data_source_);
}extern "C"
JNIEXPORT void JNICALL
Java_com_example_video_SimplePlayer_startNative(JNIEnv *env, jobject thiz) {// TODO: implement startNative()
}extern "C"
JNIEXPORT void JNICALL
Java_com_example_video_SimplePlayer_stopNative(JNIEnv *env, jobject thiz) {// TODO: implement stopNative()
}extern "C"
JNIEXPORT void JNICALL
Java_com_example_video_SimplePlayer_releaseNative(JNIEnv *env, jobject thiz) {// TODO: implement releaseNative()
}
NativeSimplePlayer.cpp
//
// Created on 2025/7/22.
//#include <string.h>
#include "NativeSimplePlayer.h"NativeSimplePlayer::NativeSimplePlayer(const char *data_source_,JNICallbackHelper *helper) {//如果被釋放,會造成懸空指針//this->data_source = data_source_;//深拷貝//C層:demo.mp4\0 C層會自動 + \0 ,strlen 不計算 \0 的長度this->data_source = new char[strlen(data_source_) + 1];strcpy(this->data_source,data_source_);this->helper = helper;
}NativeSimplePlayer::~NativeSimplePlayer() {if( data_source ){delete data_source;}if( helper){delete helper;}
}void* task_prepare(void * args){//讀取文件auto *player = static_cast<NativeSimplePlayer *>(args);player->prepare_();return 0;//必須返回,錯誤很難找
}void NativeSimplePlayer::prepare_() {//為什么FFmpeg源碼,大量使用上下文 Context//因為FFmpge源碼是純C,他沒有對象,只能上下文貫穿環境,操作成員變量/*** 第一步,打開媒體文件地址* @parm AVFormatContext  -> formatContext 上下文* @parm filename         -> data_source 路徑* @parm AVInputFormat    -> *fmt Mac、Windows 攝像頭、麥克風* @param AVDictionary    -> 設置Http連接超時,打開rtmp超時*/formatContext = avformat_alloc_context();AVDictionary  *dictionary = 0;av_dict_set(&dictionary,"timeout","5000000",0);int result = avformat_open_input(&formatContext,data_source,0,&dictionary);//釋放字典av_dict_free(&dictionary);if(result){//回調錯誤信息給Java,通過JNI反射return;}/*** 第二步,查找媒體中的音視頻流信息*/result = avformat_find_stream_info(formatContext,0);if( result < 0 ){return;}/*** 第三步,根據流信息,流的個數,用循環來找*///    for(int i = 0;i < formatContext->nb_streams;++i){for(int i = 0;i < 2;++i){/*** 第四步,獲取媒體流(視頻,音頻)*/AVStream *stream = formatContext->streams[i];/*** 第五步,從上面的流中 獲取 編碼解碼的參數* 由于后面的解碼器 編碼器 都需要參數(記錄的寬高)*/AVCodecParameters *parameters = stream->codecpar;/*** 第六步,獲取編/解碼器,根據上面的參數👆*/const AVCodec *codec = avcodec_find_decoder(parameters->codec_id);/*** 第七步,編解碼器 上下文【真正干活】*/AVCodecContext *codecContext = avcodec_alloc_context3(codec);if( !codecContext ){return;}/*** 第八步,他目前是一張白紙* 把 parameter 拷貝給=> codecContext*/result = avcodec_parameters_to_context(codecContext,parameters);if( result < 0){return;}/*** 第九步,打開解碼器*/result = avcodec_open2(codecContext,codec,0);if( result ){return;}/*** 第十步,從編解碼器從,獲取流的類型 codec_type 決定是音頻還是視頻*/if( parameters->codec_type == AVMediaType::AVMEDIA_TYPE_AUDIO){//分開音頻audio_channel = new AudioChannel();} else if(parameters->codec_type == AVMediaType::AVMEDIA_TYPE_VIDEO){//分開視頻video_channel = new VideoChannel();}}/*** 第十一步,如果流中沒有音頻,也沒有視頻 【健壯性校驗】*/if( !audio_channel && !video_channel){return;}/*** 第十二步,恭喜你,準備成功,媒體準備完成,通知上層*/if(helper){helper->onPrepared(THREAD_CHILD);}
}void NativeSimplePlayer::prepare() {//此時為Activity調用到的,所以為主線程//解封裝 FFmpeg 來解析,要使用子線程pthread_create(&pid_prepare,0,task_prepare,this);}
NativeSimplePlayer.h
//
// Created on 2025/7/22.
//#ifndef COROUTINE_NATIVESIMPLEPLAYER_H
#define COROUTINE_NATIVESIMPLEPLAYER_H#include <cstring>
#include <pthread.h>
#include "AudioChannel.h"
#include "VideoChannel.h"
#include "JNICallbackHelper.h"
#include "AudioChannel.h"
#include "VideoChannel.h"
#include "util.h"extern "C"{ //ffmpeg 是純C寫的,必須采用C的編譯方式,否則崩潰
#include "libavformat/avformat.h"
#include "libavcodec/avcodec.h"};class NativeSimplePlayer {
private:char  *data_source = 0;//指針需要初始值pthread_t pid_prepare;AVFormatContext  *formatContext = 0;AudioChannel *audio_channel = 0;VideoChannel *video_channel = 0;JNICallbackHelper *helper =0 ;
public:NativeSimplePlayer(const char *data_source,JNICallbackHelper *helper);~NativeSimplePlayer();void prepare();void prepare_();
};#endif //COROUTINE_NATIVESIMPLEPLAYER_H
JNICallbackHelper.h Native層調用Java層
//
// Created on 2025/7/22.
//#ifndef COROUTINE_JNICALLBACKHELPER_H
#define COROUTINE_JNICALLBACKHELPER_H#include <jni.h>
#include "util.h"class JNICallbackHelper {
private:JavaVM *vm = 0;JNIEnv *env = 0;jobject job;jmethodID jmd_prepared;public:JNICallbackHelper(_JavaVM *vm, _JNIEnv *env, jobject jobject);virtual ~JNICallbackHelper();void onPrepared(int thread_mode);
};#endif //COROUTINE_JNICALLBACKHELPER_H
JNICallbackHelper.cpp
//
// Created on 2025/7/22.
//#include "JNICallbackHelper.h"JNICallbackHelper::JNICallbackHelper(_JavaVM *vm, _JNIEnv *env, jobject jobject) {this->vm = vm;this->env = env;//全局引用this->job = env->NewGlobalRef(jobject);jclass claz = env->GetObjectClass(jobject);//🌟這里沒有賦值jmd_prepared = env->GetMethodID(claz,"onPrepared","()V");
}JNICallbackHelper::~JNICallbackHelper() {vm = 0;env->DeleteGlobalRef(job);job = 0;env = 0;
}void JNICallbackHelper::onPrepared(int thread_mode) {if( thread_mode == THREAD_MAIN){env->CallVoidMethod(job,jmd_prepared);} else if (thread_mode == THREAD_CHILD){//子線程不可以跨線程,要用全新的envJNIEnv  *env_child;vm->AttachCurrentThread(&env_child,0);env_child->CallVoidMethod(job,jmd_prepared);vm->DetachCurrentThread();}
}
util.h
//
// Created on 2025/7/22.
//#ifndef COROUTINE_UTIL_H
#define COROUTINE_UTIL_H#define THREAD_MAIN 1
#define THREAD_CHILD 2#endif //COROUTINE_UTIL_H
CMakeLists.txt 添加調用的 cpp
# 添加你的本地庫
add_library(native-lib-myFFmpegSHAREDnative-lib-myFFmpeg.cppJNICallbackHelper.cppVideoChannel.cppAudioChannel.cppNativeSimplePlayer.cpp)
Jave層調用類
package com.example.video;public class SimplePlayer {public native String getFFmpegVersion();static {System.loadLibrary("native-lib-myFFmpeg");}public SimplePlayer() {}private String dataSource;private OnPreparedListener onPreparedListener;public void setDataSource(String dataSource) {this.dataSource = dataSource;}/*** 播放器的準備工作*/public void prepare(){prepareNative(dataSource);}/*** 開始播放*/public void start(){startNative();}/*** 停止播放*/public void stop(){stopNative();}/*** 釋放資源*/public void release(){releaseNative();}public void onPrepared(){if( onPreparedListener != null){onPreparedListener.onPrepared();}}public void setOnPreparedListener(OnPreparedListener listener){onPreparedListener = listener;}public interface OnPreparedListener{void onPrepared();}/*** ======================= native 函數區 ==========================*/private native void prepareNative(String dataSource);private native void startNative();private native void stopNative() ;private native void releaseNative() ;}Activity 準備視頻編碼器完成
package com.example.video;import android.os.Bundle;
import android.os.Environment;
import android.util.Log;
import android.widget.TextView;
import android.widget.Toast;import androidx.activity.EdgeToEdge;
import androidx.appcompat.app.AppCompatActivity;
import androidx.core.graphics.Insets;
import androidx.core.view.ViewCompat;
import androidx.core.view.WindowInsetsCompat;import java.io.File;public class VideoActivity extends AppCompatActivity {private SimplePlayer mPlayer;public static final String TAG = VideoActivity.class.getName();@Overrideprotected void onCreate(Bundle savedInstanceState) {super.onCreate(savedInstanceState);EdgeToEdge.enable(this);setContentView(R.layout.activity_video);ViewCompat.setOnApplyWindowInsetsListener(findViewById(R.id.main), (v, insets) -> {Insets systemBars = insets.getInsets(WindowInsetsCompat.Type.systemBars());v.setPadding(systemBars.left, systemBars.top, systemBars.right, systemBars.bottom);return insets;});TextView tv = findViewById(R.id.video_text);//tv.setText(mPlayer.getFFmpegVersion());initPlayer();}private void initPlayer(){mPlayer = new SimplePlayer();File videFile = new File(Environment.getExternalStorageDirectory()+ File.separator + "Download/Mcloud.mp4");mPlayer.setDataSource(videFile.getAbsolutePath());//準備成功的回調——C++子線程調用mPlayer.setOnPreparedListener(new SimplePlayer.OnPreparedListener() {@Overridepublic void onPrepared() {Log.d(TAG, "onPrepared: 準備完成");runOnUiThread(new Runnable() {@Overridepublic void run() {Toast.makeText(VideoActivity.this,"準備完成,即將播放",Toast.LENGTH_SHORT).show();}});mPlayer.start();}});}@Overrideprotected void onResume() {super.onResume();//觸發mPlayer.prepare();}@Overrideprotected void onStop() {super.onStop();mPlayer.stop();}@Overrideprotected void onDestroy() {super.onDestroy();mPlayer.release();}
}


))


)


(筆記)(面試考試必備知識點))


