第二部分:創建型模式 - 抽象工廠模式 (Abstract Factory Pattern)
我們已經學習了單例模式(保證唯一實例)和工廠方法模式(延遲創建到子類)。現在,我們來探討創建型模式中更為復雜和強大的一個——抽象工廠模式。它處理的是創建“產品族”的問題。
- 核心思想:提供一個接口,用于創建一系列相關或相互依賴的對象,而無需指定它們具體的類。
抽象工廠模式 (Abstract Factory Pattern)
“提供一個創建一系列相關或相互依賴對象的接口,而無需指定它們具體的類。”
想象一下,你要裝修房子,可以選擇不同的裝修風格,比如“現代風格”、“中式風格”或“歐式風格”。
- 每種風格都包含一系列配套的家具:沙發、茶幾、電視柜等。
- “現代風格”的家具(現代沙發、現代茶幾)是一套,它們之間風格統一。
- “中式風格”的家具(紅木沙發、雕花茶幾)是另一套,它們也風格統一。
你不會用一個現代風格的沙發去搭配一個中式雕花的茶幾,這樣會顯得不倫不類。抽象工廠模式就是用來確保你得到的是一整套風格協調的產品。
1. 目的 (Intent)
抽象工廠模式的主要目的:
- 創建產品族:核心在于創建一系列相關的或相互依賴的對象(稱為一個“產品族”)。例如,一個UI工具包工廠可能創建按鈕、文本框、滾動條等一系列UI組件,這些組件需要有統一的外觀和行為(如Windows風格或macOS風格)。
- 客戶端與具體類解耦:客戶端代碼只與抽象的工廠接口和抽象的產品接口打交道,而不需要知道具體是哪個工廠的實現,也不需要知道具體的產品類名。
- 保證產品兼容性:由同一個具體工廠創建出來的產品,一定是相互兼容、可以協同工作的。
2. 生活中的例子 (Real-world Analogy)
-
電腦組裝:
- 抽象工廠 (AbstractFactory):
ComputerPartsFactory(定義了創建CPU、主板、內存等組件的接口)。 - 具體工廠 (ConcreteFactory):
IntelCompatibleFactory(生產Intel CPU、兼容主板、特定內存條),AMDCompatibleFactory(生產AMD CPU、兼容主板、另一特定內存條)。 - 抽象產品 (AbstractProduct):
CPU,Motherboard,RAM(這些是組件的抽象接口)。 - 具體產品 (ConcreteProduct):
IntelCPU,AMDRyzenCPU,AsusMotherboard,GigabyteMotherboard,KingstonRAM,CorsairRAM。
當你選擇IntelCompatibleFactory時,你會得到一套相互兼容的Intel平臺組件。你不會得到一個Intel的CPU卻配一個只支持AMD的主板。
- 抽象工廠 (AbstractFactory):
-
換膚功能 (Skinnable UI):
- 抽象工廠:
UIThemeFactory(定義createButton(),createCheckbox(),createWindow()等方法)。 - 具體工廠:
WindowsThemeFactory(創建Windows風格的按鈕、復選框、窗口),MacThemeFactory(創建Mac風格的按鈕、復選框、窗口),DarkThemeFactory(創建暗黑主題的組件)。 - 抽象產品:
Button,Checkbox,Window(UI組件的接口)。 - 具體產品:
WindowsButton,MacButton,DarkButton等。
用戶選擇一個主題(比如“暗黑主題”),應用就會使用DarkThemeFactory來創建所有UI元素,確保界面風格統一。
- 抽象工廠:
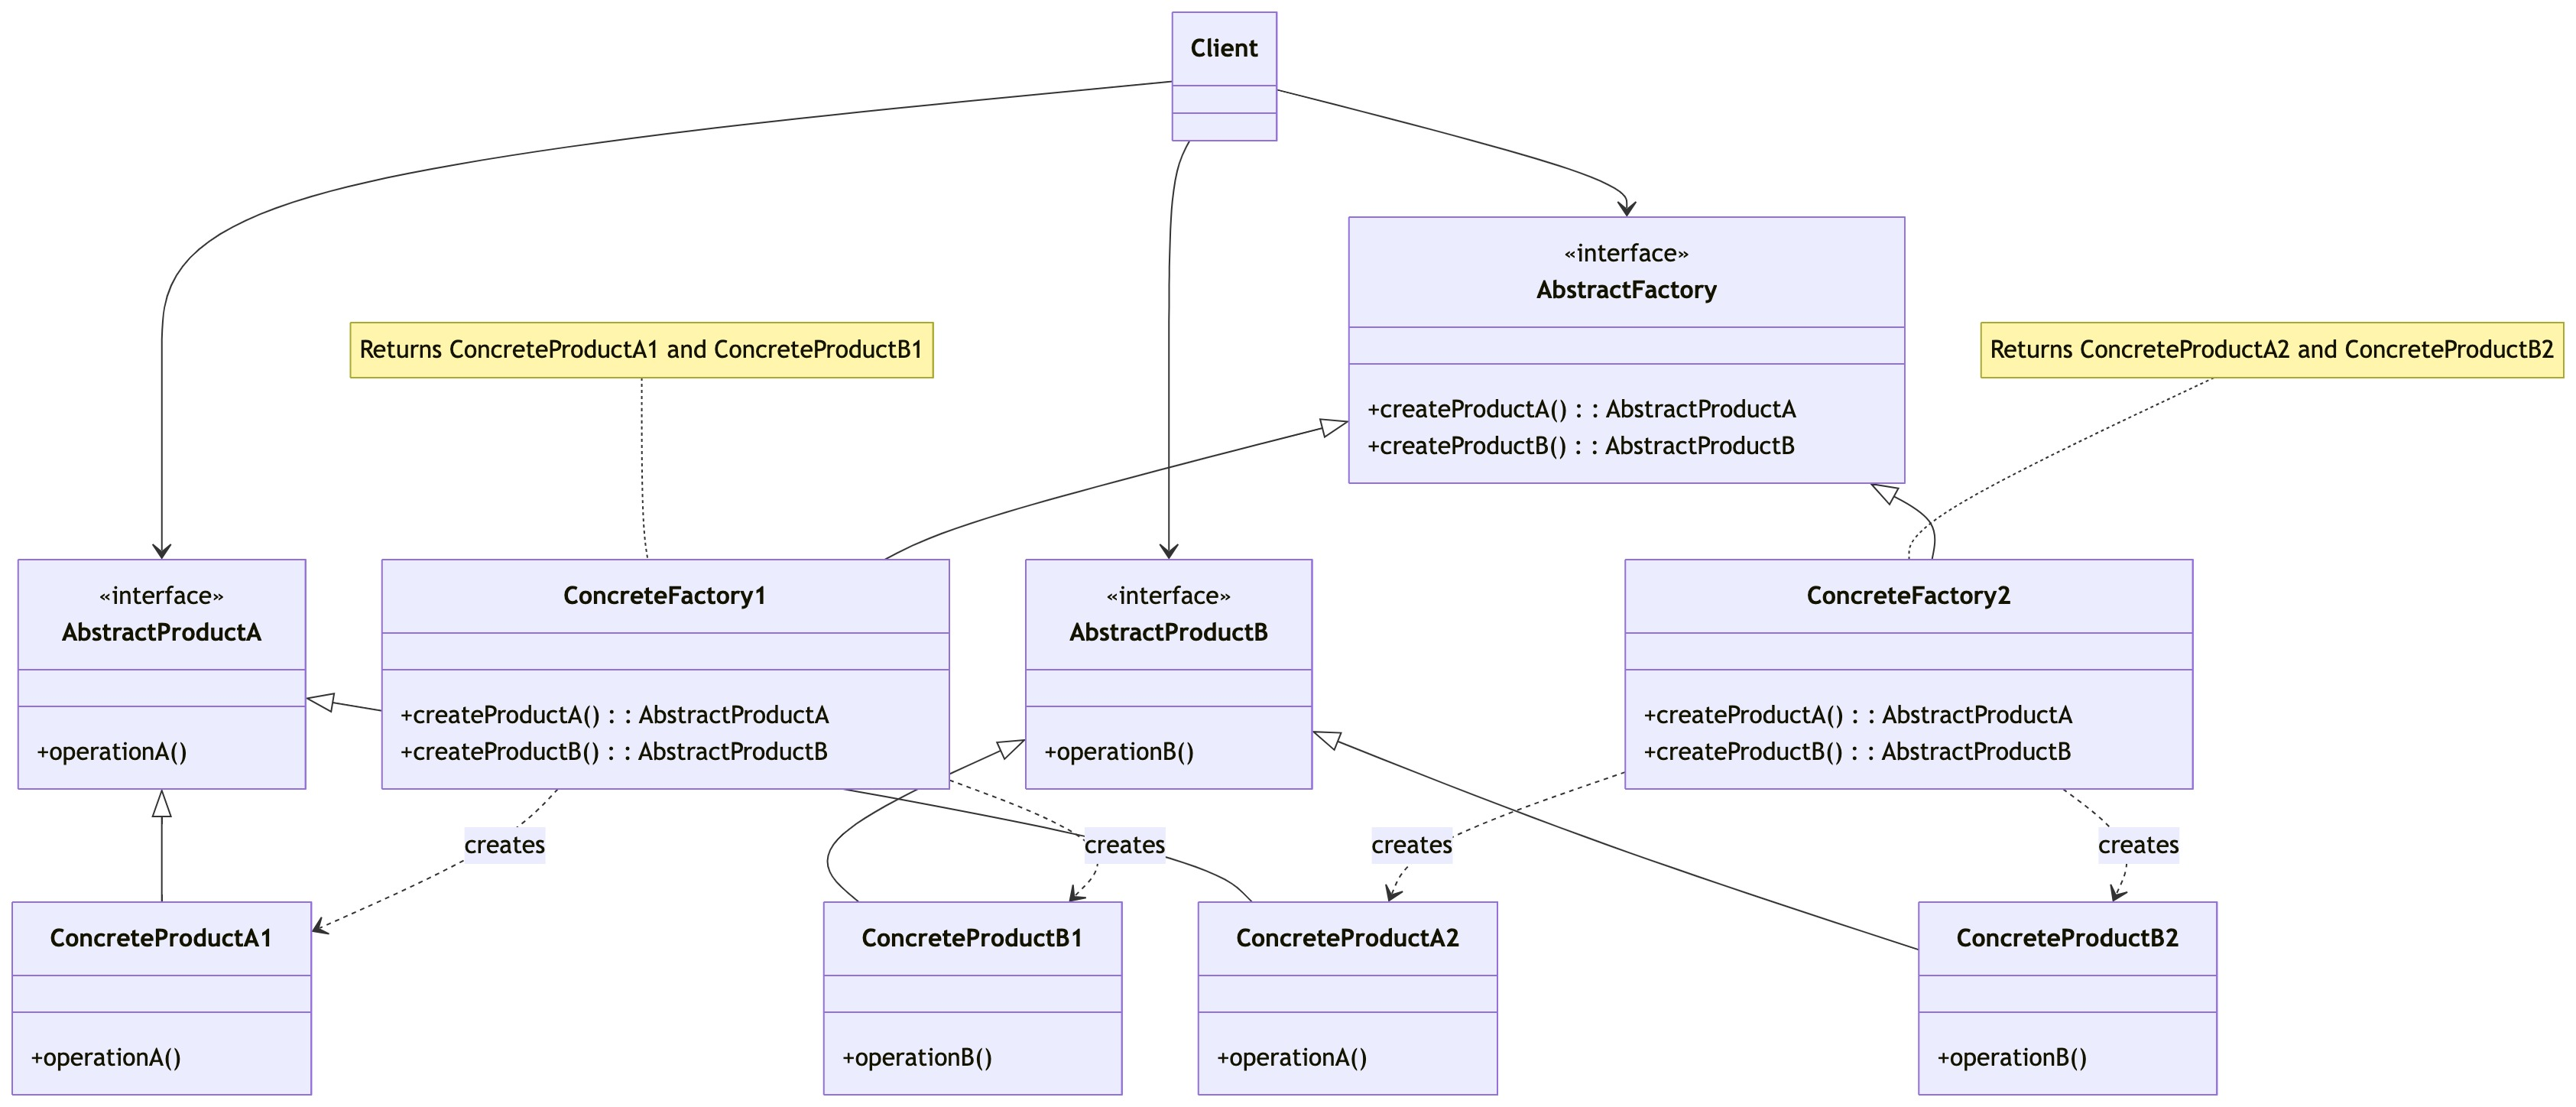
3. 結構 (Structure)
抽象工廠模式通常包含以下角色:
- AbstractFactory (抽象工廠):聲明一個創建抽象產品對象的操作接口集合。通常每個抽象產品對應一個創建方法。
- ConcreteFactory (具體工廠):實現 AbstractFactory 接口,負責創建具體產品族中的產品對象。系統可以有多個具體工廠,每個具體工廠創建一個具體的產品族。
- AbstractProduct (抽象產品):為一類產品對象聲明一個接口。系統中可以有多個不同的抽象產品,構成產品族。
- ConcreteProduct (具體產品):定義一個將被相應的具體工廠創建的產品對象。它實現了 AbstractProduct 接口。
- Client (客戶端):僅使用 AbstractFactory 和 AbstractProduct 接口。客戶端不關心具體是哪個工廠、哪個產品,它只知道它需要一個工廠來創建它需要的產品。
4. 適用場景 (When to Use)
- 一個系統要獨立于它的產品的創建、組合和表示時。即,你希望客戶端代碼與具體產品的創建過程分離。
- 一個系統要由多個產品系列中的一個來配置時。例如,系統需要支持多種“外觀感覺”(Look and Feel)。
- 當你要強調一系列相關的產品對象的設計以便進行聯合使用時。
- 當你提供一個產品類庫,而只想顯示它們的接口而不是實現時。
簡單來說:
- 需要創建的產品對象有復雜的關聯關系(屬于同一個產品族)。
- 系統需要支持不同系列(族)的產品,并且可以在運行時切換。
5. 優缺點 (Pros and Cons)
優點:
- 分離接口和實現:客戶端使用抽象接口,與具體的產品實現解耦。
- 易于交換產品系列:改變具體工廠即可改變整個產品系列,客戶端代碼無需修改。
- 有利于產品的一致性:當一個系列的產品對象被設計成一起工作時,抽象工廠模式能夠保證客戶端始終只使用同一個產品系列中的對象。
缺點:
- 難以擴展新的產品種類 (Product Kind):如果要在產品族中增加一個新的產品種類(例如,在UI主題工廠中增加創建
ScrollBar的方法),那么所有的抽象工廠接口和具體工廠實現都需要修改,這違反了開閉原則。對于這種情況,工廠方法模式可能更合適(每個產品種類一個工廠方法)。 - 類的數量會顯著增加:每增加一個產品族,就需要增加一套對應的具體產品類和具體工廠類。
6. 實現方式 (Implementations)
讓我們通過一個跨平臺UI組件的例子來看看抽象工廠模式的實現。假設我們需要為Windows和macOS創建風格一致的按鈕和文本框。
抽象產品 (Button, TextBox)
// ui_elements.go
package ui// Button 按鈕接口 (抽象產品A)
type Button interface {Render()OnClick()
}// TextBox 文本框接口 (抽象產品B)
type TextBox interface {Render()SetText(text string)GetText() string
}
// Button.java
package com.example.ui;// 按鈕接口 (抽象產品A)
public interface Button {void render();void onClick();
}// TextBox.java
package com.example.ui;// 文本框接口 (抽象產品B)
public interface TextBox {void render();void setText(String text);String getText();
}
具體產品 (WindowsButton, WindowsTextBox, MacButton, MacTextBox)
// windows_elements.go
package uiimport "fmt"// WindowsButton Windows風格按鈕 (具體產品A1)
type WindowsButton struct{}func (b *WindowsButton) Render()  { fmt.Println("Rendering a Windows style button.") }
func (b *WindowsButton) OnClick() { fmt.Println("Windows button clicked.") }// WindowsTextBox Windows風格文本框 (具體產品B1)
type WindowsTextBox struct{ text string }func (tb *WindowsTextBox) Render()        { fmt.Println("Rendering a Windows style text box.") }
func (tb *WindowsTextBox) SetText(text string) { tb.text = text }
func (tb *WindowsTextBox) GetText() string   { return tb.text }// mac_elements.go
package uiimport "fmt"// MacButton Mac風格按鈕 (具體產品A2)
type MacButton struct{}func (b *MacButton) Render()  { fmt.Println("Rendering a macOS style button.") }
func (b *MacButton) OnClick() { fmt.Println("macOS button clicked.") }// MacTextBox Mac風格文本框 (具體產品B2)
type MacTextBox struct{ text string }func (tb *MacTextBox) Render()        { fmt.Println("Rendering a macOS style text box.") }
func (tb *MacTextBox) SetText(text string) { tb.text = text }
func (tb *MacTextBox) GetText() string   { return tb.text }
// WindowsButton.java
package com.example.ui.windows;import com.example.ui.Button;
import java.awt.FlowLayout;
import javax.swing.JButton;
import javax.swing.JFrame;
import javax.swing.JOptionPane;// Windows風格按鈕 (具體產品A1)
public class WindowsButton implements Button {@Overridepublic void render() {System.out.println("Rendering a Windows style button.");// 實際場景中可能會使用Swing/JavaFX等創建真實UI// JFrame frame = new JFrame("Windows Button");// JButton button = new JButton("Win Button");// button.addActionListener(e -> onClick());// frame.setDefaultCloseOperation(JFrame.EXIT_ON_CLOSE);// frame.setLayout(new FlowLayout());// frame.add(button);// frame.setSize(200, 100);// frame.setVisible(true);}@Overridepublic void onClick() {System.out.println("Windows button clicked.");// JOptionPane.showMessageDialog(null, "Windows Button Clicked!");}
}// WindowsTextBox.java
package com.example.ui.windows;import com.example.ui.TextBox;// Windows風格文本框 (具體產品B1)
public class WindowsTextBox implements TextBox {private String text = "";@Overridepublic void render() {System.out.println("Rendering a Windows style text box: [" + text + "]");}@Overridepublic void setText(String text) { this.text = text; }@Overridepublic String getText() { return this.text; }
}// MacButton.java
package com.example.ui.mac;import com.example.ui.Button;// Mac風格按鈕 (具體產品A2)
public class MacButton implements Button {@Overridepublic void render() {System.out.println("Rendering a macOS style button.");}@Overridepublic void onClick() {System.out.println("macOS button clicked.");}
}// MacTextBox.java
package com.example.ui.mac;import com.example.ui.TextBox;// Mac風格文本框 (具體產品B2)
public class MacTextBox implements TextBox {private String text = "";@Overridepublic void render() {System.out.println("Rendering a macOS style text box: (" + text + ")");}@Overridepublic void setText(String text) { this.text = text; }@Overridepublic String getText() { return this.text; }
}
抽象工廠 (GUIFactory)
// gui_factory.go
package ui// GUIFactory 抽象UI工廠 (抽象工廠)
type GUIFactory interface {CreateButton() ButtonCreateTextBox() TextBox
}
// GUIFactory.java
package com.example.ui;// 抽象UI工廠 (抽象工廠)
public interface GUIFactory {Button createButton();TextBox createTextBox();
}
具體工廠 (WindowsFactory, MacFactory)
// windows_factory.go
package ui// WindowsFactory Windows UI工廠 (具體工廠1)
type WindowsFactory struct{}func (wf *WindowsFactory) CreateButton() Button {return &WindowsButton{}
}
func (wf *WindowsFactory) CreateTextBox() TextBox {return &WindowsTextBox{}
}// mac_factory.go
package ui// MacFactory Mac UI工廠 (具體工廠2)
type MacFactory struct{}func (mf *MacFactory) CreateButton() Button {return &MacButton{}
}
func (mf *MacFactory) CreateTextBox() TextBox {return &MacTextBox{}
}
// WindowsFactory.java
package com.example.ui.windows;import com.example.ui.Button;
import com.example.ui.GUIFactory;
import com.example.ui.TextBox;// Windows UI工廠 (具體工廠1)
public class WindowsFactory implements GUIFactory {@Overridepublic Button createButton() {System.out.println("WindowsFactory: Creating WindowsButton");return new WindowsButton();}@Overridepublic TextBox createTextBox() {System.out.println("WindowsFactory: Creating WindowsTextBox");return new WindowsTextBox();}
}// MacFactory.java
package com.example.ui.mac;import com.example.ui.Button;
import com.example.ui.GUIFactory;
import com.example.ui.TextBox;// Mac UI工廠 (具體工廠2)
public class MacFactory implements GUIFactory {@Overridepublic Button createButton() {System.out.println("MacFactory: Creating MacButton");return new MacButton();}@Overridepublic TextBox createTextBox() {System.out.println("MacFactory: Creating MacTextBox");return new MacTextBox();}
}
客戶端使用 (Application)
// main.go (示例用法)
/*
package mainimport ("fmt""./ui" // 假設 ui 包在當前目錄下"runtime"
)// Application 客戶端,它不知道具體的工廠和產品類
type Application struct {factory GUIFactorybutton  ButtontextBox TextBox
}func NewApplication(factory ui.GUIFactory) *Application {app := &Application{factory: factory}app.button = factory.CreateButton()app.textBox = factory.CreateTextBox()return app
}func (app *Application) Run() {app.button.Render()app.button.OnClick()app.textBox.SetText("Hello Abstract Factory!")app.textBox.Render()fmt.Println("Text from box:", app.textBox.GetText())
}func main() {var factory ui.GUIFactory// 根據操作系統選擇不同的工廠os := runtime.GOOSfmt.Println("Operating System:", os)if os == "windows" {factory = &ui.WindowsFactory{}} else if os == "darwin" { // darwin is macOSfactory = &ui.MacFactory{}} else {fmt.Println("Unsupported OS, defaulting to Windows style.")factory = &ui.WindowsFactory{} // 默認或提供一個通用工廠}app := NewApplication(factory)app.Run()
}
*/
// Application.java (客戶端)
package com.example;import com.example.ui.Button;
import com.example.ui.GUIFactory;
import com.example.ui.TextBox;
import com.example.ui.mac.MacFactory;
import com.example.ui.windows.WindowsFactory;public class Application {private Button button;private TextBox textBox;public Application(GUIFactory factory) {System.out.println("Client: Configuring application with a UI factory.");button = factory.createButton();textBox = factory.createTextBox();}public void run() {System.out.println("\nClient: Running the application UI...");button.render();button.onClick();textBox.setText("Hello Abstract Factory!");textBox.render();System.out.println("Text from box: " + textBox.getText() + "\n");}// Main.java (示例用法)/*public static void main(String[] args) {GUIFactory factory;Application app;String osName = System.getProperty("os.name").toLowerCase();System.out.println("Operating System: " + osName);if (osName.contains("win")) {factory = new WindowsFactory();} else if (osName.contains("mac")) {factory = new MacFactory();} else {System.out.println("Unsupported OS, defaulting to Windows style.");factory = new WindowsFactory(); // Default factory}app = new Application(factory);app.run();// 假設我們現在想切換到Mac主題 (如果當前不是Mac)if (!osName.contains("mac")) {System.out.println("\n--- Switching to Mac Theme for demonstration ---");factory = new MacFactory();app = new Application(factory);app.run();}}*/
}
7. 與工廠方法模式的區別
抽象工廠模式和工廠方法模式是初學者容易混淆的兩個模式。
-
工廠方法模式 (Factory Method):
- 關注點:創建單個產品對象。
- 結構:一個抽象工廠接口(通常只有一個創建方法
factoryMethod()),多個具體工廠實現它來創建不同的具體產品。 - 目的:延遲產品的實例化到子類。
- 解決問題:如何創建一個對象,但讓子類決定具體創建哪個對象。
-
抽象工廠模式 (Abstract Factory):
- 關注點:創建一系列相關的產品對象(一個產品族)。
- 結構:一個抽象工廠接口(包含多個創建不同種類產品的抽象方法,如
createProductA(),createProductB()),多個具體工廠實現它來創建屬于同一個產品族的不同具體產品。 - 目的:提供一個接口,用于創建一系列相關或相互依賴的對象,而無需指定它們具體的類。
- 解決問題:如何創建一組相互關聯/依賴的對象,并保證它們之間是兼容的。
簡單來說:
- 如果你只需要創建一種產品,但希望由子類決定具體創建哪種類型,用工廠方法。
- 如果你需要創建多種產品,這些產品需要配套使用(屬于一個系列/族),并且希望客戶端與具體產品解耦,用抽象工廠。
實際上,抽象工廠模式的實現中,每個具體工廠內部的創建方法(如 createButton())通常可以使用工廠方法模式來實現,或者直接 new 具體產品。
8. 總結
抽象工廠模式是創建型模式中功能最強大但也相對復雜的模式之一。它通過提供一個抽象接口來創建一系列相關的產品對象(產品族),使得客戶端代碼可以獨立于具體的產品實現。這對于需要支持多種產品系列(例如不同的UI主題、不同的數據庫實現)并且希望在它們之間輕松切換的系統非常有用。
記住它的核心:創建產品家族,保證兼容性。


從零實現用MobileFaceNet算法進行實時人臉識別(四)安裝RKNN Toolkit2)


` 和 `關卡藍圖(Level Blueprint)`的關系)


)
