代碼下載
登錄模塊
用戶登錄
頁面結構
新建 Login 組件,對應結構:
export default function Login() {return (<div className={styles.root}><NavHeader className={styles.header}>賬號登錄</NavHeader><form className={styles.form}><input placeholder="請輸入賬號" className={styles.account}></input><input type="password" placeholder="請輸入密碼" className={styles.password}></input><Button color='success' className={styles.login} type="submit">登 錄</Button></form><Link className={styles.backHome} to='/registe'>還沒有賬號,去注冊~</Link></div>)}
功能實現
1、添加狀態 username和password,獲取表單元素值:
const [username, setUsername] = useState('')const [password, setPassword] = useState('')……<input placeholder="請輸入賬號" className={styles.account} onChange={(v) => setUsername(v)}>{username}</input><input type="password" placeholder="請輸入密碼" className={styles.password} onChange={(v) => setPassword(v)}>{password}</input>
2、在form表單的 onSubmit 方法中實現表單提交,通過username和password獲取到賬號和密碼,使用API調用登錄接口,將 username 和 password 作為參數,登錄成功后,將token保存到本地存儲中(hkzf_token)并返回登錄前的頁面:
const navigate = useNavigate()……<form className={styles.form} onSubmit={(e) => {// 阻止默認行為e.preventDefault()// 請求登錄接口instance.post('/user/login', {username, password}).then((data) => {console.log('login data: ', data);const {status, description, body} = dataif (status !== 200) {// 登錄成功localStorage.setItem('hkzf_token', body.token)navigate(-1)} else {// 登錄失敗Toast.show({content: description})}})}}>
表單驗證說明
表單提交前,需要先進性表單驗證,驗證通過后再提交表單:
- 方式一:antd-mobile 組件庫的方式(需要
Form.Item文本輸入組件) - 方法二(推薦):使用更通用的 formik,React中專門用來進行表單處理和表單校驗的庫
formik
- Github地址:formik文檔
- 場景:表單處理,表單驗證
- 優勢:輕松處理React中的復雜表單,包括:獲取表單元素的值,表單驗證和錯誤信息,處理表單提交,并且將這些內容放在一起統一處理,有利于代碼閱讀,重構,測試等
- formik 具體使用
使用 formik 實現表單校驗
- 安裝
npm i formik或yarn add formik - 導入 Formik 組件,根據 render props 模式,使用 Formik 組件包裹Login組件
- 為 Formik 組件提供配置屬性 initialValues,這是初始數據;onSubmit 表單提交的執行函數,通過values獲取到表單元素值,完成登錄邏輯
- Formik 的 children 屬性是一個函數,通過函數參數獲取到values(表單元素值對象),handleSubmit,handleChange
- 使用 values 提供的值設置為表單元素的 value,使用 handleChange 設置為表單元素的 onChange,使用handleSubmit設置為表單的onSubmit
<Formik initialValues={{'username': '', password: ''}}onSubmit={(values) => {console.log('login values: ', values);// 請求登錄接口instance.post('/user/login', {'username': values.username, 'password': values.password}).then((data) => {console.log('login data: ', data);const {status, description, body} = dataif (data.status === 200) {// 登錄成功localStorage.setItem('hkzf_token', body.token)navigate(-1)} else {// 登錄失敗Toast.show({content: description})}})}}>{({values, handleSubmit, handleChange}) => {return <form className={styles.form} onSubmit={handleSubmit}><input name="username" placeholder="請輸入賬號" className={styles.account} onChange={handleChange} value={values.username}></input><input name="password" type="password" placeholder="請輸入密碼" className={styles.password} onChange={handleChange} value={values.password}></input><Button color='success' className={styles.login} type="submit">登 錄</Button></form>}}</Formik>
兩種表單驗證方式:
- 通過給 Formik 組件 配置 validate 屬性手動校驗
- 通過給 Formik 組件 validationSchema 屬性配合Yup來校驗(推薦)
給登錄功能添加表單驗證
1、安裝npm i yup 或 yarn add yup (Yup 文檔),導入Yup
2、在 Formik 組件中添加配置項 validationSchema,使用 Yup 添加表單校驗規則
validationSchema={Yup.object().shape({username: Yup.string().required('賬號為必填項').matches(/^\w{5,8}/, '5~8位的數字、字母、下劃線'),password: Yup.string().required('密碼為必填項').matches(/^\w{5,12}/, '5~8位的數字、字母、下劃線')})}
3、在 Formik 組件中,通過 children 函數屬性獲取到 errors(錯誤信息)和 touched(是否訪問過,注意:需要給表單元素添加 handleBlur 處理失焦點事件才生效!),在表單元素中通過這兩個對象展示表單校驗錯誤信
{({values, handleSubmit, handleChange, errors, touched}) => {return <form className={styles.form} onSubmit={handleSubmit}><input name="username" placeholder="請輸入賬號" className={styles.account} onChange={handleChange} value={values.username}></input>{errors.username && touched.username && <div className={styles.error}>{errors.username}</div>}<input name="password" type="password" placeholder="請輸入密碼" className={styles.password} onChange={handleChange} value={values.password}></input>{errors.password && touched.password && <div className={styles.error}>{errors.password}</div>}<Button color='success' className={styles.login} type="submit">登 錄</Button></form>}}
其他處理:
- 導入 Form 組件,替換 form 元素,去掉onSubmit
- 導入 Field 組件,替換 input 表單元素,去掉onChange,onBlur,value
- 導入 ErrorMessage 組件,替換原來的錯誤消息邏輯代碼
{({values, handleSubmit, handleChange, errors, touched}) => {return <Form className={styles.form}><Field name="username" placeholder="請輸入賬號" className={styles.account}></Field><ErrorMessage name="username" className={styles.error} component='div'></ErrorMessage><Field name="password" type="password" placeholder="請輸入密碼" className={styles.password}></Field><ErrorMessage name="password" className={styles.error} component='div'></ErrorMessage><Button color='success' className={styles.login} type="submit">登 錄</Button></Form>}}
我的頁面
登錄判斷
查詢本地緩存中是否有 token 信息來判斷是否登錄,新建 utils/auth.js 文件,為方便使用封裝如下內容:
// localStorage 中存儲 token 的鍵
const token_key = 'hkzf_token'// 獲取 token
const getToken = () => localStorage.getItem(token_key)// 設置 token
const setToken = (token) => localStorage.setItem(token_key, token)// 刪除 token
const removeToken = () => localStorage.removeItem(token_key)// 判斷是否登錄
const isAuth = !!getToken()export { getToken, setToken, removeToken, isAuth }
頁面結構
我的頁面根據是否登錄展示有所不同:

import styles from "./Profile.module.css";
import { baseUrl } from "../utils/constValue";
import { useState } from "react";
import { isAuth } from "../utils/auth";
import { Grid } from "antd-mobile";
import { useNavigate } from "react-router-dom";// 默認頭像
const DEFAULT_AVATAR = baseUrl + '/img/profile/avatar.png'
// 菜單數據
const menus = [{ id: 1, name: '我的收藏', iconfont: 'icon-coll', to: '/favorate' },{ id: 2, name: '我的出租', iconfont: 'icon-ind', to: '/rent' },{ id: 3, name: '看房記錄', iconfont: 'icon-record' },{ id: 4, name: '成為房主', iconfont: 'icon-identity'},{ id: 5, name: '個人資料', iconfont: 'icon-myinfo' },{ id: 6, name: '聯系我們', iconfont: 'icon-cust' }
]export default function Profile() {const [isLogin, setIsLogin] = useState(isAuth)const [userInfo, setUserInfo] = useState({avatar: '',nickname: ''})const {avatar, nickname} = userInfoconst navigate = useNavigate()return (<div className={styles.root}>{/* 個人信息 */}<div className={styles.title}><img className={styles.bg} src={baseUrl + '/img/profile/bg.png'}></img><div className={styles.info}><div className={styles.myIcon}><img className={styles.avater} src={avatar || DEFAULT_AVATAR} alt="頭像"></img></div><div className={styles.user}><div className={styles.name}>{nickname || '游客'}</div><span className={isLogin ? styles.logout : styles.login}>{isLogin ? '退出' : '去登錄'}</span></div><div className={styles.edit}>編輯個人資料<span className={styles.arrow}><i className="iconfont icon-arrow" /></span></div></div></div>{/* 九宮格菜單 */}<Grid columns={3} gap={8} className={styles.grid}>{menus.map((item) => {console.log('item: ', item);return <Grid.Item key={item.id} onClick={() => {if (item.to) navigate(item.to)}}><div className={styles.menusItem}><span className={'iconfont ' + item.iconfont}></span><span>{item.name}</span></div></Grid.Item>})}</Grid>{/* 加入我們 */}<div className={styles.add}><img src={baseUrl + '/img/profile/join.png'} alt=""></img></div></div>)
}
添加兩個狀態 isLogin(是否登錄)和 userInfo(用戶信息),從 utils/auth 中導入 isAuth 來判斷是否登錄。如果沒有登錄,渲染未登錄信息;如果已登錄,就渲染個人資料數據。
去登錄與退出
- 給去登錄、退出按鈕綁定點擊事件
- 點擊去登錄按鈕,直接導航到登錄頁面
- 點擊退出按鈕,彈出 Modal 對話框,提示是否確定退出。先調用退出接口(讓服務器端退出),再移除本地token(本地退出)、把登錄狀態 isLogin 設置為 false、清空用戶狀態對象。
<span className={isLogin ? styles.logout : styles.login} onClick={() => {if (isLogin) {Modal.show({title: '提示',content: '是否確定退出?',closeOnAction: true,actions: [{key: 'cancel',text: '取消'},{key: 'confirm',text: '退出',primary: true,onClick: () => {instance.post('/user/logout').finally((data) => {console.log('logout data: ', data);// 移除 tokenremoveToken()setIsLogin(isAuth)// 清除用戶信息setUserInfo({avatar: '',nickname: ''})})}}]})} else {navigate('/login')}}}>{isLogin ? '退出' : '去登錄'}</span>
獲取用戶信息
如果已登錄,就使用 useEffect 根據接口發送請求,獲取用戶個人資料
useEffect(() => {let ignore = falseif (isLogin) {instance.get('/user', {headers: {authorization: getToken()}}).then((data) => {if (!ignore) {if (data.status === 200) {setUserInfo(data.body)}}})}return () => ignore = true}, [isLogin])
登錄訪問控制
項目中的兩種類型的功能和兩種類型的頁面:
兩種功能:
- 登錄后才能進行操作(比如:獲取個人資料)
- 不需要登錄就可以操作(比如:獲取房屋列表)
兩種頁面:
- 需要登錄才能訪問(比如:發布房源頁)
- 不需要登錄即可訪問(比如:首頁)
對于需要登錄才能操作的功能使用 axios 攔截器 進行處理(比如:統一添加請求頭 authorization等);對于需要登錄才能訪問的頁面使用 路由控制
功能處理-使用axios攔截器統一處理token
在 api.js 中,添加請求攔截器 instance.interceptors.request.user(),獲取到當前請求的接口路徑(url),判斷接口路徑,是否是以/user 開頭,并且不是登錄或注冊接口(只給需要的接口添加請求頭),如果是,就添加請求頭Authorization:
// 請求攔截器
instance.interceptors.request.use((config) => {// 統一打印接口請求參數日志console.log('request url: ', config.baseURL + config.url);console.log('request params: ', config.params);console.log('request headers: ', config.headers);console.log('request data: ', config.data);// 統一顯示加載提示const {url} = configToast.show({icon: 'loading', duration: 0, content: '加載中…', maskClickable: false})// 統一判斷請求url路徑添加請求頭if (url.startsWith('/user') && !url.startsWith('/user/login') && !url.startsWith('/user/registered')) {config.headers.Authorization = getToken()}return config
})
添加響應攔截器 instance.interceptors.response.use(),判斷返回值中的狀態碼如果是 400 表示 token 失效,如果 data 中的狀態碼是 400 表示接口沒有傳遞 token,則直接移除 token 并更新 isLogin 狀態:
// 響應攔截器
instance.interceptors.response.use((res) => {// 統一打印接口響應數據日志console.log('response data: ', res);// 清除加載提示Toast.clear()// 統一判斷 token 是否失效或者被清除const {status} = res.dataif (status === 400 || res.data.status === 400) {if (isAuth) {removeToken()}if (instance.setIsLogin) {instance.setIsLogin(isAuth())}}return res.data
}, (error) => {// 統一打印接口響應錯誤日志console.log('response error: ', error);// 清除加載提示Toast.clear()return Promise.reject(error)
})
頁面處理-路由鑒權
限制某個頁面只能在登陸的情況下訪問,但是在React路由中并沒有直接提供該該功能,需要手動封裝來實現登陸訪問控制(類似與Vue路由的導航守衛)。
react-router-dom的文檔,實際上就是通過 Context 對原來路由系統做了一次包裝,來實現一些額外的功能。
1、在 utils/auth.js 中添加 是否登錄 和 設置是否登錄 的 Context,并將它們導出:
// 是否登錄 Context
const isLoginContext = createContext(isAuth())// 設置是否登錄 Context
const setIsLoginContext = createContext(null)
2、在components目錄中創建 AuthRoute.js 文件,創建組件AuthRoute并導出,添加狀態 isLogin 并將 setIsLogin 函數傳遞給網絡層,讓后將原來的路由系統包裹在 isLoginContext 和 setIsLoginContext 中:
export default function AuthRoute() {const [isLogin, setIsLogin] = useState(useContext(isLoginContext))// 將修改登錄狀態函數傳遞給網絡層instance.setIsLogin = setIsLoginreturn <isLoginContext.Provider value={isLogin}><setIsLoginContext.Provider value={setIsLogin}><Router><Routes>{/* 路由重定向 */}<Route path='/' element={<Navigate to='/home' replace></Navigate>}></Route>{/* 父路由 */}<Route path='/' element={<App></App>}>{/* 子路由 */}<Route path='/home' element={<Home></Home>}></Route><Route path='/house' element={<House></House>}></Route><Route path='/news' element={<News></News>}></Route><Route path='/profile' element={<Profile></Profile>}></Route></Route><Route path='/cityList' element={<CityList></CityList>}></Route><Route path='/map' element={<Map></Map>}></Route><Route path='/detail/:id' element={<HouseDetail></HouseDetail>}></Route><Route path='/login' element={<Login></Login>}></Route></Routes></Router></setIsLoginContext.Provider></isLoginContext.Provider>
}
3、在components目錄中創建 AuthRoute.js 文件中定義一個 loginRoute 函數,根據是否登錄來返回對應的 Rute 組件(如果沒有登陸,就重定向到登陸頁面,并指定登陸成功后腰跳轉的頁面路徑,并使用 replace 模式):
function loginRoute(isLogin) { return (route) => {if (isLogin) {return route}return <Route path={route.props.path} element={<Navigate to='/login' state={{from: {pathname: route.props.path}}} replace></Navigate>}></Route>}}
4、將啟動文件 index.js 中的路由系統刪除,由新的 <AuthRoute></AuthRoute> 組件代替:
const root = ReactDOM.createRoot(document.getElementById('root'));
root.render(<React.StrictMode><AuthRoute></AuthRoute></React.StrictMode>
);
修改登錄成功跳轉
- 登陸成功后使用 setToken 清除 token并使用 Context 更新登錄狀態,判斷是否需要跳轉到用戶想要訪問的頁面(使用 useLocation 獲取路由的 state 參數, 判斷 state.form 是否有值)
- 如果不需要,則直接調用history.go(-1) 返回上一頁
- 如果需要,就跳轉到
from.pathname指定的頁面(推薦使用replace方法模式)
const {state} = useLocation()const setIsLogin = useContext(setIsLoginContext)……// 請求登錄接口instance.post('/user/login', {'username': values.username, 'password': values.password}).then((data) => {console.log('login data: ', data);const {description, body} = dataif (data.status === 200) {// 登錄成功setToken(body.token)setIsLogin(isAuth())if (state && state.form) {navigate(state.form.pathname, {replace: true})} else {navigate(-1)}} else {// 登錄失敗Toast.show({content: description})}})
修改我的頁面的登錄狀態
用 Context 將原來的 isLogin 狀態替換:
// const [isLogin, setIsLogin] = useState(isAuth())const isLogin = useContext(isLoginContext)const setIsLogin = useContext(setIsLoginContext)
收藏模塊
檢查房源是否收藏
- 在 HouseDetail 頁面中添加狀態 isFavorite(表示是否收藏),默認值是false
- 使用 useEffect,在進入房源詳情頁面時執行
- 先調用isAuth方法,來判斷是否登陸
- 如果未登錄,直接return,不再檢查是否收藏
- 如果已登陸,從路由參數中,獲取當前房屋id
- 使用API調用接口,查詢該房源是否收藏
- 如果返回狀態碼為200,就更新isFavorite;否則,不做任何處理
// 收藏const [isFavorite, setIsFavorite] = useState(false)useEffect(() => {let ignore = false// 登錄才獲取收藏數據if (isAuth()) {instance.get('/user/favorites/' + routerParams.id).then((data) => {if (!ignore) {console.log('favorite data: ', data);if (data.status === 200) {setIsFavorite(data.body.isFavorite)}}})}return () => ignore = true}, [])
在 HouseDetail 頁面結構中,通過狀態isFavorite修改收藏按鈕的文字和圖片內容:
{/* 底部欄工具欄 */}<div className={styles.footer}><div className={styles.favorite}><imgsrc={baseUrl + (isFavorite ? '/img/star.png' : '/img/unstar.png')}className={styles.favoriteImg}alt="收藏"/><span className={styles.favoriteTxt}>{isFavorite ? '已收藏' : '收藏'}</span></div><div className={styles.consult}>在線咨詢</div><div className={styles.telephone}><a href="tel:400-618-4000" className={styles.telephoneTxt}>電話預約</a></div></div>
收藏房源
- 給收藏按鈕綁定點擊事件,調用isAuth方法,判斷是否登陸
- 如果未登錄,則使用
Toast.show提示用戶是否去登陸;如果點擊取消,則不做任何操作;如果點擊去登陸,就跳轉到登陸頁面,同時傳遞state(登陸后,再回到房源收藏頁面) - 如果已登錄則根據 isFavorite 判斷當前房源是否收藏,如果未收藏,就調用添加收藏接口,添加收藏;如果收藏了,就調用刪除接口,刪除收藏
<div className={styles.favorite} onClick={async () => {if (isAuth()) {// 已登錄if (isFavorite) {// 已收藏const deleteData = await instance.delete('/user/favorites/' + routerParams.id)console.log('delete data: ', deleteData);if (deleteData.status === 200) {Toast.show('已取消收藏')setIsFavorite(false)} else {Toast.show('登錄超時,請重新登錄')}} else {// 未收藏const postData = await instance.post('/user/favorites/' + routerParams.id)console.log('post data: ', postData);if (postData.status === 200) {Toast.show('已收藏')setIsFavorite(true)} else {Toast.show('登錄超時,請重新登錄')}}} else {// 未登錄Modal.show({title: '提示',content: '登錄后才能收藏房源,是否去登錄?',closeOnAction: true,actions: [{key: 'cancel',text: '取消'},{key: 'confirm',text: '去登錄',primary: true,onClick: async () => navigate('/login', {state: {from: 'location'}})}]})}}}><imgsrc={baseUrl + (isFavorite ? '/img/star.png' : '/img/unstar.png')}className={styles.favoriteImg}alt="收藏"/><span className={styles.favoriteTxt}>{isFavorite ? '已收藏' : '收藏'}</span></div>
房源發布模塊
主要功能為獲取房源的小區信息,房源圖片上傳,房源發布等。
前期準備
1、將 House 頁面中沒有找到房源時顯示的內容封裝成一個公共組件 NoHouse,并將其children屬性校驗為設置為 node(任何可以渲染的內容):
import styles from "./NoHouse.module.css";
import PropTypes from "prop-types";export function NoHouse(props) {return <div className={styles.noData}><img className={styles.img} src={baseUrl + '/img/not-found.png'} alt="暫無數據"/><p className={styles.msg}>{props.children}</p></div>
}NoHouse.propTypes = {//  node(任何可以渲染的內容)children: PropTypes.node.isRequired
}
2、將 HouseDetail 頁面中房屋配置的內容封裝成一個公共組件 HousePackage,并為 onSelect 屬性設置默認值:
export default function HousePackage({supporting = [], onSelect = () => {}}) {// 選中的配套名稱console.log('supporting: ', supporting);const [selectedNames, setSelectedNames] = useState(supporting)return (<>{/* 房屋配套 */}<div className={styles.aboutList}>{HOUSE_PACKAGE.map((item, i) => {const si = selectedNames.indexOf(item.name)return <div className={styles.aboutItem + (si > -1 ? ' ' + styles.aboutActive : '')} key={item.id} onClick={() => {console.log('si: ', si);const newNames = [...selectedNames]if (si > -1) {newNames.splice(si, 1)} else {newNames.push(item.name)}// 修改選中setSelectedNames(newNames)// 將值傳遞給父組件onSelect(newNames)}}><p className={styles.aboutValue}><i className={`iconfont ${item.icon} ${styles.icon}`} /></p><div>{item.name}</div></div>})}</div></>)
}HousePackage.propTypes = {supporting: PropTypes.string,onSelect: PropTypes.func
}
3、創建了三個頁面組件 Rent(已發布房源列表)、RentAdd(發布房源)、RentSearch(關鍵詞搜索校區信息),并為 Rent 組件構建如下布局:
function renderNoHouse() {return <NoHouse>您還沒有房源,<Link to='/rent/add' className={styles.link}>去發布房源</Link>吧~</NoHouse>
}
function renderList(list, navigate) {return list.map((value) => {return <HouseItem key={value.houseCode} item={value} onClick={() => {navigate('/detail/' + value.houseCode)}}></HouseItem>})
}
export default function Rent() {// 獲取已發布房源數據const {data: rentData} = useData.get('/user/houses')console.log('rent data: ', rentData);const list = rentData && rentData.body ? rentData.body : []const navigate = useNavigate()return (<div className={styles.root}><NavHeader className={styles.navigate}>房屋管理</NavHeader>{list.length > 0 ? renderList(list, navigate) : renderNoHouse()}</div>)
}
4、在 AuthRoute 中導入 Rent、RentAdd、RentSearch 3個頁面組件,使用 loginRoute 函數配置3個對應的路由規則:
{loginRoute(isLogin)(<Route path='/rent' element={<Rent></Rent>}></Route>)}{loginRoute(isLogin)(<Route path='/rent/add' element={<RentAdd></RentAdd>}></Route>)}{loginRoute(isLogin)(<Route path='/rent/search' element={<RentSearch></RentSearch>}></Route>)}
搜索小區
關鍵詞搜索小區信息分析:
- 給 SearchBar 組件添加 onChange 事件獲取文本框的值,判斷當前文本框的值是否為空(如果為空,清空列表,然后return,不再發送請求;如果不為空,使用API發送請求,獲取小區數據),使用定時器來延遲搜索,提升性能
- 給搜索列表項添加點擊事件,使用 useNavigate 跳轉到發布房源頁面,將被點擊的校區信息作為數據一起傳遞過去
防抖:搜索欄中每輸入一個值,就發一次請求,這樣對服務器壓力比較大,用戶體驗不好。解決方式:使用定時器來進行延遲執行(關鍵詞:JS文本框輸入 防抖)
import { SearchBar } from "antd-mobile";
import styles from "./RentSearch.module.css";
import { useState } from "react";
import { instance } from "../utils/api";
import useCurrentCity from "../utils/useCurrentCity";
import { replace, useNavigate } from "react-router-dom";let timer = nullexport function RentSearch() {const [searchText, setSearchText] = useState('')const {currentCity} = useCurrentCity()const [list, setList] = useState([])console.log('current city: ', currentCity);const navigate = useNavigate()return <div className={styles.root}>{/* 搜索欄 */}<SearchBar className={styles.searchBar} placeholder="請輸入小區名稱" showCancelButton value={searchText} onChange={(value) => {console.log('searchText: ', value);if (value) {console.log('timer: ', timer);if (timer) {clearTimeout(timer)timer = null}timer = setTimeout(() => {instance.get('/area/community', {params: {name: value, id: currentCity.value}}).then((data) => {console.log('search data: ', data);setList(data.body)})}, 500);} else {setList([])}setSearchText(value)}}></SearchBar>{/* 搜索項 */}<ul className={styles.list}>{list.map((v) => <li key={v.community} className={styles.item} onClick={() => {navigate('/rent/add', {replace: true, state: {community: v}})}}>{v.communityName}</li>)}</ul></div>
}
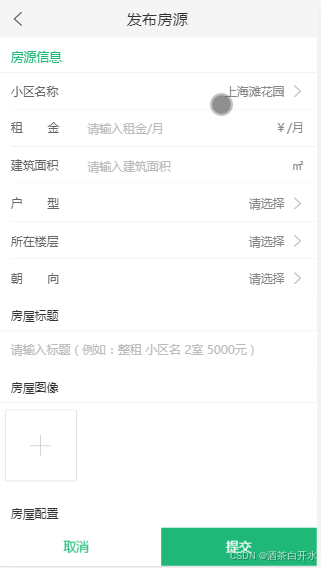
發布房源
使用 ImageUploader, Input, List, Modal, Picker, TextArea 等組件搭建頁面結構并實現功能:
// 房屋類型
const roomTypeData = [{ label: '一室', value: 'ROOM|d4a692e4-a177-37fd' },{ label: '二室', value: 'ROOM|d1a00384-5801-d5cd' },{ label: '三室', value: 'ROOM|20903ae0-c7bc-f2e2' },{ label: '四室', value: 'ROOM|ce2a5daa-811d-2f49' },{ label: '四室+', value: 'ROOM|2731c38c-5b19-ff7f' }
]// 朝向:
const orientedData = [{ label: '東', value: 'ORIEN|141b98bf-1ad0-11e3' },{ label: '西', value: 'ORIEN|103fb3aa-e8b4-de0e' },{ label: '南', value: 'ORIEN|61e99445-e95e-7f37' },{ label: '北', value: 'ORIEN|caa6f80b-b764-c2df' },{ label: '東南', value: 'ORIEN|dfb1b36b-e0d1-0977' },{ label: '東北', value: 'ORIEN|67ac2205-7e0f-c057' },{ label: '西南', value: 'ORIEN|2354e89e-3918-9cef' },{ label: '西北', value: 'ORIEN|80795f1a-e32f-feb9' }
]// 樓層
const floorData = [{ label: '高樓層', value: 'FLOOR|1' },{ label: '中樓層', value: 'FLOOR|2' },{ label: '低樓層', value: 'FLOOR|3' }
]// 獲取數據列表中 value 對應的 label 值
const labelForValue = (data, value) => {for (let index = 0; index < data.length; index++) {const element = data[index];if (element.value === value) {return element.label}}return null
}export default function RentAdd() {const {state} = useLocation()const navigate = useNavigate()const [info, setInfo] = useState({community: state ? state.community : {}})return <div className={styles.root}><NavHeader className={styles.navHeader}>發布房源</NavHeader><div className={styles.content}><List className={styles.header} header='房源信息'><List.Item prefix={<label>小區名稱</label>} extra={info.community.communityName || '請選擇'} clickable onClick={() => navigate('/rent/search')}></List.Item><List.Item prefix={<label htmlFor='price'>租 金</label>} extra='¥/月'><Input id="price" placeholder="請輸入租金/月" value={info.price} onChange={(v) => {const newInfo = {...info}newInfo.price = vsetInfo(newInfo)}}></Input></List.Item><List.Item prefix={<label htmlFor='size'>建筑面積</label>} extra='m2'><Input id="size" placeholder="請輸入建筑面積" value={info.size} onChange={(v) => {const newInfo = {...info}newInfo.size = vsetInfo(newInfo)}}></Input></List.Item><Picker columns={[roomTypeData]} value={[info.roomType]} onConfirm={(v) => {console.log('room type value: ', v)const newInfo = {...info}newInfo.roomType = v[0]setInfo(newInfo)}}>{(_, actions) => {return <List.Item prefix={<label>戶 型</label>} extra={labelForValue(roomTypeData, info.roomType) || '請選擇'} clickable onClick={actions.open}></List.Item>}}</Picker><Picker columns={[floorData]} value={[info.floor]} onConfirm={(v) => {console.log('floor value: ', v)const newInfo = {...info}newInfo.floor = v[0]setInfo(newInfo)}}>{(_, actions) => {return <List.Item prefix={<label>所在樓層</label>} extra={labelForValue(floorData, info.floor) || '請選擇'} clickable onClick={actions.open}></List.Item>}}</Picker><Picker columns={[orientedData]} value={[info.oriented]} onConfirm={(v) => {console.log('oriented value: ', v)const newInfo = {...info}newInfo.oriented = v[0]setInfo(newInfo)}}>{(_, actions) => {return <List.Item prefix={<label>朝 向</label>} extra={labelForValue(orientedData, info.oriented) || '請選擇'} clickable onClick={actions.open}></List.Item>}}</Picker></List><List header='房屋標題'><List.Item><Input placeholder="請輸入標題(例如:整租 小區名 2室 5000元)" value={info.title} onChange={(v) => {const newInfo = {...info}newInfo.title = vsetInfo(newInfo)}}></Input></List.Item></List><List header='房屋圖像'><List.Item><ImageUploader value={info.houseImg} multiple maxCount={9} showUpload={info.houseImg ? info.houseImg.length < 9 : true} onCountExceed={(exceed) => Toast.show(`最多選擇 9 張圖片,您多選了 ${exceed} 張`)} onChange={(v) => {console.log('temp slides value: ', v);const newInfo = {...info}newInfo.houseImg = vconsole.log('new info: ', newInfo);setInfo(newInfo)}} upload={async (file) => {console.log('file: ', file);const fd = new FormData()fd.append('file', file)const data = await instance.post('/houses/image', fd, {headers: {'Content-Type': 'multipart/form-data'}})console.log('image data: ', data);if (data.status === 200) {const url = data.body[0]return {url: baseUrl + data.body[0]}}}}></ImageUploader></List.Item></List><List header='房屋配置'><List.Item><HousePackage onSelect={(names) => {const newInfo = {...info}newInfo.supporting = names.join('|')setInfo(newInfo)}}></HousePackage></List.Item></List><List header='房屋描述'><List.Item><TextArea placeholder="請輸入房屋描述信息" value={info.description} rows={5} onChange={(v) => {const newInfo = {...info}newInfo.description = vsetInfo(newInfo)}}></TextArea></List.Item></List><div className={styles.bottom}><div className={styles.cancel} onClick={() => {Modal.show({title: '提示',content: '放棄發布房源?',closeOnAction: true,actions: [{key: 'cancel',text: '放棄',onClick: () => {navigate(-1)}},{key: 'edit',text: '繼續編輯',primary: true}]})}}>取消</div><div className={styles.confirm} onClick={() => {console.log('confirm info: ', info);const params = {...info}if (info.community) {params.community = info.community.community}if (info.houseImg) {const imgs = info.houseImg.map((v) => v.url.replace(baseUrl, ''))params.houseImg = imgs.join('|')}console.log('confirm params: ', params);instance.post('/user/houses', params).then((data) => {console.log('add houses data: ', data);if (data.status === 200) {navigate('/rent')} else {Toast.show('服務開小差,請稍后再試!')}})}}>提交</div></div></div></div>
}
說明:
- 上傳房屋圖片,創建 FormData 對象,調用圖片上傳接口傳遞 form 參數,并設置請求頭 Content-Type 為 multipart/form-data,通過接口返回值獲取到圖片路徑
- 發布房源,從 state 里面獲取到所有的房屋數據,調用發布房源接口傳遞所有房屋數據。
項目打包
create-react-app 腳手架的 打包文檔說明。
簡易打包
1、在根目錄創建 .env.production 文件,配置生產環境變量:
REACT_APP_URL = http://localhost:8080REACT_APP_TIME_OUT = 10000
2、打開終端進入項目根目錄,輸入命令 npm run build 或 yarn build進行項目打包,生成build文件夾(打包好的項目內容),將build目錄中的文件內容,部署到都服務器中即可。
出現以下提示,就代表打包成功,在根目錄中就會生成一個build文件夾:
Search for the keywords to learn more about each warning.
To ignore, add // eslint-disable-next-line to the line before.File sizes after gzip:209.02 kB  build/static/js/main.b6b1c41b.js10.47 kB   build/static/css/main.ef78ebb8.css1.79 kB    build/static/js/453.b9229bd0.chunk.jsThe project was built assuming it is hosted at /.
You can control this with the homepage field in your package.json.The build folder is ready to be deployed.
You may serve it with a static server:npm install -g serveserve -s buildFind out more about deployment here:https://cra.link/deployment
3、也可以通過終端中的提示,使用 serve-s build 來本地查看(需要全局安裝工具包 serve)
腳手架的配置說明
create-react-app 中隱藏了 webpack的配置,隱藏在react-scripts包中,兩種方式來修改:
- 運行命令
npm run eject釋放 webpack配置(注意:不可逆) - 通過第三方包重寫 webpack配置(比如:react-app-rewired 等)
eject 說明:
如果對構建工具和配置選擇不滿意可以eject隨時進行。此命令將從項目中刪除單個構建依賴項。
相反,它會將所有配置文件和傳遞依賴項(Webpack,Babel,ESLint等)作為依賴項復制到項目中package.json。從技術上講,依賴關系和開發依賴關系之間的區別對于生成靜態包的前端應用程序來說是非常隨意的。此外,它曾經導致某些托管平臺出現問題,這些托管平臺沒有安裝開發依賴項(因此無法在服務器上構建項目或在部署之前對其進行測試)。可以根據需要自由重新排列依賴項package.json。
除了eject仍然可以使用所有命令,但它們將指向復制的腳本,以便可以調整它們。在這一點上是獨立的。
不必使用eject,策劃的功能集適用于中小型部署,不應覺得有義務使用此功能。但是我們知道如果準備好它時無法自定義此工具將無用。
antd-mobile 按需加載
1、安裝 npm install react-app-rewired customize-cra --save-dev 用于腳手架重寫配置
2、修改package.json 中的 scripts:
"scripts": {"start": "react-app-rewired start","build": "react-app-rewired build","test": "react-scripts test","eject": "react-scripts eject"}
3、安裝 npm install babel-plugin-import --save-dev 插件,用于按需加載組件代碼和樣式
4、在項目根目錄創建文件 config-overrides.js 用于覆蓋腳手架默認配置:
const { override, fixBabelImports } = require('customize-cra')module.exports = override(fixBabelImports('import', {libraryName: 'antd-moble',style: 'css'})
)
5、重新打包,發現兩次打包的體積并沒有變化
打開 Ant Design 按需加載文檔,會發現
antd默認支持基于 ES modules 的 tree shaking,直接引入import { Button } from 'antd';就會有按需加載的效果。
基于路由代碼分割(路由懶加載)
將代碼按照路由進行分割,只在訪問該路由的時候才加載該組件內容,提高首屏加載速度。通過 React.lazy() 方法 + import() 方法、Suspense組件來實現,(React Code-Splitting文檔)。
- React.lazy() 作用: 處理動態導入的組件,讓其像普通組件一樣使用
- import(‘組件路徑’),作用:告訴webpack,這是一個代碼分割點,進行代碼分割
- Suspense組件:用來在動態組件加載完成之前,顯示一些loading內容,需要包裹動態組件內容
在 AuthRoute.js 文件中做如下調整:
import App from '../App.js'
import { BrowserRouter as Router, Routes, Route, Navigate } from "react-router-dom";
import { isLoginContext, setIsLoginContext } from "../utils/auth.js";
import React, { useContext, useState } from "react";
import { instance } from "../utils/api.js";// import Home from '../pages/Home';
// import House from '../pages/House.js';
// import News from '../pages/News.js';
// import Profile from '../pages/Profile.js';
// import CityList from '../pages/CityList';
// import Map from '../pages/Map.js';
// import HouseDetail from "../pages/HouseDetail.js";
// import Login from '../pages/Login.js';
// import Rent from "../pages/Rent.js";
// import RentAdd from "../pages/RentAdd.js";
// import RentSearch from "../pages/RentSearch.js";
// import FormikLearn from "../pages/FormikLearn.js";const Home = React.lazy(() => import('../pages/Home'))
const House = React.lazy(() => import('../pages/House.js'))
const News = React.lazy(() => import('../pages/News.js'))
const Profile = React.lazy(() => import('../pages/Profile.js'))
const CityList = React.lazy(() => import('../pages/CityList'))
const Map = React.lazy(() => import('../pages/Map.js'))
const HouseDetail = React.lazy(() => import('../pages/HouseDetail.js'))
const Login = React.lazy(() => import('../pages/Login.js'))
const Rent = React.lazy(() => import('../pages/Rent.js'))
const RentAdd = React.lazy(() => import('../pages/RentAdd.js'))
const RentSearch = React.lazy(() => import('../pages/RentSearch.js'))
const FormikLearn = React.lazy(() => import('../pages/FormikLearn.js'))function loginRoute(isLogin) { return (route) => {console.log('AuthRoute isLogin: ', isLogin);if (isLogin) {return route}return <Route path={route.props.path} element={<Navigate to='/login' state={{from: {pathname: route.props.path}}} replace></Navigate>}></Route>}
}export default function AuthRoute() {const [isLogin, setIsLogin] = useState(useContext(isLoginContext))// 將修改登錄狀態函數傳遞給網絡層instance.setIsLogin = setIsLoginreturn <isLoginContext.Provider value={isLogin}><setIsLoginContext.Provider value={setIsLogin}><React.Suspense><Router><Routes>{/* 路由重定向 */}<Route path='/' element={<Navigate to='/home' replace></Navigate>}></Route>{/* 父路由 */}<Route path='/' element={<App></App>}>{/* 子路由 */}<Route path='/home' element={<Home></Home>}></Route><Route path='/house' element={<House></House>}></Route><Route path='/news' element={<News></News>}></Route><Route path='/profile' element={<Profile></Profile>}></Route></Route><Route path='/cityList' element={<CityList></CityList>}></Route><Route path='/map' element={<Map></Map>}></Route><Route path='/detail/:id' element={<HouseDetail></HouseDetail>}></Route><Route path='/login' element={<Login></Login>}></Route>{loginRoute(isLogin)(<Route path='/rent' element={<Rent></Rent>}></Route>)}{loginRoute(isLogin)(<Route path='/rent/add' element={<RentAdd></RentAdd>}></Route>)}{loginRoute(isLogin)(<Route path='/rent/search' element={<RentSearch></RentSearch>}></Route>)}<Route path='/formik' element={<FormikLearn></FormikLearn>}></Route></Routes></Router></React.Suspense></setIsLoginContext.Provider></isLoginContext.Provider>
}
其他性能優化
1、react-virtualized只加載用到的組件 文檔,如果只使用少量的組件并增加應用程序的包大小,可以直接導入需要的組件,像這樣:
// import { List, AutoSizer, InfiniteLoader } from "react-virtualized";
import AutoSizer from "react-virtualized/dist/commonjs/AutoSizer";
import List from 'react-virtualized/dist/commonjs/List';
import InfiniteLoader from 'react-virtualized/dist/commonjs/InfiniteLoader';
2、腳手架配置解決跨域問題,代理 API 請求 文檔,首先,使用 npm 或 Yarn 安裝 http-proxy-middleware:
npm install http-proxy-middleware --save
$ # or
$ yarn add http-proxy-middleware
接下來,創建 src/setupProxy.js 現在可以根據需要注冊代理:
const { createProxyMiddleware } = require('http-proxy-middleware');module.exports = function (app) {app.use('/api',createProxyMiddleware({target: 'http://localhost:5000',changeOrigin: true,}));
};
注意:不需要將此文件導入到任何地方。當啟動開發服務器時,它會自動注冊。該文件僅支持 Node 的 JavaScript 語法。確保僅使用受支持的語言功能(即不支持 Flow、ES 模塊等)。將路徑傳遞給代理函數允許在路徑上使用通配符和/或模式匹配,這比快速路由匹配更靈活。

)
)


,并保存到 JSON 文件中)


)
是如何生成文本的!)
)
)

藍橋杯準備(需要寫的基礎))