Python----計算機視覺處理(Opencv:道路檢測之道路透視變換)
Python----計算機視覺處理(Opencv:道路檢測之提取車道線)
Python----計算機視覺處理(Opencv:道路檢測之車道線擬合)
Python----計算機視覺處理(Opencv:道路檢測之車道線顯示)
一、透視變換
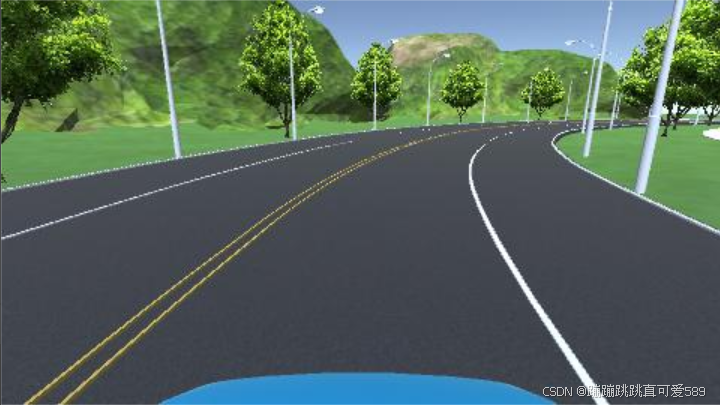
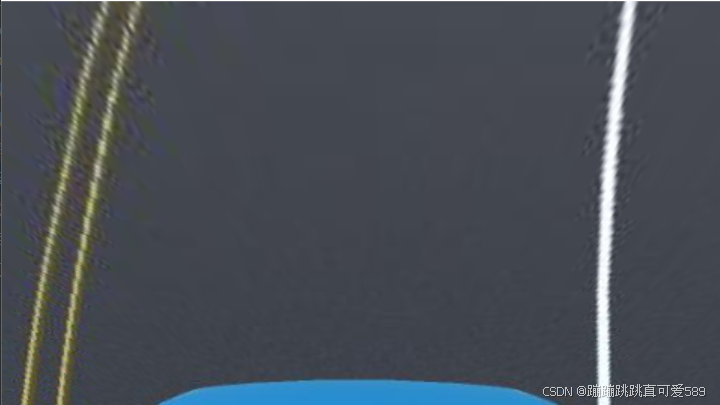
def img_to_wrp(img):height, width,_= img.shape # 獲取輸入圖像的高度和寬度# 定義源點(透視變換前的點)src = np.float32([[width // 2 - 75, height // 2], # 左側車道線的源點[width // 2 + 100, height // 2], # 右側車道線的源點[0, height], # 底部左側點[width, height] # 底部右側點])# 定義目標點(透視變換后的點)dst = np.float32([[0, 0], # 目標左上角[width, 0], # 目標右上角[0, height], # 目標左下角[width, height] # 目標右下角])# 計算透視變換矩陣M = cv2.getPerspectiveTransform(src, dst)# 計算逆透視變換矩陣W = cv2.getPerspectiveTransform(dst, src)# 應用透視變換img_wrp = cv2.warpPerspective(img, M, (width, height), flags=cv2.INTER_LINEAR)return img_wrp, W # 返回透視變換后的圖像和逆變換矩陣????????這段代碼的作用是對輸入圖像進行透視變換,以便為后續的車道線檢測做好準備。
????????首先,它獲取輸入圖像的高度和寬度,并定義源點(`src`),這些點是透視變換前車道線和底邊的具體位置。源點的選取基于圖像中車道線的預期位置,以確保透視變換能夠有效地將車道區域從圖像的視角轉變為一個鳥瞰視圖。
????????接下來,定義目標點(`dst`),這些點表示在透視變換后的標準位置,即四個角分別為上左、上右、下左和下右,以便將車道區域展現為一個矩形。
????????然后,通過 `cv2.getPerspectiveTransform` 計算透視變換矩陣 `M`,同時也計算出逆變換矩陣 `W`。
????????最后,使用 `cv2.warpPerspective` 應用透視變換,將輸入圖像轉換為新的視角,輸出變換后的圖像 `img_wrp` 和逆變換矩陣 `W`,這為后續的圖像處理和車道線繪制提供了良好的基礎。
二、提取車道線


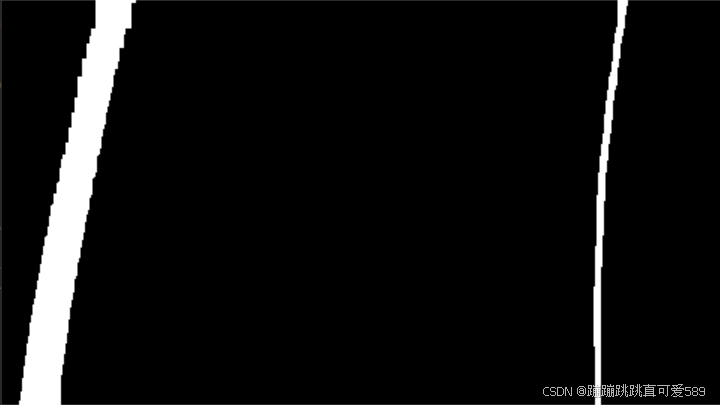
def img_road_show1(img):img_Gaussian = cv2.GaussianBlur(img, (7, 7), sigmaX=1) # 對圖像進行高斯模糊,減少噪聲img_gray = cv2.cvtColor(img_Gaussian, cv2.COLOR_BGR2GRAY) # 將模糊后的圖像轉換為灰度圖像img_Sobel = cv2.Sobel(img_gray, -1, dx=1, dy=0) # 使用Sobel算子進行邊緣檢測,提取水平邊緣ret, img_threshold = cv2.threshold(img_Sobel, 127, 255, cv2.THRESH_BINARY) # 二值化處理kernel = np.ones((11, 11), np.uint8) # 創建一個11x11的結構元素img_dilate = cv2.dilate(img_threshold, kernel, iterations=2) # 膨脹操作,增強白色區域img_erode = cv2.erode(img_dilate, kernel, iterations=2) # 腐蝕操作,去除小噪聲return img_erode # 返回處理后的圖像def img_road_show2(img):# 將圖像從BGR顏色空間轉換為HLS顏色空間img_hls = cv2.cvtColor(img, cv2.COLOR_BGR2HLS)# 提取亮度通道l_channel = img_hls[:, :, 1]# 將亮度通道進行歸一化處理l_channel = l_channel / np.max(l_channel) * 255# 創建與亮度通道同樣大小的零數組binary_output1 = np.zeros_like(l_channel)# 根據亮度閾值提取車道線區域(亮度值范圍為220到255)binary_output1[(l_channel > 220) & (l_channel < 255)] = 1# 提取黃色車道線img_lab = cv2.cvtColor(img, cv2.COLOR_BGR2Lab) # 將圖像轉換為Lab顏色空間# 將圖像的下部分設置為黑色,以減少干擾img_lab[:, 240:, :] = (0, 0, 0)# 提取Lab顏色空間中的藍色通道lab_b = img_lab[:, :, 2]# 如果藍色通道的最大值大于100則歸一化處理if np.max(lab_b) > 100:lab_b = lab_b / np.max(lab_b) * 255# 創建與亮度通道同樣大小的零數組binary_output2 = np.zeros_like(l_channel)# 根據藍色通道的閾值提取車道線區域(藍色值范圍為212到220)binary_output2[(lab_b > 212) & (lab_b < 220)] = 1# 創建結構元素,用于形態學操作kernel = np.ones((15, 15), np.uint8)# 對binary_output2進行膨脹操作,以增強車道線binary_output2 = cv2.dilate(binary_output2, kernel, iterations=1)# 對膨脹后的圖像進行兩次腐蝕操作,去除小噪聲binary_output2 = cv2.erode(binary_output2, kernel, iterations=1)binary_output2 = cv2.erode(binary_output2, kernel, iterations=1)# 創建一個與binary_output1同樣大小的零數組binary_output = np.zeros_like(binary_output1)# 將兩個二值輸出結合,提取最終車道線區域binary_output[(binary_output1 == 1) | (binary_output2 == 1)] = 1# 對最終的二值輸出進行膨脹處理kernel = np.ones((15, 15), np.uint8)img_dilate_binary_output = cv2.dilate(binary_output, kernel, iterations=1)# 對膨脹后的圖像進行腐蝕處理,以便進一步去噪聲img_erode_binary_output = cv2.erode(img_dilate_binary_output, kernel, iterations=1)# 返回最終處理后的圖像return img_erode_binary_output????????這段代碼包含兩個函數 `img_road_show1` 和 `img_road_show2`,用于處理輸入圖像并提取車道線區域。
????????`img_road_show1` 首先對輸入圖像應用高斯模糊,以減少噪聲,然后將其轉換為灰度圖并使用 Sobel 算子進行邊緣檢測,以提取水平邊緣。接著,進行二值化處理,將邊緣圖像轉為黑白圖像。之后,通過形態學操作(膨脹和腐蝕)增強白色區域并去除噪聲,最終返回處理后的圖像。
????????`img_road_show2` 則使用 HLS 顏色空間提取亮度通道,并通過閾值劃分提取亮度較高的車道線區域。接著,將圖像轉換為 Lab 顏色空間,提取藍色通道并進行歸一化,依次利用閾值檢測提取特定顏色的車道線,然后通過形態學操作去噪。
????????最終,將兩個二值化結果結合,提取出合并的車道線區域,進行再一次的膨脹和腐蝕操作,以確保得到干凈的二值圖像,最后返回這一處理后的圖像,以供后續分析或顯示。整體上,這兩個函數通過不同的方式(邊緣檢測和顏色空間分析)強化了車道線的可見性,以便于自動駕駛或圖像分析任務。
三、車道線擬合

def road_polyfit(img):# 獲取圖像的高度和寬度height, width = img.shape# 創建一個與輸入圖像相同大小的RGB圖像,用于繪制窗口out_img = np.dstack((img, img, img))# 計算每一列的白色像素總和,得到直方圖num_ax0 = np.sum(img, axis=0)# 找到直方圖左側和右側的最高點位置,分別作為車道線的起始點img_left_argmax = np.argmax(num_ax0[:width // 2]) # 左側最高點img_right_argmax = np.argmax(num_ax0[width // 2:]) + width // 2 # 右側最高點# 獲取圖像中所有非零像素的x和y位置nonzeroy, nonzerox = np.array(img.nonzero())# 定義滑動窗口的數量windows_num = 10# 定義每個窗口的高度和寬度windows_height = height // windows_numwindows_width = 30# 定義在窗口中檢測到的白色像素的最小數量min_pix = 400# 初始化當前窗口的位置,后續會根據檢測結果更新left_current = img_left_argmaxright_current = img_right_argmaxleft_pre = left_current # 記錄上一個左側窗口位置right_pre = right_current # 記錄上一個右側窗口位置# 創建空列表以存儲左側和右側車道線像素的索引left_lane_inds = []right_lane_inds = []# 遍歷每個窗口進行車道線檢測for window in range(windows_num):# 計算當前窗口的上邊界y坐標win_y_high = height - windows_height * (window + 1)# 計算當前窗口的下邊界y坐標win_y_low = height - windows_height * window# 計算左側窗口的左右邊界x坐標win_x_left_left = left_current - windows_widthwin_x_left_right = left_current + windows_width# 計算右側窗口的左右邊界x坐標win_x_right_left = right_current - windows_widthwin_x_right_right = right_current + windows_width# 在輸出圖像上繪制當前窗口cv2.rectangle(out_img, (win_x_left_left, win_y_high), (win_x_left_right, win_y_low), (0, 255, 0), 2)cv2.rectangle(out_img, (win_x_right_left, win_y_high), (win_x_right_right, win_y_low), (0, 255, 0), 2)# 找到在當前窗口中符合條件的白色像素索引good_left_index = ((nonzeroy >= win_y_high) & (nonzeroy < win_y_low)& (nonzerox >= win_x_left_left) & (nonzerox < win_x_left_right)).nonzero()[0]good_right_index = ((nonzeroy >= win_y_high) & (nonzeroy < win_y_low)& (nonzerox >= win_x_right_left) & (nonzerox < win_x_right_right)).nonzero()[0]# 將找到的索引添加到列表中left_lane_inds.append(good_left_index)right_lane_inds.append(good_right_index)# 如果找到的左側像素數量超過閾值,更新左側窗口位置if len(good_left_index) > min_pix:left_current = int(np.mean(nonzerox[good_left_index]))else:# 如果沒有找到足夠的左側像素,則根據右側像素的位置進行偏移if len(good_right_index) > min_pix:offset = int(np.mean(nonzerox[good_right_index])) - right_preleft_current = left_current + offset# 如果找到的右側像素數量超過閾值,更新右側窗口位置if len(good_right_index) > min_pix:right_current = int(np.mean(nonzerox[good_right_index]))else:# 如果沒有找到足夠的右側像素,則根據左側像素的位置進行偏移if len(good_left_index) > min_pix:offset = int(np.mean(nonzerox[good_left_index])) - left_preright_current = right_current + offset# 更新上一個窗口位置left_pre = left_currentright_pre = right_current# 將所有的索引連接成一個數組,以便后續提取像素點的坐標left_lane_inds = np.concatenate(left_lane_inds)right_lane_inds = np.concatenate(right_lane_inds)# 提取左側和右側車道線像素的位置leftx = nonzerox[left_lane_inds] # 左側車道線的x坐標lefty = nonzeroy[left_lane_inds] # 左側車道線的y坐標rightx = nonzerox[right_lane_inds] # 右側車道線的x坐標righty = nonzeroy[right_lane_inds] # 右側車道線的y坐標# 對左側和右側車道線進行多項式擬合,得到擬合曲線的參數left_fit = np.polyfit(lefty, leftx, 2) # 左側車道線的二次多項式擬合right_fit = np.polyfit(righty, rightx, 2) # 右側車道線的二次多項式擬合# 生成均勻分布的y坐標,用于繪制車道線ploty = np.linspace(0, height - 1, height)# 根據擬合的多項式計算左側和右側車道線的x坐標left_fitx = left_fit[0] * ploty ** 2 + left_fit[1] * ploty + left_fit[2]right_fitx = right_fit[0] * ploty ** 2 + right_fit[1] * ploty + right_fit[2]# 計算中間車道線的位置middle_fitx = (left_fitx + right_fitx) // 2# 在輸出圖像上標記車道線像素點out_img[lefty, leftx] = [255, 0, 0] # 左側車道線out_img[righty,rightx]=[0,0,255]# 右側車道線return left_fitx, right_fitx, middle_fitx, ploty????????這段代碼實現了車道線檢測與擬合的功能,主要通過滑動窗口的方法來識別和擬合車道線。首先獲取輸入圖像的高度和寬度,并創建一個與輸入圖像相同大小的RGB圖像用于繪制結果。
????????接著,通過計算每一列的白色像素總和生成直方圖,找到左右車道線的起始點。
????????然后,定義滑動窗口的數量、每個窗口的高度和寬度,設置檢測到的白色像素的最小數量。接下來,遍歷每個窗口,繪制窗口并在窗口內檢測白色像素的索引。
????????如果在窗口中找到足夠的白色像素,則更新當前窗口的位置;如果沒有找到,則根據相鄰車道線的像素位置進行調整。
????????最后,提取所有窗口中檢測到的車道線像素的坐標,利用多項式擬合(使用二次多項式)計算出車道線的方程,并生成均勻分布的y坐標以繪制車道線。
????????最終,將左側和右側車道線的像素標記在輸出圖像上,并返回擬合的車道線坐標和對應的y坐標。這一過程有效地提取并可視化了車道線,便于后續的自動駕駛或圖像分析應用。
四、車道線顯示
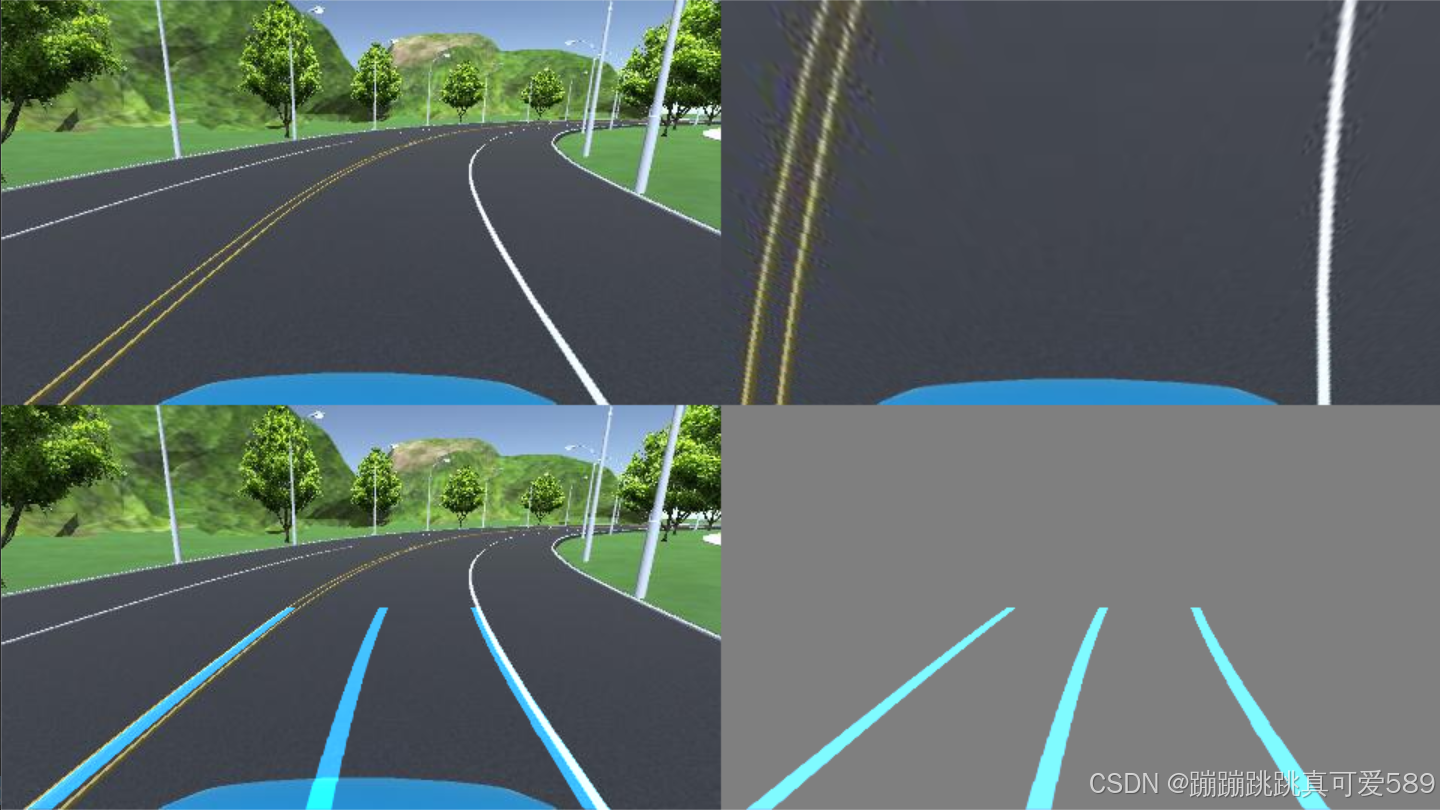
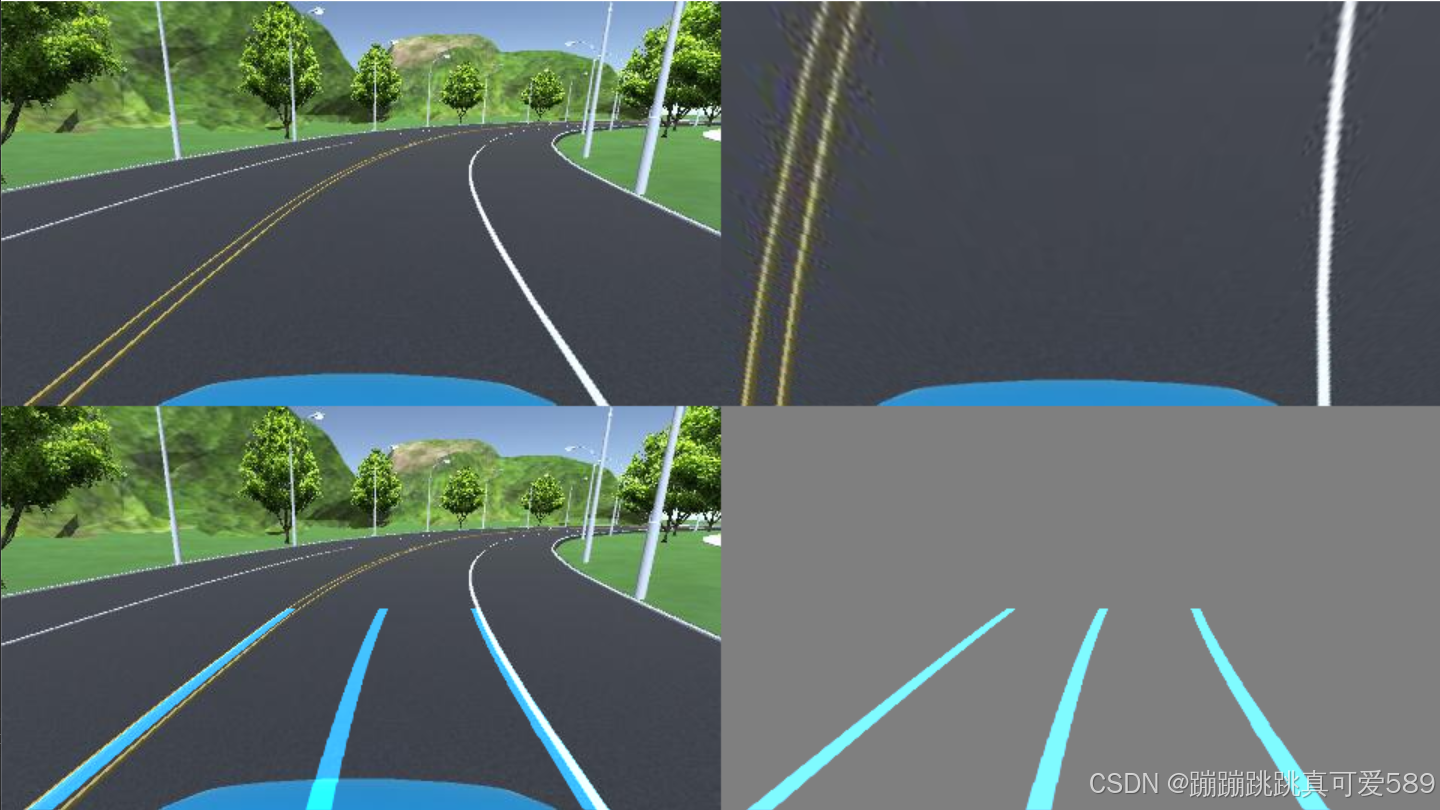
def road_show_concatenate(img, img_wrp, W, img_road1, left_fitx, right_fitx, middle_fitx, ploty):# 創建一個與 img_road1 相同大小的零圖像,數據類型為 uint8wrp_zero = np.zeros_like(img_road1).astype(np.uint8)# 創建一個三通道的零圖像,用于存放車道線color_wrp = np.dstack((wrp_zero, wrp_zero, wrp_zero))# 組合車道線點的坐標,用于繪制# pts_left, pts_right, pts_middle 是車道線在(y, x)坐標系中的坐標點pts_left = np.transpose(np.vstack([left_fitx, ploty])) # 包括左側車道線的坐標pts_right = np.transpose(np.vstack([right_fitx, ploty])) # 包括右側車道線的坐標pts_middle = np.transpose(np.vstack([middle_fitx, ploty])) # 包括中間車道線的坐標# 在 zero 圖像上繪制車道線cv2.polylines(color_wrp, np.int32([pts_left]), isClosed=False, color=(202, 124, 0), thickness=15) # 繪制左側車道線cv2.polylines(color_wrp, np.int32([pts_right]), isClosed=False, color=(202, 124, 0), thickness=15) # 繪制右側車道線cv2.polylines(color_wrp, np.int32([pts_middle]), isClosed=False, color=(202, 124, 0), thickness=15) # 繪制中間車道線# 將繪制的車道線通過逆透視變換映射到原始圖像的空間newwarp = cv2.warpPerspective(color_wrp, W, (img.shape[1], img.shape[0]))# 將透視變換后的圖像與原始圖像進行加權融合result1 = cv2.addWeighted(img, 1, newwarp, 1, 0)# 創建一個背景圖像,并將其初始化為中間灰色background_zero = np.zeros_like(img).astype(np.uint8) + 127# 將新變換的車道線圖像與背景圖像進行加權融合result = cv2.addWeighted(background_zero, 1, newwarp, 1, 0)# 將原始圖像與透視變換的圖像進行水平拼接concatenate_image1 = np.concatenate((img, img_wrp), axis=1)# 將加權融合的結果與車道線圖像進行水平拼接concatenate_image2 = np.concatenate((result1, result), axis=1)# 將兩個拼接結果進行垂直拼接,形成最終圖像concatenate_image = np.concatenate((concatenate_image1, concatenate_image2), axis=0)return concatenate_image # 返回最終拼接的圖像
????????這段代碼的目的是將車道線可視化結果與輸入圖像進行拼接,以便于展示處理效果。
????????首先,通過創建一個與 `img_road1` 同樣大小的零圖像和一個三通道的零圖像,準備繪制車道線。
????????然后,通過將左側、右側和中間車道線的坐標點(通過擬合獲得)組合在一起以便繪制。
????????接著,使用 `cv2.polylines` 在零圖像上繪制車道線,賦予其顏色和厚度。
????????接下來,利用逆透視變換將繪制的車道線圖像映射到原始圖像的空間,并將其與原始圖像進行加權融合,生成一個包含車道線的圖像。為提供背景對比,創建一個中間灰色的背景圖像,并將車道線圖像與該背景融合。
????????隨后,將原始圖像與透視變換后的圖像以及加權融合的結果進行水平拼接。
????????最終,將這兩個拼接結果進行垂直拼接,形成一個展示原始圖像、透視圖和加權結果的最終圖像,便于查看車道線檢測與處理效果。該過程為圖像處理和計算機視覺任務提供了直觀的可視化方式。
五、完整代碼
import numpy as np
import cv2# 定義透視變換函數
def img_to_wrp(img):height, width,_= img.shape  # 獲取輸入圖像的高度和寬度# 定義源點(透視變換前的點)src = np.float32([[width // 2 - 75, height // 2],  # 左側車道線的源點[width // 2 + 100, height // 2],  # 右側車道線的源點[0, height],  # 底部左側點[width, height]  # 底部右側點])# 定義目標點(透視變換后的點)dst = np.float32([[0, 0],  # 目標左上角[width, 0],  # 目標右上角[0, height],  # 目標左下角[width, height]  # 目標右下角])# 計算透視變換矩陣M = cv2.getPerspectiveTransform(src, dst)# 計算逆透視變換矩陣W = cv2.getPerspectiveTransform(dst, src)# 應用透視變換img_wrp = cv2.warpPerspective(img, M, (width, height), flags=cv2.INTER_LINEAR)return img_wrp, W  # 返回透視變換后的圖像和逆變換矩陣# 定義圖像處理函數,提取車道線
def img_road_show1(img):img_Gaussian = cv2.GaussianBlur(img, (7, 7), sigmaX=1)  # 對圖像進行高斯模糊,減少噪聲img_gray = cv2.cvtColor(img_Gaussian, cv2.COLOR_BGR2GRAY)  # 將模糊后的圖像轉換為灰度圖像img_Sobel = cv2.Sobel(img_gray, -1, dx=1, dy=0)  # 使用Sobel算子進行邊緣檢測,提取水平邊緣ret, img_threshold = cv2.threshold(img_Sobel, 127, 255, cv2.THRESH_BINARY)  # 二值化處理kernel = np.ones((11, 11), np.uint8)  # 創建一個11x11的結構元素img_dilate = cv2.dilate(img_threshold, kernel, iterations=2)  # 膨脹操作,增強白色區域img_erode = cv2.erode(img_dilate, kernel, iterations=2)  # 腐蝕操作,去除小噪聲return img_erode  # 返回處理后的圖像def img_road_show2(img):# 將圖像從BGR顏色空間轉換為HLS顏色空間img_hls = cv2.cvtColor(img, cv2.COLOR_BGR2HLS)# 提取亮度通道l_channel = img_hls[:, :, 1]# 將亮度通道進行歸一化處理l_channel = l_channel / np.max(l_channel) * 255# 創建與亮度通道同樣大小的零數組binary_output1 = np.zeros_like(l_channel)# 根據亮度閾值提取車道線區域(亮度值范圍為220到255)binary_output1[(l_channel > 220) & (l_channel < 255)] = 1# 提取黃色車道線img_lab = cv2.cvtColor(img, cv2.COLOR_BGR2Lab)  # 將圖像轉換為Lab顏色空間# 將圖像的下部分設置為黑色,以減少干擾img_lab[:, 240:, :] = (0, 0, 0)# 提取Lab顏色空間中的藍色通道lab_b = img_lab[:, :, 2]# 如果藍色通道的最大值大于100則歸一化處理if np.max(lab_b) > 100:lab_b = lab_b / np.max(lab_b) * 255# 創建與亮度通道同樣大小的零數組binary_output2 = np.zeros_like(l_channel)# 根據藍色通道的閾值提取車道線區域(藍色值范圍為212到220)binary_output2[(lab_b > 212) & (lab_b < 220)] = 1# 創建結構元素,用于形態學操作kernel = np.ones((15, 15), np.uint8)# 對binary_output2進行膨脹操作,以增強車道線binary_output2 = cv2.dilate(binary_output2, kernel, iterations=1)# 對膨脹后的圖像進行兩次腐蝕操作,去除小噪聲binary_output2 = cv2.erode(binary_output2, kernel, iterations=1)binary_output2 = cv2.erode(binary_output2, kernel, iterations=1)# 創建一個與binary_output1同樣大小的零數組binary_output = np.zeros_like(binary_output1)# 將兩個二值輸出結合,提取最終車道線區域binary_output[(binary_output1 == 1) | (binary_output2 == 1)] = 1# 對最終的二值輸出進行膨脹處理kernel = np.ones((15, 15), np.uint8)img_dilate_binary_output = cv2.dilate(binary_output, kernel, iterations=1)# 對膨脹后的圖像進行腐蝕處理,以便進一步去噪聲img_erode_binary_output = cv2.erode(img_dilate_binary_output, kernel, iterations=1)# 返回最終處理后的圖像return img_erode_binary_outputdef road_polyfit(img):# 獲取圖像的高度和寬度height, width = img.shape# 創建一個與輸入圖像相同大小的RGB圖像,用于繪制窗口out_img = np.dstack((img, img, img))# 計算每一列的白色像素總和,得到直方圖num_ax0 = np.sum(img, axis=0)# 找到直方圖左側和右側的最高點位置,分別作為車道線的起始點img_left_argmax = np.argmax(num_ax0[:width // 2])  # 左側最高點img_right_argmax = np.argmax(num_ax0[width // 2:]) + width // 2  # 右側最高點# 獲取圖像中所有非零像素的x和y位置nonzeroy, nonzerox = np.array(img.nonzero())# 定義滑動窗口的數量windows_num = 10# 定義每個窗口的高度和寬度windows_height = height // windows_numwindows_width = 30# 定義在窗口中檢測到的白色像素的最小數量min_pix = 400# 初始化當前窗口的位置,后續會根據檢測結果更新left_current = img_left_argmaxright_current = img_right_argmaxleft_pre = left_current  # 記錄上一個左側窗口位置right_pre = right_current  # 記錄上一個右側窗口位置# 創建空列表以存儲左側和右側車道線像素的索引left_lane_inds = []right_lane_inds = []# 遍歷每個窗口進行車道線檢測for window in range(windows_num):# 計算當前窗口的上邊界y坐標win_y_high = height - windows_height * (window + 1)# 計算當前窗口的下邊界y坐標win_y_low = height - windows_height * window# 計算左側窗口的左右邊界x坐標win_x_left_left = left_current - windows_widthwin_x_left_right = left_current + windows_width# 計算右側窗口的左右邊界x坐標win_x_right_left = right_current - windows_widthwin_x_right_right = right_current + windows_width# 在輸出圖像上繪制當前窗口cv2.rectangle(out_img, (win_x_left_left, win_y_high), (win_x_left_right, win_y_low), (0, 255, 0), 2)cv2.rectangle(out_img, (win_x_right_left, win_y_high), (win_x_right_right, win_y_low), (0, 255, 0), 2)# 找到在當前窗口中符合條件的白色像素索引good_left_index = ((nonzeroy >= win_y_high) & (nonzeroy < win_y_low)& (nonzerox >= win_x_left_left) & (nonzerox < win_x_left_right)).nonzero()[0]good_right_index = ((nonzeroy >= win_y_high) & (nonzeroy < win_y_low)& (nonzerox >= win_x_right_left) & (nonzerox < win_x_right_right)).nonzero()[0]# 將找到的索引添加到列表中left_lane_inds.append(good_left_index)right_lane_inds.append(good_right_index)# 如果找到的左側像素數量超過閾值,更新左側窗口位置if len(good_left_index) > min_pix:left_current = int(np.mean(nonzerox[good_left_index]))else:# 如果沒有找到足夠的左側像素,則根據右側像素的位置進行偏移if len(good_right_index) > min_pix:offset = int(np.mean(nonzerox[good_right_index])) - right_preleft_current = left_current + offset# 如果找到的右側像素數量超過閾值,更新右側窗口位置if len(good_right_index) > min_pix:right_current = int(np.mean(nonzerox[good_right_index]))else:# 如果沒有找到足夠的右側像素,則根據左側像素的位置進行偏移if len(good_left_index) > min_pix:offset = int(np.mean(nonzerox[good_left_index])) - left_preright_current = right_current + offset# 更新上一個窗口位置left_pre = left_currentright_pre = right_current# 將所有的索引連接成一個數組,以便后續提取像素點的坐標left_lane_inds = np.concatenate(left_lane_inds)right_lane_inds = np.concatenate(right_lane_inds)# 提取左側和右側車道線像素的位置leftx = nonzerox[left_lane_inds]  # 左側車道線的x坐標lefty = nonzeroy[left_lane_inds]  # 左側車道線的y坐標rightx = nonzerox[right_lane_inds]  # 右側車道線的x坐標righty = nonzeroy[right_lane_inds]  # 右側車道線的y坐標# 對左側和右側車道線進行多項式擬合,得到擬合曲線的參數left_fit = np.polyfit(lefty, leftx, 2)  # 左側車道線的二次多項式擬合right_fit = np.polyfit(righty, rightx, 2)  # 右側車道線的二次多項式擬合# 生成均勻分布的y坐標,用于繪制車道線ploty = np.linspace(0, height - 1, height)# 根據擬合的多項式計算左側和右側車道線的x坐標left_fitx = left_fit[0] * ploty ** 2 + left_fit[1] * ploty + left_fit[2]right_fitx = right_fit[0] * ploty ** 2 + right_fit[1] * ploty + right_fit[2]# 計算中間車道線的位置middle_fitx = (left_fitx + right_fitx) // 2# 在輸出圖像上標記車道線像素點out_img[lefty, leftx] = [255, 0, 0]  # 左側車道線out_img[righty,rightx]=[0,0,255]# 右側車道線return left_fitx, right_fitx, middle_fitx, plotydef road_show_concatenate(img, img_wrp, W, img_road1, left_fitx, right_fitx, middle_fitx, ploty):# 創建一個與 img_road1 相同大小的零圖像,數據類型為 uint8wrp_zero = np.zeros_like(img_road1).astype(np.uint8)# 創建一個三通道的零圖像,用于存放車道線color_wrp = np.dstack((wrp_zero, wrp_zero, wrp_zero))# 組合車道線點的坐標,用于繪制# pts_left, pts_right, pts_middle 是車道線在(y, x)坐標系中的坐標點pts_left = np.transpose(np.vstack([left_fitx, ploty]))  # 包括左側車道線的坐標pts_right = np.transpose(np.vstack([right_fitx, ploty]))  # 包括右側車道線的坐標pts_middle = np.transpose(np.vstack([middle_fitx, ploty]))  # 包括中間車道線的坐標# 在 zero 圖像上繪制車道線cv2.polylines(color_wrp, np.int32([pts_left]), isClosed=False, color=(202, 124, 0), thickness=15)  # 繪制左側車道線cv2.polylines(color_wrp, np.int32([pts_right]), isClosed=False, color=(202, 124, 0), thickness=15)  # 繪制右側車道線cv2.polylines(color_wrp, np.int32([pts_middle]), isClosed=False, color=(202, 124, 0), thickness=15)  # 繪制中間車道線# 將繪制的車道線通過逆透視變換映射到原始圖像的空間newwarp = cv2.warpPerspective(color_wrp, W, (img.shape[1], img.shape[0]))# 將透視變換后的圖像與原始圖像進行加權融合result1 = cv2.addWeighted(img, 1, newwarp, 1, 0)# 創建一個背景圖像,并將其初始化為中間灰色background_zero = np.zeros_like(img).astype(np.uint8) + 127# 將新變換的車道線圖像與背景圖像進行加權融合result = cv2.addWeighted(background_zero, 1, newwarp, 1, 0)# 將原始圖像與透視變換的圖像進行水平拼接concatenate_image1 = np.concatenate((img, img_wrp), axis=1)# 將加權融合的結果與車道線圖像進行水平拼接concatenate_image2 = np.concatenate((result1, result), axis=1)# 將兩個拼接結果進行垂直拼接,形成最終圖像concatenate_image = np.concatenate((concatenate_image1, concatenate_image2), axis=0)return concatenate_image  # 返回最終拼接的圖像if __name__ == '__main__':# 讀取圖像文件 '15.png'img = cv2.imread('15.png')# 對圖像進行透視變換,以便后續的車道線檢測img_wrp, W = img_to_wrp(img)# 通過顯示車道線的函數生成一個車道線顯示圖像img_road1 = img_road_show1(img_wrp)# 調用 road_polyfit 函數進行車道線的多項式擬合# left_fitx, right_fitx, middle_fitx 包含了左右車道線和中間車道線的 x 坐標# ploty 包含了 y 坐標的范圍left_fitx, right_fitx, middle_fitx, ploty = road_polyfit(img_road1)# 將處理后的圖像與繪制的車道線組合在一起concatenate_image = road_show_concatenate(img, img_wrp, W, img_road1, left_fitx, right_fitx, middle_fitx, ploty)# 顯示最終的拼接圖像cv2.imshow('concatenate_image', concatenate_image)# 等待用戶按下任意鍵,以退出顯示窗口cv2.waitKey(0)


)

入門)
