文章說明
本篇文章主要通過代碼案例的方式,展示 poi-tl 生成 docx 文件的一些常用操作,主要涵蓋以下內容 :
- 插入文本字符(含樣式、超鏈接)
- 插入圖片
- 插入表格
- 引入標簽(通過可選文字的方式,這種方式也可以實現插入圖片和插入表格)
當然 poi-tl 官方也有很詳細的介紹,官網文檔地址:https://deepoove.com/poi-tl/
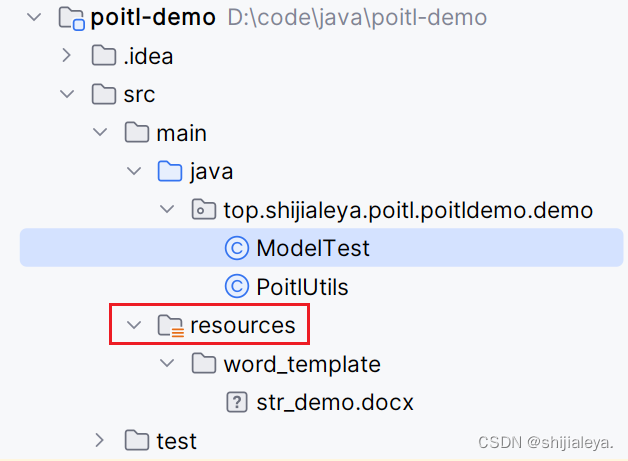
項目初始化【必讀】
項目創建好之后第一件事當然是引入依賴啦。
下面是 maven 引入的依賴,如果使用 Gradle 自行轉成 Gradle 依賴。
<!-- poi 依賴 -->
<dependency><groupId>org.apache.poi</groupId><artifactId>poi</artifactId><version>5.2.5</version>
</dependency>
<!-- poi-tl -->
<dependency><groupId>com.deepoove</groupId><artifactId>poi-tl</artifactId><version>1.12.2</version>
</dependency>
在 poi-tl 生成 docx 文件時,先搞清楚三個問題:
- 定義 docx 模板文件:要生成怎么樣的文件,自行創建一個 docx 的模板文件
- 定義模板文件的數據:向模板文件中,添加數據
- 生成文件位置:實際開發中大多會通過網絡的方式傳遞,這里只展示生成在本地文件
本篇文章展示一些關鍵代碼,為了減少冗余,我們可以定義一個生成 docx 的工具類 PoitlUtils:
import com.deepoove.poi.XWPFTemplate;import java.io.FileOutputStream;
import java.io.IOException;
import java.io.InputStream;
import java.util.Map;/*** @author 17279*/
public class PoitlUtils {/*** @param templateData 生成模板文件所需的所有數據* @param templateFilePath 模板文件路徑(這里讀取的是 resources 下的文件)* @param outputFilePath 模板文件輸入的地址*/public static void generateWordFile(Map<String, Object> templateData, String templateFilePath, String outputFilePath) {// 讀取模板文件try (InputStream templateIn = PoitlUtils.class.getResourceAsStream(templateFilePath)) {// 生成模板文件XWPFTemplate template = XWPFTemplate.compile(templateIn).render(templateData);template.writeAndClose(new FileOutputStream(outputFilePath));// 這個目的是:生成文件之后調用 cmd 打開本地文件,實際生產不需要該操作// Runtime.getRuntime().exec(String.format("cmd /c %s", outputFilePath));} catch (IOException e) {e.printStackTrace();}}
}
這里使用的所有 docs 模板文件,我都存放在 resources 的目錄下。
插入文本
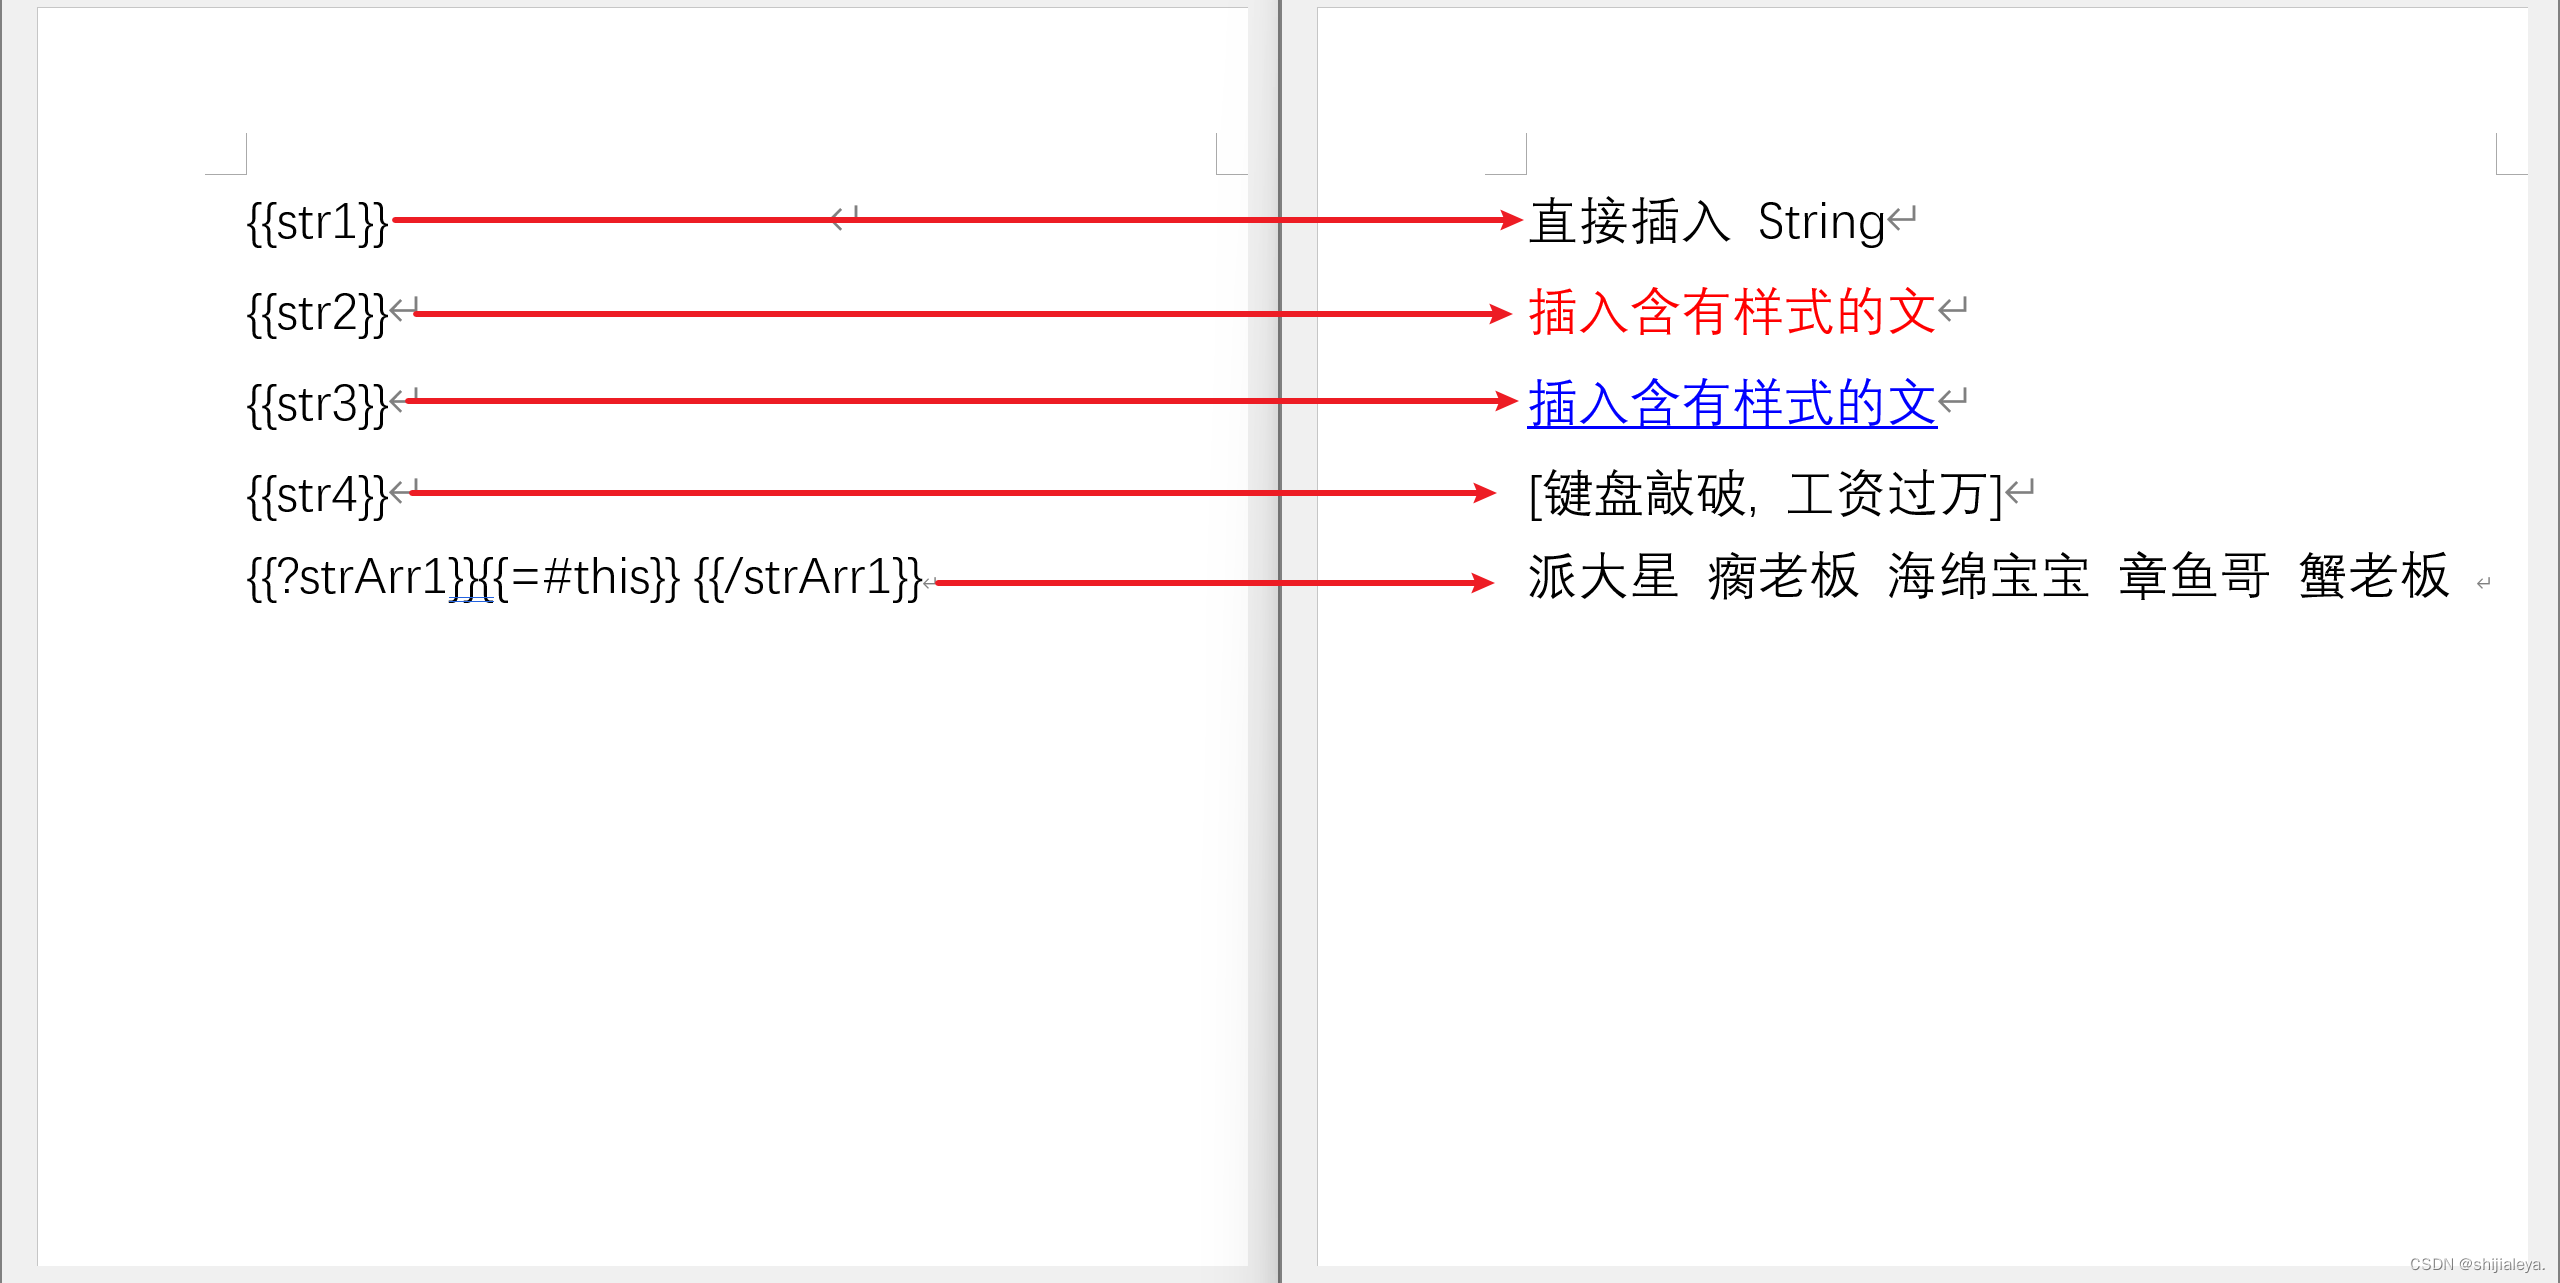
str_demo.docx 文件,文本使用 {{xxx}} 設置占位符:
{{str1}}
{{str2}}
{{str3}}
{{str4}}
{{?strArr1}}{{=#this}} {{/strArr1}}
案例代碼:
// 模板文件
String templateFilePath = "/word_template/str_demo.docx";
// 輸出文件
String outputFilePath = "D:/output.docx";
// 插入文本數據
Map<String, Object> templateData = new HashMap<String, Object>() {{// 直接插入 Stringput("str1", "直接插入 String");// 插入含有樣式的文本put("str2", Texts.of("插入含有樣式的文").color("ff0000").create());// 插入含超鏈接的文本put("str3", Texts.of("插入含有樣式的文").link("http://www.shijialeya.top/").create());// 傳入一個對象put("str4", Arrays.asList("鍵盤敲破", "工資過萬"));// 遍歷文本put("strArr1", Arrays.asList("派大星", "瘸老板", "海綿寶寶", "章魚哥", "蟹老板"));
}};
// 文件生成
PoitlUtils.generateWordFile(templateData, templateFilePath, outputFilePath);
文檔效果:
要注意 docx 文件上的 {{xxx}} xxx 的前后不要有空格,如果將外面的文字復制到 word 可能會自動加空格。
插入圖片
img_demo.docx 文件,圖片通過 {{@xxx}} 設置占位符:
{{@img1}}{{@img2}}{{@img3}}{{@img4}}{{?imgArr1}}{{@#this}} {{/imgArr1}}
案例代碼:
// 模板文件
String templateFilePath = "/word_template/img_demo.docx";
// 輸出文件
String outputFilePath = "D:/output.docx";
// 插入文本數據
Map<String, Object> templateData = new HashMap<String, Object>() {{// 直接插入本地圖片(默認圖片的寬度與文檔的寬度一致)// put("img1", "C:/Users/17279/Pictures/head.jpg");// 插入本地圖片,并設置圖片大小put("img1", Pictures.ofLocal("C:/Users/17279/Pictures/head.jpg").size(100, 100).create());// 通過流的形式寫入圖片put("img2", Pictures.ofStream(new FileInputStream("C:/Users/17279/Pictures/head.jpg"), PictureType.JPEG).size(150, 150).create());// 寫入網絡圖片put("img3", Pictures.ofUrl("http://file.shijialeya.top/head.jpg", PictureType.JPEG).size(170, 170).create());// 寫入通過 Java 生成的圖片put("img4", Pictures.ofBufferedImage(new BufferedImage(190, 190, BufferedImage.TYPE_BYTE_GRAY), PictureType.PNG).size(190, 190).create());// 遍歷圖片put("imgArr1", new ArrayList<Object>() {{add(Pictures.ofLocal("C:/Users/17279/Pictures/head.jpg").size(100, 100).create());add(Pictures.ofLocal("C:/Users/17279/Pictures/head.jpg").size(100, 100).create());add(Pictures.ofLocal("C:/Users/17279/Pictures/head.jpg").size(100, 100).create());}});
}};
// 文件生成
PoitlUtils.generateWordFile(templateData, templateFilePath, outputFilePath);
文檔效果:

插入表格
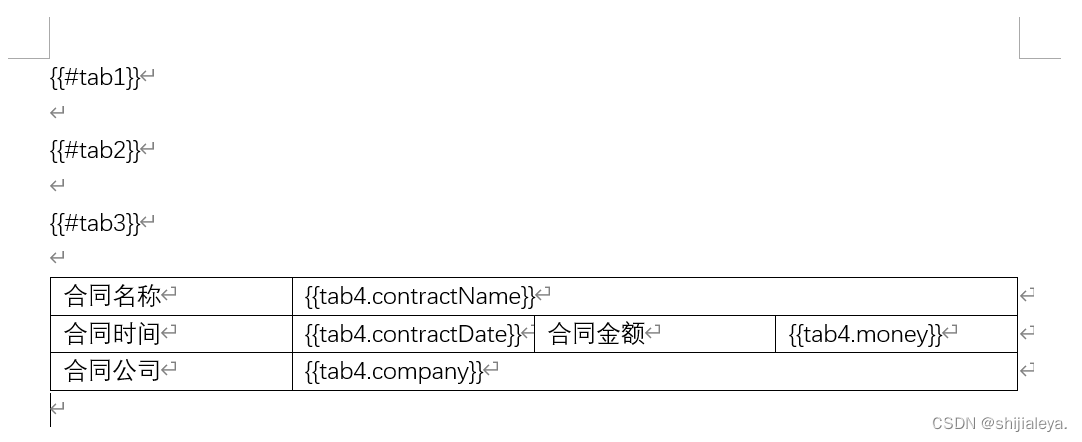
tab_demo.docx 文件,圖片通過 {{#xxx}} 設置占位符:
{{#tab1}}{{#tab2}}{{#tab3}}合同名稱	{{tab4.contractName}}
合同時間	{{tab4.contractDate}}	合同金額	{{tab4.money}}
合同公司	{{tab4.company}}
案例代碼:
// 模板文件
String templateFilePath = "/word_template/tab_demo.docx";
// 輸出文件
String outputFilePath = "D:/output.docx";
// 插入文本數據
Map<String, Object> templateData = new HashMap<String, Object>() {{// 插入一個基礎表格String[][] tabData1 = {new String[]{"姓名", "性別", "年齡"},new String[]{"派大星", "16", "男"},new String[]{"章魚哥", "35", "男"}};put("tab1", Tables.of(tabData1).create());// 插入一個含有樣式的表格Tables.TableBuilder tabData2 = Tables// 創建一個指定寬度的表格(docx 文檔的 80% 寬度).ofPercentWidth("80%")// 表格設為水平居中.center()// 設置表格邊框.border(BorderStyle.builder()// 邊框樣式.withType(XWPFTable.XWPFBorderType.DOUBLE)// 邊框顏色.withColor("ff0000")// 邊框粗細(邊框為線條類型才會有效).withSize(12).build());tabData2.addRow(Rows.of("姓名", "性別", "年齡")// 設置文字顏色.textColor("FFFFFF")// 設置對應表格的背景顏色.bgColor("4472C4")// 文字居中.center().create());tabData2.addRow(Rows.of("派大星", "16", "男").create());put("tab2", tabData2.create());// 合并單元格String[][] tabData3 = {new String[]{"姓名", "性別", "年齡"},new String[]{"派大星", "16", "男"},new String[]{"章魚哥", "35", "男"},new String[]{"共2人", null, null},};put("tab3", Tables.of(tabData3)// 添加單元格合并規則.mergeRule(MergeCellRule.builder()// [縱坐標, 橫坐標] 索引從零開始,合并 [3, 0] 到 [3, 2] 位置的表格.map(MergeCellRule.Grid.of(3, 0), MergeCellRule.Grid.of(3, 2)).build()).create());// 對應格式一定的表格,直接采用字符串替換即可put("tab4", new HashMap<String, Object>() {{put("contractName", "第一季度財務報告");put("contractDate", new SimpleDateFormat("yyyy-MM-dd").format(new Date()));put("company", "xxx有限責任公司");put("money", 10089.33);}});
}};
// 文件生成
PoitlUtils.generateWordFile(templateData, templateFilePath, outputFilePath);
文檔效果: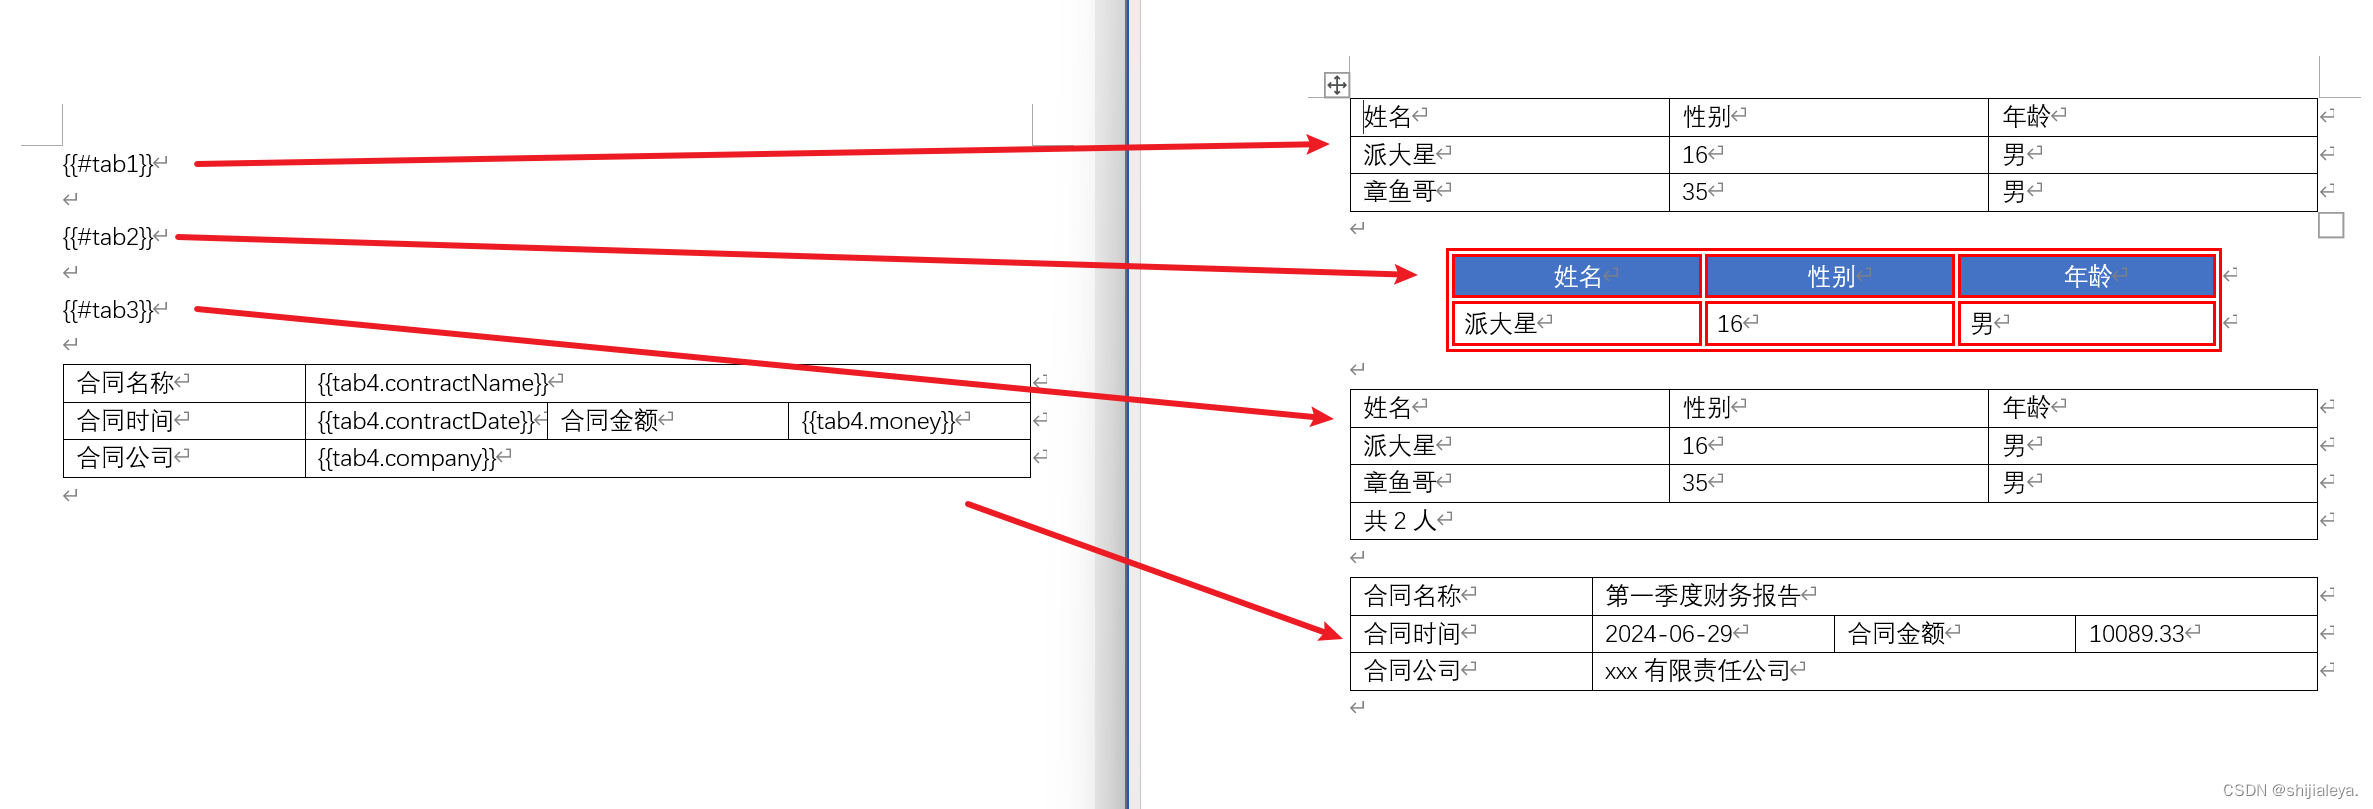
引入標簽
插入圖片
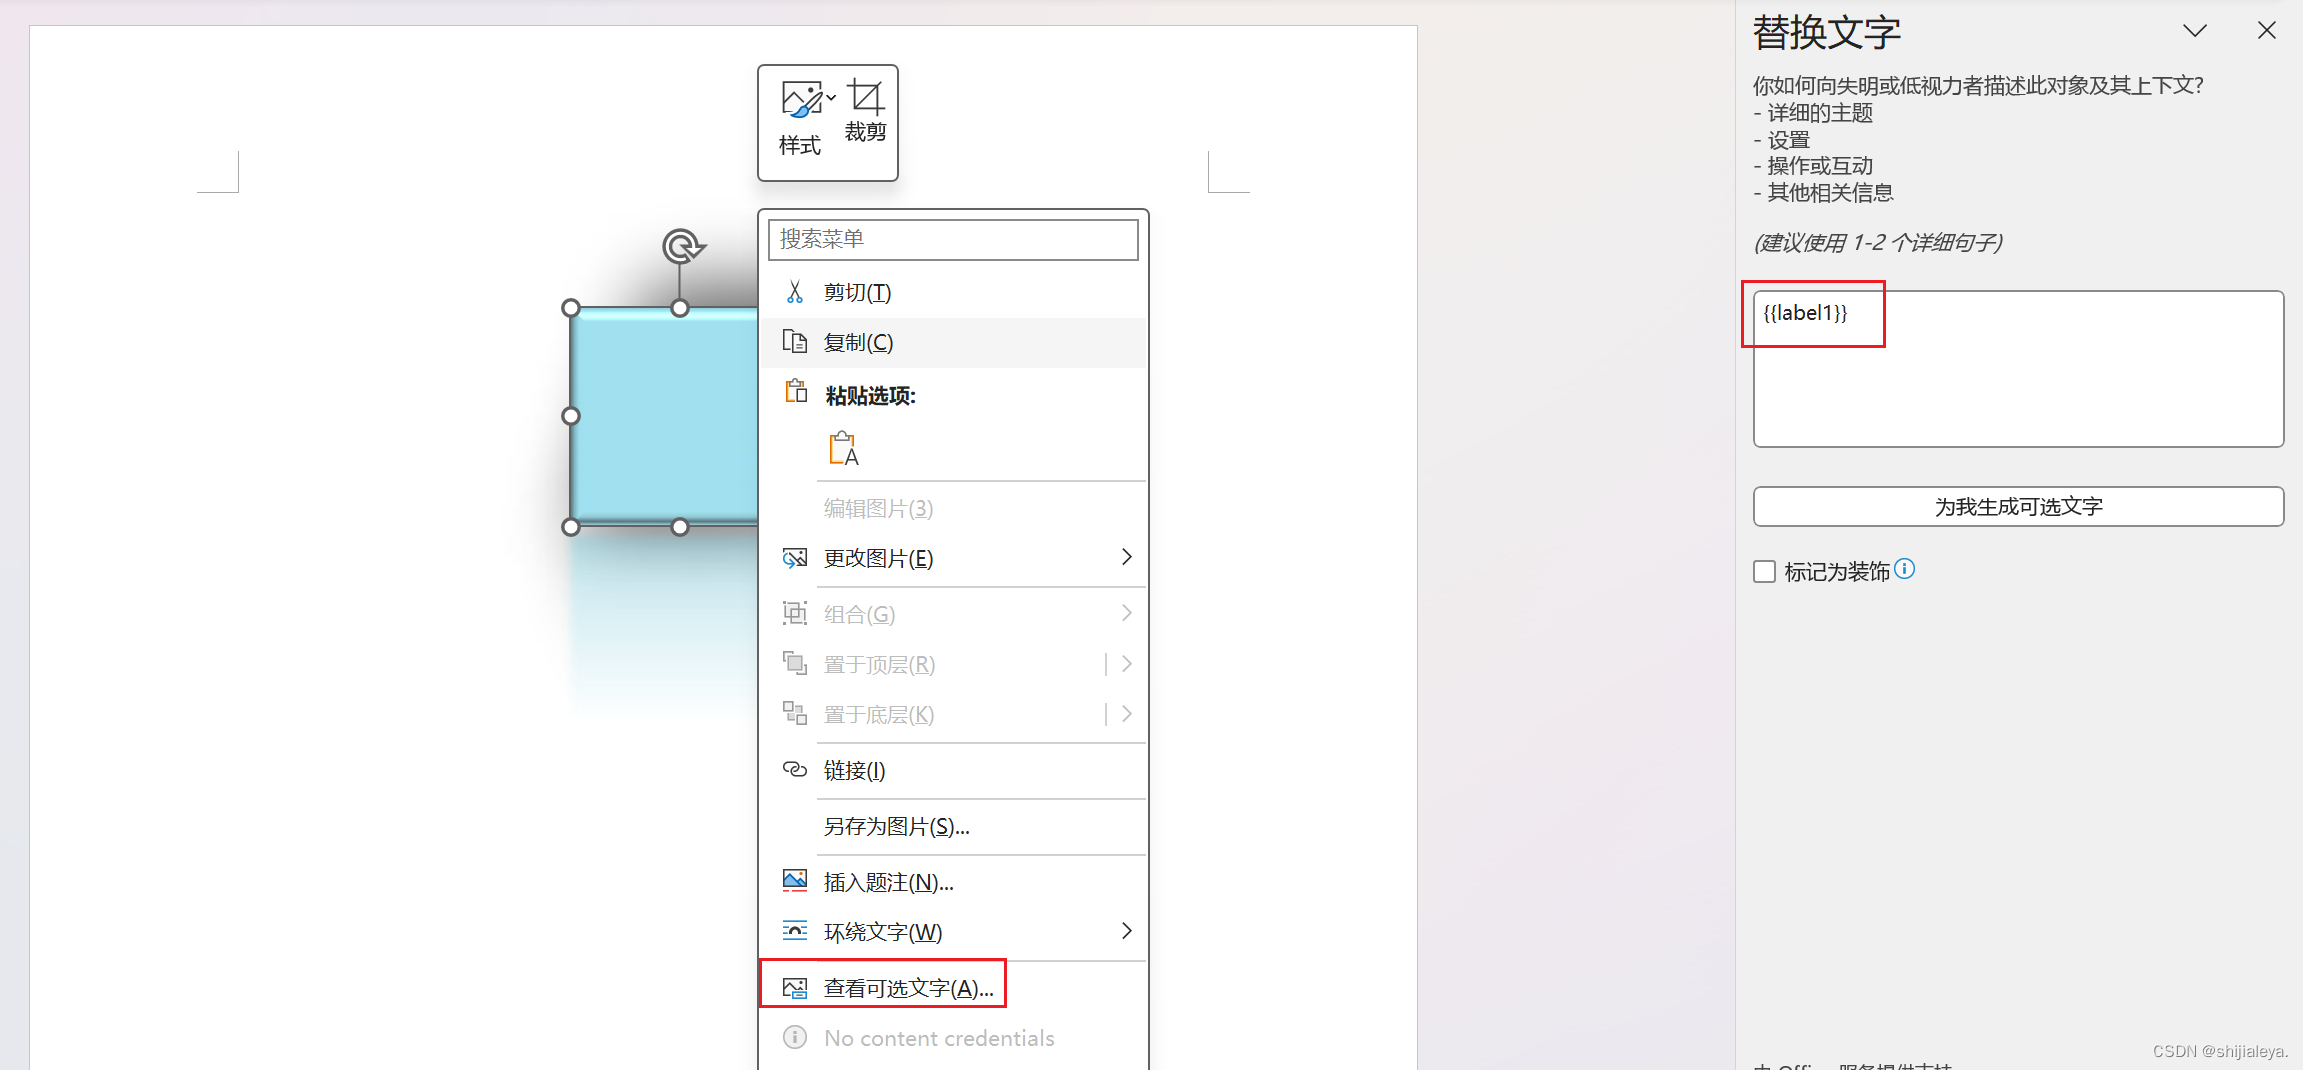
上面也有插入圖片的方式,但是通過引入標簽的方式插入圖片時,可以先在 word 模板文件中提前編輯好圖片的樣式,通過替換圖片的方式,會保留原本設置好的樣式。
在 docx 模板文件中先插入一張圖片,并且調整好圖片的樣式,之后右鍵圖片選擇【查看可選文字】,在可選文字中通過 {{xxx}} 的方式填寫屬性名稱。
【特別提醒】貌似 WPS 沒有可選文字的功能,不確定是不是 WPS 版本的原因,反正我沒找到可選文字。
因此我特地把 WPS 卸載之后換成了 Office 工具。
案例代碼:
// 模板文件
String templateFilePath = "/word_template/quote_demo01.docx";
// 輸出文件
String outputFilePath = "D:/output.docx";
// 插入文本數據
Map<String, Object> templateData = new HashMap<String, Object>() {{// 直接插入本地圖片,這里會保留模板文件的圖片樣式put("label1", Pictures.ofLocal("C:/Users/17279/Pictures/head.jpg").create());
}};
// 文件生成
PoitlUtils.generateWordFile(templateData, templateFilePath, outputFilePath);
文檔效果:

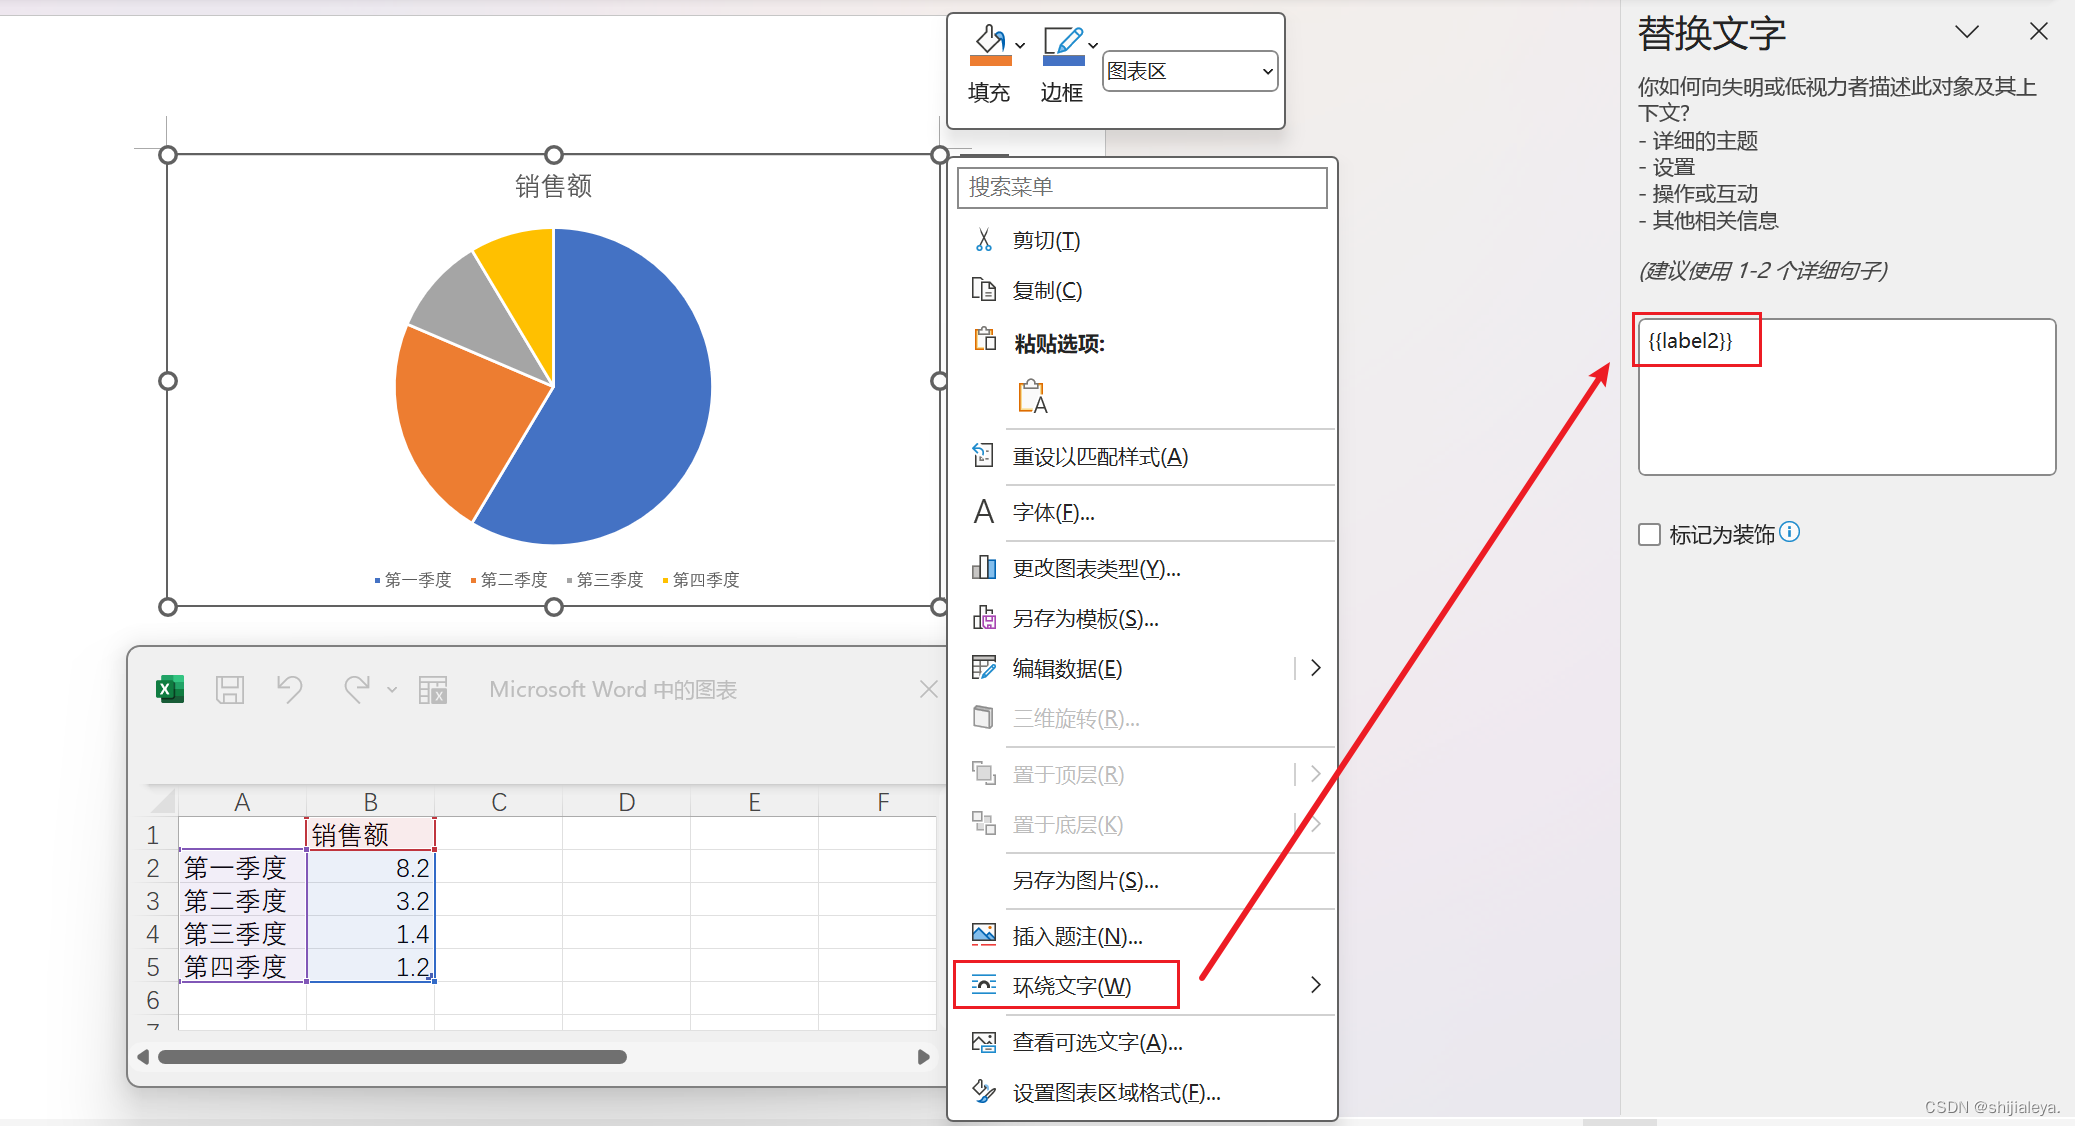
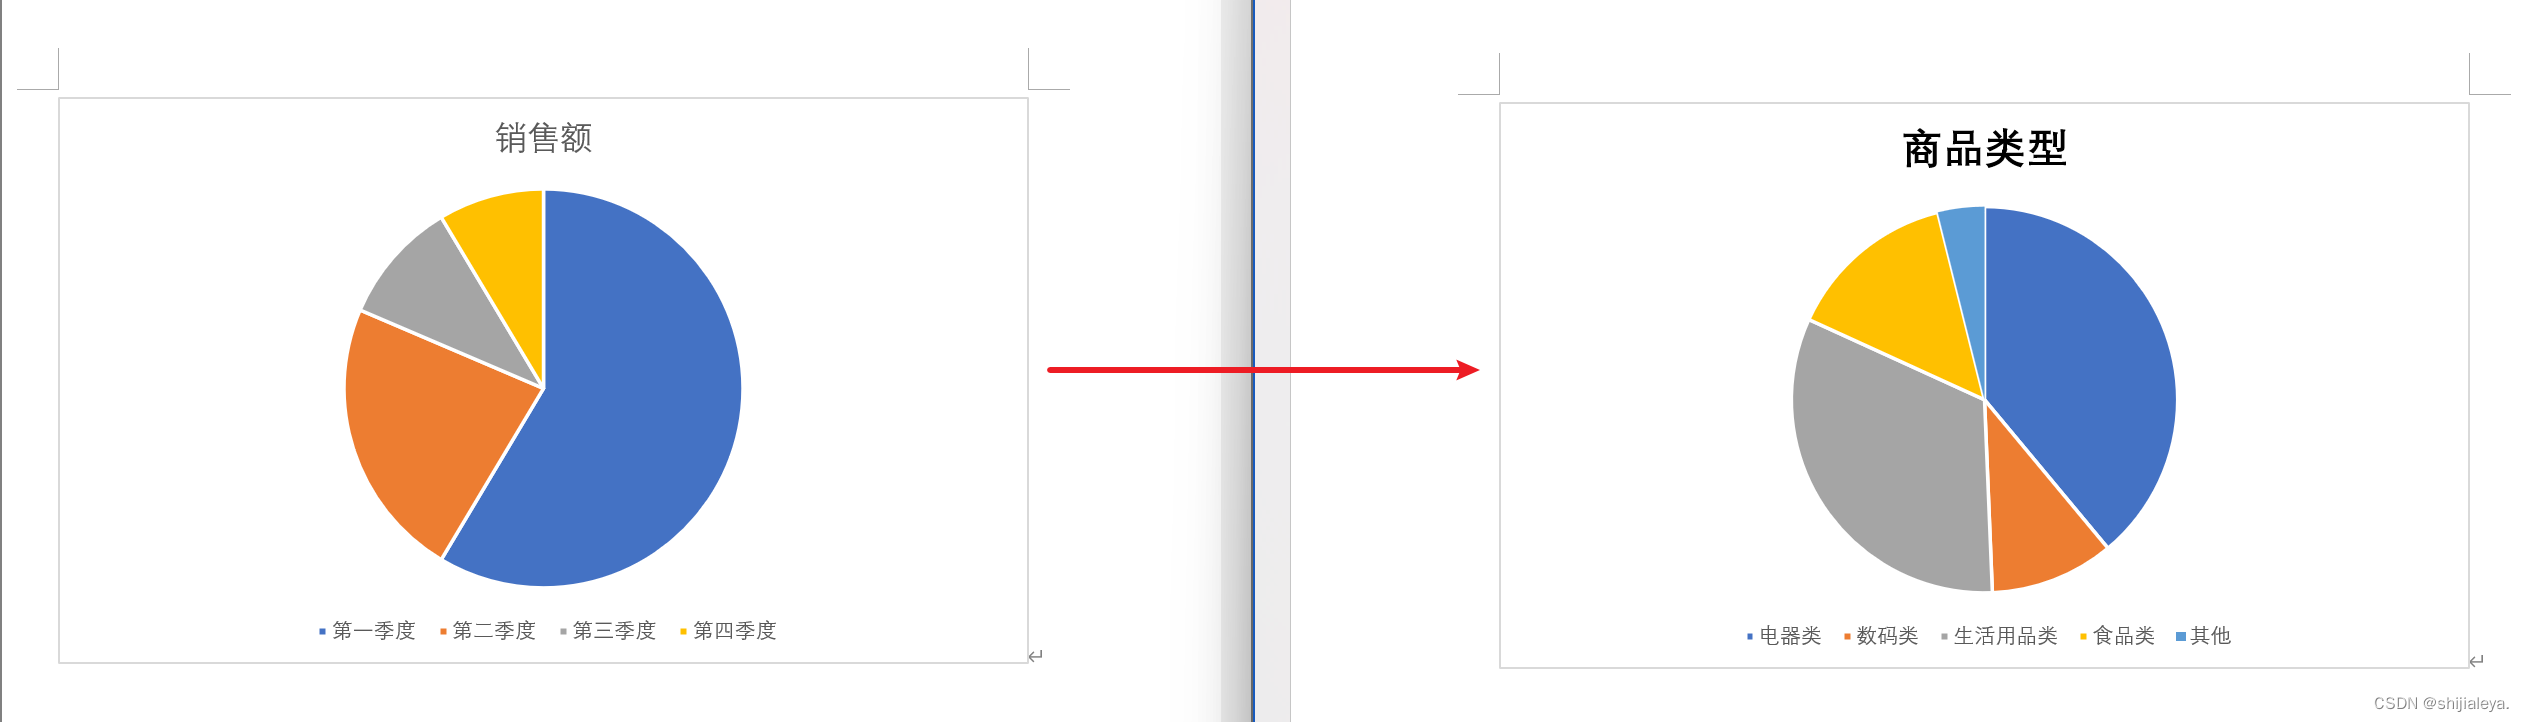
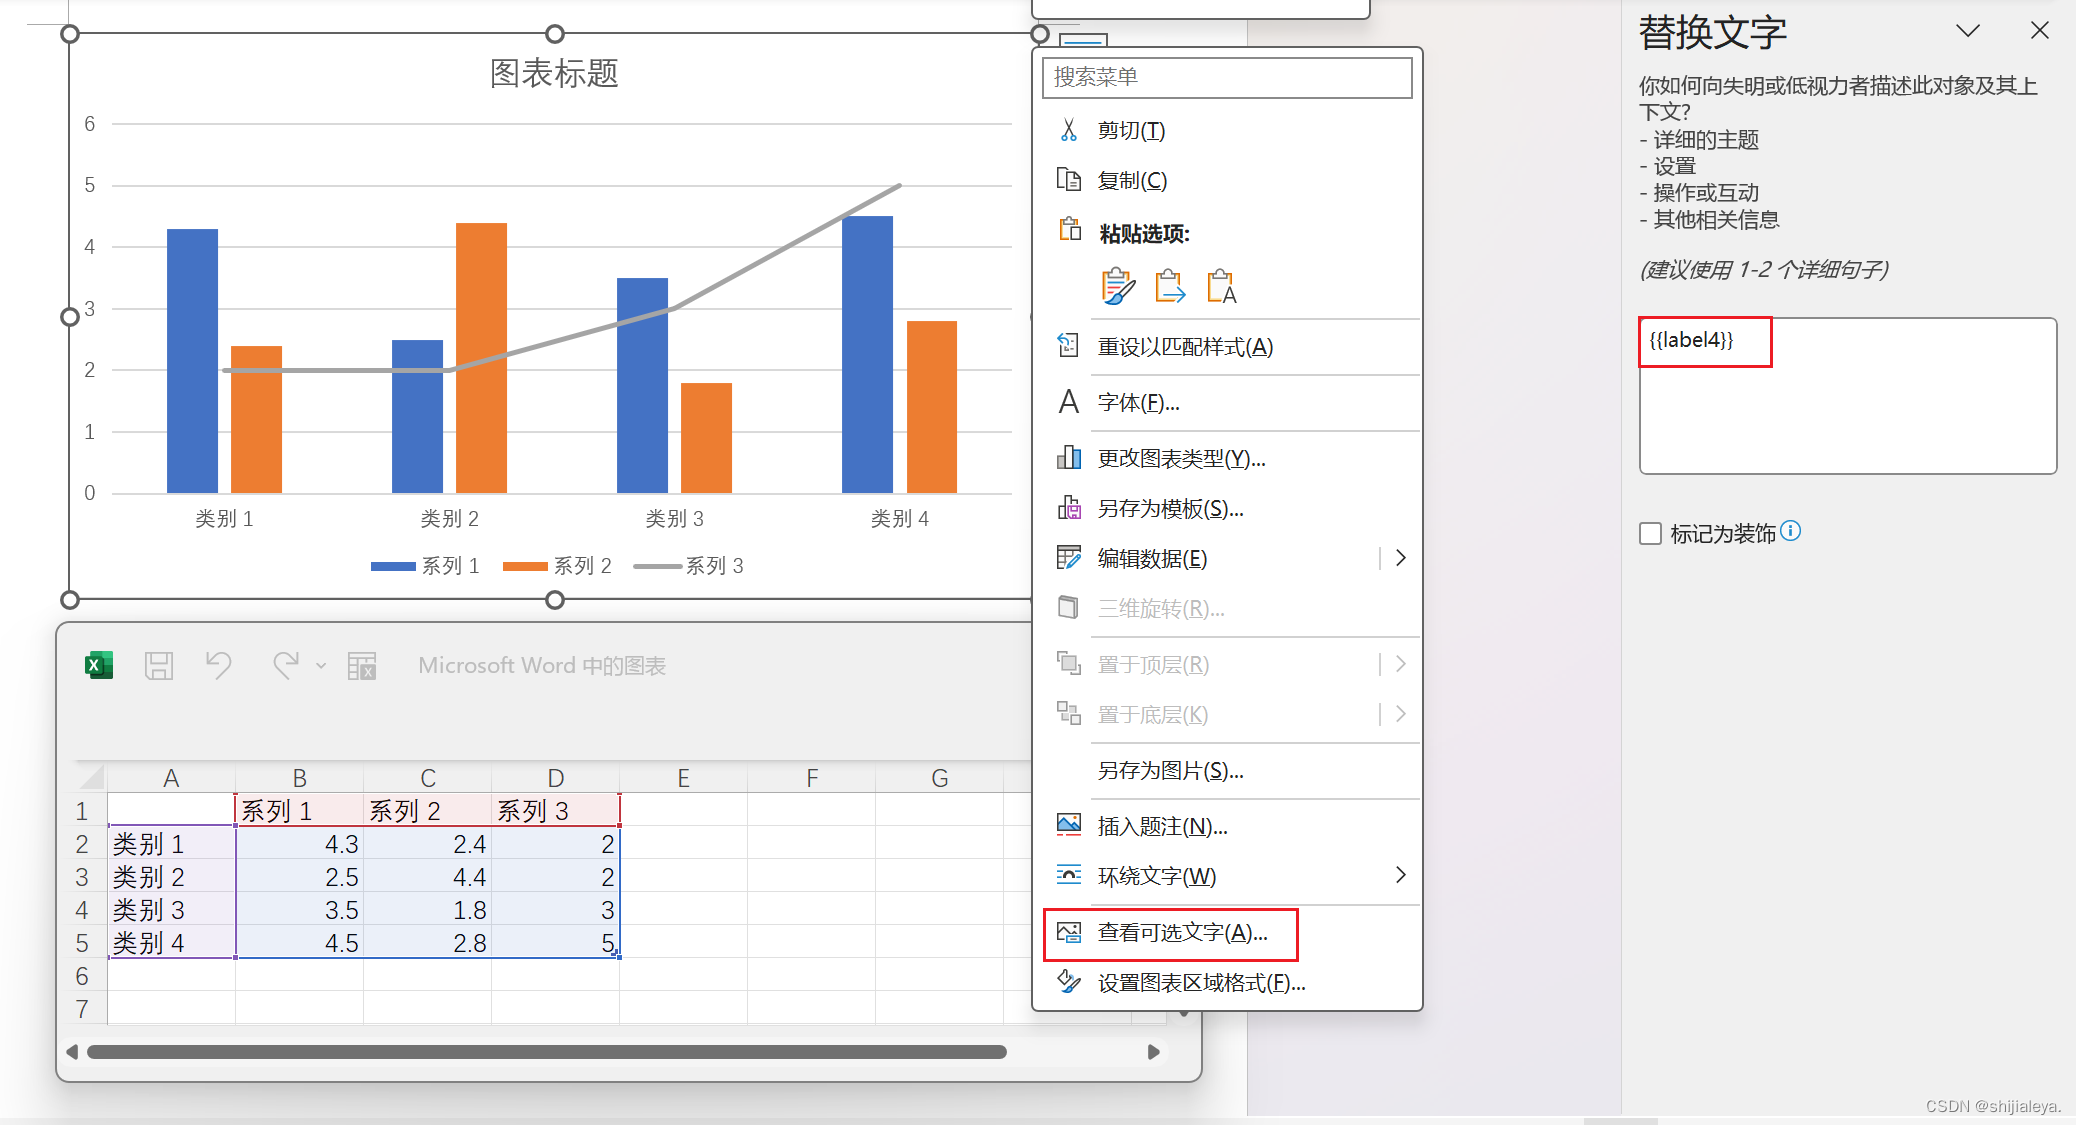
插入單系列圖表
單系列圖表指的是餅圖(3D餅圖)、圓環圖等。
同引入標簽插入圖片一樣,在插入圖表的時候,需要在 docx 模板中創建一個單系列的圖表,設置好樣式,之后右鍵圖表選擇【查看可選文字】,在可選文字中通過 {{xxx}} 的方式填寫屬性名稱。
案例代碼:
// 模板文件
String templateFilePath = "/word_template/quote_demo02.docx";
// 輸出文件
String outputFilePath = "D:/output.docx";
// 插入文本數據
Map<String, Object> templateData = new HashMap<String, Object>() {{// 添加單系列圖表的表格數據put("label2", Charts.ofSingleSeries("商品類型", new String[]{"電器類", "數碼類", "生活用品類", "食品類", "其他"}).series("數量", new Integer[]{30, 8, 25, 11, 3}).create());
}};
// 文件生成
PoitlUtils.generateWordFile(templateData, templateFilePath, outputFilePath);
文檔效果:
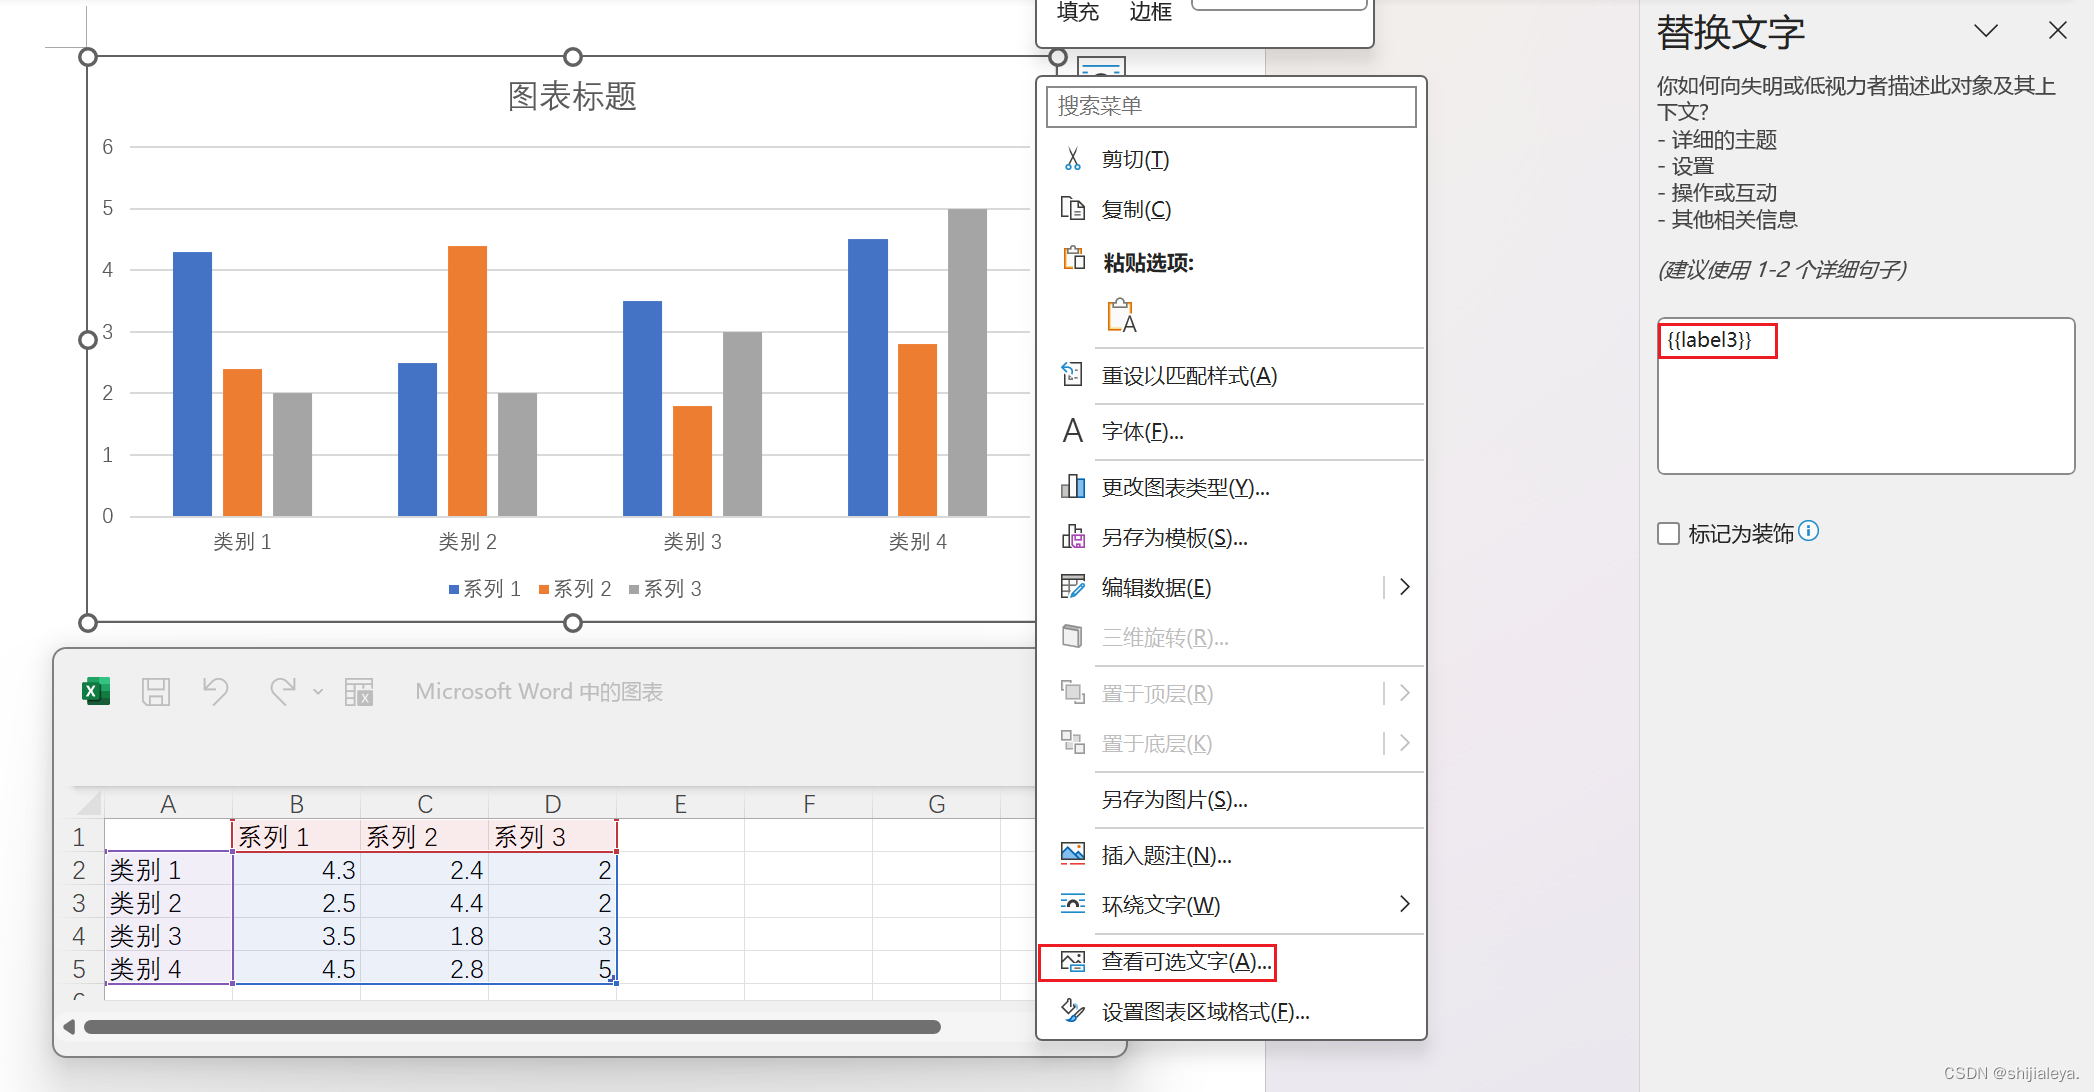
插入多系列圖表
多系列圖表指的是條形圖(3D條形圖)、柱形圖(3D柱形圖)、面積圖(3D面積圖)、折線圖(3D折線圖)、雷達圖、散點圖等。
模板文件如下:
案例代碼:
// 模板文件
String templateFilePath = "/word_template/quote_demo03.docx";
// 輸出文件
String outputFilePath = "D:/output.docx";
// 插入文本數據
Map<String, Object> templateData = new HashMap<String, Object>() {{// 添加單系列圖表的表格數據put("label3", Charts.ofMultiSeries("銷售額", new String[]{"第一季度", "第二季度", "第三季度", "第四季度"}).addSeries("電器類", new Integer[]{22, 25, 28, 25}).addSeries("數碼類", new Integer[]{5, 10, 8, 4}).addSeries("其他", new Integer[]{30, 42, 22, 33}).create());
}};
// 文件生成
PoitlUtils.generateWordFile(templateData, templateFilePath, outputFilePath);
文檔效果: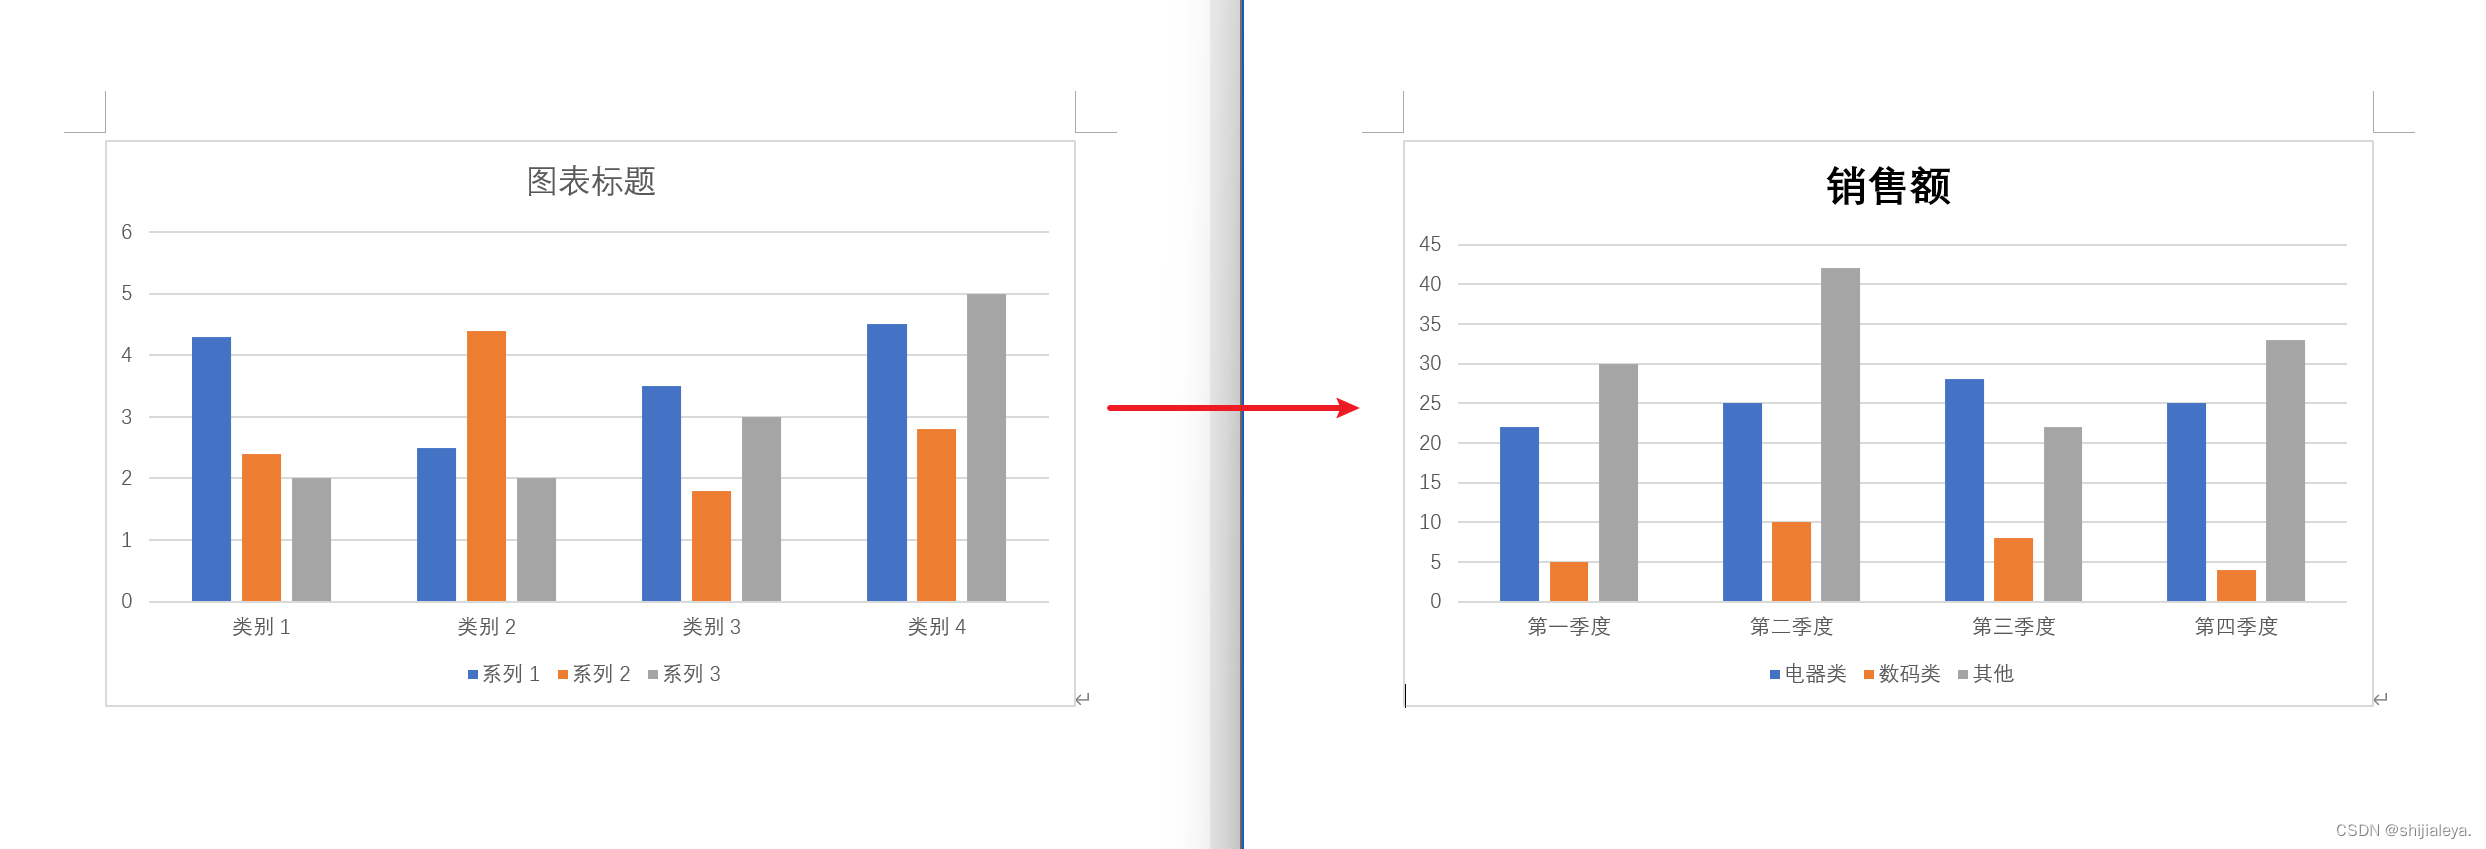
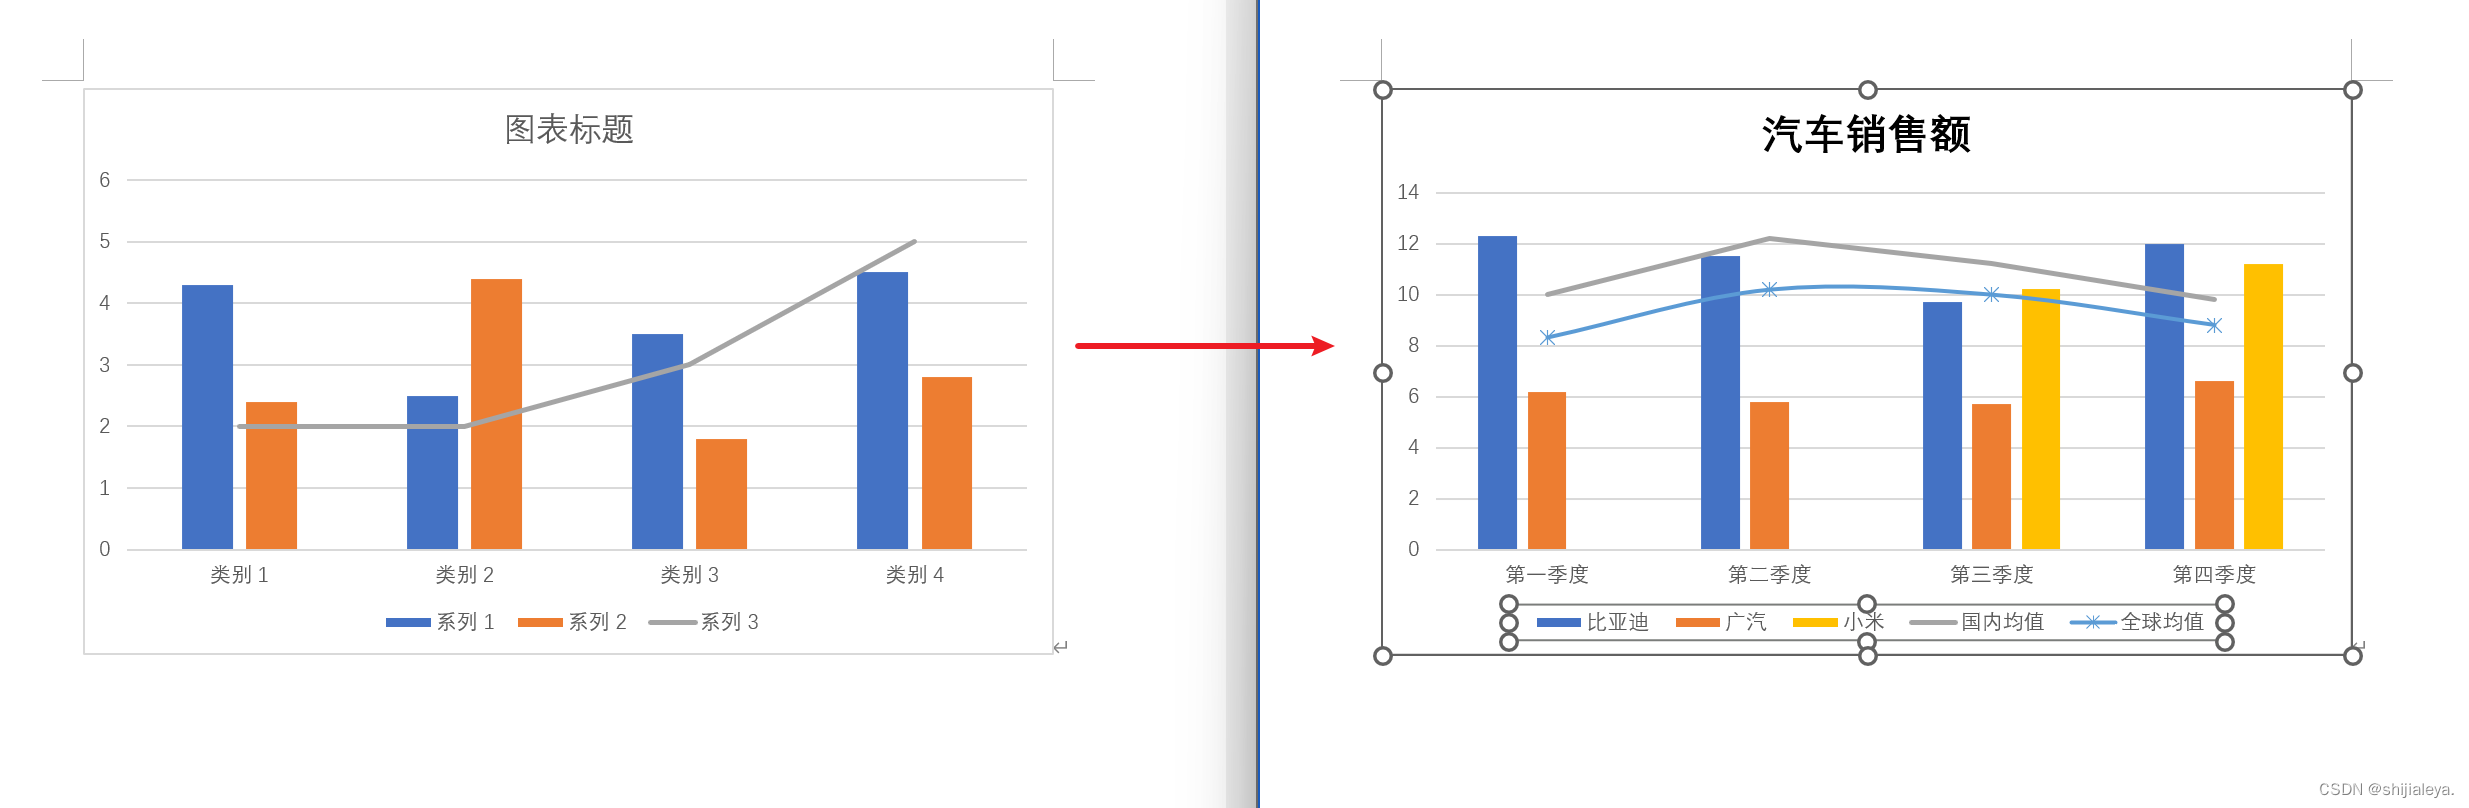
插入組合圖表
組合圖表指的是由多系列圖表(柱形圖、折線圖、面積圖)組合而成的圖表。
模板文件如下:
案例代碼:
// 模板文件
String templateFilePath = "/word_template/quote_demo04.docx";
// 輸出文件
String outputFilePath = "D:/output.docx";
// 插入文本數據
Map<String, Object> templateData = new HashMap<String, Object>() {{// 添加單系列圖表的表格數據put("label4", Charts.ofComboSeries("汽車銷售額", new String[]{"第一季度", "第二季度", "第三季度", "第四季度"})// 添加柱狀圖數據.addBarSeries("比亞迪", new Double[]{12.3, 11.5, 9.7, 12.0}).addBarSeries("廣汽", new Double[]{6.2, 5.8, 5.7, 6.6}).addBarSeries("小米", new Double[]{0.0, 0.0, 10.2, 11.2})// 添加折線圖數據.addLineSeries("國內均值", new Double[]{10.0, 12.2, 11.2, 9.8}).addLineSeries("全球均值", new Double[]{8.3, 10.2, 10.0, 8.8}).create());
}};
// 文件生成
PoitlUtils.generateWordFile(templateData, templateFilePath, outputFilePath);
文檔效果:


)


:實習初體驗)


——結合案例講Mybatis怎么操作sql)


)


)
