graspnet+Astra2相機實現部署
🚀 環境配置 🚀
- ubuntu 20.04
- Astra2相機
- cuda 11.0.1
- cudnn v8.9.7
- python 3.8.19
- pytorch 1.7.0
- numpy 1.23.5
1. graspnet的復現
具體的復現流程可以參考這篇文章:Ubuntu20.04下GraspNet復現流程
這里就不再詳細介紹了
2. Astra2的Python API
以下內容都是參考官方文檔:Orbbec SDK for Python 使用手冊
我們首先確認輸入到網絡中的數據為一個點云數據,再一個我們需要一個rgb圖像用來給點云上色,graspnetAPI幫我們寫好了從深度圖轉換到點云的函數create_point_cloud_from_depth_image,所以我們只需要寫好從相機的視頻流獲取深度圖片和rgb圖片的部分就好了,特別注意的是,大多數相機的rgb的fov是要大于深度圖的fov所以我們要對兩者進行對齊操作,對齊操作的本質就是在深度圖中填充0,使得深度圖和rgb圖的大小一致。大多數的相機廠商已經提供了具體的示例來演示如何進行對齊,這里就不再贅述。
這里我直接給出我寫的astra2.py,用于獲取相機的深度圖和rgb圖的代碼,大家可以參考一下思路
astra2.py
from pyorbbecsdk import *
import numpy as np
import cv2
import os
import open3d as o3dclass Camera:def __init__(self, width=1280, height=720,fps=15):self.im_width = widthself.im_height = heightself.fps = fpsself.intrinsic = Noneself.scale = None# 連接相機# self.connect()def connect(self):"""用于連接相機"""self.pipeline = Pipeline()config = Config()# color configprofile_list = self.pipeline.get_stream_profile_list(OBSensorType.COLOR_SENSOR)color_profile = profile_list.get_default_video_stream_profile()config.enable_stream(color_profile)# depth configprofile_list = self.pipeline.get_stream_profile_list(OBSensorType.DEPTH_SENSOR)assert profile_list is not Nonedepth_profile = profile_list.get_default_video_stream_profile()assert depth_profile is not Noneprint("color profile : {}x{}@{}_{}".format(color_profile.get_width(),color_profile.get_height(),color_profile.get_fps(),color_profile.get_format()))print("depth profile : {}x{}@{}_{}".format(depth_profile.get_width(),depth_profile.get_height(),depth_profile.get_fps(),depth_profile.get_format()))config.enable_stream(depth_profile)# set synchronize for depth img and color imgconfig.set_align_mode(OBAlignMode.SW_MODE)self.pipeline.enable_frame_sync()# start configself.pipeline.start(config)# get intrinsicself.intrinsic = self.get_intrinsic()def disconnect(self):"""用于斷開相機"""self.pipeline.stop()def get_frame(self):"""通過流來獲取color frame和depth frame"""while True:frames: FrameSet = self.pipeline.wait_for_frames(200)if frames is None:continuecolor_frame = frames.get_color_frame()if color_frame is None:continuedepth_frame = frames.get_depth_frame()if depth_frame is None:continueif color_frame != None and depth_frame != None:breakreturn color_frame, depth_framedef frame2data(self, color_frame, depth_frame):"""暫時沒用"""width = depth_frame.get_width()height = depth_frame.get_height()scale = depth_frame.get_depth_scale()depth_data = np.frombuffer(depth_frame.get_data(), dtype=np.uint16)depth_data = depth_data.reshape((height, width))width = color_frame.get_width()height = color_frame.get_height()color_data = np.asanyarray(color_frame.get_data(), dtype=np.uint16)# color_data = color_data.reshape((height, width, 3))return color_data.astype(np.float32), depth_data.astype(np.float32)def get_data(self):"""通過流來獲取color data和depth data"""# 連接相機self.connect()color_frame, depth_frame = self.get_frame()width = color_frame.get_width()height = color_frame.get_height()color_format = color_frame.get_format()data = np.asanyarray(color_frame.get_data())color_data = cv2.imdecode(data, cv2.IMREAD_COLOR)color_data.astype(np.float32)print('color_image.shape: ', color_data.shape)# print("===width: {}===".format(width))# print("===height: {}===".format(height))width = depth_frame.get_width()height = depth_frame.get_height()scale = depth_frame.get_depth_scale()print("===width: {}===".format(width))print("===height: {}===".format(height))print("===scale: {}===".format(scale))save_dir = os.path.join(os.getcwd(), "real/intrinsic")if not os.path.exists(save_dir):os.mkdir(save_dir)filename = save_dir + "/camera_depth_scale.txt"save = np.array([scale])np.savetxt(filename, save, delimiter=' ')depth_data = np.frombuffer(depth_frame.get_data(), dtype=np.uint16)depth_data = depth_data.reshape((height, width))depth_data = depth_data.astype(np.float32) * scaleprint('depth_image.shape: ', depth_data.shape)depth_data = cv2.normalize(depth_data, None, 0, 255, cv2.NORM_MINMAX, dtype=cv2.CV_16U)# 斷開相機self.disconnect()return color_data, depth_datadef get_data_saved(self):color_data, depth_data = self.get_data()# depth_image = depth_data_normalized.astype(np.uint8)save_image_dir = os.path.join(os.getcwd(), "real/images")if not os.path.exists(save_image_dir):os.mkdir(save_image_dir)depth_filename = save_image_dir + "/depth_{}x{}.png".format(depth_data.shape[0], depth_data.shape[1])color_filename = save_image_dir + "/color_{}x{}.png".format(color_data.shape[0], color_data.shape[1])cv2.imwrite(color_filename, color_data)# depth_data.tofile(depth_filename)cv2.imwrite(depth_filename, depth_data)return color_data, depth_datadef get_intrinsic(self):"""獲取內參"""# get intrinsicitsc = self.pipeline.get_camera_param()raw_intrinsic = itsc.depth_intrinsicintrinsic = np.array([raw_intrinsic.fx, 0, raw_intrinsic.cx, 0, raw_intrinsic.fy, raw_intrinsic.cy,0, 0, 1]).reshape(3,3)print("intrinsic: ", itsc)print('depth intrinsic: ', raw_intrinsic)print("intrinsic matrix", intrinsic)save_dir = os.path.join(os.getcwd(), "real/intrinsic")if not os.path.exists(save_dir):os.mkdir(save_dir)filename = save_dir + "/camera_itcs.txt"np.savetxt(filename, intrinsic, delimiter=' ')return intrinsic# for testdef visualize(self):"""顯示rgbd圖像"""color_data, depth_data = self.get_data()depth_image = cv2.normalize(depth_data, None, 0, 255, cv2.NORM_MINMAX, dtype=cv2.CV_8U)depth_image = cv2.applyColorMap(depth_image, cv2.COLORMAP_JET)# overlay color image on depth imagedepth_image = cv2.addWeighted(color_data, 0.5, depth_image, 0.5, 0)cv2.imshow("Depth with Color", depth_image)cv2.waitKey(500)if __name__ == '__main__':camera = Camera()camera.visualize()color, depth = camera.get_data()print("depth.shape: ", depth.shape)
測試相機是否實現對齊,結果如下
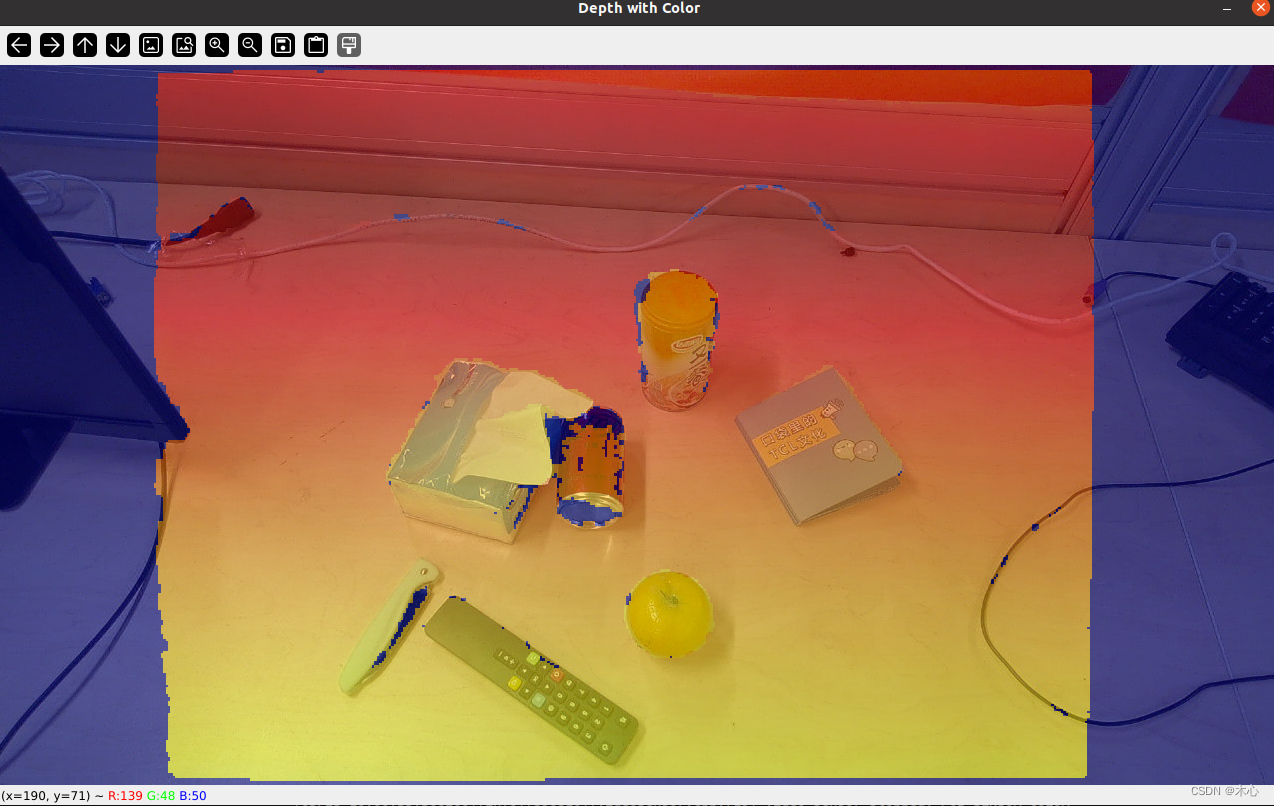
表明了相機確實實現了對齊操作
3. 修改demo.py
我們使用get_data()函數就能夠讓相機進行一次拍攝,然后得到color_data和depth_data供我們進行后續的處理。然后可以修改一下demo.py,將從文件讀取數據改為直接從相機進行讀取
demo.py
...
from astra2 import Camera()
astra2 = Camera()...def get_and_process_data():# 使用相機獲取一次數據color, depth = astra2.get_data()color = color / 255.0...
然后別的部分可以保持不變或者以后再修改。這里一定要使用官方提供的checkpoint-rs.tar,如果使用checkpoint-kn.tar,會出現異常,暫時我也沒有找到原因。
最后處理的效果如下

可以看到出現了許多我們不希望存在的抓取框,這個可以通過調整workspace_mask來進行過濾
復習筆記)

)

)


)


