一、Java事件處理機制的應用
JavaFX:JavaFX是Java平臺上的一個GUI工具包,它提供了一些內置的事件處理機制。
Swing:Swing是Java平臺上的另一個GUI工具包,它也提供了一些內置的事件處理機制。
二、JavaFX和Swing的關鍵區別:
以下是JavaFX和Swing之間的一些關鍵區別:
- JavaFX是比Swing更新的技術,旨在最終取代它。
- JavaFX旨在比Swing更現代和視覺上更吸引人,支持動畫、3D圖形和其他高級功能。
- JavaFX使用場景圖模型進行渲染,而Swing使用更傳統的基于小部件的方法。
- JavaFX比Swing更好地支持CSS樣式,使創建視覺上一致的UI更容易。
- JavaFX比Swing更好地支持多媒體和Web內容。
三、 使用idea創建JavaFX應用

BootstrapFX:https://github.com/kordamp/bootstrapfx
提供特殊的CSS樣式表用于美化JavaFX的GUI
ControlsFX:https://controlsfx.github.io/ 提供更多JavaFX中沒有的組件
FormsFX:https://github.com/dlsc-software-consulting-gmbh/FormsFX/ 可以快速創建和設計表單
FXGL:https://github.com/AlmasB/FXGL?tab=readme-ov-file
Ikonli:https://kordamp.org/ikonli/
圖標包
TilesFX:https://github.com/HanSolo/tilesfx?tab=readme-ov-file
游戲開發框架
ValidatorFX: https://github.com/effad/ValidatorFX
用于表單驗證等
三、筆記
本筆記大部分根據此視頻整理:https://www.bilibili.com/video/BV1Qf4y1F7Zv/?spm_id_from=333.337.search-card.all.click&vd_source=4085910f7c5c4dddcc04446ebf3aed6b
1. 基本機構
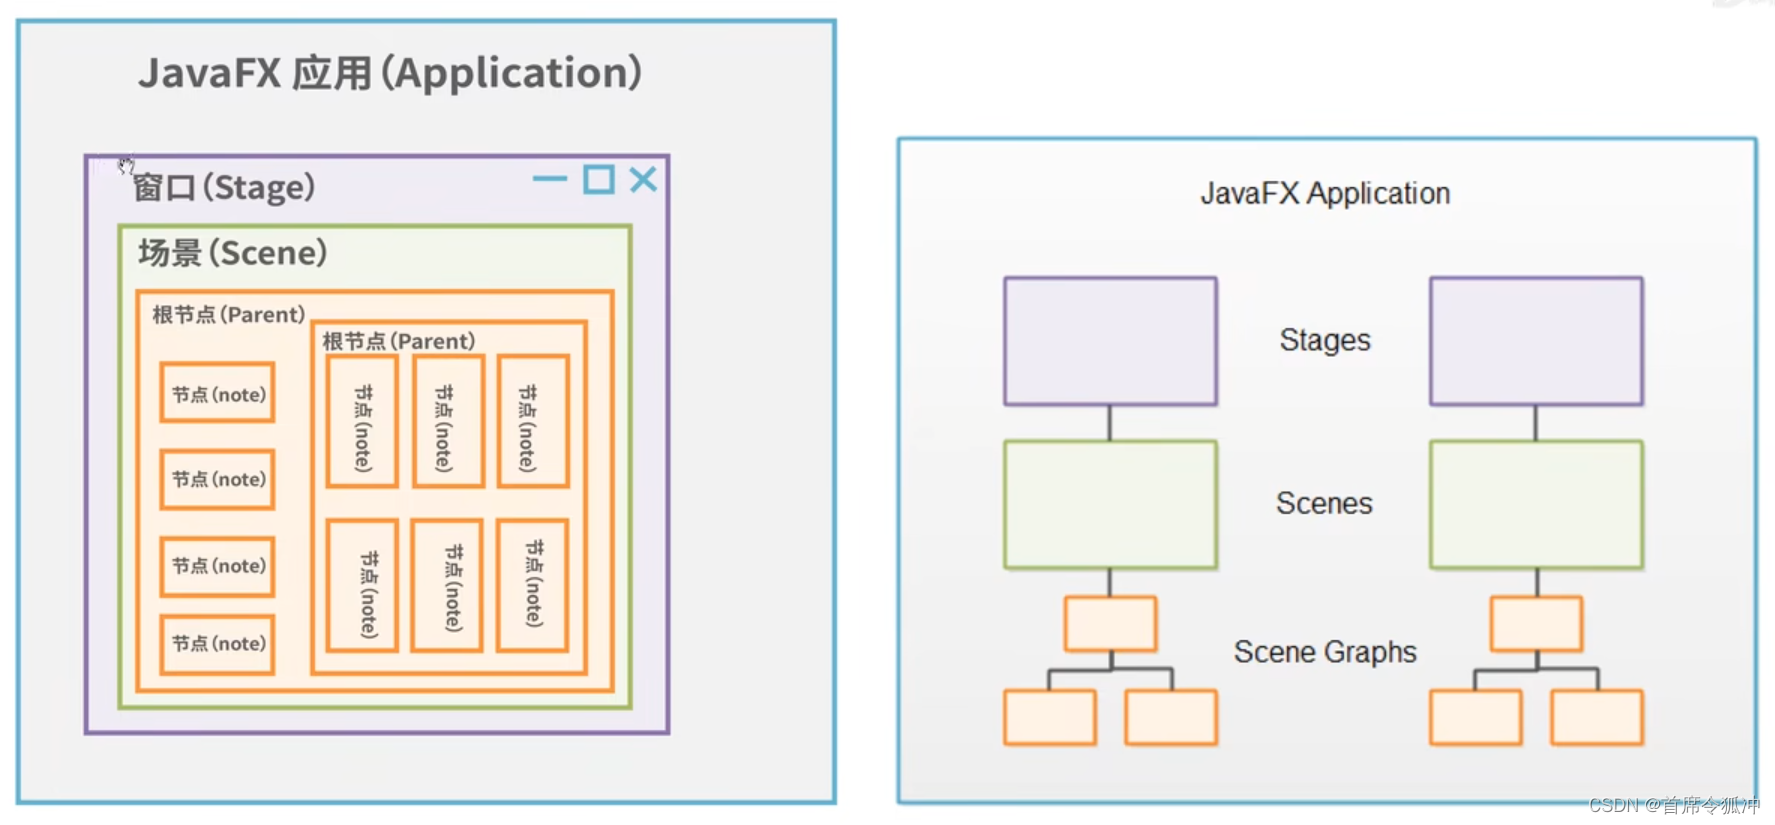
一個javaFX程序一般會有一個或多個窗口(Stage類的實例),
窗口可以設置一個場景(Scene類的實例),窗口可以切換不同的場景,但是一次只能設置一個,每個場景中可以添加一個或多個節點(node),每個node中也可以嵌套多個(node),node需有一個根節點
基本代碼結構
Test就相當于程序的入口類,這個入口類必須繼承Application,然后重寫Application中的start方法,start方法中有個Stage 參數,這個就是表示的程序的窗口類,然后在重寫的start方法中去實現一些場景,布局,節點等。
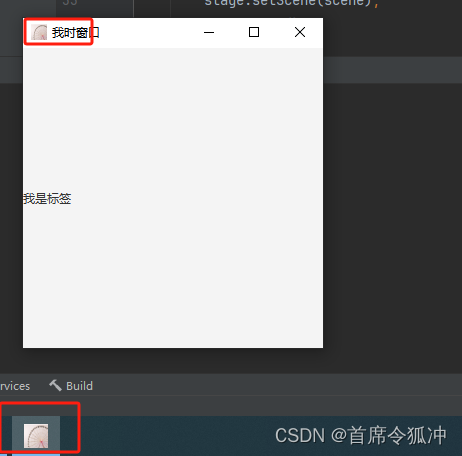
public class Test extends Application {public static void main(String[] args) {launch(args);}@Overridepublic void start(Stage stage) throws Exception {//窗口stage.setTitle("我時窗口");//標簽Label label = new Label("我是標簽");//場景Scene scene = new Scene(label,300 , 300);stage.setScene(scene);stage.show();}
}
2. 涉及類介紹
Application
Application類是程序入口類繼承之后,重寫其中的start()方法即可,但如果你要在窗口的創建前后做一些其他事情,那可以重寫其init()方法和stop()方法,因為Application的生命周期為init() ----->start() ----->stop()(窗口關閉時自動調用)。
在idea中使用alt+insert ,點擊Override Method 重寫 init() 和stop()
Stage
窗口
常用方法:
-
Title
-
icon 設置程序的
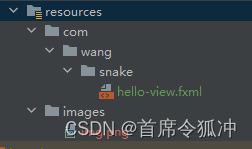
此icon圖片在resources下的images目錄,resources目錄的屬性為 Rsources Root
stage.getIcons().add(new Image(Objects.requireNonNull(getClass().getResourceAsStream("/images/img.png"))));
-
resiziable
窗口大小是否可變,默認true可變,false 不可變stage.setResizable(false); -
x,y,width,height
窗口的寬高,一般不設置,都是設置場景的寬高 -
StageStyye
窗口樣式,比如不顯示關閉和圖片等外邊樣式。//默認樣式,系統樣式 stage.initStyle(StageStyle.DECORATED);具體查看StageStyle中的其他枚舉
-
Modality
窗口的模態,也就是窗口之間的影響關系,比如子窗口打開之后不能點擊父窗口這種功能。stage.initModality(Modality.NONE);具體查看Modality中的其他枚舉
-
event
事件
//設置關閉窗口時,程序是否退出 默認為true 退出 false 不退出Platform.setImplicitExit(false);stage.setOnCloseRequest(event -> {System.out.println("關閉窗口");//取消默認關閉窗口事件event.consume();Alert alert = new Alert(Alert.AlertType.CONFIRMATION);alert.setTitle("退出程序");alert.setHeaderText(null);alert.setContentText("點擊確定退出");alert.showAndWait().ifPresent(response -> {if (response == ButtonType.OK) {stage.close();Platform.exit();}});});
Scene
場景
- 場景切換
創建button --> 設置button位置—>把button放入錨點布局中—>創建場景,把錨點布局放入場景中 —>給button設置事件(因為是切換場景,所以給button設置事件要有第二個場景對象,所以此處給button設置事件寫在最后,也就是第二個場景創建完成之后)
public void start(Stage stage) throws Exception {//創建一個buttonButton button0 = new Button("切換場景");//設置button的位置button0.setLayoutX(150);button0.setLayoutY(150);//把button放入錨點布局 AnchorPane anchorPane = new AnchorPane(button0);//創建場景,把錨點布局放入場景Scene scene = new Scene(anchorPane, 300, 300);Button button1 = new Button("返回場景");button1.setLayoutX(150);button1.setLayoutY(150);//標簽Label label = new Label("我是標簽");label.setLayoutX(100);label.setLayoutY(100);AnchorPane anchorPane1 = new AnchorPane(button1, label);//場景2Scene scene2 = new Scene(anchorPane1, 300, 300);//給button0 添加事件button0.setOnAction(event -> {stage.setScene(scene2);});button1.setOnAction(event -> {stage.setScene(scene);});//窗口stage.setTitle("我時窗口");stage.getIcons().add(new Image(Objects.requireNonNull(getClass().getResourceAsStream("/images/img.png"))));stage.setScene(scene);stage.show();}
- 鼠標箭頭的樣式
scene.setCursor(new ImageCursor(new Image(Objects.requireNonNull(getClass().getResourceAsStream("/images/1xxx.png")))));
scene2.setCursor(new ImageCursor(new Image(Objects.requireNonNull(getClass().getResourceAsStream("/images/2xxx.png")))));
Node
Node類是一個抽象類,所有控件都是的父類都是最終繼承的Node抽象類,包括但不限于 按鈕、復選框、顏色選擇、日期選擇、文字輸入框、導航欄以及所有的可見控件。
常用方法
下面以Label標簽為例來展示Node中的一些常用方法
        //標簽Label label = new Label("我是標簽");//設置標簽的位置label.setLayoutX(100);label.setLayoutY(100);//設置標簽的樣式label.setStyle("-fx-font-size: 20px; -fx-border-color: blue; -fx-border-width: 3px");//設置標簽的寬高label.setPrefWidth(200);label.setPrefHeight(50);//設置標簽的對齊方式label.setAlignment(Pos.CENTER);//設置標簽的可見性
//        label.setVisible(false);//設置標簽的混合模式 比如兩個圖層交叉部分的混合樣式,不常用
//        label.setBlendMode(BlendMode.ADD);//設置標簽的透明度label.setOpacity(0.5);//設置標簽的旋轉角度label.setRotate(45);//設置標簽的平移label.setTranslateX(20);label.setTranslateY(20);//設置3D的旋轉角度label.setScaleX(2);label.setScaleY(2);label.setScaleY(2);//獲取父節點Parent parent = label.getParent();//獲取節點所在的場景Scene scene1 = label.getScene();//獲取節點的idString id = label.getId();
Node屬性的 單向綁定 和 監聽器
Circle circle = new Circle();circle.setCenterX(50);circle.setCenterY(50);circle.setRadius(25);circle.setFill(Color.WHITE);circle.setStroke(Color.BLACK);//Node屬性的 單向綁定 ,例如 當scene的寬高改變時,circle的寬高也會改變circle.centerXProperty().bind(scene2.widthProperty().divide(2));circle.centerYProperty().bind(scene2.heightProperty().divide(2));//Node屬性的 監聽器 ,監聽屬性的變化circle.centerXProperty().addListener((observable, oldValue, newValue) -> {System.out.println("X 軸位置改變了,原來是 "+oldValue+",現在是 "+newValue);});circle.centerYProperty().addListener((observable, oldValue, newValue) -> {System.out.println("Y 軸位置改變了,原來是 "+oldValue+",現在是 "+newValue);});
控件事件綁定
控件也就是繼承node的那些控件,比如按鈕,文本框,標簽等,見上面Node介紹。
控件事件綁定就是給按鈕綁定點擊事件,鍵盤事件,鼠標事件,拖拽等。
其使用方法基本都是 控件.setOn事件(event) ,具體使用查看文檔,事件非常多。
示例為給按鈕綁定點擊事件,給場景綁定鍵盤按下釋放時的事件。
Button button3 = new Button("向上移動");//設置button的位置button3.setLayoutX(200);button3.setLayoutY(200);//button3按鈕綁定事件 label 向上移動5px ---- 主要方法button3.setOnAction(event -> {label.setLayoutY(label.getLayoutY()-5);});AnchorPane anchorPane1 = new AnchorPane(button1, label,circle,button3);//場景2Scene scene2 = new Scene(anchorPane1, 300, 300);//給場景2添加鍵盤事件 如果按鍵盤向下鍵擊,label 向下移動5pxscene2.setOnKeyReleased(event -> {KeyCode code = event.getCode();if (code == KeyCode.DOWN){label.setLayoutY(label.getLayoutY()+5);}});
Color、Font、Image
color
Color black = Color.BLACK;Color rgb = Color.rgb(255, 0, 0);Color hsb = Color.hsb(0, 0, 0);Color web = Color.web("#ff0000");
Font
Font font1 = new Font("微軟雅黑", 20);Font font = Font.font("微軟雅黑", 20);// 字體,自重(bold是加粗),大小Font font2 = Font.font("仿宋", FontWeight.BOLD, 20);//使用資源文件種的字體 或者加載網絡中的字體Font font3 = Font.loadFont(Objects.requireNonNull(Test.class.getResource("")).toExternalForm(), 20);
Image
可以使用本地或者網絡中的圖片
ImageView imageView = new ImageView();Image image = new Image(Objects.requireNonNull(getClass().getResourceAsStream("/images/img.png")));imageView.setImage(image);
3. FXML布局文件
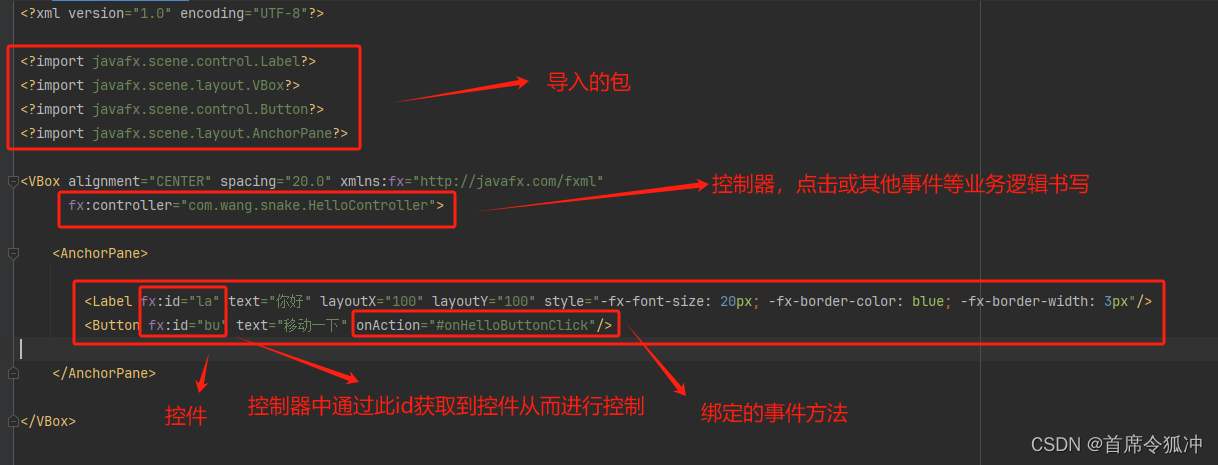
想寫什么控件,就用什么標簽,標簽里的屬性與寫類代碼時的屬性一直
4. SceneBuilder
首先下載SceneBuilder: https://openjfx.cn/scene-builder/
一路下一步安裝,安裝之后在idea中配置
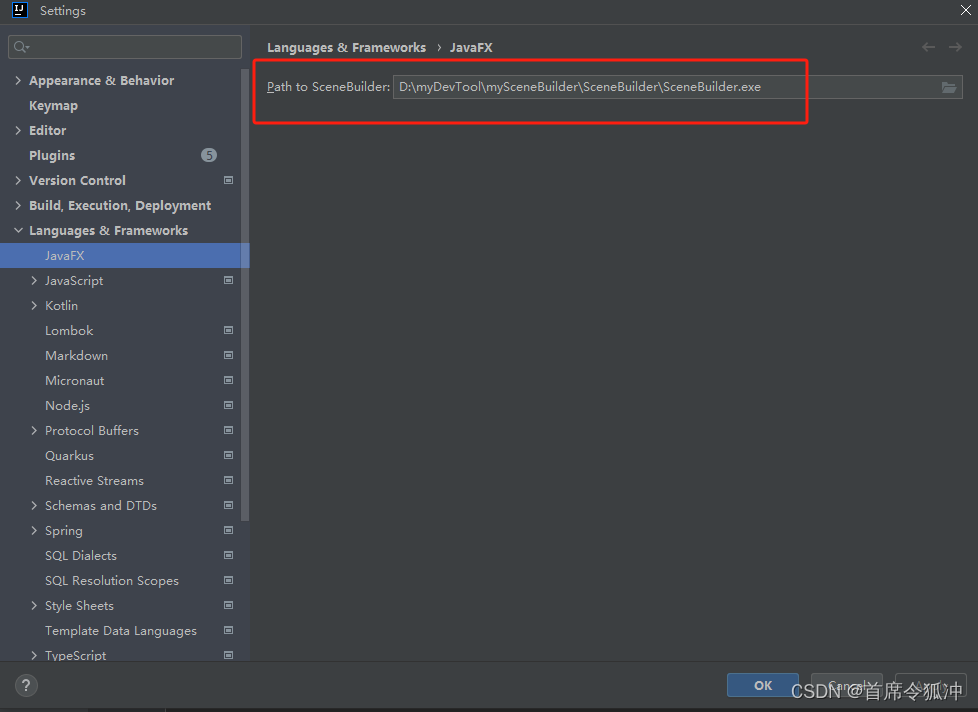
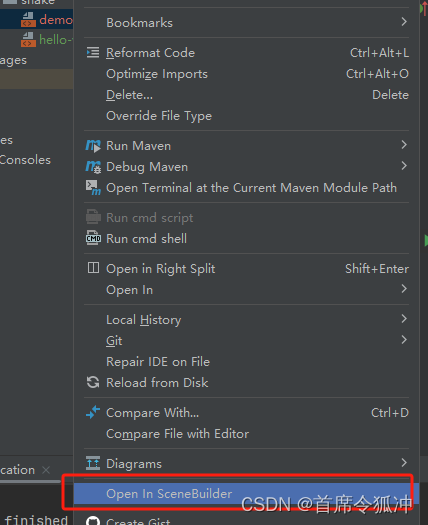
配置完之后在idea中打開fxml使用SceneBuilder打開方式
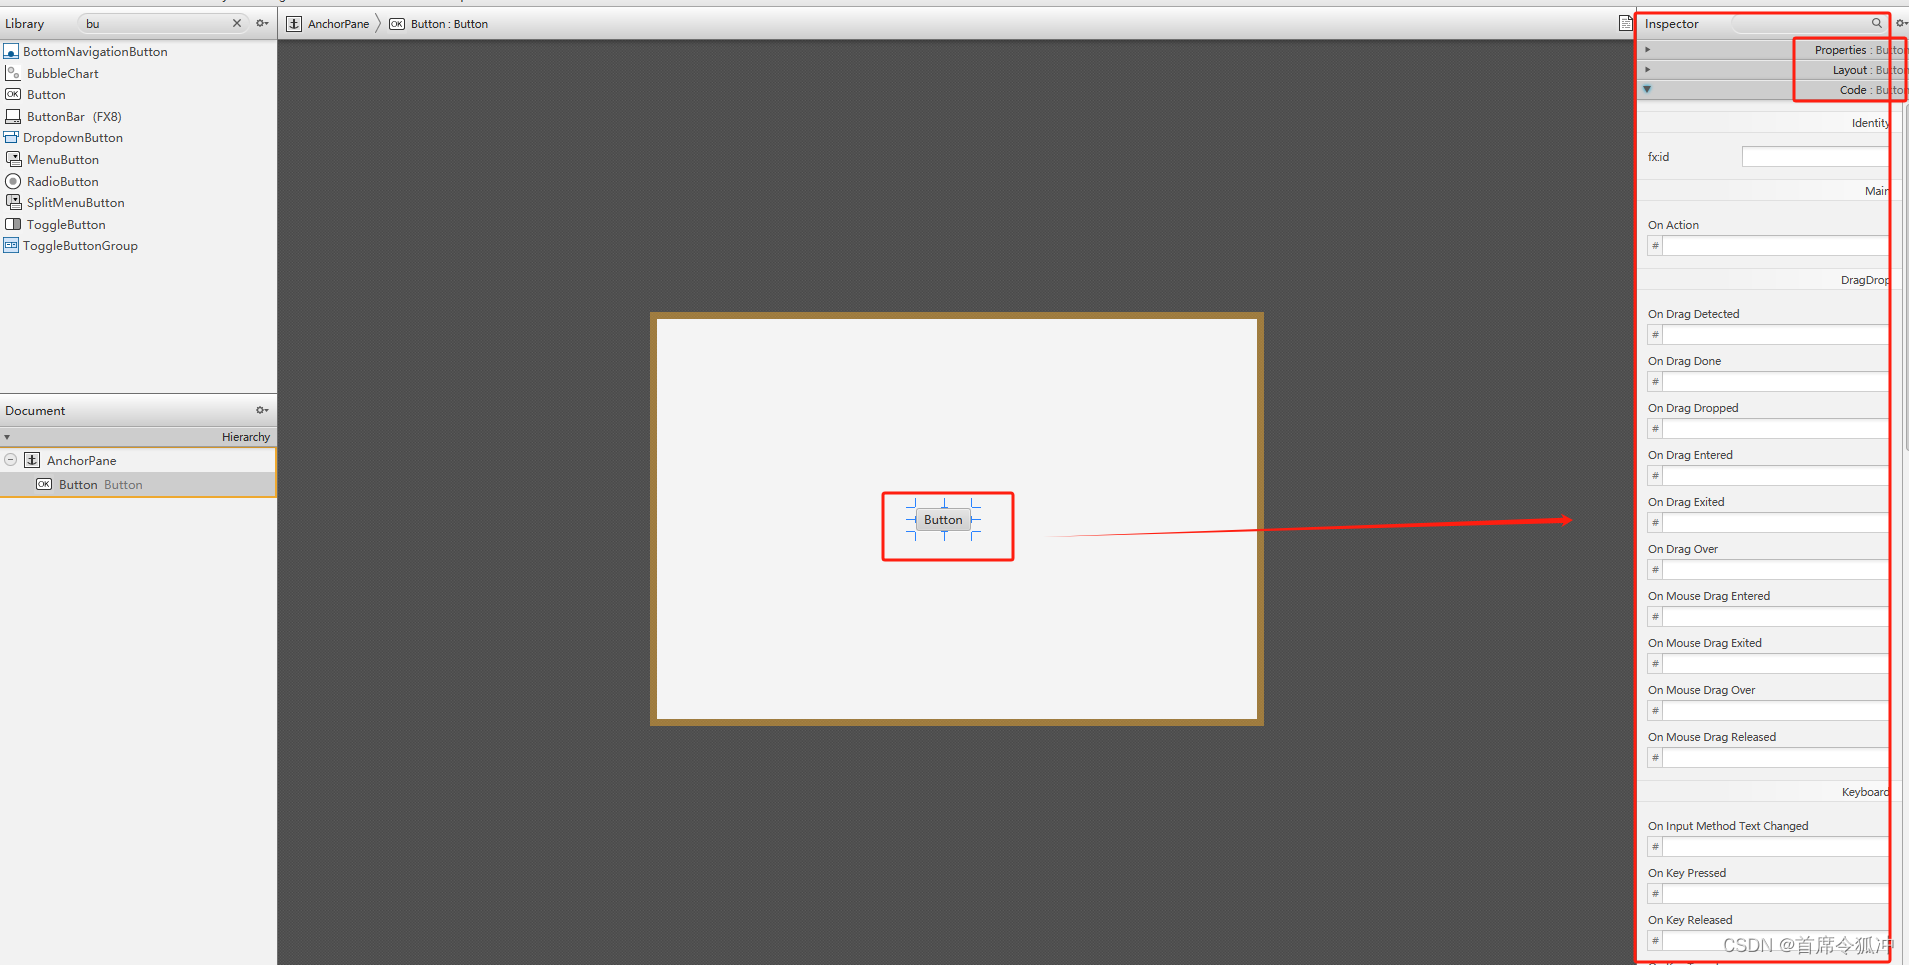
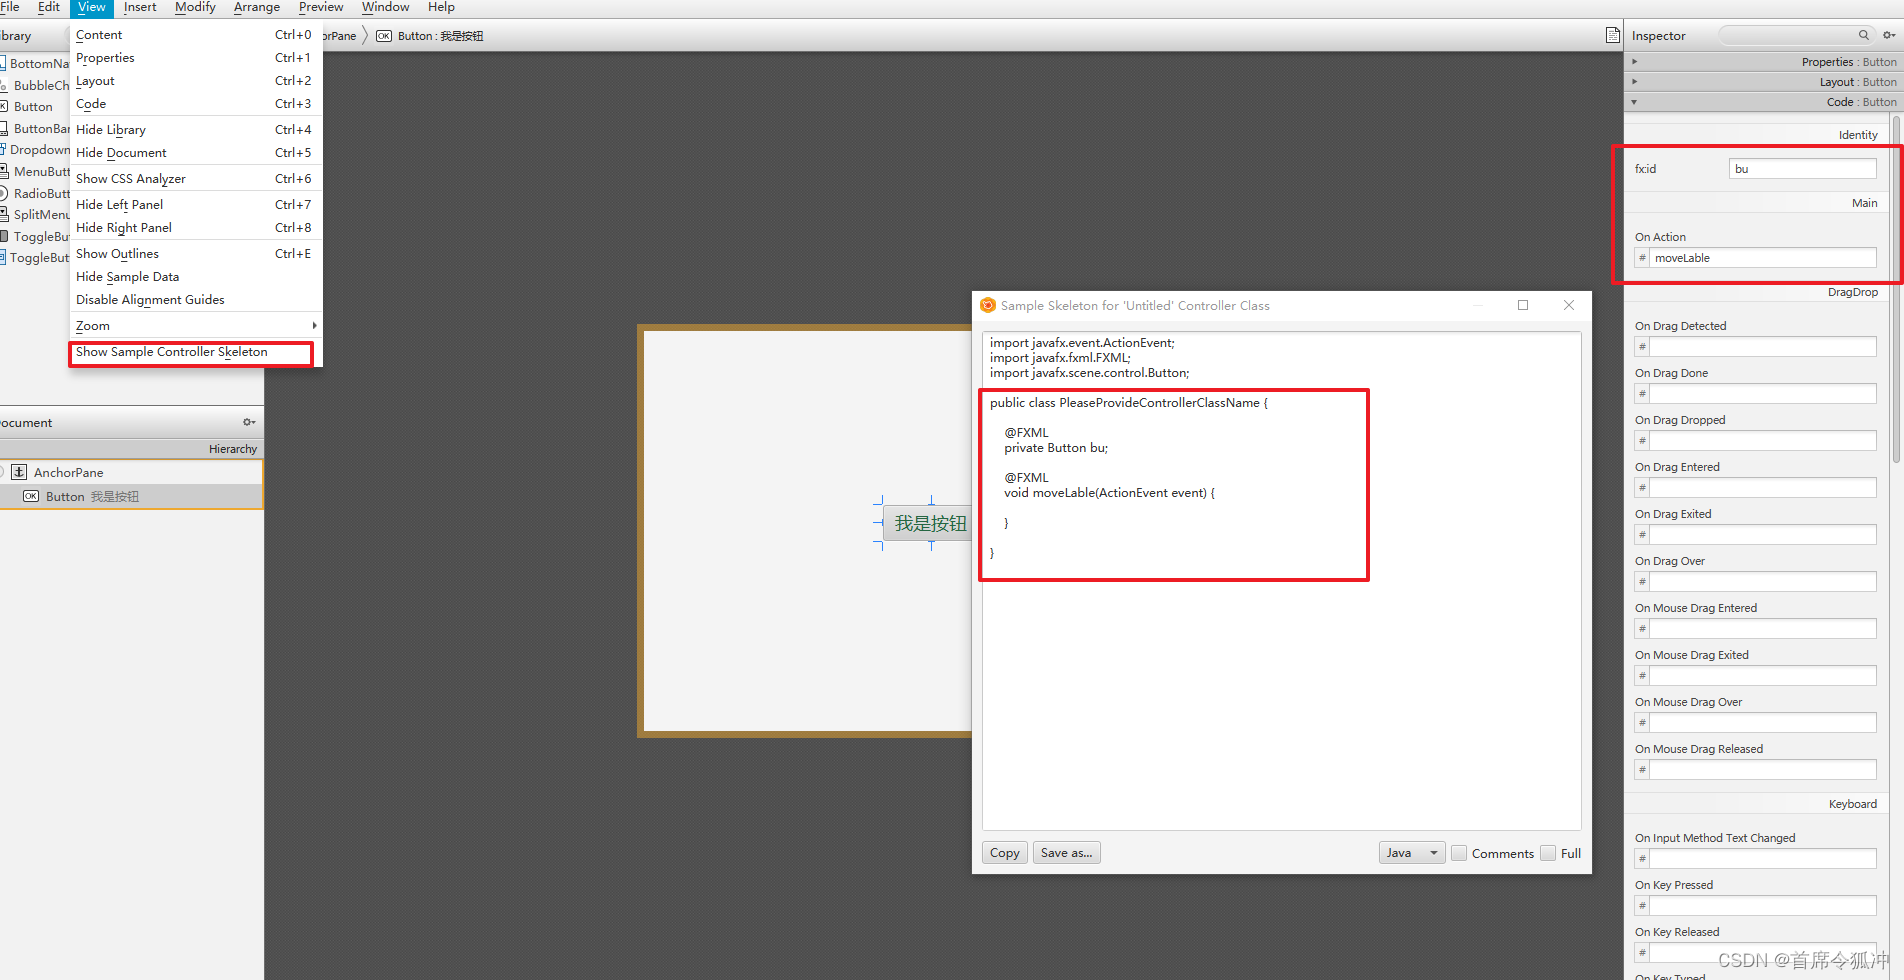
在SceneBuilder中創建FXMl,拖拽創建控件,然后修改控件屬性,綁定事件
出現控制器中的代碼
file–>save 保存 FXML
5. Controller中的initialize方法
布局文件 和 此controller 設置的屬性和事件都初始化完畢,則會自動調用 initialize
也就是說,在initialize 方法中,可以獲取布局文件中的控件,并做相應的初始化,如果布局文件中控件已經設置了對應的屬性或事件,則initialize方法中會覆蓋。
示例:以下代碼中initialize會覆蓋moveLable方法。因為moveLable是bu在FXMl中綁定的setOnAction事件,但是initialize又給bu綁定了另一個setOnAction事件,又因為initialize是在控件所有屬性和事件都初始化完畢之后才執行的,所以就覆蓋掉了之前綁定的事件。
public class HelloController2 {@FXMLpublic Label la2;@FXMLpublic Button bu;@FXMLvoid moveLable() {System.out.println("點擊");
//        la2.setLayoutY(la2.getLayoutY() - 10);}//布局文件 和 此controller 設置的屬性和事件都初始化完畢,則會自動調用 initialize//也就是說, 在initialize 方法中,可以獲取布局文件中的控件,并做相應的初始化,如果布局文件中控件已經設置了對應的屬性或事件,則initialize方法中會覆蓋public void initialize() {bu.setOnAction(event -> {System.out.println("xxxxxx");});}
}
6. 入口類Application中操作controller
比如,當需要圖形根據scene 的大小的變化而變化時,也就是scene 的操作需要影響控件。
主要方法:fxmlLoader.getController()
public class HelloApplication extends Application {@Overridepublic void start(Stage stage) throws IOException {FXMLLoader fxmlLoader = new FXMLLoader(HelloApplication.class.getResource("demo.fxml"));Scene scene = new Scene(fxmlLoader.load(), 600, 400);//-----主要方法HelloController2 controller = fxmlLoader.getController();//circleBind 為controller中自己定義的方法controller.circleBind(scene);//---主要方法stage.setTitle("Hello!");stage.setScene(scene);stage.show();}public static void main(String[] args) {launch();}
}
public class HelloController2 {@FXMLprivate Circle uu;public void circleBind(Scene scene){//單向數據綁定uu.centerYProperty().bind(scene.heightProperty().divide(2));uu.centerXProperty().bind(scene.widthProperty().divide(2));}}
7. Platform.runLater()
javaFX程序中,為了避免其他線程污染ui界面,其不允許除主線程以外的其他線程去更改或刷新ui,也就是說,刷新界面只能通過main方法來實現,也就是繼承Application那個類。
如果想在主線程刷新ui界面,可以使用Platform.runLater(),該方法給讓主線程空閑時候允許Platform.runLater()隊列里的內容。也就是說把對ui操作的代碼放在Platform.runLater()中。
Platform.runLater() 不是開啟多線程,因為其和主線程的線程名稱都一樣。
參考:https://blog.csdn.net/weixin_57792864/article/details/127025819
很多控件的事件方法其實內部都是使用了Platform.runLater()
錯誤示例:
Exception in thread "Thread-3" java.lang.IllegalStateException: Not on FX application thread; currentThread = Thread-3
public class Test2 extends Application {@Overridepublic void start(Stage stage) throws Exception {Button button = new Button("獲取姓名");button.setLayoutX(200);button.setLayoutY(200);Label label = new Label("我的姓名是");label.setLayoutX(200);label.setLayoutY(100);//錯誤代碼  ----------------------------button.setOnAction(event -> {new Thread(() -> {label.setText("我的姓名是 - 王二小");}).start();});AnchorPane anchorPane  = new AnchorPane(button,label);Scene scene = new Scene(anchorPane,400,400);stage.setScene(scene);stage.show();}public static void main(String[] args) {launch(args);}
}
正確示例:
public class Test2 extends Application {@Overridepublic void start(Stage stage) throws Exception {Button button = new Button("獲取姓名");button.setLayoutX(200);button.setLayoutY(200);Label label = new Label("我的姓名是");label.setLayoutX(200);label.setLayoutY(100);//主要代碼 -----------------------------------button.setOnAction(event -> {Platform.runLater(() -> {label.setText("我的姓名是 - 王二小");});});AnchorPane anchorPane  = new AnchorPane(button,label);Scene scene = new Scene(anchorPane,400,400);stage.setScene(scene);stage.show();}public static void main(String[] args) {launch(args);}
}
8. Canvas 畫布
https://www.bilibili.com/video/BV1Qf4y1F7Zv?p=14


(76))

】圖的最短路徑問題)


)


)


