若該文為原創文章,轉載請注明原文出處。
一、功能介紹
主要是想實現跟蹤視頻中的一個特定目標。
使用了OpenCV庫來實現視頻中特定目標的跟蹤。需要提供視頻文件路徑以及目標在第一幀中的位置坐標(x, y, width, height),程序會自動跟蹤該目標在整個視頻中的移動。
二、環境搭建
pip install opencv-contrib-python==3.4.13.47 -i https://pypi.tuna.tsinghua.edu.cn/simple其他版本自行測試。
三、工作原理
1. 初始化階段
- 程序首先讀取視頻的第一幀,獲取圖像尺寸
- 根據用戶提供的坐標初始化目標區域(ROI - Region of Interest)
- 保存初始目標區域作為模板用于后續重新檢測
- 嘗試創建并初始化跟蹤器(優先級順序:CSRT、KCF、MOSSE)
2. 主跟蹤循環
- 逐幀讀取視頻
- 使用跟蹤器更新目標位置
- 如果跟蹤成功:
- 在當前幀上繪制目標邊界框
- 更新位置歷史信息
- 定期更新模板庫(用于重新檢測)
- 重置失敗計數器
- 如果跟蹤失敗:
- 啟動重新檢測機制
3. 重新檢測機制
當跟蹤失敗時,程序采用多種策略來重新找到目標:
多層次搜索策略:
- 局部搜索:在預測位置附近區域搜索
- 擴展搜索:逐漸擴大搜索區域
- 全圖搜索:在整個圖像中搜索
多種檢測方法:
- 模板匹配:使用保存的模板與當前圖像進行匹配
- ORB特征匹配:使用ORB特征檢測和匹配算法
- 全圖特征匹配:在整個圖像上進行特征匹配
動態調整機制:
- 根據失敗次數動態調整搜索區域大小
- 使用歷史位置預測目標可能位置
- 循環使用不同檢測方法
4. 模板管理
程序維護一個模板庫:
- 保存多個不同時刻的目標圖像作為模板
- 定期更新模板以適應目標外觀變化
- 限制模板數量防止內存過度使用
5. 運動預測
- 記錄目標的歷史位置
- 計算平均運動向量預測下一位置
- 根據預測位置調整搜索區域中心
6. 失敗處理
- 設置最大失敗次數限制
- 多種重新檢測策略輪換使用
- 如果重新檢測成功則重新初始化跟蹤器
四、源碼
import cv2
import sys
import os
import numpy as np
import time
import mathdef safe_roi(roi, img_width, img_height):"""確保ROI在圖像范圍內"""x, y, w, h = roix = max(0, x)y = max(0, y)w = min(w, img_width - x)h = min(h, img_height - y)w = max(0, w)h = max(0, h)return (x, y, w, h)def adaptive_template_match(search_area, templates, scales=[0.4, 0.6, 0.8, 1.0, 1.2, 1.5, 1.8, 2.0]):"""自適應模板匹配,支持多模板和多尺度"""best_match = Nonebest_val = -1best_scale = 1.0best_template_idx = 0for scale in scales:# 縮放搜索區域if scale != 1.0:scaled_search = cv2.resize(search_area, None, fx=scale, fy=scale)else:scaled_search = search_areafor idx, template in enumerate(templates):# 確保模板小于搜索區域if template.shape[0] > scaled_search.shape[0] or template.shape[1] > scaled_search.shape[1]:continuetry:# 模板匹配res = cv2.matchTemplate(scaled_search, template, cv2.TM_CCOEFF_NORMED)min_val, max_val, min_loc, max_loc = cv2.minMaxLoc(res)# 更新最佳匹配if max_val > best_val:best_val = max_valbest_loc = max_locbest_scale = scalebest_template_idx = idxexcept:continuereturn best_val, best_loc, best_scale, best_template_idxdef validate_detection(frame, candidate_roi, templates, min_similarity=0.3):"""驗證檢測結果是否有效"""x, y, w, h = candidate_roi# 確保ROI有效if w <= 5 or h <= 5:return False# 提取候選區域candidate_img = frame[y:y+h, x:x+w]if candidate_img.size == 0 or candidate_img.shape[0] == 0 or candidate_img.shape[1] == 0:return False# 與所有模板比較相似度max_similarity = 0for template in templates:try:# 調整模板大小以匹配候選區域resized_template = cv2.resize(template, (w, h))# 計算直方圖相似度hist1 = cv2.calcHist([candidate_img], [0, 1, 2], None, [8, 8, 8], [0, 256, 0, 256, 0, 256])hist2 = cv2.calcHist([resized_template], [0, 1, 2], None, [8, 8, 8], [0, 256, 0, 256, 0, 256])cv2.normalize(hist1, hist1)cv2.normalize(hist2, hist2)similarity = cv2.compareHist(hist1, hist2, cv2.HISTCMP_CORREL)if similarity > max_similarity:max_similarity = similarityif similarity > min_similarity:return Trueexcept:continueprint(f"直方圖驗證失敗: 最大相似度={max_similarity:.2f}")return Falsedef contour_similarity(img1, template):"""通過輪廓比較圖像相似度"""try:# 預處理圖像if len(img1.shape) == 3:gray1 = cv2.cvtColor(img1, cv2.COLOR_BGR2GRAY)else:gray1 = img1.copy()if len(template.shape) == 3:gray2 = cv2.cvtColor(template, cv2.COLOR_BGR2GRAY)else:gray2 = template.copy()# 二值化_, thresh1 = cv2.threshold(gray1, 127, 255, cv2.THRESH_BINARY)_, thresh2 = cv2.threshold(gray2, 127, 255, cv2.THRESH_BINARY)# 查找輪廓contours1, _ = cv2.findContours(thresh1, cv2.RETR_EXTERNAL, cv2.CHAIN_APPROX_SIMPLE)contours2, _ = cv2.findContours(thresh2, cv2.RETR_EXTERNAL, cv2.CHAIN_APPROX_SIMPLE)if not contours1 or not contours2:return 0.0# 取最大輪廓cnt1 = max(contours1, key=cv2.contourArea)cnt2 = max(contours2, key=cv2.contourArea)# 計算相似度 (值越小越相似)similarity = cv2.matchShapes(cnt1, cnt2, cv2.CONTOURS_MATCH_I2, 0.0)# 轉換為相似度分數 (1-相似度,值越大越相似)return 1.0 - min(similarity, 1.0)except Exception as e:print(f"輪廓相似度計算錯誤: {e}")return 0.0def template_match_score(frame, roi, templates):"""評估候選區域的模板匹配分數"""x, y, w, h = roiif w <= 5 or h <= 5:return 0.0patch = frame[y:y+h, x:x+w]if patch.size == 0:return 0.0best_score = 0.0for template in templates:try:# 調整模板大小resized_tpl = cv2.resize(template, (w, h))# 計算匹配分數result = cv2.matchTemplate(patch, resized_tpl, cv2.TM_CCOEFF_NORMED)_, max_val, _, _ = cv2.minMaxLoc(result)if max_val > best_score:best_score = max_valexcept:continuereturn best_scoredef detect_with_orb(frame, templates, search_area_roi=None):"""使用ORB特征匹配檢測目標"""if search_area_roi:x1, y1, x2, y2 = search_area_roisearch_area = frame[y1:y2, x1:x2]else:search_area = frameif search_area.size == 0:return None# 初始化ORB檢測器orb = cv2.ORB_create(nfeatures=2000)# 檢測搜索區域的關鍵點和描述符kp_search, des_search = orb.detectAndCompute(search_area, None)if des_search is None or len(kp_search) < 10:return Nonebest_match = Nonebest_matches = 0for template in templates:# 檢測模板的關鍵點和描述符kp_template, des_template = orb.detectAndCompute(template, None)if des_template is None or len(kp_template) < 5:continue# 創建BFMatcher對象bf = cv2.BFMatcher(cv2.NORM_HAMMING, crossCheck=True)try:# 匹配描述符matches = bf.match(des_template, des_search)matches = sorted(matches, key=lambda x: x.distance)# 選擇最佳匹配if len(matches) > 10:# 獲取匹配點坐標src_pts = np.float32([kp_template[m.queryIdx].pt for m in matches]).reshape(-1, 1, 2)dst_pts = np.float32([kp_search[m.trainIdx].pt for m in matches]).reshape(-1, 1, 2)# 計算單應性矩陣M, mask = cv2.findHomography(src_pts, dst_pts, cv2.RANSAC, 5.0)if M is not None:# 獲取模板的角點h, w = template.shape[:2]pts = np.float32([[0, 0], [0, h-1], [w-1, h-1], [w-1, 0]]).reshape(-1, 1, 2)# 應用單應性矩陣dst = cv2.perspectiveTransform(pts, M)# 計算邊界框xs = [p[0][0] for p in dst]ys = [p[0][1] for p in dst]x, y, w, h = int(min(xs)), int(min(ys)), int(max(xs)-min(xs)), int(max(ys)-min(ys))if w > 5 and h > 5 and w < frame.shape[1] and h < frame.shape[0]:# 計算匹配質量match_quality = len(matches) * (1.0 - np.mean([m.distance for m in matches[:10]])/100.0)if match_quality > best_matches:best_matches = match_qualitybest_match = (x, y, w, h)except Exception as e:print(f"ORB匹配錯誤: {e}")continueif best_match and search_area_roi:# 調整坐標到原圖x, y, w, h = best_matchbest_match = (x + search_area_roi[0], y + search_area_roi[1], w, h)return best_matchdef main(video_path, roi_coords):# 打開視頻文件cap = cv2.VideoCapture(video_path)if not cap.isOpened():print("無法打開視頻文件")return# 讀取第一幀獲取圖像尺寸ret, frame = cap.read()if not ret:print("無法讀取第一幀")returnheight, width = frame.shape[:2]print(f"視頻尺寸: {width}x{height}")# 解析并驗證ROI坐標try:if len(roi_coords) != 4:raise ValueError("需要4個坐標值: x, y, width, height")x, y, w, h = map(int, roi_coords)print(f"初始ROI: x={x}, y={y}, w={w}, h={h}")if w <= 0 or h <= 0:raise ValueError("ROI寬度和高度必須為正數")roi_box = safe_roi((x, y, w, h), width, height)if roi_box[2] <= 0 or roi_box[3] <= 0:raise ValueError(f"調整后ROI無效: {roi_box}")print(f"有效ROI: x={roi_box[0]}, y={roi_box[1]}, w={roi_box[2]}, h={roi_box[3]}")except Exception as e:print(f"ROI坐標錯誤: {e}")print(f"請確保ROI在圖像范圍內 (0-{width}, 0-{height})")cap.release()return# 保存初始模板用于重新檢測x0, y0, w0, h0 = roi_boxinitial_template = frame[y0:y0+h0, x0:x0+w0].copy()# 創建跟蹤器tracker = Nonetracker_types = [('CSRT', cv2.TrackerCSRT_create),('KCF', cv2.TrackerKCF_create),('MOSSE', cv2.TrackerMOSSE_create)]# 重新讀取第一幀cap.set(cv2.CAP_PROP_POS_FRAMES, 0)ret, frame = cap.read()# 嘗試不同的跟蹤器for tracker_name, tracker_creator in tracker_types:try:print(f"嘗試使用 {tracker_name} 跟蹤器...")tracker = tracker_creator()success = tracker.init(frame, roi_box)if success:print(f"{tracker_name} 跟蹤器初始化成功")breakelse:print(f"{tracker_name} 跟蹤器初始化失敗")tracker = Noneexcept:print(f"{tracker_name} 跟蹤器創建失敗")tracker = Noneif tracker is None:print("無法初始化任何跟蹤器")cap.release()returnprint("開始跟蹤目標...")# 創建窗口cv2.namedWindow("目標跟蹤", cv2.WINDOW_NORMAL)# 顯示初始幀和ROIcv2.rectangle(frame, (roi_box[0], roi_box[1]), (roi_box[0] + roi_box[2], roi_box[1] + roi_box[3]), (0, 255, 0), 2)cv2.putText(frame, "按ESC退出", (10, 30), cv2.FONT_HERSHEY_SIMPLEX, 0.7, (0, 255, 0), 2)cv2.imshow("目標跟蹤", frame)cv2.waitKey(1000)frame_count = 0tracking_failures = 0max_failures = 200  # 允許更多失敗幀reinit_threshold = 3  # 更早開始重新檢測last_known_position = roi_boxreinit_attempts = 0last_success_time = time.time()# 模板管理templates = [initial_template]  # 模板列表max_templates = 5  # 更多模板template_update_interval = 5  # 更頻繁更新模板# 運動預測prev_positions = []max_history = 10# 重新檢測狀態reinit_mode = 0  # 0: 模板匹配, 1: ORB特征匹配, 2: 全圖搜索while True:ret, frame = cap.read()if not ret:print("視頻結束")breakframe_count += 1# 更新跟蹤器success, bbox = tracker.update(frame)# 處理跟蹤結果if success:x, y, w, h = [int(v) for v in bbox]safe_bbox = safe_roi((x, y, w, h), width, height)if safe_bbox[2] > 0 and safe_bbox[3] > 0:# 更新位置歷史if len(prev_positions) >= max_history:prev_positions.pop(0)prev_positions.append((x, y, w, h))cv2.rectangle(frame, (safe_bbox[0], safe_bbox[1]), (safe_bbox[0] + safe_bbox[2], safe_bbox[1] + safe_bbox[3]), (0, 255, 0), 2)status_text = f"跟蹤成功 (幀 {frame_count})"cv2.putText(frame, status_text, (10, 30), cv2.FONT_HERSHEY_SIMPLEX, 0.7, (0, 255, 0), 2)tracking_failures = 0last_known_position = safe_bboxreinit_attempts = 0last_success_time = time.time()reinit_mode = 0  # 重置重新檢測模式# 定期更新模板if frame_count % template_update_interval == 0:# 獲取當前目標區域target_roi = frame[safe_bbox[1]:safe_bbox[1]+safe_bbox[3], safe_bbox[0]:safe_bbox[0]+safe_bbox[2]]# 檢查與現有模板的相似度min_similarity = 0.7too_similar = Falsefor tpl in templates:if target_roi.shape[0] > 5 and target_roi.shape[1] > 5:# 計算直方圖相似度hist1 = cv2.calcHist([target_roi], [0], None, [256], [0,256])hist2 = cv2.calcHist([tpl], [0], None, [256], [0,256])cv2.normalize(hist1, hist1)cv2.normalize(hist2, hist2)similarity = cv2.compareHist(hist1, hist2, cv2.HISTCMP_CORREL)if similarity > min_similarity:too_similar = Truebreak# 只添加顯著不同的模板if not too_similar:# 如果模板數量已達上限,移除最舊的if len(templates) >= max_templates:templates.pop(0)# 添加新模板if target_roi.size > 0 and target_roi.shape[0] > 5 and target_roi.shape[1] > 5:templates.append(target_roi.copy())print(f"更新模板,當前模板數: {len(templates)}")# 處理跟蹤失敗if not success:tracking_failures += 1status_text = f"跟蹤失敗 (幀 {frame_count})"cv2.putText(frame, status_text, (10, 30), cv2.FONT_HERSHEY_SIMPLEX, 0.7, (0, 0, 255), 2)# 嘗試重新檢測目標if tracking_failures >= reinit_threshold and reinit_attempts < 30:reinit_attempts += 1print(f"嘗試重新檢測目標 (嘗試 {reinit_attempts}, 模式 {reinit_mode})")# 動態調整搜索區域邊界base_margin = 300dynamic_margin = min(1000, base_margin + 50 * reinit_attempts)  # 更大搜索范圍# 使用位置歷史預測搜索區域if len(prev_positions) >= 2:# 計算平均運動向量dx = 0dy = 0speeds = []for i in range(1, len(prev_positions)):dx_i = prev_positions[i][0] - prev_positions[i-1][0]dy_i = prev_positions[i][1] - prev_positions[i-1][1]dx += dx_idy += dy_ispeeds.append(np.sqrt(dx_i**2 + dy_i**2))# 計算平均速度avg_speed = np.mean(speeds) if speeds else 0# 基于速度和方向預測predict_frames = min(20, 5 + reinit_attempts)  # 預測幀數predict_x = last_known_position[0] + int(dx * predict_frames / len(prev_positions))predict_y = last_known_position[1] + int(dy * predict_frames / len(prev_positions))# 根據速度調整搜索范圍speed_factor = min(3.0, 1.0 + avg_speed/50.0)dynamic_margin = int(min(1000, 300 * speed_factor + 50 * reinit_attempts))# 確保預測位置在圖像范圍內predict_x = max(0, min(width - 1, predict_x))predict_y = max(0, min(height - 1, predict_y))search_center = (predict_x, predict_y)else:search_center = (last_known_position[0] + last_known_position[2] // 2, last_known_position[1] + last_known_position[3] // 2)# 計算搜索區域search_x1 = max(0, search_center[0] - dynamic_margin)search_y1 = max(0, search_center[1] - dynamic_margin)search_x2 = min(width, search_center[0] + dynamic_margin)search_y2 = min(height, search_center[1] + dynamic_margin)search_area_roi = (search_x1, search_y1, search_x2, search_y2)# 根據重新檢測模式選擇方法candidate_roi = None# 模式0: 模板匹配if reinit_mode == 0:if search_x2 > search_x1 and search_y2 > search_y1:search_area = frame[search_y1:search_y2, search_x1:search_x2]# 自適應模板匹配best_val, best_loc, best_scale, best_template_idx = adaptive_template_match(search_area, templates)print(f"模板匹配結果: 置信度={best_val:.2f}, 尺度={best_scale}, 模板={best_template_idx}")# 動態匹配閾值match_threshold = max(0.35, 0.7 - 0.02 * reinit_attempts)  # 更低閾值if best_val > match_threshold:# 計算匹配位置match_x = search_x1 + int(best_loc[0] / best_scale)match_y = search_y1 + int(best_loc[1] / best_scale)# 計算縮放后的模板尺寸scaled_w = int(w0 * (1.0 / best_scale))scaled_h = int(h0 * (1.0 / best_scale))# 創建新的ROIcandidate_roi = (match_x, match_y, scaled_w, scaled_h)print(f"模板匹配候選: {candidate_roi}")# 模式1: ORB特征匹配if reinit_mode == 1 or (reinit_mode == 0 and candidate_roi is None):print("嘗試ORB特征匹配...")candidate_roi = detect_with_orb(frame, templates, (search_x1, search_y1, search_x2, search_y2))if candidate_roi:print(f"ORB檢測到候選目標: {candidate_roi}")# 模式2: 全圖搜索if reinit_mode == 2 or (reinit_mode == 1 and candidate_roi is None):print("嘗試金字塔全圖搜索...")# 使用圖像金字塔pyramid_levels = 3best_candidate = Nonebest_score = -1for level in range(pyramid_levels):scale = 1.0 / (2 ** level)resized_frame = cv2.resize(frame, None, fx=scale, fy=scale)# 在縮小后的圖像上搜索candidate = detect_with_orb(resized_frame, templates)if candidate:# 縮放回原圖坐標x, y, w, h = candidatecandidate = (int(x/scale), int(y/scale), int(w/scale), int(h/scale))# 評分 (使用模板匹配驗證)score = template_match_score(frame, candidate, templates)if score > best_score:best_score = scorebest_candidate = candidatecandidate_roi = best_candidateif candidate_roi:print(f"金字塔搜索檢測到候選目標: {candidate_roi}, 分數={best_score:.2f}")# 處理檢測結果if candidate_roi:safe_new_roi = safe_roi(candidate_roi, width, height)if safe_new_roi[2] > 5 and safe_new_roi[3] > 5:# 添加更靈活的驗證閾值min_sim = max(0.25, 0.4 - 0.01 * reinit_attempts)  # 隨嘗試次數降低閾值# 添加多種驗證方法valid = validate_detection(frame, safe_new_roi, templates, min_sim)# 添加輪廓相似度驗證if not valid and len(templates) > 0:template = templates[-1]  # 使用最新模板candidate_img = frame[safe_new_roi[1]:safe_new_roi[1]+safe_new_roi[3], safe_new_roi[0]:safe_new_roi[0]+safe_new_roi[2]]if candidate_img.size > 0:contour_sim = contour_similarity(candidate_img, template)print(f"輪廓相似度: {contour_sim:.2f}")if contour_sim > 0.6:  # 輪廓相似度閾值print(f"輪廓驗證通過: {contour_sim:.2f}")valid = Trueif valid:# 嘗試重新初始化跟蹤器for tracker_name, tracker_creator in tracker_types:try:new_tracker = tracker_creator()init_success = new_tracker.init(frame, safe_new_roi)if init_success:tracker = new_trackertracking_failures = 0reinit_attempts = 0last_known_position = safe_new_roiprint(f"重新檢測到目標!使用 {tracker_name} 跟蹤器")# 繪制重新檢測到的區域cv2.rectangle(frame, (safe_new_roi[0], safe_new_roi[1]), (safe_new_roi[0] + safe_new_roi[2], safe_new_roi[1] + safe_new_roi[3]), (255, 0, 0), 2)cv2.putText(frame, "重新檢測到目標!", (10, 60), cv2.FONT_HERSHEY_SIMPLEX, 0.7, (255, 0, 0), 2)# 更新最后成功時間last_success_time = time.time()breakexcept:continueelse:print("檢測結果驗證失敗")# 繪制搜索區域cv2.rectangle(frame, (search_x1, search_y1), (search_x2, search_y2), (0, 255, 255), 1)cv2.putText(frame, f"搜索區域 (模式:{reinit_mode})", (search_x1, search_y1-10), cv2.FONT_HERSHEY_SIMPLEX, 0.5, (0, 255, 255), 1)# 升級重新檢測模式if reinit_attempts % 5 == 0:reinit_mode = (reinit_mode + 1) % 3print(f"升級重新檢測模式到 {reinit_mode}")if tracking_failures > max_failures:print(f"連續跟蹤失敗超過 {max_failures} 次,停止跟蹤")break# 顯示幀cv2.imshow("目標跟蹤", frame)# 按ESC退出if cv2.waitKey(30) & 0xFF == 27:break# 釋放資源cap.release()cv2.destroyAllWindows()print(f"跟蹤完成,處理了 {frame_count} 幀")def get_first_frame(video_path):"""提取并保存視頻第一幀"""cap = cv2.VideoCapture(video_path)if not cap.isOpened():print("無法打開視頻文件")return Noneret, frame = cap.read()cap.release()if not ret:print("無法讀取視頻第一幀")return Noneoutput_path = "first_frame.jpg"cv2.imwrite(output_path, frame)print(f"已保存第一幀為: {output_path}")return output_pathif __name__ == "__main__":if len(sys.argv) < 6:print("請提供視頻文件路徑和初始ROI坐標")print("用法: python tracker.py <video_path> <x> <y> <width> <height>")print("示例: python tracker.py video.mp4 100 50 200 150")# 如果只有視頻路徑,提取第一幀if len(sys.argv) == 2:video_path = sys.argv[1]if os.path.exists(video_path):first_frame = get_first_frame(video_path)if first_frame:print(f"請使用圖像查看軟件打開 '{first_frame}' 獲取ROI坐標")else:video_path = sys.argv[1]roi_coords = sys.argv[2:6]  # 讀取四個坐標值# 檢查視頻文件是否存在if not os.path.exists(video_path):print(f"錯誤: 視頻文件 '{video_path}' 不存在")else:main(video_path, roi_coords)
五、測試
python .\02_tracker.py .\normal_video.mp4 185 375 70 70測試結果
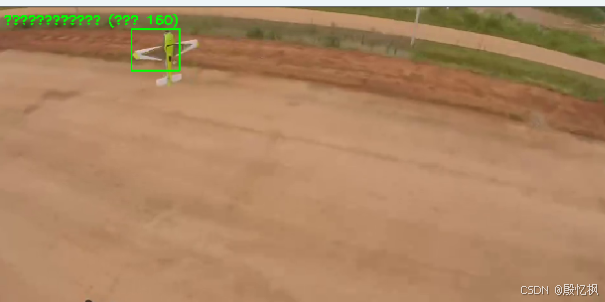
測試過程中發現,中途如果目標消失或目標過小,那就檢測不到,算法還有待優化
如有侵權,或需要完整代碼,請及時聯系博主。

)
![[免費]基于Python的招聘職位信息推薦系統(獵聘網數據分析與可視化)(Django+requests庫)【論文+源碼+SQL腳本】](http://pic.xiahunao.cn/[免費]基于Python的招聘職位信息推薦系統(獵聘網數據分析與可視化)(Django+requests庫)【論文+源碼+SQL腳本】)

材質詳解)
)


)

:PHP 與 HTML 表單:實現數據交互)


、共用體、枚舉類型、typedef類型)