1. MCP Server介紹
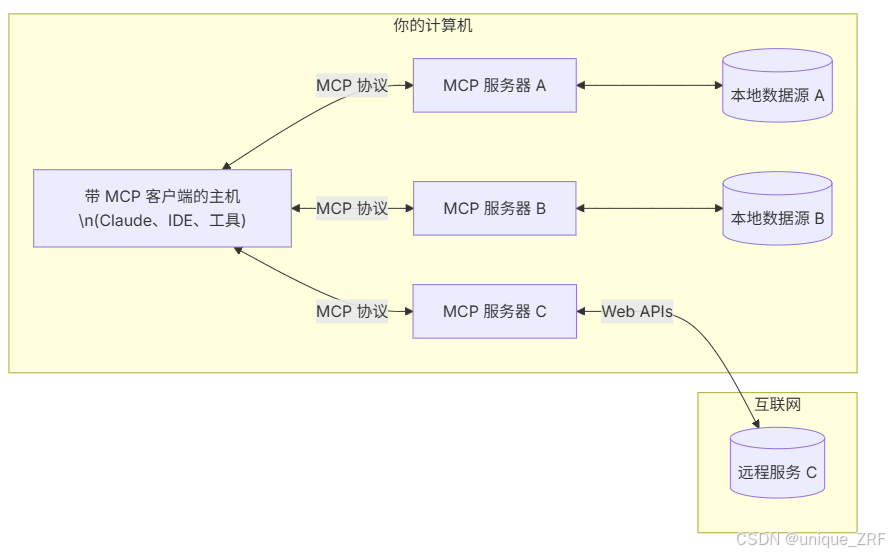
MCP Server 是實現模型上下文協議(MCP)的服務器,旨在為 AI 模型提供一個標準化接口,連接外部數據源和工具,例如文件系統、數據庫或 API。
相比之下,在MCP出現前,AI調用工具基本上是通過Function Call 完成的,通過Function Call 調取相關Function 或 API 調用相關工具,AI 模型根據用戶提示生成函數調用指令,這些指令隨后由系統執行,例如查詢天氣或管理文件。但是存在兩個問題:
- 不同的大模型廠商 Function Call 的格式不一致
- 大量的 api 工具的輸入和輸出格式不一致,封裝管理起來繁瑣不方便
而 MCP 相當于是一個統一的 USB-C,不僅統一了不同大模型廠商的 Function Call 格式,也對相關工具的封裝進行了統一。
今天 MCP 的價值也得到了越來越多的人的認可。
目前 MCP 支持兩種主要的傳輸協議:
- **Stdio 傳輸協議:**主要針對本地,需要在用戶本地安裝命令行工具,對運行環境有特定要求
- **SSE(Server-Sent Events)傳輸協議:**主要針對云服務部署,基于 HTTP 長連接實現
目前市面上支持MCP的客戶端主要有如Claude desktop,Cline,Cursor 等,由于claude封禁較嚴重,我們主要基于自建 Client,Cursor 和 Cline進行構建。
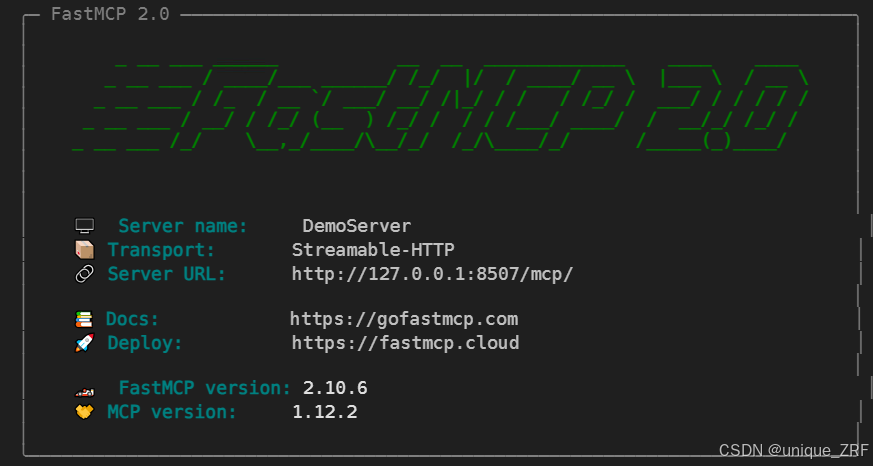
2. 基于FastMCP的簡單server-client交互示例(http方式調用)
2.1 server端代碼
安裝依賴包:
pip install fastmcp httpx
服務端代碼(server.py)
from fastmcp import FastMCP# 1. 創建 MCP 實例
mcp = FastMCP("demo-server")# 2. 用裝飾器注冊工具
@mcp.tool()
def greet(name: str) -> str:"""Say hello to someone."""return f"Hello, {name}!"
@mcp.tool()
def calculate(a:float,b:float,op:str) -> float:"""數學計算器(支持加減乘除)"""ops = {'+': a + b,'-': a - b,'*': a * b,'/': a / b if b != 0 else float('nan')}result = ops.get(op, float('nan'))return result# 3. 啟動服務
if __name__ == "__main__":# transport 默認是 stdio,也可以換成 "http" 或 "sse"mcp.run(transport="http", host="127.0.0.1", port=9000)
在Terminal運行,注意要切換到對應的conda環境中:
python server.py
注意:如果使用jupyter運行,則需要將mcp.run(transport="http",host="127.0.0.1", port=9000)
改為
await mcp.run_async(transport="http", host="127.0.0.1", port=9000)
2.2. client端代碼示例
客戶端代碼(client.py):
import asyncio
from fastmcp import Client# 1. 指定 MCP 服務器地址
config = {"mcpServers": {"demo": {"url": "http://127.0.0.1:9000/mcp","transport": "streamable-http"}}
}async def main():client = Client(config)async with client:# 2. 調用工具result1 = await client.call_tool("greet", {"name": "world"})result2 = await client.call_tool("calculate", {"a":12,"b":15,"op": "*"})calculate_result = result2.content[0].textname_result2 = result1.content[0].textprint("計算結果:", calculate_result)print("輸出結果:", name_result2)if __name__ == "__main__":asyncio.run(main())
在Terminal運行,注意要切換到對應的conda環境中:
python client.py
運行結果:

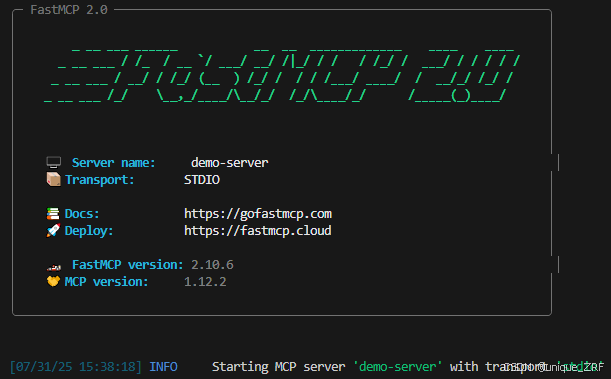
3. 基于FastMCP的簡單server-client交互示例(stdio方式調用)
3.1 server端代碼
from fastmcp import FastMCP# 1. 創建 MCP 實例
mcp = FastMCP("demo-server")# 2. 用裝飾器注冊工具
@mcp.tool()
def greet(name: str) -> str:"""Say hello to someone."""return f"Hello, {name}!"# 3. 啟動服務(改為 stdio)
if __name__ == "__main__":mcp.run(transport="stdio")
運行:
python server.py
3.2. client端代碼
import asyncio
from mcp import ClientSession, StdioServerParameters
from mcp.client.stdio import stdio_clientasync def main():# 1. 告訴客戶端如何啟動 server.pyserver_params = StdioServerParameters(command="python",args=["server.py"],env=None)# 2. 建立連接并拿到 sessionasync with stdio_client(server_params) as (read, write):async with ClientSession(read, write) as session:await session.initialize()# 3. 調用 greet 工具result = await session.call_tool("greet", arguments={"name": "Bob"})print("結果 ->", result.content[0].text)   # Hello, Bob!if __name__ == "__main__":asyncio.run(main())
運行:
python client.py
運行結果

4. 參考鏈接:
MCP Server & Client教程
FastMcp簡介
Python FastMCP中文文檔
MCP 通信消息格式之 JSON-RPC 2.0 協議
MCP簡介
)

:PHP 與 HTML 表單:實現數據交互)


、共用體、枚舉類型、typedef類型)


![[12月考試] E](http://pic.xiahunao.cn/[12月考試] E)

——設備樹(下)——OF函數)


