文章目錄
- 引言
- 環境準備
- 1. 安裝Xinference
- 2. 啟動Xinference服務
- 3. 部署語音模型
- Python實現文本轉語音
- 關鍵參數說明
- 應用場景
- 性能優化建議
- 常見問題解決
- 結語
引言
文本轉語音(Text-to-Speech, TTS)技術在智能助手、有聲讀物、語音導航等應用中扮演著重要角色。本文將介紹如何利用Xinference框架部署高質量的語音合成模型(如CosyVoice-300M-SFT),并通過類似OpenAI的API接口實現文本轉語音功能。
環境準備
1. 安裝Xinference
pip install "xinference[all]"
2. 啟動Xinference服務
# 啟動服務(默認端口9997)
xinference-local
3. 部署語音模型
# 部署300M大小的CosyVoice模型
xinference launch --model-name cosyvoice --model-type tts --model-size-in-billions 0.3
Python實現文本轉語音
import openai
from pydub import AudioSegment
from pydub.playback import play
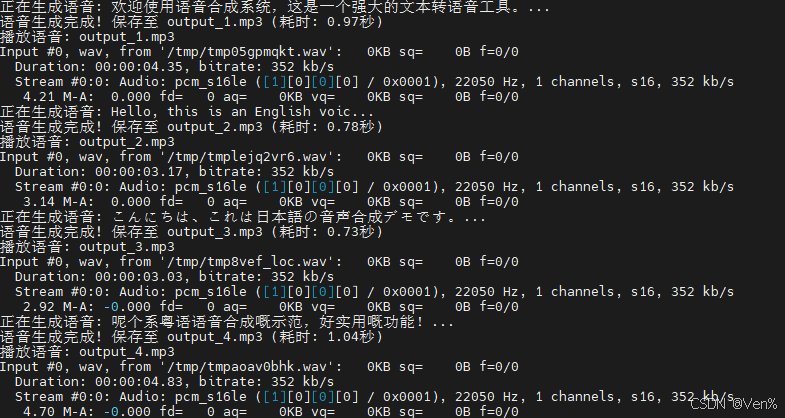
import timeclass TextToSpeechConverter:def __init__(self, base_url="http://127.0.0.1:9998/v1", api_key="not-needed"):self.client = openai.Client(api_key=api_key, base_url=base_url)def text_to_speech(self, text, voice="中文女", output_file="output.mp3", play_audio=False):"""將文本轉換為語音并保存為MP3文件參數:text: 要轉換的文本voice: 音色選擇(中文女/中文男/日語男/粵語女/英文女/英文男/韓語女)output_file: 輸出文件名play_audio: 是否立即播放生成的語音"""try:print(f"正在生成語音: {text[:30]}...")start_time = time.time()# 調用TTS APIresponse = self.client.audio.speech.create(model="CosyVoice-300M-SFT",input=text,voice=voice)# 保存語音文件with open(output_file, 'wb') as f:f.write(response.content)process_time = time.time() - start_timeprint(f"語音生成完成! 保存至 {output_file} (耗時: {process_time:.2f}秒)")# 播放生成的語音if play_audio:self.play_audio(output_file)return output_fileexcept Exception as e:print(f"語音生成失敗: {str(e)}")return Nonedef play_audio(self, file_path):"""播放生成的語音文件"""try:print(f"播放語音: {file_path}")audio = AudioSegment.from_mp3(file_path)play(audio)except Exception as e:print(f"播放失敗: {str(e)}")if __name__ == "__main__":# 創建TTS轉換器實例tts = TextToSpeechConverter()# 示例文本轉換samples = [{"text": "歡迎使用語音合成系統,這是一個強大的文本轉語音工具。", "voice": "中文女"},{"text": "Hello, this is an English voice synthesis example.", "voice": "英文女"},{"text": "こんにちは、これは日本語の音聲合成デモです。", "voice": "日語男"},{"text": "呢個系粵語語音合成嘅示范,好實用嘅功能!", "voice": "粵語女"},]for i, sample in enumerate(samples):output_file = f"output_{i+1}.mp3"tts.text_to_speech(text=sample["text"],voice=sample["voice"],output_file=output_file,play_audio=True)
運行結果如下:
關鍵參數說明
-
音色選擇:
中文女:標準普通話女聲中文男:標準普通話男聲粵語女:粵語女聲日語男:日語男聲英文女/男:英語女聲/男聲韓語女:韓語女聲
-
模型參數:
model="CosyVoice-300M-SFT":指定使用的語音模型input:要轉換的文本內容(支持中英文混合)
應用場景
- 智能客服系統:自動生成語音回復
- 有聲內容創作:將文章/書籍轉換為語音
- 語音導航系統:為導航應用生成實時語音提示
- 語言學習工具:提供多語言發音示范
- 輔助功能:為視障用戶轉換文本內容
性能優化建議
-
GPU加速:
# 啟用GPU加速(需要CUDA環境) xinference-local --gpu -
批處理請求:
# 同時生成多個語音片段 texts = ["第一條消息", "第二條消息", "第三條消息"] for i, text in enumerate(texts):tts.text_to_speech(text, output_file=f"batch_{i}.mp3") -
長文本處理:
def split_long_text(text, max_length=200):"""將長文本分割為適合處理的片段"""return [text[i:i+max_length] for i in range(0, len(text), max_length)]long_text = "這是一個很長的文本..." # 500+字符
segments = split_long_text(long_text)
for i, segment in enumerate(segments):tts.text_to_speech(segment, output_file=f"segment_{i}.mp3")
常見問題解決
-
服務連接失敗:
- 檢查Xinference是否正常運行:
xinference status - 確認API地址是否正確(默認:http://localhost:9998/v1)
- 檢查Xinference是否正常運行:
-
語音生成速度慢:
- 使用GPU加速:
xinference-local --gpu - 減少單次請求的文本長度
- 使用GPU加速:
-
音色不自然:
- 嘗試不同音色選項
- 調整文本標點符號(適當添加停頓)
- 確保文本語言與音色匹配(如中文文本使用中文音色)
結語
通過Xinference部署語音合成模型,我們能夠輕松實現高質量的文本轉語音功能。本文提供的Python實現方案具有以下優勢:
- 簡單易用的API接口
- 支持多種語言和音色
- 本地部署保障數據隱私
- 高性能語音生成能力
隨著語音合成技術的不斷發展,我們期待未來能夠實現更加自然、富有表現力的語音合成效果。


)


 在PyInstaller打包前后的區別)

基礎支持模塊(游戲窗口、游戲對象、物理系統、動畫系統、射線檢測))


