Ansible 的配置文件采用 INI 格式,分為多個模塊,每個模塊包含特定功能的配置參數。
以下是ansible.cfg配置文件中對各部分的詳細解析:
[defaults](全局默認配置)
inventory
指定主機清單文件路徑,默認值為 /etc/ansible/hosts。若取消注釋,Ansible 會從此文件讀取主機信息。
#inventory = /etc/ansible/hosts
remote_user
默認遠程登錄用戶(如 root)。若未在 Playbook 中指定 remote_user,則使用此值。
#remote_user = root
host_key_checking
是否驗證 SSH 主機密鑰。默認啟用(True)。禁用需取消注釋并設為 False(適用于測試環境):
#host_key_checking = False
forks
并發任務數,默認 5。增大此值可提升執行效率(需根據控制機性能調整)。
#forks = 5
gathering
控制是否自動收集主機信息(facts)。默認 implicit(隱式收集,可通過 gather_facts: False 關閉)。
#gathering = implicit
roles_path
指定 Ansible 角色的搜索路徑(支持多路徑,用 : 分隔)。
#roles_path = /etc/ansible/roles
log_path
指定日志文件路徑,默認不記錄日志。取消注釋后啟用日志:
#log_path = /var/log/ansible.log
module_name 默認模塊(如 command、shell)
module_name = shell
private_key_file 默認 SSH 私鑰路徑
private_key_file = ~/.ssh/id_rsa
vault_password_file Vault 密碼文件路徑
vault_password_file = ~/.vault_pass
display_skipped_hosts 是否顯示跳過的任務
display_skipped_hosts = False # 默認True
hash_behaviour 變量沖突時的行為(replace 或 merge)
hash_behaviour = merge 默認replace
nocows 禁用 cowsay 動畫 默認0
nocows = 1
nocolor 禁用輸出顏色 默認0
nocolor = 1
fact_caching 緩存 Facts 的存儲類型(如 jsonfile、redis)
fact_caching = jsonfile # 默認memory
fact_caching_connection 緩存存儲路徑(如 Redis 為 localhost:6379:0)
fact_caching_connection = /tmp/facts
[inventory](主機清單配置)
enable_plugins
指定啟用的清單插件,默認包括 host_list, script, auto 等。可添加自定義插件(如 virtualbox)。
#enable_plugins = host_list, virtualbox, yaml, constructed
ignore_extensions
解析目錄作為清單源時,忽略指定擴展名的文件。
#ignore_extensions = .pyc, .pyo, .swp, .bak, ~, .rpm, .md, .txt
ignore_patterns 忽略的文件匹配模式 默認空
ignore_patterns = test_*
unparsed_is_failed 未解析的清單文件是否報錯 默認False
unparsed_is_failed = True[privilege_escalation](權限提升配置)
become
是否啟用權限提升(如 sudo)。默認 True。
#become = True
become_method
提升權限的方式(如 sudo、su)。
#become_method = sudo
become_user
提升權限后的用戶(默認 root)。
#become_user = root
become_ask_pass
是否在權限提升時提示輸入密碼。默認 False。
#become_ask_pass = False
[paramiko_connection]
[ssh_connection](SSH 連接優化)
ssh_args
SSH 連接參數。默認啟用 ControlPersist 提升性能:
#ssh_args = -C -o ControlMaster=auto -o ControlPersist=60s
pipelining
啟用管道傳輸以提升性能。需確保目標主機的 sudoers 文件禁用 requiretty。
#pipelining = False # 改為 True 啟用
retries
SSH 連接失敗后的重試次數(默認 3 次)。
#retries = 3
transfer_method
文件傳輸方式(sftp、scp、piped)默認smart
transfer_method = sftp
[persistent_connection](持久連接配置)
connect_timeout
持久連接的空閑超時時間(默認 30 秒)。
#connect_timeout = 30
command_timeout
單條命令的超時時間(默認30秒)
command_timeout = 60
[accelerate](加速模式配置)
accelerate_port 加速模式端口
accelerate_port = 6000 # 默認5099
accelerate_timeout 加速連接超時時間(秒)
accelerate_timeout = 60 # 默認30
accelerate_multi_key 允許多個密鑰
accelerate_multi_key = yes # 默認 no
[selinux](SELinux 配置)
special_context_filesystems 需要特殊處理的文件系統,默認nfs, vboxsf, fuse, ramfs, 9p, vfat
special_context_filesystems = cifs
libvirt_lxc_noseclabel 允許 libvirt_lxc 無 SELinux 標簽,默認no
libvirt_lxc_noseclabel = yes
[colors](輸出顏色配置)
自定義不同日志級別的顏色(如錯誤信息為紅色):
#error = red
#ok = green
[diff](差異顯示配置)
always
是否始終顯示文件差異(等同于命令行參數 -D)。
#always = no # 改為 yes 啟用
context 差異顯示的上下文行數
context = 3 # 默認
常見配置場景
禁用 SSH 主機密鑰檢查(適用于測試環境):
[defaults]
host_key_checking = False
啟用管道傳輸優化性能:
[ssh_connection]
pipelining = True
配置默認權限提升:
[privilege_escalation]
become = True
become_method = sudo
become_user = root
總結
優先級:Ansible 配置按以下順序加載(優先級從高到低):
環境變量 ANSIBLE_CONFIG
當前目錄的 ansible.cfg
用戶家目錄的 .ansible.cfg
/etc/ansible/ansible.cfg
建議:在項目目錄中創建 ansible.cfg,覆蓋全局配置,避免修改系統級文件。
以下是hosts文件中對各部分的詳細解析:
Ansible 的主機清單文件(Inventory File)用于定義被管理的主機和組,支持靈活的主機分組、模式匹配及變量定義。以下是對配置文件的逐部分解析:
1.基礎結構
文件路徑:默認路徑為 /etc/ansible/hosts,但可通過 ansible.cfg 或命令行參數自定義。
注釋與空白行:以 # 開頭的行是注釋,空白行會被忽略。
2.未分組的主機
直接在文件頂部列出主機(不歸屬任何組):
# green.example.com
# blue.example.com
# 192.168.100.1
# 192.168.100.10
取消注釋后,這些主機會被 Ansible 識別,但無組歸屬。
3.分組主機
使用 [組名] 定義組,組內列出主機名或 IP:
# [webservers]
# alpha.example.org
# beta.example.org
# 192.168.1.100
# 192.168.1.110
取消注釋后,組 webservers 包含 4 臺主機。
作用:可針對組執行任務(如 ansible webservers -m ping)。
4.主機范圍模式
使用 [start:end] 簡化連續主機的定義:
# www[001:006].example.com
實際解析為:
www001.example.com, www002.example.com, …, www006.example.com。
支持格式:數字填充(如 001 表示 3 位補零),也支持無前導零(見下方示例)。
5.無前導零的主機范圍
直接使用數字區間:
# db-[99:101]-node.example.com
實際解析為:
db-99-node.example.com, db-100-node.example.com, db-101-node.example.com。
6.高級用法(需手動添加)
用戶示例
未展示,但以下功能是 Ansible 支持的:
嵌套組:
使用 :children 定義父組包含子組:
[web:children]
webservers
loadbalancers
變量定義:
為組或主機設置變量:
[webservers]
web1.example.com ansible_user=admin
[dbservers:vars]
db_port=3306
動態清單:
通過腳本或云平臺 API 動態生成主機清單(需可執行文件返回 JSON 格式)。
7.示例配置(取消注釋后)
[webservers]
alpha.example.org
beta.example.org
192.168.1.100
192.168.1.110[dbservers]
db01.intranet.mydomain.net
db02.intranet.mydomain.net
10.25.1.56
10.25.1.57# 使用主機范圍
www[001:003].example.com
db-[99:101]-node.example.com
Ansible內置變量:
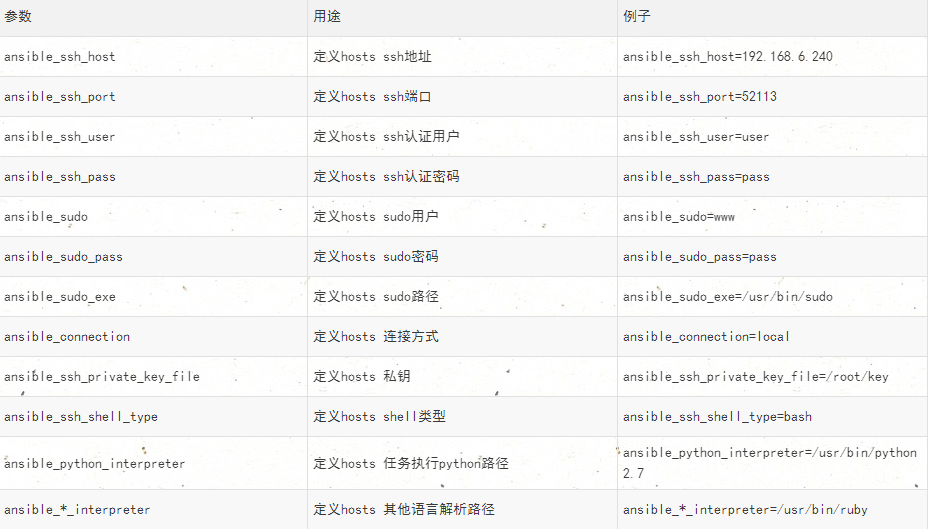
示例:
[webservers]
web1.example.com ansible_ssh_pass='your_password'
web2.example.com ansible_ssh_pass='your_password'
8.常見問題與注意事項
1.主機范圍語法:
格式必須為 [start:end],支持數字和字母(如 web[a:d].example.com 生成 weba 到 webd)。
補零操作:www[01:05].example.com 生成 www01, www02, …, www05。
2.組與變量優先級:
主機變量 > 組變量 > 父組變量 > 全局變量。
3.動態清單:
更適合云環境,可通過 ansible-inventory -i dynamic_inventory.py --list 測試。
4.別名與端口:
定義別名和指定 SSH 端口:
jump ansible_host=192.168.1.200 ansible_port=2222
9.驗證清單
使用命令檢查主機清單是否正確解析:
ansible-inventory -i hosts.cfg --list
rules目錄的的主要作用及示例
一、Roles 的主要作用
Ansible Roles 是一種模塊化設計模式,用于將 Playbook 拆解為可復用的組件。其主要作用包括:
1.代碼組織
將任務、變量、文件、模板等按功能分類,形成標準化的目錄結構,提升代碼可讀性。
2.復用性
同一 Role 可在多個 Playbook 中重復使用,避免重復編寫相似代碼。
3.協作友好
通過 Roles 分離不同功能模塊,便于團隊分工開發和維護。
4.變量與邏輯分離
將配置變量(如端口、路徑)與任務邏輯解耦,增強靈活性。
5.易于擴展
支持依賴管理(通過 meta/main.yml),可定義 Role 之間的依賴關系。
二、Roles 的標準目錄結構
一個完整的 Role 目錄通常包含以下子目錄和文件(以 roles/nginx 為例):
roles/
└── nginx/                  # Role 名稱├── tasks/              # 任務定義│   └── main.yml        # 主任務文件├── handlers/           # 觸發器(服務重啟等)│   └── main.yml├── templates/          # Jinja2 模板文件│   └── nginx.conf.j2├── files/              # 靜態文件(無需模板渲染)│   └── custom_404.html├── vars/               # 角色專用變量│   └── main.yml├── defaults/           # 默認變量(優先級最低)│   └── main.yml├── meta/               # 角色元數據(依賴、作者等)│   └── main.yml└── README.md           # 角色說明文檔
三、Roles 示例:部署 Nginx
1.目錄結構
roles/
└── nginx/├── tasks/│   └── main.yml├── handlers/│   └── main.yml├── templates/│   └── nginx.conf.j2└── defaults/└── main.yml
2.關鍵文件內容
tasks/main.yml(核心任務)
- name: Install Nginxapt:name: nginxstate: present- name: Copy Nginx configurationtemplate:src: nginx.conf.j2dest: /etc/nginx/nginx.confnotify: restart nginx- name: Ensure Nginx is runningservice:name: nginxstate: startedenabled: yes
handlers/main.yml(觸發器)
- name: restart nginxservice:name: nginxstate: restarted
templates/nginx.conf.j2(模板文件)
user www-data;
worker_processes {{ nginx_worker_processes }};
error_log /var/log/nginx/error.log;
pid /run/nginx.pid;events {worker_connections {{ nginx_worker_connections }};
}
defaults/main.yml(默認變量)
nginx_worker_processes: 2
nginx_worker_connections: 1024
四、使用 Role 的 Playbook
在 Playbook 中引用 Role(site.yml):
- hosts: webserversroles:- role: nginxvars:nginx_worker_processes: 4 # 覆蓋默認變量


)


)


