前言
因為經常對圖像要做數據清洗,又很費時間去重新寫一個,我一直在想能不能寫一個通用的腳本或者制作一個可視化的界面對文件夾圖像做批量的修改圖像大小、重命名、劃分數據訓練和驗證集等等。這里我先介紹一下我因為寫過的一些腳本,然后我們對其進行繪總,并制作成一個可視化界面。
腳本
獲取圖像路徑
我們需要一個函數去讀取文件夾下的所有文件,獲取其文件名,而關于這一部分我很早以前就做過了,詳細可以看這里:解決Python讀取圖片路徑存在轉義字符
import osdef get_image_path(path):imgfile = []file_list = os.listdir(path)for i in file_list:new_path = os.path.join(path, i).replace("\\", "/")_, file_ext = os.path.splitext(new_path)if file_ext[1:] in ('bmp', 'dng', 'jpeg', 'jpg', 'mpo', 'png', 'tif', 'tiff', 'webp', 'pfm'):imgfile.append(new_path)return natsorted(imgfile)if __name__=="__main__":images_path = r'E:\PythonProject\img_processing_techniques_main\document\images'images_path_list = get_image_path(images_path)print(images_path_list)我們在這里進行了重命名,請以此篇為準。
批量修改圖像大小
def modify_images_size(target_path, target_hwsize, save_path=None):"""批量修改圖像大小"""h, w = target_hwsizeimages_paths = get_image_path(target_path)os.makedirs(save_path, exist_ok=True)for i, one_image_path in enumerate(images_paths):try:image = Image.open(one_image_path)resized_image = image.resize((w, h))base_name = os.path.basename(one_image_path)if save_path is not None:new_path = os.path.join(save_path, base_name)else:new_path = one_image_pathresized_image.save(new_path)print(f"Resized {one_image_path} to {new_path}")except Exception as e:print(f"Error resizing {one_image_path}: {e}")這里的腳本用于圖像的批量修改,如果不給保存路徑,那么就會修改本地的文件,我們是不推薦這里的,最好還是做好備份。
劃分數據集與驗證集
def split_train_val_txt(target_path, train_ratio=.8, val_ratio=.2, onlybasename=False):"""如果 train_ratio + val_ratio = 1 表示只劃分訓練集和驗證集, train_ratio + val_ratio < 1表示將剩余的比例劃分為測試集"""assert train_ratio + val_ratio <= 1test_ratio = 1. - (train_ratio + val_ratio)images_paths = get_image_path(target_path)num_images = len(images_paths)num_train = round(num_images * train_ratio)num_val = num_images - num_train if test_ratio == 0 else math.ceil(num_images * val_ratio)num_test = 0 if test_ratio == 0 else num_images - (num_train + num_val)with open(os.path.join(target_path, 'train.txt'), 'w') as train_file, \open(os.path.join(target_path, 'val.txt'), 'w') as val_file, \open(os.path.join(target_path, 'test.txt'), 'w') as test_file:for i, image_path in enumerate(images_paths):if onlybasename:image_name, _ = os.path.splitext(os.path.basename(image_path))else:image_name = image_pathif i < num_train:train_file.write(f"{image_name}\n")elif i < num_train + num_val:val_file.write(f"{image_name}\n")else:test_file.write(f"{image_name}\n")print(f"Successfully split {num_images} images into {num_train} train, {num_val} val, and {num_test} test.")
我在這里修改了劃分測試集的邏輯,根據劃分比例來評判,以免出現使用向上取整或向下取整導致出現的問題(測試集比例不為0,驗證集比例按照向上取整劃分)。
復制圖像到另外一個文件夾
def copy_images_to_directory(target_path, save_folder, message=True):"""復制整個文件夾(圖像)到另外一個文件夾"""try:os.makedirs(save_folder, exist_ok=True)source_path = get_image_path(target_path)for img_path in source_path:base_file_name = os.path.basename(img_path)destination_path = os.path.join(save_folder, base_file_name)shutil.copy2(img_path, destination_path)if message:print(f"Successfully copied folder: {img_path} to {save_folder}")except Exception as e:print(f"Error copying folder, {e}")這個本來是一個小功能,但是我想的是有時候如果要做每張圖的匹配,可以修改為將符合條件的路徑復制到目標文件夾中。修改也只需加一個列表的判斷即可。
獲取數據集的均值標準化
def get_dataset_mean_std(train_data):train_loader = DataLoader(train_data, batch_size=1, shuffle=False, num_workers=0,pin_memory=True)mean = torch.zeros(3)std = torch.zeros(3)for im, _ in train_loader:for d in range(3):mean[d] += im[:, d, :, :].mean()std[d] += im[:, d, :, :].std()mean.div_(len(train_data))std.div_(len(train_data))return list(mean.numpy()), list(std.numpy())def get_images_mean_std(target_path):images_paths = get_image_path(target_path)num_images = len(images_paths)mean_sum = np.zeros(3)std_sum = np.zeros(3)for one_image_path in images_paths:pil_image = Image.open(one_image_path).convert("RGB")img_asarray = np.asarray(pil_image) / 255.0individual_mean = np.mean(img_asarray, axis=(0, 1))individual_stdev = np.std(img_asarray, axis=(0, 1))mean_sum += individual_meanstd_sum += individual_stdevmean = mean_sum / num_imagesstd = std_sum / num_imagesreturn mean.astype(np.float32), std.astype(np.float32)都是相同的方法獲取RGB圖像的均值標準化,我們更建議直接使用第二個。
批量修改圖像后綴名
def modify_images_suffix(target_path, format='png'):"""批量修改圖像文件后綴"""images_paths = get_image_path(target_path)for i, one_image_path in enumerate(images_paths):base_name, ext = os.path.splitext(one_image_path)new_path = base_name + '.' + formatos.rename(one_image_path, new_path)print(f"Converting {one_image_path} to {new_path}")這里僅僅是修改圖像的后綴,至于這種強力的修改是否會對圖像的格式造成影響我們不做考慮。
批量重命名圖像
def batch_rename_images(target_path,save_path,start_index=None,prefix=None,suffix=None,format=None,num_type=1,
):"""重命名圖像文件夾中的所有圖像文件并保存到指定文件夾:param target_path: 目標文件路徑:param save_path: 文件夾的保存路徑:param start_index: 默認為 1, 從多少號開始:param prefix: 重命名的通用格式前綴, 如 rename001.png, rename002.png...:param suffix: 重命名的通用格式后綴, 如 001rename.png, 002rename.png...:param format (str): 新的后綴名,不需要包含點(.):param num_type: 數字長度, 比如 3 表示 005:param message: 是否打印修改信息"""os.makedirs(save_path, exist_ok=True)images_paths = get_image_path(target_path)current_num = start_index if start_index is not None else 1for i, image_path in enumerate(images_paths):image_name = os.path.basename(image_path)name, ext = os.path.splitext(image_name)if format is None:ext = extelse:ext = f'.{format}'padded_i = str(current_num).zfill(num_type)if prefix and suffix:new_image_name = f"{prefix}{padded_i}{suffix}{ext}"elif prefix:new_image_name = f"{prefix}{padded_i}{ext}"elif suffix:new_image_name = f"{padded_i}{suffix}{ext}"else:new_image_name = f"{padded_i}{ext}"new_path = os.path.join(save_path, new_image_name)current_num += 1print(f"{i + 1} Successfully rename {image_path} to {new_path}")shutil.copy(image_path, new_path)print("Batch renaming and saving of files completed!")
我們在這里添加了重命名的功能,其實發現很多都可以套在這里面來,所以后面我們修改過后會做成ui進行顯示。
完整腳本
下面是我經過測試后的一個腳本,大家可以直接拿去使用。
import os
import math
import torch
import numpy as np
from PIL import Image
import shutil
from torch.utils.data import DataLoader
from natsort import natsorteddef get_image_path(path):imgfile = []file_list = os.listdir(path)for i in file_list:new_path = os.path.join(path, i).replace("\\", "/")_, file_ext = os.path.splitext(new_path)if file_ext[1:] in ('bmp', 'dng', 'jpeg', 'jpg', 'mpo', 'png', 'tif', 'tiff', 'webp', 'pfm'):imgfile.append(new_path)return natsorted(imgfile)def modify_images_size(target_path, target_hwsize, save_path=None):"""批量修改圖像大小"""h, w = target_hwsizeimages_paths = get_image_path(target_path)os.makedirs(save_path, exist_ok=True)for i, one_image_path in enumerate(images_paths):try:image = Image.open(one_image_path)resized_image = image.resize((w, h))base_name = os.path.basename(one_image_path)if save_path is not None:new_path = os.path.join(save_path, base_name)else:new_path = one_image_pathresized_image.save(new_path)print(f"Resized {one_image_path} to {new_path}")except Exception as e:print(f"Error resizing {one_image_path}: {e}")def split_train_val_txt(target_path, train_ratio=.8, val_ratio=.2, onlybasename=False):"""如果 train_ratio + val_ratio = 1 表示只劃分訓練集和驗證集, train_ratio + val_ratio < 1表示將剩余的比例劃分為測試集"""assert train_ratio + val_ratio <= 1test_ratio = 1. - (train_ratio + val_ratio)images_paths = get_image_path(target_path)num_images = len(images_paths)num_train = round(num_images * train_ratio)num_val = num_images - num_train if test_ratio == 0 else math.ceil(num_images * val_ratio)num_test = 0 if test_ratio == 0 else num_images - (num_train + num_val)with open(os.path.join(target_path, 'train.txt'), 'w') as train_file, \open(os.path.join(target_path, 'val.txt'), 'w') as val_file, \open(os.path.join(target_path, 'test.txt'), 'w') as test_file:for i, image_path in enumerate(images_paths):if onlybasename:image_name, _ = os.path.splitext(os.path.basename(image_path))else:image_name = image_pathif i < num_train:train_file.write(f"{image_name}\n")elif i < num_train + num_val:val_file.write(f"{image_name}\n")else:test_file.write(f"{image_name}\n")print(f"Successfully split {num_images} images into {num_train} train, {num_val} val, and {num_test} test.")def copy_images_to_directory(target_path, save_folder):"""復制整個文件夾(圖像)到另外一個文件夾"""try:os.makedirs(save_folder, exist_ok=True)source_path = get_image_path(target_path)for img_path in source_path:base_file_name = os.path.basename(img_path)destination_path = os.path.join(save_folder, base_file_name)shutil.copy2(img_path, destination_path)print(f"Successfully copied folder: {img_path} to {save_folder}")except Exception as e:print(f"Error copying folder, {e}")def get_dataset_mean_std(train_data):train_loader = DataLoader(train_data, batch_size=1, shuffle=False, num_workers=0,pin_memory=True)mean = torch.zeros(3)std = torch.zeros(3)for im, _ in train_loader:for d in range(3):mean[d] += im[:, d, :, :].mean()std[d] += im[:, d, :, :].std()mean.div_(len(train_data))std.div_(len(train_data))return list(mean.numpy()), list(std.numpy())def get_images_mean_std(target_path):images_paths = get_image_path(target_path)num_images = len(images_paths)mean_sum = np.zeros(3)std_sum = np.zeros(3)for one_image_path in images_paths:pil_image = Image.open(one_image_path).convert("RGB")img_asarray = np.asarray(pil_image) / 255.0individual_mean = np.mean(img_asarray, axis=(0, 1))individual_stdev = np.std(img_asarray, axis=(0, 1))mean_sum += individual_meanstd_sum += individual_stdevmean = mean_sum / num_imagesstd = std_sum / num_imagesreturn mean.astype(np.float32), std.astype(np.float32)def modify_images_suffix(target_path, format='png'):"""批量修改圖像文件后綴"""images_paths = get_image_path(target_path)for i, one_image_path in enumerate(images_paths):base_name, ext = os.path.splitext(one_image_path)new_path = base_name + '.' + formatos.rename(one_image_path, new_path)print(f"Converting {one_image_path} to {new_path}")def batch_rename_images(target_path,save_path,start_index=None,prefix=None,suffix=None,format=None,num_type=1,
):"""重命名圖像文件夾中的所有圖像文件并保存到指定文件夾:param target_path: 目標文件路徑:param save_path: 文件夾的保存路徑:param start_index: 默認為 1, 從多少號開始:param prefix: 重命名的通用格式前綴, 如 rename001.png, rename002.png...:param suffix: 重命名的通用格式后綴, 如 001rename.png, 002rename.png...:param format (str): 新的后綴名,不需要包含點(.):param num_type: 數字長度, 比如 3 表示 005:param message: 是否打印修改信息"""os.makedirs(save_path, exist_ok=True)images_paths = get_image_path(target_path)current_num = start_index if start_index is not None else 1for i, image_path in enumerate(images_paths):image_name = os.path.basename(image_path)name, ext = os.path.splitext(image_name)if format is None:ext = extelse:ext = f'.{format}'padded_i = str(current_num).zfill(num_type)if prefix and suffix:new_image_name = f"{prefix}{padded_i}{suffix}{ext}"elif prefix:new_image_name = f"{prefix}{padded_i}{ext}"elif suffix:new_image_name = f"{padded_i}{suffix}{ext}"else:new_image_name = f"{padded_i}{ext}"new_path = os.path.join(save_path, new_image_name)current_num += 1print(f"{i + 1} Successfully rename {image_path} to {new_path}")shutil.copy(image_path, new_path)print("Batch renaming and saving of files completed!")
if __name__=="__main__":images_path = r'E:\PythonProject\img_processing_techniques_main\document\images'images_path_list = get_image_path(images_path)save_path =r'./save_path'# modify_images_size(images_path, (512, 512), save_path)# print(images_path_list)# split_train_val_txt(images_path, .8, .2)# copy_images_to_directory(images_path, save_folder='./save_path2')# mean, std = get_images_mean_std(images_path)# print(mean, std)# modify_images_suffix('./save_path2')
BatchVision的可視化設計
我將前面的一些腳本制作成了一個批量文件處理系統 BatchVision,可實現批量修改圖像大小,劃分訓練集和驗證集,以及批量重命名,其他的一些小功能例如灰度化處理和計算均值標準化。
完整項目請看此處:UI-Design-System-Based-on-PyQt5
這里通過網盤鏈接分享的離線使用文件exe,無需安裝環境:?BatchVision
我們設計的可視化界面如下圖所示:
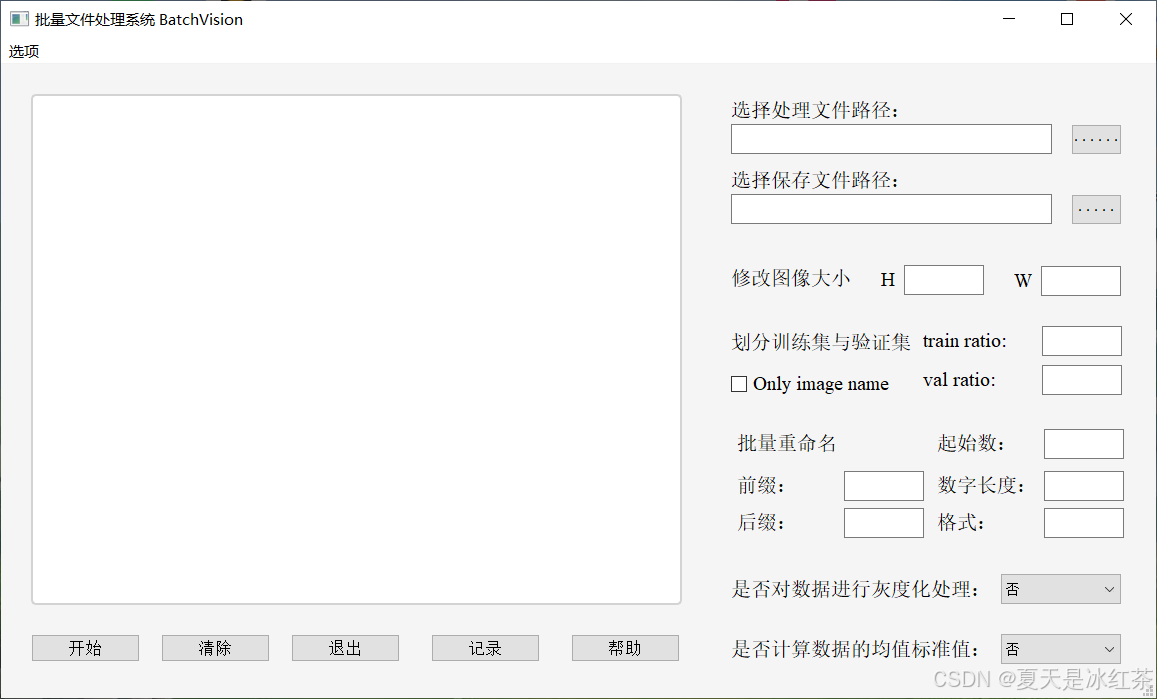
其中的一些設定我都是經過嚴格的判斷,如果還有問題可以聯系我修改。


詳細解讀)


