注:本文為 “Headless Linux” 相關文章合輯。
機翻未校。
How to Install and Set Up Headless Linux Server
如何安裝和設置無頭 Linux 服務器
Winnie Ondara
Last Updated: January 31, 2023
A vast majority of Linux users are familiar with a Linux desktop PC which provides a graphical environment with which you can interact with the system. However, unlike a Linux desktop, a headless server is an operating system that runs without a GUI (Graphical User Environment).
大多數 Linux 用戶都熟悉帶有圖形界面的 Linux 桌面電腦,用戶可以通過圖形環境與系統進行交互。然而,與 Linux 桌面不同,無頭服務器是一種沒有圖形用戶界面的操作系統。
It is installed on hardware that is not connected to any peripheral device such as a monitor, keyboard, or mouse during its operation (although these are required during the initial setup).
在運行過程中,它安裝在未連接任何外設(如顯示器、鍵盤或鼠標)的硬件上(盡管在初始設置期間需要這些設備)。
In most cases, headless servers are remotely accessed and administered on the command line via the SSH protocol using SSH clients.
在大多數情況下,無頭服務器通過 SSH 協議使用 SSH 客戶端 在命令行上進行遠程訪問和管理。
The main goal of headless servers is to provide access to crucial services such as web and database services to clients or users. Headless servers are mostly found in data centers and run enterprise or production workloads.
無頭服務器的主要目標是為客戶端或用戶提供對關鍵服務(如 Web 和數據庫服務)的訪問權限。無頭服務器主要出現在數據中心,用于運行企業或生產工作負載。
Pros of a Headless Linux System
無頭Linux系統的優點
Graphical installations are usually associated with high resource overhead. Applications such as the Firefox browser, and GIMP are resource-intensive programs and end up hogging lots of system memory and CPU.
圖形安裝通常與高資源開銷相關聯。像 Firefox 瀏覽器和 GIMP 這樣的應用程序是資源密集型程序,會占用大量系統內存和 CPU。
This impacts the performance of critical production workloads or applications which have to make do with the few resources that are available.
這會影響關鍵生產工作負載或應用程序的性能,因為它們只能使用有限的資源。
Since there are no graphical components on headless servers, most of the resources are accorded to critical applications which results in optimized performance.
由于無頭服務器上沒有圖形組件,大多數資源都被分配給關鍵應用程序,從而實現了優化的性能。
Headless servers ensure critical enterprise workloads run smoothly since there is no competition for system resources with other non-critical applications. It’s, therefore, efficient to host your applications on a headless server since there are no fancy graphical applications that will impact performance.
無頭服務器確保關鍵企業工作負載順利運行,因為它們不會與其他非關鍵應用程序爭奪系統資源。因此,在無頭服務器上托管應用程序是高效的,因為沒有華麗的圖形應用程序會影響性能。
Installation of a Headless Linux Server
安裝無頭 Linux 服務器
The installation of a headless Linux server is similar to installing a Linux OS with a graphical environment. Most Linux distributions such as Ubuntu, Rocky Linux, AlmaLinux, and Debian provide a minimal ISO installation image which has a small memory footprint and provides only the essential tools to install the operating system.
無頭 Linux 服務器的安裝過程與安裝帶有圖形環境的 Linux 操作系統類似。大多數 Linux 發行版,如 Ubuntu、Rocky Linux、AlmaLinux 和 Debian,都提供了一個最小化的 ISO 安裝鏡像,該鏡像占用內存小,僅提供安裝操作系統的基本工具。
This is different from a full DVD ISO which is usually quite large – mostly gigabytes in memory – and provides all the graphical tools and utilities.
這與通常很大的完整 DVD ISO 不同,后者通常占用數 GB 的內存,并提供所有的圖形工具和實用程序。
Download Linux ISO Image
下載 Linux ISO 映像
For this guide, we will demonstrate how you can get started with installing the Debian 11 server (Debian Bullseye). So, head over to the Debian Download Page and grab the net installer ISO which is roughly 400MB in size.
在本指南中,我們將展示如何開始安裝 Debian 11 服務器(Debian Bullseye)。因此,請前往 Debian 下載頁面,下載大約 400MB 的網絡安裝程序 ISO。
Also, note you can use any Linux distribution ISO image to set up a headless server.
請注意,您可以使用任何 Linux 發行版的 ISO 鏡像來設置無頭服務器。
Create a Bootable Linux USB Drive
創建可啟動的 Linux USB 驅動器
Once you have downloaded the ISO image, the next step is to burn the ISO to a USB drive which will be used as the bootable medium.
下載 ISO 鏡像后,下一步是將 ISO 鏡像刻錄到 USB 驅動器,該驅動器將用作可引導介質。
You can create a LiveUSB medium using USB creator tools or you can also do this on the command line using the dd command as shown.
您可以使用 USB 創建工具 創建 LiveUSB 介質,也可以使用命令行中的 dd 命令來完成此操作。
$ dd if=~/Downloads/debian-11.6.0-amd64-netinst.iso of=/dev/sdx bs=4M status=progress
Installing Linux Headless Server Using USB Drive
使用 USB 驅動器安裝 Linux 無頭服務器
With the bootable USB drive in place, plug it into the bare metal server which should, at first, be connected to a monitor and keyboard for the initial setup.
準備好可引導 USB 驅動器后,將其插入裸金屬服務器,該服務器最初應連接顯示器和鍵盤以進行初始設置。
Power on the server and navigate to the BIOS settings. Ensure that the USB drive is first on the boot order priority. Save and changes and continue booting.
打開服務器電源并進入 BIOS 設置。確保 USB 驅動器是啟動順序中的第一優先級。保存更改并繼續啟動。
Once the system powers on, you will be presented with a list of menu options. Here, we will go with Graphical Install which provides a graphical installation method to make work easier.
系統啟動后,您將看到一個菜單選項列表。在這里,我們將選擇 圖形安裝,它提供了一種圖形化安裝方法,使工作更輕松。
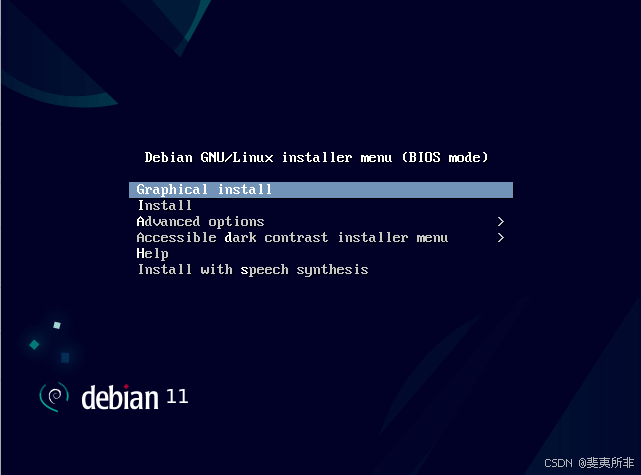
Debian 圖形安裝
The next steps will require you to make a couple of selections. These include choosing the installation language, timezone, keyboard layout, hostname, creating a regular user account and root account as well as partitioning the hard drive.
接下來的步驟需要您進行一些選擇,包括選擇安裝語言、時區、鍵盤布局、主機名、創建普通用戶賬戶和根賬戶,以及分區硬盤。
Lastly, you will be presented with a ‘Software Selection’ step that provides a wide array of desktop environments to choose from.
最后,您將看到一個“軟件選擇”步驟,提供多種桌面環境供您選擇。
But since our mission is to install a headless server, we will only select the ‘SSH Server’ and ‘Standard system utilities’ options and click ‘Continue’. This ensures that we only install the necessary packages required for the headless server to run.
但由于我們的目標是安裝無頭服務器,因此我們只會選擇“SSH 服務器”和“標準系統工具”選項,然后點擊“繼續”。這確保我們只安裝無頭服務器運行所需的必要軟件包。
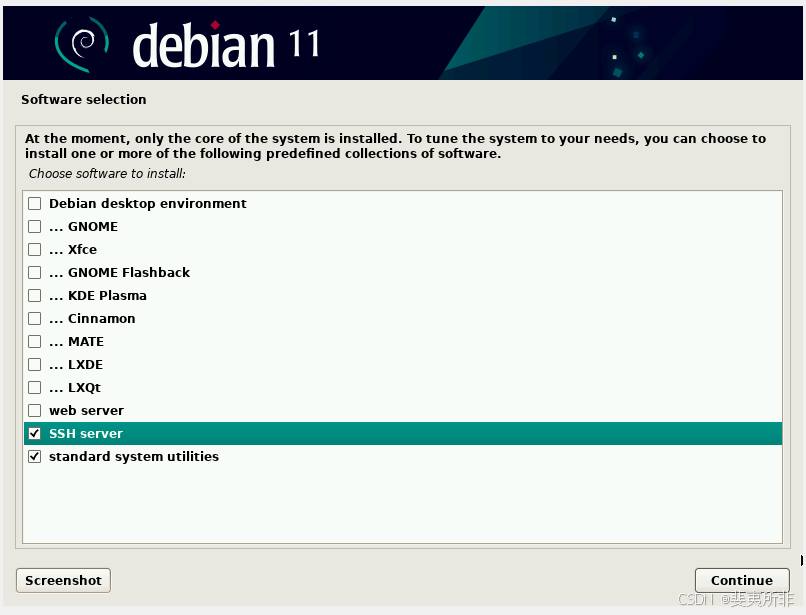
Debian 軟件選擇
From here onwards, proceed with the Debian installation till the end and reboot the system.
從這里開始,繼續完成 Debian 的安裝,直到最后重啟系統。
Debian Post-Installation
Debian 安裝后
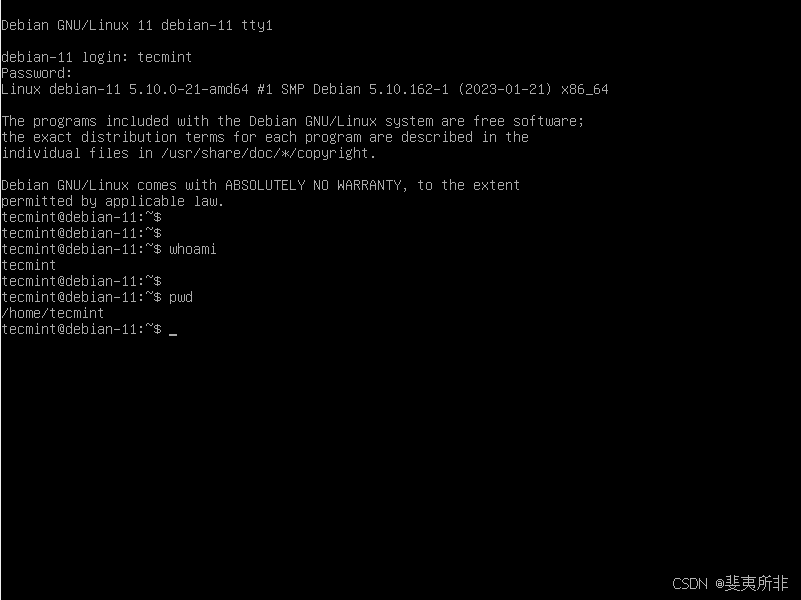
Upon rebooting your server you will see the following screen. The first option is already pre-select, so simply press ENTER.
重新啟動服務器后,您將看到以下屏幕。第一個選項已經被預選,因此只需按 ENTER。

啟動 Debian Linux
On the login screen, provide your username and password and press ENTER on both occasions to access the system. Evidently, there’s no graphical environment, and going forward, access to the system will be on the command line via the SSH protocol.
在登錄屏幕上,輸入用戶名和密碼,然后兩次按 ENTER 以訪問系統。顯然,沒有圖形環境,今后將通過 SSH 協議在命令行上訪問系統。
Debian 登錄
Testing Remote Connection to Headless Server
測試與無頭服務器的遠程連接
Speaking of SSH, we need to confirm if the service is running. To verify this, switch to the root user
說到 SSH,我們需要確認服務是否正在運行。為此,請切換到 root 用戶
$ su -
Then run the following command to check the running status of SSH.
然后運行以下命令以檢查 SSH 的運行狀態。
# systemctl status sshd
The following output confirms that the service is running. Be sure to enable the service to autostart on boot.
以下輸出確認服務正在運行。請確保啟用該服務以在啟動時自動啟動。
# systemctl enable sshd

檢查 SSH 服務器
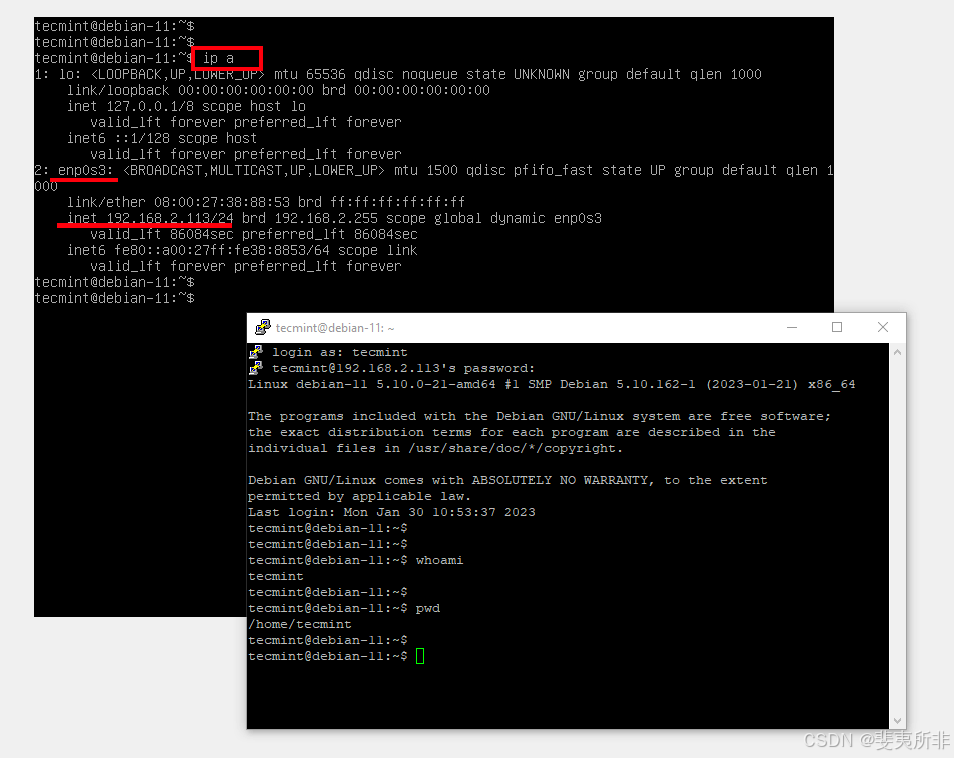
To test remote connectivity to the server, first, check its IP address by running the ip command:
要測試對服務器的遠程連接,請首先通過運行 ip 命令來檢查其 IP 地址:
# ip a
Locate your active interface – in this case enp0s3 – and check the address prefixed by the ‘inet’ directive. In our case, the IP of our server is 192.168.2.113.
找到您的活動接口(在本例中為 enp0s3),并檢查以“inet”開頭的地址。在我們的例子中,服務器的 IP 地址是 192.168.2.113。
Next, head over to a remote PC within the LAN and try to ping the server. If you get positive ping results, this implies that the server is reachable.
接下來,在局域網內的遠程計算機上嘗試 ping 服務器。如果收到積極的 ping 結果,這意味著服務器是可達的。
Finally, you can use an SSH client like PuTTY to access and login into the server.
最后,您可以使用 SSH 客戶端,如 PuTTY,來訪問并登錄服務器。
SSH 連接到遠程無頭服務器
Perfect! This confirms that we have successfully installed and set up a Headless Linux system. At this point, you can now disconnect the monitor, keyboard, and mouse since the server will now be accessed and managed remotely via the SSH service.
完美!這證實我們已成功安裝并設置了一個無頭 Linux 系統。此時,您可以斷開顯示器、鍵盤和鼠標,因為服務器將通過 SSH 服務進行遠程訪問和管理。
Conclusion
結論
In this guide, we have demonstrated how you can go about setting up a headless Linux system using Debian 11. The procedure for accomplishing the same feat is similar in other distributions, of course with slight variations here and there.
在本指南中,我們展示了如何使用 Debian 11 設置無頭 Linux 系統。在其他發行版中完成相同任務的步驟大致相似,當然會有一些細微的差異。
But rest assured, the minimal ISO provided by a Linux distribution is all you need to successfully install and set up a headless server.
但請放心,Linux 發行版提供的最小化 ISO 鏡像足以成功安裝并設置無頭服務器。
在 ubuntu 服務器上使用 Chrome Headless
Shuangquan IP 屬地:湖北
2017.08.24 12:08:31
Install Google Chrome
幾個月前發布的 Chrome 59 beta 推出了 headless 模式。原生的 Chrome,更好的通用性,更快的速度…… 似乎是時候和 Phantomjs、Ghost 們說再見了。搜索一圈發現大多數人都是在桌面版的 linux 或者 mac 上嘗了鮮,然而要將 Chrome 用于 web2.0 爬蟲的話,還是得在服務器版的 linux 中運行。
安裝 chrome
測試環境: Ubuntu 16.04 如果是桌面版的 ubuntu,直接到官網下載最新版 chrome 安裝就好。對于服務器版的 chrome,只能用命令行安裝服務器版本 Chrome _
sudo apt-get install libxss1 libappindicator1 libindicator7
wget https://dl.google.com/linux/direct/google-chrome-stable_current_amd64.deb
sudo dpkg -i google-chrome*.deb  # Might show "errors", fixed by next line
sudo apt-get install -f
測試
啟動 chrome
google-chrome --headless --remote-debugging-port=9222 https://chromium.org --disable-gpu
這里是使用 headless 模式進行遠程調試,ubuntu 上大多沒有 gpu,所以 --disable-gpu 以免報錯。之后使用另一個命令行訪問本地的 9222 端口:
curl http://localhost:9222
能夠看到調試信息應該就是裝好了。
下載 chromedriver
chromedriver 提供了操作 chrome 的 api,是 selenium 控制 chrome 的橋梁。[下載鏈接] https://sites.google.com/a/chromium.org/chromedriver/downloads] 查看最新的 Chrome 版本。下載并解壓:
wget https://chromedriver.storage.googleapis.com/2.31/chromedriver_linux64.zip
unzip chromedriver_linux64.zip
運行
這里我們直接用 selenium 來控制 chrome 在 headless 模式下運行:
from selenium import webdriverchrome_options = webdriver.ChromeOptions()
chrome_options.add_argument('--headless')
chrome_options.add_argument('--disable-gpu')client = webdriver.Chrome(chrome_options=chrome_options, executable_path='/home/chromedriver')  # 如果沒有把 chromedriver 加入到 PATH 中,就需要指明路徑client.get("https://jiayi.space")  # 替換為實際的 URL
content = client.page_source.encode('utf-8')print(content)
client.quit()
當然這里是打印出了頁面的內容。之后我找了一個以前爬過的網站來試試,它做了 js 加密重定向,而且檢測到 phantomjs 請求直接丟棄。結果 Chrome headless 成功拿到渲染后的頁面。基于簡單的測試后,感覺一切都還很完美。還不知道在生產環境下有沒有什么 bug,遇到再更新咯。
最后編輯于 :2018.06.05 11:02:44
via:
-
How to Install and Set Up Headless Linux Server
https://www.tecmint.com/setup-headless-linux-server/ -
在 ubuntu 服務器上使用 Chrome Headless - 簡書
https://www.jianshu.com/p/4ede64b7ccdb


)


)


郵件函數漏洞)


)

