目錄
一.XMLHttpRequest
二.XMLHttpRequest——查詢參數
三.案例——地區查詢
四.XMLHttpRequest_數據提交
五.Promise
六.Promise三種狀態
七.Promiseee+XHR獲取省份列表(案例)
八.封裝-簡易axios-獲取省份列表
九.封裝-簡易axios-獲取地區列表
十.封裝-簡易axios-注冊用戶?
一.XMLHttpRequest
1.XMLHttpRequest定義:
????????XMLHttpRequest(XHR)對象用于與服務器交互。通過 XMLHttpRequest 可以在不刷新頁面的情況下請求特定 URL,獲取數據。這允許網頁在不影響用戶操作的情況下,更新頁面的局部內容。XMLHttpRequest 在AJAX 編程中被大量使用。
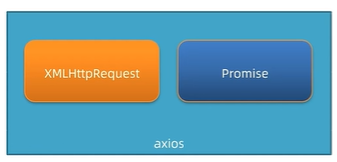
2.關系:axios內部采用XMLHttpRequest與服務器交互
3.使用
- 創建XMLHttpRequest對象
const xhr = new XMLRequest()
xhr.open('請求方法','請求URL網址')
xhr.addEventListener('loadend', ()=>{console.log(xhr.response)
})
xhr.send()- 配置請求方法和請求URL地址
- 監聽loadend事件,接受響應結果
- 發起請求
4.案例:
<!DOCTYPE html>
<html lang="en"><head><meta charset="UTF-8"><meta http-equiv="X-UA-Compatible" content="IE=edge"><meta name="viewport" content="width=device-width, initial-scale=1.0"><title>XMLHttpRequest_基礎使用</title>
</head><body><p class="my-p8"></p>
<script>/*** 目標:使用XMLHttpRequest對象與服務器通信*  1. 創建 XMLHttpRequest 對象*  2. 配置請求方法和請求 url 地址*  3. 監聽 loadend 事件,接收響應結果*  4. 發起請求*/const xhr = new XMLHttpRequest()xhr.open('GET', 'https://hmajax.itheima.net/api/province')xhr.addEventListener('loadend', ()=> {console.log(xhr.response)//轉換為了對象const  data = JSON.parse(xhr.response)console.log(data.list.join('<br>'))document.querySelector('.my-p8').innerHTML = data.list.join('<br>')})xhr.send()</script>
</body></html>
二.XMLHttpRequest——查詢參數
1.定義:瀏覽器提供給服務i的額外信息,讓服務器返回瀏覽器想要的數據
2.語法:http://xxxx.com/xxxx/xxxx?參數名1 = 值1 & 參數名2 = 值2
3.案例:
<!DOCTYPE html>
<html lang="en"><head><meta charset="UTF-8"><meta http-equiv="X-UA-Compatible" content="IE=edge"><meta name="viewport" content="width=device-width, initial-scale=1.0"><title>XMLHttpRequest_查詢參數</title>
</head><body>
<p class="hello"></p>
<script>/*** 目標:使用XHR攜帶查詢參數,展示某個省下屬的城市列表*/const xhr = new XMLHttpRequest();xhr.open('GET', 'https://hmajax.itheima.net/api/city?pname=遼寧省');xhr.addEventListener('loadend', () => {console.log(xhr.response);const data = JSON.parse(xhr.response);console.log(data.list.join('<br>'));document.querySelector('.hello').innerHTML = data.list.join('<br>')})xhr.send();
</script>
</body></html>
三.案例——地區查詢
<!DOCTYPE html>
<html lang="en"><head><meta charset="UTF-8"><meta http-equiv="X-UA-Compatible" content="IE=edge"><meta name="viewport" content="width=device-width, initial-scale=1.0"><title>案例_地區查詢</title><link rel="stylesheet" href="https://cdn.jsdelivr.net/npm/bootstrap@5.1.3/dist/css/bootstrap.min.css"><style>:root {font-size: 15px;}body {padding-top: 15px;}</style>
</head><body>
<div class="container"><form id="editForm" class="row"><!-- 輸入省份名字 --><div class="mb-3 col"><label class="form-label">省份名字</label><input type="text" value="北京" name="province" class="form-control province" placeholder="請輸入省份名稱" /></div><!-- 輸入城市名字 --><div class="mb-3 col"><label class="form-label">城市名字</label><input type="text" value="北京市" name="city" class="form-control city" placeholder="請輸入城市名稱" /></div></form><button type="button" class="btn btn-primary sel-btn">查詢</button><br><br><p>地區列表: </p><ul class="list-group"><!-- 示例地區 --><li class="list-group-item">東城區</li></ul>
</div>
<script src="https://cdn.jsdelivr.net/npm/axios/dist/axios.min.js"></script>
<script>/*** 目標: 根據省份和城市名字, 查詢對應的地區列表*///1.查詢按鈕綁定點擊事件document.querySelector('.sel-btn').addEventListener('click', ()=>{//2.獲取輸入框的值const pname = document.querySelector('.province').valueconst cname = document.querySelector('.city').value//3.組織查詢參數到字符串const qOBJ = {pname,cname}const paramsOBJ = new URLSearchParams(qOBJ)const queryString = paramsOBJ.toString()console.log(queryString)//4.清空現有列表document.querySelector('.list-group').innerHTML = '<li class="list-group-item">加載中...</li>'//5.使用fetch查詢地區列表fetch(`https://hmajax.itheima.net/api/area?${queryString}`).then(response => {if (!response.ok) {throw new Error('網絡響應不正常')}return response.json()}).then(data => {console.log(data)// 使用反引號創建模板字符串const htmlStr = data.list.map(areaName => {return `<li class="list-group-item">${areaName}</li>`}).join('')console.log(htmlStr)document.querySelector('.list-group').innerHTML = htmlStr}).catch(error => {console.error('查詢失敗:', error)document.querySelector('.list-group').innerHTML = `<li class="list-group-item text-danger">查詢失敗: ${error.message}</li>`})})
</script>
</body>
</html>
四.XMLHttpRequest_數據提交
1.需求:通過XHR提交用戶名和密碼,完成注冊功能
請求頭設置Content-Type:application/json
請求體攜帶JSON字符串
const xhr = new XMLHttpRequest()
xhr.open('請求方法','請求URL網址')
xhr.addEventListener('loadend',()=>{console.log(xhr.response)
})
//告訴服務器,我傳遞的內容類型,是JSON字符串
xhr.setRequestHeader('Content-Type','application/json')
//準備數據并轉成JSON字符串
const user = {username:'用戶名', password:'密碼'}
const userStr = JSON.stringify(user)
//發送請求體
xhr.send(userStr)
2.案例:
<!DOCTYPE html>
<html lang="en"><head><meta charset="UTF-8"><meta http-equiv="X-UA-Compatible" content="IE=edge"><meta name="viewport" content="width=device-width, initial-scale=1.0"><title>XMLHttpRequest_數據提交</title>
</head><body>
<button class="reg-btn">注冊用戶</button>
<script>/*** 目標:使用xhr進行數據提交-完成注冊功能*/document.querySelector('.reg-btn').addEventListener('click', () => {const xhr = new XMLHttpRequest()xhr.open('POST','https://hmajax.itheima.net/api/register')xhr.addEventListener('loadend',()=>{console.log(xhr.response)})
//告訴服務器,我傳遞的內容類型,是JSON字符串xhr.setRequestHeader('Content-Type','application/json')
//準備數據并轉成JSON字符串const user = {username:'huopengzhao', password:'123456'}const userStr = JSON.stringify(user)
//發送請求體xhr.send(userStr)})
</script>
</body></html>
五.Promise
1.定義:Promise對象用于表示一個異步操作的最終完成(或失敗)及其結果值
2.好處:
- 邏輯更清晰
- 了解axios函數內部的運行機制
- 能夠解決回調函數低于問題
//1.創建promise對象
const p = new Promise((resolve, reject) =>{//2.執行異步任務-并傳遞結果//成功調用:resolve(值)觸發then()執行//失敗調用:reject(值)觸發catch()執行})
//3.接受結果
p.then(result =>{//成功
}).catch(error=》{//失敗
})
案例:
<!DOCTYPE html>
<html lang="en"><head><meta charset="UTF-8"><meta http-equiv="X-UA-Compatible" content="IE=edge"><meta name="viewport" content="width=device-width, initial-scale=1.0"><title>認識Promise</title>
</head><body>
<script>/*** 目標:使用Promise管理異步任務*/const p = new Promise((resolve, reject) => {//執行異步代碼setTimeout(() => {//成功調用resolve(.then接受),失敗調用reject(.catch接受)//resolve('模擬AJAX請求成功')reject(new Error('模擬AJAX請求失敗'))},2000)})//3.獲取結果p.then((result) => {console.log(result)}).catch((error) => {console.log(error)})
</script>
</body></html>
六.Promise三種狀態
1.作用:了解Promise對象如何關聯的處理函數,以及代碼執行順序
2.概念:一個promise對象必將處于以下幾種狀態
(Promise對象一旦被兌現/拒絕就是已敲定,狀態無法再被改變)
- 待定(pending):初始狀態,既沒有兌現,也沒有拒絕
- 已兌現(fulfilled):意味著操作成功完成
- 已拒絕(rejected):意味著操作失敗
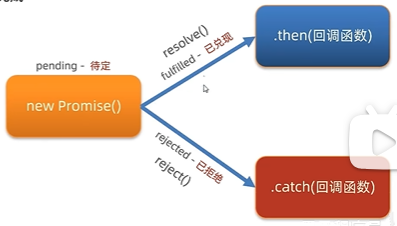
3.案例
/*** 目標:認識Promise狀態*/// 1. 創建Promise對象(pending-待定狀態)const p = new Promise((resolve, reject) => {console.log('Promise對象開始執行')// 2. 執行異步代碼setTimeout(() => {// resolve('模擬AJAX請求-成功結果')//resolve()=>'fulfilled狀態-已兌現'=>then()//reject()=>'rejected狀態-已拒絕'=>catch()reject(new Error('模擬AJAX請求-失敗結果'))}, 2000)})console.log(p)// 3. 獲取結果p.then(result => {console.log(result)}).catch(error => {console.log(error)})七.Promiseee+XHR獲取省份列表(案例)
<!DOCTYPE html>
<html lang="en">
<head><meta charset="UTF-8"><title>案例_使用Promise+XHR_獲取省份列表</title>
</head>
<body>
<p class="hello"></p><script>const p = new Promise((resolve, reject) => {const xhr = new XMLHttpRequest()xhr.open('GET', 'https://hmajax.itheima.net/api/province')xhr.addEventListener('load', () => {if (xhr.status >= 200 && xhr.status < 300) {try {const response = JSON.parse(xhr.response)resolve(response)} catch (e) {reject(new Error('解析JSON失敗'))}} else {reject(new Error(`請求失敗: ${xhr.status}`))}})xhr.addEventListener('error', () => {reject(new Error('網絡請求失敗'))})xhr.send()})p.then(result => {console.log(result)if (result.list && Array.isArray(result.list)) {document.querySelector('.hello').innerHTML = result.list.join('<br>')} else {throw new Error('返回數據格式不正確')}}).catch(error => {console.error(error)document.querySelector('.hello').innerHTML = `加載失敗: ${error.message}`})
</script>
</body>
</html>
八.封裝-簡易axios-獲取省份列表
需求:基于Promise+XHR封裝myAxios函數,獲取省份列表
步驟:
- 定義myAxios函數,接收配置對象,返回Promise對象
- 發起XHR請求,默認請求方法為GET
- 調用成功/失敗的處理程序
- 使用myAxios函數,獲取省份列表展示
function myAxios(config){return new Promise((resolve,reject) =>{//xhr請求//調用成功/失敗的處理程序
})
}
myAxios({url:'目標資源地址'
}).then(result => {}).catch(error => {})
代碼實現:
<!DOCTYPE html>
<html lang="en"><head><meta charset="UTF-8"><meta http-equiv="X-UA-Compatible" content="IE=edge"><meta name="viewport" content="width=device-width, initial-scale=1.0"><title>封裝_簡易axios函數_獲取省份列表</title>
</head><body>
<p class="hello"></p>
<script>/*** 目標:封裝_簡易axios函數_獲取省份列表*  1. 定義myAxios函數,接收配置對象,返回Promise對象*  2. 發起XHR請求,默認請求方法為GET*  3. 調用成功/失敗的處理程序*  4. 使用myAxios函數,獲取省份列表展示*/function myAxios(config){return new Promise((resolve,reject) =>{//xhr請求//調用成功/失敗的處理程序const xhr = new XMLHttpRequest()xhr.open(config.method || 'GET', config.url)xhr.addEventListener('loadend', () => {if(xhr.status >= 200 && xhr.status < 300){resolve(JSON.parse(xhr.responseText))}else {reject(new Error(xhr.response))}})xhr.send()})}myAxios({url:'https://hmajax.itheima.net/api/province'}).then(result => {console.log(result)document.querySelector('.hello').innerHTML = result.list.join('<br>')}).catch(error => {console.log(error)document.querySelector('.hello').innerHTML = error.message})
</script>
</body></html>
九.封裝-簡易axios-獲取地區列表
需求:修改myAxios函數支持傳遞查詢參數,獲取‘遼寧省’,‘大連市’對應地區列表展示
要求
- myAxios函數調用后,傳入params選項
- 基于URLSearchParams轉換查詢字符串
- 使用自己封裝的myAxios函數展示地區列表
function myAxios(config){return new Promise((resolve, reject) => {//XHR請求 - 判斷params選項,攜帶查詢參數//調用成功/失敗的處理程序
})
}myAxios({url:'目標自已按地址',params:{參數名1:值1,參數名2:值2}
})
代碼展示:
<!DOCTYPE html>
<html lang="en"><head><meta charset="UTF-8"><meta http-equiv="X-UA-Compatible" content="IE=edge"><meta name="viewport" content="width=device-width, initial-scale=1.0"><title>封裝_簡易axios函數_獲取地區列表</title>
</head><body>
<p class="my-p"></p>
<script>/*** 目標:封裝_簡易axios函數_獲取地區列表*  1. 判斷有params選項,攜帶查詢參數*  2. 使用URLSearchParams轉換,并攜帶到url上*  3. 使用myAxios函數,獲取地區列表*/function myAxios(config) {return new Promise((resolve, reject) => {const xhr = new XMLHttpRequest()//1.判斷params選項,是否攜帶查詢參數if(config.params){//2.使用URLSearchParams轉換,并攜帶到url上const paramsObj = new URLSearchParams(config.params)const queryString = paramsObj.toString()//把查詢參數字符串,拼接在url?后面config.url += `?${queryString}`}xhr.open(config.method || 'GET', config.url)xhr.addEventListener('loadend', () => {if (xhr.status >= 200 && xhr.status < 300) {resolve(JSON.parse(xhr.response))} else {reject(new Error(xhr.response))}})xhr.send()})}
//3.使用myAxios函數,獲取地區列表myAxios({url:'https://hmajax.itheima.net/api/area',params:{pname: '遼寧省',cname: '大連市'}}).then(result =>{console.log(result)document.querySelector('.my-p').innerHTML = result.list.join('<br>')}).catch(error =>{console.log(error)document.querySelector('.my-p').innerHTML = error.message})</script>
</body></html>
十.封裝-簡易axios-注冊用戶?
需求:修改myAxios函數支持傳遞請求體數據,完成注冊用戶功能
步驟:
- myAxios函數調用后,判斷data選項
- 轉換數據類型,在send方法中發送
- 使用自己封裝的myAxios函數完成注冊用戶功能
function myAxios(config){return new Promise((resolve, reject) => {//XHR請求 - 判斷data選項,攜帶查詢參數//調用成功/失敗的處理程序
})
}myAxios({url:'目標自已按地址',data:{參數名1:值1,參數名2:值2}
})
代碼實現:
<!DOCTYPE html>
<html lang="en"><head><meta charset="UTF-8"><meta http-equiv="X-UA-Compatible" content="IE=edge"><meta name="viewport" content="width=device-width, initial-scale=1.0"><title>封裝_簡易axios函數_注冊用戶</title>
</head><body>
<button class="reg-btn">注冊用戶</button>
<script>/*** 目標:封裝_簡易axios函數_注冊用戶*  1. 判斷有data選項,攜帶請求體*  2. 轉換數據類型,在send中發送*  3. 使用myAxios函數,完成注冊用戶*/function myAxios(config) {return new Promise((resolve, reject) => {const xhr = new XMLHttpRequest()if (config.params) {const paramsObj = new URLSearchParams(config.params)const queryString = paramsObj.toString()config.url += `?${queryString}`}xhr.open(config.method || 'GET', config.url)xhr.addEventListener('loadend', () => {if (xhr.status >= 200 && xhr.status < 300) {resolve(JSON.parse(xhr.response))} else {reject(new Error(xhr.response))}})//1.判斷data選項,是否攜帶請求體if (config.data) {const jsonStr = JSON.stringify(config.data)xhr.setRequestHeader('Content-Type', 'application/json')xhr.send(jsonStr)}else{//如果沒有請求體數據,就正常發起請求xhr.send()}})}document.querySelector('.reg-btn').addEventListener('click', () => {//3.使用myAxios函數,完成注冊用戶myAxios({url:'https://hmajax.itheima.net/api/register',method:'POST',data:{username:'huopengzhao',password:'123456'}}).then(result => {console.log(result)}).catch(error => {console.log(error)})})
</script>
</body></html>
)
)

資源限制-詳細介紹)


)

)


?)


