第七章:包與依賴管理
在我們使用open-lovable的旅程中,已經探索了它如何管理對話狀態(第一章:對話狀態管理)、將創意轉化為可運行代碼(第二章:AI代碼生成管道)、如何在安全的虛擬環境中執行代碼(第三章:E2B沙箱交互),以及它如何理解現有項目(第四章:代碼庫理解)。
我們還看到它如何智能選擇修改內容(第五章:編輯意圖與上下文選擇)和從網頁重構設計(第六章:網頁抓取與設計輸入)。
但當AI生成精彩代碼后,在運行前還有關鍵一步:確保所有"原料"準備就緒。
想象我們請求一位超級智能廚師(AI)烘焙新型蛋糕。廚師寫下配方(代碼),這個配方可能需要"香草精"或"泡打粉"等特殊原料(相當于外部庫或"包")。如果廚房(項目環境)缺少這些原料,蛋糕(應用)就無法成型!
這就是包與依賴管理的用武之地。它如同open-lovable的專屬廚房助手,確保項目擁有運行所需的所有外部構件(如react、axios、framer-motion或@heroicons/react),能自動識別代碼需要的包并在隔離環境(E2B沙箱)中直接安裝。
核心問題:缺失原料
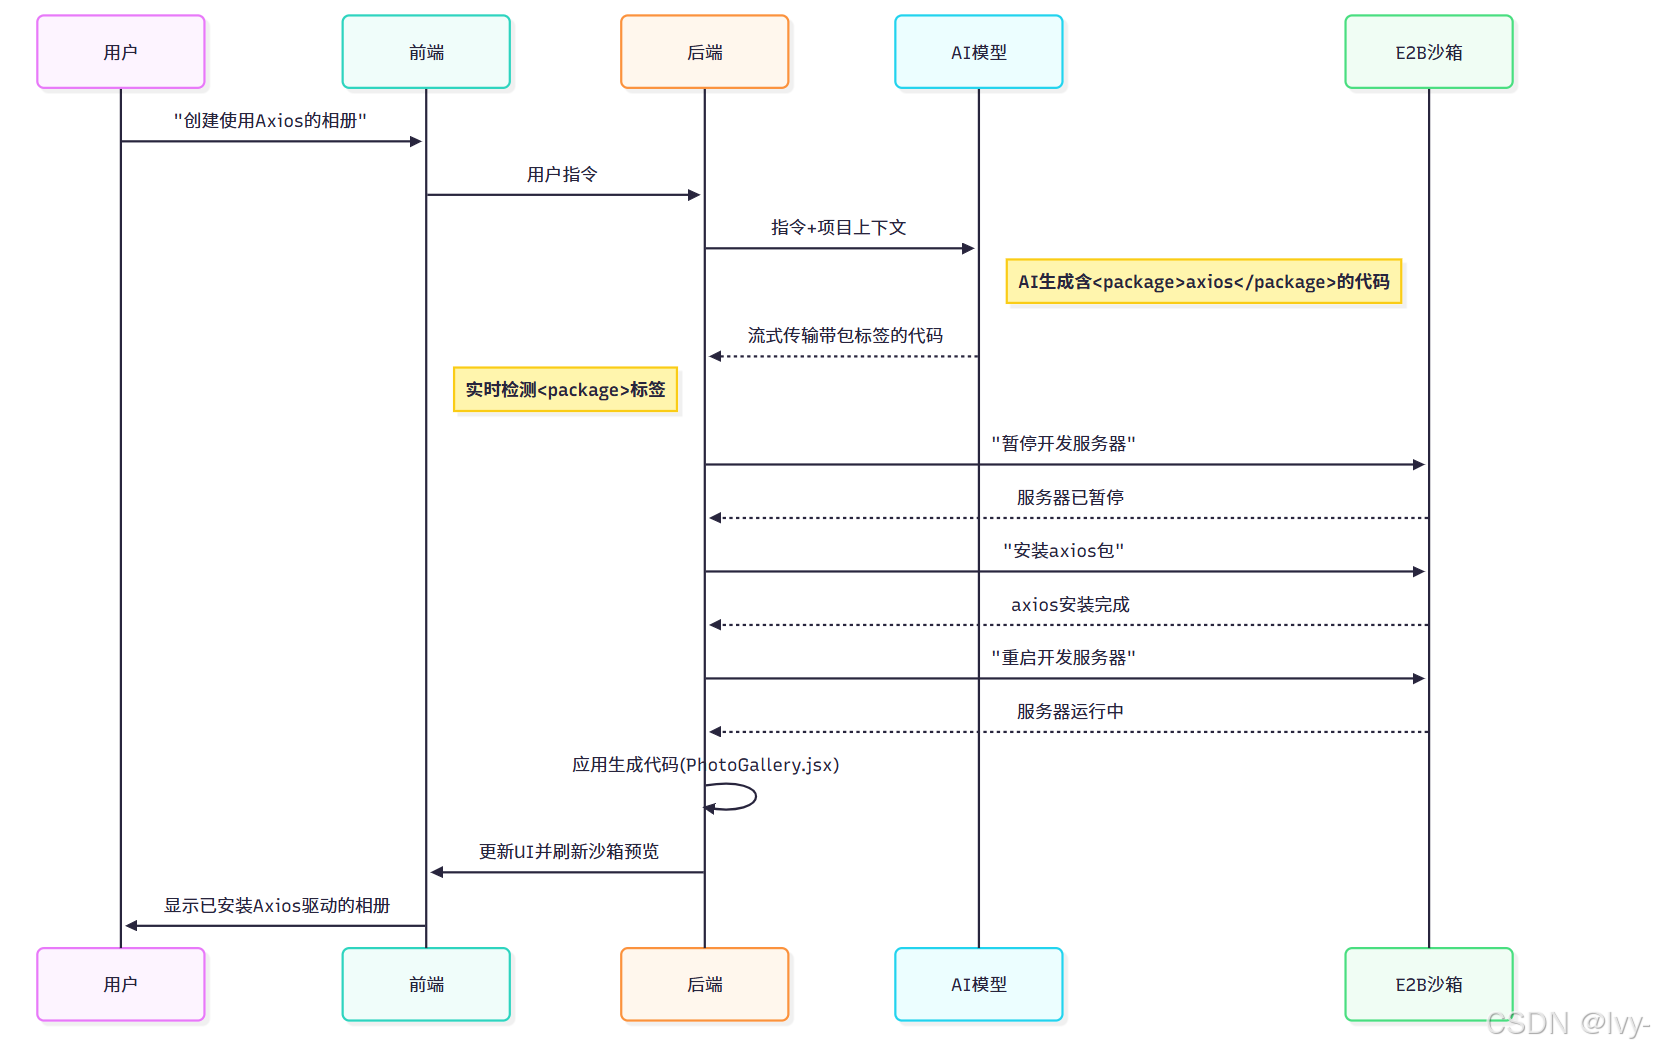
假設我們請求open-lovable:“創建從API獲取圖片的簡易相冊”
AI可能生成如下代碼(簡化版):
import React, { useEffect, useState } from 'react';
import axios from 'axios'; // 關鍵行!function PhotoGallery() {const [images, setImages] = useState([]);useEffect(() => {axios.get('https://api.example.com/photos').then(response => setImages(response.data)).catch(error => console.error('獲取圖片錯誤:', error));}, []);return (<div>{images.map(img => <img key={img.id} src={img.url} alt={img.title} />)}</div>);
}export default PhotoGallery;
注意這行:import axios from 'axios';
如果項目未安裝axios包,代碼會立即拋出"找不到模塊"錯誤。包與依賴管理通過自動檢測并安裝所需包,讓代碼直接運行。
核心概念
open-lovable以智能化方式處理包管理:
- 包(庫):他人創建共享的預編寫代碼,避免重復造輪。如
axios處理網絡請求,framer-motion實現動畫 - 依賴:代碼運行所"依賴"的包
- 自動檢測:
- AI顯式標注:AI在輸出中通過特殊標簽聲明所需包(主要可靠方式)
- 導入語句掃描:掃描代碼中的
import/require語句推測需求
- 沙箱安裝:使用
npm等工具在E2B沙箱中直接安裝 - 去重機制:安裝前檢查已有包,避免重復安裝
庫
axios
是一個基于 Promise 的 HTTP 客戶端,用于瀏覽器和 Node.js,能輕松發送異步請求并處理響應數據。
安裝 axios
在項目中使用 axios 前,需要先安裝它。可以通過 npm 或 yarn 安裝:
npm install axios
# 或
yarn add axios
發起 GET 請求
axios 支持多種 HTTP 請求方法,GET 是最基礎的一種。以下是一個簡單的 GET 請求示例:
const axios = require('axios');axios.get('https://jsonplaceholder.typicode.com/posts/1').then(response => {console.log(response.data);}).catch(error => {console.error('Error fetching data:', error);});
發起 POST 請求
如果需要向服務器發送數據,可以使用 POST 請求:
axios.post('https://jsonplaceholder.typicode.com/posts', {title: 'foo',body: 'bar',userId: 1}).then(response => {console.log(response.data);}).catch(error => {console.error('Error posting data:', error);});
設置請求配置
axios 允許通過配置對象自定義請求行為,例如設置超時或請求頭:
axios.get('https://jsonplaceholder.typicode.com/posts', {timeout: 5000,headers: { 'X-Custom-Header': 'foobar' }}).then(response => {console.log(response.data);});
處理并發請求
如果需要同時發起多個請求,可以使用 axios.all:
axios.all([axios.get('https://jsonplaceholder.typicode.com/posts/1'),axios.get('https://jsonplaceholder.typicode.com/posts/2')
]).then(axios.spread((response1, response2) => {console.log(response1.data, response2.data);}));
攔截請求和響應
axios 提供了攔截器功能,可以在請求或響應被處理前進行攔截:
axios.interceptors.request.use(config =>
{console.log('Request sent:', config.url);return config;
}, error => {return Promise.reject(error);
});axios.interceptors.response.use(response =>
{console.log('Response received');return response;
}, error => {return Promise.reject(error);
});
取消請求
axios 支持取消請求,適用于用戶取消操作或組件卸載時中止請求:
const source = axios.CancelToken.source();axios.get('https://jsonplaceholder.typicode.com/posts/1', {cancelToken: source.token
}).catch(error => {if (axios.isCancel(error)) {console.log('Request canceled:', error.message);}});source.cancel('Operation canceled by the user.');
錯誤處理
通過 catch 捕獲請求中的錯誤,并區分不同類型的錯誤:
axios.get('https://jsonplaceholder.typicode.com/posts/invalid').catch(error => {if (error.response) {console.error('Server responded with error status:', error.response.status);} else if (error.request) {console.error('No response received:', error.request);} else {console.error('Error setting up request:', error.message);}});
使用 async/await
axios 支持 async/await 語法,使異步代碼更易讀:
async function fetchData() {try {const response = await axios.get('https://jsonplaceholder.typicode.com/posts/1');console.log(response.data);} catch (error) {console.error('Error:', error);}
}fetchData();
framer-motion
一個用于 React 的動畫庫,能輕松創建流暢的交互式動畫和復雜的手勢效果。
安裝 framer-motion
通過 npm 或 yarn 安裝 framer-motion:
npm install framer-motion
# 或
yarn add framer-motion
基本動畫實現
導入 motion 組件并定義動畫屬性:
import { motion } from "framer-motion";function App() {return (<motion.divanimate={{ x: 100, rotate: 360 }}transition={{ duration: 2 }}>旋轉移動的方塊</motion.div>);
}
animate定義目標狀態(如位移、旋轉)。transition控制動畫時長和緩動效果。
關鍵幀動畫
通過數組定義多階段關鍵幀:
<motion.divanimate={{ x: [0, 100, -50, 0], opacity: [1, 0.5, 1] }}transition={{ duration: 3 }}
/>
數組中的每個值為動畫序列的關鍵幀。
交互觸發動畫
結合用戶交互(如懸停、點擊):
<motion.buttonwhileHover={{ scale: 1.1 }}whileTap={{ scale: 0.9 }}
>點擊我
</motion.button>
whileHover:懸停時觸發。whileTap:點擊時觸發。
路徑繪制動畫
使用 pathLength 屬性實現 SVG 路徑繪制效果:
<motion.svgviewBox="0 0 100 100"
><motion.pathd="M0,0 L100,100"stroke="black"initial={{ pathLength: 0 }}animate={{ pathLength: 1 }}transition={{ duration: 2 }}/>
</motion.svg>
布局動畫
自動平滑過渡布局變化:
<motion.div layout>{isExpanded && <motion.p layout>更多內容</motion.p>}
</motion.div>
添加 layout 屬性即可啟用布局動畫。
滾動觸發動畫
結合 useScroll 實現視差效果:
import { useScroll, motion } from "framer-motion";function Component() {const { scrollYProgress } = useScroll();return (<motion.divstyle={{ scaleX: scrollYProgress }}/>);
}
scrollYProgress 返回 0-1 的滾動進度值。
退出動畫
配合 React 組件卸載時的動畫:
import { AnimatePresence } from "framer-motion";function Modal({ isOpen }) {return (<AnimatePresence>{isOpen && (<motion.divinitial={{ opacity: 0 }}animate={{ opacity: 1 }}exit={{ opacity: 0 }}>彈窗內容</motion.div>)}</AnimatePresence>);
}
AnimatePresence 用于管理組件卸載動畫。
手勢拖拽
實現可拖拽元素:
<motion.divdragdragConstraints={{ left: 0, right: 0, top: 0, bottom: 0 }}
/>
dragConstraints 限制拖拽范圍。
注意事項
- 性能優化:避免同時激活過多復雜動畫。
- 移動端適配:部分手勢功能需測試觸摸設備兼容性。
- 組件層級:確保
AnimatePresence直接包裹動態組件。
包處理流程
底層實現
1. AI聲明需求(XML標簽)
open-lovable指導AI在代碼生成輸出中使用XML式標簽,這是可靠的通信方式(詳見第二章系統提示詞):
使用包前必須用<package>標簽聲明
示例:<package>three</package> 或 <package>@heroicons/react</package>也可用<packages>標簽批量聲明:
<packages>
react-router-dom
axios
framer-motion
</packages>
AI響應示例:
<explanation>
這是使用axios的新相冊組件
</explanation><package>axios</package><file path="src/components/PhotoGallery.jsx">
import React, { useEffect, useState } from 'react';
import axios from 'axios';
// ...組件代碼
</file>
2. 從AI輸出檢測包
后端實時掃描流式文本中的包標簽(見app/api/generate-ai-code-stream/route.ts):
// 流式處理邏輯(簡化)
let tagBuffer = '';
for await (const textPart of result.textStream) {tagBuffer += textPart;// 正則匹配包標簽const packageRegex = /<package>([^<]+)<\/package>/g;const packagesRegex = /<packages>([\s\S]*?)<\/packages>/g;// 處理單個包標簽while ((match = packageRegex.exec(tagBuffer)) !== null) {const pkg = match[1].trim();if (!packagesToInstall.includes(pkg)) {packagesToInstall.push(pkg);await sendProgress({ type: 'package', name: pkg });}}// 處理批量包聲明while ((match = packagesRegex.exec(tagBuffer)) !== null) {const pkgs = match[1].split(/[\n,]/).map(p => p.trim());pkgs.forEach(pkg => {if (!packagesToInstall.includes(pkg)) {packagesToInstall.push(pkg);await sendProgress({ type: 'package', name: pkg });}})}
}
3. 從文件導入檢測包(備用驗證)
app/api/detect-and-install-packages/route.ts通過正則掃描導入語句:
// 導入檢測邏輯(簡化)
const importRegex = /import\s+.*?from\s+['"]([^'"]+)['"]/g;
const requireRegex = /require\s*\(['"]([^'"]+)['"]\)/g;for (const [filePath, content] of Object.entries(files)) {if (!/\.(jsx?|tsx?)$/.test(filePath)) continue;let match;while ((match = importRegex.exec(content)) !== null) {imports.add(match[1]);}while ((match = requireRegex.exec(content)) !== null) {imports.add(match[1]);}
}// 過濾本地路徑和內置模塊
const uniquePackages = [...new Set([...imports].filter(p => !p.startsWith('.') && !p.startsWith('/')).map(p => p.startsWith('@') ? p.split('/').slice(0,2).join('/') : p.split('/')[0])
)];
4. 沙箱內安裝包
app/api/install-packages/route.ts處理實際安裝:
// 安裝流程(簡化)
export async function POST(request: NextRequest) {const { packages, sandboxId } = await request.json();// 1. 檢查已安裝包const checkScript = `// 讀取package.json比對依賴const dependencies = require('./package.json').dependencies || {};const needInstall = ${JSON.stringify(packages)}.filter(p => !dependencies[p.split('@')[0]]);console.log('NEED_INSTALL:' + JSON.stringify(needInstall));`;const { stdout } = await sandbox.runCode(checkScript);const packagesToInstall = JSON.parse(stdout.match(/NEED_INSTALL:(.*)/)[1]);// 2. 暫停開發服務器await sandbox.runCode(`const { execSync } = require('child_process');execSync('pkill -f "vite|next"');`);// 3. npm安裝if (packagesToInstall.length > 0) {await sandbox.runCode(`const { execSync } = require('child_process');execSync('npm install --legacy-peer-deps ${packagesToInstall.join(' ')}', { stdio: 'inherit' });`);}// 4. 重啟服務器await sandbox.runCode(`const { spawn } = require('child_process');const vite = spawn('npm', ['run', 'dev'], { detached: true });fs.writeFileSync('/tmp/vite.pid', vite.pid.toString());`);
}
智能包管理的優勢
- 零配置:無需手動執行
npm install - 零報錯:預防"模塊未找到"錯誤
- 實時反饋:安裝進度可視化
- 高效開發:自動化處理保障流暢體驗
- 可靠環境:確保依賴版本一致性
結語
本章揭示了open-lovable如何通過智能包管理充當開發助手,從AI輸出和代碼導入中檢測依賴,在E2B沙箱中自動化安裝,最終實現"原料完備即用"的無縫開發體驗。這種自動化機制是構建高效AI開發流程的核心要素。
END ★,°:.☆( ̄▽ ̄).°★ 。


)


排序算法—插入排序(插入、希爾)(動圖演示))


實戰一——圖像本質、數字矩陣、RGB + 圖片基本操作(灰度、裁剪、替換等))

)


)
)
