代碼:express-exe: 將Express開發的js打包成exe服務丟給客戶端使用
實現目標
-
Express 集成 Sequelize 操作 Sqlite3 數據庫;
-
啟動 Sqlite3 時默認開啟 WAL 模式,避免讀寫互鎖,支持并發讀;
-
利用 Conf 實現主進程與 Express 服務的底層通信;
-
打包成可執行文件,在 mac 和 windows 兩套系統中均可使用;
Express 集成 Sequelize
-
Express 在啟動時,會檢查所有可能的 require 類庫,并將該類庫實例化,作為單例方式向外導出使用
-
這樣包括一些類庫引入時需要前置構建的工作,即可交給啟動函數來執行,執行完畢后,再對外拋出
-
遇到異步類函數比較難操作,傳統的 commonJS 沒有頂層 await,實現等待處理比較麻煩
-
createModel 函數無需 async/await 化,雖然能保證模型 findAll 之前必然完成 wal 和 sync,但實際操作是主進程以子進程方式先啟動 http 服務,之后才開始運行主渲染進程 和 webview 進程,兩者產生并發性操作幾乎為 0,因此無需耗費心思在每次 User 使用前都等待 db 的統一化操作
-
Model 只是一種映射類 和 db 鏈接是兩個概念,前者存在的意義是實現 sql 語句拼接的函數化以及返回 sql 的對象化填充時有個 Map 對應,sequelize 才是將 Model 轉化的 sql 語句拿去執行的人
-
因此,我們可以集中管理 sequelize,封裝一個 sequelize 收集類專門收集所有的 db 連接,等服務關閉時,統一關閉 db 鏈接
-
以下就是上面實現的具體代碼,分為 userModel.js,instanceModel.js,sequelizeCollector.js 三個文件
// userModel.js
// src/models/userModel.js
const { DataTypes } = require('sequelize');
const { createModel } = require('./instanceModel');const { Model, sequelize } = createModel('User', {id: {type: DataTypes.INTEGER,autoIncrement: true,primaryKey: true,},name: {type: DataTypes.STRING,allowNull: false,},email: {type: DataTypes.STRING,allowNull: false,unique: true,},
});module.exports = { User: Model, sequelize };// instanceModel.js
// src/models/instanceModel.js
const sequelizeCollector = require("../db/sequelizeCollector");function createModel(modelName, attributes, options = {}) {// Get Sequelize instance from collectorconst sequelize = sequelizeCollector.getInstance(modelName);// 定義模型const Model = sequelize.define(modelName, attributes, {tableName: modelName.toLowerCase(),freezeTableName: true,timestamps: true,...options,});// 同步模型到數據庫(創建表)Model.sync({ force: false }).then(() => {console.log(`${modelName} table synchronized`);}).catch((err) => {console.error(`Failed to sync ${modelName} table:`, err);});return { Model, sequelize };
}module.exports = { createModel };// sequelizeCollector.js
const { Sequelize } = require('sequelize');
const path = require('path');
const ConfigManager = require("../config/ConfManager");class SequelizeCollector {constructor() {this.connections = new Map(); // Using Map to store modelName -> sequelize instancethis.configManager = new ConfigManager({ configName: "starter.http", configPath: "./config" });}// 添加 Sequelize 連接addConnection(modelName, sequelizeInstance) {if (sequelizeInstance && typeof sequelizeInstance.close === 'function') {this.connections.set(modelName, sequelizeInstance);console.log(`Sequelize connection added for model: ${modelName}`);}}// 獲取或創建 Sequelize 實例getInstance(modelName) {// Check if instance already existsif (this.connections.has(modelName)) {return this.connections.get(modelName);}// Create new Sequelize instance if it doesn't existconst dbPath = path.join(this.configManager.get("dbPath"), '/sqlite', `${modelName.toLowerCase()}.db`);const sequelize = new Sequelize({dialect: 'sqlite',storage: dbPath,logging: false,});// Enable WAL modesequelize.query('PRAGMA journal_mode = WAL;').then(() => {console.log(`WAL mode enabled for database: ${dbPath}`);}).catch((err) => {console.error(`Failed to enable WAL mode for ${dbPath}:`, err);});// Add to connectionsthis.addConnection(modelName, sequelize);return sequelize;}// 移除 Sequelize 連接removeConnection(modelName) {if (this.connections.has(modelName)) {this.connections.delete(modelName);console.log(`Sequelize connection removed for model: ${modelName}`);}}// 關閉所有 Sequelize 連接async closeAllConnections() {const closePromises = Array.from(this.connections.entries()).map(async ([modelName, sequelize]) => {try {await sequelize.close();this.connections.delete(modelName);console.log(`Sequelize connection closed for model: ${modelName}`);} catch (error) {console.error(`Error closing Sequelize connection for ${modelName}:`, error);}});await Promise.all(closePromises);}// 獲取當前連接數量getConnectionCount() {return this.connections.size;}
}// 單例模式
const sequelizeCollector = new SequelizeCollector();module.exports = sequelizeCollector;// userService.js
// services/userService.js
const formatUtils = require('../utils/format'); // 引入工具模塊
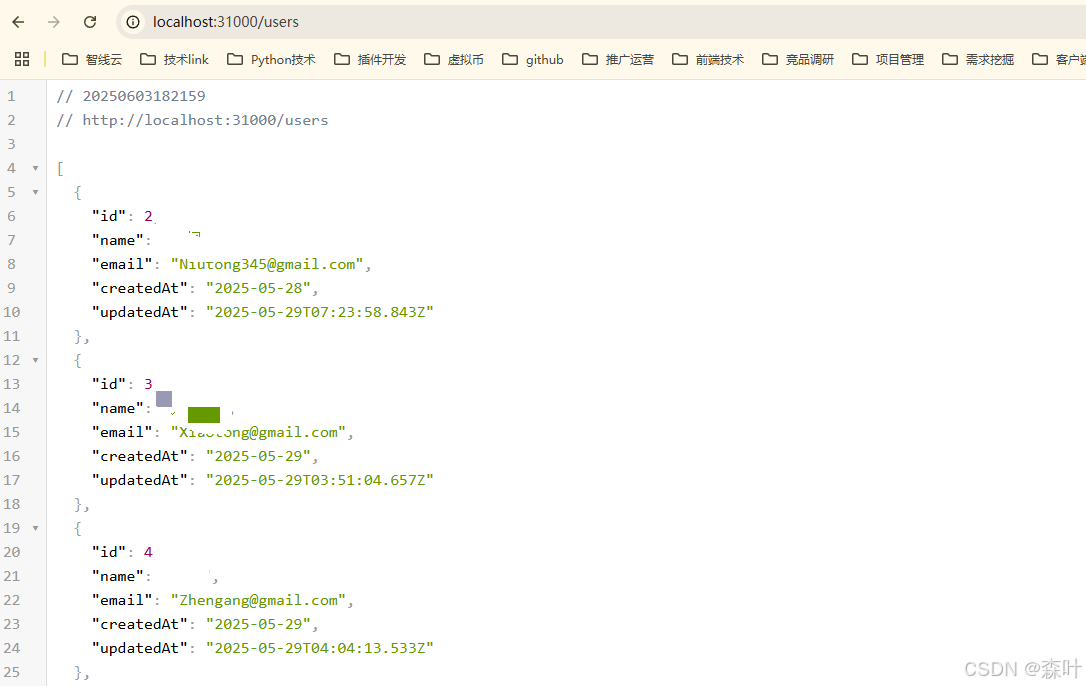
const {User} = require('../models/userModel');// 獲取所有用戶
async function getUsers() {try {/*** 下面注釋的代碼是將 createModel 函數 async/await* 這種方式可保證 wal 和 sync 均完成的后再執行 findAll* 但考慮現實情況, wal 和 sync 操作不需要 await* 因為是單步操作 協程調度下 單步操作基本為交替操作* wal 和 sync 距離很近 操作可在 findAll 前完成* 從輸出的 console 也能判斷該結論* 此外 因為主渲染進程 和 webview 都在 http 啟動之后才開始運行* 所以 wal 和 sync 異步操作沒有任何影響* 在協程邏輯下 sync 操作不會和 findAll 同時存在* 因此 sync 理論上會先執行后再執行 findAll*/// const {User, sequelize} = await UserPromise;// console.log(User)const users = await User.findAll();return users.map(user => ({...user.toJSON(),name: formatUtils.capitalize(user.name),email: formatUtils.capitalize(user.email),createdAt: formatUtils.formatDate(user.createdAt),}));} catch (error) {throw new Error(`Error fetching users: ${error.message}`);}
}
打成可執行文件
-
利用 windows 的 wsl,運行在 centos 系統中
-
CentOS7 的類庫不支持 node18 版本,會報類庫錯誤
-
升級為 CentOS8 會遇到以下問題
wsl centos8 二進制安裝文件
https://github.com/wsldl-pg/CentWSL/releases
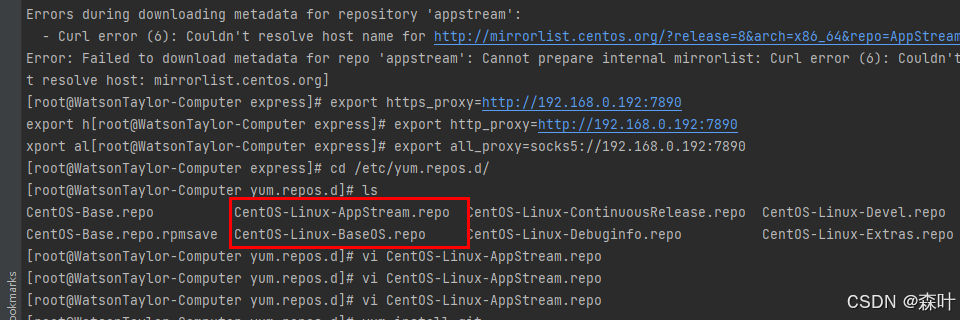
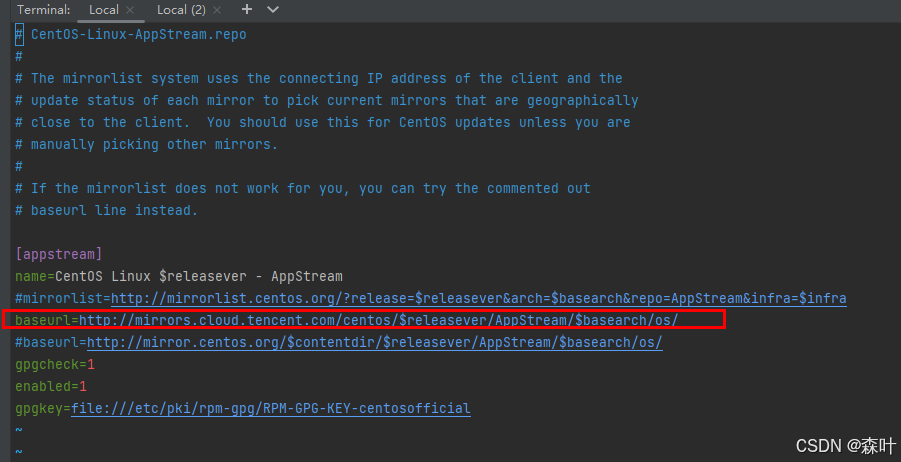
除了將基本鏡像更換為騰訊云,還要把下面截圖的兩個文件里面的鏡像更換為騰訊云
curl -o /etc/yum.repos.d/CentOS-Base.repo http://mirrors.cloud.tencent.com/repo/centos8_base.repoCentOS8 需要額外更改兩個文件
解決阿里云CentOS8 yum安裝appstream報錯,更新yum后無法makecache的問題_errors during downloading metadata for repository -CSDN博客
搞定鏡像后,要安裝開發包,否則報prebuild-install 錯誤,這樣在pkg . 打包時就不會報prebuild-install錯誤了
dnf groupinstall -y "Development Tools"
dnf install -y python3 python3-devel
yum install -y python39
echo "alias python3=/usr/bin/python3.9" >> ~/.bashrc
source ~/.bashrc
macos 打包直接雙擊運行問題
-
雙擊運行默認路徑是 /User/xxx 用戶根目錄,必須到指定路徑,使用 ./pkg-express 方式運行,才能正確尋找路徑
-
因此需要使用絕對路徑更好
注意
-
切換不同平臺時,需要運行 npm rebuild,否則是沒有這個平臺的二進制的,即使都能打包出來對應的可執行文件,但不可運行


)


![[Go] Option選項設計模式 — — 編程方式基礎入門](http://pic.xiahunao.cn/[Go] Option選項設計模式 — — 編程方式基礎入門)

)


--Java版)


rpmyum)
![[git]忽略.gitignore文件](http://pic.xiahunao.cn/[git]忽略.gitignore文件)