目錄
- 1、背景
- 2、refena創世紀代碼
- 3、localsend里refena的刷新
- 3.1 初始狀態
- 3.2 發起設備掃描流程
- 3.3 掃描過程
- 3.3 刷新界面
- 4.localsend的設備掃描流程
- 4.1 UDP廣播設備注冊流程
- 4.2 TCP/HTTP設備注冊流程
- 4.3 localsend的服務器初始化工作
- 4.4總結
1、背景
在很久以前,我曾經經歷了一小段時間的Flutter開發,當時Flutter的版本才迭代到1.0,在做一個短視頻應用的開發中,我曾經產生了一個巨大的疑問,就是Flutter的狀態刷新怎么才能簡潔、高效,如果每次及每個地方都使用setstate()來刷新界面確實顯得非常笨重。
這么多年過去了,就像一個回旋鏢一樣,我又進了一個Flutter/kotlin混合開發的項目,項目是在開源的localsend項目上做二次開發,localsend作為跨平臺傳輸軟件,可以實現在同一局域網的端到端設備之間共享文件。本篇博客將以最簡單的方式介紹refena創世紀代碼、localsend里refena的刷新、localsend的設備掃描流程。
2、refena創世紀代碼
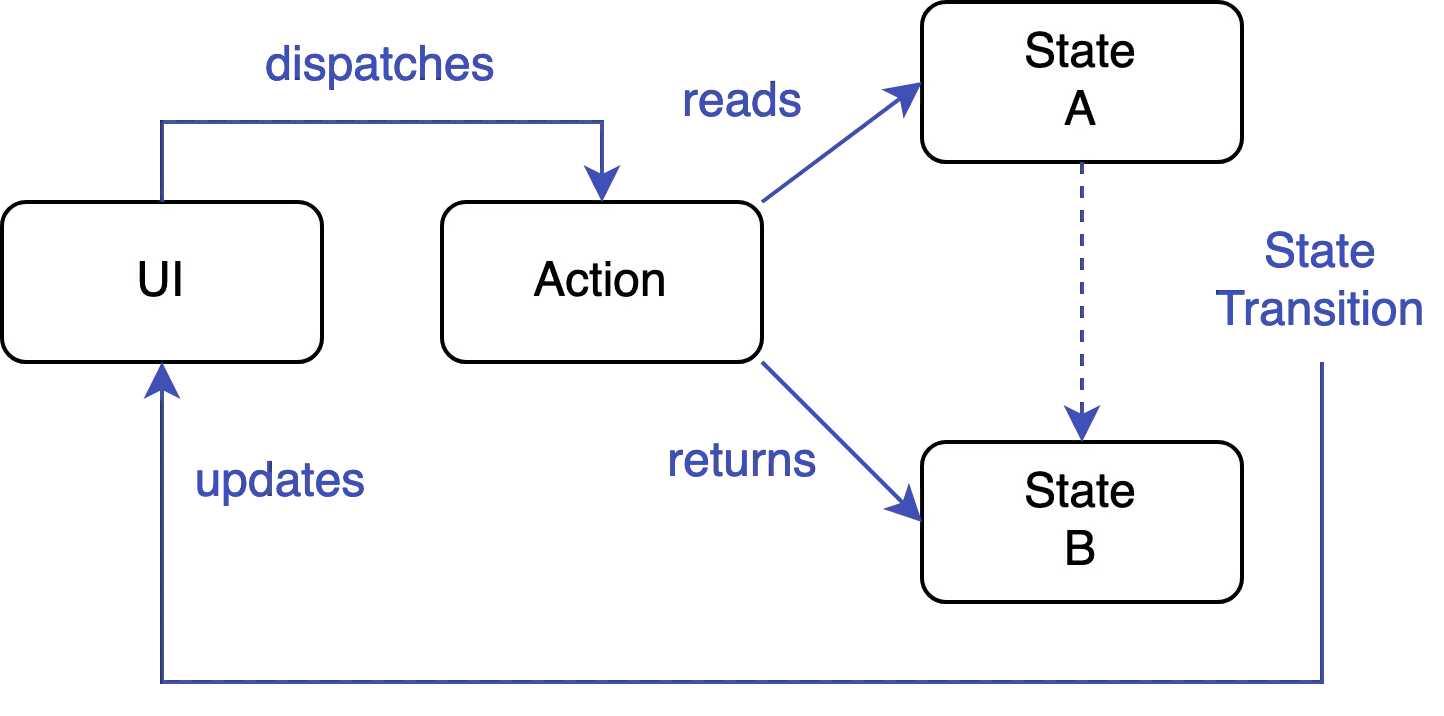
由于采用了Flutter作為開發框架,狀態管理必不可少,相比于市面常見的Flutter狀態管理框架async_redux,localsend采用了不太常用的狀態管理框架refena。作為被async_redux啟迪的狀態管理框架,redux中常見的store、 state、 actions 、 reducers同樣適用。store保存了應用里所有的狀態,而store被保存在各種provider里;action被保存在自身的reducers里,觸發store狀態發生變化的唯一辦法是發送一個action。有關redux的工作流及基礎概念可以參考這篇文章以及下面這張圖:
refena官網有最小化的狀態刷新介紹,先搬運介紹一下refena的創世紀代碼:
final counterProvider = ReduxProvider<ReduxCounter, int>((ref) => Counter());//1.在refena中,notifier用以保存實際狀態,并且可以觸發監聽它們的控件刷新
//2.init()方法可以定義Notifier初始化狀態
//3.可以通過ref來獲取定義的其他provider
//4.這里定義counter的初始狀態:10
class ReduxCounter extends ReduxNotifier<int> {int init() => 10;
}//1.ReduxAction最重要的方法就是reduce()方法,用于向provider返回一個新的狀態
//2.這里返回的狀態為ReduxCounter現在的值加上傳遞過來的值
class AddAction extends ReduxAction<ReduxCounter, int> {final int amount;AddAction(this.amount);int reduce() => state + amount;
}class MyPage extends StatelessWidget {Widget build(BuildContext context) {int counterState = context.watch(counterProvider);return Scaffold(body: Center(child: Text('Counter state: $counterState'),),floatingActionButton: FloatingActionButton(//點擊觸發action dispatchonPressed: () => context.redux(counterProvider).dispatch(AddAction(2)),child: const Icon(Icons.add),),);}
}
總結起來,在refena下的工作流為:1、定義初始狀態;2、重寫reduce()方法,在ReduxAction或各個Action子類中定義要改變的狀態;3、定義狀態的觸發條件,調用dispatch方法觸發狀態改變。總的來說,refena狀態刷新其實和MVVM有許多相似之處。
3、localsend里refena的刷新
localsend典型的功能如下:兩個接入同一個局域網的設備相互發送UDP廣播或HTTP請求,確立連接之后通過HTTP協議來傳輸文件。下面將簡單介紹localsend掃描到設備后的界面刷新流程。
3.1 初始狀態
localsend的初始狀態如下:

打開應用,進入發送頁簽,在“附件的設備”這個列表下開始掃描局域網內的設備。發送頁簽進行初始化工作,并且發送了一個全局異步的action——SendTabInitAction:
class SendTab extends StatelessWidget {const SendTab();Widget build(BuildContext context) {return ViewModelBuilder(provider: sendTabVmProvider,//依然是在init方法里分發初始化actioninit: (context) => context.global.dispatchAsync(SendTabInitAction(context)),......
這個SendTabInitAction的代碼十分簡單:
class SendTabInitAction extends AsyncGlobalAction {……Future<void> reduce() async {//從provider里邊讀取是否有掃描到的設備final devices = ref.read(nearbyDevicesProvider).devices;if (devices.isEmpty) {//如果沒有設備觸發設備掃描流程await dispatchAsync(StartSmartScan(forceLegacy: false));}}
}
根據refena工作流,發起一個action后,會直接調用它的reduce方法,在reduce方法里產生新的狀態,并通過各種方式把這個新的狀態同步給widget刷新界面。所以,設備是如何掃描出來的只需要跟進StartSmartScan這個action即可。
3.2 發起設備掃描流程
接下來就進入了localsend代碼的核心——掃描設備流程,這個流程較為復雜,包括dart下高級網絡編程及refena線程間通信等,這里只給出掃描開始及獲取到掃描結果的偽代碼:
//英文注釋為原生代碼注釋
class StartSmartScan extends AsyncGlobalAction {static const maxInterfaces = 15;final bool forceLegacy;Future<void> reduce() async {// 1.Try performant Multicast/UDP method first//首先發起UDP廣播,UDP廣播性能比TCP/HTTP性能高。ref.redux(nearbyDevicesProvider).dispatch(StartMulticastScan());// At the same time, try to discover favorites//首先從文件里讀取是否有收藏的設備final favorites = ref.read(favoritesProvider);final https = ref.read(settingsProvider).https;await ref.redux(nearbyDevicesProvider).dispatchAsync(StartFavoriteScan(devices: favorites, https: https));……// 2.If no devices has been found, then switch to legacy discovery mode// which is purely HTTP/TCP based.final stillEmpty = ref.read(nearbyDevicesProvider).devices.isEmpty;final stillInSendTab =ref.read(homePageControllerProvider).currentTab == HomeTab.send;if (forceLegacy || (stillEmpty && stillInSendTab)) {final networkInterfaces =//localIpProvider保存了從platformChannel里讀取到的當前設備的IP//(這里解釋一下為什么當前設備的IP需要單獨用一個localIpProvider來保存,//在android設備里,根據底軟實現可能有多個網卡,對應也有多個設備IP)//依然首先從provider(內存)里讀取是否之前掃描到過設備ref.read(localIpProvider).localIps.take(maxInterfaces).toList();if (networkInterfaces.isNotEmpty) {//開始掃描當前設備所有IP所在局域網的設備await dispatchAsync(StartLegacySubnetScan(subnets: networkInterfaces));}} else {……}}
}
3.3 掃描過程
掃描代碼主體流程主要分為兩個步驟:1.通過UDP協議掃描局域網設備;2.通過TCP/HTTP協議掃描設備。掃描流程較為復雜,需要對網絡編程有一定基礎的了解。我們跳過具體的掃描流程,直接到獲取掃描結果的部分。
//英文注釋為localsend原生注釋
/// HTTP based discovery on a fixed set of subnets.
class StartLegacySubnetScan extends AsyncGlobalAction {……Future<void> reduce() async {//讀取配置信息,端口號、是否是HTTPS協議等final settings = ref.read(settingsProvider);final port = settings.port;final https = settings.https;// send announcement in parallel//發起設備掃描流程——UDP組播ref.redux(nearbyDevicesProvider).dispatch(StartMulticastScan());await Future.wait<void>([for (final subnet in subnets)ref.redux(nearbyDevicesProvider).dispatchAsync(//發起設備掃描流程——TCP/HTTP請求StartLegacyScan(port: port, localIp: subnet, https: https)),]);……}
}
/// It does not really "scan".
/// It just sends an announcement which will cause a response on every other LocalSend member of the network.
class StartMulticastScanextends ReduxAction<NearbyDevicesService, NearbyDevicesState> {NearbyDevicesState reduce() {external(notifier._isolateController)//開啟線程發起UDP組播.dispatch(IsolateSendMulticastAnnouncementAction());return state;}
}
/// Scans one particular subnet with traditional HTTP/TCP discovery.
/// This method awaits until the scan is finished.
class StartLegacyScanextends AsyncReduxAction<NearbyDevicesService, NearbyDevicesState> {final int port;final String localIp;final bool https;……Future<NearbyDevicesState> reduce() async {……// 1.Scan all IP addresses on the WLANfinal stream = external(notifier._isolateController)//開啟線程發起TCP/HTTP協議設備掃描流程,掃描到的設備保存在Stream里.dispatchTakeResult(IsolateInterfaceHttpDiscoveryAction(networkInterface: localIp,port: port,https: https,));// 2.Register the device to the RegisterDeviceActionawait for (final device in stream) {//將stream里的設備賦值RegisterDeviceAction//掃描過的設備保存到nearbyDevicesProviderawait dispatchAsync(RegisterDeviceAction(device));}……}
}
3.3 刷新界面
/// Registers a device in the state.
/// It will override any existing device with the same IP.
class RegisterDeviceActionextends AsyncReduxAction<NearbyDevicesService, NearbyDevicesState> {……Future<NearbyDevicesState> reduce() async {……//在RegisterDeviceAction的reduce方法里觸發界面刷新var nearbyDevicesState = state.copyWith(devices: {...state.devices}..update(device.ip, (_) => device, ifAbsent: () => device),);……}
}
這樣,通過掃描設備流程就將掃描到的設備更新到了界面上:

4.localsend的設備掃描流程
4.1 UDP廣播設備注冊流程
在前文里,我們已經提到設備掃描首先會以UDP廣播來掃描設備,先來看看代碼實現。
  //英文注釋為原生代碼注釋/// Binds the UDP port and listen to UDP multicast packages/// It will automatically answer announcement messagesStream<Device> startListener() async* {……final sockets = await _getSockets(syncState.multicastGroup, syncState.port);//遍歷UDP組播地址的所有Socketfor (final socket in sockets) {//開始監聽是否有組播socket.socket.listen((_) {final datagram = socket.socket.receive();……try {//將Socket數據轉換為對象final dto = MulticastDto.fromJson(jsonDecode(utf8.decode(datagram.data)));if (dto.fingerprint == syncState.securityContext.certificateHash) {return;}……if ((dto.announcement == true || dto.announce == true) && syncState.serverRunning) {// only respond when server is running//向UDP組播廣播方返回應答消息//這里業務邏輯為UDP設備注冊流程//廣播發送方作為server//廣播應答方作為client_answerAnnouncement(peer);}} catch (e) {……}});}// Tell everyone in the network that I am online//向UDP組播地址所有成員發送UDP組播,此舉可以提供設備掃描成功率sendAnnouncement(); // ignore: unawaited_futuresyield* streamController.stream;}/// Responds to an announcement.Future<void> _answerAnnouncement(Device peer) async {try {// Answer with TCP//通過dio向廣播發送方發起一路HTTP請求,這里的請求接口為設備注冊接口await _ref.read(dioProvider).discovery.post(ApiRoute.register.target(peer),data: _getRegisterDto().toJson(),);} catch (e) {……}}/// Sends an announcement which triggers a response on every LocalSend member of the network.//發送一個廣播,在網絡的每個localSend成員上觸發應答廣播消息Future<void> sendAnnouncement() async {final syncState = _ref.read(syncProvider);final sockets = await _getSockets(syncState.multicastGroup);final dto = _getMulticastDto(announcement: true);//分別以100ms、500ms、2000ms向發送方應答組播消息for (final wait in [100, 500, 2000]) {……for (final socket in sockets) {try {socket.socket.send(dto, InternetAddress(syncState.multicastGroup), syncState.port);socket.socket.close();} catch (e) {……}}}……}Future<List<_SocketResult>> _getSockets(String multicastGroup, [int? port]) async {//通過各個平臺的platformChannel獲取當前設備的IP(android設備通常是SoftAP IP)final interfaces = await NetworkInterface.list();final sockets = <_SocketResult>[];for (final interface in interfaces) {try {//根據IP地址綁定到localsend預先定義的端口號上,返回一個Socket端點final socket = await RawDatagramSocket.bind(InternetAddress.anyIPv4, port ?? 0);//把這個Socket加入到UDP組播地址里socket.joinMulticast(InternetAddress(multicastGroup), interface);……} catch (e) {……}}return sockets;
}
4.2 TCP/HTTP設備注冊流程
UDP設備流程結束之后,才會走到HTTP設備注冊流程。HTTP設備注冊流程資源占用率比UDP廣播這種方式大得多。
class HttpScanDiscoveryService {……//參數名networkInterface代碼當前設備的IP地址。如192.168.31.246Stream<Device> getStream({required String networkInterface, required int port, required bool https}) {//遍歷197.168.31.0~197.168.31.255里的所有IP,嘗試向這里面的每個IP地址發起一路HTTP請求final ipList = List.generate(256, (i) => '${networkInterface.split('.').take(3).join('.')}.$i').where((ip) => ip != networkInterface).toList();_runners[networkInterface]?.stop();_runners[networkInterface] = TaskRunner<Device?>(initialTasks: List.generate(ipList.length,//發起設備注冊請求(index) => () async => _doRequest(ipList[index], port, https),),concurrency: 50,);return _runners[networkInterface]!.stream.where((device) => device != null).cast<Device>();}Future<Device?> _doRequest(String currentIp, int port, bool https) async {……final device = await _targetedDiscoveryService.state.discover(ip: currentIp,port: port,https: https,onError: null,);……}return device;}
4.3 localsend的服務器初始化工作
前面講到了localsend的界面刷新、設備注冊流程,還有個問題就是localsend到底如何處理這些廣播、請求的?簡單來說,localsend在進入應用的時候,跑了一個HTTP server來處理組播、HTTP請求。
/// Starts the server.Future<ServerState?> startServer({required String alias,required int port,required bool https,}) async{//1.檢查用戶給localsend客戶端取的別名,例如:“美麗的芒果”alias = alias.trim();if (alias.isEmpty) {alias = generateRandomAlias();}……final router = SimpleServerRouteBuilder();final fingerprint = ref.read(securityProvider).certificateHash;_receiveController.installRoutes(router: router,alias: alias,port: port,https: https,fingerprint: fingerprint,showToken: ref.read(settingsProvider).showToken,);_sendController.installRoutes(router: router,alias: alias,fingerprint: fingerprint,);final HttpServer httpServer;//默認HTTPS協議,需要先安裝默認證書if (https) {final securityContext = ref.read(securityProvider);httpServer = await HttpServer.bindSecure('0.0.0.0',port,SecurityContext()..usePrivateKeyBytes(securityContext.privateKey.codeUnits)..useCertificateChainBytes(securityContext.certificate.codeUnits),);} else {//HTTP協議無需證書httpServer = await HttpServer.bind('0.0.0.0',port,);}//啟動服務final server = SimpleServer.start(server: httpServer, routes: router);final newServerState = ServerState(httpServer: server,alias: alias,port: port,https: https,session: null,webSendState: null,pinAttempts: {},);state = newServerState;return newServerState;}
最后一個問題,localsend作為服務器有哪些RESTful API?根據官方文檔,localsend應該提供了以下這些接口:
enum ApiRoute {//早期的注冊接口,現已廢棄info('info'),//現在版本的注冊接口,傳遞client端IP地址、名稱等基礎信息register('register'),//文件傳輸之前獲取token的接口prepareUpload('prepare-upload', 'send-request'),//文件傳輸接口upload('upload', 'send'),//取消接口,包括發送取消、接收取消cancel('cancel'),……;
4.4總結
總結起來,localsend的關鍵原理:
- 建立一個HTTP Sever。監聽相關端口接收UDP組播;初始化RESTful API接口,用于HTTP的設備注冊、文件傳輸;
- UDP設備注冊流程中,服務端監聽UDP組播端口、客戶端回復組播消息并在回復組播消息后發起HTTP注冊流程,向服務端傳輸IP等關鍵信息;
- TCP設備注冊流程中,主動作為客戶端遍歷當前網段的所有IP,發起一路HTTP請求,向服務端注冊;
- 掃描到設備后,通過在服務端/客戶端之間的HTTP協議來傳輸文件。傳輸過程中,文件發送方為client;文件接收方為server。client發起一路post請求到服務器即可完成文件傳輸。


)


