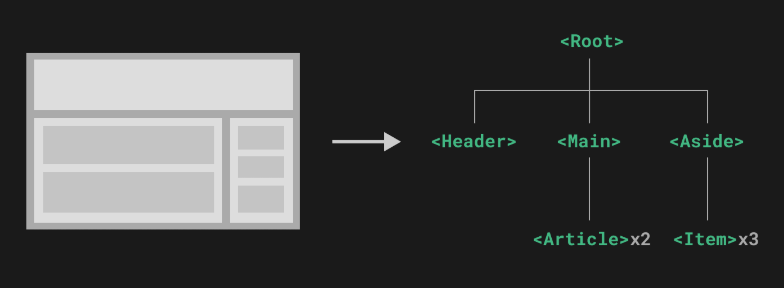
組件允許我們將 UI 劃分為獨立的、可重用的部分,并且可以對每個部分進行單獨的思考。在實際應用中,組件常常被組織成一個層層嵌套的樹狀結構:
一、注冊
Vue 組件本質上是一個可以復用的 自定義 HTML 元素,為了在其他組件中使用一個組件,你必須先注冊它。注冊的過程就是:把組件告訴 Vue,這樣 Vue 才能在模板中識別并正確渲染它。
注冊方式分類(Vue 3)
| 注冊方式 | 說明 | 特點 |
|---|---|---|
| 全局注冊 | 應用級注冊,所有組件都能使用 | 簡便、但增加全局污染 |
| 局部注冊 | 在組件內部通過 components 注冊 | 推薦,更清晰、可維護 |
<script setup> | Composition API 的簡化寫法 | Vue 3 推薦,自動引入更方便 |
?1、全局注冊
// main.js 或 main.ts
import { createApp } from 'vue'
import App from './App.vue'
import MyComponent from './components/MyComponent.vue'const app = createApp(App)// 注冊全局組件
app.component('MyComponent', MyComponent)app.mount('#app')
特點:
-
一次注冊,整個項目中的模板都能使用
<MyComponent /> -
缺點是全局污染命名空間,不利于維護,不推薦在大型項目中濫用
?2、局部注冊
<script setup>
import MyComponent from './MyComponent.vue'
</script>
<template><MyComponent />
</template>
特點:
-
只在當前組件作用域內生效
-
更加清晰、模塊化,推薦使用
3、自動注冊(文件自動引入)
?在使用 Vite 或 Webpack 的 Vue 項目中,可以借助 import.meta.glob 或 require.context() 實現自動注冊所有組件:
示例(自動全局注冊 components 文件夾下所有組件):
// main.js
import { createApp } from 'vue'
import App from './App.vue'
const app = createApp(App)
const modules = import.meta.glob('./components/*.vue', { eager: true })
for (const path in modules) {const component = modules[path].defaultconst name = component.name || path.split('/').pop().replace('.vue', '')app.component(name, component)
}
app.mount('#app')
?4、動態組件注冊
使用 <component :is="componentName"> 可以動態切換渲染的組件:
<template><component :is="currentComponent" />
</template><script setup>
import ComponentA from './ComponentA.vue'
import ComponentB from './ComponentB.vue'const currentComponent = ref('ComponentA')
</script>
?需要配合預先注冊這些組件或使用異步加載。
5、 Vue 3 <script setup> 的注冊簡化優勢
從 Vue 3.2 起,推薦使用 <script setup>,其優勢是:
-
無需寫
components選項; -
直接引入即可自動生效;
-
模板中可直接使用變量名作為標簽。
<script setup>
import MyComponent from './MyComponent.vue'
</script><template><MyComponent />
</template>
這種方式既是局部注冊,又是最現代、推薦的寫法。
二、組件通信(prop與emit)
Vue 的組件是樹狀結構,存在父子關系、兄弟關系、跨層級關系:
-
父 → 子:傳遞數據(
props) -
子 → 父:觸發事件(
emit) -
兄弟之間或跨層通信:需要狀態共享或事件中心
掌握組件通信的方式,是 Vue 構建中大型項目的基礎。
Vue 組件通信方式總覽(Vue 3)
| 類型 | 通信方式 | 說明 |
|---|---|---|
| 父 → 子 | props | 父組件向子組件傳遞數據 |
| 子 → 父 | emit | 子組件向父組件發送事件 |
| 雙向綁定 | v-model | 基于 modelValue 和 update:modelValue |
| 任意組件間 | 狀態管理(如 Pinia) | 共享狀態,兄弟 / 跨層通信 |
| 任意組件間 | provide/inject | 祖先 → 后代,非響應式(默認) |
| 任意組件間 | 事件總線(不推薦) | Vue 3 中已不推薦,Pinia 更優 |
| 父/子操作子/父組件實例 | ref 綁定組件 | 訪問子組件方法或屬性 |
?1、父傳子通信(props)
1、什么是 props?
props是指 父組件通過 HTML 屬性的形式,向子組件傳遞的數據。
你可以把 props 理解為組件的“參數”:
父組件在使用子組件時,像調用函數一樣傳入值,而子組件通過 props 來接收值并使用。
2、基本使用
?父組件傳值:
<!-- Parent.vue -->
<MyCard title="Vue 面經" content="面試知識點" />
?子組件接收值:
<!-- MyCard.vue -->
<script setup>
const props = defineProps(['title', 'content'])
</script>
<template><div><h3>{{ props.title }}</h3><p>{{ props.content }}</p></div>
</template>
?在 <script setup> 中你也可以這樣寫更簡潔:
const { title, content } = defineProps(['title', 'content'])?除了使用字符串數組來聲明 props 外,還可以使用對象的形式:
// 使用 <script setup>
defineProps({title: String,content: String})
對于以對象形式聲明的每個屬性,key 是 prop 的名稱,而值則是該 prop 預期類型的構造函數。比如,如果要求一個 prop 的值是?number?類型,則可使用?Number?構造函數作為其聲明的值。
對象形式的 props 聲明不僅可以一定程度上作為組件的文檔,而且如果其他開發者在使用你的組件時傳遞了錯誤的類型,也會在瀏覽器控制臺中拋出警告。
Vue 中 props 是只讀的:
-
子組件可以讀取
props的值; -
但不可以修改它,因為這可能會破壞父組件的狀態管理。?
?如果你確實需要修改,可以復制到一個 ref:const localTitle = ref(props.title)
更改對象 / 數組類型的 props?
當對象或數組作為 props 被傳入時,雖然子組件無法更改 props 綁定,但仍然可以更改對象或數組內部的值。這是因為 JavaScript 的對象和數組是按引用傳遞,對 Vue 來說,阻止這種更改需要付出的代價異常昂貴。
這種更改的主要缺陷是它允許了子組件以某種不明顯的方式影響父組件的狀態,可能會使數據流在將來變得更難以理解。在最佳實踐中,你應該盡可能避免這樣的更改,除非父子組件在設計上本來就需要緊密耦合。在大多數場景下,子組件應該拋出一個事件(emit)來通知父組件做出改變。
?3、響應式 Props 解構 ?
Vue 的響應式依賴追蹤機制是這樣的:
-
當你在一個 計算屬性 或
watchEffect/watch函數中訪問某個響應式數據的屬性,Vue 會自動收集這個屬性作為依賴。 -
當這個屬性變化時,對應的副作用函數就會被重新執行。
?3.4 及以下版本的問題:props 解構會“失去響應性”
const { foo } = defineProps(['foo'])watchEffect(() => {console.log(foo)
})在 Vue 3.4 及以前版本:
這里 foo 是普通值(不是 ref 或 reactive 的值),不會追蹤變更。
所以 watchEffect() 只執行一次,不會在 foo 更新時再次觸發。
?Vue 3.5 的改進:解構的 props 自動補充響應式追蹤
?在 Vue 3.5 中,Vue 編譯器做了優化:
const { foo } = defineProps(['foo'])
等價于:
const props = defineProps(['foo'])watchEffect(() => {console.log(props.foo) // Vue 編譯器自動轉換為 props.foo
})
這就意味著:
-
解構的變量
foo仍然是響應式的**(由編譯器自動轉換)**; -
在
watchEffect、computed等副作用函數中訪問foo時可以正常追蹤變化; -
無需再使用
toRefs()手動保持響應性,前提是你是在<script setup>的作用域內直接用。
?注意:在傳遞到函數時不會保留響應性!
const { foo } = defineProps(['foo'])watch(foo, () => {// ? 不會追蹤 foo 的變化,因為 foo 是值,不是響應式引用
})這是一個很容易踩的坑!
在 watch(foo) 這種寫法中,foo 被當作一個“值”傳入,而不是 getter;
所以watch 只監聽了一次值,不會追蹤變化,Vue 也會在控制臺發出警告。
?正確做法:將解構后的 prop 包裝成 getter
watch(() => foo, () => {// ? 正確,foo 的變化會被追蹤
})
為什么這樣可以?
因為 () => foo 是一個 getter 函數;
Vue 會自動追蹤 getter 內部訪問的響應式屬性;
所以 foo 的變化會被正確響應。
?在 Vue 3.5 中,解構的 props 在 watchEffect/computed 中是響應式的,但在函數調用/事件中不是,此時要用 () => foo 包裝成 getter。
?4、props 類型聲明和校驗
Vue 3 推薦的方式:
const props = defineProps<{title: stringcontent?: string
}>()
使用對象形式提供更多配置:
const props = defineProps({title: {type: String,required: true},content: {type: String,default: '默認內容'}
})
| 選項 | 作用 |
|---|---|
type | 聲明類型,如 String、Number 等 |
required | 是否必傳 |
default | 默認值 |
?Vue 組件可以更細致地聲明對傳入的 props 的校驗要求。如果傳入的值不滿足類型要求,Vue 會在瀏覽器控制臺中拋出警告來提醒使用者。這在開發給其他開發者使用的組件時非常有用。
要聲明對 props 的校驗,你可以向?defineProps()?宏提供一個帶有 props 校驗選項的對象,例如:
defineProps({// 基礎類型檢查// (給出 `null` 和 `undefined` 值則會跳過任何類型檢查)propA: Number,// 多種可能的類型propB: [String, Number],// 必傳,且為 String 類型propC: {type: String,required: true},// 必傳但可為 null 的字符串propD: {type: [String, null],required: true},// Number 類型的默認值propE: {type: Number,default: 100},// 對象類型的默認值propF: {type: Object,// 對象或數組的默認值// 必須從一個工廠函數返回。// 該函數接收組件所接收到的原始 prop 作為參數。default(rawProps) {return { message: 'hello' }}},// 自定義類型校驗函數// 在 3.4+ 中完整的 props 作為第二個參數傳入propG: {validator(value, props) {// The value must match one of these stringsreturn ['success', 'warning', 'danger'].includes(value)}},// 函數類型的默認值propH: {type: Function,// 不像對象或數組的默認,這不是一個// 工廠函數。這會是一個用來作為默認值的函數default() {return 'Default function'}}
})
4、在模板中使用 props:
你可以像使用普通變量一樣直接使用 props 中的數據。? <p>{{ content }}</p>
5、動態綁定 props:使用 v-bind
使用?v-bind?或縮寫?:?來進行動態綁定的 props:
<!-- 根據一個變量的值動態傳入 -->
<MyCard :title="post.title" /><!-- 根據一個更復雜表達式的值動態傳入 -->
<MyCard :title="post.title + ' by ' + post.author.name" />或者使用 v-bind 對象方式:
<MyButton v-bind="{ label: buttonText, disabled: true }" />
使用一個對象綁定多個 prop
如果你想要將一個對象的所有屬性都當作 props 傳入,你可以使用
沒有參數的v-bind?,即只使用?v-bind?而非?:prop-name。例如,這里有一個?post?對象:?
?const post = { ititle: 'My Journey with Vue' ,content:'面試知識點'}
以及下面的模板:<MyCard v-bind="post" />
而這實際上等價于:<MyCard?:title="post.title"?:content="post.content" />
6、布爾類型的特殊寫法?
Vue 中的布爾型 props 可以使用屬性存在即為 true的簡寫方式:
<!-- 等價于 :isLoading="true" -->
<LoadingSpinner isLoading />
7、CamelCase 與 kebab-case 的映射
Vue 支持駝峰式聲明 props:const props = defineProps(['isLoading'])
但是在模板中使用組件時應使用 kebab-case:<MyComponent is-loading />
2、子 → 父:使用 emit事件
?在 Vue 中,emit 是子組件向父組件發送事件的核心機制,它是實現子 → 父通信的標準方式。理解和正確使用 emit 對于掌握組件通信和構建響應式組件非常重要,尤其在面試和組件封裝時經常考查。
1、什么是 emit?
emit是 Vue 組件中用來在子組件中觸發自定義事件,通知父組件做出響應的方法。
-
父組件可以監聽這些事件,就像監聽原生 DOM 事件一樣。
-
子組件不會直接操作父組件的數據,而是通過 emit 發出事件,由父組件處理。
?2、最基礎的使用方式
?子組件:觸發事件
<!-- MyButton.vue -->
<script setup>
const emit = defineEmits(['click'])
</script>
<template><button @click="emit('click')">點擊</button>
</template>
🌱 父組件:監聽事件
<!-- Parent.vue -->
<MyButton @click="handleClick" /><script setup>
function handleClick() {console.log('子組件點擊事件觸發了')
}
</script>
3、emit 的參數傳遞
?你可以在 emit 時傳遞參數,供父組件使用:
?子組件:emit('select', itemId)
?父組件:<MyItem @select="onItemSelect" />?
function onItemSelect(id) {
? console.log('你選擇了 ID:', id)
}
4、defineEmits() 的類型定義?
1、什么是 defineEmits()?
defineEmits() 是 <script setup> 中用來 聲明和使用自定義事件 的語法糖(宏函數):
-
它的作用等價于傳統組件的
emits選項; -
并返回一個名為
emit的函數,供你在組件內觸發事件; -
只能在
<script setup>的頂層作用域中使用。
?2、基本用法:聲明 + 觸發事件
<script setup>
const emit = defineEmits(['submit', 'inFocus'])function onClick() {emit('submit') // 觸發“submit”事件
}
</script>
解釋:
-
defineEmits(['submit'])表示這個組件會觸發名為'submit'的事件; -
defineEmits接收一個字符串數組,每個字符串代表一個事件名。
-
emit('submit')就是在組件內部觸發這個事件; -
父組件就可以通過
<MyForm @submit="handleSubmit" />來監聽。
?為什么要顯式聲明事件?
雖然 emit() 可以直接使用事件名,但聲明事件有很多好處:
| 好處 | 說明 |
|---|---|
| 🧠 文檔化 | 讓組件的可用事件一目了然 |
| ? 類型校驗 | 在 TypeScript 下自動提示事件名和參數 |
| 💡 IDE 補全 | 支持事件名的自動補全 |
| ?? 區分 DOM 屬性 | 幫助 Vue 更好地區分自定義事件和 HTML 屬性(比如 focus 和 inFocus) |
??在非 <script setup> 中如何使用?
?export default {emits: ['submit', 'inFocus'], // 顯式聲明setup(props, ctx) {ctx.emit('submit') // 觸發事件}
}
或者解構方式:
?setup(props, { emit }) {emit('submit')
}
?在選項式組件中,事件由 emits 選項聲明,通過 ctx.emit() 或解構 emit() 使用。
?對象語法 + 參數校驗(Vue 支持)
const emit = defineEmits({submit(payload: { email: string; password: string }) {return payload.email.includes('@') && payload.password.length > 6}
})
說明:
-
這是對象語法,事件名作為 key;
-
value 是一個驗證函數,用于校驗參數合法性;
-
如果返回
false,Vue 會在 dev 環境報出 warning,提醒你傳參錯誤。
?TypeScript 的推薦寫法(強類型聲明)
const emit = defineEmits<{(e: 'change', id: number): void(e: 'update', value: string): void
}>()
3、重要規則和限制
| 限制 | 說明 |
|---|---|
| 頂層使用 | defineEmits() 只能寫在 <script setup> 頂部作用域 |
| 不可嵌套 | 不能在函數體或條件判斷里調用 |
返回值是 emit() | 用它觸發事件(而不是 $emit()) |
| TypeScript 推薦 | 使用泛型定義事件名和參數 |
5、事件校驗
在 Vue 中我們熟悉了對 props 做類型校驗,比如:
const props = defineProps({title: String
})
而 defineEmits() 也支持類似的“事件參數校驗”,尤其是在你希望防止父組件傳錯數據、提高組件代碼自解釋性時很有用。
?示例:
<script setup>
const emit = defineEmits({// 沒有校驗click: null,// 校驗 submit 事件submit: ({ email, password }) => {if (email && password) {return true} else {console.warn('Invalid submit event payload!')return false}}
})function submitForm(email, password) {emit('submit', { email, password })
}
</script>
你聲明了兩個事件:
| 事件名 | 校驗方式 | 說明 |
|---|---|---|
click | null | 沒有參數校驗,隨便觸發 |
submit | 函數 | 有參數校驗邏輯,必須傳入合法對象 |
submit 校驗函數解釋:
-
接收的是你
emit('submit', { ... })傳入的參數; -
返回
true表示校驗通過; -
返回
false則該事件不會被觸發(Vue 會阻止它),并在控制臺輸出警告。
什么時候使用事件校驗??
| 適用場景 | 示例 |
|---|---|
| 表單提交事件需要 email + password | 防止少傳字段或格式錯誤 |
| 對自定義事件要求固定格式 | 如 { id: number, status: string } |
| 組件復雜、文檔難覆蓋時 | 用事件校驗機制輔助防錯 |
| 團隊協作開發 | 強約束組件輸入,提高可維護性 |
事件校驗 vs 類型提示
| 特性 | 類型提示(TS 泛型) | 參數校驗(對象語法) |
|---|---|---|
| 校驗時間 | 編譯時 | 運行時 |
| 表現方式 | IDE 提示、自動補全 | 控制臺 warning / 阻止觸發 |
| 安全性 | 提前發現問題 | 運行時保護 |
| 推薦搭配 | 強烈建議一起使用 |
?推薦組合用法(TS + 校驗):
const emit = defineEmits<{(e: 'submit', payload: { email: string, password: string }): void
}>({submit(payload) {return !!payload.email && !!payload.password}
})
說明:
-
讓你同時擁有類型安全 + 運行時驗證;
-
避免父組件漏傳或傳錯參數;
-
自動提示 + 編譯保護 + 控制臺預警 = 組件更安全!
三、組件的v-model
v-model 是 Vue 提供的一個語法糖,用于在 父組件和子組件之間同步數據。
?它相當于下面兩件事的組合:
<!-- 相當于 -->
<MyInput:modelValue="username"@update:modelValue="username = $event"
/>換句話說,v-model="username" 背后做了兩件事:
父組件將 username 作為 modelValue 傳給子組件;
子組件通過 emit('update:modelValue', newValue) 通知父組件更新。
?1、在子組件中實現 v-model
?子組件 MyInput.vue:
<script setup>
const props = defineProps(['modelValue'])         // 接收值
const emit = defineEmits(['update:modelValue'])   // 聲明事件function onInput(event) {emit('update:modelValue', event.target.value)   // 通知父組件更新
}
</script><template><input :value="modelValue" @input="onInput" />
</template>
?父組件使用:<MyInput v-model="username" />
現在 username 就在父子組件之間保持同步了 ?
2、為什么叫 modelValue?
在 Vue 3 中:
-
默認
v-model會綁定到modelValue; -
觸發事件名為
update:modelValue; -
這是一個約定俗成的機制,是 Vue 內部解析
v-model的基礎。
支持多個 v-model:自定義參數名?
Vue 3 新特性:可以給 v-model 自定義參數名,實現多個綁定!?
<MyComponentv-model:title="postTitle"v-model:content="postContent"
/>
對應子組件寫法:
const props = defineProps(['title', 'content'])
const emit = defineEmits(['update:title', 'update:content'])function updateTitle(val) {emit('update:title', val)
}
function updateContent(val) {emit('update:content', val)
}
模板中:
<input :value="title" @input="updateTitle($event.target.value)" />
<textarea :value="content" @input="updateContent($event.target.value)" />
?這樣你就可以用多個 v-model 在一個組件上雙向綁定多個值!
3、常見錯誤和調試點
| 問題 | 原因 |
|---|---|
| 父組件數據不更新 | 子組件沒有 emit update:modelValue |
| 輸入后無效 | 子組件沒綁定 :value |
| 事件名拼錯 | 必須是 update:modelValue |
| 未聲明 props | modelValue 沒在 defineProps 中注冊 |
Vue 3.4+ 中的新能力 —— 自定義組件支持 v-model 修飾符,也就是:
如何讓一個組件能夠識別、響應并處理像
.trim、.capitalize這樣的 v-model 修飾符,并實現自定義行為。
這在實際開發中非常有用,比如封裝輸入組件時自動格式化大小寫、過濾空格、處理數字等。
1、 什么是 v-model 修飾符?
Vue 在 v-model 上原生支持的修飾符包括:
| 修飾符 | 功能 |
|---|---|
.trim | 去除字符串前后空格 |
.number | 將輸入轉換為數字 |
.lazy | 延遲到 change 時才更新 |
<input v-model.trim="username" />
在 Vue 原生組件中,這些由 Vue 自動處理。但在自定義組件中,我們需要顯式實現支持這些修飾符。
?2、核心 API:defineModel() 和修飾符解構
const [model, modifiers] = defineModel()
-
model是一個響應式引用,類似于以前的modelValue -
modifiers是一個對象,包含當前v-model所使用的所有修飾符
3、基于修飾符處理數據:使用 get / set 轉換函數
你可以為 defineModel() 提供 get / set 選項:?
const [model, modifiers] = defineModel({set(value) {if (modifiers.capitalize) {return value.charAt(0).toUpperCase() + value.slice(1)}return value}
})
-
每次外部
v-model設置值進來時,會通過set()處理; -
你可以在里面根據
modifiers條件來轉化數據,比如大小寫轉換、過濾等。
?使用示例
父組件:
<MyInput v-model.capitalize="username" />子組件 MyInput.vue:
<script setup>
const [model, modifiers] = defineModel({set(value) {if (modifiers.capitalize && typeof value === 'string') {return value.charAt(0).toUpperCase() + value.slice(1)}return value}
})
</script><template><input v-model="model" />
</template>
-
用戶輸入
john; -
model會變成John并 emit 給父組件; -
父組件中的
username自動更新為John。
四、透傳
Vue 的透傳(Attribute Inheritance / 透傳屬性),是指當你在使用一個組件時,傳遞給它的非 prop 屬性(未在 props 中聲明的屬性),會自動或手動傳遞到子組件內部的某個元素上。
?1、什么是透傳屬性?
透傳屬性指的是父組件向子組件傳遞的、子組件沒有聲明為 props 的屬性。
Vue 會將這些屬性自動收集到 $attrs 中,你可以選擇是否讓它們傳遞到組件的某個元素上。
?最常見的例子就是?class、style?和?id。
示例說明:?
<!-- 父組件 -->
<MyButton class="primary" id="submit-btn" />
如果 MyButton 組件內部沒有聲明 class 或 id 為 props:
<script setup>
defineProps([]) // 不接收任何 props
</script><template><button>點擊我</button>
</template>
2、默認行為(單根元素):
-
Vue 會自動把
class="primary"和id="submit-btn"透傳到<button>上 ?
?結果 DOM 渲染為:<button class="primary" id="submit-btn">點擊我</button>
3、$attrs 的作用
$attrs 是一個包含所有未被聲明為 props 的屬性和事件監聽器的對象。
import { useAttrs } from 'vue'
const attrs = useAttrs()
它是一個響應式只讀對象,你可以:
-
檢查有哪些透傳屬性;
-
將它們手動綁定到內部元素上。
4、對?class?和?style?的合并?
如果一個子組件的根元素已經有了?class?或?style?attribute,它會和從父組件上繼承的值合并。
同樣的規則也適用于?v-on?事件監聽器:?如果原生?button?元素自身也通過?v-on?綁定了一個事件監聽器,則這個監聽器和從父組件繼承的監聽器都會被觸發。
5、深層組件繼承?
當你的組件根節點是另一個組件時(比如你的組件是一個“代理組件”),透傳屬性是如何繼續傳遞的,以及哪些會被消費、哪些會被繼續傳下去。
?根節點是另一個組件的情況
<!-- MyButton.vue -->
<template><BaseButton />
</template>
在這個設計中:
-
<MyButton />是一個外殼(代理)組件; -
它的根節點直接渲染了另一個子組件
<BaseButton />; -
用戶在使用
<MyButton />時傳入的一些屬性或事件,可能需要“透傳”到底層的<BaseButton />。
6、透傳機制如何處理?
Vue 的透傳屬性機制如下:
| 類型 | 是否自動透傳給 BaseButton? | 說明 |
|---|---|---|
未聲明的屬性(如 class、id) | ? 會 | Vue 自動透傳到 <BaseButton /> |
未聲明的事件監聽器(如 @click) | ? 會 | 會被當作 $attrs 繼續傳遞下去 |
| 聲明過的 props(在 MyButton 中聲明) | ? 不會 | 被 MyButton 自己“消費” |
聲明過的 emits(如 defineEmits(['submit'])) | ? 不會 | 被 MyButton 自己監聽,Vue 認為你要手動處理 |
?如何將消費過的 props/emits 顯式“再透傳”?
?Props 手動傳下去:<BaseButton :type="type" />
Emits 手動再觸發:<BaseButton @submit="emit('submit', $event)" />
這樣你才能讓 <MyButton> 代理 type 和 submit 的行為,使它們繼續在 <BaseButton> 上生效。
7、禁用 Attributes 繼承?
如果你不想要一個組件自動地繼承 attribute,你可以在組件選項中設置?inheritAttrs: false。
?從 3.3 開始你也可以直接在?<script setup>?中使用defineOptions
<script setup>
defineOptions({inheritAttrs: false
})
// ...setup 邏輯
</script>現在我們要再次使用一下?<MyButton>?組件例子。有時候我們可能為了樣式,需要在?<button>?元素外包裝一層?<div>:
<div class="btn-wrapper"><button class="btn" v-bind="$attrs">Click Me</button>
</div>我們想要所有像?class?和?v-on?監聽器這樣的透傳 attribute 都應用在內部的?<button>?上而不是外層的?<div>?上。我們可以通過設定?inheritAttrs: false?和使用?v-bind="$attrs"?來實現:
<div class="btn-wrapper">
? <button class="btn" v-bind="$attrs">Click Me</button>
</div>?
8、多根節點的 Attributes 繼承?
和單根節點組件有所不同,有著多個根節點的組件沒有自動 attribute 透傳行為。
<template><header>頭部</header><footer>底部</footer>
</template>
這時如果父組件這樣使用:
<MyLayout class="layout" />
? class="layout" 將不會被傳遞給 header 或 footer,因為 Vue:無法判斷應該透傳到哪一個根節點;所以默認放棄透傳,你必須手動綁定。?如果需要,你可以在?<script setup>?中使用?useAttrs()?API 來訪問一個組件的所有透傳 attribute:
<script setup>
import { useAttrs } from 'vue'const attrs = useAttrs()
</script>?需要注意的是,雖然這里的?attrs?對象總是反映為最新的透傳 attribute,但它并不是響應式的 (考慮到性能因素)。你不能通過偵聽器去監聽它的變化。如果你需要響應性,可以使用 prop。或者你也可以使用?onUpdated()?使得在每次更新時結合最新的?attrs?執行副作用。
五、插槽
?1、什么是插槽(slot)?
插槽是 Vue 提供的一種機制,用于 父組件將模板內容“注入”到子組件內部指定位置。
可以把插槽看作是“組件內部預留的占位區域”,讓父組件在使用時可以自定義渲染內容。
?2、默認插槽
最基礎的插槽用法,只使用 <slot /> 標簽。
子組件:
<!-- MyCard.vue -->
<template><div class="card"><slot /> <!-- 插槽位置 --></div>
</template>
父組件使用:
<MyCard><p>我是通過插槽傳進去的內容</p>
</MyCard>
效果:
最終渲染相當于:
<div class="card"><p>我是通過插槽傳進去的內容</p>
</div>
3、具名插槽
?你需要插入多個不同區域的內容時,可以使用具名插槽。
子組件:
<template><header><slot name="header" /></header><main><slot /></main><footer><slot name="footer" /></footer>
</template>父組件:
<MyLayout><template #header><h1>頂部標題</h1></template><p>中間內容</p><template #footer><small>底部版權</small></template>
</MyLayout>
#header 是 slot name="header" 的內容;
默認插槽(沒有 name)會插到 <slot />。
? 語法糖 #xxx 相當于 v-slot:xxx。
?4、條件插槽
?Vue 提供了 $slots 對象,用來訪問傳入的插槽內容。
你可以用它判斷插槽是否存在,從而決定是否渲染某段結構。
場景:
比如你想封裝一個 Card 組件:
-
如果傳入了 header 插槽,就顯示
.card-header; -
否則,不渲染這個 DOM 元素;
-
同樣的邏輯適用于 footer 和默認插槽。
<template><div class="card"><div v-if="$slots.header" class="card-header"><slot name="header" /></div><div v-if="$slots.default" class="card-content"><slot /></div><div v-if="$slots.footer" class="card-footer"><slot name="footer" /></div></div>
</template>解釋:
$slots.header 是一個函數,只要插槽傳入了內容,就返回真;
v-if="$slots.header" 只在插槽內容存在時才渲染對應的包裝結構;
這樣可以避免不必要的 DOM 結構,組件更輕量、更智能。
補充知識:
-
$slots是 Vue 運行時提供的插槽訪問 API; -
你也可以訪問作用域插槽內容(如
$slots.default()); -
不推薦在
<script setup>中直接訪問$slots,應使用useSlots():
?5、動態插槽名
Vue 支持在 v-slot 或其縮寫 # 中使用動態參數,讓你可以根據變量名選擇插入哪個具名插槽。
就像在指令中用
v-bind:[attr]動態綁定屬性名,這里是動態綁定插槽名。
<base-layout><template v-slot:[dynamicSlotName]><p>插入動態插槽的內容</p></template><!-- 等價的縮寫寫法 --><template #[dynamicSlotName]><p>插入動態插槽的內容</p></template>
</base-layout>
dynamicSlotName 是你在 <script setup> 或 data 中定義的變量,如:const dynamicSlotName = 'main' // 動態決定插槽名
如果子組件定義了 <slot name="main" />,這個內容就會插入那里;這是動態選擇插槽的一種方式,可以根據業務邏輯插入不同位置。
?🔒 動態插槽名的語法限制:
表達式必須是字符串或能轉換為字符串的值;
不能嵌套復雜表達式(如 a.b.c + '-slot' 需要先賦值為變量);
不能用于默認插槽(因為默認插槽沒有名字);
6、作用域插槽
?插槽內容可以訪問到父組件的數據作用域,因為插槽內容本身是在父組件模板中定義的。插槽內容無法訪問子組件的數據。Vue 模板中的表達式只能訪問其定義時所處的作用域
?如果你希望子組件向插槽暴露一些數據,讓父組件在插入內容時可以動態使用這些數據,就要用到作用域插槽。
 子組件:
<!-- ListRenderer.vue -->
<template><ul><li v-for="(item, index) in items" :key="index"><slot :item="item" :index="index" /></li></ul>
</template>
<script setup>
defineProps({items: Array
})
</script>
父組件使用:
<ListRenderer :items="['Vue', 'React', 'Svelte']"><template #default="{ item, index }">{{ index + 1 }} - {{ item.toUpperCase() }}</template>
</ListRenderer>子組件使用 slot 并暴露 :item、:index 數據;
父組件通過解構作用域插槽參數使用這些數據;
父組件可以完全控制每一項如何渲染(定制渲染邏輯)。
?子組件傳入插槽的 props 作為了?v-slot?指令的值,可以在插槽內的表達式中訪問。
<MyComponent v-slot="{ text, count }"> {{ text }} {{ count }} </MyComponent>?父組件也可以通過v-slot指令得到子組件的值
作用域插槽的應用場景總結
| 應用場景 | 說明 |
|---|---|
| 高級可定制的組件 | 組件封裝邏輯,視圖交給外部 |
| 列表、表格、分頁等通用結構 | 可插入任意項結構 |
| 表單、彈窗、布局區域定制 | 分區插槽 |
| 響應式邏輯封裝(鼠標、拖拽) | 無渲染組件,純邏輯暴露數據 |


![[Vue]編程式導航](http://pic.xiahunao.cn/[Vue]編程式導航)

)


-對稱加密(DES、AES、3DES、Blowfish、Twofish)一篇了解所有主流對稱加密,輕松上手使用。)


)

