之所以想寫這一系列,是因為之前工作過程中使用Spring Security OAuth2搭建了網關和授權服務器,但當時基于spring-boot 2.3.x,其默認的Spring Security是5.3.x。之后新項目升級到了spring-boot 3.3.0,結果一看Spring Security也升級為6.3.0。無論是Spring Security的風格和以及OAuth2都做了較大改動,里面甚至將授權服務器模塊都移除了,導致在配置同樣功能時,花費了些時間研究新版本的底層原理,這里將一些學習經驗分享給大家。
注意:由于框架不同版本改造會有些使用的不同,因此本次系列中使用基本框架是 spring-boo-3.3.0(默認引入的Spring Security是6.3.0),JDK版本使用的是19,本系列OAuth2的代碼采用Spring Security6.3.0框架,所有代碼都在oauth2-study項目上:https://github.com/forever1986/oauth2-study.git
目錄
- 1 整體架構
- 2 前提條件準備
- 3 授權服務器
- 4 網關
- 4.1 初始化項目
- 4.2 配置nacos自動加載
- 4.3 配置redis
- 4.4 配置gateway以及資源服務器
- 5 測試服務
- 6 測試結果
前面我們通過二十幾章的內容,將新版本Spring Security 6實現OAuth2的大部分內容都講了一遍。相信沒有講到的內容,你自己現在也能通過看源代碼上手了。這一章作為最后,將以一個真實生成案例,做一個授權服務器+網關的組合,作為內部微服務訪問鑒權。(由于gateway默認采用的是netty作為服務器,并且支持Webflux響應式編程,因此本章也是基于上2章學習的響應式編程,搭建gateway)
1 整體架構
在微服務架構中,隨著微服務越來越多,一般會采用一個網關作為統一管理,但是網關也會涉及鑒權問題,而OAuth2經常為微服務架構提供統一的認證和授權服務。這里的鑒權需要說明一下,一種是訪問權限,一種是詳細的業務權限,假如一個前端服務需要訪問訂單服務,那么訂單服務就是訪問權限,能訪問多少訂單數據則屬于業務權限。而OAuth2只做訪問權限管理,也就是前端服務能訪問哪些后端服務,至于詳細業務權限還是需要每個后端服務自己實現。因此網關結合OAuth2其實是一個url訪問權限管理,底層是網關作為一個資源服務器,驗證access_token以及其scope去判斷url。
下面我們就通過授權服務器+網關的組合,展現真實環境下搭建一個以OAuth2為基礎的網關權限認證。
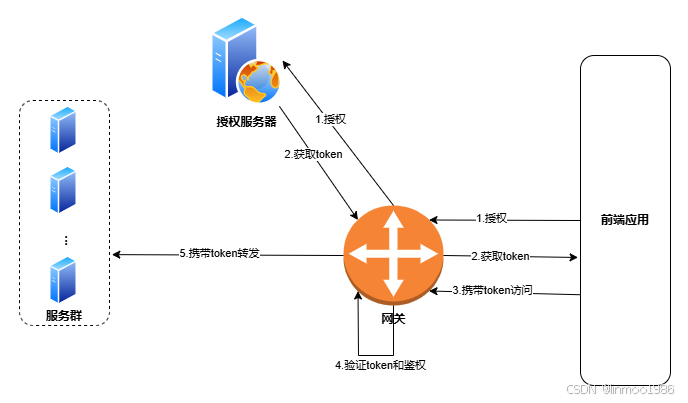
1)前端應用通過登錄并獲得應用授權
2)授權服務器返回token
3)前端應用攜帶token去訪問API網關
4)API網關通過驗證token有效性以及鑒權情況
5)驗證通過后,則轉發請求
2 前提條件準備
1)mysql數據庫,建立一個oauth_study數據庫,里面建立4張表,分別是t_user(用戶信息),oauth2_registered_client(客戶端信息)、oauth2_authorization_consent(授權信息)和oauth2_authorization(授權確認信息)。SQL語句參考lesson20的create.sql附件。注意:由于數據庫和表都是沿用之前項目的,如果之前項目已經新建過表,則無需在新建,只需要執行insert.sql
-- 插入一個用戶lesson20
INSERT INTO oauth_study.t_user (username, password, email, phone) VALUES('lesson20', '{noop}1234', 'lesson20@demo.com', '13788888888');
-- 插入一個客戶端lesson20-client,其使用client_credentials客戶端模式,并且scopes包括一個api-a的值(角色)
INSERT INTO oauth_study.oauth2_registered_client (id, client_id, client_id_issued_at, client_secret, client_secret_expires_at, client_name, client_authentication_methods, authorization_grant_types, redirect_uris, post_logout_redirect_uris, scopes, client_settings, token_settings) VALUES('7f5b4fc6-9b32-42e0-89a3-012ad594a6e8', 'lesson20-client', '2025-02-11 16:04:01', '{bcrypt}$2a$10$ytMBTJDyysYDsI.aqSJche1/1de00KdPw4IeHZAMCT5T8SdxfciTq', NULL, 'lesson20-client', 'client_secret_basic', 'refresh_token,client_credentials', 'http://localhost:8080/login/oauth2/code/lesson20-client', 'http://localhost:8080/', 'api-a,openid,profile', '{"@class":"java.util.Collections$UnmodifiableMap","settings.client.require-proof-key":false,"settings.client.require-authorization-consent":true}', '{"@class":"java.util.Collections$UnmodifiableMap","settings.token.reuse-refresh-tokens":true,"settings.token.x509-certificate-bound-access-tokens":false,"settings.token.id-token-signature-algorithm":["org.springframework.security.oauth2.jose.jws.SignatureAlgorithm","RS256"],"settings.token.access-token-time-to-live":["java.time.Duration",300.000000000],"settings.token.access-token-format":{"@class":"org.springframework.security.oauth2.server.authorization.settings.OAuth2TokenFormat","value":"self-contained"},"settings.token.refresh-token-time-to-live":["java.time.Duration",3600.000000000],"settings.token.authorization-code-time-to-live":["java.time.Duration",300.000000000],"settings.token.device-code-time-to-live":["java.time.Duration",300.000000000]}');
2)redis緩存數據庫,用于存儲登錄的token以及權限數據
3)nacos注冊和配置中心,用于微服務注冊以及gateway網關的配置
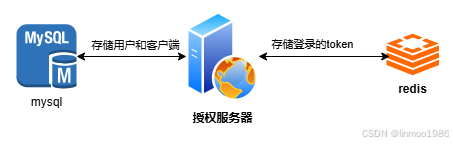
3 授權服務器
1)授權服務器使用mysql存儲用戶信息以及客戶端信息
2)授權服務器使用前后端分離的方式(自定義登錄接口,屏蔽登錄界面)
3)登錄使用jwt生成token(非對稱加密),屏蔽原先session
4)登錄的token使用redis存儲
注意:由于其功能與lesson06子模塊一樣,因此我們直接使用lesson06子模塊,需要了解詳情,請參考《系列之六 - 授權服務器–自定義授權頁面》
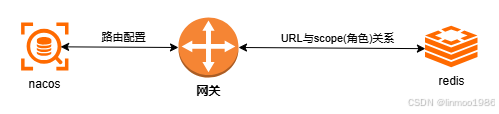
4 網關
1)通過讀取naocs實現路由配置,實現路由動態加載
2)通過讀取本地的公鑰,進行token驗證
3)通過讀取redis存儲的URL與授權的scope(角色)的關系,實現鑒權判斷
代碼參考lesson20子模塊下面的gateway子模塊
4.1 初始化項目
1)在lesson20子模塊下面新建gateway子模塊,其pom引入
<dependencies><!-- 注意:引入spring-cloud-starter-gateway之后,并不需要在引入spring-boot-starter-web --><dependency><groupId>org.springframework.cloud</groupId><artifactId>spring-cloud-starter-gateway</artifactId></dependency><!-- 引入spring-cloud-loadbalancer --><dependency><groupId>org.springframework.cloud</groupId><artifactId>spring-cloud-starter-loadbalancer</artifactId></dependency><dependency><groupId>com.alibaba.cloud</groupId><artifactId>spring-cloud-starter-alibaba-nacos-discovery</artifactId></dependency><dependency><groupId>com.alibaba.cloud</groupId><artifactId>spring-cloud-starter-alibaba-nacos-config</artifactId></dependency><dependency><groupId>com.alibaba</groupId><artifactId>fastjson</artifactId></dependency><dependency><groupId>org.projectlombok</groupId><artifactId>lombok</artifactId></dependency><dependency><groupId>org.springframework.boot</groupId><artifactId>spring-boot-starter-oauth2-resource-server</artifactId></dependency><!--Spring Cloud2020之后移除了bootstrap加載,需要手動加入依賴--><dependency><groupId>org.springframework.cloud</groupId><artifactId>spring-cloud-starter-bootstrap</artifactId></dependency><!-- 引用PathMatcher匹配方法 --><dependency><groupId>org.springframework.security</groupId><artifactId>spring-security-oauth2-jose</artifactId></dependency><dependency><groupId>org.springframework.boot</groupId><artifactId>spring-boot-starter-data-redis</artifactId></dependency></dependencies>
2)在resources下配置文件bootstrap.yml(注意:是bootstrap.yml,而非application.yml)
server:port: 9001
spring:application:name: gateway-lesson20cloud:nacos:discovery:server-addr: 127.0.0.1:8848username: nacospassword: nacosconfig:server-addr: 127.0.0.1:8848username: nacospassword: nacosloadbalancer:ribbon:enabled: false#redis配置data:redis:host: 127.0.0.1
3)拷貝lesson06的resources目錄下的demo.jks文件到gateway子模塊的resources下面
4.2 配置nacos自動加載
1)nacos上面配置gateway-lesson20的json格式配置文件,在public命名空間下,DEFAULT_GROUP分組下面
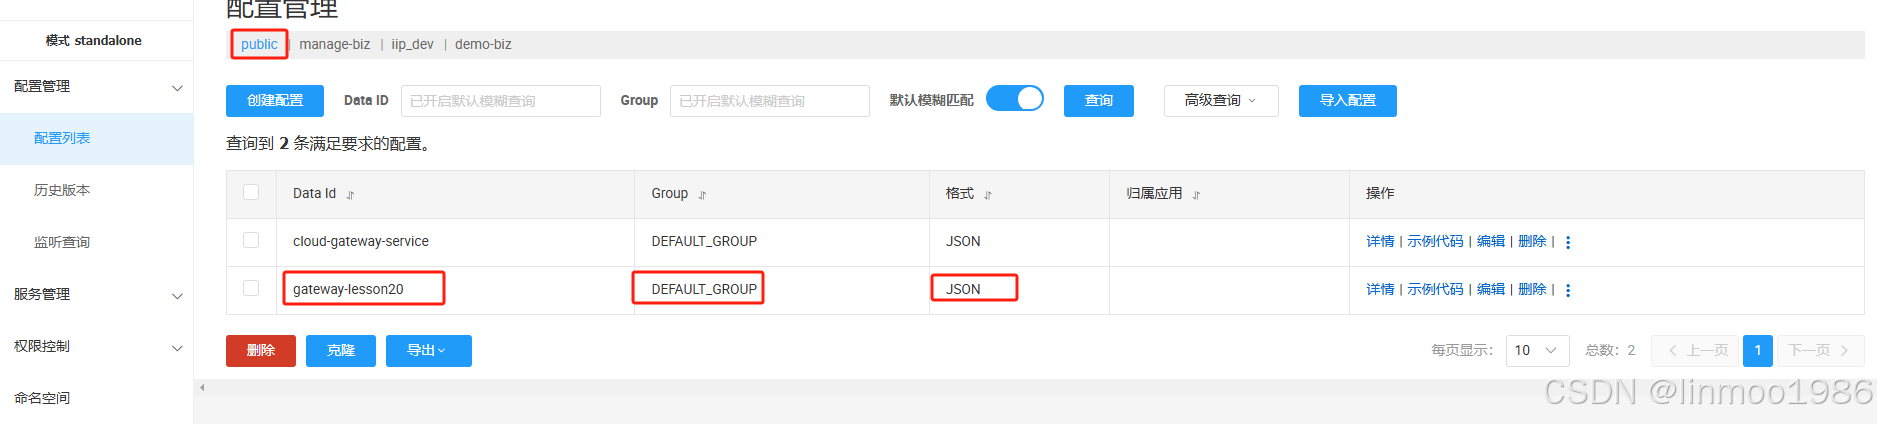
2)gateway-lesson20的內容如下
[{"id": "auth","predicates": [{"args": {"pattern": "/auth/**"},"name": "Path"}],"uri": "http://localhost:9000","filters": [{"args": {"_genkey_0": "1"},"name": "StripPrefix"}]},{"id": "api-a","predicates": [{"args": {"pattern": "/api-a/**"},"name": "Path"}],"uri": "http://localhost:9002","filters": [{"args": {"_genkey_0": "1"},"name": "StripPrefix"}]}
]
3)在config包下面配置nacos自動加載代碼NacosRouteDefinitionRepository
/*** nacos路由數據源*/
@Component
public class NacosRouteDefinitionRepository implements RouteDefinitionRepository {private static final Logger logger = LoggerFactory.getLogger(NacosRouteDefinitionRepository.class);private static final String SCG_DATA_ID = "gateway-lesson20";private static final String SCG_GROUP_ID = "DEFAULT_GROUP";private final ApplicationEventPublisher publisher;private final NacosConfigManager nacosConfigManager;public NacosRouteDefinitionRepository(ApplicationEventPublisher publisher, NacosConfigManager nacosConfigManager) {this.publisher = publisher;this.nacosConfigManager = nacosConfigManager;addListener();}@Overridepublic Flux<RouteDefinition> getRouteDefinitions() {List<RouteDefinition> routeDefinitionList = new ArrayList<>(0);try {String configContent = nacosConfigManager.getConfigService().getConfig(SCG_DATA_ID, SCG_GROUP_ID, 5000);if (!Strings.isNullOrEmpty(configContent)) {routeDefinitionList = JSON.parseArray(configContent, RouteDefinition.class);}} catch (NacosException e) {logger.error("從Nacos加載配置的動態路由信息異常", e);}return Flux.fromIterable(routeDefinitionList);}/*** 添加Nacos監聽*/private void addListener() {try {nacosConfigManager.getConfigService().addListener(SCG_DATA_ID, SCG_GROUP_ID, new Listener() {@Overridepublic Executor getExecutor() {return null;}@Overridepublic void receiveConfigInfo(String configInfo) {publisher.publishEvent(new RefreshRoutesEvent(this));}});} catch (NacosException e) {logger.error("添加Nacos監聽異常", e);}}@Overridepublic Mono<Void> save(Mono<RouteDefinition> route) {return null;}@Overridepublic Mono<Void> delete(Mono<String> routeId) {return null;}
}
4.3 配置redis
1)在config包下面配置redis配置類RedisConfiguration
@Configuration
public class RedisConfiguration {/*** 主要做redis配置。redis有2種不同的template(2種的key不能共享)* 1.StringRedisTemplate:以String作為存儲方式:默認使用StringRedisTemplate,其value都是以String方式存儲* 2.RedisTemplate:*    1)使用默認RedisTemplate時,其value都是根據jdk序列化的方式存儲*    2)自定義Jackson2JsonRedisSerializer序列化,以json格式存儲,其key與StringRedisTemplate共享,返回值是LinkedHashMap*    3)自定義GenericJackson2JsonRedisSerializer序列化,以json格式存儲,其key與StringRedisTemplate共享,返回值是原先對象(因為保存了classname)*/@Bean@ConditionalOnMissingBean({RedisTemplate.class})public RedisTemplate redisTemplate(RedisConnectionFactory factory) {RedisTemplate<String, Object> template = new RedisTemplate();template.setConnectionFactory(factory);//本實例采用GenericJackson2JsonRedisSerializerObjectMapper om = new ObjectMapper();om.setVisibility(PropertyAccessor.ALL, JsonAutoDetect.Visibility.ANY);GenericJackson2JsonRedisSerializer jackson2JsonRedisSerializer = new GenericJackson2JsonRedisSerializer();StringRedisSerializer stringRedisSerializer = new StringRedisSerializer();template.setKeySerializer(stringRedisSerializer);template.setHashKeySerializer(stringRedisSerializer);template.setValueSerializer(jackson2JsonRedisSerializer);template.setHashValueSerializer(jackson2JsonRedisSerializer);template.afterPropertiesSet();return template;}@Bean@ConditionalOnMissingBean({StringRedisTemplate.class})public StringRedisTemplate stringRedisTemplate(RedisConnectionFactory factory) {StringRedisTemplate template = new StringRedisTemplate();template.setConnectionFactory(factory);return template;}}
2)在controller下面新建RedisController,用于初始化redis數據
@RestController
public class RedisController {@Autowiredprivate RedisTemplate redisTemplate;@GetMapping("/init")public void init() {Map<String, List<String>> urlPermRolesRules = new ConcurrentHashMap<>();List<String> roles = new ArrayList<>();// /api-a/*的所有接口都需要api-a的角色才能訪問roles.add("api-a");urlPermRolesRules.put("/api-a/*", roles);redisTemplate.opsForHash().putAll(ResourceServerManager.AUTHORITIES_URL_ROLE,urlPermRolesRules);}
}
4.4 配置gateway以及資源服務器
1)在包security下,新建以反應式方式設置鑒權類ResourceServerManager
@Component
@Slf4j
public class ResourceServerManager implements ReactiveAuthorizationManager<AuthorizationContext> {private static final String AUTHORIZATION_KEY ="Authorization";private static final String AUTHORITIES_SCOPE_PREFIX = "SCOPE_";public static final String AUTHORITIES_URL_ROLE = "AUTHORITIES_URL_ROLE";@Autowiredprivate RedisTemplate redisTemplate;@Overridepublic Mono<AuthorizationDecision> check(Mono<Authentication> mono, AuthorizationContext authorizationContext) {ServerHttpRequest request = authorizationContext.getExchange().getRequest();// 預檢請求放行if (request.getMethod() == HttpMethod.OPTIONS) {return Mono.just(new AuthorizationDecision(true));}// 訪問登錄和授權的請求,放行PathMatcher pathMatcher = new AntPathMatcher();String path = request.getURI().getPath();if (pathMatcher.match("/auth/**", path)|| pathMatcher.match("/init", path)) {return Mono.just(new AuthorizationDecision(true));}// 判斷token(必須在Authorization中有)String token = "";boolean tokenCheckFlag = false;if(Objects.nonNull(request.getHeaders().getFirst(AUTHORIZATION_KEY)) && !Strings.isNullOrEmpty(request.getHeaders().getFirst(AUTHORIZATION_KEY))){token = request.getHeaders().getFirst(AUTHORIZATION_KEY);tokenCheckFlag = true;}if (!tokenCheckFlag) {return Mono.just(new AuthorizationDecision(false));}log.info("判斷權限");// 緩存中獲取url與角色的對應關系Map<String, List<String>> urlPermRolesRules = redisTemplate.opsForHash().entries(AUTHORITIES_URL_ROLE);// 獲取當前資源 所需要的角色List<String> authorizedRoles = new ArrayList<>(); // 擁有訪問權限的角色for (Map.Entry<String, List<String>> permRoles : urlPermRolesRules.entrySet()) {String perm = permRoles.getKey();if (pathMatcher.match(perm, path)) {List<String> values = permRoles.getValue();authorizedRoles.addAll(values);}}// 判斷JWT中攜帶的scope,對應在緩存中有/api-a/*權限的角色Mono<AuthorizationDecision> authorizationDecisionMono = mono.filter(Authentication::isAuthenticated).flatMapIterable(Authentication::getAuthorities).map(GrantedAuthority::getAuthority).any(authority -> {String roleCode = authority.substring(AUTHORITIES_SCOPE_PREFIX.length()); // 用戶的角色boolean hasAuthorized = !CollectionUtils.isEmpty(authorizedRoles) && authorizedRoles.contains(roleCode);return hasAuthorized;}).map(AuthorizationDecision::new).defaultIfEmpty(new AuthorizationDecision(false));return authorizationDecisionMono;}
}
2)在config包下,新建ResourceServerConfig,配置網關為資源服務器
@RequiredArgsConstructor
@Configuration
@EnableWebFluxSecurity //注意該注解,是使用Flux方式
public class ResourceServerConfig {private final ResourceServerManager resourceServerManager;@Beanpublic SecurityWebFilterChain securityWebFilterChain(ServerHttpSecurity http) {// 本地獲取公鑰http.oauth2ResourceServer(server ->server.jwt(jwt->jwt.jwtDecoder(jwtDecoder())));// 配置路由攔截http.authorizeExchange(exchange->// 設置resourceServerManagerexchange.anyExchange().access(resourceServerManager))// 處理未授權.exceptionHandling(ex->ex.accessDeniedHandler(accessDeniedHandler()))// 關閉csrf.csrf(ServerHttpSecurity.CsrfSpec::disable);return http.build();}/*** 自定義未授權響應*/@BeanServerAccessDeniedHandler accessDeniedHandler() {return (exchange, denied) -> {Mono<Void> mono = Mono.defer(() -> Mono.just(exchange.getResponse())).flatMap(response -> ResponseUtils.writeErrorInfo(response));return mono;};}/*** 自定義JwtDecoder*/public ReactiveJwtDecoder jwtDecoder() {NimbusReactiveJwtDecoder jwtDecoder = NimbusReactiveJwtDecoder.withPublicKey(generateRsaKey()).build();return jwtDecoder;}/*** 其 key 在啟動時生成,用于創建上述 JWKSource*/private static RSAPublicKey generateRsaKey() {KeyStoreKeyFactory factory = new KeyStoreKeyFactory(new ClassPathResource("demo.jks"), "linmoo".toCharArray());KeyPair keyPair = factory.getKeyPair("demo", "linmoo".toCharArray());RSAPublicKey publicKey = (RSAPublicKey) keyPair.getPublic();return publicKey;}
}
3)在utils包下面,新建ResponseUtils工具類
public class ResponseUtils {public static Mono<Void> writeErrorInfo(ServerHttpResponse response) {response.setStatusCode(HttpStatus.UNAUTHORIZED);response.getHeaders().set(HttpHeaders.CONTENT_TYPE, MediaType.APPLICATION_JSON_VALUE);response.getHeaders().set("Access-Control-Allow-Origin", "*");response.getHeaders().set("Cache-Control", "no-cache");String body = "{\\\"code\\\":\\\"\"" + "0001" + '\"' + "\", \\\"msg\\\":\\\"\"" + "無權限" + '\"' + "'}";DataBuffer buffer = response.bufferFactory().wrap(body.getBytes(StandardCharsets.UTF_8));return response.writeWith(Mono.just(buffer)).doOnError(error -> DataBufferUtils.release(buffer));}}
4)設置啟動類
@SpringBootApplication
@EnableDiscoveryClient
public class Oauth2Lesson20GatewayApplication {public static void main(String[] args) {SpringApplication.run(Oauth2Lesson20GatewayApplication .class, args);}}
5 測試服務
使用一個訪問api-a的服務,作為測試后端服務
代碼參考lesson20子模塊下面的api-a子模塊
1)在lesson20子模塊下面新建api-a子模塊,其pom引入如下:
<dependencies><dependency><groupId>org.springframework.boot</groupId><artifactId>spring-boot-starter-webflux</artifactId></dependency>
</dependencies>
2)其resources下的yaml如下:
server:port: 9002
3)在controller目錄新建DemoController測試接口,我們這里也采用響應式編程方式。
@RestController
public class DemoController {@GetMapping("/demo")public Mono<String> demo() {return Mono.just("demo");}
}
4)新建啟動類Oauth2Lesson20ApiApplication
@SpringBootApplication
public class Oauth2Lesson20ApiApplication {public static void main(String[] args) {SpringApplication.run(Oauth2Lesson20ApiApplication .class, args);}}
6 測試結果
分別啟動:lesson06子模塊,gateway子模塊和api-a子模塊
1)先訪問:http://localhost:9001/init 將權限和角色綁定設置到redis中

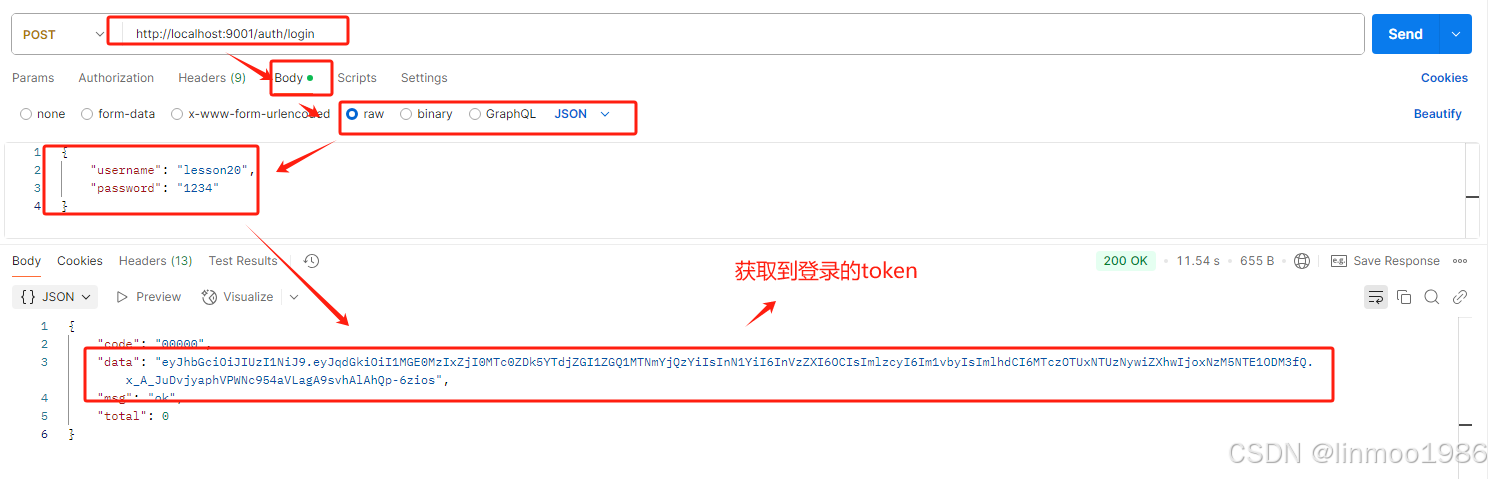
2)訪問:http://localhost:9001/auth/login 進行登錄,得到登錄的token(注意:這里訪問的是gateway,通過gateway轉發到授權服務器上)
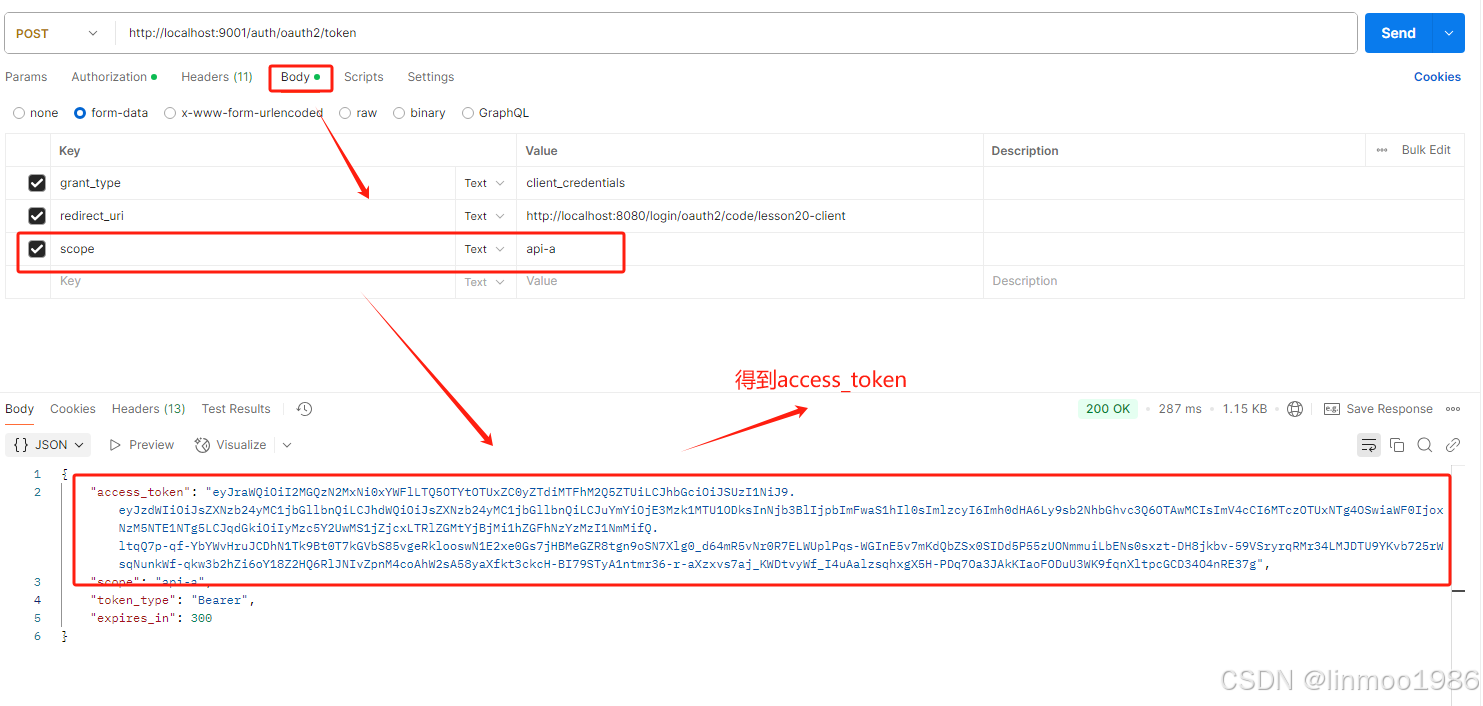
3)訪問:http://localhost:9001/auth/oauth2/token 獲取access_token。在步驟1中獲得到的登錄token,放入headers中的access_token,這里使用的是客戶端模式。(注意:這里訪問的是gateway,通過gateway轉發到授權服務器上)


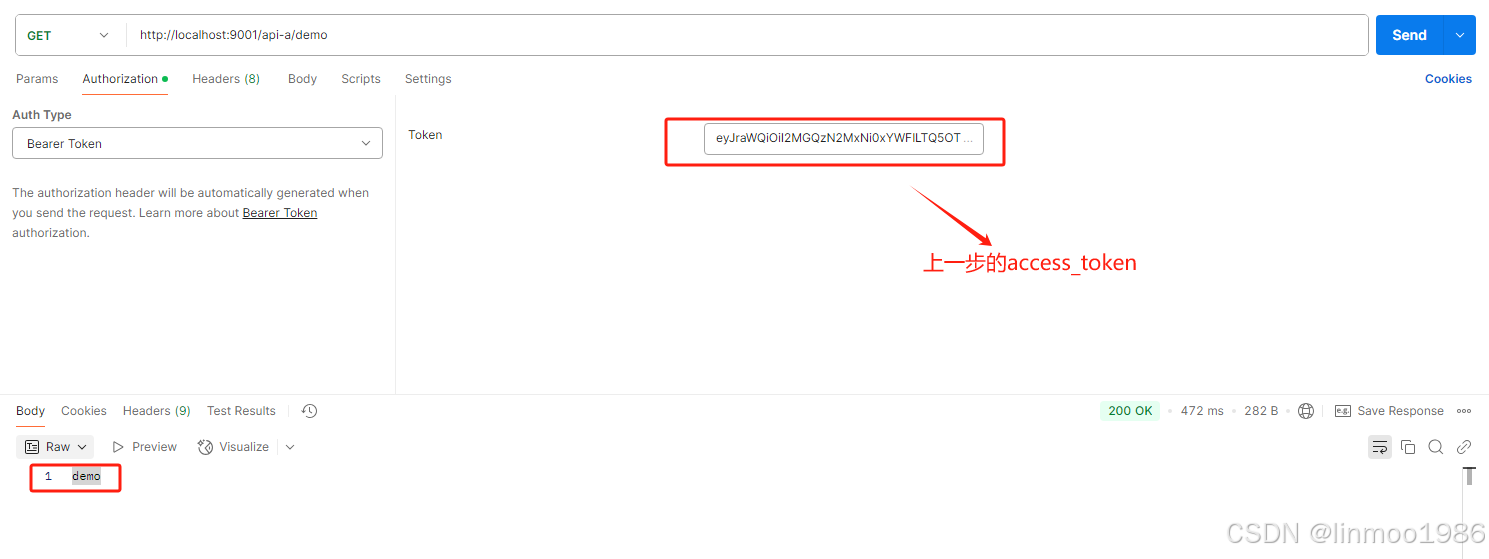
4)訪問:http://localhost:9001/api-a/demo 在步驟2中獲取到的的access_token,訪問可以得到demo結果(注意這里也是訪問gateway,由gateway判斷token有效性以及鑒權,然后轉發到api-a服務上)
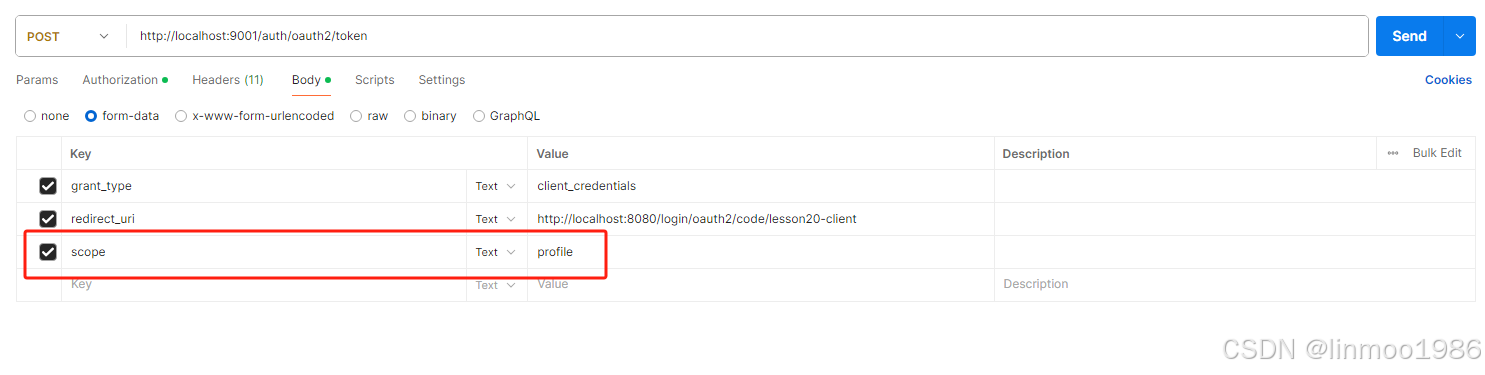
4)假如在步驟2中的scope參數沒有api-a,通過這樣獲取的access_token是無法訪問demo的,大家可以測試一下
結語:至此,我們對Spring Security 6實現OAuth2的內容就介紹完了,當然還有很多內容沒有介紹,不過相信通過這一系列,你應該已經掌握了底層原理了,自己就可以去看其它的功能。感謝陪伴!


:圖片目標檢測推理應用)
)


)


,獲取文件鏈接)


)


