一、步驟
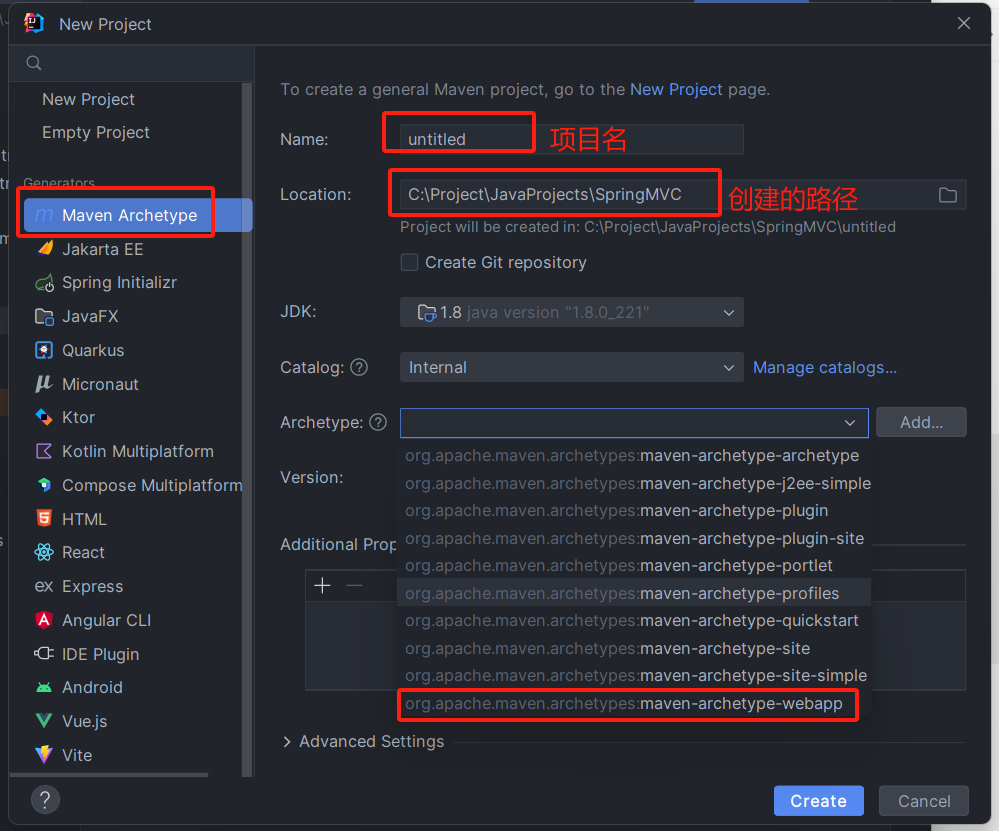
1.創建工程
2.加入springmvc依賴--pom.xml
<!--springmvc依賴-->
<dependency>
<groupId>org.springframework</groupId>
<artifactId>spring-webmvc</artifactId>
<version>5.2.10.RELEASE</version>
</dependency>
<!--lombok依賴-->
<dependency>
<groupId>org.projectlombok</groupId>
<artifactId>lombok</artifactId>
<version>1.18.24</version>
</dependency>
<!--servlet依賴-->
<dependency>
<groupId>javax.servlet</groupId>
<artifactId>servlet-api</artifactId>
<version>2.5</version>
</dependency>
<!--jackson依賴:字符串轉換-->
<dependency>
<groupId>com.fasterxml.jackson.core</groupId>
<artifactId>jackson-databind</artifactId>
<version>2.15.2</version>
</dependency>
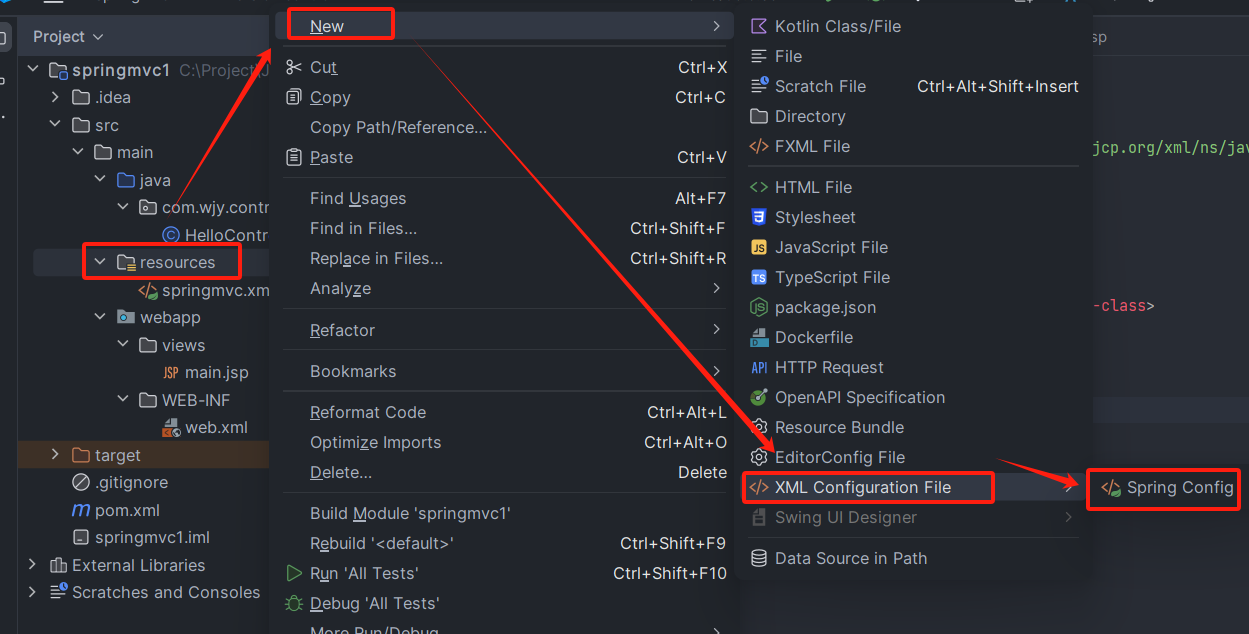
3.創建springmvc的配置文件
如果沒有證明沒有引入springmvc的依賴
<?xml version="1.0" encoding="UTF-8"?>
<beans xmlns="http://www.springframework.org/schema/beans"
xmlns:xsi="http://www.w3.org/2001/XMLSchema-instance"
xmlns:context="http://www.springframework.org/schema/context"
xmlns:mvc="http://www.springframework.org/schema/mvc"
xsi:schemaLocation="http://www.springframework.org/schema/beans http://www.springframework.org/schema/beans/spring-beans.xsd http://www.springframework.org/schema/context https://www.springframework.org/schema/context/spring-context.xsd http://www.springframework.org/schema/mvc https://www.springframework.org/schema/mvc/spring-mvc.xsd">
</beans>
<?xml version="1.0" encoding="UTF-8"?>
<beans xmlns="http://www.springframework.org/schema/beans"
xmlns:xsi="http://www.w3.org/2001/XMLSchema-instance"
xmlns:context="http://www.springframework.org/schema/context"
xmlns:mvc="http://www.springframework.org/schema/mvc"
xsi:schemaLocation="Index of /schema/beans http://www.springframework.org/schema/beans/spring-beans.xsd Index of /schema/context https://www.springframework.org/schema/context/spring-context.xsd Index of /schema/mvc https://www.springframework.org/schema/mvc/spring-mvc.xsd">
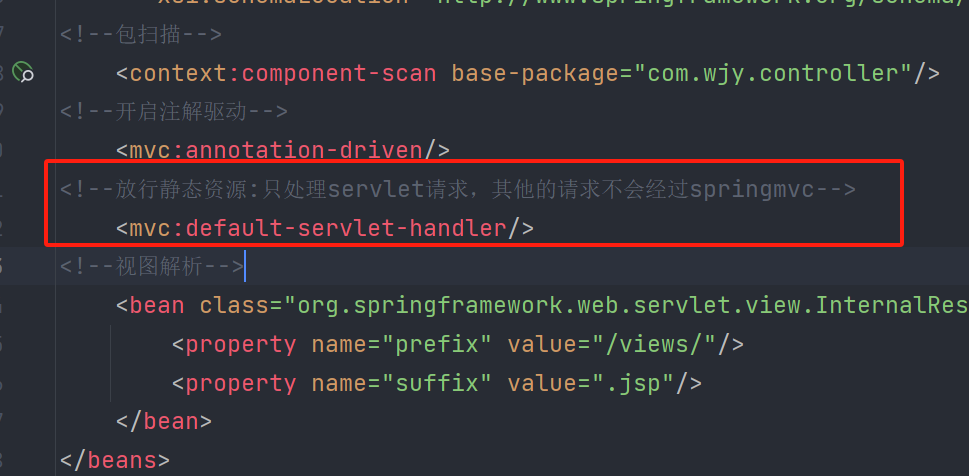
<!--包掃描-->
<context:component-scan base-package="com.wjy.controller"/>
<!--開啟注解驅動-->
<mvc:annotation-driven/>
<!--視圖解析-->
<bean class="org.springframework.web.servlet.view.InternalResourceViewResolver">
<property name="prefix" value="/views/"/>
<property name="suffix" value=".jsp"/>
</bean>
</beans>
4.注冊servlet
<?xml version="1.0" encoding="UTF-8"?>
<web-app xmlns="http://xmlns.jcp.org/xml/ns/javaee"
xmlns:xsi="http://www.w3.org/2001/XMLSchema-instance"
xsi:schemaLocation="Java EE: XML Schemas for Java EE Deployment Descriptors http://xmlns.jcp.org/xml/ns/javaee/web-app_4_0.xsd"
version="4.0">
</web-app>
<?xml version="1.0" encoding="UTF-8"?>
<web-app xmlns="http://xmlns.jcp.org/xml/ns/javaee"xmlns:xsi="http://www.w3.org/2001/XMLSchema-instance"xsi:schemaLocation="http://xmlns.jcp.org/xml/ns/javaee http://xmlns.jcp.org/xml/ns/javaee/web-app_4_0.xsd"version="4.0"><!--注冊DispatcherServlet--><servlet><servlet-name>springmvc01</servlet-name><servlet-class>org.springframework.web.servlet.DispatcherServlet</servlet-class><init-param><param-name>contextConfigLocation</param-name><!--classpath編譯后的路徑--><param-value>classpath:springmvc.xml</param-value></init-param></servlet><!--servlet映射 /表示任意路徑 --><servlet-mapping><servlet-name>springmvc01</servlet-name><url-pattern>/</url-pattern></servlet-mapping>
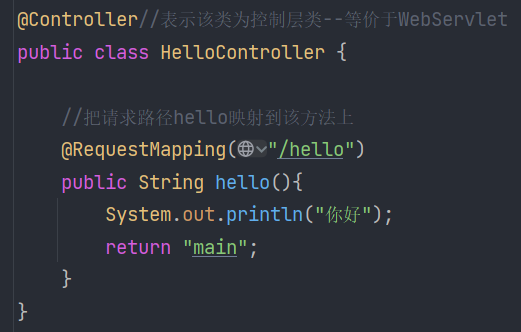
</web-app>5.創建控制層處理類
6.部署tomcat并訪問
二、
1.流程
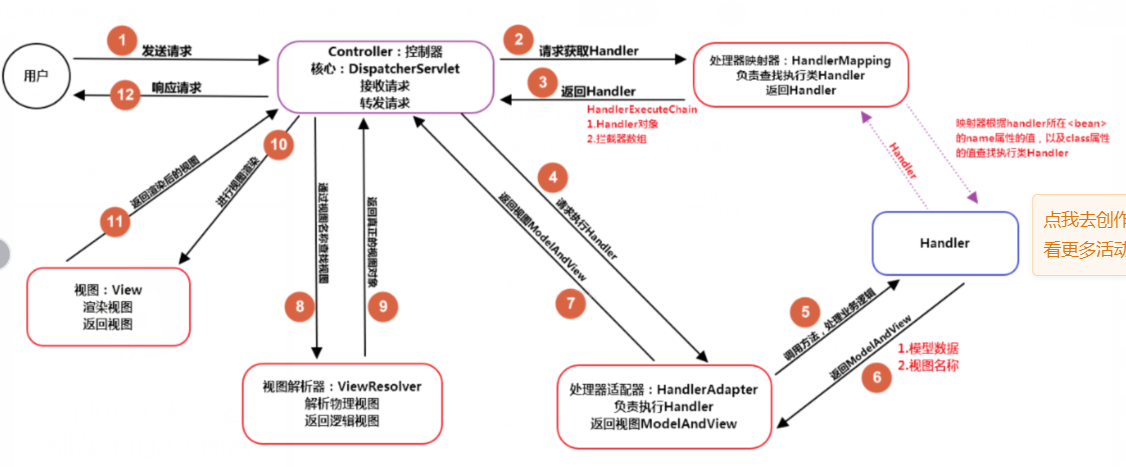
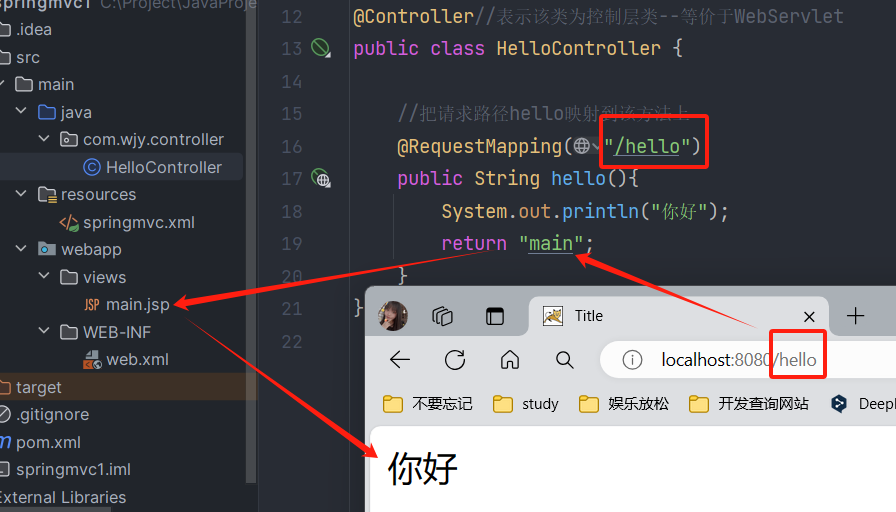
1.客戶端發送請求:http://localhost:8080/hello
2.來到tomcat服務器
3.springmvc的前端控制器DipatcherServlet接受所有的請求
4.查看你的請求地址和哪個@RequesMaping匹配。
5.執行對應的方法。方法返回一個字符串。
6.springmvc把該字符串解析【視圖解析器】為要轉發的網頁。把該字符串經過視圖解析器拼接。/prefix/字符串.后綴
7.拿到拼接的地址,找到對應的網頁。
8.渲染該網頁給客戶。
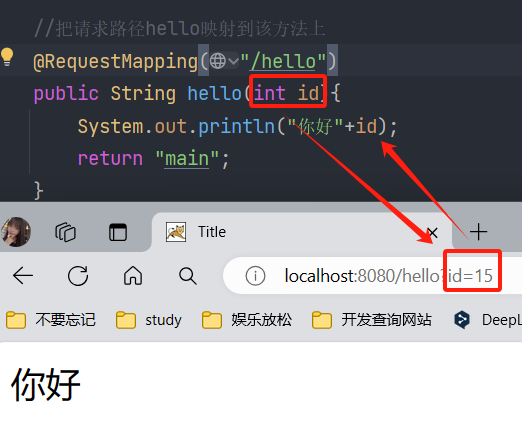
2.springmvc接收參數
2.1接收少量參數
比如刪除時,傳遞一個參數
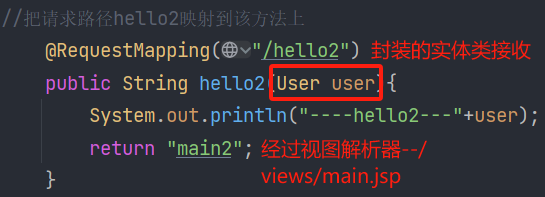
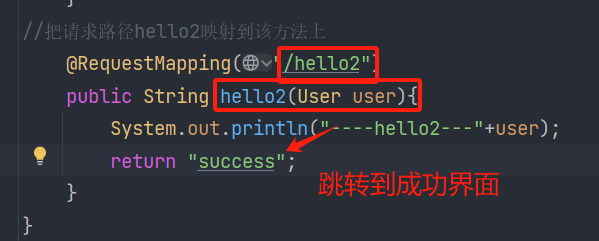
2.2接收大量參數
表單提交的數據--大量數據,我們可以封裝到一個類中。
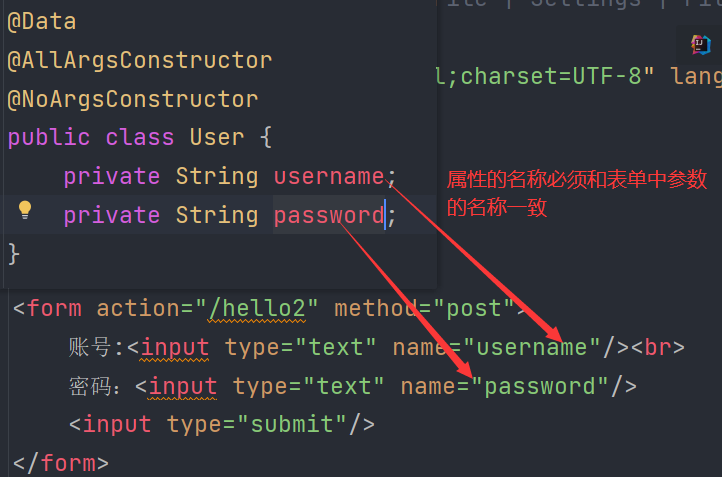
控制層代碼
3.解決中文亂碼問題
只能使用過濾器
3.1第一種方式
自己定義時使用的servlet依賴
<dependency>
<groupId>javax.servlet</groupId>
<artifactId>javax.servlet-api</artifactId>
<version>3.1.0</version>
</dependency>
package com.wjy.filter;import javax.servlet.*;
import javax.servlet.annotation.WebFilter;
import java.io.IOException;@WebFilter("/*")
public class EncodingFilter implements Filter {public void init(FilterConfig filterConfig) throws ServletException {}public void doFilter(ServletRequest request, ServletResponse response, FilterChain chain) throws IOException, ServletException {response.setCharacterEncoding("utf-8");request.setCharacterEncoding("utf-8");chain.doFilter(request,response);}public void destroy() {}
}
3.2第二種--web.xml
使用spring提供的編碼過濾器
<!--注冊編碼過濾器-->
<filter>
<filter-name>encodingFilter</filter-name>
<filter-class>org.springframework.web.filter.CharacterEncodingFilter</filter-class>
<init-param>
<param-name>encoding</param-name>
<param-value>utf-8</param-value>
</init-param>
<init-param>
<param-name>forceRequestEncoding</param-name>
<param-value>true</param-value>
</init-param>
<init-param>
<param-name>forceResponseEncoding</param-name>
<param-value>true</param-value>
</init-param>
</filter>
<filter-mapping>
<filter-name>encodingFilter</filter-name>
<url-pattern>/*</url-pattern>
</filter-mapping>
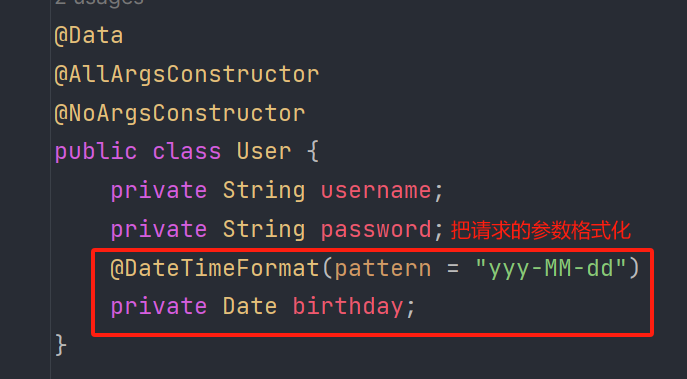
4.處理日期類

5.處理靜態資源--springmvc.xml
<!--放行靜態資源:只處理servlet請求,其他的請求不會經過springmvc-->
<mvc:default-servlet-handler/>
6.小測試
@Data
@AllArgsConstructor
@NoArgsConstructor
public class User {private String username;private String password;
// 日期格式轉換@DateTimeFormat(pattern = "yyyy-MM-dd")
//日期顯示時間戳@JsonFormat(pattern = "yyyy-MM-dd HH:mm:ss",timezone = "GMT+8")//json的格式private Date birthday;
}
搭建好上面的框架后(一、步驟的內容)寫控制處理類的內容--關于登錄
@Controller
public class LoginController {@RequestMapping("/g")//跳轉的位置public String login(User user){if ("admin".equals(user.getUsername())&&"123".equals(user.getPassword())){return "success";//符合要求--經過視圖解析器(轉發):/views/success.jsp}return "redirect:/login.jsp";//重定向跳轉--且不經過視圖解析器}
}
三、
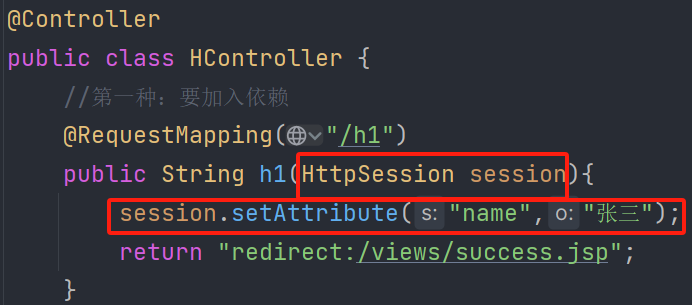
1. 控制層如何保存數據到頁面
Servlet保存數據可以使用四大域對象:PageContext、Request、Session、Appliaction
request.setAttribute(key,value);//存放數據到request中
request.getAttribute(key);或者${key}//獲取request對象中保存的數據
第一種:先加入session依賴才能使用
<!--servlet依賴-->
<dependency>
<groupId>javax.servlet</groupId>
<artifactId>servlet-api</artifactId>
<version>2.5</version>
</dependency>
第二種:springmvc封裝好的,直接加入注解使用
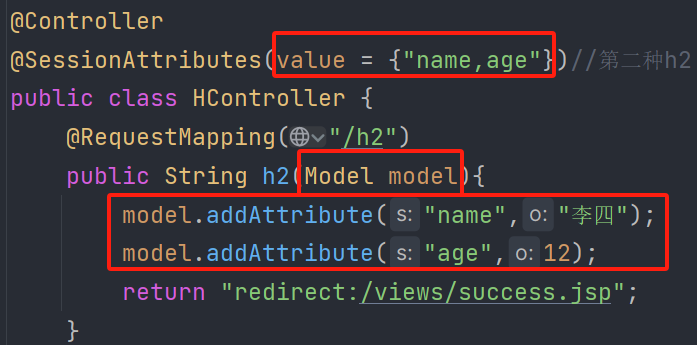
總結:
spring保存數據可以像之前servlet保存數據一樣。也可以使用model類對象保存
model類中保存數據默認作用域request,設置作用域為session。@SessionAttributes(value={"key"})
2. springmvc返回json數據
1.ajax異步請求時需要響應json數據
實現ajax的方式:①jquery②axios
2.servlet之前響應json數據的步驟:
①引入fastjson依賴
②JSON.toJsonString(java對象)//把java對象轉化為json字符串
③out.print(json數據)
④out.flush();out.close();
3.springmvc響應json數據
1.引入jackson依賴
2.在controller方法上使用@ResponseBody:java對象轉化為json字符串
3.該方法返回類型java對象
①引入依賴jackson
<dependency>
<groupId>com.fasterxml.jackson.core</groupId>
<artifactId>jackson-databind</artifactId>
<version>2.15.2</version>
</dependency>
@RequestMapping("/ajax01")@ResponseBody//把該方法返回的java對象轉化為json字符串--jacksonpublic User ajax01(){User user = new User("wjy","123456",new Date());return user;}@RequestMapping("/ajax02")@ResponseBodypublic List<User> ajax02(){ArrayList<User> users = new ArrayList<User>();users.add(new User("王佳瑤","1203",new Date()));users.add(new User("高元浩","0906",new Date()));return users;}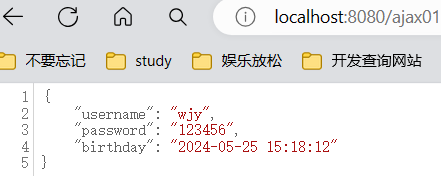

2.1日期顯示時間戳

// 日期格式轉換
@DateTimeFormat(pattern = "yyyy-MM-dd")
//日期顯示時間戳,timezone表示時區,GMT+8表示東八區(中國)
@JsonFormat(pattern = "yyyy-MM-dd HH:mm:ss",timezone = "GMT+8")//json的格式
private Date birthday;
3. springmvc全局異常處理
當controller出現異常時,全部交于springmvc的全局異常處理類解決
@ControllerAdvice//控制層的異常處理
public class MyGlobeExceptionHandler {//當控制層發生RuntimeException異常類型時交于該方法處理@ExceptionHandler(value = RuntimeException.class)public String my01(RuntimeException e){//把異常處理的對象交于該方法的參數System.out.println("發生了運行時異常");return "fail";}//當控制層發生Exception異常類型時交于該方法處理@ExceptionHandler(value = Exception.class)public String my02(Exception e){//把異常處理的對象交于該方法的參數System.out.println("發生了Exception時異常");return "fail";}
}
@RequestMapping("/list01")public String list01(HttpSession session,int id) throws Exception {//如果上面的異常處理類只有一個Exception異常不管這里有什么異常它都會執行//Exception所有異常的父類if(id==1){//等于1時會輸出第一個異常int c=10/0;}else if(id==2){//輸出第二個異常throw new Exception("~~~~~~~~");}//保存數據到sessionsession.setAttribute("name","王五");return "redirect:/views/main.jsp";}3.掃描異常處理類
<!--com.wjy:掃描該包以及該包下的子包(范圍廣)-->
<context:component-scan base-package="com.wjy"/>
<!--掃描多個包之間使用逗號隔開-->
<context:component-scan base-package="com.wjy.Controller,com.wjy.handle"/>
4. springmvc攔截器
之前使用filter過濾,攔截不符合要求的一切請求資源
攔截器:攔截器只會攔截controller層的資源

4.1創建一個攔截器
public class MyInterceptor implements HandlerInterceptor {//前綴攔截器--Boolean。如果返回true允許放行public boolean preHandle(HttpServletRequest request, HttpServletResponse response,Object handler) throws Exception{System.out.println("攔截器");return false;}
}
4.2配置攔截規則
<!--配置攔截器規則-->
<mvc:interceptors>
<mvc:interceptor>
<!--mapping:攔截的規則/**:表示多層路徑-->
<mvc:mapping path="/**"/>
<!--exclude-mapping:不會被攔截的路徑-->
<mvc:exclude-mapping path="/g"/>
<!--bean:表示自定義的攔截器的路徑-->
<bean class="com.wjy.interceptor.MyInterceptor"/>
</mvc:interceptor>
</mvc:interceptors>
5.restful風格
@ResController:控制層類(表示該類中所有的方法返回的都是json數據)
@GetMapping():只處理get請求方式(一般處理查詢請求)
@PostMapping():添加 (使用Post發送請求)
@DeleteMapping():刪除
@PutMapping():修改
@RequestBody:把json字符串轉化為java對象,使用在方法的參數上
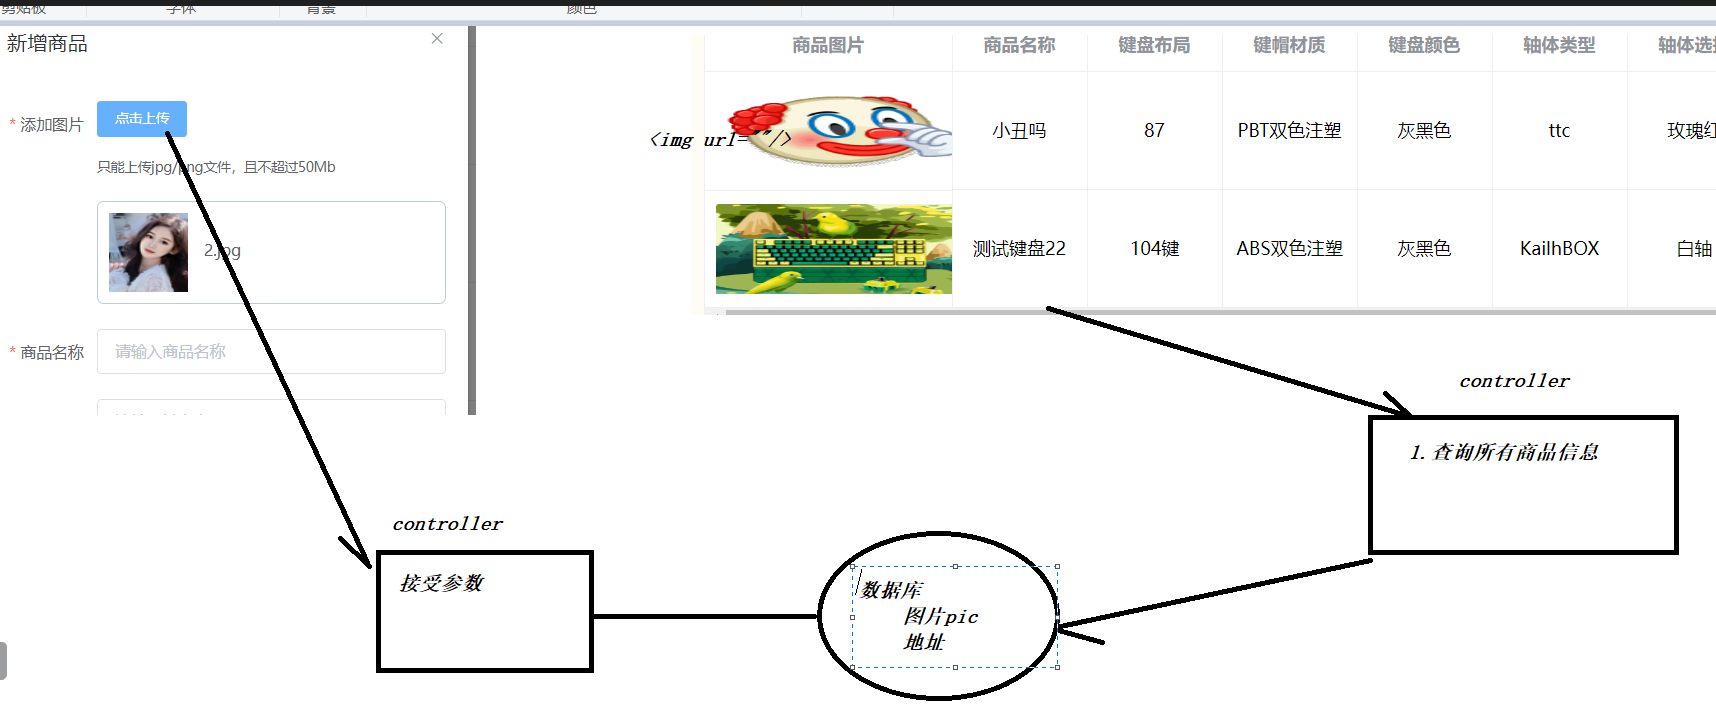
四、文件上傳
1.引入上傳的依賴
<!--文件上傳依賴-->
<dependency>
<groupId>commons-fileupload</groupId>
<artifactId>commons-fileupload</artifactId>
<version>1.4</version>
</dependency>
2.配置文件上傳的攔截器
<!--文件上傳解析器 id:必須為multipartResolver-->
<bean id="multipartResolver" class="org.springframework.web.multipart.commons.CommonsMultipartResolver">
<!--設置文件上傳的大小 單位為byte字節 1M=1024kb=1024b 10*1024*1024-->
<property name="maxUploadSize" value="10485760"/>
<!--設置編碼-->
<property name="defaultEncoding" value="utf-8"/>
</bean>
3.完成上傳文件的代碼
<%--表單: 提交方式必須為post enctype編碼:multipart/form-data文件編碼--%>
<form method="post" action="/upload" enctype="multipart/form-data">
<%--input必須設置文件文件框 而且必須起名稱--%>
選擇上傳的文件:<input type="file" name="myfile"/><br>
<input type="submit" value="上傳"/>
</form>
1.本地上傳
@Controller
public class UploadController {
/**
*
* @param myfile 接受你上傳的文件對象信息封裝到該類。該類中可以獲取上傳文件的信息。比如:文件名 文件大小 文件后綴等
* 這個名稱必須為文件上傳表單的文件框的名稱一致
* @return
*/
@PostMapping("/upload")
public String upload(MultipartFile myfile, HttpServletRequest request) throws IOException {
//獲取tomcat上下文中的指定目錄的路徑
String realPath = request.getSession().getServletContext().getRealPath("/upload");
//根據上面的路徑創建一個文件對象
File file=new File(realPath);
//如果沒有該目錄則創建
if (!file.exists()) {
file.mkdirs();
}
//把上傳的文件轉移到upload目錄下--重名覆蓋了
String uuid = UUID.randomUUID().toString().replace("-", "");
File target=new File(realPath+"/"+(uuid+myfile.getOriginalFilename()));
myfile.transferTo(target);
return "success";
}
}
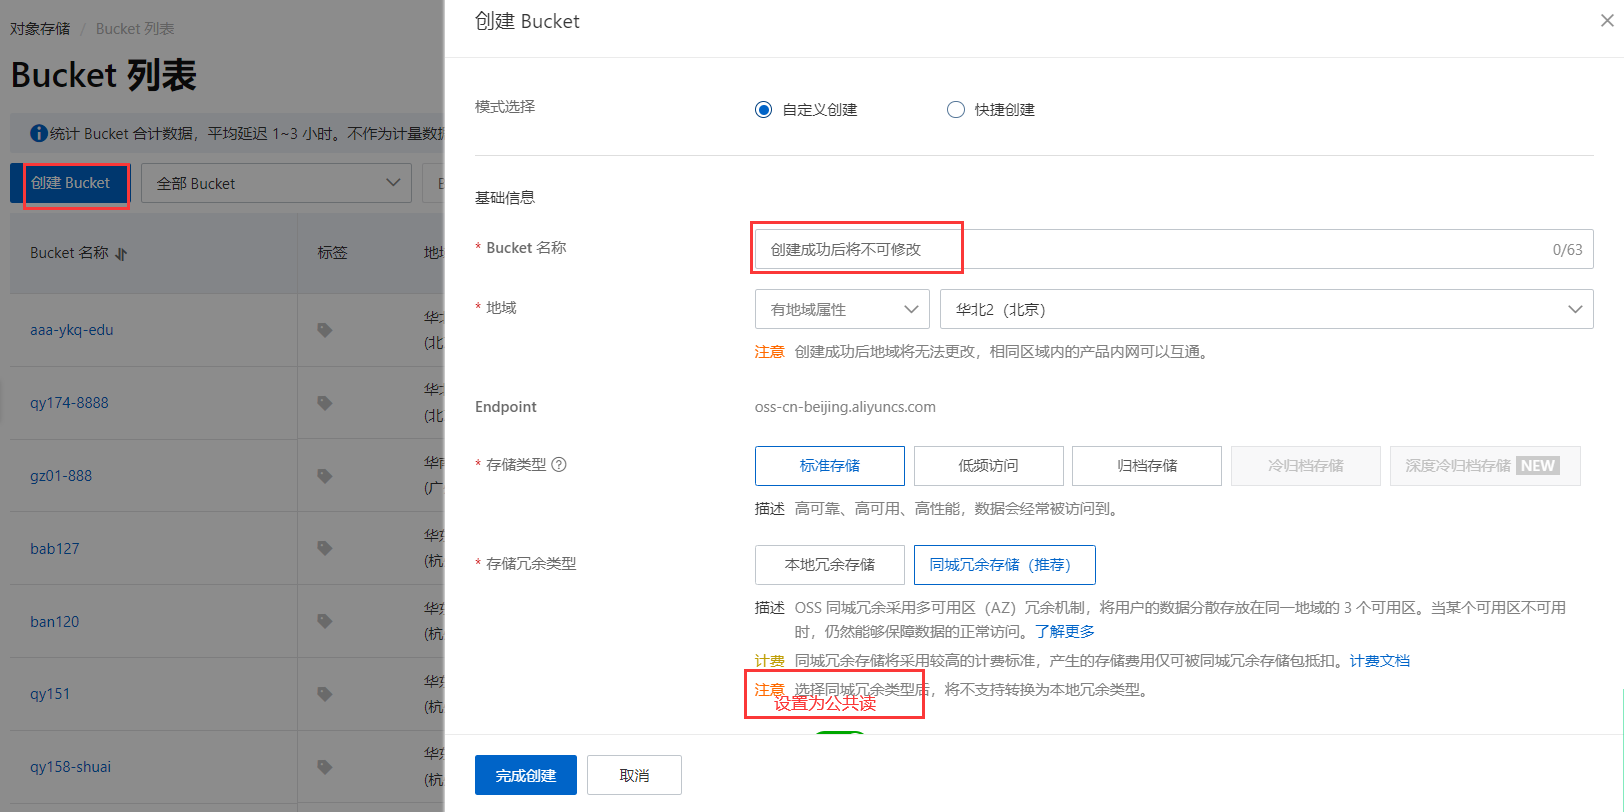
2.Oss服務器上傳
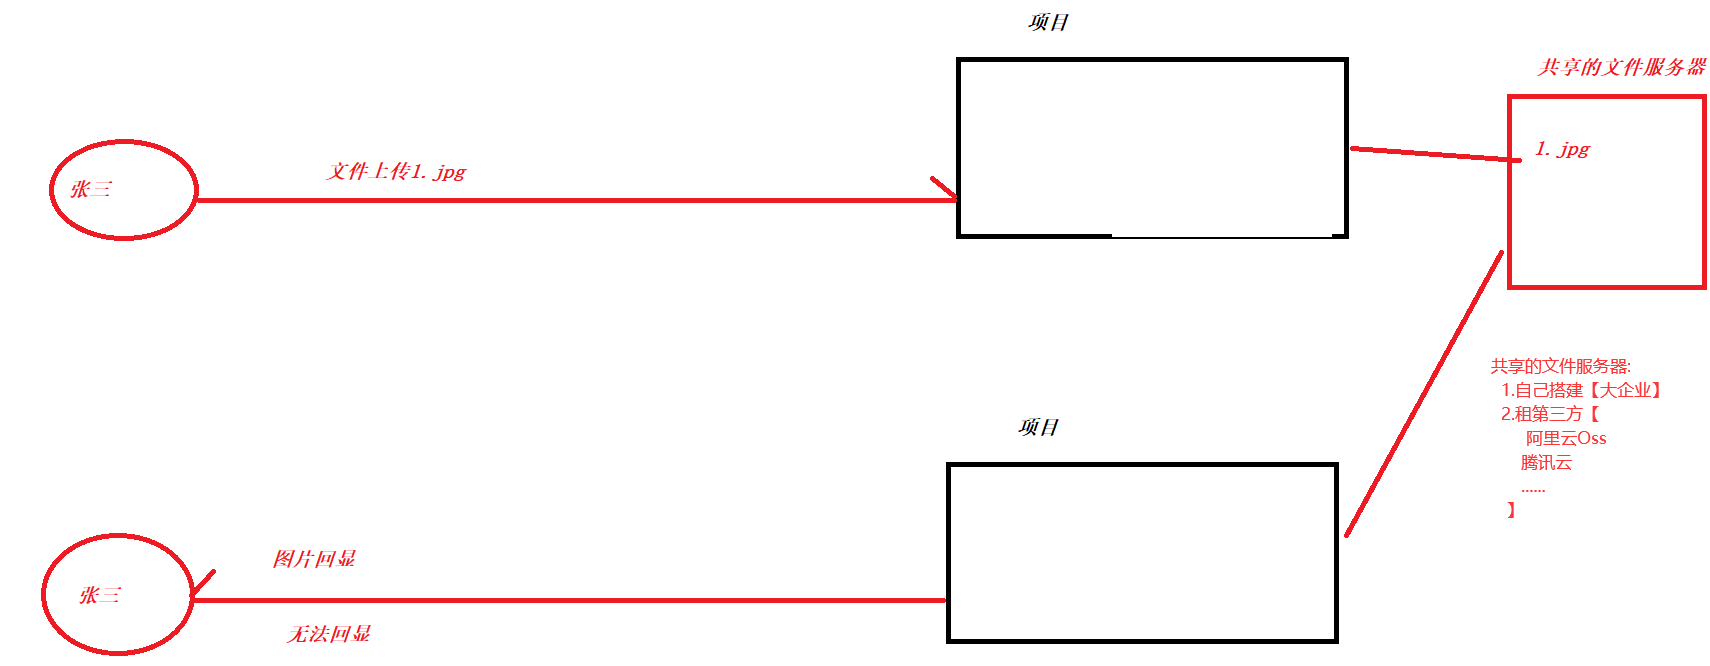
- 如果項目搭建了集群。那么導致文件數據無法共享。
- 如果項目的target刪除了。導致文件數據丟失。
引入oss的依賴[jdk8]
<dependency>
<groupId>com.aliyun.oss</groupId>
<artifactId>aliyun-sdk-oss</artifactId>
<version>3.15.1</version>
</dependency>
代碼

@PostMapping("/upload2")public String upload(MultipartFile file){// Endpoint以華東1(杭州)為例,其它Region請按實際情況填寫。String endpoint = "oss-cn-beijing.aliyuncs.com";// 填寫Bucket名稱,例如examplebucket。String bucketName = "qy174-wjy-01";//上傳到oss后的名字String objectName = UUID.randomUUID().toString().replace("-","")+file.getOriginalFilename();// 創建OSSClient實例。/*** String endpoint,自己的endpoint* String accessKeyId, 自己的id* String secretAccessKey自己的密鑰*/String accessKeyId="LTAI5tGhFRyaoCHa7jm7Mjzx";String secretAccessKey="dkOIOg15IDUJZ2LJCOU4Tz7arnGfOC";OSS ossClient = new OSSClientBuilder().build(endpoint,accessKeyId,secretAccessKey);try {InputStream inputStream = file.getInputStream();// 創建PutObjectRequest對象。PutObjectRequest putObjectRequest = new PutObjectRequest(bucketName, objectName, inputStream);// 創建PutObject請求。PutObjectResult result = ossClient.putObject(putObjectRequest);//上傳的地址String path="https://"+bucketName+"."+endpoint+"/"+objectName;return path;} catch (Exception oe) {}finally {if (ossClient != null) {ossClient.shutdown();}}return "失敗";}<%-- 添加對話的開始--%>
<el-dialog title="添加" :visible.sync="addDialogForm"><el-form ref="addForm" :rules="rules" :model="addForm" label-width="80px"><el-form-item label="廣告標題" prop="title"><el-input v-model="addForm.title"></el-input></el-form-item><el-form-item label="廣告照片" prop="imageUrl"><%-- action:文件上傳的路徑show-file-list:列表的數列值on-success:上傳成功觸發的函數before-upload:上傳前觸發的函數--%><el-uploadclass="avatar-uploader"action="/upload":show-file-list="false":on-success="handleAvatarSuccess":before-upload="beforeAvatarUpload"<%-- v-model="addForm.imageUrl"--%>><img v-if="imageUrl" :src="imageUrl" class="avatar"><i v-else class="el-icon-plus avatar-uploader-icon"></i></el-upload></el-form-item><el-form-item><el-button type="primary" @click="addSubmit('addForm')">提交</el-button><el-button @click="addDialogForm=false">取消</el-button></el-form-item></el-form>
</el-dialog>
<%-- 添加對話的結束--%>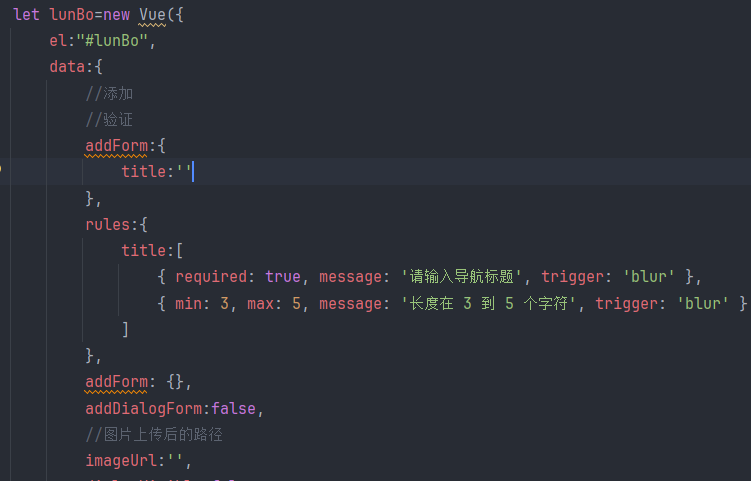
//上傳后的地址handleAvatarSuccess(res, file) {this.imageUrl = res;/* let reader = new FileReader()reader.readAsDataURL(file.raw)reader.onload = () => {this.imageUrl = reader.result}*/},//上傳前觸發的函數beforeAvatarUpload(file) {const isJPG = file.type === 'image/jpeg';const isLt2M = file.size / 1024 / 1024 < 2;if (!isJPG) {this.$message.error('上傳頭像圖片只能是 JPG 格式!');}if (!isLt2M) {this.$message.error('上傳頭像圖片大小不能超過 2MB!');}return isJPG && isLt2M;},//點擊添加--打開對話框showAdd(){this.addDialogForm=true;},//確認添加addSubmit(formName){this.$refs[formName].validate((valid)=> {if (valid) {this.addForm.imageUrl = this.imageUrl;this.addDialogForm = false;axios.post("insertLunBo", this.addForm).then(result => {if (result.data.code === 200) {this.$message.success(result.data.msg);this.addForm = {};this.loadMessage();} else {this.$message.error(result.data.msg);}})}})},


】PXE高效批量網絡裝機)


)


