
?
一、命令行使用詳解
使用?Pytest?插件在Playwright 中來編寫端到端的測試。
1、命令行執行測試
pytest --browser webkit --headed2、使用 pytest.ini 文件配置
內容如下:
[pytest]
# Run firefox with UIaddopts = --headed --browser firefox
效果:運行測試類,可以直接可以按照配置執行 命令行執行,無需指定參數輸入pytest即可
3、CLI 參數詳解
前提:未使用pytest.ini配置
3.1、在帶頭模式下運行測試(默認:無頭)
pytest --headed3.2、在不同的瀏覽器中運行測試
在不同的瀏覽器 chromium、firefox 或 webkit 中運行測試。可以多次指定(默認:chromium)
pytest --browser chromium --headed
?
3.3、使用的瀏覽器通道
pytest --browser-channel chrome --headed3.4、將 Playwright 操作速度減慢指定的毫秒數
將 Playwright 操作速度減慢指定的毫秒數。很有用,以便您可以查看正在發生的事情(默認值:0)。
pytest --browser chromium --headed --slowmo 5000 # (5秒)3.5、記錄測試結果
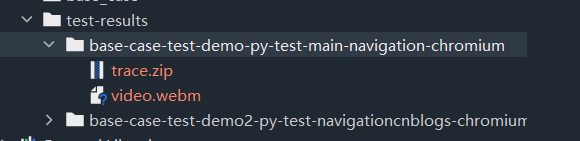
是否為每個測試記錄跟蹤。on、off或retain-on-failure(默認:off)
pytest --browser chromium --headed --tracing on3.6、視頻錄制
是否為每個測試錄制視頻。on、off或retain-on-failure(默認:off)。
pytest --browser chromium --headed --video on結果默認保存在test-results目錄下,和測試結果文件一樣
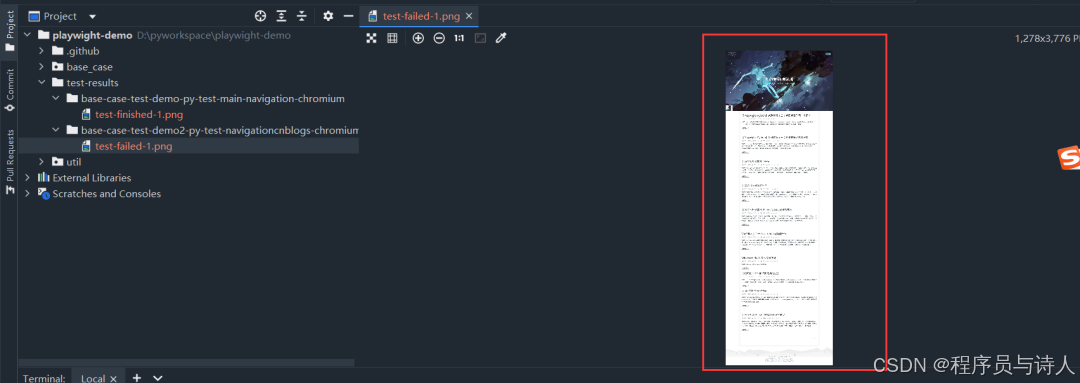
3.7、截圖
是否在每次測試后自動捕獲屏幕截圖。on、off或only-on-failure(默認:off)pytest --browser chromium --headed --screenshot on效果:
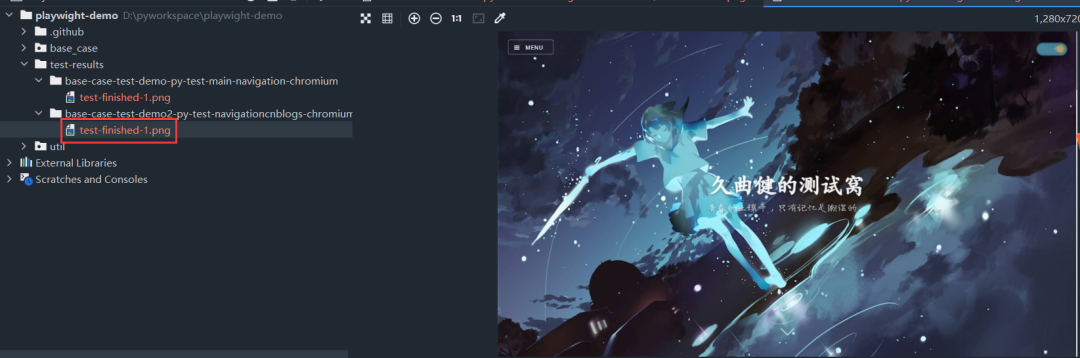
在失敗時截取整頁截圖(長截圖)默認情況下,僅捕獲視口。需要啟用 --screenshot(默認off).?
pytest --browser chromium --headed --screenshot on --full-page-screenshot效果:
二、Fixtures夾具
因為我們使用fixture更加靈活,具體有獨立的命名,然后呢,還可以按模塊化的方式實現,每個fixture都可以互相調用,并且呢范圍可以跨函數、類、模塊、還有整個session范圍
那fixture怎么使用呢?
1、fixture初步使用
我們直接在函數前定義就可以 @pytest.fixture() 但是這塊是有一些注意事項:要定義的函數最好不要以test開頭,和用例分開,并且fixture定義的函數是有返回值的,下邊的測試用例可以調用fixture的返回值
我們看下實戰
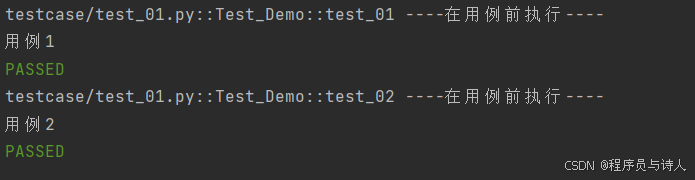
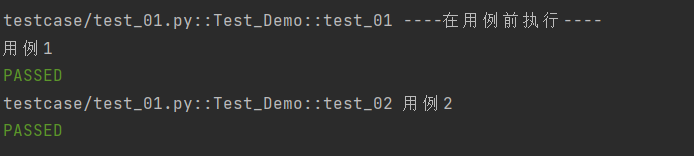
@pytest.fixture()
def?set():print("----在用例前執行----")def?test_01(set):print('用例1')
這里我們定義了一個測試夾具,然后再test_01中使用了測試夾具的參數,那么執行結果應該是會先調用這個夾具函數,然后再執行用例函數
看下執行結果:

2、fixture進一步使用
我們還有一種使用fixture的方式@pytest.mark.usefixtures(fixture_name)這樣使用,我們如果用在類上呢,這個類下的所有用例都會調用這個fixture 直接看實戰:
@pytest.fixture()
def?set():print("----在用例前執行----")@pytest.mark.usefixtures('set')
class?Test_Demo():def?test_01(self):print('用例1')def?test_02(self):print('用例2')
看下結果:
每個用例前都執行了測試夾具
那么還有一種只作用在用例上呢 看實戰:
@pytest.fixture()
def?set():print("----在用例前執行----")class?Test_Demo():@pytest.mark.usefixtures('set')def?test_01(self):print('用例1')def?test_02(self):print('用例2')
執行結果:
只有用例1前執行了測試夾具
3、fixture作用域
在我們之前用了setupClass和tearDownclass,指的是在每個類前會執行前置,在執行后置 那我們在fixture中,也可以這樣使用 并且有好幾個:
-
unction:默認作用域,每個測試用例都運行一次
-
class:每個測試類只執行一次
-
module:每個模塊只執行一次
-
package:每個python包只執行一次
-
session:整個會話只執行一次,即運行項目時整個過程只執行一次
如果設置多個的話,會有一個優先級:session > package > module > class > function
那我們以其中的作用域為class做一個實戰場景:
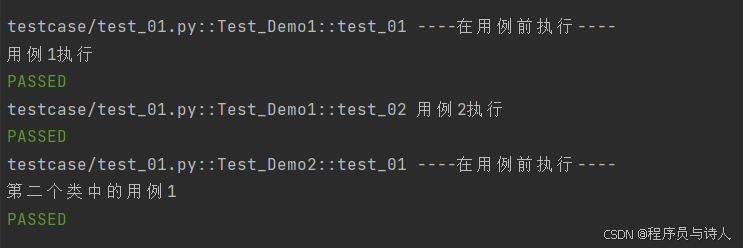
@pytest.fixture(scope='class')
def?set():print("----在用例前執行----")class?Test_Demo1:def?test_01(self,set):print('用例1執行')def?test_02(self,set):print('用例2執行')class?Test_Demo2():def?test_01(self,set):print('第二個類中的用例1')
我們在夾具函數上定義每個類只執行一次 現在猜下執行結果是什么,是不是夾具——>Test_Demo1,夾具——>Test_Demo2 直接看結果:
?
4、自定義夾具的使用
對于browser和context夾具,請使用以下夾具來定義自定義啟動選項。
-
browser_type_launch_args:覆蓋 browser_type.launch() 的啟動參數。它應該返回一個 Dict。
-
browser_context_args:覆蓋 browser.new_context() 的選項。它應該返回一個 Dict。
示例代碼:
import?pytest@pytest.mark.browser_context_args(timezone_id="Europe/Berlin",?locale="en-GB")
def?test_browser_context_args(page):assert?page.evaluate("window.navigator.userAgent")?==?"Europe/Berlin"assert?page.evaluate("window.navigator.languages")?==?["de-DE"]
?
三、配置測試
1、并行測試
# install dependency
pip install pytest-xdist
# use the --numprocesses flag
pytest --numprocesses auto
根據測試的硬件和性質,可以將 numprocesses 設置為從 2 到計算機上的 CPU 數量之間的任意值。如果設置得太高,您可能會注意到意外行為。
2、跳過測試
@pytest.mark.skip("firefox")
def test_visit_example(page):page.goto("https://www.alipansou.com/")
3、配置 base-url執行
使用 base-url 參數啟動 Pytest。pytest-base-url 插件用于允許您從配置、CLI arg 或作為固定裝置設置基本 url 的插件。pytest --base-url [http://localhost:8080](http://localhost:8080)
def?test_visit_example(page):page.goto("/admin")#?->?Will?result?in?http://localhost:8080/admin
4、忽略 HTTPS 錯誤
conftest.py
import?pytest@pytest.fixture(scope="session")
def?browser_context_args(browser_context_args):return?{**browser_context_args,"ignore_https_errors":?True}
5、使用自定義視口大小
conftest.py
import?pytest@pytest.fixture(scope="session")
def?browser_context_args(browser_context_args):return?{**browser_context_args,"viewport":?{"width":?1920,"height":?1080,}}
6、設備仿真
conftest.py
import?pytest@pytest.fixture(scope="session")
def?browser_context_args(browser_context_args,?playwright):iphone_11?=?playwright.devices['iPhone?11?Pro']return?{**browser_context_args,**iphone_11,}
使用pytest --device="iPhone 11 Pro" --headed執行腳本效果:

?
7、與 unittest.TestCase的使用
與 unittest.TestCase。這有一個限制,即只能指定一個瀏覽器,并且在指定多個瀏覽器時不會生成多個瀏覽器的矩陣。示例代碼:
#?-*-?coding:?utf-8?-*-
#?@Time????:?2024/07/06?18:10
#?@Author??:?longrong.lang
#?@FileName:?test_unittest.py
#?@Software:?PyCharm
#?@Cnblogs :https://www.cnblogs.com/longronglang
#?@Motto:你只管努力,剩下的交給天意.
import?pytest
import?unittestfrom?playwright.sync_api?import?Pageclass?MyTest(unittest.TestCase):@pytest.fixture(autouse=True)def?setup(self,?page:?Page):self.page?=?pagedef?test_foobar(self):self.page.goto("https://microsoft.com")assert?self.page.evaluate("1?+?1")?==?2
8、運行調試
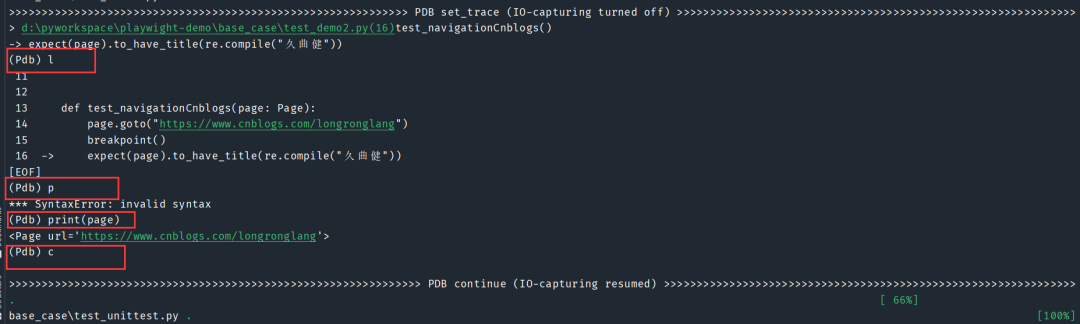
在測試代碼中使用 breakpoint() 語句暫停執行并獲取 pdb REPL。
def?test_bing_is_working(page):page.goto("https://bing.com")breakpoint()#?...
如何進行調試:
-
啟動調試:當程序在breakpoint()處暫停時,它會自動進入pdb調試環境。
-
查看狀態:在pdb中,你可以使用命令如l(list)來查看當前代碼周圍的行,p 變量名來打印變量的值。
-
繼續執行:要繼續執行程序直到下一個斷點或程序結束,你可以輸入c(continue)命令。
-
如果你只是想在特定點暫停代碼執行,但不希望進入pdb環境,可以考慮使用其他方法,比如打印語句(print())或條件斷點。
效果:
四、關于自動等待的說明
很可能您不需要手動等待,因為 Playwright 具有自動等待功能。如果你仍然依賴它,你應該使用 page.wait_for_timeout(5000) 而不是 time.sleep(5)最好不要等待超時,但有時它對調試很有用。在這些情況下,請使用我們的 wait (wait_for_timeout) 方法而不是 time 模塊。這是因為我們在內部依賴于異步操作,而當使用 time.sleep(5)它們無法得到正確的處理。
?
 ?
?
】PXE高效批量網絡裝機)


)


