文章目錄
- 一、基于https協議的靜態網站
- 1.概念解釋
- 2. SSL協議提供的服務:
- 3.web服務的配置詳解
- web服務的常用種類
- nginx的基本配置參數
- 4.使用nginx的http_ssl模塊建立加密認證網站
- 查看
- 配置文件:
- ssl配置文件的主要參數
- 實驗一:搭建nginx+ssl的加密認證web服務器
- 代碼解釋:
- 實驗二:組建多個子目錄網站www.openlab.com
一、基于https協議的靜態網站
1.概念解釋
HTTPS(全稱:Hyper Text Transfer Protocol over Secure Socket Layer 或 Hypertext TransferProtocol Secure,超文本傳輸安全協議),是以安全為目標的HTTP通道。
HTTPS并不是一個新協議,而是HTTP+SSL(TLS)。原本HTTP先和TCP(假定傳輸層是TCP協議)直接通信,而加了SSL后,就變成HTTP先和SSL通信,再由SSL和TCP通信,相當于SSL被嵌在了HTTP和TCP之間
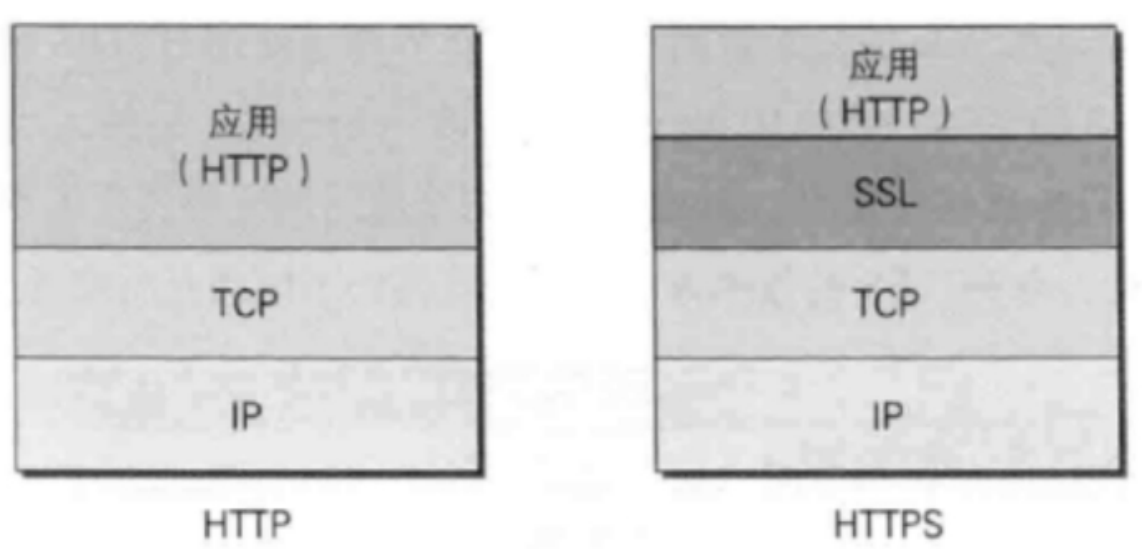
SSL 是“Secure Sockets Layer”的縮寫,中文叫做“安全套接層”
2. SSL協議提供的服務:
**
-
認證用戶和服務器,確保數據發送到正確的客戶機和服務器
-
加密數據以防止數據中途被竊取
-
維護數據的完整性,確保數據在傳輸過程中不被改變
注:關于https的安全通信機制,我會專門出一篇博文來介紹,這里不做過多贅述
3.web服務的配置詳解
web服務的常用種類
Apache
Nginx
openresty
大廠自研
nginx的基本配置參數
nginx全局配置
http {
include /etc/nginx/mime.types; #可解析的靜態資源類型
default_type application/octet-stream; #用來配置Nginx響應前端請求默認的MIME類
型
log_format main '$remote_addr - $remote_user [$time_local] "$request" '
'$status $body_bytes_sent "$http_referer" '
'"$http_user_agent" "$http_x_forwarded_for"';
access_log /var/log/nginx/access.log main; #訪問日志
sendfile on; # Nginx服務器是否使用sendfile()傳輸文件
#tcp_nopush on; # 當包累計到一定大小后就發送,默認0.2s一次
keepalive_timeout 65; # 長連接超時時間
子配置文件
3.5.Nginx配置
3.5.1.nginx虛擬主機
默認情況下nginx只能發布一個站點
如果要發布多個站點需要搭建多臺nginx來滿足,如果這樣會浪費太多資源
為解決上述問題,啟用nginx的虛擬主機即可
虛擬主機有兩種模式,基于IP或者基于域名
3.5.2基于IP的虛擬主機
#gzip on; #可以使網站的css、js 、xml、html 等靜態資源在傳輸時
進行壓縮
include /etc/nginx/conf.d/*.conf; #指定子配置文件
}
子配置文件
/etc/nginx/conf.d/default.conf
server {
listen 80; #監聽端口
server_name localhost; #服務器的名字
location / {
root /usr/share/nginx/html; #默認發布目錄
index index.html index.htm; #默認發布文件
}
#error_page 404 /404.html;
# redirect server error pages to the static page /50x.html
#
error_page 500 502 503 504 /50x.html; #訪問出錯呈現錯誤頁面
location = /50x.html {
root /usr/share/nginx/html;
}
}
4.使用nginx的http_ssl模塊建立加密認證網站
查看
[root@server ~]# nginx  -V
# 看是否有--with-http_ssl_module模塊,否則需要安裝mod_ssl
配置文件:
- 證書文件:/……/xxxx.crt
- 私鑰文件:/……/xxxx.key
ssl配置文件的主要參數
[root@server ~]# vim  /etc/nginx/nginx.conf   # 主配置文https段,默認為注釋,可以取消注釋
# Settings for a TLS enabled server.
#
#    server {
#        listen       443 ssl http2;    # 監聽443端口
#        listen       [::]:443 ssl http2;
#        server_name  _;                  # 域名
#        root         /usr/share/nginx/html;    # 網頁默認
#
#        ssl_certificate "/etc/pki/nginx/server.crt";   # 證書路徑
#        ssl_certificate_key "/etc/pki/nginx/private/server.key";  # 私鑰文件路徑
#        ssl_session_cache shared:SSL:1m;
#        ssl_session_timeout  10m;
#        ssl_ciphers PROFILE=SYSTEM;
#        ssl_prefer_server_ciphers on;
#
#        # Load configuration files for the default server block.
#        include /etc/nginx/default.d/*.conf;
#
#        error_page 404 /404.html;
#            location = /40x.html {
#        }
#
#        error_page 500 502 503 504 /50x.html;
#            location = /50x.html {
#        }
實驗一:搭建nginx+ssl的加密認證web服務器
第一步:準備工作
# 恢復快照
[root@server ~]# setenforce  0           [root@server ~]# systemctl stop  firewalld[root@server ~]# systemctl disable  firewalld[root@server ~]# yum  install  nginx  mod_ssl -y[root@server ~]# systemctl start  nginx   # 啟動httpd[root@server ~]# systemctl enable  nginx  # 設置開機啟動
第二步:新建存儲網站數據文件的目錄
[root@server ~]# mkdir  -p  /www/zy
# 私用xftp將windows的zy網站數據文件上傳到/www/zy目錄中
第三步:制作證書
# 在/etc/nginx目錄下制作整數所用的私鑰文件zy.key
[root@server ~]# openssl  genrsa  -aes128  2048 > /etc/nginx/zy.key
Generating RSA private key, 2048 bit long modulus (2 primes)
............+++++
......................................................................................................................................................................................................+++++
e is 65537 (0x010001)
Enter pass phrase:             # 輸入加密私鑰的密碼123456
Verifying - Enter pass phrase: # 再輸一遍# 制作證書
[root@server ~]# openssl  req  -utf8  -new  -key  /etc/nginx/zy.key  -x509  -days  365  -out  /etc/nginx/zy.crt
Enter pass phrase for /etc/nginx/zy.key:    # 需要輸入加密私鑰的密碼
You are about to be asked to enter information that will be incorporated
into your certificate request.
What you are about to enter is what is called a Distinguished Name or a DN.
There are quite a few fields but you can leave some blank
For some fields there will be a default value,
If you enter '.', the field will be left blank.
-----
# 注意:下列證書信息項目,在面試時常問
Country Name (2 letter code) [AU]:86							  # 國家代碼
State or Province Name (full name) [Some-State]:shanxi			  # 省份
Locality Name (eg, city) []:xi'an								  # 城市
Organization Name (eg, company) [Internet Widgits Pty Ltd]:openlab# 公司
Organizational Unit Name (eg, section) []:RHCE                    # 部門
Common Name (e.g. server FQDN or YOUR name) []:server             # 主機名
Email Address []:andy@qq.com									  # 郵箱# 在加載SSL支持的Nginx并使用上述私鑰時除去必須的口令
[root@server ~]# cd  /etc/nginx
[root@server nginx]# cp  zy.key  zy.key.org
[root@server nginx]# openssl rsa -in zy.key.org -out zy.key
Enter pass phrase for zy.key.org:  # 輸入加密私鑰的密碼
writing RSA key
第五步:修改配置文件
[[root@server nginx]# cd  ~
[root@server ~]# vim  /etc/nginx/nginx.confserver {listen       443 ssl http2;server_name  172.25.254.101;root         /www/zy;ssl_certificate  /etc/nginx/zy.crt;ssl_certificate_key  /etc/nginx/zy.key;}
server {      # 輸入http跳轉到httpslisten 80;server_name 172.25.254.101;return 301 https://172.25.254.101;}
第六步:重啟服務
[root@server nginx]# cd  ~
[root@server ~]# nginx  -t
nginx: the configuration file /etc/nginx/nginx.conf syntax is ok
nginx: configuration file /etc/nginx/nginx.conf test is successful
[root@server nginx]# systemctl start nginx
第七步:測試
在windows端打開瀏覽器,輸入https://172.25.254.101,點擊高級->接受風險并繼續


代碼解釋:
openssl genrsa -aes128 2048 > /etc/nginx/zy.key
這條命令 openssl genrsa -aes128 2048 > /etc/nginx/zy.key 是用來生成一個帶有AES-128加密的2048位RSA私鑰,并將結果輸出到 /etc/nginx/zy.key 文件中。
具體來說:
openssl genrsa: 這是 OpenSSL 命令,用于生成RSA私鑰。
-aes128: 這個選項指定生成的私鑰使用AES-128位加密。
2048: 這個參數指定生成的RSA密鑰長度為2048位。
/etc/nginx/zy.key: 這部分將生成的私鑰輸出到 /etc/nginx/zy.key 文件中。
生成的私鑰文件 /etc/nginx/zy.key 將會被用作Nginx配置中的 ssl_certificate_key 指令所指定的SSL證書私鑰文件。這對于建立安全的HTTPS連接至關重要,確保通信的保密性和完整性。
server {listen       443 ssl http2;         # 服務器監聽在443端口上,使用SSL加密和HTTP/2協議server_name  192.168.48.130;      # 服務器名設置為IP地址192.168.48.130root         /www/zy;               # 網站的根目錄設置為/www/zyssl_certificate  /etc/nginx/zy.crt; # SSL證書文件路徑設置為/etc/nginx/zy.crtssl_certificate_key  /etc/nginx/zy.key; # SSL證書私鑰文件路徑設置為/etc/nginx/zy.key
}
實驗二:組建多個子目錄網站www.openlab.com
組建多個子目錄網站www.openlab.com,該網站有2個子目錄www.openlab.com/file和www.openlab.com/ftp,要求:
- file數據使用http讀取
- ftp數據使用https讀取
第一步:準備工作
# 恢復快照
[root@server ~]# setenforce  0           [root@server ~]# systemctl stop  firewalld[root@server ~]# systemctl disable  firewalld[root@server ~]# yum  install  nginx -y[root@server ~]# systemctl start  nginx   # 啟動nginx[root@server ~]# systemctl enable  nginx  # 設置開機啟動
第二步:新建網頁目錄并建立網頁
[root@server ~]# mkdir  -p  /www/file
[root@server ~]# mkdir  -p  /www/ftp
[root@server ~]# echo  "file"  >  /www/file/index.html  # 寫入網站數據
[root@server ~]# echo  "ftp"  >  /www/ftp/index.html
第三步:建立本地hosts域名映射
[root@server ~]# vim  /etc/hosts   # 添加如下內容
192.168.48.130  www.openlab.com
第四步:建立file網站
[root@server ~]# vim  /etc/nginx/nginx.conf
server {listen       80;server_name  www.openlab.com;location   /file {alias /www/file/;index index.html index.htm;}}
第五步:建立https的ftp網站
# 制作私鑰
[root@server ~]# openssl  genrsa  -aes128  2048 > /etc/nginx/ftp.key
Generating RSA private key, 2048 bit long modulus (2 primes)
............+++++
......................................................................................................................................................................................................+++++
e is 65537 (0x010001)
Enter pass phrase:             # 輸入加密私鑰的密碼123456
Verifying - Enter pass phrase: # 再輸一遍# 制作證書
[root@server ~]# openssl  req  -utf8  -new  -key  /etc/nginx/ftp.key  -x509  -days  365  -out  /etc/nginx/ftp.crt
Enter pass phrase for /etc/nginx/ftp.key:    # 需要輸入加密私鑰的密碼
You are about to be asked to enter information that will be incorporated
into your certificate request.
What you are about to enter is what is called a Distinguished Name or a DN.
There are quite a few fields but you can leave some blank
For some fields there will be a default value,
If you enter '.', the field will be left blank.
-----
# 注意:下列證書信息項目,在面試時常問
Country Name (2 letter code) [AU]:86							  # 國家代碼
State or Province Name (full name) [Some-State]:shanxi			  # 省份
Locality Name (eg, city) []:xi'an								  # 城市
Organization Name (eg, company) [Internet Widgits Pty Ltd]:openlab# 公司
Organizational Unit Name (eg, section) []:RHCE                    # 部門
Common Name (e.g. server FQDN or YOUR name) []:server             # 主機名
Email Address []:andy@qq.com									  # 郵箱# 在加載SSL支持的Nginx并使用上述私鑰時除去必須的口令
[root@server ~]# cd  /etc/nginx
[root@server nginx]# cp  ftp.key  ftp.key.org
[root@server nginx]# openssl rsa -in ftp.key.org -out ftp.key
Enter pass phrase for ftp.key.org:  # 輸入加密私鑰的密碼
writing RSA key
[root@server ~]# vim  /etc/nginx/nginx.conf      # 編輯配置文件
server {listen       443 ssl http2;server_name  www.openlab.com;location /ftp {alias         /www/ftp;index  index.html  index.htm;}ssl_certificate       "/etc/nginx/ftp.crt";ssl_certificate_key   "/etc/nginx/ftp.key";}
第六步:重啟服務
[root@server ~]# systemctl restart nginx
第七步:測試
# 輸入www.openlab.com/file
# 輸入https://www.openlab.com/ftp,點擊高級->接受風險并繼續


![[從0開始軌跡預測][NMS]:NMS的應用(目標檢測、軌跡預測)](http://pic.xiahunao.cn/[從0開始軌跡預測][NMS]:NMS的應用(目標檢測、軌跡預測))

)


GPS/指南針(一))

![[Labview] 改寫表格內容并儲存覆蓋Excel](http://pic.xiahunao.cn/[Labview] 改寫表格內容并儲存覆蓋Excel)
![[21] Opencv_CUDA應用之使用Haar級聯的對象檢測](http://pic.xiahunao.cn/[21] Opencv_CUDA應用之使用Haar級聯的對象檢測)
