上一篇我們介紹了基本使用方法
flask使用
【 1 】基本使用
from flask import Flask# 1 實例化得到對象
app = Flask(__name__)# 2 注冊路由--》寫視圖函數
@app.route('/')
def index():# 3 返回給前端字符串return 'hello world'if __name__ == '__main__':# 運行app,默認運行在5000app.run()app.run(host='0.0.0.0',port=8080)
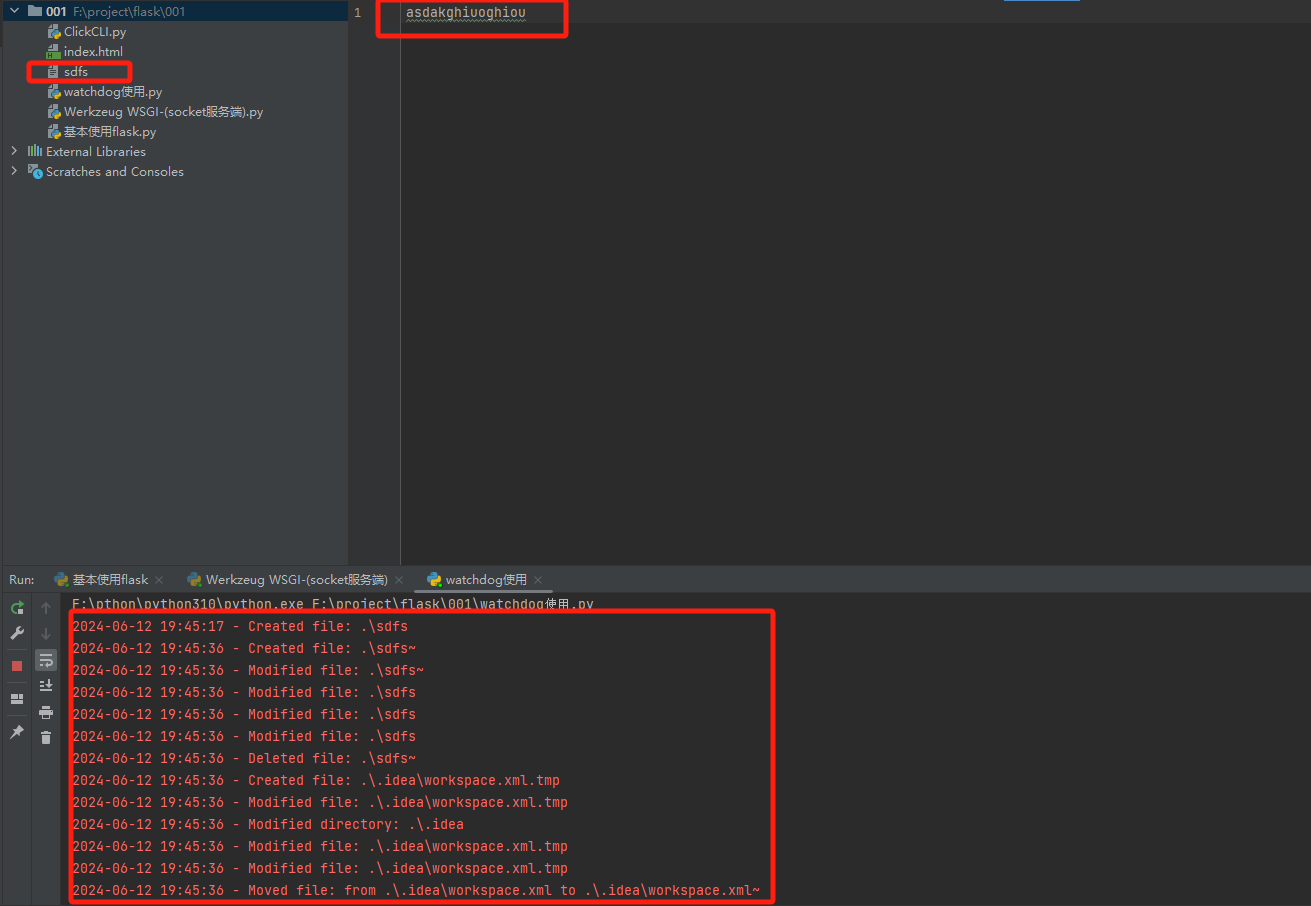
【 2 】watchdog使用
pip3 install watchdog
# pip3 install watchdog
# 當前目錄下文件修改會被監控到,打印日志
import sys
import time
import logging
from watchdog.observers import Observer
from watchdog.events import LoggingEventHandlerif __name__ == "__main__":logging.basicConfig(level=logging.INFO,format='%(asctime)s - %(message)s',datefmt='%Y-%m-%d %H:%M:%S')path = sys.argv[1] if len(sys.argv) > 1 else '.'event_handler = LoggingEventHandler()observer = Observer()observer.schedule(event_handler, path, recursive=True)observer.start()try:while True:time.sleep(1)except KeyboardInterrupt:observer.stop()observer.join()
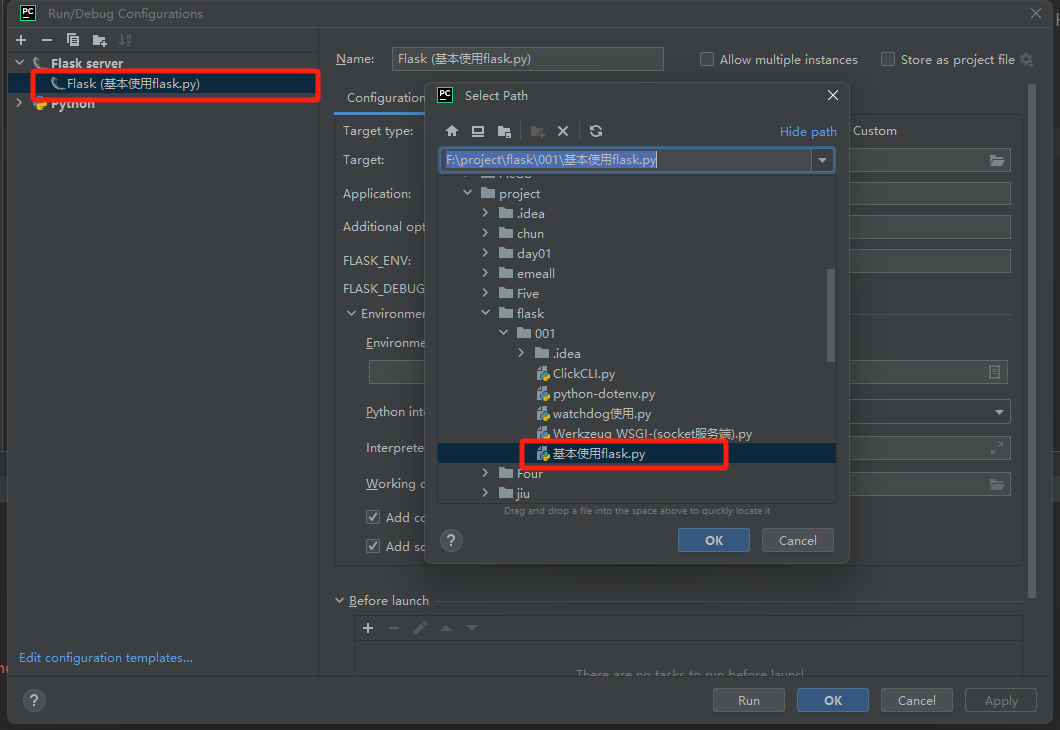
運行項目方式
-方式一(pycharm配置):-新建一個flask-server---》配置選中 script---》有app的文件-方式二:命令(推薦這種)flask --app py文件名字 runflask --app 5-flask再體驗.py run-方式三:命令python38 -m flask --app py文件名字 runpython38 -m flask --app 5-flask再體驗.py run-方式四,右鍵運行if __name__ == '__main__':app.run()-方式五:命令運行(跟右鍵運行一樣)python38 5-app.py- 方式6:少用(pip install python-dotenv)flask app run
【 3 】python-dotenv
- 注意添加一個.env文件里面
# pip3 install python-dotenv
import os
from dotenv import load_dotenv
from dotenv import dotenv_values
## 1 加載配置文件
# 必須在根路徑下新建一個 .env 的文件,并寫入配置才能返回True,會把.env下的配置文件設置進環境變量
# res=load_dotenv()  # take environment variables from .env
# print(res)
# print(os.environ.get('DOMAIN'))
# print(os.environ.get('NAME'))
# print(os.environ.get('AGE'))
# You will probably want to add .env to your .gitignore, especially if it contains secrets like a password.
## 2 獲取環境變量字典
print(config)  # OrderedDict([('DOMAIN', 'https://ent.cri.cn/star/photo'), ('NAME', 'jing'), ('HOBBY', 'raw')])
print(config.get('DOMAIN'))
print(config.get('NAME'))
print(config.get('HOBBY'))
【 5 】虛擬環境
# 之前咱們學過適應第三方模塊創建虛擬環境
# python內置(venv)可以直接創建虛擬環境Use a virtual environment to manage the dependencies for your project, both in development and in production.
# 在開發和生產中,使用虛擬環境來管理項目的依賴關系What problem does a virtual environment solve? The more Python projects you have, the more likely it is that you need to work with different versions of Python libraries, or even Python itself. Newer versions of libraries for one project can break compatibility in another project.
# 虛擬環境解決什么問題?您擁有的 Python 項目越多,您就越有可能需要使用不同版本的 Python 庫,甚至是 Python 本身。一個項目的較新版本的庫可能會破壞另一項目的兼容性。Virtual environments are independent groups of Python libraries, one for each project. Packages installed for one project will not affect other projects or the operating system’s packages.
# 虛擬環境是一組獨立的 Python 庫,每個項目對應一個。為一個項目安裝的軟件包不會影響其他項目或操作系統的軟件包Python comes bundled with the venv module to create virtual environments.
# Python 使用 venv 模塊來創建虛擬環境###### Mac/linux
# 創建虛擬環境
mkdir myproject
cd myproject
python3 -m venv .venv# 激活虛擬環境
. .venv/bin/activate####Win
# 創建虛擬環境
mkdir myproject
cd myproject
py -3 -m venv .venv
# 激活虛擬環境
.venv\Scripts\activate
【 6 】debug
flask --app 5-app.py run --debugflask --app  "app名字.py" run --debugflask --app "基本使用flask.py" run --debug
# 1 瀏覽器顯示錯誤信息
# 2 改了代碼自動重啟

【 三 】fastapi
# from typing import Union  # python 的內置--》數據校驗
import timefrom fastapi import FastAPI
import asyncioapp = FastAPI()@app.get("/")
async def read_root():# 如果有ioawait asyncio.sleep(2)# time.sleep(10)return {"Hello": "World"}@app.get("/items/{item_id}")
def read_item(item_id, q=None):return {"item_id": item_id, "q": q}# 天生自帶接口文檔----》方便我們快速寫前后端分離的接口# uvicorn 7-fast-api初體驗:app# 針對于io多的web后端,使用 異步框架,會提高性能
# 咱們項目,基本都是io多,查詢數據庫,redis 都是io操作
# 使用fastapi能提高并發量
【 四 】登陸案例
from flask import Flask, render_template, request, redirectapp = Flask(__name__)@app.route('/login', methods=['GET', 'POST'])
def login():if request.method == 'GET':# 返回模板return render_template('login.html')else:# 取出用戶名密碼,判斷# flask的request 沒有POST,GET# request.form 就是 post# request.args 就是 GETusername = request.form.get('username')password = request.form.get('password')if username == 'jing' and password == '123':# 重定向到百度return redirect('https://www.baidu.com')else:return render_template('login.html', error='用戶名密碼錯誤')if __name__ == '__main__':app.run(debug=True)<!DOCTYPE html>
<html lang="en">
<head><meta charset="UTF-8"><title>登錄</title>
</head>
<body>
<form method="post"><p>用戶名: <input type="text" name="username"></p><p>密碼: <input type="password" name="password"></p><input type="submit" value="登陸"> {{error}}</form>
</body>
</html>
from flask import Flask, render_template, request, redirect, session, jsonify# html(rander_template) jsonify(響應格式)
app = Flask(__name__, template_folder="templates", static_folder="static")
app.secret_key = 'sdasudgiguasdb' # 如果使用session,必須加秘鑰# 用戶信息
USERS = {1: {'name': '劉亦菲', 'age': 18, 'gender': '男','text': "劉亦菲,1987年8月25日出生于湖北省武漢市,華語影視女演員、歌手,畢業于北京電影學院2002級表演系本科",'img': 'https://img2.woyaogexing.com/2021/10/16/e3ccba623848430ba83209c0621a2256!400x400.jpeg'},2: {'name': '彭于晏', 'age': 28, 'gender': '男','text': "彭于晏,1982年3月24日出生于中國臺灣省澎湖縣,畢業于不列顛哥倫比亞大學,華語影視男演員。。。。。。。。",'img': 'https://img2.woyaogexing.com/2021/10/16/e71aa35728c34313bccb4c371192990f!400x400.jpeg'},3: {'name': '迪麗熱巴', 'age': 38, 'gender': '女','text': "迪麗熱巴(Dilraba),1992年6月3日出生于中國新疆烏魯木齊市,畢業于上海戲劇學院,中國內地影視女演員",'img': 'https://img2.woyaogexing.com/2021/10/30/6a34146dde2d4f1c832463a5be1ed027!400x400.jpeg'},4: {'name': '亞瑟', 'age': 38, 'gender': '男','text': "亞瑟,是騰訊手游《王者榮耀》中一名戰士型英雄角色,也是《王者榮耀》的新手英雄之一,既可攻又可守",'img': 'https://img2.woyaogexing.com/2021/10/30/371b2aa7a03c4f53b7b1bc86f877d7d1!400x400.jpeg'},
}# 加入裝飾器
from functools import wraps# 用戶登陸,寫個裝飾器
def login_required(func):def inner(*args, **kwargs):if session.get('username'):res = func(*args, **kwargs)return reselse:return redirect('/login')return inner@app.route('/',endpoint='/')
@login_required
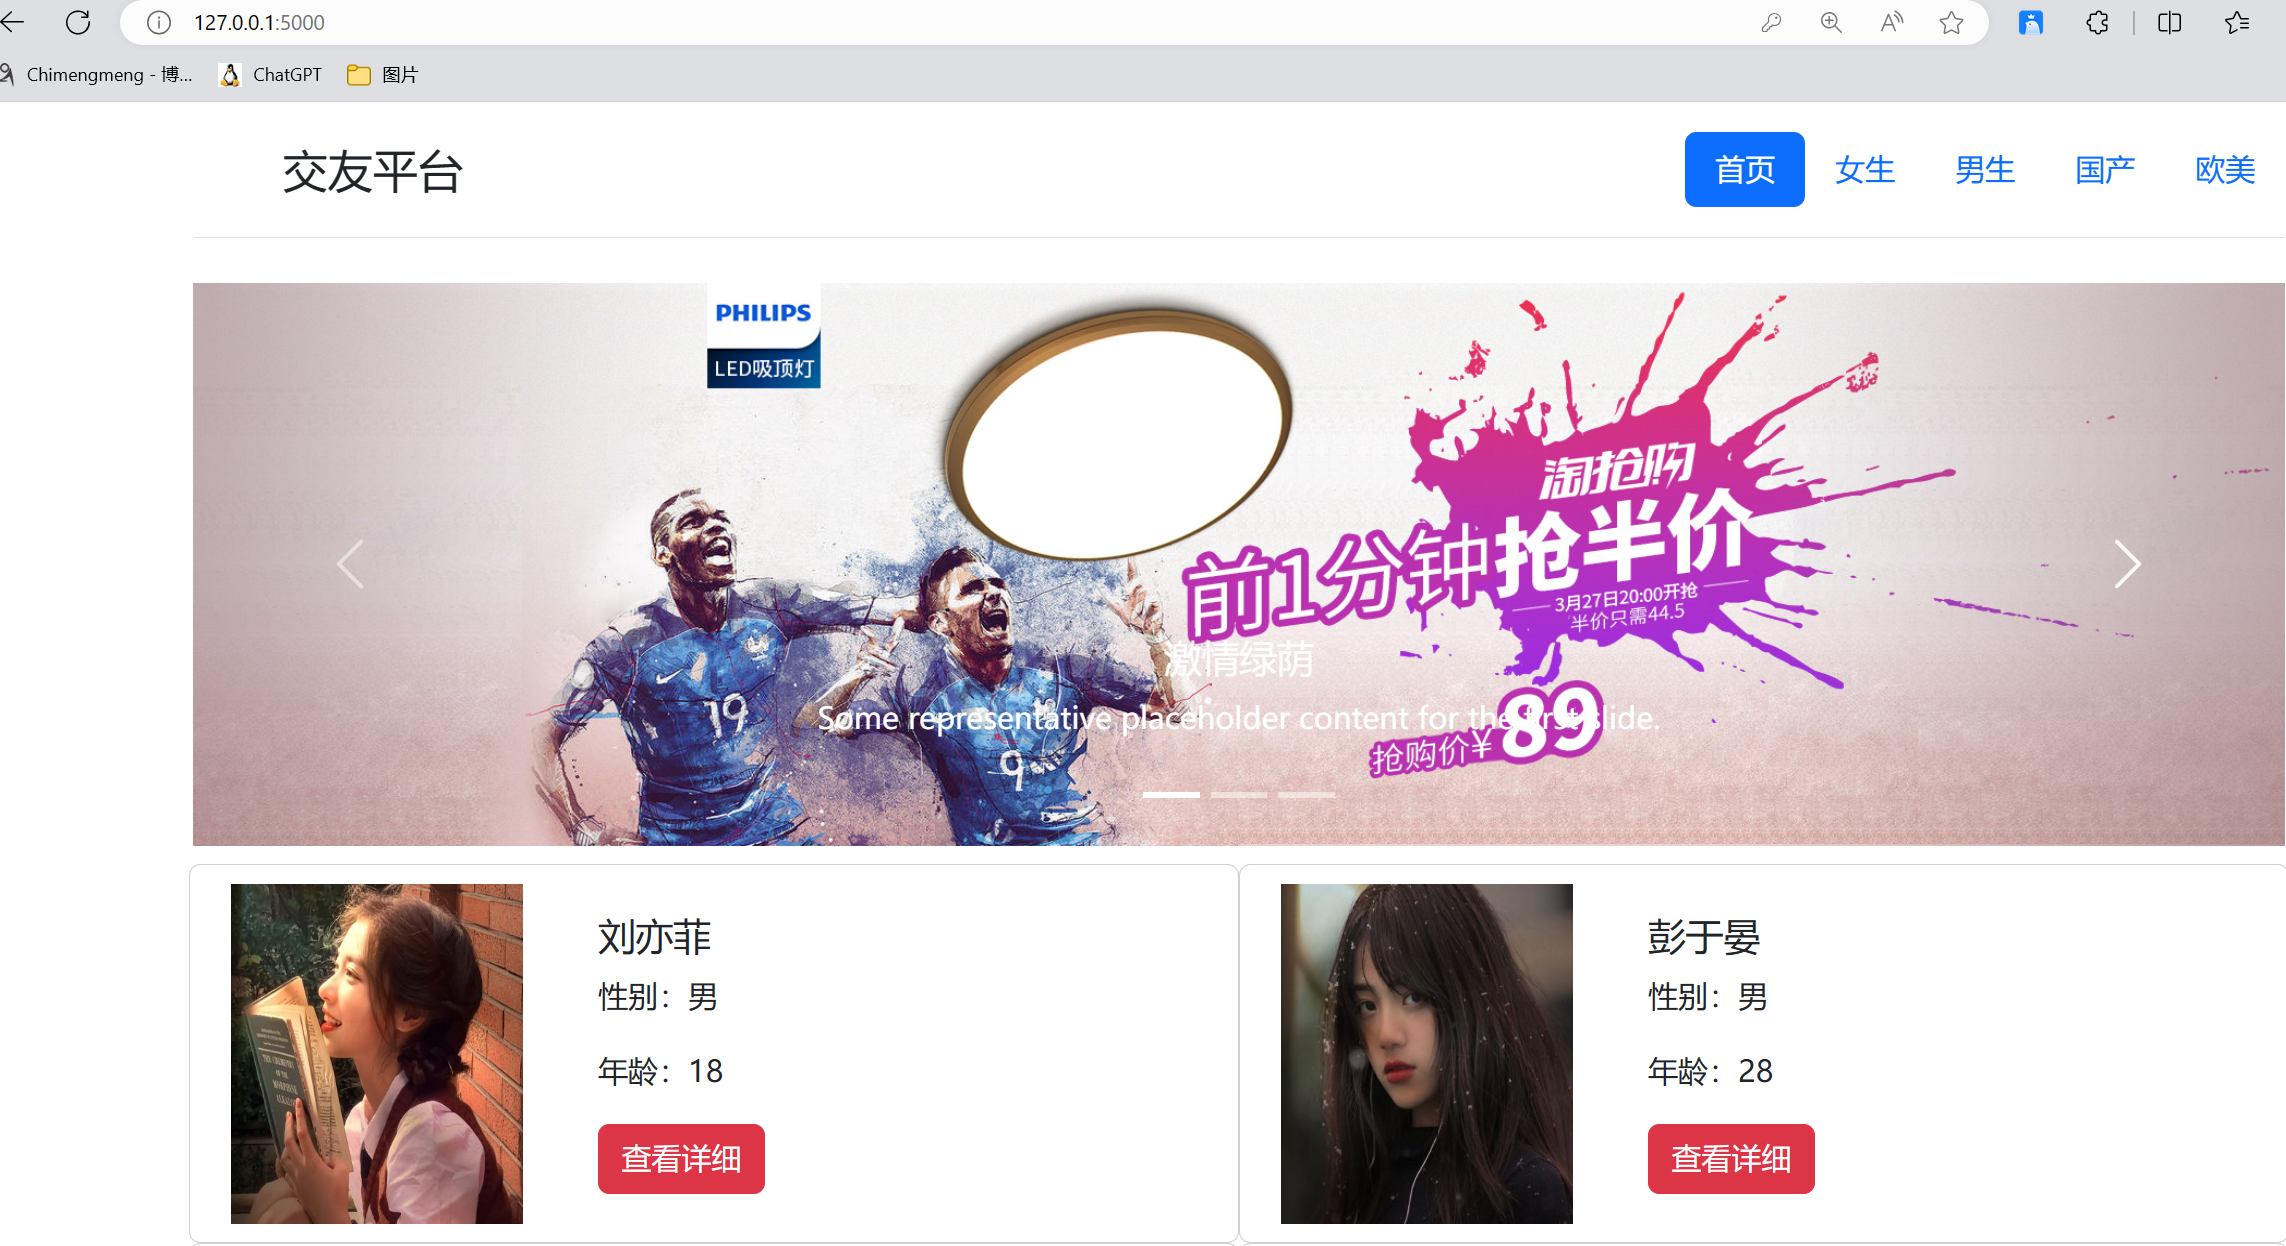
def index():# 7 判斷用戶是否登錄,如果登錄了,返回模板if session.get('username'):# 1 返回模板,渲染到模板中return render_template('index.html', user_dict=USERS)@app.route('/login', methods=['GET', 'POST'])def login():# 2 判斷是get請求還是post請求,需要使用request對象## 2.1 request 正常每次請求都是新的request---》現在flask中全局就一個request--》它會不會亂套?if request.method == 'GET':return render_template('login1.html')else:# 3 取出用戶名密碼--》請求對象中取--》requestusername = request.form.get('username')password = request.form.get('password')if username == 'jing' and password == '123123':# 6 登錄成功--》登錄信息寫入cookie--》使用session寫入session['username'] = username# 4 登錄成功--》重定向到 indexreturn redirect('/')else:# 5 登錄失敗--》返回login.html 頁面,但是頁面中渲染錯誤信息return render_template('login1.html', error='用戶名密碼錯誤')@app.route('/detail/<int:pk>', methods=['GET'],endpoint='detail')
@login_required
def detail(pk):if session.get('username'):user = USERS.get(pk)return render_template('detail.html', info=user)@app.route('/demo01', methods=['GET'])
def demo01():request.argsreturn jsonify({'code': 100, 'msg': '成功'})if __name__ == '__main__':app.run()<!DOCTYPE html>
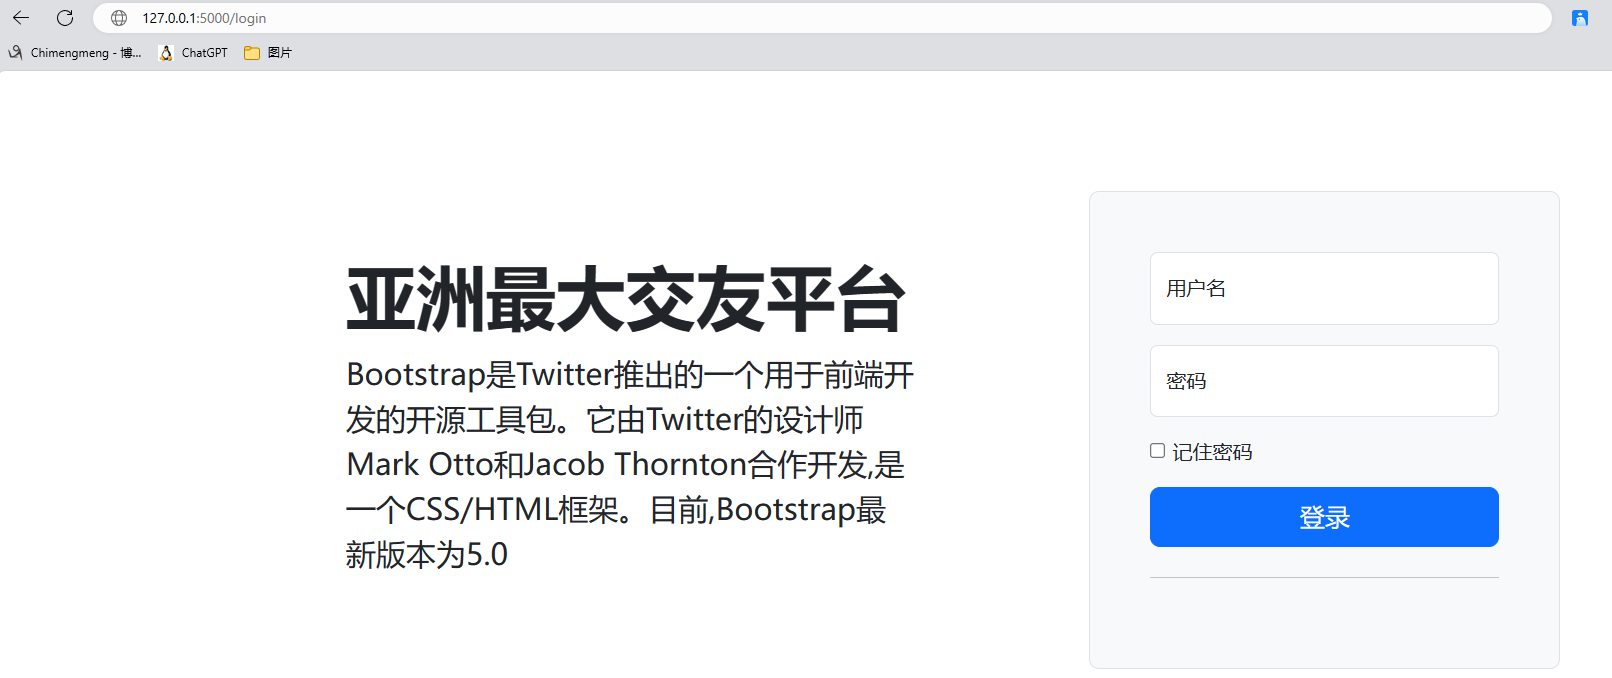
<html lang="en">
<head><meta charset="UTF-8"><link rel="stylesheet" href="https://cdn.jsdelivr.net/npm/bootstrap@5.3.0-alpha1/dist/css/bootstrap.min.css"><title>登錄</title>
</head>
<body>
<div class="container col-xl-10 col-xxl-8 px-4 py-5"><div class="row align-items-center g-lg-5 py-5"><div class="col-lg-7 text-center text-lg-start"><h1 class="display-4 fw-bold lh-1 mb-3">亞洲最大交友平臺</h1><p class="col-lg-10 fs-4">Bootstrap是Twitter推出的一個用于前端開發的開源工具包。它由Twitter的設計師MarkOtto和Jacob Thornton合作開發,是一個CSS/HTML框架。目前,Bootstrap最新版本為5.0</p></div><div class="col-md-10 mx-auto col-lg-5"><form class="p-4 p-md-5 border rounded-3 bg-light" method="post"><div class="form-floating mb-3"><input type="text" class="form-control" id="floatingInput" placeholder="name@example.com" name="username"><label for="floatingInput">用戶名</label></div><div class="form-floating mb-3"><input type="password" class="form-control" id="floatingPassword" placeholder="Password" name="password"><label for="floatingPassword">密碼</label></div><div class="checkbox mb-3"><label><input type="checkbox" value="remember-me"> 記住密碼</label></div><button class="w-100 btn btn-lg btn-primary" type="submit">登錄</button><hr class="my-4"><small class="text-muted">{{error}}</small></form></div></div>
</div>
</body>
</html>
<!DOCTYPE html>
<html lang="en">
<head><meta charset="UTF-8"><link rel="stylesheet" href="https://cdn.jsdelivr.net/npm/bootstrap@5.3.0-alpha1/dist/css/bootstrap.min.css"><script src="https://cdn.jsdelivr.net/npm/bootstrap@5.3.0-alpha1/dist/js/bootstrap.bundle.min.js"></script><title>Title</title>
</head>
<body>
<div class="container"><div class="sticky-top"><header class="d-flex flex-wrap justify-content-center py-3 mb-4 border-bottom"><a href="/" class="d-flex align-items-center mb-3 mb-md-0 me-md-auto text-dark text-decoration-none"><svg class="bi me-2" width="40" height="32"><use xlink:href="#bootstrap"></use></svg><span class="fs-4">交友平臺</span></a><ul class="nav nav-pills"><li class="nav-item"><a href="#" class="nav-link active" aria-current="page">首頁</a></li><li class="nav-item"><a href="#" class="nav-link">女生</a></li><li class="nav-item"><a href="#" class="nav-link">男生</a></li><li class="nav-item"><a href="#" class="nav-link">國產</a></li><li class="nav-item"><a href="#" class="nav-link">歐美</a></li></ul></header></div><div class="position-relative overflow-hidden p-3 p-md-5 m-md-3 text-center bg-light"><div class="col-md-5 p-lg-5 mx-auto my-5"><h1 class="display-4 fw-normal">{{info.name}}</h1><img src="{{info.img}}" alt=""width="300px" height="300px" style="margin: 20px"><p class="lead fw-normal">{{info.text}}</p><a class="btn btn-outline-secondary" href="#">收藏</a></div><div class="product-device shadow-sm d-none d-md-block"></div><div class="product-device product-device-2 shadow-sm d-none d-md-block"></div></div><div><footer class="py-3 my-4"><ul class="nav justify-content-center border-bottom pb-3 mb-3"><li class="nav-item"><a href="#" class="nav-link px-2 text-muted">首頁</a></li><li class="nav-item"><a href="#" class="nav-link px-2 text-muted">特性</a></li><li class="nav-item"><a href="#" class="nav-link px-2 text-muted">聯系我們</a></li><li class="nav-item"><a href="#" class="nav-link px-2 text-muted">資料獲取</a></li><li class="nav-item"><a href="#" class="nav-link px-2 text-muted">關于</a></li></ul><p class="text-center text-muted">Copyright ? 1998 - 2029 liuqingzheng. All Rights Reserved. </p></footer></div></div>
</body>
</html>
<!DOCTYPE html>
<html lang="en">
<head><meta charset="UTF-8"><link rel="stylesheet" href="https://cdn.jsdelivr.net/npm/bootstrap@5.3.0-alpha1/dist/css/bootstrap.min.css"><script src="https://cdn.jsdelivr.net/npm/bootstrap@5.3.0-alpha1/dist/js/bootstrap.bundle.min.js"></script><title>Title</title>
</head>
<body>
<div class="container"><!--    頭部--><div class="sticky-top"><header class="d-flex flex-wrap justify-content-center py-3 mb-4 border-bottom"><a href="/" class="d-flex align-items-center mb-3 mb-md-0 me-md-auto text-dark text-decoration-none"><svg class="bi me-2" width="40" height="32"><use xlink:href="#bootstrap"></use></svg><span class="fs-4">交友平臺</span></a><ul class="nav nav-pills"><li class="nav-item"><a href="#" class="nav-link active" aria-current="page">首頁</a></li><li class="nav-item"><a href="#" class="nav-link">女生</a></li><li class="nav-item"><a href="#" class="nav-link">男生</a></li><li class="nav-item"><a href="#" class="nav-link">國產</a></li><li class="nav-item"><a href="#" class="nav-link">歐美</a></li></ul></header></div><!--輪播圖--><div><div class="bd-example-snippet bd-code-snippet"><div class="bd-example"><div id="carouselExampleCaptions" class="carousel slide" data-bs-ride="carousel"><div class="carousel-indicators"><button type="button" data-bs-target="#carouselExampleCaptions" data-bs-slide-to="0" class=""aria-label="Slide 1"></button><button type="button" data-bs-target="#carouselExampleCaptions" data-bs-slide-to="1"aria-label="Slide 2" class="active" aria-current="true"></button><button type="button" data-bs-target="#carouselExampleCaptions" data-bs-slide-to="2"aria-label="Slide 3" class=""></button></div><div class="carousel-inner"><div class="carousel-item"><img src="https://img.zcool.cn/community/01fb5458fedf57a801214550f9677a.jpg@2o.jpg" alt=""width="100%" height="300"><div class="carousel-caption d-none d-md-block"><h5>激情綠蔭</h5><p>Some representative placeholder content for the first slide.</p></div></div><div class="carousel-item active"><img src="https://img2.baidu.com/it/u=2951612437,4135887500&fm=253&fmt=auto&app=138&f=JPEG"alt="" width="100%" height="300"><div class="carousel-caption d-none d-md-block"><h5>品牌雨傘</h5><p>Some representative placeholder content for the second slide.</p></div></div><div class="carousel-item"><img src="https://img1.baidu.com/it/u=1417689082,3333220267&fm=253&fmt=auto&app=138&f=JPEG"alt="" width="100%" height="300"><div class="carousel-caption d-none d-md-block"><h5>家裝節</h5><p>Some representative placeholder content for the third slide.</p></div></div></div><button class="carousel-control-prev" type="button" data-bs-target="#carouselExampleCaptions"data-bs-slide="prev"><span class="carousel-control-prev-icon" aria-hidden="true"></span><span class="visually-hidden">Previous</span></button><button class="carousel-control-next" type="button" data-bs-target="#carouselExampleCaptions"data-bs-slide="next"><span class="carousel-control-next-icon" aria-hidden="true"></span><span class="visually-hidden">Next</span></button></div></div></div></div><!--    內容--><div class="row row-cols-md-2" style="padding: 10px">{% for k,v in user_dict.items() %}<div class="card"><div class="row " style="padding: 10px"><img src="{{v.get('img')}}" alt="" class="col-md-4"><div class="col-md-8"><div class="card-body"><h5 class="card-title">{{v['name']}}</h5><p class="card-text">性別:{{v.gender}}</p><p class="card-text">年齡:{{v.age}}</p><p class="card-text"><a href="/detail/{{k}}" class="btn btn-danger">查看詳細</a></p></div></div></div></div>{%endfor%}</div><!--    table--><div class="bd-example" style="margin-top: 30px"><table class="table table-hover table-striped table-bordered"><thead><tr class="table-danger"><th colspan="3" class="text-center">更多交友</th></tr></thead><tbody><tr class="table-success"><th>楊冪</th><td>女</td><td>33</td></tr><tr class="table-warning"><th scope="row">劉亦菲</th><td>未知</td><td>40</td></tr><tr class="table-success"><th scope="row">彭于晏</th><td>男</td><td>23</td></tr><tr class="table-warning"><th scope="row">陳奕迅</th><td>男</td><td>44</td></tr><tr class="table-success"><th scope="row">薛之謙</th><td>男</td><td>36</td></tr><tr class="table-warning"><th>李清照</th><td>女</td><td>未知</td></tr></tbody></table></div><!--分頁--><div class="d-flex justify-content-center"><ul class="pagination pagination-lg"><li class="page-item"><a class="page-link" href="#" aria-label="Previous"><span aria-hidden="true">?</span></a></li><li class="page-item"><a class="page-link" href="#">1</a></li><li class="page-item"><a class="page-link" href="#">2</a></li><li class="page-item"><a class="page-link" href="#">3</a></li><li class="page-item"><a class="page-link" href="#">4</a></li><li class="page-item"><a class="page-link" href="#">5</a></li><li class="page-item"><a class="page-link" href="#">6</a></li><li class="page-item"><a class="page-link" href="#" aria-label="Next"><span aria-hidden="true">?</span></a></li></ul></div><!--    尾部--><div><footer class="py-3 my-4"><ul class="nav justify-content-center border-bottom pb-3 mb-3"><li class="nav-item"><a href="#" class="nav-link px-2 text-muted">首頁</a></li><li class="nav-item"><a href="#" class="nav-link px-2 text-muted">特性</a></li><li class="nav-item"><a href="#" class="nav-link px-2 text-muted">聯系我們</a></li><li class="nav-item"><a href="#" class="nav-link px-2 text-muted">資料獲取</a></li><li class="nav-item"><a href="#" class="nav-link px-2 text-muted">關于</a></li></ul><p class="text-center text-muted">Copyright ? 1998 - 2029 liuqingzheng. All Rights Reserved. </p></footer></div>
</div>
</body>
</html>

裝飾器
-
只需要添加在路由下面即可
-
@app.route('/detail/<int:pk>', methods=['GET'],endpoint='detail') @login_required def detail(pk):if session.get('username'):user = USERS.get(pk)return render_template('detail.html', info=user) -
問題一:登錄裝飾器,放上還是下 放下面問題二:每個路由有個別名【反向解析】--》這個別名如果不寫--》會以函數名作為別名--》一旦加了登錄認證裝飾器,所有別名都變成了 inner# 1 使用裝飾器裝飾裝飾器 @wraps(func) # 2 每個人都指定別名
def login_required(func):def inner(*args, **kwargs):if session.get('username'):res = func(*args, **kwargs)return reselse:return redirect('/login')return inner
【 五 】配置文件
-
django中配置文件用的是: settings.py
? -實際開發中用了兩套配置文件
-
主要用方式三跟方式四
-
print(app.config) 默認配置項
<Config {'DEBUG': False, 'TESTING': False, 'PROPAGATE_EXCEPTIONS': None, 'SECRET_KEY': None, 'PERMANENT_SESSION_LIFETIME': datetime.timedelta(days=31), 'USE_X_SENDFILE': False, 'SERVER_NAME': None, 'APPLICATION_ROOT': '/', 'SESSION_COOKIE_NAME': 'session', 'SESSION_COOKIE_DOMAIN': None, 'SESSION_COOKIE_PATH': None, 'SESSION_COOKIE_HTTPONLY': True, 'SESSION_COOKIE_SECURE': False, 'SESSION_COOKIE_SAMESITE': None, 'SESSION_REFRESH_EACH_REQUEST': True, 'MAX_CONTENT_LENGTH': None, 'SEND_FILE_MAX_AGE_DEFAULT': None, 'TRAP_BAD_REQUEST_ERRORS': None, 'TRAP_HTTP_EXCEPTIONS': False, 'EXPLAIN_TEMPLATE_LOADING': False, 'PREFERRED_URL_SCHEME': 'http', 'TEMPLATES_AUTO_RELOAD': None, 'MAX_COOKIE_SIZE': 4093}>
flask中的配置文件是一個flask.config.Config對象(繼承字典),默認配置為:{'DEBUG': get_debug_flag(default=False), 是否開啟Debug模式'TESTING': False, 是否開啟測試模式'PROPAGATE_EXCEPTIONS': None, 'PRESERVE_CONTEXT_ON_EXCEPTION': None,'SECRET_KEY': None,'PERMANENT_SESSION_LIFETIME': timedelta(days=31),'USE_X_SENDFILE': False,'LOGGER_NAME': None,'LOGGER_HANDLER_POLICY': 'always','SERVER_NAME': None,'APPLICATION_ROOT': None,'SESSION_COOKIE_NAME': 'session','SESSION_COOKIE_DOMAIN': None,'SESSION_COOKIE_PATH': None,'SESSION_COOKIE_HTTPONLY': True,'SESSION_COOKIE_SECURE': False,'SESSION_REFRESH_EACH_REQUEST': True,'MAX_CONTENT_LENGTH': None,'SEND_FILE_MAX_AGE_DEFAULT': timedelta(hours=12),'TRAP_BAD_REQUEST_ERRORS': False,'TRAP_HTTP_EXCEPTIONS': False,'EXPLAIN_TEMPLATE_LOADING': False,'PREFERRED_URL_SCHEME': 'http','JSON_AS_ASCII': True,'JSON_SORT_KEYS': True,'JSONIFY_PRETTYPRINT_REGULAR': True,'JSONIFY_MIMETYPE': 'application/json','TEMPLATES_AUTO_RELOAD': None,}# 3 修改默認# 方式一:直接在app上改,實際他們在config屬性上(開發階段用)app.debug=Trueapp.secret_key='asdfasdf'# 方式二:通過app.config改--》celery就是這樣app.config['DEBUG']=Trueapp.config['SECRET_KEY']='aaaa'# 方式三:app.config.from_pyfile("python文件名稱")--跟django一樣1 寫一個 settings.py2 app.config.from_pyfile('settings.py')# 方式四:app.config.from_object('settings.TestingConfig')class Config(object):DEBUG = FalseTESTING = FalseDATABASE_URI = '127.0.0.1'DATABASE_PORT = 3306class ProductionConfig(Config):DATABASE_URI = '192.168.1.11'DATABASE_PORT = 3308class DevelopmentConfig(Config):DEBUG = True# 方式其他:app.config.from_envvar("環境變量名稱")app.config.from_json("json文件名稱") app.config.from_mapping({'DEBUG': True}) #可能會用- 配置中心---》服務--》有個地址,發送請求會返回一對json格式配置文件-nocos# dotenv的使用# 4 設置自己(跟修改默認一樣)-app.config['DB_PASSWORD']='lqz123'from flask import Flask, jsonify# 1 實例化得到對象
app = Flask(__name__)
# ## 方式一
# app.debug=True
# app.secret_key='asdfasdf'
#
# ## 方式二
# app.config['DEBUG']=True
# app.config['SECRET_KEY']='aaaa'## 方式三
# app.config.from_pyfile('settings.py')## 方式四
# app.config.from_object('settings.ProductionConfig')print(app.config)
''''''# 2 注冊路由--》寫視圖函數
@app.route('/')
def index():# 3 返回給前端字符串return 'hello world'@app.errorhandler(404)
def error_404(arg):return jsonify({'code': 'xxx'})@app.errorhandler(500)
def error_500(arg):return jsonify({'code': '500錯誤了'})if __name__ == '__main__':# 運行app,默認運行在5000app.run()# app.run(host='0.0.0.0',port=8080)


00)


