💛前情提要💛
本文是傳知代碼平臺中的相關前沿知識與技術的分享~
接下來我們即將進入一個全新的空間,對技術有一個全新的視角~
本文所涉及所有資源均在傳知代碼平臺可獲取
以下的內容一定會讓你對AI 賦能時代有一個顛覆性的認識哦!!!
以下內容干貨滿滿,跟上步伐吧~
📌導航小助手📌
- 💡本章重點
- 🍞一. 概述
- 🍞二. 論文思路
- 🍞三. 方法原理
- 🍞四. 實驗過程
- 🍞五. 使用方式
- 🫓總結
💡本章重點
- 基于擴散模型的無載體圖像隱寫術
🍞一. 概述
當前的圖像隱寫技術主要集中在基于載體圖(cover image)的方法上,這些方法通常存在泄露隱藏圖(secret image)的風險和對退化容器圖(container image)不魯棒的風險。受到最近擴散模型(diffusion models)發展的啟發,作者發現了擴散模型的兩個特性,即無需訓練即可實現兩張圖像之間的轉換以及對噪聲數據有天然的魯棒性。這些特性可以用來增強圖像隱寫任務中的安全性和魯棒性。這是首次將擴散模型引入圖像隱寫領域的嘗試。與基于載體圖的圖像隱寫方法相比,作者提出的CRoSS框架在可控性、魯棒性和安全性方面具有明顯優勢。
🍞二. 論文思路
💡技術要點:
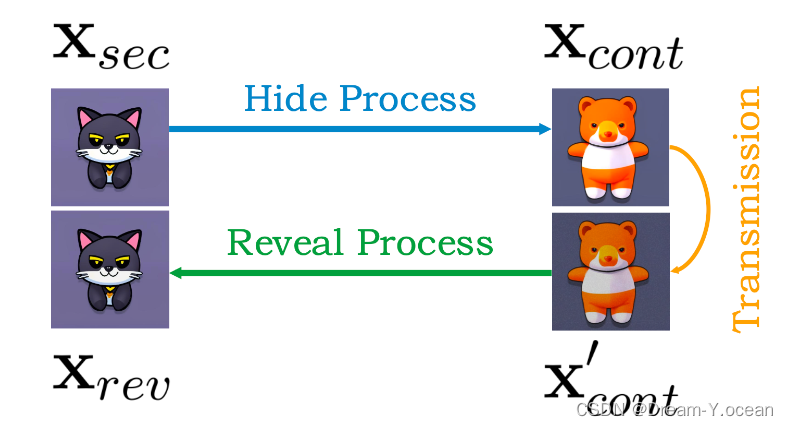
本文將無載體圖圖像隱寫任務表示為三個圖像和兩個過程組成:這三個圖像指的是秘密圖像xsec、容器圖像xcont和揭示圖像xrev,而這兩個過程是隱藏過程和揭示過程。秘密圖像xsec是我們想要隱藏的圖像,并通過隱藏過程隱藏在容器圖像xcont中。通過互聯網傳輸后,容器圖像xcont可能會退化,得到容器圖像的退化圖像x’cont,我們通過揭示過程從中提取顯示的圖像xrev。根據上述定義,我們可以將隱藏過程視為秘密圖像xsec和容器圖像xcont之間的翻譯,將揭示過程視為隱藏過程的反向過程。
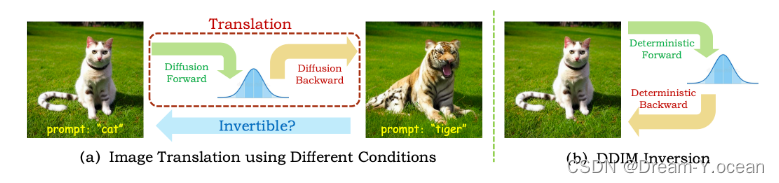
本文使用條件擴散模型來將秘密圖像進行加密使之轉換為容器圖像,并使用DDIM反轉來實現圖像分布和噪聲分布之間的雙向轉換,允許可逆圖像轉換,這樣的方法使得容器圖像能夠成功被還原為秘密圖像。
🍞三. 方法原理
1、CRoSS的隱藏過程
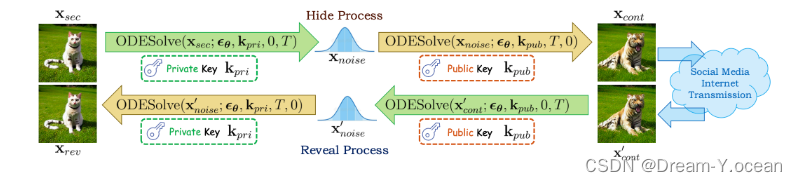
(1)原理:使用 DDIM 的前后向過程對秘密圖像進行處理,得到容器圖像。首先,使用一個私鑰作為條件,對秘密圖像進行加噪(前向過程),接著使用一個公鑰作為條件,進行去噪(后向過程),這樣就可以生成一個可以在互聯網上傳播的容器圖像了。私鑰用于描述秘密圖像中的內容,而公鑰用于控制容器圖像中的內容。
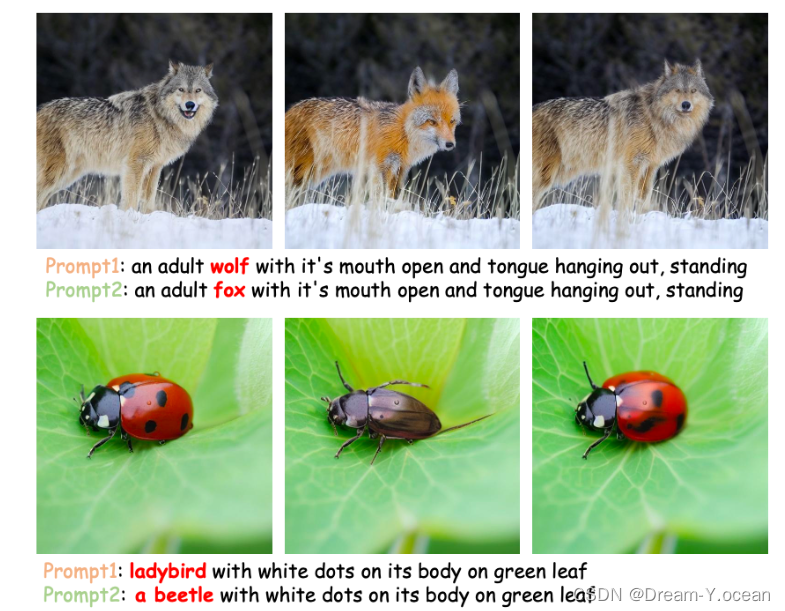
如上圖所示,prompt1是私鑰,prompt2是公鑰。并列的三幅圖中,第一幅是秘密圖像,第二幅是容器圖像,第三幅是揭示圖像。
(2)算法思路
輸入:將被隱藏的秘密圖像xsec,帶有噪聲估計器εθ的預訓練條件擴散模型,采樣時間步數T,以及作為私鑰和公鑰的兩個不同條件kpri和kpub。
輸出:用于隱藏秘密圖像xsec的容器圖像xcont。
2、CRoss的揭示過程
(1)原理:在揭示階段,假設容器圖像已通過互聯網傳輸,并可能已損壞為x’cont,接收器需要使用相同的條件擴散模型和相應提示詞,通過相同的正向和后向過程的逆過程將其顯示回秘密圖像。在整個無載體圖像隱寫過程中,我們不專門為圖像隱寫任務訓練或微調擴散模型,而是依靠DDIM反轉保證的固有可逆圖像翻譯。
(2)算法思路
輸入:通過互聯網傳輸的容器圖像x’cont(可能從xcont退化),帶有噪聲估計器εθ的預訓練條件擴散模型,采樣時間步數T,私鑰kpri和公鑰kpub。
輸出:從容器圖像中揭示出的圖像xrev。
🍞四. 實驗過程
1、實驗設置
實驗選擇了穩定Stable Diffusion v1.5作為條件擴散模型,并使用了確定性DDIM采樣算法。由秘密圖像生成噪聲圖和由噪聲圖生成容器圖各自都由50步組成。為了實現可逆圖像轉換,我們將穩定擴散的引導刻度設置為1。對于作為私鑰和公鑰的給定條件,我們有三個選項:prompts(提示詞)、ControlNets條件(depth maps, scribbles, segmentation maps)和LoRAs。
2、數據準備
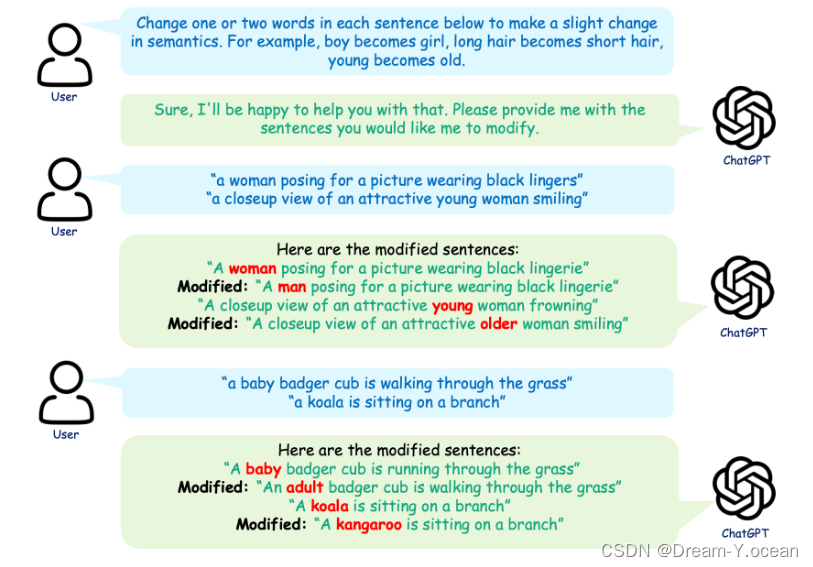
實驗收集了總共260張圖像,并生成專門為無載體圖像隱寫術量身定制的提示詞,稱為Stego260。實驗將數據集分為三類,即人類、動物和一般物體(如建筑、植物、食物、家具等)。數據集中的圖像來自公開的數據集和谷歌搜索引擎。為了生成提示密鑰,我們使用BLIP生成私鑰,并使用ChatGPT或人工調整來執行語義修改并批量生成公鑰。
下圖為使用ChatGPT生成公鑰的過程。
3、核心代碼
class ODESolve:def __init__(self, model, NUM_DDIM_STEPS=50):scheduler = DDIMScheduler(beta_start=0.00085, beta_end=0.012, beta_schedule="scaled_linear", clip_sample=False,set_alpha_to_one=False)self.model = modelself.num_ddim_steps = NUM_DDIM_STEPSself.tokenizer = self.model.tokenizerself.model.scheduler.set_timesteps(self.num_ddim_steps)self.prompt = Noneself.context = Nonedef prev_step(self, model_output: Union[torch.FloatTensor, np.ndarray], timestep: int, sample: Union[torch.FloatTensor, np.ndarray]):prev_timestep = timestep - self.scheduler.config.num_train_timesteps // self.scheduler.num_inference_stepsalpha_prod_t = self.scheduler.alphas_cumprod[timestep]alpha_prod_t_prev = self.scheduler.alphas_cumprod[prev_timestep] if prev_timestep >= 0 else self.scheduler.final_alpha_cumprodbeta_prod_t = 1 - alpha_prod_tpred_original_sample = (sample - beta_prod_t ** 0.5 * model_output) / alpha_prod_t ** 0.5pred_sample_direction = (1 - alpha_prod_t_prev) ** 0.5 * model_outputprev_sample = alpha_prod_t_prev ** 0.5 * pred_original_sample + pred_sample_directionreturn prev_sampledef next_step(self, model_output: Union[torch.FloatTensor, np.ndarray], timestep: int, sample: Union[torch.FloatTensor, np.ndarray]):timestep, next_timestep = min(timestep - self.scheduler.config.num_train_timesteps // self.scheduler.num_inference_steps, 999), timestepalpha_prod_t = self.scheduler.alphas_cumprod[timestep] if timestep >= 0 else self.scheduler.final_alpha_cumprodalpha_prod_t_next = self.scheduler.alphas_cumprod[next_timestep]beta_prod_t = 1 - alpha_prod_tnext_original_sample = (sample - beta_prod_t ** 0.5 * model_output) / alpha_prod_t ** 0.5next_sample_direction = (1 - alpha_prod_t_next) ** 0.5 * model_outputnext_sample = alpha_prod_t_next ** 0.5 * next_original_sample + next_sample_directionreturn next_sampledef get_noise_pred_single(self, latents, t, context):noise_pred = self.model.unet(latents, t, context)["sample"]return noise_preddef get_noise_pred(self, latents, t, is_forward=True, context=None):if context is None:context = self.contextguidance_scale = GUIDANCE_SCALEuncond_embeddings, cond_embeddings = context.chunk(2)noise_pred_uncond = self.model.unet(latents, t, uncond_embeddings)["sample"]noise_prediction_text = self.model.unet(latents, t, cond_embeddings)["sample"]noise_pred = noise_pred_uncond + guidance_scale * (noise_prediction_text - noise_pred_uncond)if is_forward:latents = self.next_step(noise_pred, t, latents)else:latents = self.prev_step(noise_pred, t, latents)return latents@torch.no_grad()def latent2image(self, latents, return_type='np'):latents = 1 / 0.18215 * latents.detach()image = self.model.vae.decode(latents)['sample']if return_type == 'np':image = (image / 2 + 0.5).clamp(0, 1)image = image.cpu().permute(0, 2, 3, 1).numpy()[0]image = (image * 255).astype(np.uint8)return image@torch.no_grad()def image2latent(self, image):with torch.no_grad():if type(image) is Image:image = np.array(image)if type(image) is torch.Tensor and image.dim() == 4:latents = imageelse:image = torch.from_numpy(image).float() / 127.5 - 1image = image.permute(2, 0, 1).unsqueeze(0).to(device)latents = self.model.vae.encode(image)['latent_dist'].meanlatents = latents * 0.18215return latents@torch.no_grad()def init_prompt(self, prompt: str):uncond_input = self.model.tokenizer([""], padding="max_length", max_length=self.model.tokenizer.model_max_length,return_tensors="pt")uncond_embeddings = self.model.text_encoder(uncond_input.input_ids.to(self.model.device))[0]text_input = self.model.tokenizer([prompt],padding="max_length",max_length=self.model.tokenizer.model_max_length,truncation=True,return_tensors="pt",)text_embeddings = self.model.text_encoder(text_input.input_ids.to(self.model.device))[0]self.context = torch.cat([uncond_embeddings, text_embeddings])self.prompt = prompt@torch.no_grad()def get_text_embeddings(self, prompt: str):text_input = self.model.tokenizer([prompt],padding="max_length",max_length=self.model.tokenizer.model_max_length,truncation=True,return_tensors="pt",)text_embeddings = self.model.text_encoder(text_input.input_ids.to(self.model.device))[0]return text_embeddings
4、實驗結果
運行ReadMe文件中的以下代碼,快速運行代碼進行圖片加密解密。
python demo.py --image_path ./asserts/1.png --private_key "Effiel tower" --public_key "a tree" --save_path ./output --num_steps 50
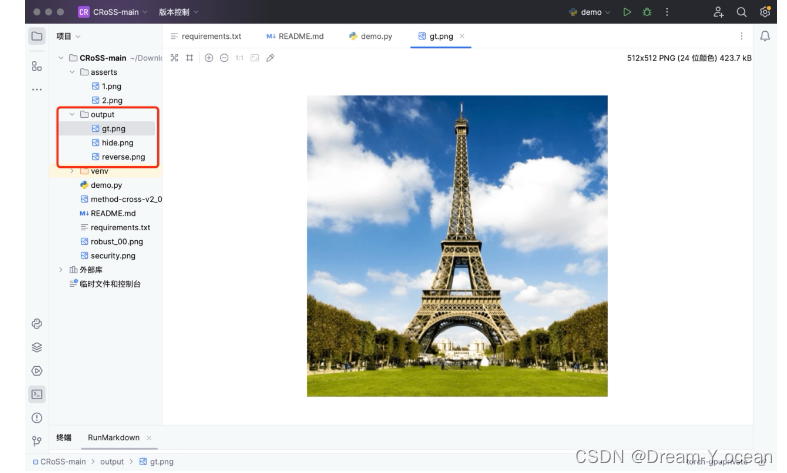
成功運行界面如下:

打開output文件夾,查看實驗過程中的三幅圖像
待加密圖像:

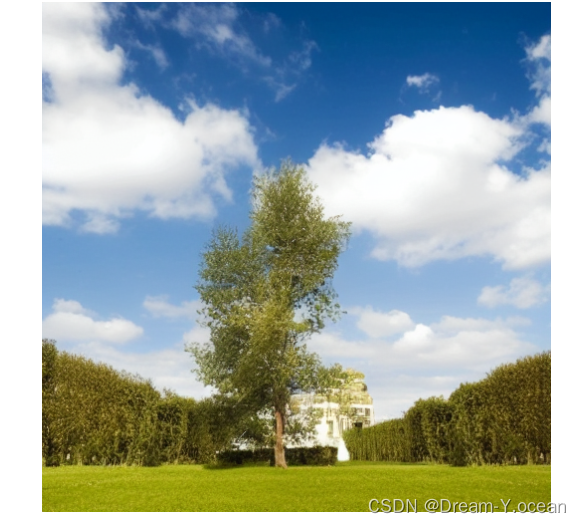
容器圖像:
揭示圖像:
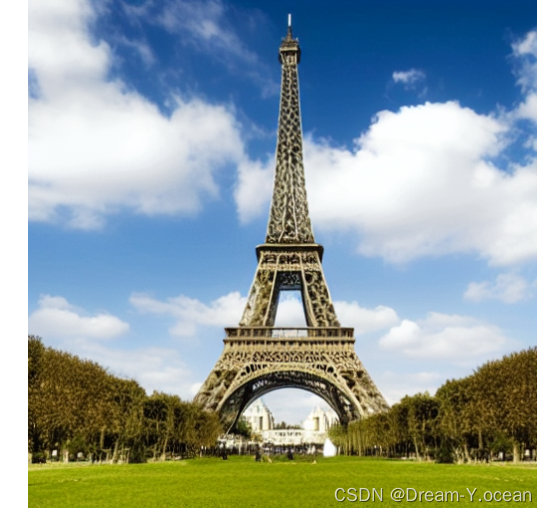
可以發現,隱寫后的圖片自然且清晰度高,不易被察覺到隱藏了秘密圖像,揭示圖像還原度高,經過網絡傳輸后仍然能夠很好地被還原。
🍞五. 使用方式
編譯器采用Pycharm,下載好項目代碼后,閱讀ReadMe文件以及“requirements.txt”。
首先運行ReadMe文件中的以下代碼,下載好實驗所需的所有庫并配置好環境。
pip install -r requirements.txt
然后運行ReadMe文件中的以下代碼,快速運行代碼進行圖片加密解密。
python demo.py --image_path ./asserts/1.png --private_key "Effiel tower" --public_key "a tree" --save_path ./output --num_steps 50
上述image_path后面的參數是要加密圖像在設備上的路徑,可以根據自己的圖片路徑進行調整;private_key后面的參數是私鑰,根據不同待加密圖片的內容自行調整;public_key后面的參數是公鑰,根據想要生成的容器圖像內容進行調整;save_path后面的參數是加密后的容器圖像的保存地址,如果不修改的話每次運行程序都會覆蓋前一次的運行結果;num_steps后面的參數是迭代次數,可以根據自己的需要進行調整,一般迭代次數越多效果越好,花費的時間越長。
🫓總結
綜上,我們基本了解了“一項全新的技術啦” 🍭 ~~
恭喜你的內功又雙叒叕得到了提高!!!
感謝你們的閱讀😆
后續還會繼續更新💓,歡迎持續關注📌喲~
💫如果有錯誤?,歡迎指正呀💫
?如果覺得收獲滿滿,可以點點贊👍支持一下喲~?
【傳知科技 – 了解更多新知識】


Java方式 獲取)


:機器閱讀理解-基礎概念解析01)


)


