介紹
Aware(感知)接口是一個標記,里面沒有任何方法,實際方法定義都是子接口確定(相當于定義了一套規則,并建議子接口中應該只有一個無返回值的方法)。
我們知道spring已經定義好了很多對象,如ApplicationContext、BeanFactory、Environment等,但是這些對象是spring框架自身的,我們去獲取這些是及其困難的,所以spring定義了一套規則能讓我們很容易得獲取框架中的對象,這就是Aware的意義,現在對Aware有一定了解了吧,Aware是感知spring容器中的對象。
spring定義了很多子接口并已實現可直接可用,下圖均為spring中的子接口。
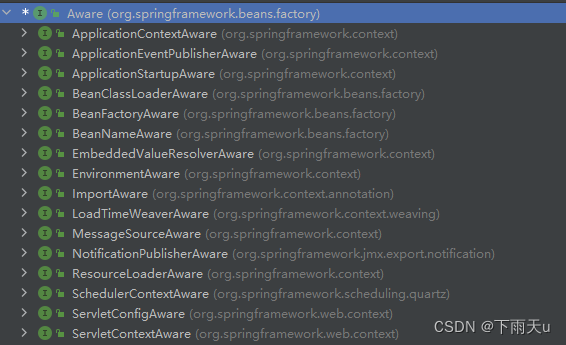
如圖第一個ApplicationContextAware,類名很清晰的告訴我們是感知ApplicationContext,ApplicationContext都知道是spring容器,所以這里表示感知容器,就是我們想獲取ApplicationContext只需要實現這個接口就行。
注意
這里的接口名都是有規則的,如ApplicationContextAware就是獲取ApplicationContext的,BeanFactoryAware就是獲取BeanFactory的,見名知意。
源碼
public interface ApplicationContextAware extends Aware {/*** 只有一個方法,實現這方法spring在啟動過程中會默認將* 調用此方法并將ApplicationContext參數傳遞過來,這樣* 我們就能很容易的獲取到ApplicationContext了*/void setApplicationContext(ApplicationContext applicationContext) throws BeansException;}例子
Teacher類并實現ApplicationContextAware 接口
package com.lp.entity;import org.springframework.beans.BeansException;
import org.springframework.context.ApplicationContext;
import org.springframework.context.ApplicationContextAware;public class Teacher implements ApplicationContextAware {private String name;private ApplicationContext applicationContext;public ApplicationContext getApplicationContext() {return applicationContext;}public String getName() {return name;}public void setName(String name) {this.name = name;}@Overridepublic String toString() {return "Teacher{" +"name='" + name + '\'' +'}';}@Overridepublic void setApplicationContext(ApplicationContext applicationContext) throws BeansException {this.applicationContext =applicationContext;}
}
配置文件
<?xml version="1.0" encoding="UTF-8"?>
<beans xmlns="http://www.springframework.org/schema/beans"xmlns:xsi="http://www.w3.org/2001/XMLSchema-instance"xmlns:context="http://www.springframework.org/schema/context"xsi:schemaLocation="http://www.springframework.org/schema/beans http://www.springframework.org/schema/beans/spring-beans.xsd http://www.springframework.org/schema/context https://www.springframework.org/schema/context/spring-context.xsd"><context:component-scan base-package="com.lp"/><bean id="teacher" class="com.lp.entity.Teacher"><property name="name" value="zhangsan"/></bean>
</beans>
測試,看一看Teacher類中能不能獲取到ApplicationContext對象
package example.lp;import com.lp.entity.Teacher;
import org.springframework.context.support.ClassPathXmlApplicationContext;public class test {public static void main(String[] args) {ClassPathXmlApplicationContext context = new ClassPathXmlApplicationContext("application.xml");Teacher teacher = (Teacher)context.getBean("teacher");System.out.println("------------ApplicationContext="+teacher.getApplicationContext());}
}

從結果中可以清晰的看到已經獲取到了ApplicationContext對象,當我們需要其他對象也可以看看其他Aware子接口,直接實現即可。
自定義Aware接口(簡單看一下)
spring中有一個ApplicationContextAwareProcessor類,里面就是實現這些子接口功能的,invokeAwareInterfaces方法就是具體邏輯。
class ApplicationContextAwareProcessor implements BeanPostProcessor {private final ConfigurableApplicationContext applicationContext;private final StringValueResolver embeddedValueResolver;/*** Create a new ApplicationContextAwareProcessor for the given context.*/public ApplicationContextAwareProcessor(ConfigurableApplicationContext applicationContext) {this.applicationContext = applicationContext;this.embeddedValueResolver = new EmbeddedValueResolver(applicationContext.getBeanFactory());}@Override@Nullablepublic Object postProcessBeforeInitialization(Object bean, String beanName) throws BeansException {if (bean instanceof Aware) {invokeAwareInterfaces(bean);}return bean;}private void invokeAwareInterfaces(Object bean) {if (bean instanceof EnvironmentAware environmentAware) {environmentAware.setEnvironment(this.applicationContext.getEnvironment());}if (bean instanceof EmbeddedValueResolverAware embeddedValueResolverAware) {embeddedValueResolverAware.setEmbeddedValueResolver(this.embeddedValueResolver);}if (bean instanceof ResourceLoaderAware resourceLoaderAware) {resourceLoaderAware.setResourceLoader(this.applicationContext);}if (bean instanceof ApplicationEventPublisherAware applicationEventPublisherAware) {applicationEventPublisherAware.setApplicationEventPublisher(this.applicationContext);}if (bean instanceof MessageSourceAware messageSourceAware) {messageSourceAware.setMessageSource(this.applicationContext);}if (bean instanceof ApplicationStartupAware applicationStartupAware) {applicationStartupAware.setApplicationStartup(this.applicationContext.getApplicationStartup());}if (bean instanceof ApplicationContextAware applicationContextAware) {applicationContextAware.setApplicationContext(this.applicationContext);}}}
自己實現Aware接口
這個需要了解一下spring啟動過程,跟BeanPostProcessor這個接口有關,也需要了解BeanPostProcessor的執行時機,這里我就不介紹了,我自己寫了一個示例,這里只是展示怎么實現Aware的。
package com.lp.entity;import org.springframework.beans.BeansException;
import org.springframework.context.ApplicationContext;
import org.springframework.context.ApplicationContextAware;public class Teacher implements ApplicationContextAware {private String name;private ApplicationContext applicationContext;public ApplicationContext getApplicationContext() {return applicationContext;}public String getName() {return name;}public void setName(String name) {this.name = name;}@Overridepublic String toString() {return "Teacher{" +"name='" + name + '\'' +'}';}@Overridepublic void setApplicationContext(ApplicationContext applicationContext) throws BeansException {this.applicationContext =applicationContext;}
}
package com.lp.entity;import com.lp.TeacherAware;public class Student implements TeacherAware {private String name;private Teacher teacher;public Teacher getTeacher() {return teacher;}public String getName() {return name;}public void setName(String name) {this.name = name;}@Overridepublic void setTeacher(Teacher teacher) {this.teacher =teacher;}
}
package com.lp;import com.lp.entity.Teacher;
import org.springframework.beans.factory.Aware;public interface TeacherAware extends Aware {void setTeacher(Teacher teacher);
}package com.lp;import com.lp.entity.Teacher;
import org.springframework.beans.BeansException;
import org.springframework.beans.factory.annotation.Autowired;
import org.springframework.beans.factory.config.BeanPostProcessor;
import org.springframework.context.ConfigurableApplicationContext;
import org.springframework.stereotype.Component;@Component
public class TeacherAwareBeanPostProcessor implements BeanPostProcessor {private final ConfigurableApplicationContext applicationContext;@Autowiredpublic TeacherAwareBeanPostProcessor(ConfigurableApplicationContext applicationContext) {this.applicationContext = applicationContext;}@Overridepublic Object postProcessBeforeInitialization(Object bean, String beanName) throws BeansException {if (bean instanceof TeacherAware teacherAware){teacherAware.setTeacher(applicationContext.getBean(Teacher.class));}return bean;}
}
<?xml version="1.0" encoding="UTF-8"?>
<beans xmlns="http://www.springframework.org/schema/beans"xmlns:xsi="http://www.w3.org/2001/XMLSchema-instance"xmlns:context="http://www.springframework.org/schema/context"xsi:schemaLocation="http://www.springframework.org/schema/beans http://www.springframework.org/schema/beans/spring-beans.xsd http://www.springframework.org/schema/context https://www.springframework.org/schema/context/spring-context.xsd"><context:component-scan base-package="com.lp"/><bean id="teacher" class="com.lp.entity.Teacher"><property name="name" value="zhangsan"/></bean><bean id="student" class="com.lp.entity.Student"><property name="name" value="lisi"/></bean></beans>
package example.lp;import com.lp.entity.Student;
import com.lp.entity.Teacher;
import org.springframework.context.support.ClassPathXmlApplicationContext;public class test {public static void main(String[] args) {ClassPathXmlApplicationContext context = new ClassPathXmlApplicationContext("application.xml");//Teacher teacher = (Teacher)context.getBean("teacher");//System.out.println("------------ApplicationContext="+teacher.getApplicationContext());Student student = (Student)context.getBean("student");System.out.println("------------Teacher="+student.getTeacher());}
}
從上述代碼和結果中可以看到,我創建了兩個bean,一個Student和一個Teacher,我用Aware方式實現了將Student中的Teacher屬性注入,當然這個場景可能不是很合適,但這里主要是演示怎么自己實現Aware接口,需要自己寫一個接口實現Aware接口并之定義一個方法(接口名最好是遵循spring規則,且只有一個void方法),創建一個實現BeanPostProcessor的對象并寫出具體實現邏輯,這兒需要你了解spring啟動流程并且知道BeanPostProcessor接口的作用。
希望對你有幫助,別忘了點贊!!
| 儲能配置 |建模秘籍文章代碼思路大全)
)


)


