1.配置自簽證書多域名的動態網站
1.1配置自簽證書
1.1.1配置倉庫
[root@apache ~]# vim /etc/yum.repos.d/epel.repo
[epel]
name=epel
baseurl=https://mirrors.aliyun.com/epel/9/Everything/x86_64/
gpgcheck=0
1.1.2安裝easy-rsa工具(用于生成和管理SSL證書)
#安裝easy-rsa用于生成和管理SSL證書
[root@apache ~]# yum install easy-rsa -y
#進入easy-rsa的工作目錄
[root@apache ~]# cd /usr/share/easy-rsa/3.2.1/
1.1.3初始化證書目錄結構
#創建pki目錄及子目錄,用于存放證書相關文件
[root@apache 3.2.1]# ./easyrsa init-pki
1.1.4查看初始化后的目錄結構
#查看初始化后的目錄結構
[root@apache 3.2.1]# tree pki/
pki/
├── inline       #存放內聯格式的證書文件(證書+私鑰合并文件)
├── issued       #存放已簽發的服務器/客戶端證書
├── private      #存放私鑰文件(重要,需保密)
├── reqs         #存放證書請求文件(CSR)
└── vars.example #證書配置模板(可自定義證書默認信息)
1.1.5生成CA根證書
[root@apache 3.2.1]# ./easyrsa build-ca nopass
#輸入CA的通用名稱(Common Name),此處設置為jun.com(可自定義,用于標識CA)
Common Name (eg: your user, host, or server name) [Easy-RSA CA]:jun.com
1.1.6為www.king.com生成私鑰和證書請求文件
#為www.king.com生成私鑰和證書請求文件
[root@apache 3.2.1]# ./easyrsa gen-req www.king.com nopass
Your files are:
* req: /usr/share/easy-rsa/3.2.1/pki/reqs/www.king.com.req  #www.king.com的證書請求
* key: /usr/share/easy-rsa/3.2.1/pki/private/www.king.com.key   #對應私鑰
1.1.7為www.jeams.org生成私鑰和證書請求文件
#為www.jeams.org生成私鑰和證書請求文件
[root@apache 3.2.1]# ./easyrsa gen-req www.jeams.org nopass
Your files are:
* req: /usr/share/easy-rsa/3.2.1/pki/reqs/www.jeams.org.req  # www.jungle.org的證書請求
* key: /usr/share/easy-rsa/3.2.1/pki/private/www.jeams.org.key  # 對應私鑰
1.1.8使用CA根證書簽發www.king.com
[root@apache 3.2.1]# ./easyrsa sign-req server www.king.com
#確認證書信息,輸入yes繼續
Type the word 'yes' to continue, or any other input to abort.Confirm requested details: yes  #確認簽發
1.1.9使用CA根證書簽發www.jeams.org
[root@apache 3.2.1]# ./easyrsa sign-req server www.jeams.org
# 確認證書信息,輸入yes繼續
Type the word 'yes' to continue, or any other input to abort.Confirm requested details: yes  #確認簽發
1.2配置虛擬主機
1.2.1安裝所需軟件
[root@apache ~]# yum install mod_ssl php httpd php-fpm -y1.2.2編寫配置文件
[root@apache ~]# vim  /etc/httpd/conf.d/name-php.conf
DocumentRoot /www/king
ServerName www.king.com
<directory /www/king>
DirectoryIndex index.html  #設置默認首頁文件為index.html
allowoverride none         #禁止使用.htaccess文件覆蓋當前配置
require all granted        #允許所有客戶端訪問該目錄
</directory>
</virtualhost><virtualhost *:443>    #綁定443端口,HTTPS默認端口
SSLEngine on
#SSL證書相關配置
SSLCertificateFile /usr/share/easy-rsa/3.2.1/pki/issued/www.jeams.org.crt  #服務器證書文件(公鑰)
SSLCertificateKeyFile /usr/share/easy-rsa/3.2.1/pki/private/www.jeams.org.key  #服務器私鑰文件
SSLCACertificateFile /usr/share/easy-rsa/3.2.1/pki/ca.crt  #CA根證書(用于客戶端驗證服務器證書)
DocumentRoot /www/jeams
ServerName www.jeams.org
<directory /www/jeams>
DirectoryIndex index.html
allowoverride none
require all granted
</directory>
</virtualhost>
1.2.3創建目錄并編寫內容到文件里
[root@apache 3.2.1]# mkdir -p /www/{king,jeams}
[root@apache 3.2.1]# echo "king,this for you" > /www/king/index.html
[root@apache 3.2.1]# echo "jeams,this for you" > /www/jeams/index.html
1.2.4檢測并重啟
[root@apache ~]# httpd -t
Syntax OK
[root@apache ~]# systemctl restart httpd php-fpm
1.2.5測試
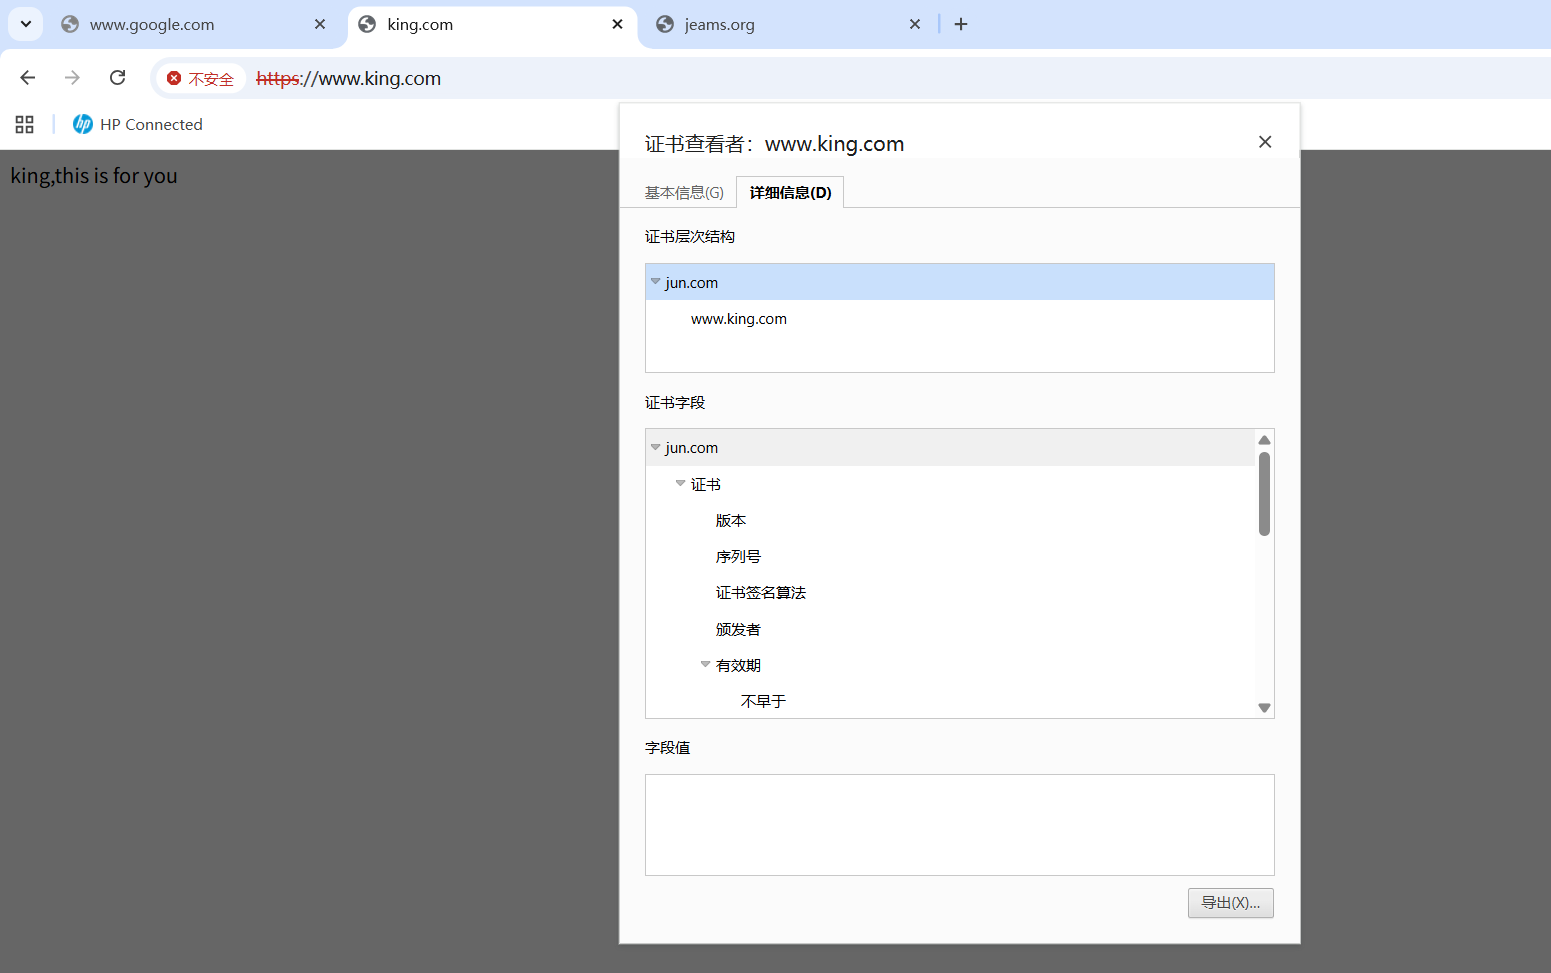
a.www.king.com(輸入https:/www.king.com)
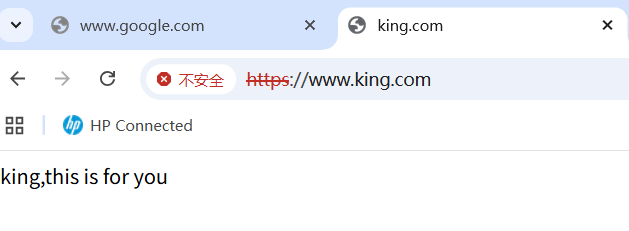
可以看到當前網站的上一層CA機構信息
b.www.jeams.org(輸入https://www.jeams.org)
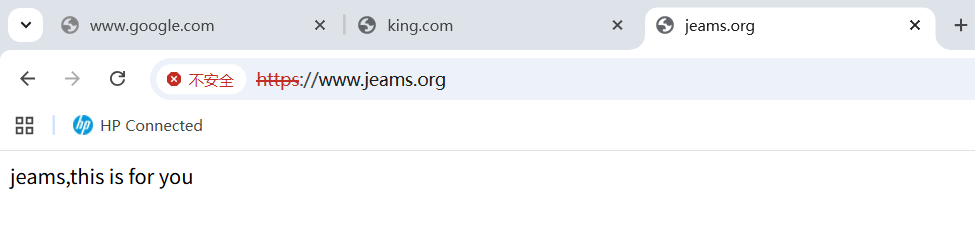
可以看到當前網站的上一層CA機構信息

2.部署http的repo倉庫
2.1安裝所需軟件
[root@apache ~]# yum install httpd -y2.2創建repo目錄及子目錄
[root@apache ~]# mkdir /repo/{rhel,centos,ubuntu,rocky,openEuler}
[root@apache ~]# tree /repo/
[root@apache ~]# mkdir /repo/rhel/{7.9,9.1}
2.3編輯配置文件
[root@apache ~]# vim /etc/httpd/conf.d/repo.conf
<directory /repo>
DirectoryIndex disabled  #禁用默認的索引文件index.html
5
options indexes followsymlinks  #indexes表示顯示目錄內容列表,followsymlinks表示追蹤軟鏈接
6
allowoverride none  #none表示不允許讀取.htaccess文件中設置的options值,實踐中不要使用.htaccess文件,會降低性能
7
require all granted  #允許所有主機通過
</directory>
<VirtualHost 192.168.75.184>  #綁定特定IP,默認使用80端口(http)DocumentRoot  /repo    #指定網站文件存放路徑
</VirtualHost>
注意:做這個之前要將歡迎界面刪除或改名使其失效
[root@apache ~]# mv /etc/httpd/conf.d/welcome.conf {,.bak}2.4測試并重啟
[root@apache ~]# httpd -t
Syntax OK
[root@apache ~]# systemctl restart httpd
2.5添加光盤
點擊虛擬機并打開設置
點擊添加光盤
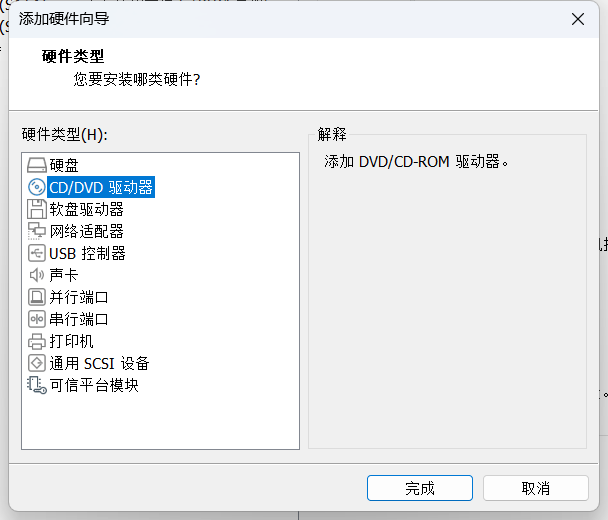
點擊確定
2.6掛載關盤到repo目錄下所對應的文件
#將rhel9.1掛載到對應的目錄
[root@apache ~]# mount /dev/sr0 /repo/rhel/9.1
#將rhel7.9掛載到對應的目錄
[root@apache ~]#mount /dev/sr1 /repo/rhel/7.9
#將centos掛載到對應的目錄
[root@apache ~]#mount /dev/sr2 /repo/centos/
#將ubuntu掛載到對應的目錄
[root@apache ~]#mount /dev/sr3 /repo/ubuntu/
#將openEuler掛載到對應的目錄
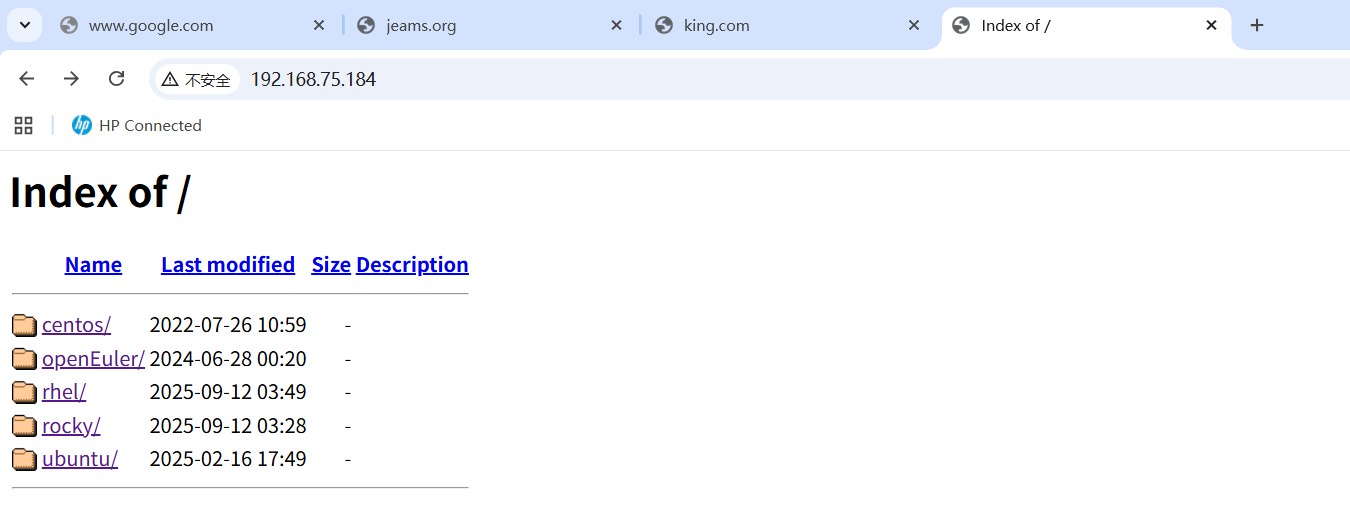
[root@apache ~]#mount /dev/sr4 /repo/openEuler/2.7測試
2.7.1Windows端測試
在瀏覽器輸入IP地址
2.7.2Linux端測試(rhel7上測試)
a.配置yum倉庫
[root@master yum.repos.d]# vi /etc/yum.repos.d/rhel7.repo
[rhel7]
name=rhel7
baseurl=http://192.168.75.184/rhel/7.9/
gpgcheck=0
b.清除緩存
[root@master yum.repos.d]# yum clean all
Loaded plugins: product-id, search-disabled-repos, subscription-managerThis system is not registered with an entitlement server. You can use subscription-manager to register.Cleaning repos: rhel7
[root@master yum.repos.d]# yum makecache
Loaded plugins: product-id, search-disabled-repos, subscription-managerThis system is not registered with an entitlement server. You can use subscription-manager to register.rhel7                                                                           | 2.8 kB  00:00:00
(1/5): rhel7/group                                                              | 628 kB  00:00:00
(2/5): rhel7/primary                                                            | 2.1 MB  00:00:00
(3/5): rhel7/filelists                                                          | 3.1 MB  00:00:00
(4/5): rhel7/group_xz                                                           |  95 kB  00:00:00
(5/5): rhel7/other                                                              | 1.1 MB  00:00:00
rhel7                                                                                        5230/5230
rhel7                                                                                        5230/5230
rhel7                                                                                        5230/5230
Metadata Cache Created
c.驗證
[root@master yum.repos.d]# yum install httpd -y
Loaded plugins: product-id, search-disabled-repos, subscription-managerThis system is not registered with an entitlement server. You can use subscription-manager to register.Resolving Dependencies
--> Running transaction check
---> Package httpd.x86_64 0:2.4.6-95.el7 will be installed
--> Processing Dependency: httpd-tools = 2.4.6-95.el7 for package: httpd-2.4.6-95.el7.x86_64
--> Processing Dependency: /etc/mime.types for package: httpd-2.4.6-95.el7.x86_64
--> Processing Dependency: libaprutil-1.so.0()(64bit) for package: httpd-2.4.6-95.el7.x86_64
--> Processing Dependency: libapr-1.so.0()(64bit) for package: httpd-2.4.6-95.el7.x86_64
--> Running transaction check
---> Package apr.x86_64 0:1.4.8-7.el7 will be installed
---> Package apr-util.x86_64 0:1.5.2-6.el7 will be installed
---> Package httpd-tools.x86_64 0:2.4.6-95.el7 will be installed
---> Package mailcap.noarch 0:2.1.41-2.el7 will be installed
--> Finished Dependency ResolutionDependencies Resolved=======================================================================================================Package                   Arch                 Version                      Repository           Size
=======================================================================================================
Installing:httpd                     x86_64               2.4.6-95.el7                 rhel7               1.2 M
Installing for dependencies:apr                       x86_64               1.4.8-7.el7                  rhel7               104 kapr-util                  x86_64               1.5.2-6.el7                  rhel7                92 khttpd-tools               x86_64               2.4.6-95.el7                 rhel7                93 kmailcap                   noarch               2.1.41-2.el7                 rhel7                31 kTransaction Summary
=======================================================================================================
Install  1 Package (+4 Dependent packages)Total download size: 1.5 M
Installed size: 4.3 M
Downloading packages:
(1/5): apr-1.4.8-7.el7.x86_64.rpm                                               | 104 kB  00:00:00
(2/5): httpd-2.4.6-95.el7.x86_64.rpm                                            | 1.2 MB  00:00:00
(3/5): httpd-tools-2.4.6-95.el7.x86_64.rpm                                      |  93 kB  00:00:00
(4/5): mailcap-2.1.41-2.el7.noarch.rpm                                          |  31 kB  00:00:00
(5/5): apr-util-1.5.2-6.el7.x86_64.rpm                                          |  92 kB  00:00:00
-------------------------------------------------------------------------------------------------------
Total                                                                   17 MB/s | 1.5 MB  00:00:00
Running transaction check
Running transaction test
Transaction test succeeded
Running transactionInstalling : apr-1.4.8-7.el7.x86_64                                                              1/5 Installing : apr-util-1.5.2-6.el7.x86_64                                                         2/5 Installing : httpd-tools-2.4.6-95.el7.x86_64                                                     3/5 Installing : mailcap-2.1.41-2.el7.noarch                                                         4/5 Installing : httpd-2.4.6-95.el7.x86_64                                                           5/5 Verifying  : httpd-tools-2.4.6-95.el7.x86_64                                                     1/5 Verifying  : mailcap-2.1.41-2.el7.noarch                                                         2/5 Verifying  : apr-1.4.8-7.el7.x86_64                                                              3/5 Verifying  : httpd-2.4.6-95.el7.x86_64                                                           4/5 Verifying  : apr-util-1.5.2-6.el7.x86_64                                                         5/5 Installed:httpd.x86_64 0:2.4.6-95.el7                                                                          Dependency Installed:apr.x86_64 0:1.4.8-7.el7        apr-util.x86_64 0:1.5.2-6.el7   httpd-tools.x86_64 0:2.4.6-95.el7  mailcap.noarch 0:2.1.41-2.el7  Complete!
3.基于nfs與yum倉庫的http部署
| 主機 | IP |
| apache(服務端) | 192.168.75.184 |
| server(客戶端) | 192.168.75.151 |
3.1安裝nfs-utils(服務端和客戶端都要安裝)
[root@apache ~]# yum install nfs-utils -y
3.2自建yum倉庫
3.2.1下載httpd及其所有依賴包
#download只下載不安裝httpd軟件包,--resolve是解決依賴
[root@apache ~]# yum  download  httpd --resolve --destdir /yum_repo/httpd/Packages
3.2.2查看結構
[root@apache ~]# tree  /yum_repo/httpd/
/yum_repo/httpd/
└── Packages├── apr-1.7.0-11.el9.x86_64.rpm├── apr-util-1.6.1-23.el9.x86_64.rpm├── apr-util-bdb-1.6.1-23.el9.x86_64.rpm├── apr-util-openssl-1.6.1-23.el9.x86_64.rpm├── httpd-2.4.57-5.el9.x86_64.rpm├── httpd-core-2.4.57-5.el9.x86_64.rpm├── httpd-filesystem-2.4.57-5.el9.noarch.rpm├── httpd-tools-2.4.57-5.el9.x86_64.rpm├── mod_http2-1.15.19-5.el9.x86_64.rpm├── mod_lua-2.4.57-5.el9.x86_64.rpm└── redhat-logos-httpd-90.4-2.el9.noarch.rpm
# createrepo為一堆 RPM 軟件包創建一個元數據倉庫(repodata/目錄),使其成為一個可被 yum或 dnf包管理器識別和使用的正式軟件倉庫。
3.2.3安裝createrepo并執行
[root@apache ~]# yum install  createrepo_c -y
[root@apache ~]# createrepo  /yum_repo/httpd/
3.2.4查看拉去到的httpd包
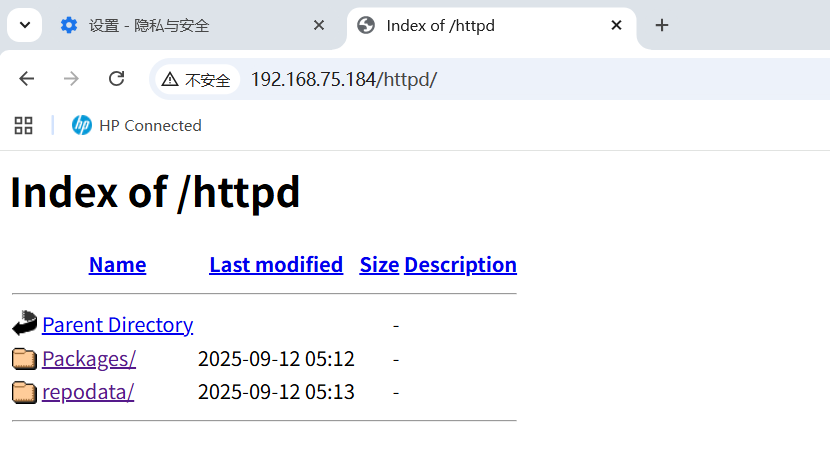
[root@apache ~]# tree -L 1  /yum_repo/httpd/
/yum_repo/httpd/
├── Packages
└── repodata
3.2.5編輯httpd庫
[root@apache ~]# vim   /etc/yum.repos.d/httpd.repo
[httpd]
name=httpd
baseurl=file:///yum_repo/httpd
gpgcheck=0
3.2.6查看是否有Packages和repodata
[root@apache ~]# ll /yum_repo/httpd3.3編輯配置文件并檢測重啟
3.3.1編輯配置文件
[root@apache ~]# vim /etc/httpd/conf.d/repo.conf
<directory /yum_repo>
DirectoryIndex disabled  #禁用默認的索引文件index.html
5
options indexes followsymlinks  #indexes表示顯示目錄內容列表,followsymlinks表示追蹤軟鏈接
6
allowoverride none  #none表示不允許讀取.htaccess文件中設置的options值,實踐中不要使用.htaccess文件,會降低性能
7
require all granted  #允許所有主機通過
</directory>
<VirtualHost 192.168.75.184:80>DocumentRoot  /yum_repo
</VirtualHost>
3.3.2檢測并重啟
[root@apache ~]# httpd -t
Syntax OK
[root@apache ~]# systemctl restart httpd
3.3.3在瀏覽器輸入IP地址
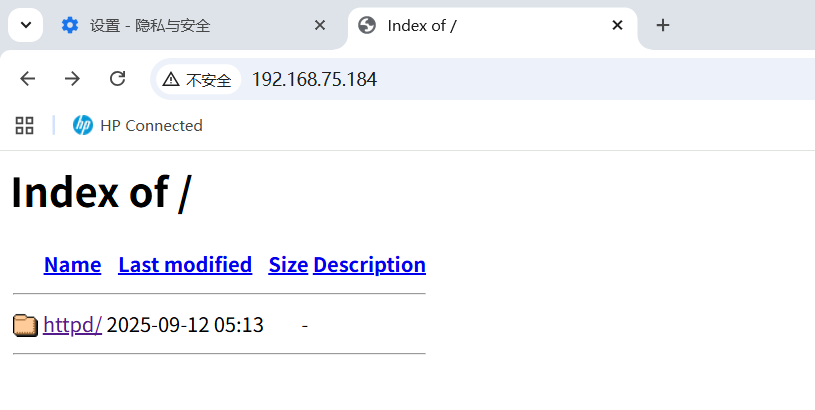
注意:要將歡迎界面備份,使其失效
[root@apache ~]# mv /etc/httpd/conf.d/welcome.conf {,.bak}3.4編輯nfs配置文件
[root@apache ~]# vim /etc/exports
/yum_repo/httpd   *(rw,sync,all_squash)各參數解釋:
#*表示允許所有客戶端訪問
#rw:讀寫權限
#sync:同步模式
#all_squash:將所有訪問的客戶端用戶映射為匿名用戶
3.5重啟服務(必須要先重啟rpcbind在重啟nfs服務)
[root@apache ~]# systemctl enable --now rpcbind
[root@apache ~]# systemctl enable --now nfs-server.service
Created symlink /etc/systemd/system/multi-user.target.wants/nfs-server.service → /usr/lib/systemd/system/nfs-server.service.
3.6客戶端查看是否收到
[root@server ~]# showmount -e 192.168.75.184
Export list for 192.168.75.184:
/yum_repo/httpd *
3.7創建文件并掛載服務端發來的文件
[root@server ~]# mkdir /httpd
[root@server ~]# mount -t nfs 192.168.75.184:/yum_repo/httpd  /httpd
[root@server ~]# cd /httpd/
[root@server httpd]# ls
Packages  repodata
3.8編寫客戶端yum倉庫
[root@server yum.repos.d]# vim httpd.repo
[httpd]
name=httpd
baseurl=http://192.168.75.184/httpd   #httpd包所對應的路徑
gpgcheck=0
3.9清除緩存
[root@server yum.repos.d]# yum makecache
正在更新 Subscription Management 軟件倉庫。
無法讀取客戶身份本系統尚未在權利服務器中注冊。可使用 subscription-manager 進行注冊。httpd                                                                                                                                                                            1.9 MB/s | 3.0 kB     00:00
元數據緩存已建立。
3.10測試
[root@server yum.repos.d]# yum install httpd -y
正在更新 Subscription Management 軟件倉庫。
無法讀取客戶身份本系統尚未在權利服務器中注冊。可使用 subscription-manager 進行注冊。httpd                                                                                                                                                                             62 kB/s | 1.4 kB     00:00
依賴關系解決。
無需任何處理。
完畢!


)


)


![第十四屆藍橋杯青少組C++選拔賽[2023.1.15]第二部分編程題(4 、移動石子)](http://pic.xiahunao.cn/第十四屆藍橋杯青少組C++選拔賽[2023.1.15]第二部分編程題(4 、移動石子))
