一、負載均衡核心概念
1.1 負載均衡定義
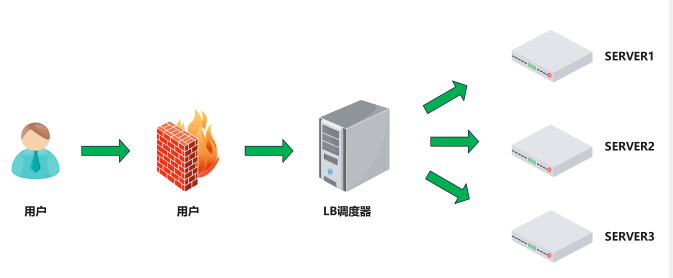
負載均衡(Load Balance,簡稱LB)是一種基于硬件設備或軟件服務的高可用反向代理技術。它將特定業務(如Web服務、網絡流量)分發到后端的一個或多個服務器/設備,從而提升業務并發處理能力、保障高可用性,并支持業務水平動態擴展。
阿里云SLB介紹 :SLB技術原理淺析-阿里云開發者社區
1.2 負載均衡的核心價值
-
動態水平擴展:Web服務器擴容對用戶無感知
-
突破單點瓶頸:提升業務并發處理能力
-
節約公網IP:降低IT成本支出
-
隱藏服務器IP:增強內部服務器安全性
-
配置簡單:固定格式的配置文件
-
功能豐富:支持四層/七層代理、動態下線主機
-
高性能:支撐數萬至數十萬并發
1.3 負載均衡類型
1.3.1 硬件負載均衡
-
、F5(美國F5網絡公司)
-
Netscaler(美國思杰公司)
-
Array(華耀科技)
-
AD-1000(深信服)
1.3.2 四層負載均衡(L4)
-
基于
IP+Port轉發流量 -
流量請求進行NAT處理后轉發
-
記錄TCP/UDP連接與服務器的映射關系
常用軟件: -
LVS(重量級)
-
Nginx(輕量級,通過
upstream模塊實現) -
HAProxy(模擬四層轉發)
-

1.3.3 七層負載均衡(L7)
-
 通過虛擬URL或主機IP識別流量,解析應用層信息
 -
代理客戶端與后端服務器建立連接(如Nginx雙向TCP連接)
-
常用軟件:
-
Nginx(基于HTTP協議,通過
proxy_pass實現) -
HAProxy(支持會話保持、路徑轉移等高級功能)
-
1.3.4 四層與七層的核心區別
| 特性 | 四層負載均衡 | 七層負載均衡 |
|---|---|---|
| 工作層級 | 傳輸層及以下 | 應用層及以下 |
| 性能 | 更高(無需解析報文內容) | 較低(需解析應用層數據) |
| 原理 | 基于IP+Port | 基于虛擬URL/主機IP |
| 功能類比 | 類似路由器 | 類似代理服務器 |
| 安全性 | 無法防御DDoS攻擊 | 可防御SYN Cookie/Flood攻擊 |
二、HAProxy深度解析
HAProxy由Willy Tarreau于2000年使用C語言開發,具備以下特性:
-
高性能TCP/HTTP負載均衡(支持萬級并發)
-
支持Cookie持久化、自動故障切換
-
兼容正則表達式及Web狀態統計
-
官方資源:
-
企業版:https://www.haproxy.com
-
社區版:http://www.haproxy.org
-
GitHub:https://github.com/haprox
-
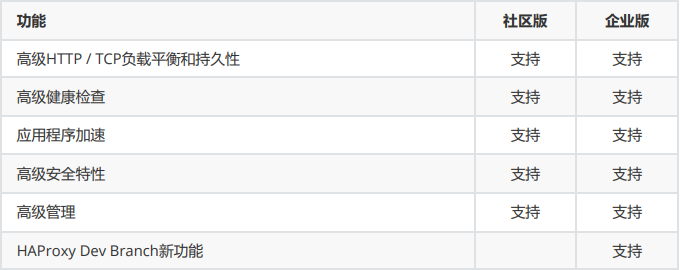
企業版 vs 社區版功能對比

三、HAProxy安裝與配置詳解
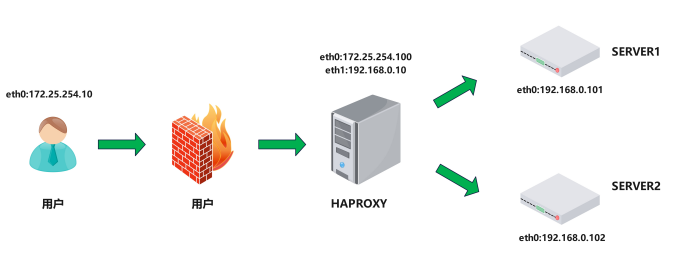
3.1.實驗環境

3.2.軟件安裝
軟件包下載地址
https://github.com/haproxy/wiki/wiki/Packages
安裝軟件包:
haproxy ~]# dnf install haproxy -y
查看版本

haproxy軟件基本信息
軟件安裝包: haproxy-2.4.22-3.el9_3.x86_64.rpm
啟動文件: /lib/systemd/system/haproxy.service
主配置目錄: /etc/haproxy/
主配置文件: /etc/haproxy/haproxy.cfg
子配置目錄: /etc/haproxy/conf.d
3.3.haproxy的基本配置信息
官方文檔:http://cbonte.github.io/haproxy-dconv/
HAProxy 的配置文件haproxy.cfg由兩大部分組成,分別是:
global:全局配置段
進程及安全配置相關的參數
性能調整相關參數
Debug參數
proxies:代理配置段
defaults:為frontend, backend, listen提供默認配置
frontend:前端,相當于nginx中的server {}
backend:后端,相當于nginx中的upstream {}
listen:同時擁有前端和后端配置,配置簡單,生產推薦使用
3.3.1.global配置
3.3.1.1 global 配置參數說明
global log 127.0.0.1 local2 #定義全局的syslog服務器;日志服務器需要開啟UDP協 議,最多可以定義兩個
chroot /var/lib/haproxy #鎖定運行目錄
pidfile /var/run/haproxy.pid #指定pid文件
maxconn 100000 #指定最大連接數
user haproxy #指定haproxy的運行用戶
group haproxy #指定haproxy的運行組
daemon #指定haproxy以守護進程方式運行
# turn on stats unix socket
stats socket /var/lib/haproxy/stats #指定haproxy的套接字文件
nbproc 2 #指定haproxy的work進程數量,默認是1個
cpu-map 1 0 #指定第一個work綁定第一個cpu核心
cpu-map 2 1 #指定第二個work綁定第二個cpu核心
nbthread 2 #指定haproxy的線程數量,默認每個進程一個線 程,此參數與nbproc互斥
maxsslconn 100000 #每個haproxy進程ssl最大連接數,用于haproxy 配置了證書的場景下
maxconnrate 100 #指定每個客戶端每秒建立連接的最大數量
3.3.1 global全局配置
globallog 127.0.0.1 local2 # 定義syslog服務器chroot /var/lib/haproxy # 鎖定運行目錄pidfile /var/run/haproxy.pid # 指定PID文件maxconn 100000 # 最大連接數user haproxy # 運行用戶group haproxy # 運行組daemon # 守護進程模式stats socket /var/lib/haproxy/stats # 狀態套接字文件nbproc 2 # 工作進程數cpu-map 1 0 # 進程1綁定CPU0cpu-map 2 1 # 進程2綁定CPU1nbthread 2 # 每個進程的線程數maxsslconn 100000 # 每進程SSL最大連接數maxconnrate 100 # 每秒最大新建連接數3.3.1.2 多進程和線程
多進程和socket文件配置如下:
haproxy ~]# vim /etc/haproxy/haproxy.cfg...上面內容省略...globallog 127.0.0.1 local2chroot /var/lib/haproxypidfile /var/run/haproxy.pidmaxconn 100000user haproxygroup haproxydaemon# turn on stats unix socketstats socket /var/lib/haproxy/haproxy.sock1 mode 600 level admin process 1 # 啟用多個sock文件stats socket /var/lib/haproxy/haproxy.sock2 mode 600 level admin process 2nbproc 2 #啟用多進程cpu-map 1 0 #進程和cpu核心綁定防止cpu抖動從而減少系統資源消耗cpu-map 2 1 #2 表示第二個進程,1表示第二個cpu核心...下面內容省略 ..查看多進程信息
haproxy haproxy]# pstree -p | grep haproxy
|-haproxy(4816)-+-haproxy(4820)
|??????????????????????????? `-haproxy(4821)
啟用多線程
haproxy ~]# vim /etc/haproxy/haproxy.cfg...上面內容省略...globallog 127.0.0.1 local2chroot /var/lib/haproxypidfile /var/run/haproxy.pidmaxconn 100000user haproxygroup haproxydaemon# turn on stats unix socketstats socket /var/lib/haproxy/haproxy.sock1 mode 600 level admin process 1 # 啟用多個sock文件stats socket /var/lib/haproxy/haproxy.sock2 mode 600 level admin process 2nbproc 2 #啟用多進程cpu-map 1 0 #進程和cpu核心綁定防止cpu抖動從而減少系統資源消耗cpu-map 2 1 #2 表示第二個進程,1表示第二個cpu核心nbthread 2 #啟用多線程...下面內容省略 ..多線程對比
未開啟多線程
haproxy ~]# cat /proc/xxxx(haproxy子進程id)/status
...上面內容省略...
Threads: 1
...下面內容省略...
開啟后
haproxy ~]# cat /proc/xxxx(haproxy子進程id)/status
...上面內容省略...
Threads: 2
...下面內容省略...
?
3.3.2 proxies配置
3.3.2.1.proxies參數說明proxies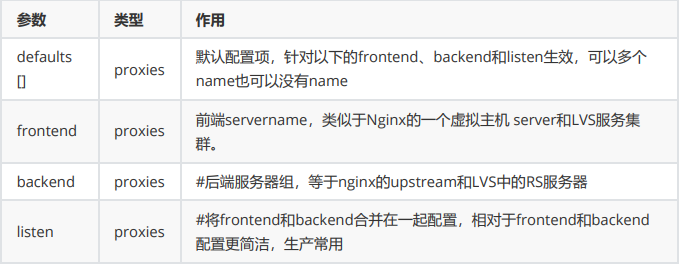
name字段只能使用大小寫字母,數字,‘-’(dash),'_‘(underscore),'.' (dot)和 ':'(colon),并且嚴格 區分大小寫
3.3.2.2 Proxies配置-defaults
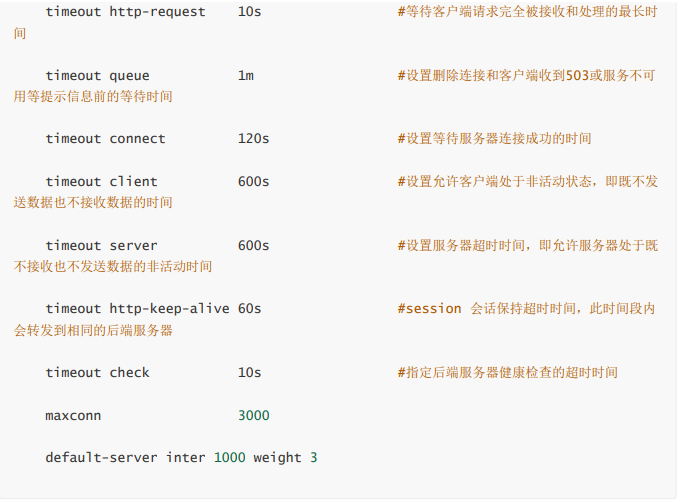

3.3.2.3 Proxies配置-frontend
frontend 配置參數:
bind:指定HAProxy的監聽地址,可以是IPV4或IPV6,可以同時監聽多個IP或端口,可同時用于listen字 段中
#格式:
bind [<address>]:<port_range> ?[, ...] [param*]
#注意:如果需要綁定在非本機的IP,需要開啟內核參數:net.ipv4.ip_nonlocal_bind=1
backlog #針對所有server配置,當前端服務器的連接數達到上限后的后援隊列長度,注意:不 支持backend
frontend 配置示例:
haproxy ~]# vim /etc/haproxy/haproxy.cfg...上面內容省略...frontend lee-webserver-80bind 172.25.254.100:80mode httpuse_backend lee-webserver-80-RS #調用backend的名稱...下面內容省略...3.3.2.4 Proxies配置-backend
定義一組后端服務器,backend服務器將被frontend進行調用。
注意: backend 的名稱必須唯一,并且必須在listen或frontend中事先定義才可以使用,否則服務無法 啟動
mode http|tcp #指定負載協議類型,和對應的frontend必須一致
option #配置選項
server #定義后端real server,必須指定IP和端口
注意:option后面加 httpchk,smtpchk,mysql-check,pgsql-check,ssl-hello-chk方法,可用于實現更 多應用層檢測功能。
server 配置

代碼示例:
haproxy ~]# vim /etc/haproxy/haproxy.cfg...上面內容省略...backend lee-webserver-80-RSmode httpserver web1 192.168.0.101:80 check inter 3s fall 3 rise 5server web2 192.168.0.102:80 check inter 3s fall 3 rise 5...上面內容省略...測試效果:

3.3.2.5 Proxies配置-listen 簡化配置
使用listen替換 frontend和backend的配置方式,可以簡化設置,通常只用于TCP協議的應用 listen配置示例:
haproxy ~]# vim /etc/haproxy/haproxy.cfg...上面內容省略...listen webserver_80bind 172.25.254.100:80mode httpoption forwardforserver webserver1 192.168.0.101:80 check inter 3s fall 3 rise 5server webserver2 192.168.0.102:80 check inter 3s fall 3 rise 5...上面內容省略...3.4.socat 工具
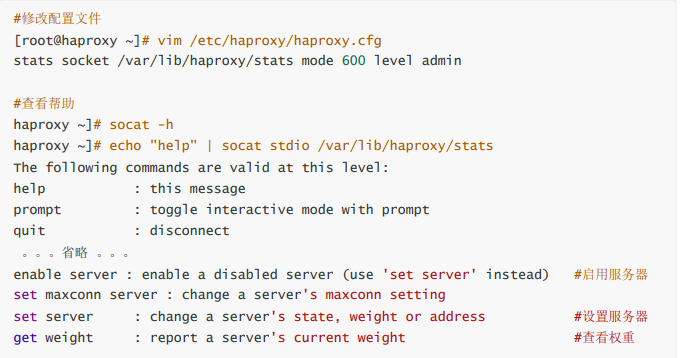
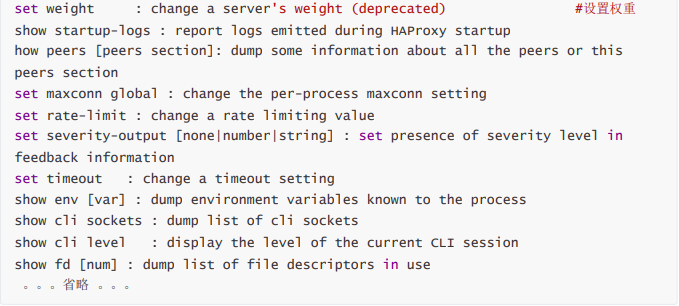
對服務器動態權重和其它狀態可以利用 socat工具進行調整,Socat 是 Linux 下的一個多功能的網絡工 具,名字來由是Socket CAT,相當于netCAT的增強版.Socat 的主要特點就是在兩個數據流之間建立雙向 通道,且支持眾多協議和鏈接方式。如 IP、TCP、 UDP、IPv6、Socket文件等
范例:利用工具socat 對服務器動態權重調整
常用示例:
#查看haproxy狀態
[root@haproxy ~]# echo "show info" | socat stdio /var/lib/haproxy/statsName: HAProxyVersion: 2.4.22-f8e3218Release_date: 2023/02/14Nbthread: 1Nbproc: 1Process_num: 1Pid: 33542Uptime: 0d 0h03m43sUptime_sec: 223Memmax_MB: 0PoolAlloc_MB: 0 #查看集群狀態[root@haproxy ~]# echo "show servers state" | socat stdio /var/lib/haproxy/stats 1# be_id be_name srv_id srv_name srv_addr srv_op_state srv_admin_state srv_uweightsrv_iweight srv_time_since_last_change srv_check_status srv_check_resultsrv_check_health srv_check_state srv_agent_state bk_f_forced_id srv_f_forced_idsrv_fqdn srv_port srvrecord srv_use_ssl srv_check_port srv_check_addrsrv_agent_addr srv_agent_port2 webcluster 1 web1 172.25.254.20 2 0 2 2 188 6 3 7 6 0 0 0 - 80 - 0 0 - - 02 webcluster 2 web2 172.25.254.30 2 0 1 1 188 6 3 7 6 0 0 0 - 80 - 0 0 - - 04 static 1 static 127.0.0.1 0 0 1 1 187 8 2 0 6 0 0 0 - 4331 - 0 0 - - 05 app 1 app1 127.0.0.1 0 0 1 1 187 8 2 0 6 0 0 0 - 5001 - 0 0 - - 05 app 2 app2 127.0.0.1 0 0 1 1 187 8 2 0 6 0 0 0 - 5002 - 0 0 - - 05 app 3 app3 127.0.0.1 0 0 1 1 186 8 2 0 6 0 0 0 - 5003 - 0 0 - - 05 app 4 app4 127.0.0.1 0 0 1 1 186 8 2 0 6 0 0 0 - 5004 - 0 0 - - 0[root@haproxy ~]# echo "show servers state" | socat stdio /var/lib/haproxy/stats 1# be_id be_name srv_id srv_name srv_addr srv_op_state srv_admin_state srv_uweightsrv_iweight srv_time_since_last_change srv_check_status srv_check_resultsrv_check_health srv_check_state srv_agent_state bk_f_forced_id srv_f_forced_idsrv_fqdn srv_port srvrecord srv_use_ssl srv_check_port srv_check_addrsrv_agent_addr srv_agent_port2 webcluster 1 web1 172.25.254.20 2 0 2 2 188 6 3 7 6 0 0 0 - 80 - 0 0 - - 02 webcluster 2 web2 172.25.254.30 2 0 1 1 188 6 3 7 6 0 0 0 - 80 - 0 0 - - 04 static 1 static 127.0.0.1 0 0 1 1 187 8 2 0 6 0 0 0 - 4331 - 0 0 - - 05 app 1 app1 127.0.0.1 0 0 1 1 187 8 2 0 6 0 0 0 - 5001 - 0 0 - - 05 app 2 app2 127.0.0.1 0 0 1 1 187 8 2 0 6 0 0 0 - 5002 - 0 0 - - 05 app 3 app3 127.0.0.1 0 0 1 1 186 8 2 0 6 0 0 0 - 5003 - 0 0 - - 05 app 4 app4 127.0.0.1 0 0 1 1 186 8 2 0 6 0 0 0 - 5004 - 0 0 - - 0#查看集群權重
[root@haproxy ~]# echo get weight webcluster/web1 | socat stdio /var/lib/haproxy/stats2 (initial 2)[root@haproxy ~]# echo get weight webcluster/web2 | socat stdio /var/lib/haproxy/stats1 (initial 1)#設置權重
[root@haproxy ~]# echo "set weight webcluster/web1 1 " | socat stdio /var/lib/haproxy/stats[root@haproxy ~]# echo "set weight webcluster/web1 2 " | socat stdio /var/lib/haproxy/stats下線后端服務器
[root@haproxy ~]# echo "disable server webserver_80/webserver1 " | socat stdio /var/lib/haproxy/stats#上線后端服務器
[root@haproxy ~]# echo "enable server webserver_80/webserver1 " | socat stdio /var/lib/haproxy/stats針對多進程處理方法
如果開啟多進程那么我們在對進程的sock文件進行操作時其對進程的操作時隨機的
如果需要指定操作進程那么需要用多soct文件方式來完成
haproxy ~]# vim /etc/haproxy/haproxy.cfg...上面內容省略...stats socket /var/lib/haproxy/stats1 mode 600 level admin process 1stats socket /var/lib/haproxy/stats2 mode 600 level admin process 2nbproc 2cpu-map 1 0cpu-map 2 1...上面內容省略..這樣每個進程就會有單獨的sock文件來進行單獨管理
[root@haproxy ~]# ll /var/lib/haproxy/總用量 0srw------- 1 root root 0 8月 8 13:43 statssrw------- 1 root root 0 8月 8 13:46 stats1srw------- 1 root root 0 8月 8 13:46 stats23.5 haproxy的狀態界面
haproxy ~]# vim /etc/haproxy/haproxy.cfg...上面內容省略...listen statsmode httpbind 0.0.0.0:8888stats enablelog globalstats uri /haproxy-statusstats auth lee:lee...下面內容省略...四.haproxy的算法
HAProxy通過固定參數 balance 指明對后端服務器的調度算法
balance參數可以配置在listen或backend選項中。
HAProxy的調度算法分為靜態和動態調度算法
有些算法可以根據參數在靜態和動態算法中相互轉換。
4.1 靜態算法
靜態算法:按照事先定義好的規則輪詢公平調度,不關心后端服務器的當前負載、連接數和響應速度 等,且無法實時修改權重(只能為0和1,不支持其它值),只能靠重啟HAProxy生效。
4.1.1 static-rr:基于權重的輪詢調度
不支持運行時利用socat進行權重的動態調整(只支持0和1,不支持其它值)
不支持端服務器慢啟動
其后端主機數量沒有限制,相當于LVS中的 wrr
慢啟動是指在服務器剛剛啟動上不會把他所應該承擔的訪問壓力全部給它,而是先給一部分,當沒 問題后在給一部分
haproxy ~]# vim /etc/haproxy/haproxy.cfg...上面內容省略...listen webserver_80bind 172.25.254.100:80mode httpbalance static-rrserver webserver1 192.168.0.101:80 weight 2 check inter 3s fall 3 rise 5server webserver2 192.168.0.102:80 weight 1 check inter 3s fall 3 rise 5...上面內容省略...


4.1.2 first
根據服務器在列表中的位置,自上而下進行調度
其只會當第一臺服務器的連接數達到上限,新請求才會分配給下一臺服務
其會忽略服務器的權重設置
不支持用socat進行動態修改權重,可以設置0和1,可以設置其它值但無效
示例:
haproxy ~]# vim /etc/haproxy/haproxy.cfg...上面內容省略...listen webserver_80bind 172.25.254.100:80mode http#balance static-rrbalance firstserver webserver1 192.168.0.101:80 weight 2 check inter 3s fall 3 rise 5server webserver2 192.168.0.102:80 weight 1 check inter 3s fall 3 rise 5...上面內容省略...
測試效果:

4.2 動態算法
動態算法
基于后端服務器狀態進行調度適當調整,
新請求將優先調度至當前負載較低的服務器
權重可以在haproxy運行時動態調整無需重啟
4.2.1 roundrobin
1. 基于權重的輪詢動態調度算法,
2. 支持權重的運行時調整,不同于lvs中的rr輪訓模式,
3. HAProxy中的roundrobin支持慢啟動(新加的服務器會逐漸增加轉發數),
4. 其每個后端backend中最多支持4095個real server,
5. 支持對real server權重動態調整,
6. roundrobin為默認調度算法,此算法使用廣泛
示例:
haproxy ~]# vim /etc/haproxy/haproxy.cfg...上面內容省略...listen webserver_80bind 172.25.254.100:80mode http#balance static-rr#balance firstbalance roundrobinserver webserver1 192.168.0.101:80 weight 2 check inter 3s fall 3 rise 5server webserver2 192.168.0.102:80 weight 1 check inter 3s fall 3 rise 5...上面內容省略...動態調整權重
[root@haproxy ~]# echo "set weight webserver_80/webserver1 2" | socat stdio /var/lib/haproxy/haproxy.sock測試效果:

4.2.2 leastconn
leastconn加權的最少連接的動態
支持權重的運行時調整和慢啟動,即:根據當前連接最少的后端服務器而非權重進行優先調度(新客戶 端連接)
比較適合長連接的場景使用,比如:MySQL等場景。
示例:
haproxy ~]# vim /etc/haproxy/haproxy.cfg...上面內容省略...listen webserver_80bind 172.25.254.100:80mode http#balance static-rr#balance first#balance roundrobinbalance leastconnserver webserver1 192.168.0.101:80 weight 2 check inter 3s fall 3 rise 5server webserver2 192.168.0.102:80 weight 1 check inter 3s fall 3 rise 5...上面內容省略...4.3 其他算法
其它算法即可作為靜態算法,又可以通過選項成為動態算法
4.3.1 source
源地址hash,基于用戶源地址hash并將請求轉發到后端服務器,后續同一個源地址請求將被轉發至同一 個后端web服務器。此方式當后端服務器數據量發生變化時,會導致很多用戶的請求轉發至新的后端服 務器,默認為靜態方式,但是可以通過hash-type支持的選項更改這個算法一般是在不插入Cookie的TCP 模式下使用,也可給拒絕會話cookie的客戶提供最好的會話粘性,適用于session會話保持但不支持 cookie和緩存的場景源地址有兩種轉發客戶端請求到后端服務器的服務器選取計算方式,分別是取模法 和一致性hash
示例:
haproxy ~]# vim /etc/haproxy/haproxy.cfg...上面內容省略...listen webserver_80bind 172.25.254.100:80mode http#balance static-rr#balance first#balance roundrobin#balance leastconnbalance sourceserver webserver1 192.168.0.101:80 weight 2 check inter 3s fall 3 rise 5server webserver2 192.168.0.102:80 weight 1 check inter 3s fall 3 rise 5...上面內容省略...
測試:
[root@node10 ~]# for N in {1..6}; do curl 172.25.254.100; doneRS1 server - 192.168.0.102RS1 server - 192.168.0.102RS1 server - 192.168.0.102RS1 server - 192.168.0.102RS1 server - 192.168.0.102RS1 server - 192.168.0.102
如果訪問客戶端時一個家庭,那么所有的家庭的訪問流量都會被定向到一臺服務器,這時source算?法的缺陷
4.3.1.1 map-base 取模法
map-based:取模法,對source地址進行hash計算,再基于服務器總權重的取模,最終結果決定將此請 求轉發至對應的后端服務器。
此方法是靜態的,即不支持在線調整權重,不支持慢啟動,可實現對后端服務器均衡調度
缺點是當服務器的總權重發生變化時,即有服務器上線或下線,都會因總權重發生變化而導致調度結果 整體改變
hash-type 指定的默值為此算法
所謂取模運算,就是計算兩個數相除之后的余數,10%7=3, 7%4=3
map-based算法:基于權重取模,hash(source_ip)%所有后端服務器相加的總權重
比如當源hash值時1111,1112,1113,三臺服務器a b c的權重均為1,
即abc的調度標簽分別會被設定為 0 1 2(1111%3=1,1112%3=2,1113%3=0)
1111 ----- > nodeb
1112 ------> nodec
1113 ------> nodea
如果a下線后,權重數量發生變化
1111%2=1,
1112%2=0,
1113%2=1
1112和1113被調度到的主機都發生變化,這樣會導致會話丟失
取模法配置示例:
haproxy ~]# vim /etc/haproxy/haproxy.cfg...上面內容省略...listen webserver_80bind 172.25.254.100:80mode http#balance static-rr#balance first#balance roundrobin#balance leastconn#balance sourcebalance sourceserver webserver1 192.168.0.101:80 weight 1 check inter 3s fall 3 rise 5server webserver2 192.168.0.102:80 weight 1 check inter 3s fall 3 rise 5...上面內容省略...?#不支持動態調整權重值
[root@haproxy ~]# echo "set weight webserver_80/webserver1 2" | socat stdio /var/lib/haproxy/haproxy.sockBackend is using a static LB algorithm and only accepts weights '0%' and '100%'.#只能動態上線和下線
[root@haproxy ~]# echo "set weight webserver_80/webserver1 0" | socat stdio /var/lib/haproxy/haproxy.sock[root@haproxy ~]# echo "get weight webserver_80/webserver1" | socat stdio /var/lib/haproxy/haproxy.sock0 (initial 1)4.3.1.2
一致性hash 一致性哈希,當服務器的總權重發生變化時,對調度結果影響是局部的,不會引起大的變動hash(o) mod n
該hash算法是動態的,支持使用 socat等工具進行在線權重調整,支持慢啟動
算法:
1、后端服務器哈希環點keyA=hash(后端服務器虛擬ip)%(2^32)
2、客戶機哈希環點key1=hash(client_ip)%(2^32) 得到的值在[0---4294967295]之間,
3、將keyA和key1都放在hash環上,將用戶請求調度到離key1最近的keyA對應的后端服務器

hash環偏斜問題
增加虛擬服務器IP數量,比如:一個后端服務器根據權重為1生成1000個虛擬IP,再hash。而后端服務器權 重為2則生成2000的虛擬IP,再bash,最終在hash環上生成3000個節點,從而解決hash環偏斜問題
hash對象
Hash對象到后端服務器的映射關系:
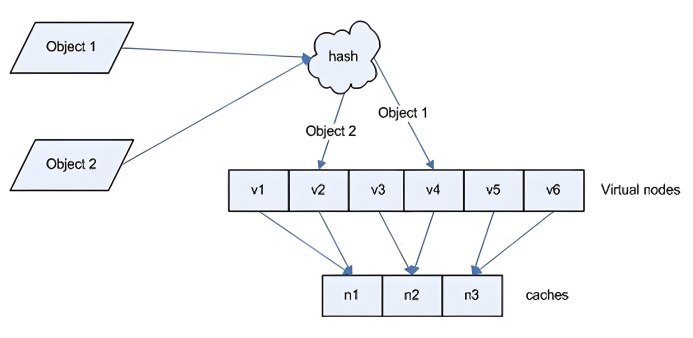
一致性hash示意圖
后端服務器在線與離線的調度方式

一致性hash配置示例
haproxy ~]# vim /etc/haproxy/haproxy.cfg...上面內容省略...listen webserver_80bind 172.25.254.100:80mode http#balance static-rr#balance first#balance roundrobin#balance leastconn#balance sourcebalance sourcehash-type consistentserver webserver1 192.168.0.101:80 weight 1 check inter 3s fall 3 rise 5server webserver2 192.168.0.102:80 weight 1 check inter 3s fall 3 rise 5...上面內容省略...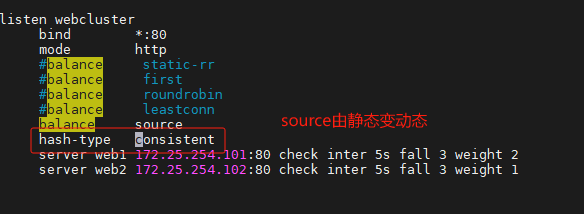
4.3.2 uri
基于對用戶請求的URI的左半部分或整個uri做hash,再將hash結果對總權重進行取模后 根據最終結果將請求轉發到后端指定服務器
適用于后端是緩存服務器場景
默認是靜態算法,也可以通過hash-type指定map-based和consistent,來定義使用取模法還是一致性 hash
注意:此算法基于應用層,所以只支持?mode http?,不支持?mode tcp
<scheme>://<user>:<password>@<host>:<port>/<path>;<params>?<query>#<frag>
左半部分:/<path>;<params>
整個uri:/<path>;<params>?<query>#<frag>

4.3.2.1 uri 取模法配置示例
haproxy ~]# vim /etc/haproxy/haproxy.cfg...上面內容省略...listen webserver_80bind 172.25.254.100:80mode http#balance static-rr#balance first#balance roundrobin#balance leastconn#balance source#balance sourcebalance uriserver webserver1 192.168.0.101:80 weight 1 check inter 3s fall 3 rise 5server webserver2 192.168.0.102:80 weight 1 check inter 3s fall 3 rise 5...上面內容省略...4.3.2.2 uri 一致性hash配置示例
haproxy ~]# vim /etc/haproxy/haproxy.cfg...上面內容省略...listen webserver_80bind 172.25.254.100:80mode http#balance static-rr#balance first#balance roundrobin#balance leastconn#balance source#balance sourcebalance urihash-type consistentserver webserver1 192.168.0.101:80 weight 1 check inter 3s fall 3 rise 5server webserver2 192.168.0.102:80 weight 1 check inter 3s fall 3 rise 5...上面內容省略...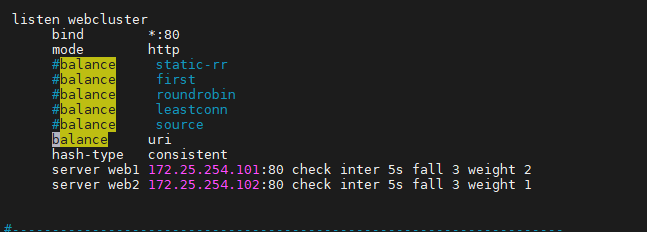
訪問測試:
訪問不同的uri,確認可以將用戶同樣的請求轉發至相同的服務器
[root@rs1 ~]# echo RS1 192.168.0.101 index1 > /var/www/html/index1.html[root@rs1 ~]# echo RS1 192.168.0.101 index2 > /var/www/html/index2.html[root@rs1 ~]# echo RS1 192.168.0.101 index3 > /var/www/html/index3.html[root@rs2 ~]# echo RS1 192.168.0.102 index1 > /var/www/html/index1.html[root@rs2 ~]# echo RS1 192.168.0.102 index2 > /var/www/html/index2.html[root@rs2 ~]# echo RS1 192.168.0.102 index3 > /var/www/html/index3.html
[root@node10 ~]# curl 172.25.254.100/index.htmlRS2 server - 192.168.0.102[root@node10 ~]# curl 172.25.254.100/index1.htmlRS1 192.168.0.101 index1[root@node10 ~]# curl 172.25.254.100/index2.htmlRS1 192.168.0.102 index2[root@node10 ~]# curl 172.25.254.100/index3.htmlRS1 192.168.0.101 index3
4.3.3 url_param
url_param對用戶請求的url中的 params 部分中的一個參數key對應的value值作hash計算,并由服務器 總權重相除以后派發至某挑出的服務器,后端搜索同一個數據會被調度到同一個服務器,多用與電商
通常用于追蹤用戶,以確保來自同一個用戶的請求始終發往同一個real server
如果無沒key,將按roundrobin算法
#假設: url =?http://www.timinglee.com/foo/bar/index.php?key=value
#則: host = "www.timinglee.com"
url_param = "key=value"
4.3.3.1 url_param取模法配置示例
haproxy ~]# vim /etc/haproxy/haproxy.cfg...上面內容省略...listen webserver_80bind 172.25.254.100:80mode http#balance static-rr#balance first#balance roundrobin#balance leastconn#balance source#balance source#balance uribalance url_param name,userid #支持對多個url_param hashtserver webserver1 192.168.0.101:80 weight 1 check inter 3s fall 3 rise 5server webserver2 192.168.0.102:80 weight 1 check inter 3s fall 3 rise 5...上面內容省略...4.3.3.2 url_param一致性hash配置示例
haproxy ~]# vim /etc/haproxy/haproxy.cfg...上面內容省略...listen webserver_80bind 172.25.254.100:80mode http#balance static-rr#balance first#balance roundrobin#balance leastconn#balance source#balance source#balance uribalance url_param name,userid #支持對多個url_param hashthash-type consistentserver webserver1 192.168.0.101:80 weight 1 check inter 3s fall 3 rise 5server webserver2 192.168.0.102:80 weight 1 check inter 3s fall 3 rise 5...上面內容省略...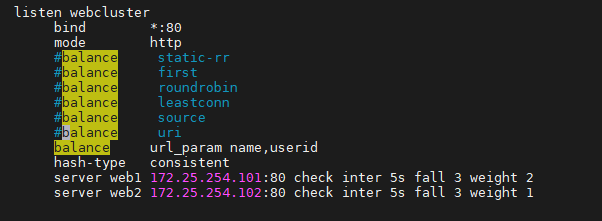
測試訪問
[root@node10 ~]# curl 172.25.254.100/index.html?name=timingleeRS1 192.168.0.101 index3[root@node10 ~]# curl 172.25.254.100/index.html?name=timingleeRS1 192.168.0.101 index3[root@node10 ~]# curl 172.25.254.100/index.html?userid=leeRS1 192.168.0.102 index3[root@node10 ~]# curl 172.25.254.100/index.html?userid=leeRS1 192.168.0.102 index3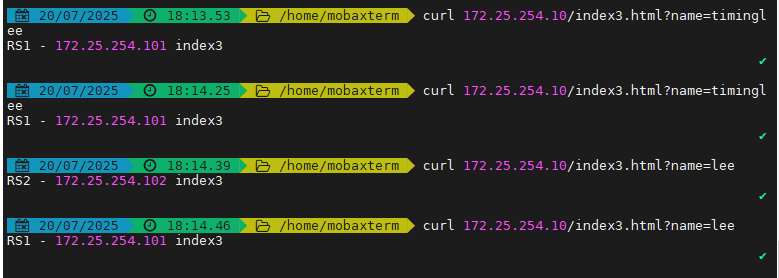
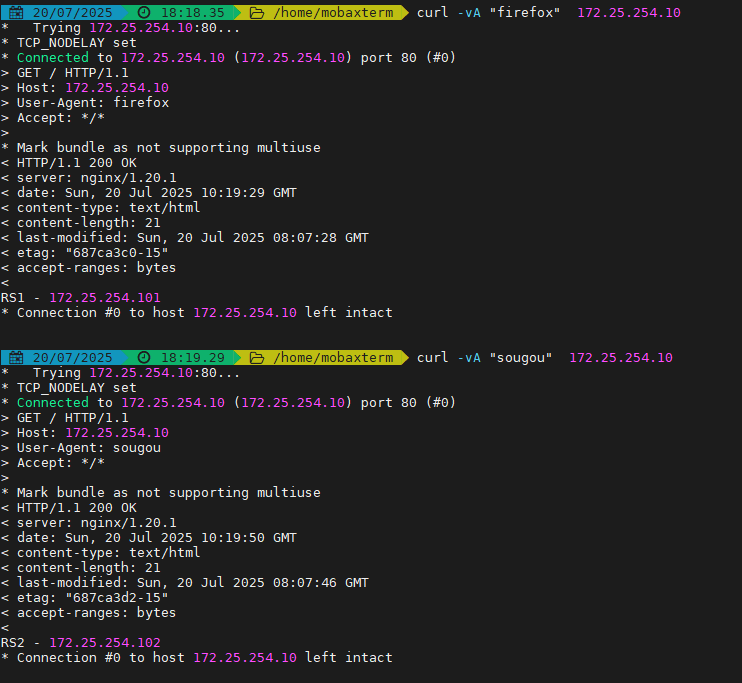
4.3.6 算法總結
#靜態
static-rr--------->tcp/http
first------------->tcp/http
#動態
roundrobin-------->tcp/http
leastconn--------->tcp/http
random------------>tcp/http
#以下靜態和動態取決于hash_type是否consistent
source------------>tcp/http
Uri--------------->http
url_param--------->http
hdr--------------->http
4.3.7 各算法使用場景
first #使用較少
static-rr #做了session共享的web集群
roundrobin random leastconn #數據庫
source
#基于客戶端公網IP的會話保持
Uri--------------->http #緩存服務器,CDN服務商,藍汛、百度、阿里云、騰訊
url_param--------->http #可以實現session保持
hdr #基于客戶端請求報文頭部做下一步處理


)


)


)
)
