1.Spring Boot返回Json數據及數據封裝
1.?Controller 中使用@RestController注解即可返回 Json 格式的數據
首先看看@RestController注解包含了什么東西,?@ResponseBody?注解是將返回的數據結構轉換為 Json 格式
@Target({ElementType.TYPE})
@Retention(RetentionPolicy.RUNTIME)
@Documented
@Controller
@ResponseBody
public @interface RestController {@AliasFor(annotation = Controller.class)String value() default "";
}
Spring Boot 中默認使用的 json 解析框架是 jackson
1.1 Spring Boot 默認對Json的處理
1.1.1 創建實體類
@Data
public class Student {public int studentId;public String studentName;
}
?1.1.2 創建接口類
@RestController
@CrossOrigin
@RequestMapping("/json")
public class JsonTest {@RequestMapping("/getStudent")public Student getStudent() {return new Student(18, "小志");}@RequestMapping("/getStudentList")public List<Student> getStudentList() {List<Student> list = new ArrayList<>();list.add(new Student(18, "小志"));list.add(new Student(19, "小莊"));list.add(new Student(20, "小王"));return list;}@RequestMapping("/getStudentMap")public Map<String,Object> getStudentMap() {Map<String,Object> map = new HashMap();map.put("學生姓名",new Student(25,"小王"));map.put("家庭地址","廈門市惠安縣");map.put("出生年月",202000326);return map;}}
?1.1.3?結果展示
-- /json/getStudent
{"studentId":18,"studentName":"小志"}-- /json/getStudentList
[{"studentId":18,"studentName":"小志"},{"studentId":19,"studentName":"小莊"},{"studentId":20,"studentName":"小王"}]-- /json/getStudentMap
{"家庭地址":"廈門市惠安縣","學生姓名":{"studentId":25,"studentName":"小王"},"出生年月":202000326}
map 中不管是什么數據類型,都可以轉成相應的 json 格式
1.1.4?jackson 中對null的處理
把map中的數據更改,測試jackson 中對null的處理
 @RequestMapping("/getStudentMap")public Map<String,Object> getStudentMap() {Map<String,Object> map = new HashMap();map.put("學生姓名",new Student(25,"小王"));map.put("家庭地址","廈門市惠安縣");map.put("出生年月",null);return map;}--/json/getStudentMap 返回結果
{"家庭地址":"廈門市惠安縣","學生姓名":{"studentId":25,"studentName":"小王"},"出生年月":null}
添加?jackson 的配置類
package org.example.springbootdemo.config;import com.fasterxml.jackson.core.JsonGenerator;
import com.fasterxml.jackson.databind.JsonSerializer;
import com.fasterxml.jackson.databind.ObjectMapper;
import com.fasterxml.jackson.databind.SerializerProvider;
import org.springframework.boot.autoconfigure.condition.ConditionalOnMissingBean;
import org.springframework.context.annotation.Bean;
import org.springframework.context.annotation.Configuration;
import org.springframework.context.annotation.Primary;
import org.springframework.http.converter.json.Jackson2ObjectMapperBuilder;import java.io.IOException;@Configuration
public class JacksonConfig {@Bean@Primary@ConditionalOnMissingBean(ObjectMapper.class)public ObjectMapper jacksonObjectMapper(Jackson2ObjectMapperBuilder builder) {ObjectMapper objectMapper = builder.createXmlMapper(false).build();objectMapper.getSerializerProvider().setNullValueSerializer(new JsonSerializer<Object>() {@Overridepublic void serialize(Object o, JsonGenerator jsonGenerator, SerializerProvider serializerProvider) throws IOException {jsonGenerator.writeString("");}});return objectMapper;}
}
-----------------------------------------------------結果如下--------------------------------------------------------------
{"家庭地址": "廈門市惠安縣","學生姓名": {"studentId": 25,"studentName": "小王"},"出生年月": ""
}
1.2??使用阿里巴巴FastJson的設置
使用 fastJson 時,對 null 的處理和 jackson 有些不同,需要繼承 WebMvcConfigurationSupport 類,然后覆蓋 configureMessageConverters 方法,在方法中,我們可以選擇對要實現 null 轉換的場景,配置好即可。
import com.alibaba.fastjson.serializer.SerializerFeature;
import com.alibaba.fastjson.support.config.FastJsonConfig;
import com.alibaba.fastjson.support.spring.FastJsonHttpMessageConverter;
import org.springframework.context.annotation.Configuration;
import org.springframework.http.MediaType;
import org.springframework.http.converter.HttpMessageConverter;
import org.springframework.web.servlet.config.annotation.WebMvcConfigurationSupport;import java.nio.charset.Charset;
import java.util.ArrayList;
import java.util.List;@Configuration
public class fastJsonConfig extends WebMvcConfigurationSupport {/*** 使用阿里 FastJson 作為JSON MessageConverter* @param converters*/@Overridepublic void configureMessageConverters(List<HttpMessageConverter<?>> converters) {FastJsonHttpMessageConverter converter = new FastJsonHttpMessageConverter();FastJsonConfig config = new FastJsonConfig();config.setSerializerFeatures(// 保留map空的字段SerializerFeature.WriteMapNullValue,// 將String類型的null轉成""SerializerFeature.WriteNullStringAsEmpty,// 將Number類型的null轉成0SerializerFeature.WriteNullNumberAsZero,// 將List類型的null轉成[]SerializerFeature.WriteNullListAsEmpty,// 將Boolean類型的null轉成falseSerializerFeature.WriteNullBooleanAsFalse,// 避免循環引用SerializerFeature.DisableCircularReferenceDetect);converter.setFastJsonConfig(config);converter.setDefaultCharset(Charset.forName("UTF-8"));List<MediaType> mediaTypeList = new ArrayList<>();// 解決中文亂碼問題,相當于在Controller上的@RequestMapping中加了個屬性produces = "application/json"mediaTypeList.add(MediaType.APPLICATION_JSON);converter.setSupportedMediaTypes(mediaTypeList);converters.add(converter);}
}
1.3 封裝返回的統一數據結構
1.3.1 定義返回統一的json結構
@Data
public class CommomResult<T> {private String code;private String message;private T data;public CommomResult(String code, String message, T data) {this.code = code;this.message = message;this.data = data;}
}
1.3.2 修改接口層的返回操作及測試
@RestController
@CrossOrigin
@RequestMapping("/json")
public class JsonTest {@RequestMapping("/getStudent")public CommomResult getStudent() {//return new Student(18, "小志");return new CommomResult("0","查詢成功",new Student(18,"小志"));}@RequestMapping("/getStudentList")public CommomResult getStudentList() {List<Student> list = new ArrayList<>();list.add(new Student(18, "小志"));list.add(new Student(19, "小莊"));list.add(new Student(20, "小王"));//return list;return new CommomResult<>("0","查詢成功",list);}@RequestMapping("/getStudentMap")public CommomResult getStudentMap() {Map<String,Object> map = new HashMap();map.put("學生姓名",new Student(25,"小王"));map.put("家庭地址","廈門市惠安縣");map.put("出生年月",null);//return map;return new CommomResult<>("0","查詢成功",map);}}
1.3.3 測試結果
-- /json/getStudent
{"code": "0","message": "查詢成功","data": {"studentId": 18,"studentName": "小志"}
}-- /json/getStudentList
{"code": "0","message": "查詢成功","data": [{"studentId": 18,"studentName": "小志"},{"studentId": 19,"studentName": "小莊"},{"studentId": 20,"studentName": "小王"}]
}-- /json/getStudentMap
{"code": "0","message": "查詢成功","data": {"家庭地址": "廈門市惠安縣","學生姓名": {"studentId": 25,"studentName": "小王"},"出生年月": ""}
}
2.使用slf4j進行日志記錄
3.Spring Boot中的項目屬性配置
3.1 少量配置信息的情況
通過注解,獲取當前配置信息
配置文件信息
server:port: 12888配置類?
@Component
public class ConfigEntity {@Value("${server.port}")private String port;
}
測試接口層
?注意(@value注解的包):
import org.springframework.beans.factory.annotation.Value;
@RestController
@CrossOrigin
@RequestMapping("/test")
public class TestController {@Value("${server.port}")private String port;private final static Logger logger = LoggerFactory.getLogger(TestController.class);@RequestMapping("/getConfig")public String getConfig() {logger.info("獲取注解的配置:" + port);return "獲取配置";}}
結果如下
-- /test/getConfig
2025-07-18 11:03:10.568  INFO 21816 --- [  XNIO-1 task-1] o.e.s.c.TestController                   : 獲取注解的配置:12888
3.2 多個配置信息的情況
application-dev.yml 文件# 配置多個微服務的地址
url:# 訂單微服務的地址orderUrl: http://localhost:8002# 用戶微服務的地址userUrl: http://localhost:8003# 購物車微服務的地址shoppingUrl: http://localhost:8004
?情況一的方式,需要添加多個@value注解,情況二則是封裝一個url的配置封裝類
注意@ConfigurationProperties需要引入依賴,還需補充prefix參數前綴
<dependency><groupId>org.springframework.boot</groupId><artifactId>spring-boot-configuration-processor</artifactId><optional>true</optional>
</dependency>
@Data
@Component
@ConfigurationProperties(prefix = "url")
public class UrlApplication {private String orderUrl;private String userUrl;private String shoppingUrl;
}
測試接口
@RestController
@CrossOrigin
@RequestMapping("/test")
public class TestController {@Resourceprivate UrlApplication urlApplication;private final static Logger logger = LoggerFactory.getLogger(TestController.class);@RequestMapping("/getConfig")public String getConfig() {logger.info("獲取注解的配置:" + urlApplication.getOrderUrl());logger.info("獲取注解的配置:" + urlApplication.getShoppingUrl());logger.info("獲取注解的配置:" + urlApplication.getUserUrl());return "獲取配置";}}
結果
-- /test/getConfig
2025-07-18 11:38:27.261  INFO 11612 --- [  XNIO-1 task-1] o.e.s.c.TestController                   : 獲取注解的配置:http://localhost:8002
2025-07-18 11:38:27.262  INFO 11612 --- [  XNIO-1 task-1] o.e.s.c.TestController                   : 獲取注解的配置:http://localhost:8004
2025-07-18 11:38:27.262  INFO 11612 --- [  XNIO-1 task-1] o.e.s.c.TestController                   : 獲取注解的配置:http://localhost:8003
3.3 指定項目配置文件
通過application.yml中的屬性:?
spring:profiles:active: XX4.Springboot中的MVC支持
Spring Boot 的 MVC 支持主要來介紹實際項目中最常用的幾個注解,包括?@RestController、?@RequestMapping、@PathVariable、@RequestParam?以及?@RequestBody。主要介紹這幾個注解常用的使用方式和特點。
4.1. @RestController
@Target({ElementType.TYPE})
@Retention(RetentionPolicy.RUNTIME)
@Documented
@Controller
@ResponseBody
public @interface RestController {@AliasFor(annotation = Controller.class)String value() default "";
}?@RestController?注解包含了原來的?@Controller?和?@ResponseBody?注解
?@ResponseBody?注解是將返回的數據結構轉換為 Json 格式
如果接口返回的是類似 /login 登錄頁面,那就不能使用?@RestController?注解,因為使用這個注解返回就會解析成json字符串,得使用@Controller注解,且導入 thymeleaf 依賴(請求的路徑未在控制器中定義,或對應的 Thymeleaf 模板不存在則報錯如下)

4.2. @RequestMapping?
@RequestMapping?是一個用來處理請求地址映射的注解,它可以用于類上,也可以用于方法上。
該注解有6個屬性,一般在項目中比較常用的有三個屬性:value、method 和 produces。
value 屬性:指定請求的實際地址,value 可以省略不寫
method 屬性:指定請求的類型,主要有 GET、PUT、POST、DELETE,默認為 GET
produces屬性:指定返回內容類型,如 produces = “application/json; charset=UTF-8”
4.3. @PathVariable
@PathVariable?注解主要是用來獲取 url 參數
@RestController
@CrossOrigin
@RequestMapping("/test")
public class TestController {@GetMapping("/testRequest/{id}")public String testRequest(String id) {System.out.println("獲取到的id為:" + id);return "測試@PathVariable ";}-- /test/testRequest/18
獲取到的id為:null@GetMapping("/testRequest/{id}")public String testRequest(@PathVariable String id) {System.out.println("獲取到的id為:" + id);return "測試@PathVariable ";}-- /test/testRequest/18
獲取到的id為:18}
如果想要 url 中占位符中的 id 值直接賦值到參數 id 中,需要保證 url 中的參數和方法接收參數一致,否則就無法接收。如果不一致的話,其實也可以解決,需要用?@PathVariable?中的 value 屬性來指定對應關系。
@GetMapping("/testRequest/{name}")public String testRequest(@PathVariable(value = "name") String studentName) {System.out.println("學生的姓名:" + studentName);return "測試@PathVariable ";}支持多個參數的接收。同樣地,如果 url 中的參數和方法中的參數名稱不同的話,也需要使用 value 屬性來綁定兩個參數
4.4. @RequestParam
@RequestParam?注解顧名思義,也是獲取請求參數的
主要區別在于: @PathValiable 是從 url 模板中獲取參數值, 即這種風格的 url:http://localhost:8080/user/{id} ;而 @RequestParam 是從 request 里面獲取參數值,即這種風格的 url:http://localhost:8080/user?id=1
    @GetMapping("/testRequest")public String testRequest(@RequestParam(value = "age") String age) {System.out.println("學生的年齡:" + age);return "測試@PathVariable ";}--/test/testRequest?age=88
學生的年齡:88
除了 value 屬性外,還有個兩個屬性比較常用:
- required 屬性:true 表示該參數必須要傳,否則就會報 404 錯誤,false 表示可有可無。
- defaultValue 屬性:默認值,表示如果請求中沒有同名參數時的默認值。
如果表單數據很多,我們不可能在后臺方法中寫上很多參數,每個參數還要?@RequestParam?注解。針對這種情況,我們需要封裝一個實體類來接收這些參數,實體中的屬性名和表單中的參數名一致即可。
@Data
public class User {public String userName;public String passWord;
}
接口測試類
@RestController
@CrossOrigin
@RequestMapping("/test")
public class TestController {@PostMapping("/form")public String form(@RequestParam(value = "userName") String userName ,@RequestParam(value = "passWord") String passWord ) {System.out.println("用戶名:" + userName);System.out.println("密碼:" + passWord);return "測試@PathVariable ";}@PostMapping("/form2")public String form2(User user) {System.out.println("用戶名:" + user.userName);System.out.println("密碼:" + user.passWord);return "測試@PathVariable ";}}
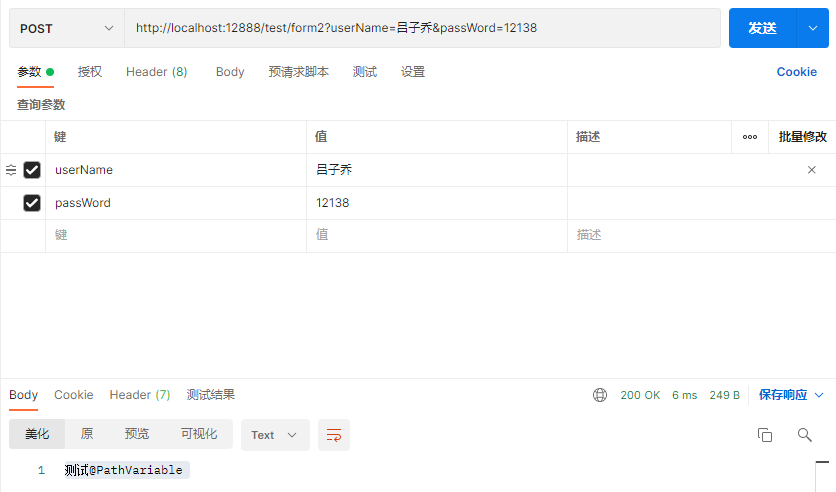
---------------------------------------------------------結果-----------------------------------------------------------------
用戶名:呂子喬
密碼:12138
4.5. @RequestBody
@PostMapping("/form3")public String form3(@RequestBody User user) {System.out.println("用戶名:" + user.userName);System.out.println("密碼:" + user.passWord);return "測試@RequestBody ";}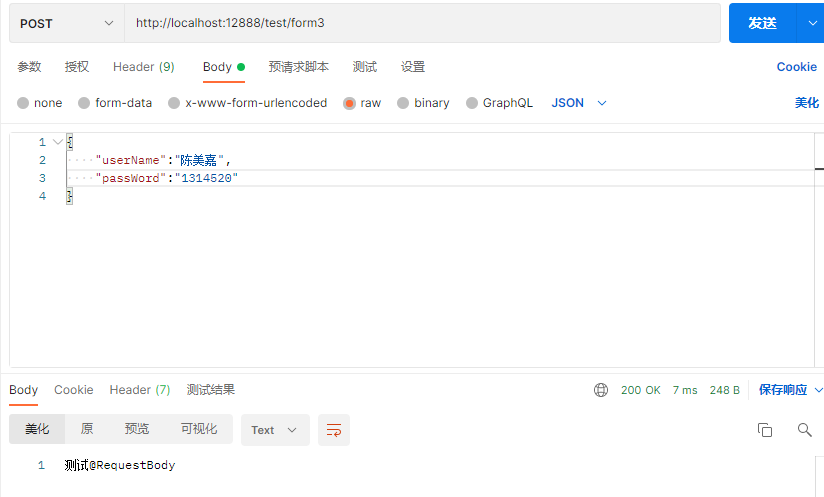
---------------------------------------------------------結果-----------------------------------------------------------------
用戶名:陳美嘉
密碼:1314520
5.Spring Boot集成 Swagger2 展現在線接口文檔
步驟一:添加Swagger2 的 maven 依賴
步驟二:添加Swagger2 的配置類,注意應添加?@Configuration?注解,@EnableSwagger2?注解。
5.1 可能會出現的問題!
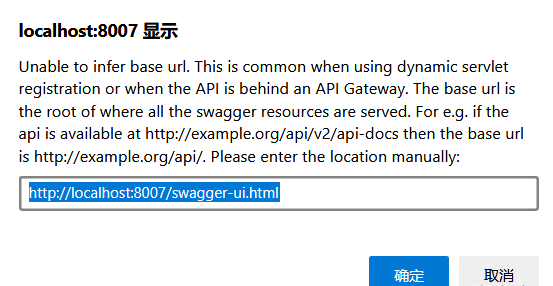
5.2 問題的解決
網頁打開?localhost:8007/swagger-ui.html出現這種情況(此處8007是我后端配置的啟動端口),大概率是由于你沒有將swagger的配置類放到啟動類的同一個目錄下,這樣子啟動類就不知道加載,雖然你有添加?@Configuration?注解,解決方法可以在啟動類中添加掃描注解@ComponentScan("xx")
可能你添加完之后并未解決問題,這可能是殘留的緩存導致的,可以刪除編譯后的target目錄重新運行!!!
5.3 注解
實體類注解
?@ApiModel?實體類的描述
?@ApiModelProperty?實體類屬性的描述
接口類注解
@Api?注解用于類上,表示標識這個類是 swagger 的資源。
@ApiOperation?注解用于方法,表示一個 http 請求的操作。
@ApiParam?注解用于參數上,用來標明參數信息。


|SVM-拉格朗日函數構造)

-day24)

)


