1概述
FastAPI 是一個現代的高性能 Web 框架,用于使用 Python 構建 API。它旨在讓開發者輕松快速高效地構建 API,同時提供 API 的自動驗證、序列化和文檔記錄等功能,使其成為構建 Web 服務和微服務的熱門選擇。
在這個 FastAPI 教程中,我們將使用 FastAPI 創建一個雜貨清單應用程序。在本教程結束時,你將了解如何在 Visual Studio Code 終端、編輯器和調試器中使用 FastAPI。
2設置項目
要在 VS Code 中成功完成本教程,首先需要設置 Python 開發環境。具體而言,本教程需要Python 3 和VS Code 的 Python 擴展。
在本部分中,我們將創建一個文件夾以在 VS Code 中作為工作區打開,設置 Python 虛擬環境,并安裝項目的依賴項。
(1)在文件系統中,為本教程創建一個項目文件夾,例如 .groceries-plugin
(2)在 VS Code 中打開這個新文件夾(文件>打開文件夾…)。
(3)當 Workspace Trust 提示出現時,選擇 Yes, I trust the authors 以允許工作區訪問必要的資源和擴展。
現在,我們創建一個文件requirements.txt列出需為應用程序安裝的依賴項。該requirements.txt文件是 Python 開發中的一種常見做法,用于指定項目所依賴的庫及其版本。此文件有助于確保處理項目的任何人都可以重新創建類似的開發環境,使其成為保持一致性的便捷組件。
我們將安裝 FastAPI 來創建應用程序,uvicorn 作為服務器,Redis 和type-redis用于處理數據存儲和與 Redis 數據庫交互。
(1)在 VS Code 中創建新文件(文件>新建文本文件或 Ctrl+N)。
(2)向其添加以下內容:
fastapi
redis
types-redis
uvicorn
(3)保存文件 (Ctrl+S) 并將其命名為requirements.txt 。
(4)通過打開命令面板 (Ctrl+Shift+P) 并運行 Python: Create Environment 命令來創建虛擬環境。
(5)當系統詢問環境類型時,選擇 Venv:

(6)然后選擇計算機上可用的最新版本的 Python:
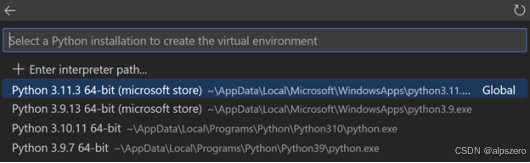
(7)從下拉列表中選擇文件requirements.txt,以便自動安裝依賴項,然后選擇 “OK”:

以上操作將創建虛擬環境,自動安裝依賴項,并為工作區選擇供 Python 擴展使用的環境。你可以通過檢查 VS Code 的右下角來確認它已被選中:

3開始編碼
我們開始創建應用程序。
(1)使用 File > New File… 創建新的 Python 文件,然后選擇 Python File。
(2)在文件夾groceries-plugin中另存為main.py (Ctrl+Shift+S)。
(3)將以下代碼添加到main.py并保存該文件:
from fastapi import FastAPI
app = FastAPI()
@app.get("/")
def root():return {"message": "Hello World"}
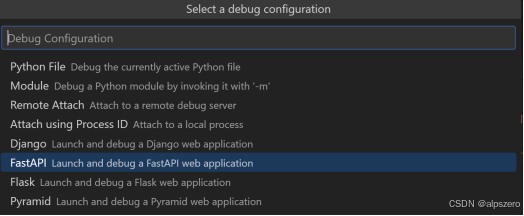
(4)通過啟動調試器 (F5) 運行代碼。
(5)從下拉菜單中,從列表中選擇 FastAPI 配置選項:
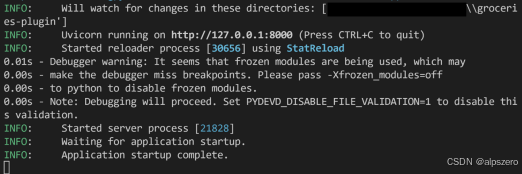
這會自動創建一個調試配置,該配置調用 uvicorn 以通過調試器啟動應用程序服務器,并允許你單步調試源代碼以檢查其行為。你應該在終端中看到類似以下內容的內容:
提示: 如果默認端口已在使用中,請停止調試器并打開命令面板 (Ctrl+Shift+P),搜索 Debug: Add Configuration,選擇 Python Debugger,然后選擇 FastAPI。這將創建一個自定義配置文件.vscode/launch.json,你可以在其中進行編輯。將以下內容添加到"args":[]以設置自定義端口:“–port=5000”。保存文件,然后使用 (F5) 重新啟動調試器。
(6)Ctrl + 單擊終端中的http://127.0.0.1:8000/ URL在默認瀏覽器打開該地址:
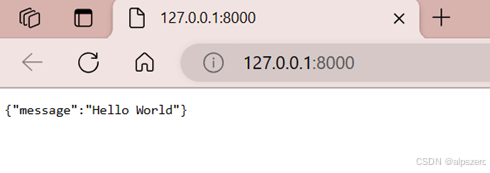
FastAPI 應用程序已啟動并運行!
(7)使用調試工具欄中的 Stop 按鈕或通過 Shift+F5 停止調試器。
4為雜貨清單項目創建模型
現在我們已經讓 FastAPI 應用程序運行起來,我們可以使用 Pydantic 定義雜貨清單項目,Pydantic 是一個與 FastAPI 無縫集成的數據驗證和解析庫。Pydantic 允許你使用帶有類型提示(type hints)的 Python 類定義數據模型,以便在 API 請求中自動驗證和解析傳入數據(稱為“有效負載”)。
讓我們為雜貨清單項創建一個模型ItemPayload。我們將使用該模型來定義要添加到雜貨清單中的商品的數據結構。此模型將具有三個字段:item_id 、 item_name和 quantity。
(1)使用 File > New File… 創建新的 Python 文件,然后選擇 Python File。
(2)將以下行添加到models.py文件中,然后將其保存在文件夾groceries-plugin中 (Ctrl+Shift+S):
from typing import Optional
from pydantic import BaseModel
class ItemPayload(BaseModel):item_id: Optional[int]item_name: strquantity: int
Pylance 是 VS Code 中 Python 的默認語言服務器,它支持類型提示功能,這些功能對使用 Pydantic 模型和 FastAPI 非常有用。這是因為 Pylance 構建在 Pyright 之上,Pyright 是一個 Python 的靜態類型檢查器,可以檢測代碼中的類型錯誤,以防止錯誤并提高代碼質量。
5創建路由
現在我們需要一個地方來存儲雜貨清單項目。為簡單起見,我們從一個空字典開始。
(1)首先,導入示例所需的所有包。打開文件main.py并將第一行導入行替換為以下行:
from fastapi import FastAPI, HTTPException
from models import ItemPayload
(2)在app = FastAPI()下面添加以下行:
grocery_list: dict[int, ItemPayload] = {}
這將創建一個新的空字典,該字典接收int類型(作為項目 ID) 的鍵和ItemPayload類型的值。
現在,我們將在 FastAPI 應用程序中定義路由。在 Web 應用程序的場景中,路由類似于將特定 URL 映射到處理這些 URL 的代碼的路徑。這些路由用作應用程序中不同功能的入口點。當客戶端(例如 Web 瀏覽器或其他程序)使用特定 URL 向我們的應用程序發送請求時,FastAPI 會根據 URL 將該請求路由到相應的函數(也稱為路由處理程序或視圖函數),該函數處理請求并生成響應。
讓我們繼續定義路由以添加和檢索單個項目,以及返回雜貨清單中的所有項目。
(3)在文件main.py末尾添加以下路由:
# Route to add a item
@app.post("/items/{item_name}/{quantity}")
def add_item(item_name: str, quantity: int):if quantity <= 0:raise HTTPException(status_code=400, detail="Quantity must be greater than 0.")# if item already exists, we'll just add the quantity.# get all item namesitems_ids = {item.item_name: item.item_id if item.item_id is not None else 0 for item in grocery_list.values()}if item_name in items_ids.keys():# get index of item_name in item_ids, which is the item_iditem_id = items_ids[item_name]grocery_list[item_id].quantity += quantity
# otherwise, create a new itemelse:# generate an ID for the item based on the highest ID in the grocery_listitem_id = max(grocery_list.keys()) + 1 if grocery_list else 0grocery_list[item_id] = ItemPayload(item_id=item_id, item_name=item_name, quantity=quantity)return {"item": grocery_list[item_id]}
現在,我們來檢查一下此路由是否按預期工作。最快的方法是使用 VS Code 的調試器以及 FastAPI 的端點/docs,它提供有關所有可用 API 路由的信息,并允許你與 API 交互以探索其參數和響應。本文檔是根據 FastAPI 應用程序中定義的元數據和類型提示動態生成的。
(4)通過單擊行號(或 F9)的左旁注,在if quantity <= 0語句旁邊添加一個斷點。調試器將在執行該行之前停止,因此你可以逐行檢查代碼。

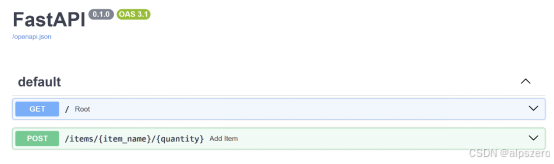
(5)啟動調試器 (F5),然后在瀏覽器中導航到http://127.0.0.1:8000/docs
這里應該有一個 Swagger 接口,其中包含應用程序中可用的兩個端點:/items和 root (/)。
(6)選擇/items路由旁邊的向下箭頭將其展開,然后選擇右側顯示的 Try it out (試用) 按鈕。
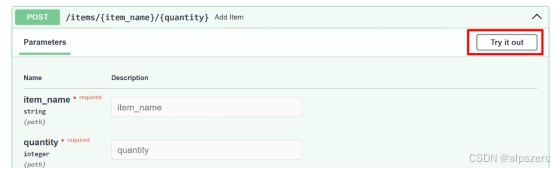
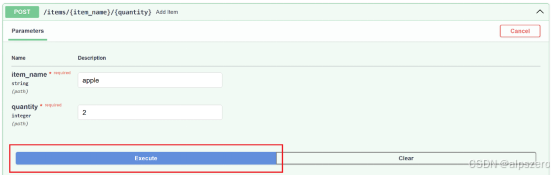
(7)通過將字符串傳遞給item_name字段并將數字傳遞給quantity 來添加雜貨清單項。例如,你可以將 apple 作為item_name ,將 2 作為 quantity.
(8)選擇 Execute。
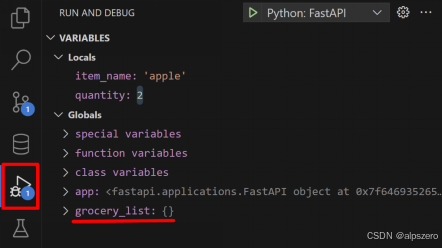
(9)再次打開 VS Code,并注意到調試器已停止在你之前設置的斷點處。

在左側,此時定義的所有局部和全局變量都顯示在 Variables 窗口中的 Run and Debug 視圖下。在我們的示例中,在 locals 變量視圖下item_name設置為 ‘apple’ 并設置quantity為 2,在 globals 變量視圖下設置grocery_list為空字典。
現在,讓我們使用 VS Code 的 Debug Console 進行一些探索。
(10)選擇quantity <= 0語句,右鍵單擊編輯器,然后選擇 Evaluate in Debug Console:
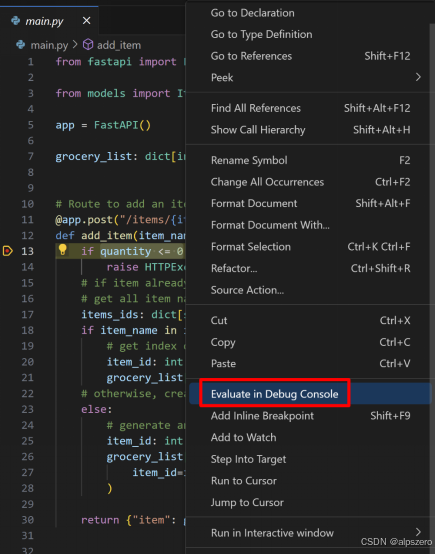
這將打開 Debug Console 并運行選定的表達式。正如我們的示例中所預期的那樣,表達式的計算結果為False 。
Debug Console 可以是一個強大的工具,用于快速測試表達式并更好地了解斷點時代碼的狀態。你還可以使用它來運行任意代碼,例如調用函數或打印變量。你可以在 Python 教程中了解有關 VS Code 中 Python 調試的更多信息。
現在,你可以通過在 Debug view (調試) 視圖工具欄中選擇 Continue (繼續) 或按 F5 來繼續執行代碼。
最后,讓我們為應用程序添加剩余的路由,以便我們可以列出所有項目或特定項目,以及將它們從我們的雜貨清單中刪除。你可以讓調試器保持運行狀態,因為當你保存下一步中所做的更改時,它將自動重新加載應用程序。
(11)將main.py 中的內容替換為以下代碼:
from fastapi import FastAPI, HTTPException
from models import ItemPayloadapp = FastAPI()grocery_list: dict[int, ItemPayload] = {}# Route to add an item
@app.post("/items/{item_name}/{quantity}")
def add_item(item_name: str, quantity: int) -> dict[str, ItemPayload]:if quantity <= 0:raise HTTPException(status_code=400, detail="Quantity must be greater than 0.")# if item already exists, we'll just add the quantity.# get all item namesitems_ids: dict[str, int] = {item.item_name: item.item_id if item.item_id is not None else 0for item in grocery_list.values()}if item_name in items_ids.keys():# get index of item_name in item_ids, which is the item_iditem_id: int = items_ids[item_name]grocery_list[item_id].quantity += quantity# otherwise, create a new itemelse:# generate an ID for the item based on the highest ID in the grocery_listitem_id: int = max(grocery_list.keys()) + 1 if grocery_list else 0grocery_list[item_id] = ItemPayload(item_id=item_id, item_name=item_name, quantity=quantity)return {"item": grocery_list[item_id]}# Route to list a specific item by ID
@app.get("/items/{item_id}")
def list_item(item_id: int) -> dict[str, ItemPayload]:if item_id not in grocery_list:raise HTTPException(status_code=404, detail="Item not found.")return {"item": grocery_list[item_id]}# Route to list all items
@app.get("/items")
def list_items() -> dict[str, dict[int, ItemPayload]]:return {"items": grocery_list}# Route to delete a specific item by ID
@app.delete("/items/{item_id}")
def delete_item(item_id: int) -> dict[str, str]:if item_id not in grocery_list:raise HTTPException(status_code=404, detail="Item not found.")del grocery_list[item_id]return {"result": "Item deleted."}# Route to remove some quantity of a specific item by ID
@app.delete("/items/{item_id}/{quantity}")
def remove_quantity(item_id: int, quantity: int) -> dict[str, str]:if item_id not in grocery_list:raise HTTPException(status_code=404, detail="Item not found.")# if quantity to be removed is higher or equal to item's quantity, delete the itemif grocery_list[item_id].quantity <= quantity:del grocery_list[item_id]return {"result": "Item deleted."}else:grocery_list[item_id].quantity -= quantityreturn {"result": f"{quantity} items removed."}
(12)保存文件 (Ctrl+S)。應用程序應自動重新加載。
現在,你可以使用調試器和 Debug Console 再次打開/docs頁面并測試新路由,以更好地了解代碼執行情況。完成后,你可以停止調試器 (Shift+F5)。你還可以通過單擊來刪除我們在步驟 4 中添加的斷點。
現在有了一個正在運行的 FastAPI 應用程序,其中包含用于從雜貨清單中添加、列出和刪除商品的路由。


)

--DatePicker)


-----刪除鏈表中指定值的節點)