1.HTTP Cookie
定義
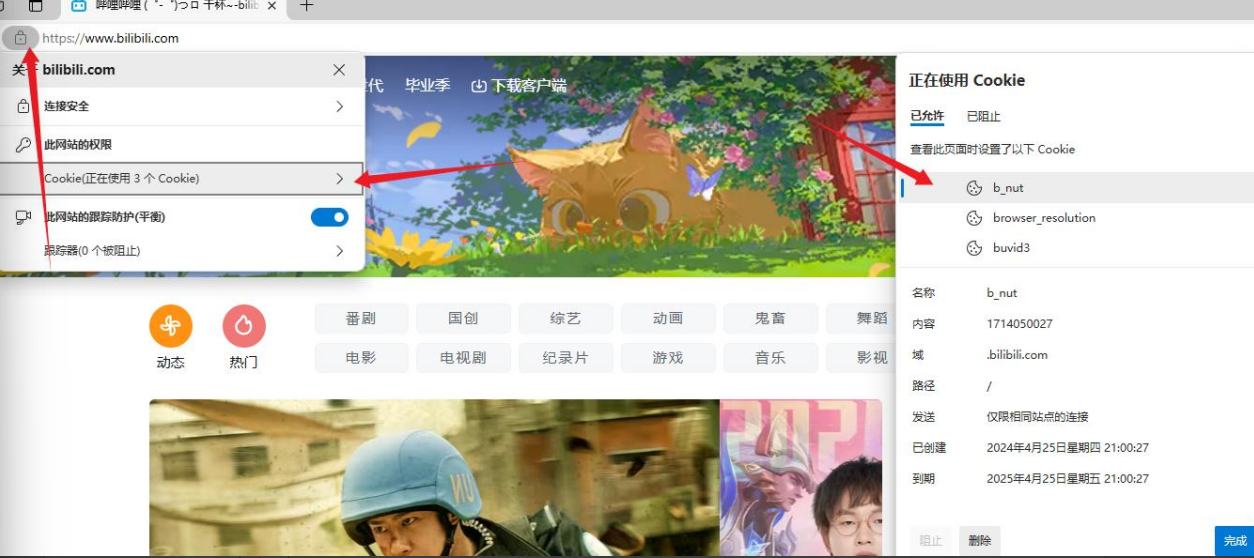
認識cookie
HTTP存在一個報頭選項:Set-cookie,可以用來進行給瀏覽器設置cookie值。
在HTTP響應頭中添加,客服端獲取并自行設置并保存。
完整的Set-Cookie實例
C++Set-Cookie: username=peter; expires=Thu, 18 Dec 2024 12:00:00UTC; path=/; domain=.example.com; secure; HttpOnly
2.HTTP Session
?沒有Session時的隱私風險
如果沒有Session機制,Web應用可能需要依賴其他方式(如Cookie)來跟蹤用戶狀態。Cookie存儲在客戶端,容易被惡意程序獲取和篡改,從而導致隱私泄露。此外,沒有Session的加密通信工具可能無法提供端到端加密或去中心化存儲,從而增加數據被竊取或監控的風險。
數據存儲位置:Session數據存儲在服務器端,而不是客戶端。即使客戶端的Session ID被竊取,攻擊者也無法直接獲取到存儲在服務器上的會話數據。
安全性:服務器可以更好地控制Session的生命周期,例如定期更新Session ID、限制Session的使用范圍等,從而降低被攻擊的風險。
3.cookie實現
HttpProtocol.hpp文件
第一個類是實現網絡請求的,GetLine函數用來截取一行,以HttpSep(\r\n)來作為分隔符,則0到pos位置就是一行的內容了,把讀取到的內容在刪除掉,讀取下一行內容。Deserialize函數是序列化,request是網絡請求,用getline函數獲取一行出來,第一行是請求行,單獨存儲起來,然后就是一直死循環讀取剩下的報頭數據,直到讀到了空行,如果是空行的話ok為true且empty也會true則就會把剩下的內容全都放到req_content里,這里就是文本內容了,也是要單獨存儲的,empty不為空就說明還是在讀取報頭信息,就把報頭信息放到vector里面存儲,這里是把鍵和值一起放到string里面的。
#pragma once#include <iostream>
#include <string>
#include <sstream>
#include <vector>
#include <memory>
#include <ctime>
#include "TcpServer.hpp"const std::string HttpSep = "\r\n";
// 可以配置的
const std::string homepage = "index.html";
const std::string wwwroot = "./wwwroot";class HttpRequest
{
public:HttpRequest():_req_blank(HttpSep),_path(wwwroot){}bool GetLine(std::string& str,std::string* line){auto pos=str.find(HttpSep);if(pos==std::string::npos)return false;*line=str.substr(0,pos);str.erase(0,pos+HttpSep.size());return true;}bool Deserialize(std::string& request){std::string line;bool ok=GetLine(request,&line);if(!ok)return false;_req_line=line;while(true){bool ok=GetLine(request,&line);if(ok&&line.empty()){_req_content=request;break;}else if(ok&&!line.empty()){_req_header.push_back(line);}elsebreak;}return true;}void DebugHttp(){std::cout<<"_req_line:"<<_req_line<<std::endl;for(auto& line:_req_header){std::cout<<"--->"<<line<<std::endl;}}~HttpRequest(){}
private:std::string _req_line;std::vector<std::string> _req_header;std::string _req_blank;std::string _req_content;std::string _method;std::string _url;std::string _http_version;std::string _path;std::string _suffix;
};
?第二個代碼是網絡響應的,構造函數設置網絡版本和狀態碼和狀態信息。SetCode函數設置狀態碼的值,SetDesc函數設置狀態信息,MakeStatusLine函數構造狀態行,網絡版本+空格號+狀態碼+空格號+狀態信息+換行拼接在一起。AddHeader函數把報頭信息+換行符插入到vector中。AddContent函數設置文內容。Serialize函數先構造出狀態行,然后把報頭信息一一取出拼接在狀態行的后面,for結束后標識狀態行和報頭信息已經填好了,接下來就是空行和文本內容的填充,把填充完整的響應返回。
const std::string BlankSep=" ";
const std::string LineSep="\r\n";class HttpResponse
{
public:HttpResponse():_http_version("HTTP/1.0"),_status_code(200),_status_code_desc("OK"),_resp_blank(LineSep){}void SetCode(int code){_status_code=code;}void SetDesc(const std::string& desc){_status_code_desc=desc;}void MakeStatusLine(){_status_line=_http_version+BlankSep+std::to_string(_status_code)+BlankSep+_status_code_desc+LineSep;}void AddHeader(const std::string& header){_resp_header.push_back(header+LineSep);}void AddContent(const std::string& content){_resp_content=content;}std::string Serialize(){MakeStatusLine();std::string response_str=_status_line;for(auto& header:_resp_header){response_str+=header;}response_str+=_resp_blank;response_str+=_resp_content;return response_str;}~HttpResponse(){}private:std::string _status_line;std::vector<std::string> _resp_header;std::string _resp_blank;std::string _resp_content;std::string _http_version;int _status_code;std::string _status_code_desc;};
這個類就是網絡處理部分。構造函數要接收一個端口號,make_unique構造一個TcpServer對象出來,參數是端口號和一個bind對象,再調用Init函數。ProveCookieWrite函數和ProveCookieTimeOut函數都是添加報頭信息,一個是用戶名一個是用戶名和過期時間(這里設置一分鐘),ProvePath函數添加了路徑,ProveOtherCookie添加了密碼。HandlerHttp函數就是處理部分了,創建請求對象,調用請求的反序列化方法,顯示報頭信息,創建響應對象,設置狀態碼,狀態信息,添加報頭內容,添加文本內容helloworld(前端格式寫的,最后網頁訪問會看到helloworld),最后返回完整的且序列化后的信息。
class Http
{std::string GetMonthName(int month){std::vector<std::string> months={"Jan", "Feb", "Mar", "Apr", "May", "Jun", "Jul", "Aug", "Sep", "Oct", "Nov", "Dec"};return months[month];}std::string GetWeekDayName(int day){std::vector<std::string> weekdays={"Sun", "Mon", "Tue", "Wed", "Thu", "Fri", "Sat"};return weekdays[day];}std::string ExpireTimeUseRfc1123(int t) // 秒級別的未來UTC時間{time_t timeout = time(nullptr) + t;struct tm *tm = gmtime(&timeout); // 這里不能用localtime,因為localtime是默認帶了時區的. gmtime獲取的就是UTC統一時間char timebuffer[1024];//時間格式如: expires=Thu, 18 Dec 2024 12:00:00 UTCsnprintf(timebuffer, sizeof(timebuffer), "%s, %02d %s %d %02d:%02d:%02d UTC", GetWeekDayName(tm->tm_wday).c_str(),tm->tm_mday,GetMonthName(tm->tm_mon).c_str(),tm->tm_year+1900,tm->tm_hour,tm->tm_min,tm->tm_sec);return timebuffer;}
public:Http(uint16_t port){_tsvr=std::make_unique<TcpServer>(port,std::bind(&Http::HandlerHttp,this,std::placeholders::_1));_tsvr->Init();}std::string ProveCookieWrite(){return "Set-Cookie: username=zhangsan;";}std::string ProveCookieTimeOut(){return "Set-Cookie: username=zhangsan;expires="+ExpireTimeUseRfc1123(60)+";";}std::string ProvePath(){return "Set-Cookie: username=zhangsan; path=/a/b";}std::string ProveOtherCookie(){return "Set-Cookie: passwd=1234567890; path=/a/b;";}std::string HandlerHttp(std::string request){HttpRequest req;req.Deserialize(request);req.DebugHttp();lg.LogMessage(Debug,"%s\n",ExpireTimeUseRfc1123(60).c_str());HttpResponse resp;resp.SetCode(200);resp.SetCode(200);resp.SetDesc("OK");resp.AddHeader("Content-Type: text/html");resp.AddHeader(ProvePath());resp.AddHeader(ProveOtherCookie());resp.AddContent("<html><h1>helloworld</h1></html>");return resp.Serialize();}void Run(){_tsvr->Start();}~Http(){}
private:std::unique_ptr<TcpServer> _tsvr;
};
TcpServer.hpp文件
構造函數接收端口號和回調函數,以及套接字的值初始化等。ProcessConnection函數參數為Socket對象和InetAddr對象,調用sock方法recv在創建的套接字中讀取內容,調用handler處理讀取到的信息,把響應信息發送回去,關閉套接字(關閉后就不能傳入命令了 telnet指令)。Start函數則會調用AcceptConnection函數進行連接(Tcp協議需要雙方連接才能通信),創建task_t對象賦值為bind對象,bind是第一個是函數地址,但是類的話不是這樣,類函數需要&來獲取函數地址,后面的都是參數,而類函數還需要傳遞this指針,因為類函數隱式參數this。接著再創建實例并調用插入函數把task插入進去。
#pragma once#include <iostream>
#include <string>
#include <cerrno>
#include <cstring>
#include <cstdlib>
#include <sys/types.h>
#include <sys/socket.h>
#include <netinet/in.h>
#include <arpa/inet.h>
#include <sys/wait.h>
#include <functional>
#include <memory>
#include "ThreadPool.hpp"
#include "Log.hpp"
#include "Comm.hpp"
#include "Socket.hpp"
#include "InetAddr.hpp"using namespace Net_Work;
const static int default_backlog = 6;
using task_t = std::function<void()>;
using handler_t = std::function<std::string(std::string)>;class TcpServer
{
public:TcpServer(uint16_t port,handler_t handler):_port(port),_isrunning(false),_listensock(new TcpSocket()),_handler(handler){}void Init(){_listensock->BuildListenSocketMethod(_port,default_backlog);}void ProcessConnection(std::shared_ptr<Socket> sock,InetAddr addr){std::string request_str;if(sock->Recv(&request_str,4096)){std::string response=_handler(request_str);sock->Send(response);sock->CloseSocket();}}void Start(){_isrunning=true;while(_isrunning){std::string clientip;uint16_t clientport;std::shared_ptr<Socket> sock=_listensock->AcceptConnection(&clientip,&clientport);if(sock==nullptr){continue;}InetAddr addr(clientip,clientport);task_t task=std::bind(&TcpServer::ProcessConnection,this,sock,addr);ThreadPool<task_t>::GetInstance()->Push(task);}_isrunning=false;}~TcpServer(){}
private:uint16_t _port;std::unique_ptr<Socket> _listensock;bool _isrunning;handler_t _handler;
};
成員函數與非成員函數的區別
非成員函數 :對于非成員函數(即全局函數或命名空間內的函數),函數名本身可以直接作為函數的指針。例如,對于一個非成員函數
void foo(),可以將foo作為函數指針使用。成員函數 :成員函數屬于類的一部分,它們的調用需要一個對象上下文(即通過對象來調用)。因此,要獲取成員函數的地址,必須使用
&操作符。例如,對于類A中的成員函數void bar(),要獲取其地址,必須寫成&A::bar。
Main.cc文件
#include "HttpProtocol.hpp"
#include <memory>using namespace std;void Usage(std::string proc)
{std::cout<<"Usage: \n\t"<<proc<<" local_port\n"<<std::endl;
}int main(int argc,char* argv[])
{if(argc!=2){Usage(argv[0]);return Usage_Err;}uint16_t port=stoi(argv[1]);std::unique_ptr<Http> http=make_unique<Http>(port);http->Run();return 0;
}
ThreadPool.hpp文件
#pragma once#include <iostream>
#include <queue>
#include <vector>
#include <pthread.h>
#include <functional>
#include "Log.hpp"
#include "Thread.hpp"
#include "LockGuard.hpp"static const int defaultnum=5;class ThreadData
{
public:ThreadData(const std::string& name):threadname(name){}~ThreadData(){}
public:std::string threadname;
};template<class T>
class ThreadPool
{
private:ThreadPool(int thread_num=defaultnum):_thread_num(thread_num){pthread_mutex_init(&_mutex,nullptr);pthread_cond_init(&_cond,nullptr);for(int i=0;i<_thread_num;i++){std::string threadname="thread-";threadname+=std::to_string(i+1);ThreadData td(threadname);_threads.emplace_back(threadname,std::bind(&ThreadPool<T>::ThreadRun,this,std::placeholders::_1),td);lg.LogMessage(Info,"%s is created...\n", threadname.c_str());}}ThreadPool(const ThreadPool<T>& tp)=delete;const ThreadPool<T>& operator=(const ThreadPool<T>)=delete;public:static ThreadPool<T>* GetInstance(){if(instance==nullptr){LockGuard lockguard(&sig_lock);if(instance==nullptr){lg.LogMessage(Info, "創建單例成功...\n");instance =new ThreadPool<T>();instance->Start();}}return instance;}bool Start(){for(auto& thread:_threads){thread.Start();lg.LogMessage(Info, "%s is running ...\n", thread.ThreadName().c_str());}return true;}void ThreadWait(const ThreadData& td){lg.LogMessage(Debug, "no task, %s is sleeping...\n", td.threadname.c_str());pthread_cond_wait(&_cond,&_mutex);}void ThreadWakeup(){pthread_cond_signal(&_cond);}void checkSelf(){}void ThreadRun(ThreadData &td){while(true){T t;{LockGuard lockguard(&_mutex);while(_q.empty()){ThreadWait(td);lg.LogMessage(Debug, "thread %s is wakeup\n", td.threadname.c_str());}t=_q.front();_q.pop();}t();}}void Push(T& in){LockGuard Lockguard(&_mutex);_q.push(in);ThreadWakeup();}~ThreadPool(){pthread_mutex_destroy(&_mutex);pthread_cond_destroy(&_cond);}void Wait(){for(auto& thread: _threads){thread.Join();}}
private:std::queue<T> _q;std::vector<Thread<ThreadData>> _threads;int _thread_num;pthread_mutex_t _mutex;pthread_cond_t _cond;static ThreadPool<T>* instance;static pthread_mutex_t sig_lock;};
template <class T>
ThreadPool<T> *ThreadPool<T>::instance = nullptr;
template <class T>
pthread_mutex_t ThreadPool<T>::sig_lock = PTHREAD_MUTEX_INITIALIZER;
thread.hpp文件
#pragma once#include <iostream>
#include <string>
#include <functional>
#include <pthread.h>// 設計方的視角
//typedef std::function<void()> func_t;
template<class T>
using func_t = std::function<void(T&)>;template<class T>
class Thread
{
public:Thread(const std::string &threadname, func_t<T> func, T &data):_tid(0), _threadname(threadname), _isrunning(false), _func(func), _data(data){}static void *ThreadRoutine(void *args) // 類內方法,{// (void)args; // 僅僅是為了防止編譯器有告警Thread *ts = static_cast<Thread *>(args);ts->_func(ts->_data);return nullptr;}bool Start(){int n = pthread_create(&_tid, nullptr, ThreadRoutine, this/*?*/);if(n == 0) {_isrunning = true;return true;}else return false;}bool Join(){if(!_isrunning) return true;int n = pthread_join(_tid, nullptr);if(n == 0){_isrunning = false;return true;}return false;}std::string ThreadName(){return _threadname;}bool IsRunning(){return _isrunning;}~Thread(){}
private:pthread_t _tid;std::string _threadname;bool _isrunning;func_t<T> _func;T _data;
};
代碼流程
main中unique_ptr創建了Http對象的智能指針,就會調用Http類的構造函數,會給Http的tsvr賦值上一個make出來的TcpServer對象,參數是端口號和bind對象,Tcp類也會調用構造函數確定了端口號和回調函數handler,接著調用init函數,里面會調用BuildListenSocketMethod創建套接字并初始化。這時走完了main的第20行代碼,接著21調用http的run函數,里面調用tsvr的Start函數,又到了Tcpserver部分,這里就會開始連接然后調用GetInstacnce函數,此時會跳到threadPool部分,執行threadpool的構造函數,鎖和條件變量初始化,然后開始往_threads里面插入線程名字和bind對象(ThreadRun函數),因為_thread<Thread<ThreadData>>,所以就會調用thread構造函數,確定了回調函數是Threadrun函數,然后再繼續執行GetInstance函數,開辟空間調用線程池的Start函數,start函數會調用所有線程的start函數(thread.start()),就會跳到thread部分,這里就會創建線程執行routine函數,然后調用回調函數threadrun,參數是線程對象ThreadData型,就會回到線程池部分,run會一直檢查任務隊列是否為空,為空就把這個線程放到條件變量中,不為空就取出任務隊列并執行,這里是全部到條件變量中等待,還沒有插入。此時才到Push(task)地方,開始插入任務,然后喚醒線程,喚醒的線程就會執行routine函數走回調函數func(Threadrun函數),run函數while隊列不是空,就可以取出任務執行了,而這個任務就是httphandler函數,處理請求,構造響應返回。
4.session實現
HttpProcotol.hpp文件
請求類方法實現,GetLine把套接字讀取的內容進行行劃分,以間隔號作為基準劃分多行。Parse函數把提取的行進行分離,stringstream字符串流,會以空格號為間隔把方法,uri和版本號提取出來存儲在成員變量中,接著定義prefix,然后范圍for遍歷報頭信息,如果報頭信息中有與prefix一樣的字符串就把跟prefix一樣的部分之后的地方提取出來存儲在cookie中,在插入到vector中管理,接著改變prefix值,在來一次,這次找的就是sessionid=,會提取=后面的值存儲到vector中管理。
#pragma once#include <iostream>
#include <string>
#include <sstream>
#include <vector>
#include <memory>
#include <ctime>
#include <functional>
#include "TcpServer.hpp"
#include "Session.hpp" // 引入sessionconst std::string HttpSep = "\r\n";
// 可以配置的
const std::string homepage = "index.html";
const std::string wwwroot = "./wwwroot";class HttpRequest
{
public:HttpRequest():_req_blank(HttpSep),_path(wwwroot){}bool GetLine(std::string& str,std::string* line){auto pos=str.find(HttpSep);if(pos==std::string::npos){return false;}*line=str.substr(0,pos);str.erase(0,pos+HttpSep.size());return true;}void Parse(){std::stringstream ss(_req_line);ss>>_method>>_url>>_http_version;std::string prefix="Cookie:";for(auto& line:_req_header){std::string cookie;if(strncmp(line.c_str(),prefix.c_str(),prefix.size())==0){cookie=line.substr(prefix.size());_cookies.emplace_back(cookie);break;}}prefix="sessionid=";for(const auto& cookie:_cookies){if(strncmp(cookie.c_str(),prefix.c_str(),prefix.size())==0){_sessionid=cookie.substr(prefix.size());}}}std::string Url(){return _url;}std::string SessionId(){return _sessionid;}bool Deserialize(std::string& request){std::string line;bool ok=GetLine(request,&line);if(!ok)return false;_req_line=line;while(true){bool ok=GetLine(request,&line);if(ok&& line.empty()){_req_content=request;break;}else if(ok&& !line.empty()){_req_header.push_back(line);}else{break;}}return true; }void DebugHttp(){std::cout<<"_req_line:"<<_req_line<<std::endl;for(auto& line:_req_header){std::cout<<"--->"<<line<<std::endl;}}~HttpRequest(){}
private:std::string _req_line;std::vector<std::string> _req_header;std::string _req_blank;std::string _req_content;std::string _method;std::string _url;std::string _http_version;std::string _path;std::string _suffix;std::vector<std::string> _cookies;std::string _sessionid;
};
?處理請求的地方,構建請求和應答類,反序列化請求并提取請求行的信息,定義number變量,走if判斷,如果為login就說明要登陸,然后提取sessionid值,如果為空說明沒有登陸過,定義用戶名為number+1,創建session對象,會走session構造函數,得到名字和狀態,調用Sessionmanager類方法Addsession插入創建的s對象,會創建一個sessionid值出來,通過隨機數加時間戳,并把創建好的sessionid和s存儲到map里面管理,把sessionid信息添加到報頭中。如果不是login則會查看sessionid值,不為空就調用Getsession函數,在Session.hpp文件中的SessionManger類中成員變量_sessions中查看是否存在這個sessionid,存在就打印正在活躍,沒有就標識過期,后面就是設置狀態碼狀態信息等內容。
std::string HandlerHttp(std::string request){HttpRequest req;HttpResponse resp;req.Deserialize(request);req.Parse();static int number=0;if(req.Url()=="/login"){std::string sessionid=req.SessionId();if(sessionid.empty()){std::string user="user-"+std::to_string(number++);session_ptr s=std::make_shared<Session>(user,"logined");std::string sessionid=_session_manager->AddSession(s);lg.LogMessage(Debug, "%s 被添加, sessionid是: %s\n", user.c_str(), sessionid.c_str());resp.AddHeader(ProveSession(sessionid));}}else{std::string sessionid=req.SessionId();if(!sessionid.empty()){session_ptr s=_session_manager->GetSession(sessionid);if(s!=nullptr)lg.LogMessage(Debug, "%s 正在活躍.\n", s->_username.c_str());elselg.LogMessage(Debug, "cookie : %s 已經過期, 需要清理\n", sessionid.c_str()); }}resp.SetCode(200);resp.SetDesc("OK");resp.AddHeader("Content-Type:text/html");resp.AddContent("<html><h1>helloworld</h1></html>");return resp.Serialize();}Session.hpp文件
Session類主要是定義用戶名字和訪問什么文件,SessionManger則是管理session的類,添加session和檢驗并返回session。
#pragma once#include <iostream>
#include <string>
#include <memory>
#include <ctime>
#include <unistd.h>
#include <unordered_map>// 用來進行測試說明
class Session
{
public:Session(const std::string &username, const std::string &status):_username(username), _status(status){_create_time = time(nullptr); // 獲取時間戳就行了,后面實際需要,就轉化就轉換一下}~Session(){}
public:std::string _username;std::string _status;uint64_t _create_time;uint64_t _time_out; // 60*5std::string vip; // vipint active; // std::string pos;//當然還可以再加任何其他信息,看你的需求
};using session_ptr = std::shared_ptr<Session>;class SessionManager
{
public:SessionManager(){srand(time(nullptr) ^ getpid());}std::string AddSession(session_ptr s){uint32_t randomid = rand() + time(nullptr); // 隨機數+時間戳,實際有形成sessionid的庫,比如boost uuid庫,或者其他第三方庫等std::string sessionid = std::to_string(randomid);_sessions.insert(std::make_pair(sessionid, s));return sessionid;}session_ptr GetSession(const std::string sessionid){if(_sessions.find(sessionid) == _sessions.end()) return nullptr;return _sessions[sessionid];}~SessionManager(){}
private:std::unordered_map<std::string, session_ptr> _sessions;
};


微調技術總結)

)


)

實現)


